Jewelry Set From Waste Wood


My last project was making a mahjong board and tile racks. From that project a piece was left of 25x61 cm and many very small pieces. I’m part of that group of people that never throws anything away, because if you throw it away you almost always need it afterwards. So the smallest pieces count for me and they all go in a jar. For this Instructable I don't use the 25x61cm plywood board but the very small pieces.
You can do fun things with these leftovers. For example, I once made an Instructable for a pendant with epoxy made from waste wood. This time I opted for beads and tiny pieces of wood. But leftovers of waste wood, and certainly the very small bits, can also be painted with food-color, for example, after which you can process them in casting resin.
I'm not giving measurements in this Instructable but ideas and how to make it, after all it's about waste.
Supplies
Small pieces of waste wood
Dremel
Dremel workstation (drill press)
Drill 3/64''
Strong clamp (to hold the small piece while drilling)
Hand jigsaw
Hand jigsaw board
Sandpaper 240
Pencil
Pliers set (for jewelry)
Scissors
1 Spang/necklace
2 Earring hooks
2 Pieces of elastic (for jewelry) of 30 cm
2 Eye pins of 5 cm
2 Crimp beads (option)
Beads
Piece of 28 gauge wire of 20 cm
Resin
Wax cord or chain
Resin mold
Food-color
Varnish or varnish glue
Sort, Cut and Sand


I start by sorting the piece. I make a rough design by laying out the pieces for choker necklace, bracelet and earrings.
One piece of the wide pieces for the bracelet is missing a corner, I shorten the piece with a hand jigsaw until I am left with a rectangle with smooth corners. I shorten the other pieces to the same size. The narrow wood I want to use for the bracelet is too frayed on the back and I decide to remove a layer of wood with a knife. The plywood is 6 mm thick and 4 mm is left after removing a layer, this is very thin to drill so I take some extra pieces. I saw the thin pieces to the same size as the wide pieces.
The narrow wood is fine for the choker necklace, just too long, so I shorten it to the same length as the squares.
The earrings are also almost good. Besides two squares I also have two small corners of waste wood, left over from the sides of the mahjong tile racks, these have a round shape on the inside. By shortening the corners, they thus somewhat get the shape of a heart.
Now that all the pieces are custom made and having the right size, I sand everything for the first time so that any splinters are gone. From here I work per piece of jewelry.
The Earrings


First I determine where the holes should be drilled and use a drill bit as thin as possible, a 3/64'' drill bit. The hole it makes fits exactly the spang, elastic, eye pin and the beads. After the holes have been marked, I mount the Dremel in the workstation and adjust the height suitable for all the pieces. Because the pieces are very small I use a strong clamping clipper to hold the pieces. Thanks to the clip, the hole is now easy to drill without risking my fingers. I sand once more and after sanding I successively slide the square on the chain pin, then a black marbled bead followed by the heart-shaped piece of wood and finally a purple bead. The best is to close with a crimp bead, but if you don't have one, like I do, you can also bend the end with a pair of pliers to a small circle. Make sure you don't feel a sharp tip of the eye pin.
One done, one to go!
One done, one to go!
The Choker Necklace


Again I first look where the holes have to be drilled and again I use the clip to hold the pieces, safety first. I sand the pieces after drilling. Very carefully I now remove the screw part of the spang with a pair of pliers so that everything can be threaded on it. First I measure all the pieces of wood and beads to determine how many beads should come before and after the wood. I start with 4 purple beads and then a black marbled one on which I move on to the pattern 5 purple and one black. After the fifth black bead a wooden square follows, then a black bead, a wooden rectangle, a purple bead, wooden rectangle, purple bead, wooden rectangle, black bead and a square.
I repeat this pattern until all the wood is used up and close the wood with a black bead.
I continue with the first step but then in reverse order and close with 4 purple beads. Finally, I place the screw part back on the spang, this is a bit of fiddling, but in the end it's in place and I tighten the screw part with a pair of pliers. The choker necklace is ready.
The Bracelet


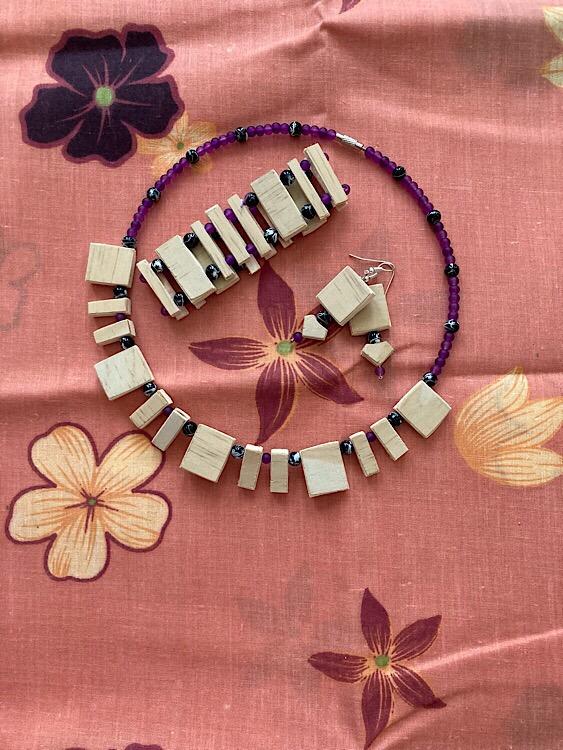
Here too I start by marking out where the hole should be. I want a double laced bracelet so the holes are 0.5 mm from the side. Continuing with the steps of drilling and sanding. I have two pieces of elastic of 30 cm each. On each piece I tie a black marbled bead about 5 cm from the end. Because the elastic does not go through the holes that way, I make a beading needle by folding a piece of 28 gauge wire in half. In the fold I pull the elastic through. Now I can string the the bracelet, first one side then the other side. Starting with a wide rectangle, this connects to the black bead, after the wide rectangle, a black bead follows, followed by a narrow rectangle, then a purple bead, a narrow rectangle, a purple bead, a narrow rectangle, a black bead and then again a wide rectangle. I repeat this step until I have 18 cm.
This works out very well because I end up with three small rectangles. Then I tie a narrow rectangle at the end so that everything cannot come off the elastic.
I repeat the whole process with the second elastic. As soon as the second elastic is threaded, I first remove the knot from the narrow rectangle, I put this aside because it is no longer needed. Then I loosen the black bead from the same elastic and slide it against the wide rectangle.
Both ends can now be tied together and I repeat the process with the second elastic. The bracelet is finished. Because I came out well, you can't see where the bracelet is tied together because the pattern continues.
Waste wood has now provided me a nice jewelry set!
Using the Waste of the Waste


Making the jewelry set also produced some waste. And again, I used it. In other words: I used the waste of the waste! This time with resin.
These days I use resin with a mixing ratio of 2:1. I use a mold that allows me to make sixteen pendants at once. Actually it is a chocolate mold but I thought it was well suited for resin.
For casting resin, always follow the instructions on the packaging, wear gloves and ventilate well.
First I mix 20 ml A and 10 ml B. With this I can make 6 (first) layers in my mold. I sprinkle some sifted sawdust (the larger pieces) In one of them. I set the finer sawdust aside for as long as possible.
I don't do anything with the other pendants in the making, first the material has to harden a bit. Meanwhile I cut the layer of plywood that I have cut in the bracelet of the narrow strips into small pieces. This is easy with scissors because it is only 2 mm thick. Then I paint all the pieces with food color. This also has to dry first.
After drying, the pieces must be treated with varnish or varnish glue. Otherwise, the food will give off color as soon as it comes into contact with the resin. A slightly longer piece curls up when it dries, I pin it into shape with two pins.
From a sheet of tempex, which was once in a box and served as protection, I cut a square in which I can later let the varnished pieces dry. Once the food color is dry, I paint the pieces with varnish/glue. I don't use a brush because as soon as food color gets wet, it gives off again. In stead I put a little varnish in a cup, stick a piece of wood on a pin, dip it in the varnish and let it drain over a piece of kitchen paper. Then I insert the pin into the tempex so that the varnish can dry.
When the varnish is dry and the resin is a tough mass, I put the pieces in the resin. Again I make 20 ml A and 10 ml B and divide this again over the six compartments. The resin is now allowed to cure until tomorrow and then the third layer, of the same amount, goes in.
After the third layer and curing, the pendants are almost ready. Just drill some holes for a cord or chain. The last leftovers were good for three pendants, all the waste I started with has been used up, no leftovers left.