IoT School Project Philips Hue
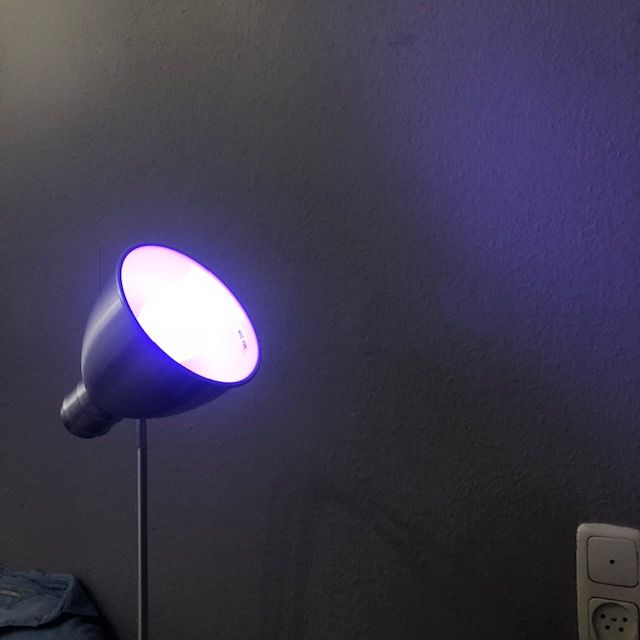
This is a manual I had to write for school. It's not complete and I'm not sure if you can even use it. My knowledge of API's is the bare minimum. We wanted to make an interactive mirror with lights on the back that reacted to the weather, light from outside, etc.
I looked at how I could program a Philips Hue lamp with an Arduino. In this, I explain all my steps and how far I have come. I have not succeeded in programming the Hue with the Arduino but I think it is a good start.
I have needed this:
an Arduino
a hue lamp
a bridge
Philips Hue developer account
Sources:
https://www.developers.meethue.com/documentation/g...
https://github.com/bsalinas/ArduinoHue
https://arduino-esp8266.readthedocs.io/en/latest/e...
https://www.makeuseof.com/tag/control-philips-hue-...
Get Started
Before you can access the API documentation, you’ll need to register as a developer. It’s free, but you need to accept the terms and conditions. You can make one here > https://developers.meethue.com/user/85080/edit
Hue App
Download the official Philips Hue App. Connect your phone to the network you want the Hue bridge is on.
Connect the Bridge
Connect your bridge with your network and is functioning properly. Test that the smartphone app can control the lights on the same network. It has to be on the same Wi-Fi network.
IP Address
Then you need to discover the IP address of the bridge on your network. Push link to connect to the bridge in the app and try controlling lights.
If it’s all working then go to the settings menu in the app. Than go to “My Bridge”, go to “Network settings”. Switch off the DHCP toggle and you see the IP address of the bridge. Note the IP address, then switch DHCP back on.
Debug Your Hue
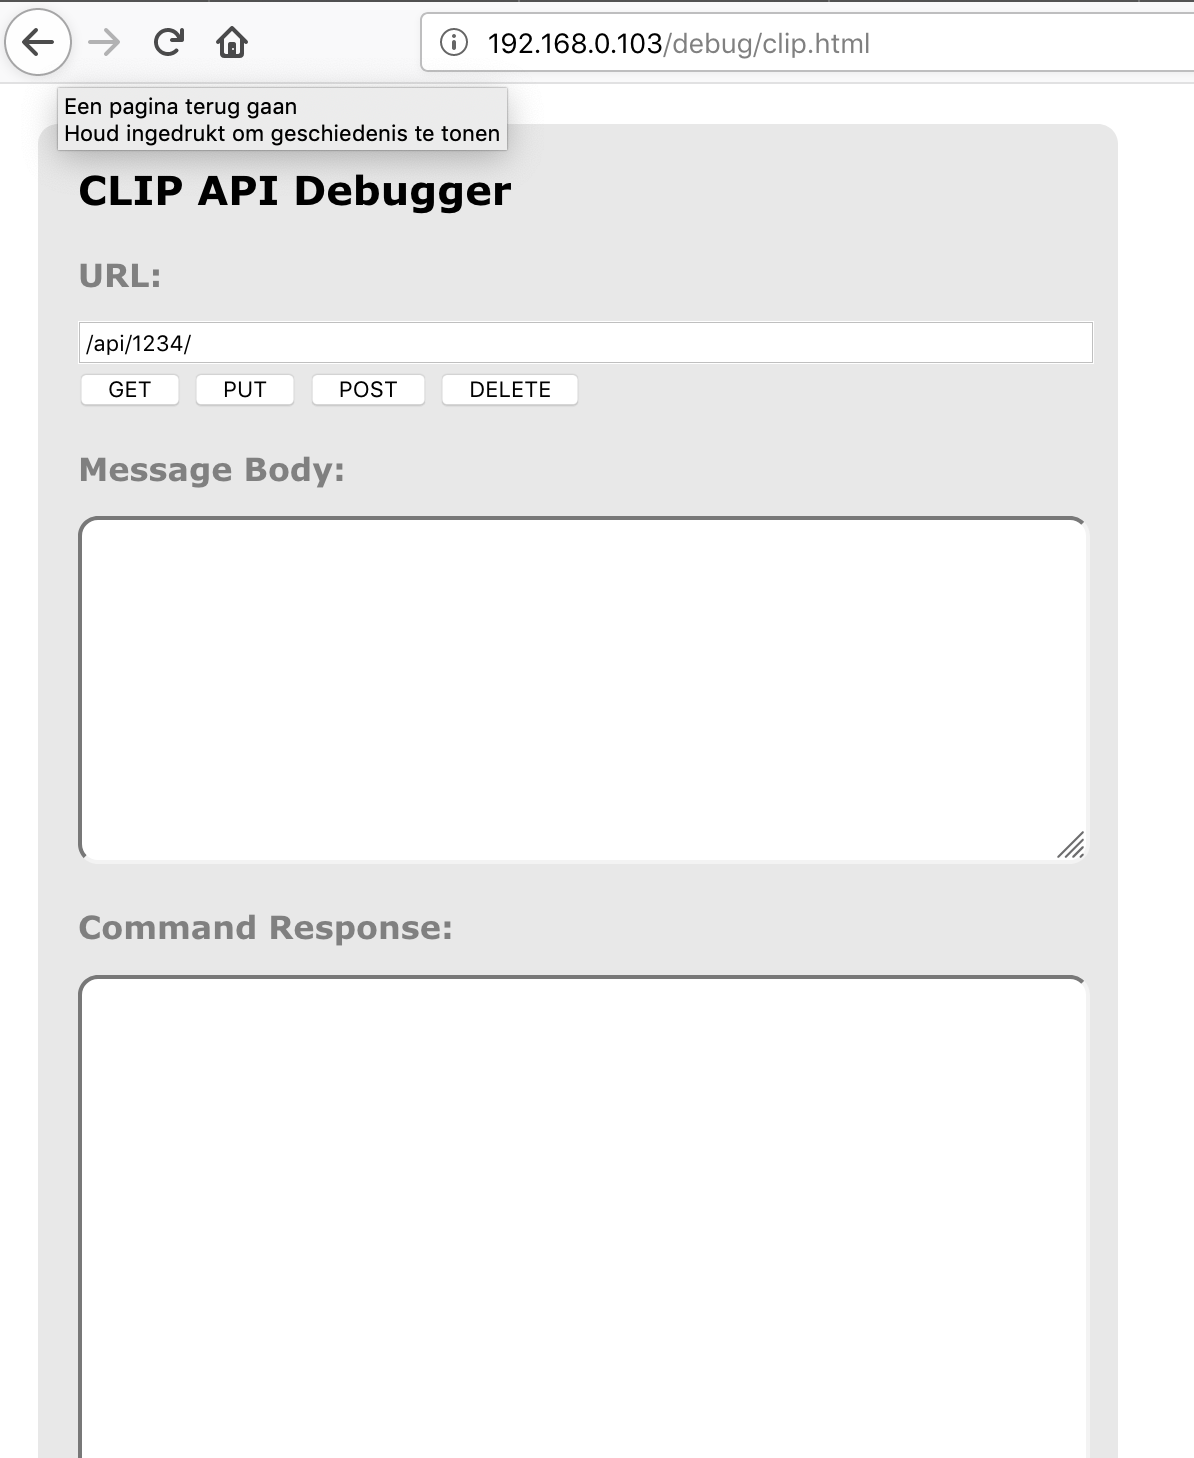
When you wrote that down you need to debug your Hue. You need the IP-Address for this step. You have to visit the next site.
http:// /debug/clip.html
The interface will look like this in the image. This is the basis of all web traffic and of the hue RESTful interface.
I got this information about the Restful interface of the Philips Hue site.
URL: this is actually the local address of a specific resource (thing) inside the hue system. It could be light, a group of lights or many more things. This is the object you’ll be interacting within this command.
A body: this is the part of the message which describes what you want to change and how. Here you enter, in JSON format, the resource name and value you’d like to change/add.
A method: here you have a choice of the 4 HTTP methods the hue call can use.
GET: this is the command to fetch all information about the addressed resource
PUT: this is the command to modify an addressed resource
POST: this is the command to create a new resource inside the addressed resource
DELETE: this is the command to delete the addressed resource Response: In this area, you’ll see the response to your command. Also in JSON format.
Let's Get Started
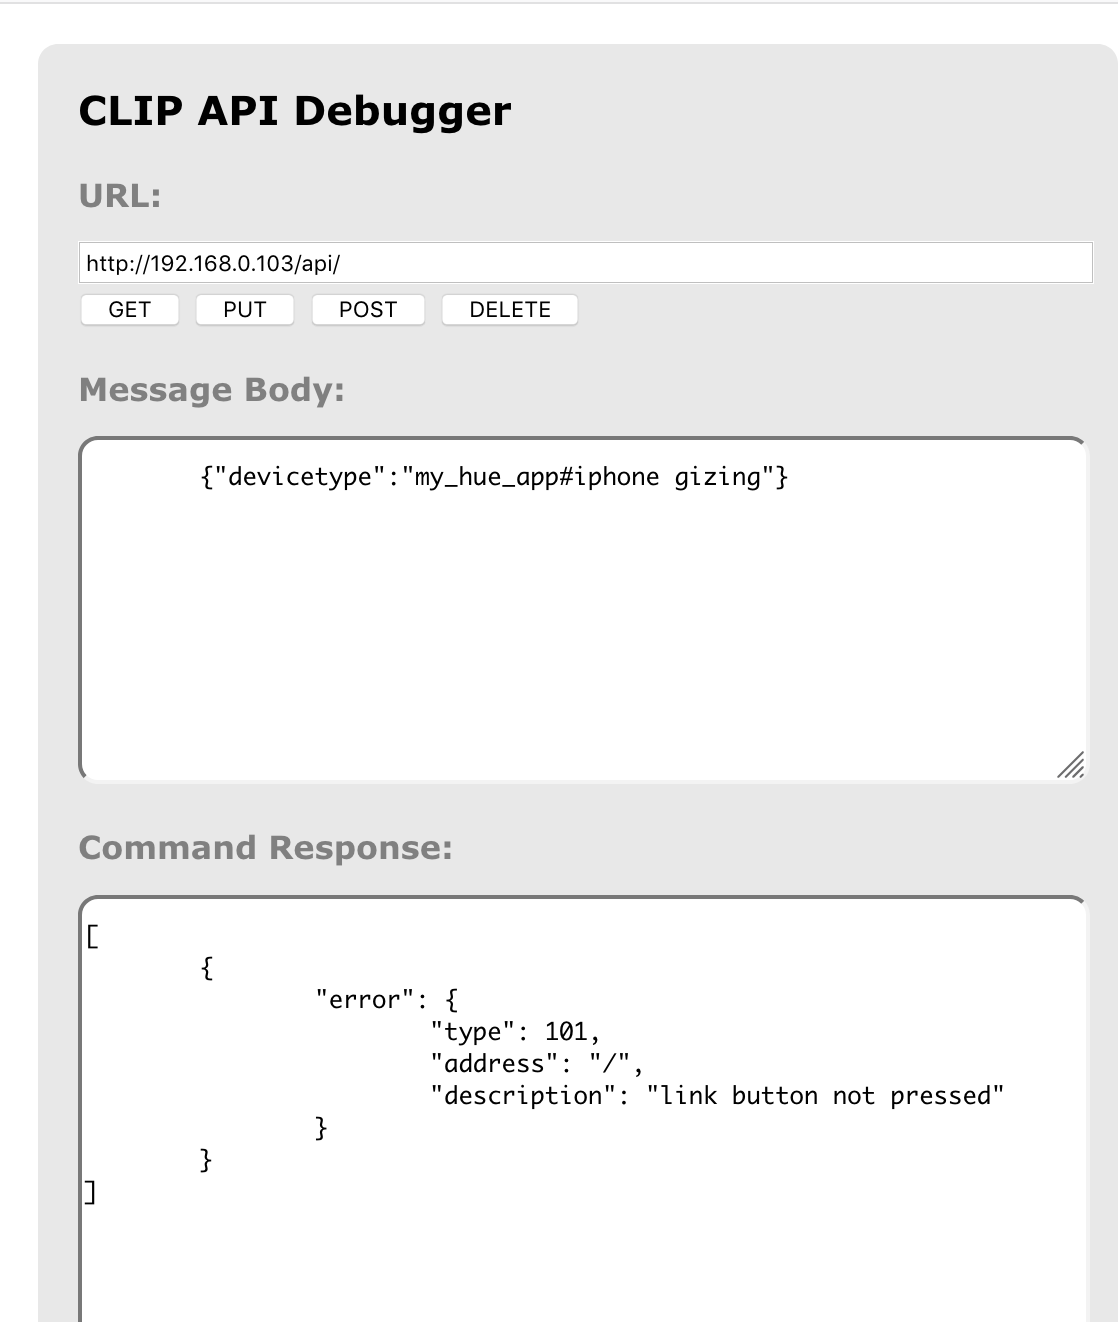
Now we need a randomly generated username that the bridge creates for you. You will get one by filling this.
Put in the URL:
http:// < your Bridge ID> /api/
Put in the BODY:
{"devicetype":"my_hue_app#iphone username"}
and press GET
This command is basically saying "please create a new resource inside /api "(where usernames sit) with the following properties. At first, you will get an error, and that's because it's the security step of Philips Hue. By pressing the button they prove that you have physical access to the bridge.
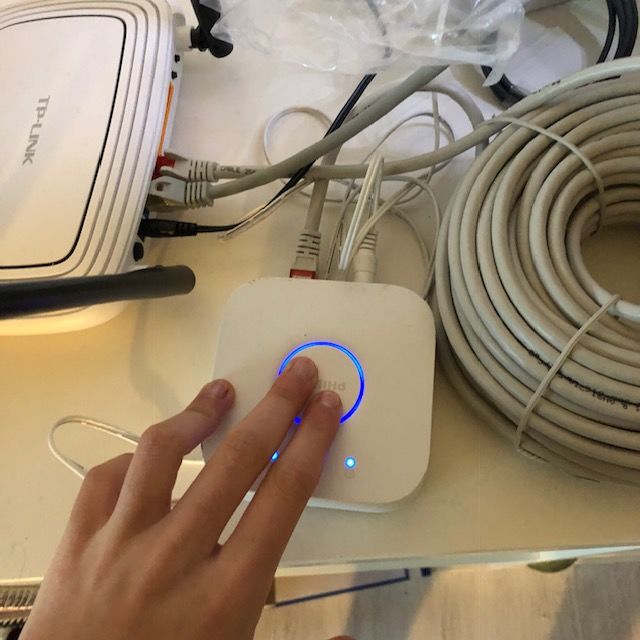
Now Press the button on the Bridge and click POST again.
Now you will get a username that the bridge made for you.
Let's Do Something With the Lights
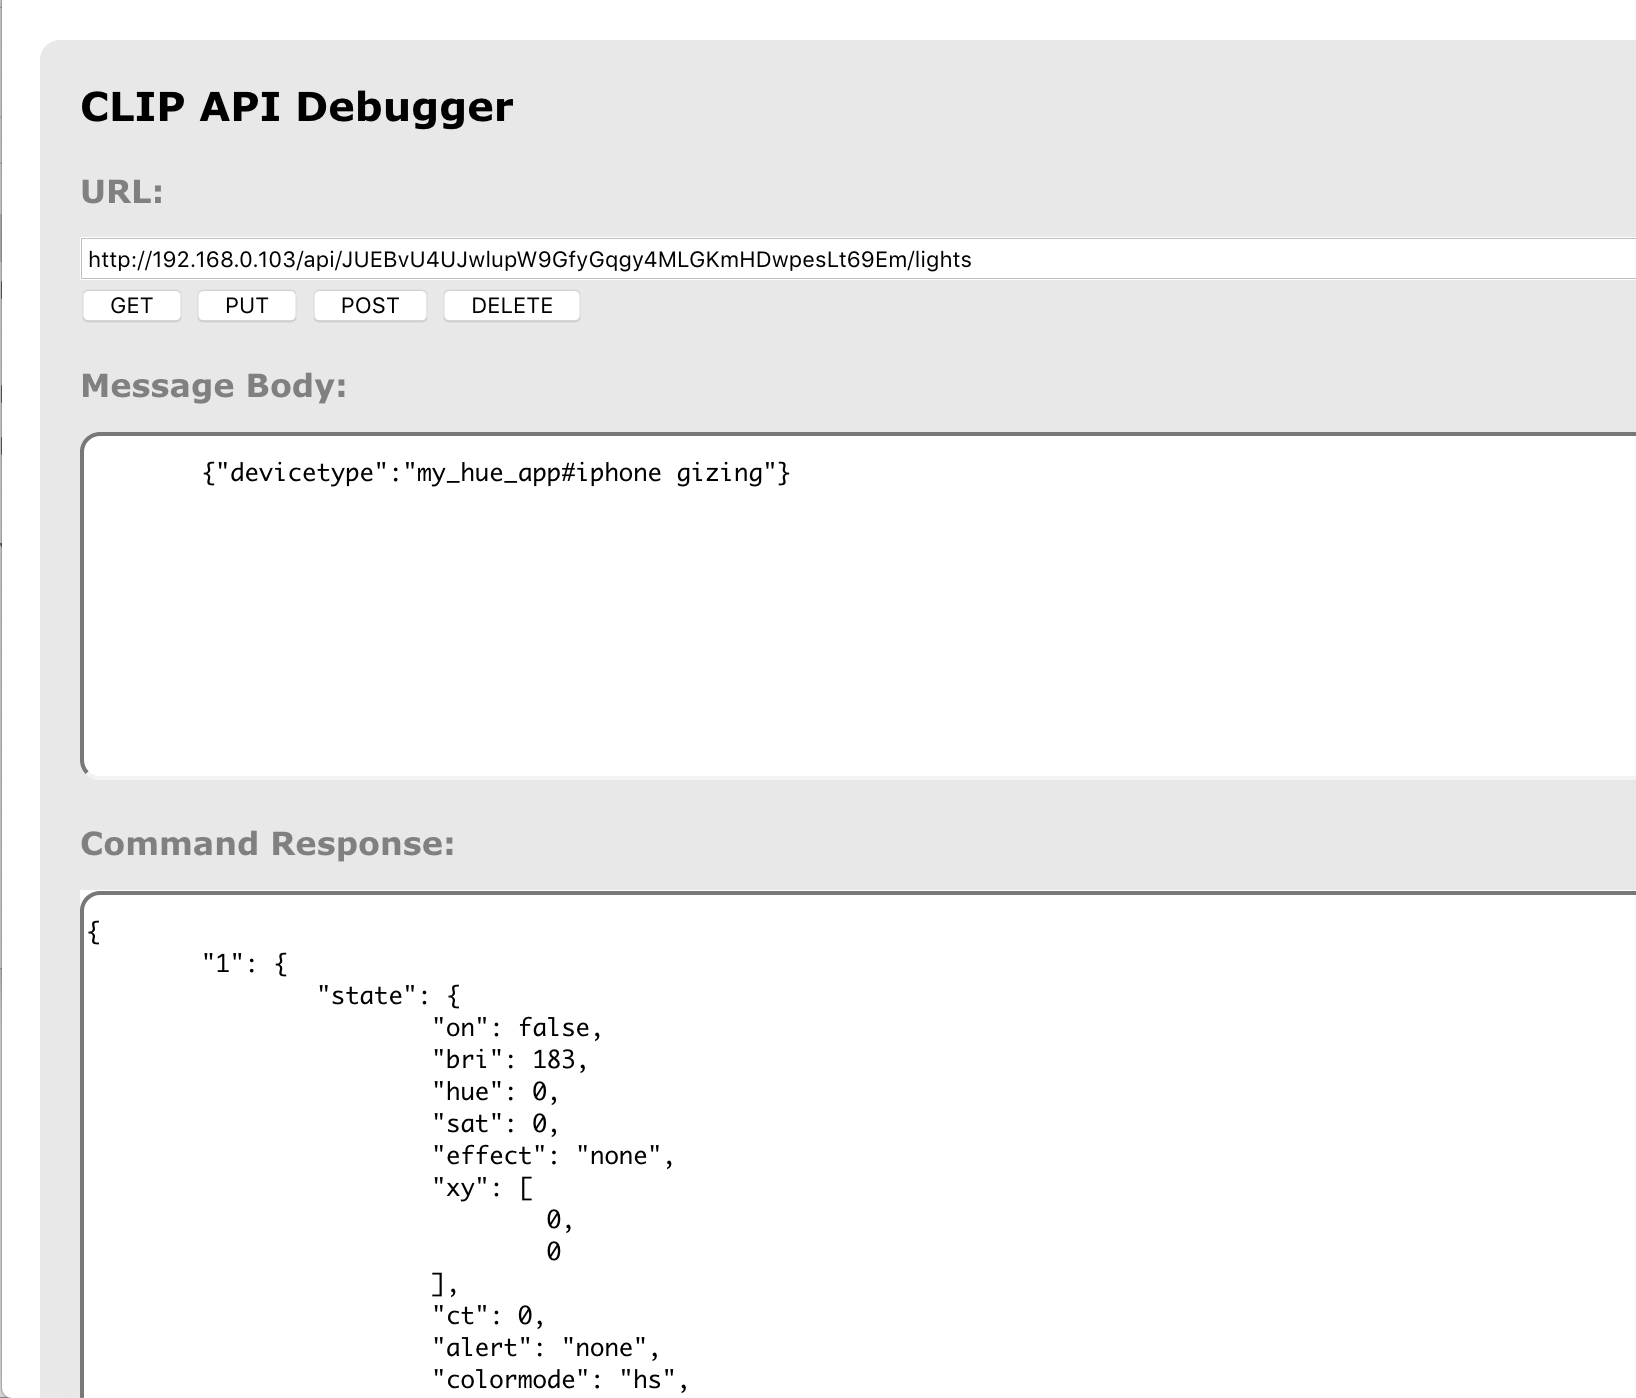
Copie your username and put it in the following line.
Put this in your URL
http://< your bridge id> /api/< username that the bridge gave you> /lights
Press GET
You should get a JSON response with all the lights in your system and their names.
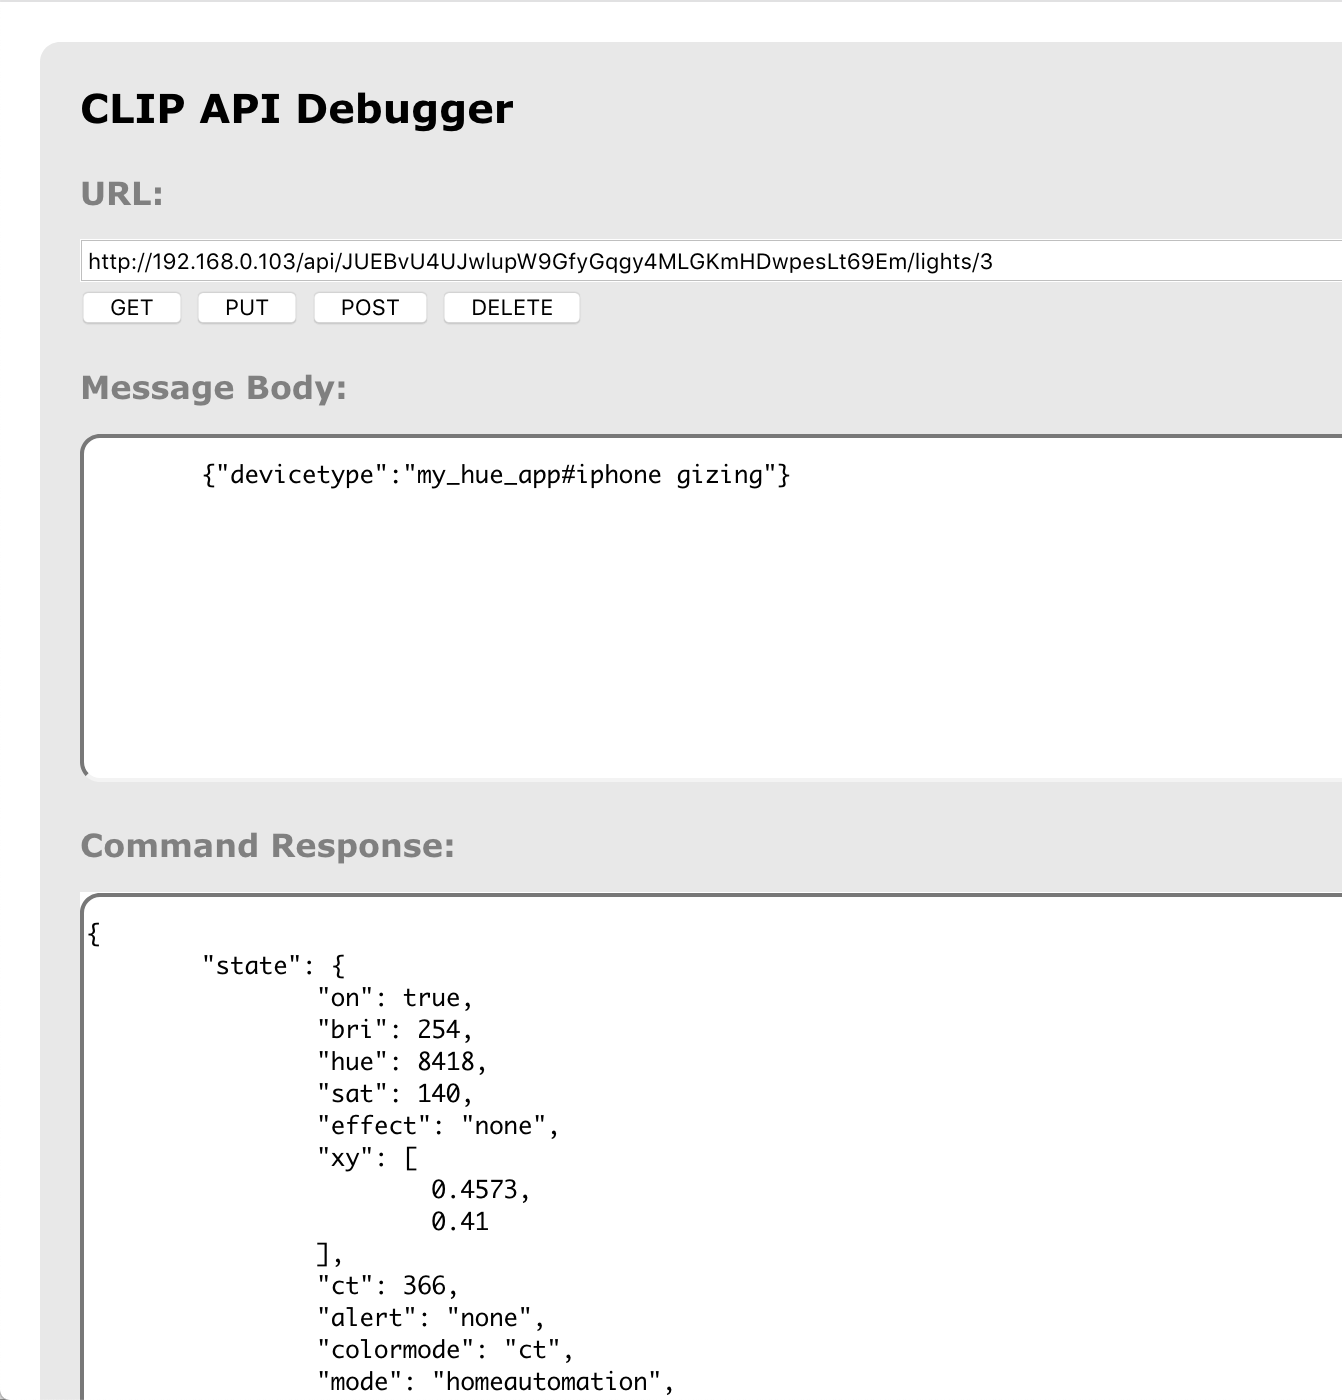
I borrowed some Hue Lights from school, the one I use is the one with id 3. I want specific information about this light.
Put this next to the URL you already had:
http:// /api/ /lights/3
Press GET
Now you get al the information about Led 3 (if you have another number like 1 you will see information about that one).
Let's Control the Light
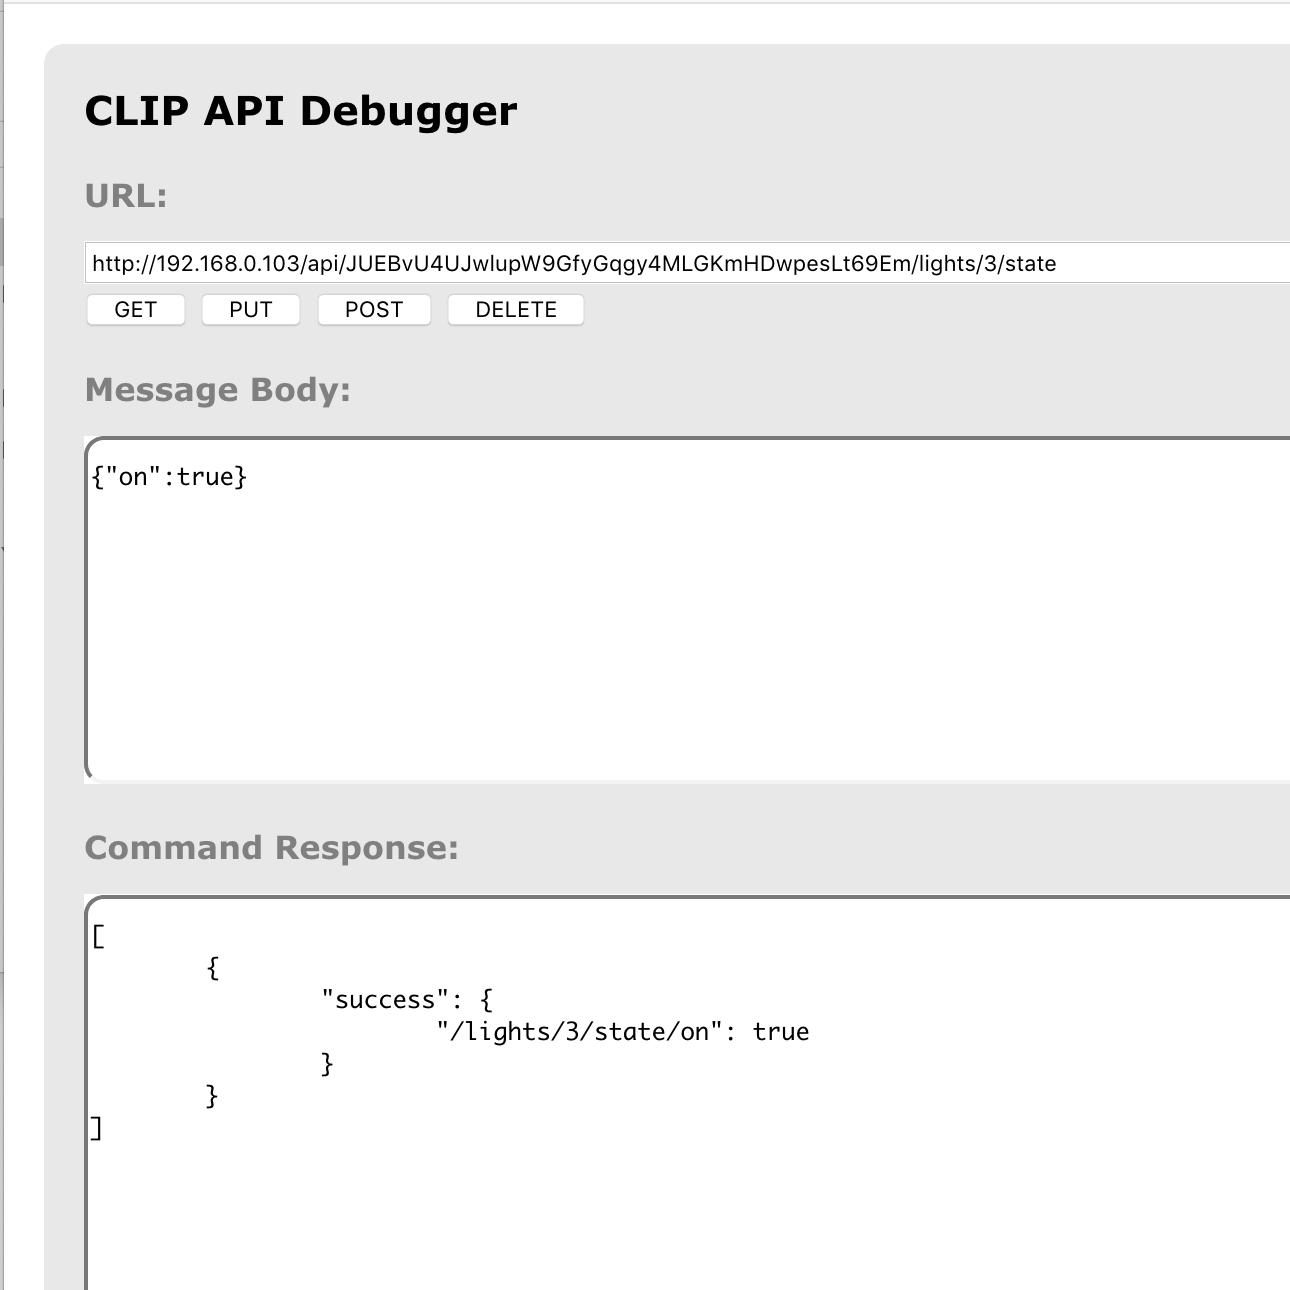
You see in "state" that my led is "on". We want to control the light in "state".
Put this next to the URL you already had:
http:// /api/ < username that the bridge gave to you > /lights/ 3/ state
Put the next line in the BODY
{"on":false}
Press PUT
Now your light will be turning off! Change the value in the body to true and the light will turn on again.
Now everything is working I want to do this with my Arduino. I looked at the link Philips Hue gave to make the light color change. But you need Python for this, I never worked with Python so I looked for something else.
If you like to look at this code I have the Github link here:
I looked how I could get information from this developer site to my arduino. Most of the time I didn't understand the language. But I found some code on a website from James Bruce.
This is the link to the website.
https://www.makeuseof.com/tag/control-philips-hue-lights-arduino-and-motion-sensor/
First I saw that he was using an Ethernet cable. I only had a Hue Light bulb and Bridge an Arduino, and little understanding of code. It took a while for me to understand his code, but I still don't really understand it.
I first added this library for the internet.
#include <ESP8266WiFi.h>
This is for your network (it has to be the same as the Hue Light bulb)
const char* ssid = " "; // put here your WiFi network SSID
const char* password = " "; // put here your WiFi network password
These are the ID of your Bridge and the username your bridge gave to you. (I don't know where the 80 stands for but when I did some research I saw that it was used for networks).
// Hue constants
const char hueHubIP[] = "< your hue bridge id >"; // Hue hub IP const
char hueUsername[] = "< username that de bridge gave you >"; // Hue username
const int hueHubPort = 80;
// Hue variables
bool hueOn; // on/off
int hueBri; // brightness
value long hueHue; // hue value
String hueCmd; // Hue command
unsigned long buffer=0; //buffer for received data storage
unsigned long addr;
For the void setup, I did the most for the internet connection. In this code, the Arduino is looking if he can connect with the network.
void setup()
{ Serial.begin(9600);
Serial.println();
Serial.printf("Connecting to %s ", ssid);
WiFi.begin(ssid, password);
while (WiFi.status() != WL_CONNECTED) {
delay(500);
Serial.print("."); }
Serial.println(" connected"); }
In the loop of James, I saw that he had an If and else statement. But that was for the ethernet cable, so I tried to leave this out. I also sometimes tried to adjust it, but I did not know yet with a lot of data. Some things in the code I did understand, in the string is the data that is given to the Hue light.
void loop(){
// A series of four sample commands, which color fades two lights between red and pink. Read up on the Hue API
// documentation for more details on the exact commands to be used, but note that quote marks must be escaped.
String command = "{\"on\": true,\"hue\": 50100,\"sat\":255,\"bri\":255,\"transitiontime\":"+String(random(15,25))+"}";
setHue(1,command);
command = "{\"on\": true,\"hue\": 65280,\"sat\":255,\"bri\":255,\"transitiontime\":"+String(random(15,25))+"}";
setHue(2,command);
command = "{\"hue\": 65280,\"sat\":255,\"bri\":255,\"transitiontime\":"+String(random(15,25))+"}"; setHue(1,command);
command = "{\"hue\": 50100,\"sat\":255,\"bri\":255,\"transitiontime\":"+String(random(15,25))+"}"; setHue(2,command);
}
The next code was a Boolean, but in Arduino you have to write Bool. At first, I got a lot of errors because of the word client. So I looked it up and saw that some code used the line "WifiClient client;". So I used it to and it worked.
In the if statement you often see client.print. If you look into the code, you will see that the URL you entered earlier is divided into pieces. Now enter your own code. I had to choose my 3rd LED light.
/* setHue() is our main command function, which needs to be passed a light number and a
* properly formatted command string in JSON format (basically a Javascript style array of variables * and values. It then makes a simple HTTP PUT request to the Bridge at the IP specified at the start. */
bool setHue(int lightNum,String command) {
WiFiClient client;
if (client.connect(hueHubIP, hueHubPort)){
while (client.connected()){
client.print("PUT /api/");
client.print(hueUsername);
client.print("/lights/");
client.print(lightNum); // hueLight zero based, add 1
client.println("3/state"); // here I changed the hue name and state
client.print("Host: ");
client.println(hueHubIP);
client.print("Content-Length: ");
client.println(command.length());
client.println("Content-Type: text/plain;charset=UTF-8");
client.println(); // blank line before body
client.println(command); // Hue command
}
client.stop();
return true; // command executed }
else
return false; // command failed
}
At the second Boolean, I did the same thing with changing some words. I uploaded it to see if it worked.
/* A helper function in case your logic depends on the current state of the light.
* This sets a number of global variables which you can check to find out if a light is currently on or not * and the hue etc. Not needed just to send out commands */
bool getHue(int lightNum) {
WiFiClient client;
if (client.connect(hueHubIP, hueHubPort)) {
client.print("GET /api/");
client.print(hueUsername);
client.print("/lights/");
client.print(lightNum);
client.println("3/state");
client.print("Host: ");
client.println(hueHubIP);
client.println("Content-type: application/json");
client.println("keep-alive");
client.println();
while (client.connected()) {
if (client.available()) {
client.findUntil("\"on\":", "\0");
hueOn = (client.readStringUntil(',') == "true"); // if light is on, set variable to true
client.findUntil("\"bri\":", "\0");
hueBri = client.readStringUntil(',').toInt(); // set variable to brightness value
client.findUntil("\"hue\":", "\0");
hueHue = client.readStringUntil(',').toInt(); // set variable to hue value
break; // not capturing other light attributes yet } }
client.stop();
return true; // captured on,bri,hue }
else
return false; // error reading on,bri,hue
}
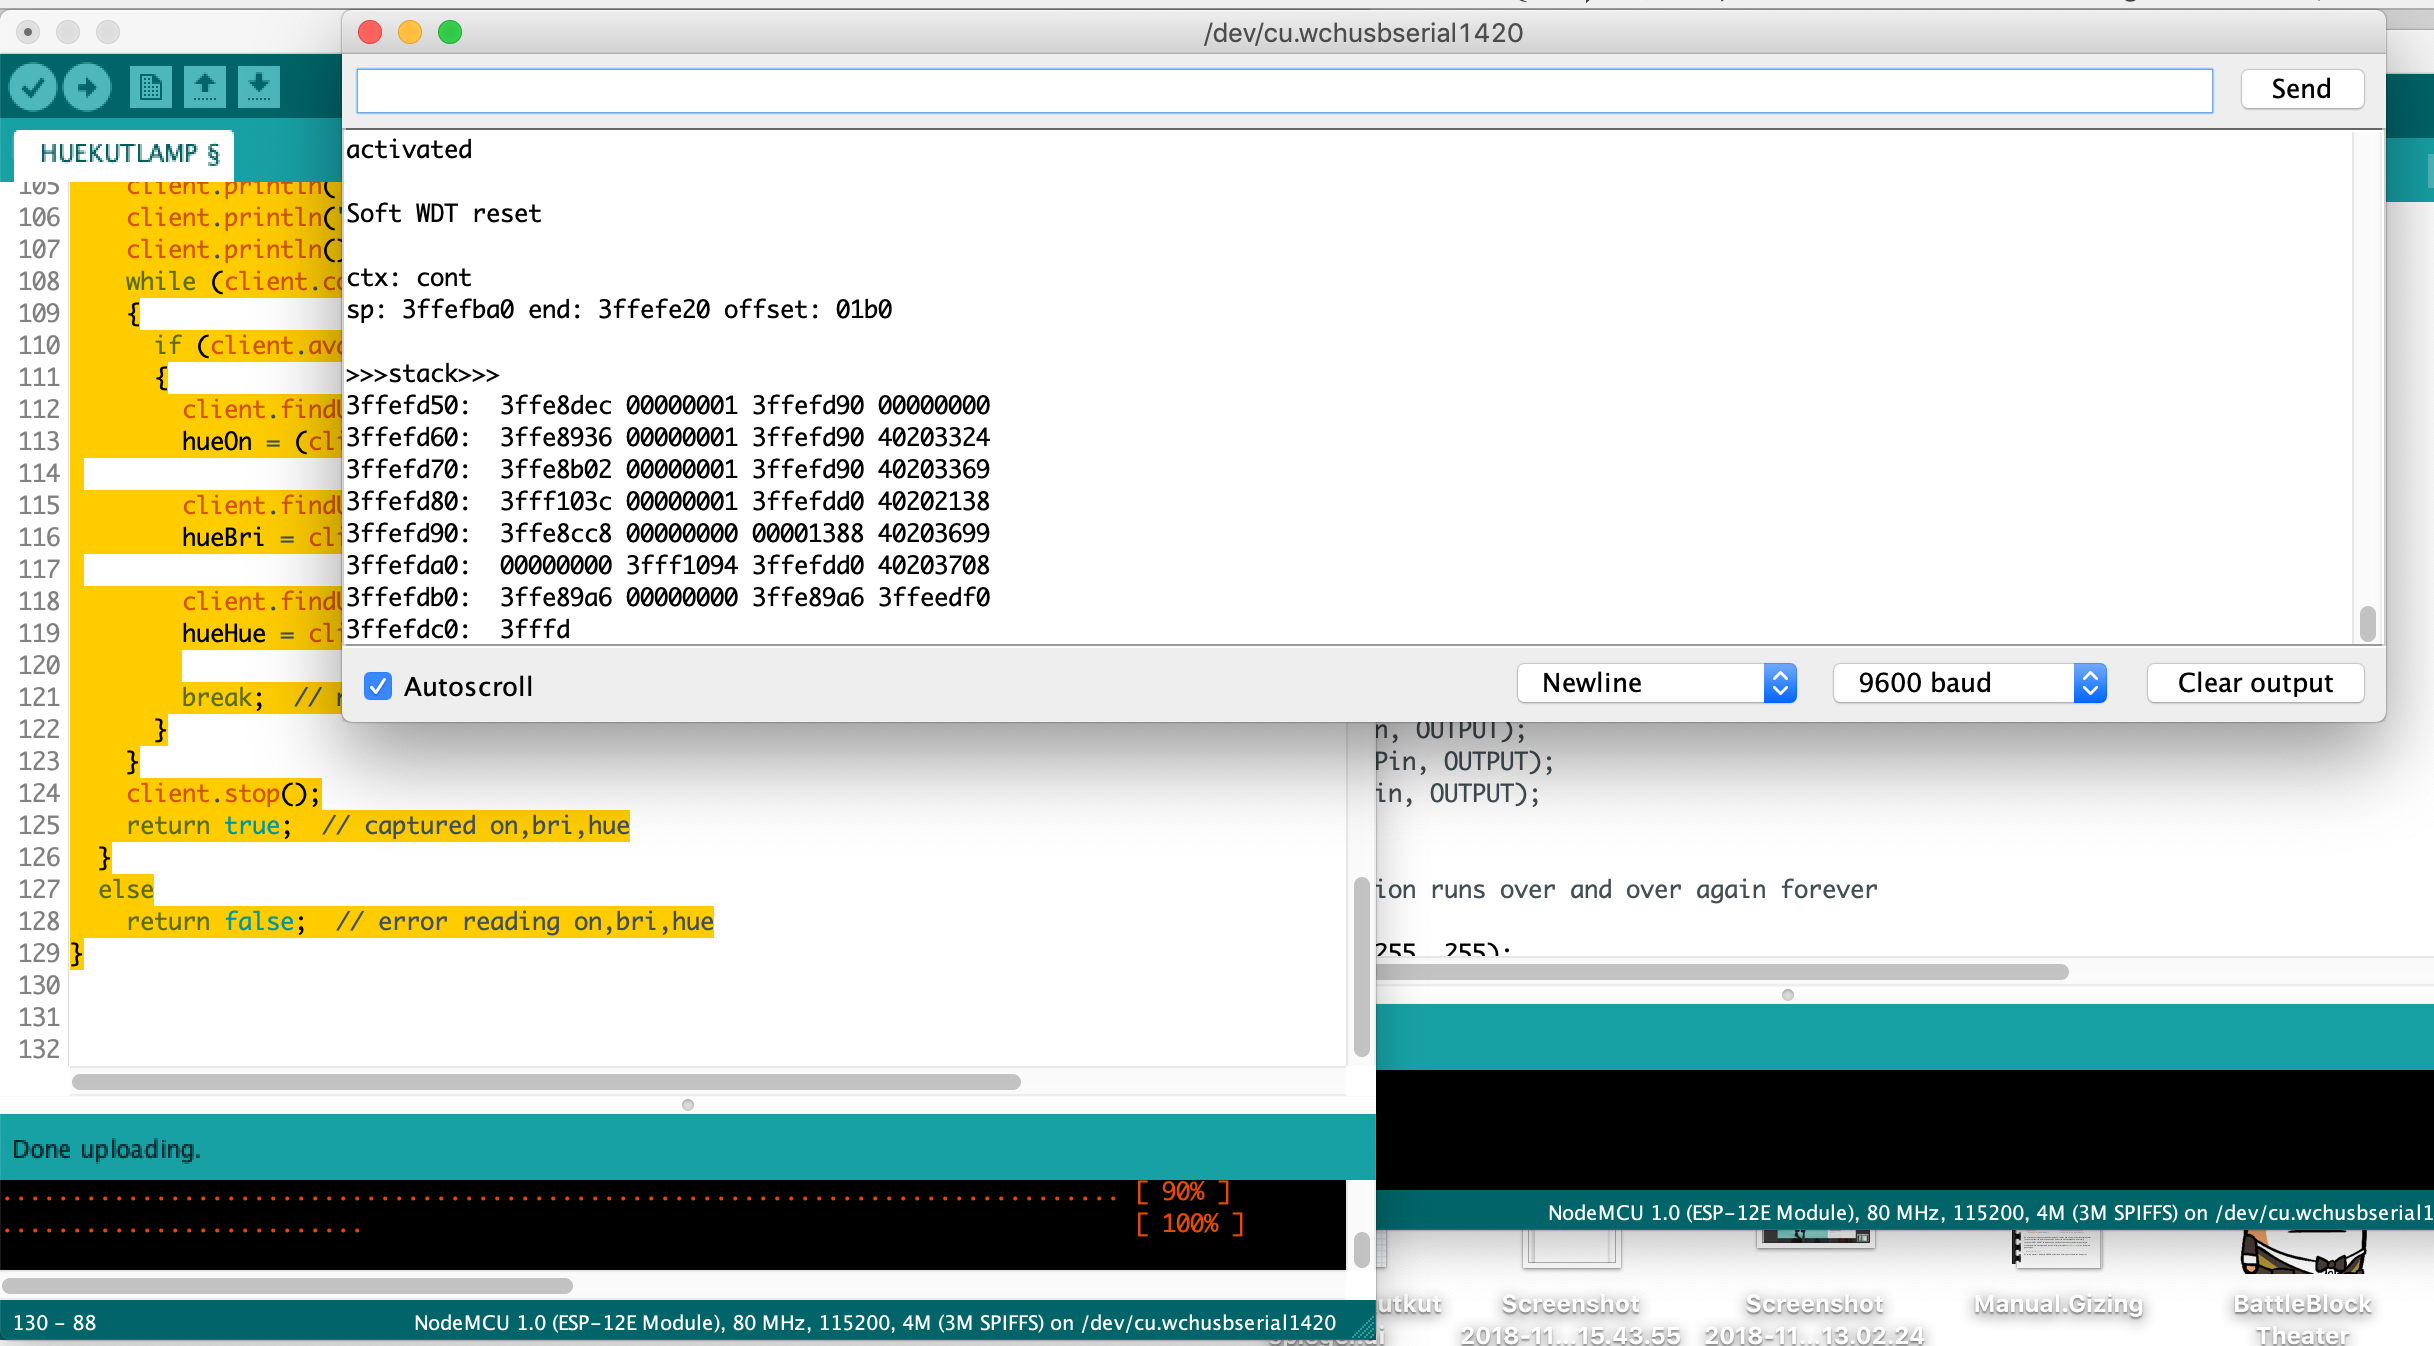
I think I could make a connection with the Philips Hue. I receive information but it still needs to be used.
Unfortunately, this goes beyond what I can code. If you know the answer, or if there are real errors that need to be corrected, I'd love to hear it. :-)