IoT Push Button (Control Objects Across the Internet Via a Raspberry Pi)
by LimitOS in Circuits > Raspberry Pi
1676 Views, 4 Favorites, 0 Comments
IoT Push Button (Control Objects Across the Internet Via a Raspberry Pi)

What you'll be building
In this tutorial you'll hook up a physical push button so that pushing it changes the on or off state within the LimitOS web application. Combined with other tutorials, you can then push a physical button and turn something else on and off across the internet.
Requirements
Raspberry Pi connected to the internet
Circuit materials: push button, breadboard, wires, 10k ohm resistor
Set Up the Circuit

Connect the button to GPIO pin 17, and ground it using a 10k ohm resistor.
Run LimitOS on the Raspberry Pi
LimitOS runs alongside your existing operating system, and can be run via:
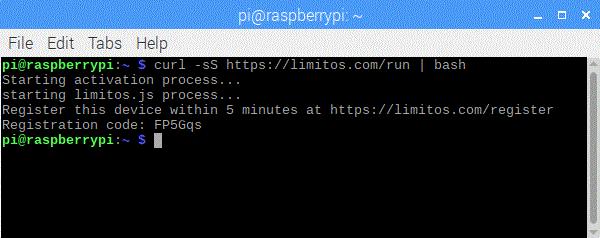
curl -sS https://limitos.com/run | bash
Follow the on-screen instructions to register the device afterwards.
Set Up the Device on the LimitOS Website
After registering your device, you'll be on the LimitOS website at https://limitos.com . From there, go to your device by clicking "My Devices" and selecting your device. Then add pin 17 as a digital input, and you can push the button and see the on/off state on the LimitOS webpage.