IoT APIS V2 - Autonomous IoT-enabled Automated Plant Irrigation System
by arkhipenko in Circuits > Arduino
18625 Views, 156 Favorites, 0 Comments
IoT APIS V2 - Autonomous IoT-enabled Automated Plant Irrigation System


This project is an evolution of my previous instructable: APIS - Automated Plant Irrigation System
I have been using APIS for almost a year now, and wanted to improve upon the previous design:
- Ability to monitor the plant remotely. This is how this project became IoT-enabled.
- Easy to replace soil humidity probe. I have been through three different designs of the humidity probe, and no matter which material I used, it eroded sooner or later. So the new design was supposed to last as long as possible and be quickly and easily replaced.
- Water level in the bucket. I wanted to be able to tell how much water is still available in the bucket and stop watering when the bucket is empty.
- Better looks. A gray project box was a good start, but I wanted to create something that looked a bit better. You will be the judge if I was able to accomplish that goal...
- Autonomy. I wanted the new system to be autonomous in terms of power and/or availability of the internet.
The resulting project is not less configurable then its predecessor, and has additional useful features.
I also wanted to utilize my newly acquired 3D-printer, so some of the parts will have to be printed.
Hardware


You will need the following components to build IoT APIS v2:
-
NodeMcu Lua ESP8266 ESP-12E WIFI Development Board - on banggood.com
-
SODIAL(R) 3-Pin Ultrasonic Sensor Distance Measuring Module, Dual Transducer, Three-pin on Board - on amazon.com
-
DC 3V-6V 5V Small Submersible Water Pump Aquarium Fish Tank Pump - on ebay.com
- Three color LED - on amazon.com
- Vero board - on amazon.com
- PN2222 transistor - on amazon.com
- Plastic screws, bolts and nuts
- Soldering equipment and supplies
- Wires, resistors, headers and other miscellaneous electronic components
- Empty Tropicana OJ 2.78 QT jar
- 2 galvanized nails
Overall Design


Overall design consists of the following components:
1. Soil humidity probe and plant watering enclosure (combined - 3d printed)
2. Tubing and wiring
3. Tray water leak sensor (3d printed)
4. Control module mounted on top of the OJ jar (placed and enclosed in the 3d printed case)
5. Submersed water pump
6. NodeMCU sketch
7. IoT configuration
8. Power supply: USB via power outlet -OR- solar panel (autonomous mode)
Let's discuss each component individually
Submerged Water Pump


Submerged water pump is located below the handle of the OJ jar (to avoid interference with water level measurement). The pump is placed in such a way that it is "hovering" about 2-3 mm above the bottom of the jar to allow free water flow to the intake.
Because the pump should be fully submerged for normal operation, minimal water level in the jar should be around 3 cm (about 1 inch).
Control Module Mounted on Top of the OJ Jar

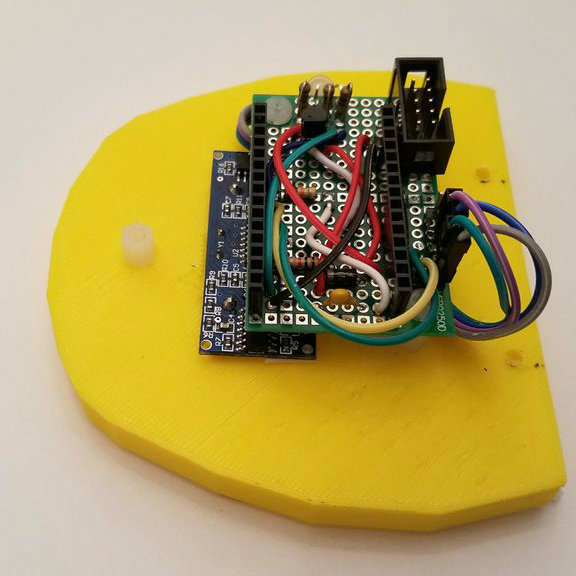


I chose standard large Tropicana OJ jar to be a water container. Those are widely available and standard.
The control module is placed on top of the jar after the original tap is removed.
The platform on which control module is located is 3d printed. The STL file is provided in the files and sketches sections of this instructable.
The pump, tubing and wiring is routed through the handle of Tropicana jar to clear up space for water level measurement.
Water level is measured by the ultrasonic distance sensor integrated with the control module platform. Water level is determined as a difference is distance measurement of an empty jar, and jar filled up with water to a certain level.
Control module and US sensor are covered with a 3d printed "dome". STL file of the dome is provided in the files and sketches section of this instructable.
Control Module - Schematics


Schematics for the control module (including the list of components), and bread board design files are provided in the files and sketches section of this instructable.
NOTE: Working with NodeMCU proved to be a challenging task in terms of available GPIO pins. Almost all GPIOs serve a number of functions, which makes them either unavailable for use, or impossible to use in the deep sleep mode (due to special functions they play during the boot process). In the end I managed to find a balance between use of GPIOs and my requirements, but it took a few frustrating iterations.
For instance a number of GPIOs remain "hot" during deep sleep. Connecting LED to those defeated the purpose of power consumption reduction during deep sleep.
Tray Water Leak Sensor


If your pot has an overflow hole at the bottom, then there is a risk of water overflowing the bottom tray and spilling on the floor (shelf or whatever it is your plant is located on).
I noticed that soil humidity measurement is greatly affected by probe position, soil density, distance from the watering outlet, etc. In other words, going by soil humidity only could be damaging to your home if water overflows the bottom tray and spills over.
The overflow sensor is a spacer between the pot and the bottom tray, with two wires wrapped around the bars. When water fills up the tray, the two wires become connected, thus signalling microcontroller that water is present in the bottom tray.
Eventually, water evaporates, and the wires become disconnected.
Bottom tray is 3d printed. The STL file is available from the files and sketches section of this instructable.
Soil Humidity Probe and Watering Enclosure


I designed a hexagon 3d printed enclosure to be a combined soil humidity probe and watering enclosure.
A 3d printing file (STL) is available in the files and sketches section of this instructable.
The enclosure consists of two parts, which have to be glued together. A modified barbed fitting is glued into the side of the enclosure to attach tubing.
Two 4.5mm holes are provided to place the galvanized nails, serving as soil humidity probes. Connectivity to the microcontroller is achieved via metal spacers selected specifically to fit the nails.
3d design is done using www.tinkercad.com which is a great and easy-to-use yet powerful 3d design tool.
NOTE: You might want to ask why I didn't simply use one of the pre-manufactured soil probes? The answer is: the foil on those dissolve within weeks. In fact, even with a limited time the nails are under voltage, they still erode and need to be replaced at least once a year. The above design allows replacing the nails within seconds.
Tubing and Wiring

Water is delivered to the plan via Super-Soft Latex Rubber Semi-Clear Tubing (with 1/4" Inside Diameter and 5/16" Outside Diameter).
The pump outlet requires larger tubing and an adapter: Chemical-Resistant Polypropylene Barbed Fitting, Reducing Straight for 1/4" x 1/8" Tube ID.
Finally, a Chemical-Resistant Polypropylene Barbed Fitting, Straight for 1/8" Tube ID serves as connector to the watering enclosure.
NodeMCU Sketch

NodeMCU sketch implements several features of IoT APIS v2:
- Connects to the existing WiFi network -OR- runs as a WiFi Access Point (depending on the configuration)
- Queries NTP servers to obtain local time
- Implements webserver for plant monitoring, and adjusting of watering and networking parameters
- Measures soil humidity, bottom tray water leaks, water level in the jar, and provides visual indication via 3 color LED
- Implements online and powersave modes of operation
- Saves information about each of the watering runs locally in the internal flash memory
NodeMCU Sketch - WiFi

By default IoT APIS v2 will create a local WiFi access point called "Plant_XXXXXX", where XXXXXX is the serial number of the ESP8266 chip on board of NodeMCU.
You can access built-in webserver via URL: http://plant.io internal DNS server will connect your device to the APIS status page.
From the status page, you can navigate to the watering parameters page and network parameters page, where you can make IoT APIS v2 connect to your WiFi network and start reporting status to the cloud.
IoT APIS support online and power-save modes of operations:
- In the online mode IoT APIS keeps WiFi connection up all the time, so you can check your plant status at any time
- In the power-save mode, IoT APIS checks soil humidity and water level periodically, putting the device into "deep-sleep" mode in between, thus dramatically reducing its power consumption. However, device is not available online all the time, and parameters could only be changed during the time device powers up (currently every 30 minutes, aligned with hour/half-hour real-time clock). Device will stay online for 1 minute each 30 minutes to allow configuration changes, and then will enter deep sleep mode. If user connects to the device, the "up" time is extended to 3 minutes for every connection.
When device is connected to local WiFi network, its IP address is reported to the IoT cloud server, and visible on the mobile monitoring device.
NodeMCU Sketch - NTP

IoT APIS v2 uses NTP protocol to obtain local time from the NIST time servers. Correct time is used to determine if device should enter "night" mode, i.e. avoid running the pump or flashing LED.
Night time is configurable for workdays and weekend morning separately.
NodeMCU Sketch - Local Web Server


IoT APIS v2 implements a local web server for status reporting and configuration changes.
The home page provides information about current humidity and water level, presence of overflow water in the bottom tray, and statistics of the most recent watering run.
Network configuration page (accessible via configure network button) provides ability to connect to local WiFi network, and change between Online and Power Saving modes. (Changes to the network configuration will cause device to reset)
Watering configuration page (accessible via configure water button) provides ability change watering parameters (soil humidity to start/stop watering, duration of the watering run and saturation pause between runs, number of runs, etc.)
Webserver HTML files are located in the data folder of the IoT APIS Arduino IDE sketch. They should be uploaded into NodeMCU flash memory as a SPIFF filesystem using "ESP8266 Sketch Data Upload" tool located here.
NodeMCU Sketch - Local Watering Log and Access to Internal File System

In case network connectivity is not available the IoT APIS v2 system is logging all watering activities locally.
To access the log, connect to the device and navigate to the '/edit' page, then download watering.log file. This file contains the history of all watering runs since logging has been started.
Example of such log file (in tab separated format) is attached to this step.
NOTE: The download page is not available when IoT APIS v2 is running is Access Point mode (due to dependency on online Java Script library).
Downloads
NodeMCU Sketch - Soil Humidity, Bottom Tray Water Leak, Water Level, 3 Color LED


Soil humidity measurement is based on the same principle as the original APIS. Please refer to that instructable for the details.
Water tray leaks are detected by momentarily applying voltage to the wires located under the pot using internal PULLUP resistors. If resulting PIN state is LOW, then there is water in the tray. PIN state of HIGH indicates that the circuit is "broken", therefore there is no water in the bottom tray.
Water level is determined by measuring distance from the top of the jar to the water surface and comparing it to the distance to the bottom of an empty jar. Please note the use of the 3 pin sensor! Those are more expensive than HC-SR04 four pin sensors. Unfortunately I ran out of GPIOs on NodeMCU and had to cut every wire I could to make the design work on just one NodeMCU without additional circuits.
3 color LED is used to visually indicate APIS state:
- Moderately blinking GREEN - connecting to WiFi network
- Quickly blinking GREEN - querying NTP server
- Brief solid GREEN - connected to WiFi and obtained current time from NTP successfully
- Brief solid WHITE - network initialization finished
- Quickly blinking WHITE - initiating Access Point Mode
- Quickly blinking BLUE - watering
- Moderately Blinking BLUE - saturating
- Briefly solid AMBER followed by briefly solid RED - unable to get time from NTP
- Briefly solid WHITE during access to internal web server
LED does not operate in the "night" mode. NIght mode could only be reliably determined if device was able to obtain local time from the NTP servers at least once (local Real Time Clock will be used until next connection to NTP is established)
Example of the LED function is available on YouTube here.
Solar Power, Power Bank and Autonomous Operation


One of the ideas behind IoT APIS v2 was ability to operate autonomously.
Current design uses a solar power panel and an interim 3600 mAh power bank to achieve that.
- Solar panel is available on amazon.com
- Power bank is also available on amazon.com
Solar panel has built in 2600 mAh battery as well, but it was not able to sustain 24h APIS operation even in the powersave mode (I suspect the battery does not deal well with simultaneous charge and discharge). A combination of two batteries seem to provide adequate power and allow re-charging of both batteries during the day. Solar panel charges power bank, while power bank powers up APIS device.
Please NOTE:
Those components are optional. You can just power the device with any USB adapter which provides 1A current.
IoT Integration - Blynk


One of the goals for the new design was the ability to monitor soil humidity, water level and other parameters remotely.
I chose Blynk (www.blynk.io) as an IoT platform due to its ease of use and appealing visual design.
Since my sketch is based on the TaskScheduler cooperative multitasking library, I did not want to use Blynk device libraries (they are not enabled for TaskScheduler). Instead, I used Blynk HTTP RESTful API (available here).
Configuring the App is as intuitive as it could be. Please follow the attached screenshots.
Sketches and Files

IoT APIS v2 sketch is located on the github here: Sketch
A few libraries used by the sketch are located here:
- TaskScheduler - cooperative multitasking library for Arduino and esp8266
- AvgFilter - integer implementation of the Average filter for sensor data smoothing
- RTCLib - implementation of the hardware and software Real Time Clock (modified by me)
- Time - Modifications for the Time library
- Timezone - library supporting time zone calculations
NOTE:
Datasheets, pin documentation, and 3D files are located in the "files" sub-folder of the main sketch.
HTML files for the built-in webserver should be uploaded to the NODE MCU flash memory using arduino-esp8266fs-plugin (which creates a filesystem file from the "data" sub-folder of the main sketch folder and uploads it into flash memory)