Intro to 123D Make: Building a 3D Charizard
by watchmeflyy in Workshop > Laser Cutting
6223 Views, 89 Favorites, 0 Comments
Intro to 123D Make: Building a 3D Charizard


When Pokemon Go servers keep crashing, just make your own Pokemon.
UMakers in Claremont, CA is home to the shop class that I never had: in just three days I was exposed to laser cutting, CNC routing, 3D printing, and some wood working tools (miter saw, table saw, etc).
For this project, I received a crash course on how to work the laser cutter (the one at UMakers is a Full Spectrum hobby 20x12 inch) in addition to using 123D Make, which can slice your .stl files (standard files for 3D models) into lasers for 3D puzzles. What better way to cement my learning than with a tutorial explaining what I did and exploring further options?
Materials
- software: You'll need a software that can take standard .stl files for 3D models and convert them into discrete layers. I used the free software called 123D Make so that's the one that will be covered in this tutorial, but there are other alternative choices as listed on this list, such as blender, sketchup.)
- cutting material: When deciding what material to use, keep in mind the question, how many pieces can you handle? My model used about 150 pieces, but some can go upwards of 500 if you're dedicated enough. Using thicker material makes it easier on you, but resolution is a lot worse since layers are much thicker. You could increase the model's height, but then can you fit the model in your living room space? I ended up using ~0.14in thick cardboard to get a final height of 6in.
- laser cutter: If you're extremely dedicated, you can use an xacto knife. Alternatively you can use chipboard/cardstock and an electronic cutting tool like a Cricut machine or Silhouette. For best results though, laser cutting will provide a nice, clean edge that's made even cooler by being slightly singed. Plus, cutting small pieces of cardboard with a box knife/xacto without squashing the inner ridges is a nightmare to attempt.
- glue
- dowels or wire (optional, but suggested for alignment and stability)
Finding and Choosing Modeling Files
The file I found for my Charizard was from here, but this website lists many sources for any other shapes/fandoms/etc that you might want .stl or .obj files for. Googling "______ .stl file" usually does the trick as well.
Be careful as you choose your model, and keep your material in mind. You might only have cardboard, for example, and thus making tiny figures (~4in or below) will be hard if you want a certain resolution (thicker layers will look choppy-er if you have small figures). Or if you only have cardstock, tiny figures would be preferred unless you really do want 500 or so pieces just to make something 4 inches tall.
Another thing to keep in mind is the geometry: does the figure have acute overhangs? (parts that extend roughly horizontal with no support beneath). If so, be warned that if the overhang is quite long, you might end up with pieces that sag. And if the angle is too acute (close to horizontal) you may have problems in the model that will be outlined in dark glue because pieces are unconnected (I'll point this out in the next step). For the charizard, the place to worry about a bit was the wing tip area. The wings are quite thin in the model, so each layer of the wing had to be meticulously staggered to get the gentle curvature. Thankfully, glue was enough to prevent too much staggering, but just be warned.
123D Make or Other Softwares
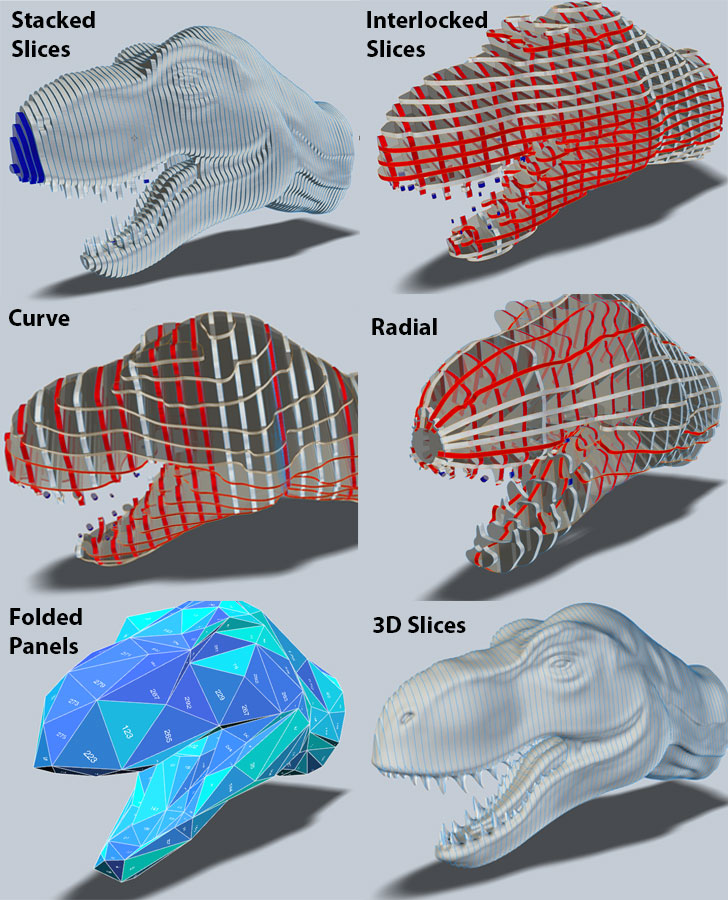
Overview of Autodesk 123D make: this is a software that turns 3D models into 2D sketchs for building, mainly by slicing the model into discrete layers for stacking or slot insertion. In this case I have stacked layers, but there are other options for using slots (uses less material, but not as solid) to make what is essentially a puzzle, or folded panels, which is good for making papercraft foldable models.
There are other softwares you can use (see link here) but I just learned 123D Make and like it already. It's quite user friendly and relatively simple to learn. Of course, if you like other softwares with the same function, use those if you'd like. But I'll be giving an intro to the 123D Make environment and building options in the next steps.
123D Make: Choosing Construction Technique and Material

.png)
.png)
Begin by importing your model (click on the 123D Make logo on the upper left corner). Then take a look at the toolbar on the left edge of the program: you can specify your material, model dimensions, and construction technique (see this picture for an example of your options). It's a good idea to go straight for the construction technique first so you can see a predicted view of your model, and thus more easily see how your model will turn out when you change your material and dimensions. In this charizard's case, I went for stacked layers as my construction method (but of course you can choose different options, in which case the parameters that you can change will be different).
Once you choose stacked layers, more options pop up on your left menu bar. If you choose other construction options, different parameters pop up. For this case, you can see that you can change dowel positioning or slice direction. (more on that for the next step)
This blue part of the layers that you see is a model issue (see the top tab on the right menu bar). If you click on that tab, it'll explain the issue: for this case, it was because the angle of the wing tips is so much of an overhang that these pieces are essentially unconnected. I didn't worry about this issue because I could just make the wings less curved but stagger them as much I could all the same.
123D Make: Choosing Material and Dimensions
.png)
.png)
Now that you can see the layers stacked together, choose your material. Maybe you only have one type of material lying around, in which case you're constrained by that fact. Otherwise, check out your projected outcome (123D Make provides an estimation of what your model will look like) before deciding among whatever you have.
At first I planned on using letter sized (8.5x11in) cardstock, hence the 688 pieces to assemble. In my arrogance I just looked at that number and said, "Pssh I can handle 688 pieces."
Sure... nope.
Later, since we had 20x12x0.14in cardboard, I input that as a custom material. Alternatively, there are preset options for common commertially-sold materials. Then I'm down to only 150 pieces, and I let out a sigh of relief. If you still have too many pieces than you can handle, or if you don't like how choppy the resolution of the layers look in the model image, you can decrease or increase your model dimensions to fix those respective problems. You may also want to increase your model if you have tiny pieces that will easily fall through the honeycomb of your laser cutting bed and into some dark hole where it'll never be seen ever again.
123D Make: Changing Dowel Positions and Using Assembly Mode
.png)
.png)
.png)
.png)
Add dowels for support and easier alignment (the pieces that go through the dowel will be perfectly aligned by virtue of the piercing). On the left panel you can see that you get to choose where they are positioned in addition to the size and dimension of the dowels you'll use. You might have square dowels, for example, or you might use barbeque skewers or thick gauge wire. For me I used skewers, which were circular and 0.1" in diameter.
Another button below that outlines the assembly steps as you assemble layers later. You can even see the corrugated ridges of the cardboard for a realistic image of the model. Use this button for later once you've cut out your material and are ready to assembly. You can also use this now to see and predict problems you may encounter if you continue using this material selected or the dowel option. I actually caught the redundant dowel by stepping through this; the automatically generated dowel intersected with another one, which didn't make sense.
123D Make: Looking at Your Part Files
.png)
.png)
.png)
Once you're satisfied with your material dimension, you can look at the part files that it'll generate by double clicking on the right panel with the preview of the page. See the above pictures' notes as I changed different parameter, and their effects on my resultant part files.
123D Make: Exporting Pdf or Printing Directly
.png)
.png)
.png)
Once you've decided on your model dimensions, you can double click on the right panel's preview of your cuts. On the bottom of the window you can see the option to export the pdf/eps/dxf or directly printing to your laser cutter. Again, hopefully you have access to electronic cutting, else you'll be meticulously cutting with an xacto until the cows come home...
Exporting the pdf is sometimes a great idea so you can clean up some of the parts if you'd like (maybe you want to engrave a logo/symbol/name on your model). One great way to get more round, smooth models is to go into Inkscape (or other graphics softwares) and using the "simplify nodes" option (ctrl/command + L) to make the curved edges in the pdf more rounded, as 123D make tends to turn curves into clear polygons.
Cutting Out Your Shapes
.png)


I am fortunate enough to [finally] have access to a laser cutter (Full Spectrum, hobby 20x12in) so I used that. Just upload the file into your cutting software of choice and cut away.
Warning for laser cutting; the file exported from 123D Make has red and blue lines, but the blue lines are the ones you want to cut all the way through and red is for vector cuts. Most laser cutting presets have red as the cut-all-the-way-through and blue as raster/vector cut.
Be very careful with lifting your material off the laser cutting board, as your tiny pieces may fall through the honeycomb of the bed. I know that mine did for sure, but I fixed that with some patching later.
Assembly


.png)

.png)

My model is built from the bottom up (but for other models it might be easier from top to bottom for some reason, or if you have rotated slices so right to left/left to right). I started by inserting a skewer into a table clamp and inserting the first piereced shape through it before piercing more layers on top. Use glue between each layer for additional strength in your model. Adding dowels: Just insert the bottom of the new skewer through the hole; no big deal to worry about.
For guidance as you assemble, go to Assembly Steps and click through the progress bar on the bottom. Then you can see how the model should look before and after you add each layer. Also, the position of the part you're using is highlighted on the material part files on the right panel, making it easier to find your part.
Patching and Finishing


If you lost some of the smaller parts of your part files when you took your material off the laser cutter honeycomb bed, fear not: you can either recut those or do the, erm, resourceful way. I just cut off a skinny rectangle from the edge of my material and cut out skinny trapezoids/rectangles/other shapes to replace those small shapes (since they were mostly small skinny tubes for the bottom of the wings for wing tips.
Don't forget to trim your dowels. If they are loose enough, pull them up slightly, trim to the desired final height, and push it back down. Alternatively, go in with some automatic rotary cutter (Dremel, etc.) and carefully cut off the dowel tips.
Admiration and Next Steps


Now that your meticulous hours of assembly are behind you, spend another couple hours admiring every angle of your creation. And think of improvements, of course.
Little things you could try:
- Add-ons for your model: add some props to augment your model. For the Charizard, I could squeeze some glue on plastic film, use food coloring to color it like flames, and stick that piece in the Charizard's mouth once the glue dries for some fire. Color in your model with some paint or coat it for protection from the elements.
- Use another construction technique for comparison. You've used stacked layers, but perhaps folded panels could be a cool papercraft look for a more polygonal, angular look? Or maybe you like the puzzle-like aspect of slots -- go crazy with the possibilities.
- You've used one type of material, but maybe you want to scale up with thicker material or scale down with thinner papers? A life-sized Charizard would be a pretty awesome doorway greeter for your home.
- LEDs. Enough said.
As always, feel free to drop questions and comments in the section below, and I hope you enjoy the possibilities of turning 3D models to 2D sketches.