Intrefacing Fingerprint Sensor
by hariramanil810 in Circuits > Arduino
327 Views, 3 Favorites, 0 Comments
Intrefacing Fingerprint Sensor
.png)
If you have hard-time 3d printing stuff and other materials which i have provided in this project please refer the professionals for the help, JLCPCB is one of the best company from shenzhen china they provide, PCB manufacturing, PCBA and 3D printing services to people in need, they provide good quality products in all sectors
Please use the following link to register an account in JLCPCB
Pcb Manufacturing
----------
2 layers
4 layers
6 layers
PCBA Services
JLCPCB have 350k+ Components In-stock. You don’t have to worry about parts sourcing, this helps you to save time and hassle, also keeps your costs down.
Moreover, you can pre-order parts and hold the inventory at JLCPCB, giving you peace-of-mind that you won't run into any last minute part shortages. jlcpcb.com/RNA
3d printing
-------------------
SLA -- MJF --SLM -- FDM -- & SLS. easy order and fast shipping makes JLCPCB better companion among other manufactures try out JLCPCB 3D Printing servies
JLCPCB 3D Printing starts at $1 &Get $54 Coupons for new users
The fingerprint sensor is one kind of sensor which is used in a fingerprint detection device. These devices are mainly inbuilt in the fingerprint detection module and it is used for computer safety. The main features of this device mainly include accuracy, better performance, robustness based on exclusive fingerprint biometric technology. Both fingerprint scanner otherwise reader are an extremely safe & suitable device for safety instead of a secret word. Because the password is easy to scan and also it is hard to keep in mind
Supplies
.png)
.png)
.png)
Fingerprint sensor modules, like the one in the following figure, made fingerprint recognition more accessible and easy to add to your projects. This means that is is super easy to make fingerprint collection, registration, comparison and search.

These modules come with FLASH memory to store the fingerprints and work with any microcontroller or system with TTL serial. These modules can be added to security systems, door locks, time attendance systems, and much more.
Prices for this sensor greatly vary from $10 to $50. We recommend checking the Fingerprint sensor module on Maker Advisor that compares the price in different stores. The fingerprint sensor modules featured on Maker Advisor should be compatible with this guide.
Specifications
Here’s the specifications of the fingerprint sensor module we’re using (you should check your sensor datasheet or the specifications provided by your supplier – they shouldn’t be much different than these):
- Voltage supply: DC 3.6 to 6.0V
- Current supply: <120mA
- Backlight color: green
- Interface: UART
- Bad rate: 9600
- Safety level: five (from low to high: 1,2,3,4,5)
- False Accept Rate (FAR): <0.001% (security level 3)
- False Reject Rate (FRR): <1.0% (security level 3)
- Able to store 127 different fingerprints
The fingerprint sensor module used in this project came with really thin wires, so soldering breadboard-friendly wires was needed. We recommend using different colors according to the pin function. In our case:
- DNC – white wires
- VCC – red wire
- TX – blue wire
- RX – green wire
- GND – black wire
The easiest way to control the fingerprint sensor module with the Arduino is by using the Adafruit library for this sensor. Follow the next instructions to install the library:
- Click here to download the Adafruit Fingerprint Sensor library. You should have a .zip folder in your Downloads folder
- Unzip the .zip folder and you should get Adafruit-Fingerprint-Sensor-Library-master folder
- Rename your folder from Adafruit-Fingerprint-Sensor-Library-master folder to Adafruit_Fingerprint_Sensor_Library folder
- Move the folder to your Arduino IDE installation libraries folder
- Finally, re-open your Arduino IDE
.png)
.png)
Enroll a New Fingerprint
Having the fingerprint sensor module wired to the Arduino, follow the next steps to enroll a new fingerprint. Make sure you’ve installed the Adafruit Fingerprint Sensor library previously.
1. In the Arduino IDE, go to File > Examples > Adafruit Fingerprint Sensor Library > Enroll.
2. Upload the code, and open the serial monitor at a baud rate of 9600.
3. You should enter an ID for the fingerprint. As this is your first fingerprint, type 1 at the top left corner, and then, click the Send button.

4. Place your finger on the scanner and follow the instructions on the serial monitor.
You’ll be asked to place the same finger twice on the scanner. If you get the “Prints matched!” message, as shown below, your fingerprint was successfully stored. If not, repeat the process, until you succeed.

Store as many fingerprints you want using this method.
Finding a Match
You now should have several fingerprints saved on different IDs. To find a match with the fingerprint sensor, follow the next instructions.
1. In the Arduino IDE, go to File > Examples > Adafruit Fingerprint Sensor Library > Fingerprint and upload the code to your Arduino board.
2. Open the Serial Monitor at a baud rate of 9600. You should see the following message:

3. Place the finger to be identified on the scan.
4. On the serial monitor, you can see the ID that matches the fingerprint. It also shows the confidence – the higher the confidence, the similar the fingerprint is with the stored fingerprint.

.png)
.png)
1. Open your Arduino IDE and go to Sketch > Include Library > Manage Libraries. The Library Manager should open.
2. Type “SSD1306” in the search box and install the SSD1306 library from Adafruit.

3. After installing the SSD1306 library from Adafruit, type “GFX” in the search box and install the library.

4. After installing the libraries, restart your Arduino IDE.
Code
Before uploading the code, you need to enroll different fingerprints from different persons. Go to “Enroll a New Fingerprint” section above, upload the given code and follow the instructions to enroll two fingerprints.
Then, modify the code so that the fingerprint IDs match the name of the persons enrolled – scroll down to page for an explanation of the code. Finally, you can upload the code provided.
#include <Wire.h>
#include <Adafruit_GFX.h>
#include <Adafruit_SSD1306.h>
#define OLED_RESET 4
Adafruit_SSD1306 display(OLED_RESET);

#include <Adafruit_Fingerprint.h>
#include <SoftwareSerial.h>
SoftwareSerial mySerial(2, 3);

Adafruit_Fingerprint finger = Adafruit_Fingerprint(&mySerial);
int fingerprintID = 0;
String IDname;

void setup(){
  //Fingerprint sensor module setup
  Serial.begin(9600);
  // set the data rate for the sensor serial port
  finger.begin(57600);

  if (finger.verifyPassword()) {
    Serial.println("Found fingerprint sensor!");
.png)
.png)
Fingerprint sensor includes pins like DNC, VCC, TX, RX, and GND. These pins are connected through different colored connecting wires. Each color wire is used to indicate each pin of the sensor.
- DNC pin is connected by a white wire
- VCC pin is connected by a red wire
- TX pin is connected by a blue wire
- RX pin is connected by a green wire
- GND pin is connected by a black wire
The connection of the fingerprint sensor module to an Arduino board can be done like the following.
- The black wire is connected to the GND pin of the Arduino
- The red wire is connected to the 5V of the Arduino
- Green wire is connected to the digital pin-2 of the Arduino
- The white wire is connected to the digital pin-3 of the Arduino
The connection of display to an Arduino board can be done like the following.
- Vcc pin of the display is connected to the 5V pin of the Arduino
- GND pin of the display is connected to the Arduino GND pin
- CS pin of the display is connected to the Digital Pin-10
- RST pin of the display is connected to the DIgital Pin-9
- A0 pin of the display is connected to the Digital Pin-8
- SDA pin of the display is connected to the Digital Pin-11
- SCK pin of the display is connected to the Digital Pin-13
- LED pin of the display is connected to the 3.3V pin of the Arduino
Check the sensor as well as display by placing a finger over the sensor for every50ms, then the module checks the finger whether it is enrolled or not within the memory of the device. If it discovers in the memory then it go backs that finger prints identification. Finally, it shows a message like ‘WELCOME’ and after few seconds it will lock the screen automatically.
Secure your project with biometrics - this all-in-one optical fingerprint sensor will make adding fingerprint detection and verification super simple. These modules are typically used in safes - there's a high powered DSP chip that does the image rendering, calculation, feature-finding and searching. Connect to any microcontroller or system with TTL serial, and send packets of data to take photos, detect prints, hash and search. You can also enroll new fingers directly - up to 162 finger prints can be stored in the onboard FLASH memory.
.png)
.png)
There are basically two requirements for using the optical fingerprint sensor. First is you'll need to enroll fingerprints - that means assigning ID #'s to each print so you can query them later. Once you've enrolled all your prints, you can easily 'search' the sensor, asking it to identify which ID (if any) is currently being photographed.
You can enroll using the Windows software (easiest and neat because it shows you the photograph of the print) or with the Arduino sketch (good for when you don't have a Windows machine handy or for on-the-road enrolling
Wire up the sensor as described in the sketch comments after uploading the sketch. Since the sensor wires are so thin and short, we stripped the wire a bit and melted some solder on so it made better contact but you may want to solder the wires to header or similar if you're not getting good contact. When you plug in the power, you may see the LED blink to indicate the sensor is working.
The 'confidence' is a score number (from 0 to 255) that indicates how good of a match the print is, higher is better. Note that if it matches at all, that means the sensor is pretty confident so you don't have to pay attention to the confidence number unless it makes sense for high security applications.
Of course you have to have enrolled a fingerprint first! If you did this using the Windows program, that's good to go. If you have not yet, you should at least have gotten a Found fingerprint sensor! printout. You can go ahead to the next step to enroll fingerprints.
If you get Did not find fingerprint sensor :( check your wiring, maybe swap the RX and TX wire as that's a common issue
If you want to have a more detailed report, change the loop() to run getFingerprintID() instead of getFingerprintIDez() - that will give you a detailed report of exactly what the sensor is detecting at each point of the search process.
.png)
.png)
We did put together a simple sketch for enrolling a new finger via Arduino - its not as easy to use as the Windows program but it does work!
Run the File→Examples→Adafruit_Fingerprint→enroll sketch and upload it to the Arduino, use the same wiring as above.
When you open up the serial monitor, it will ask for you to type in the ID to enroll - use the box up top to type in a number and click Send.

Then go through the enrollment process as indicated. When it has successfully enrolled a finger, it will print Stored!

Don't forget to do a search test when you're done enrolling to make sure its all good!
.png)
It's fairly long but it will help you set-up and test your sensor!
When you first start up, you should get something like this:
If you get an error like RuntimeError: Failed to read data from sensor it means something went wrong - check your wiring and baud rate!
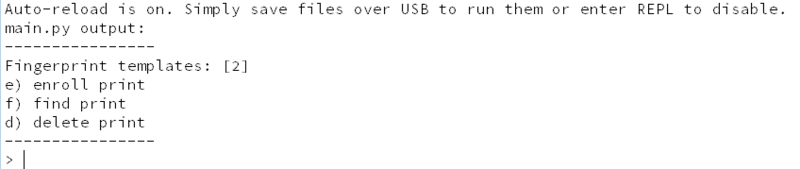
This menu system is fairly simple, you have three things you can do
- Enroll print - you will use your finger to take images and 'store' the model in the sensor
- Find print - determine whether a fingerprint is known and stored
- Delete print - clear out a model
Enrolling Prints
Enrolling a finger print is easy. Type e to start the process. You'll need to select a location. The sensor can store up to 127 print locations. Pick a valid number, then place your finger twice to enroll.

Note that after success, the Fingerprint templates: [...] printout will include the new template id.
If an error occurs, the sensor will give you an error, such as if the two prints don't match, or if it failed to store or generate a model:

Finding Prints
Once you've enrolled fingerprints you can then test them. Run the find command, and try various fingers! Once the fingerprint id identified it will tell you the location number, in this case #5

Finally, you should arrive to this page corresponding to your device. What is important on this page is the Feed ID that identify your device, and the API key that identify your account. Please note these two values, you will need them later. Now, we need to create "Channels" to track some data. Click on "Add Channel" to create the first one:
Deleting Fingerprints
If you made a mistake you can remove fingerprint models from the database. For example, here's how to delete #5. Note the Fingerprint templates: [...] printout changes!
