Intermediate MaxMSP
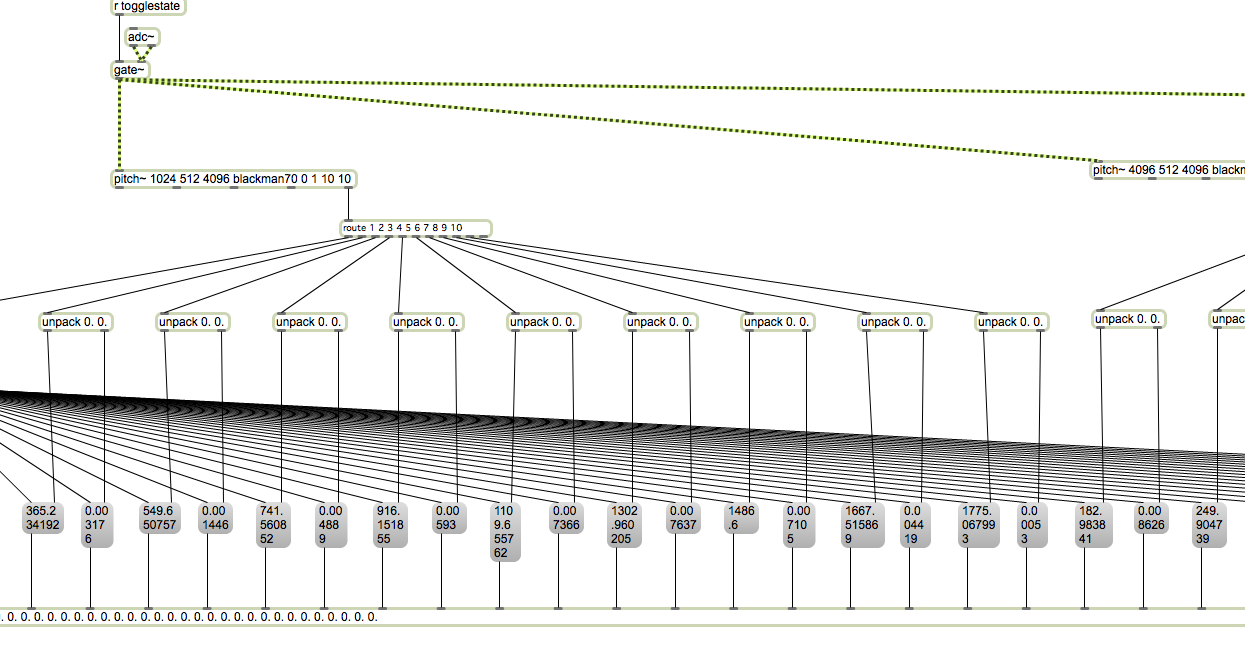
This Instructable is a continuation of Intro to MaxMSP, a three part workshop I'm teaching at Women's Audio Mission here in San Francisco. This Instructable build upon the topics discussed in Intro to MaxMSP and introduces some ways to work with audio in Max. Part 3 of the workshop focuses on how to get Max to talk to hardware. First off, here are some examples of the types of things you can do with audio in Max:
Fornant synthesis - using filters to recreate human vocal sounds
Audio to MIDI
Granular Synthesis- cutting up a sample into tiny grains and pieces the grains together to make new sounds
Fornant synthesis - using filters to recreate human vocal sounds
Audio to MIDI
Granular Synthesis- cutting up a sample into tiny grains and pieces the grains together to make new sounds
Lists - Pack / Unpack
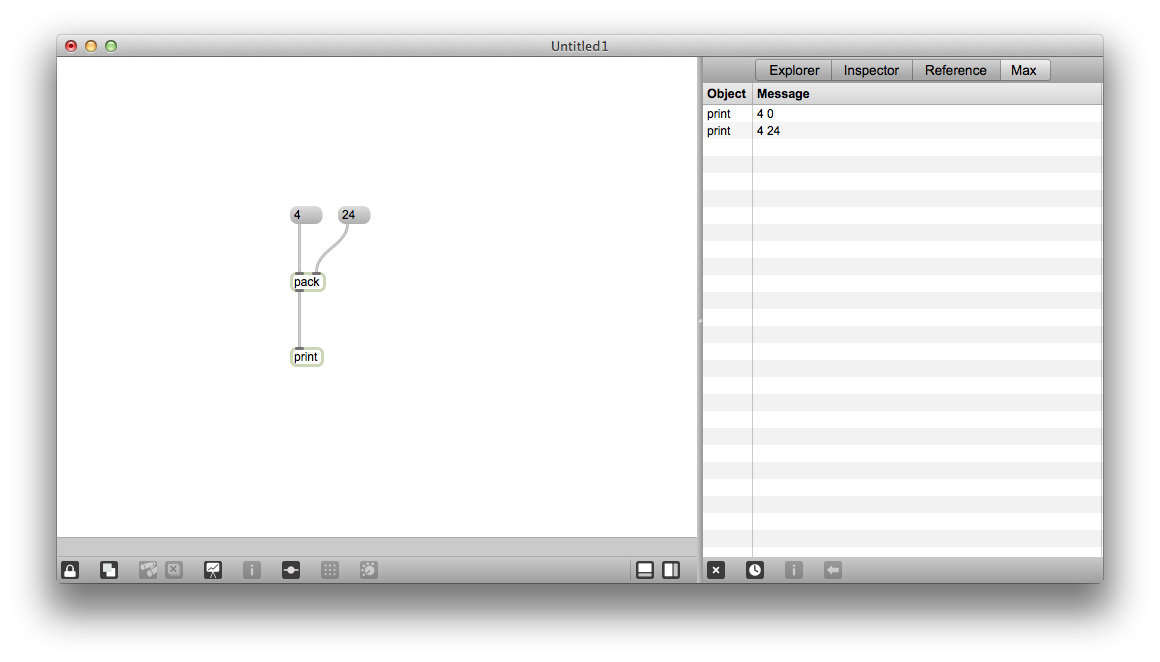
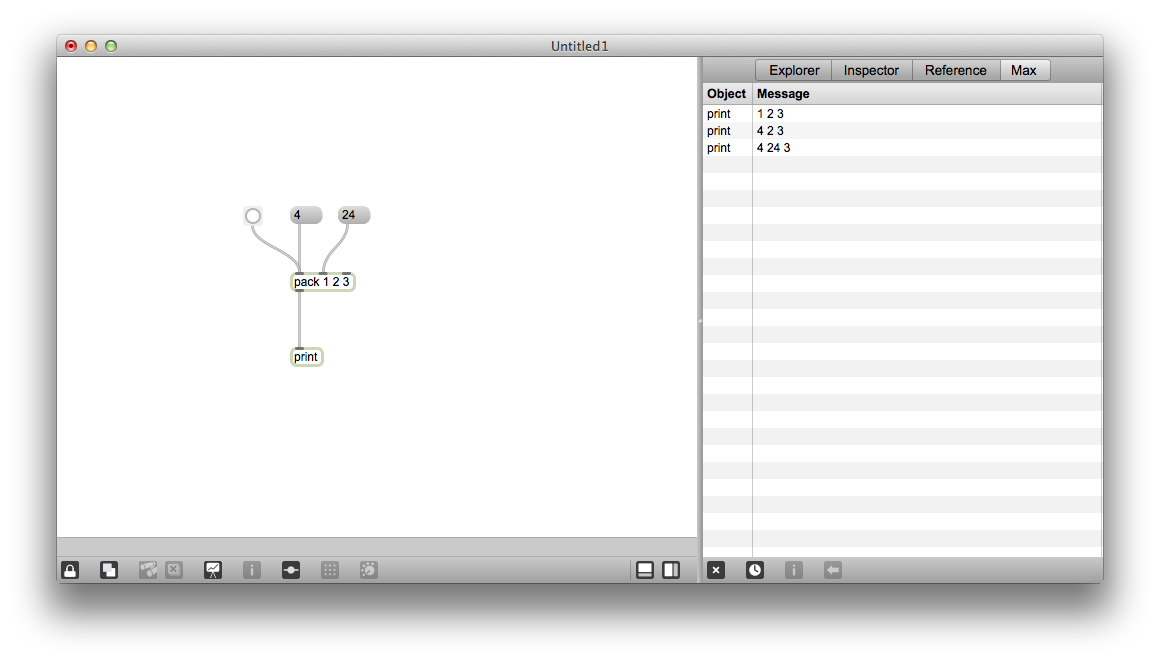
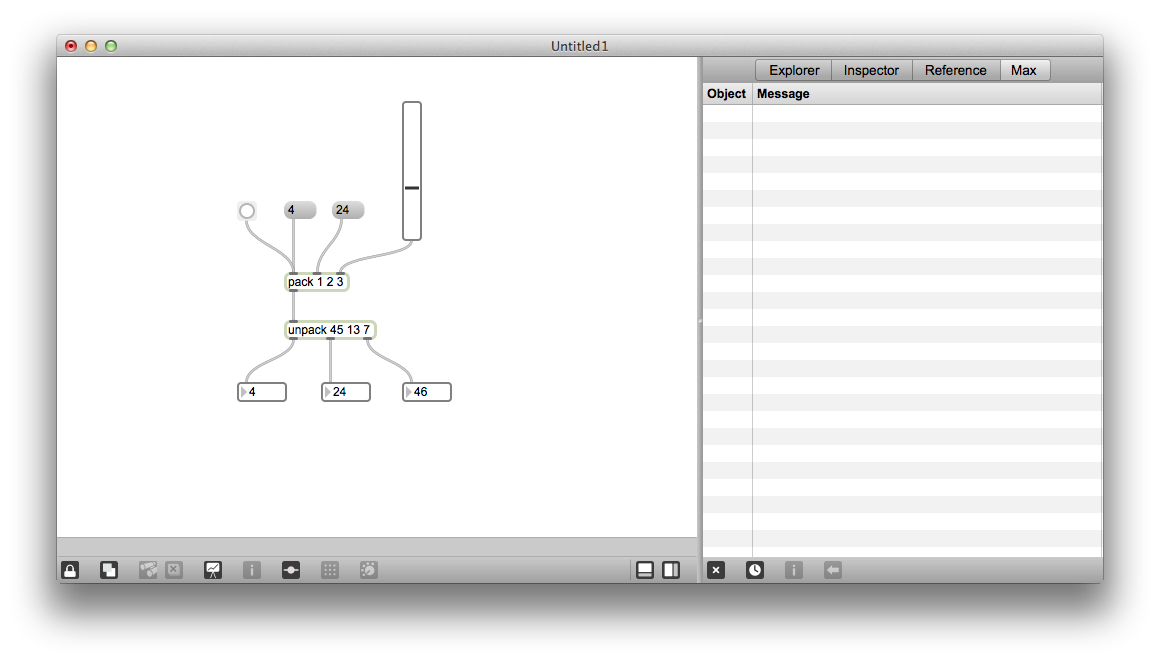
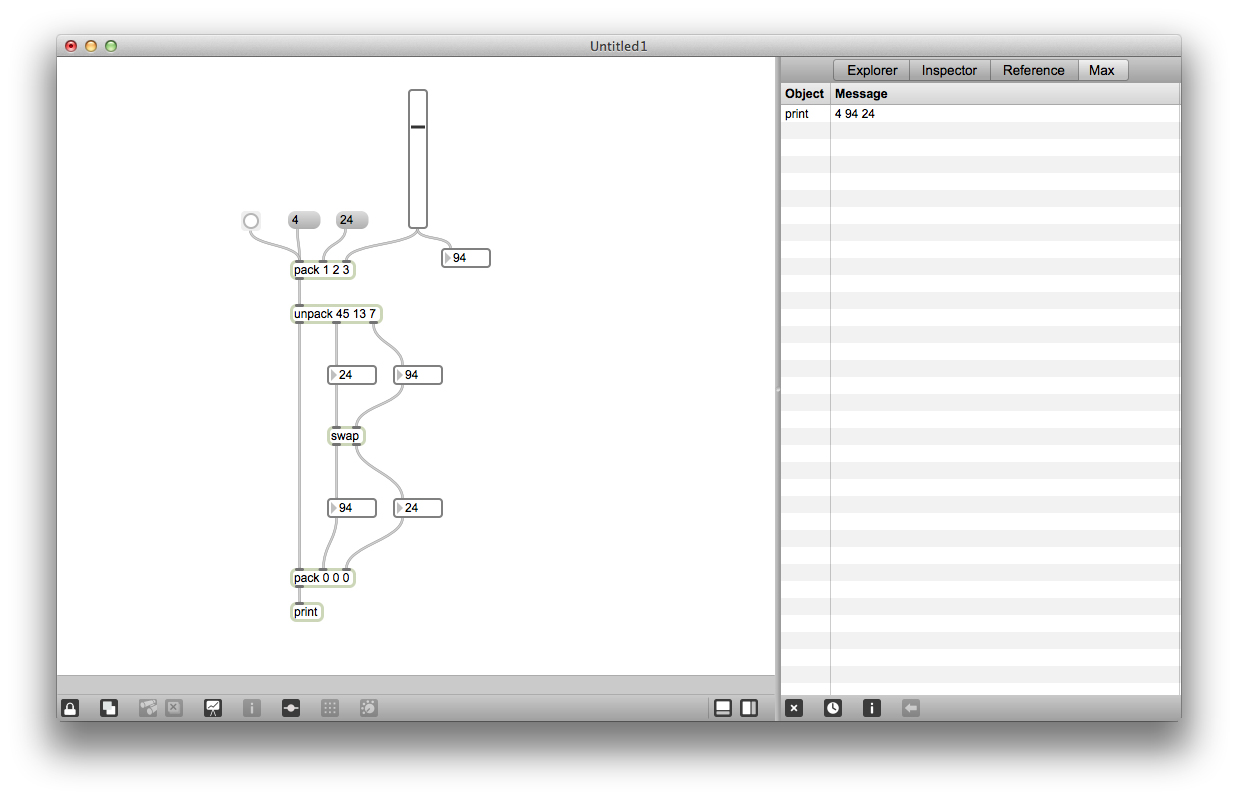
In Max, it's often useful to deal with lists. A list is an ordered series of messages, lists can contain numbers and words. The "pack" object lets you create lists of all different sizes. Create a pack object. By default pack creates lists containing two messages, so it has two inlets. The leftmost inlet of the pack object is hot and the remaining inlet is cold. Send a 4 to the hot inlet, since the cold inlet has note yet been set, pack uses its default value of 0 to complete the list: {4,0}. Now send a 24 to the cold inlet and send another 4 to the hot inlet, you should see {4, 24}.
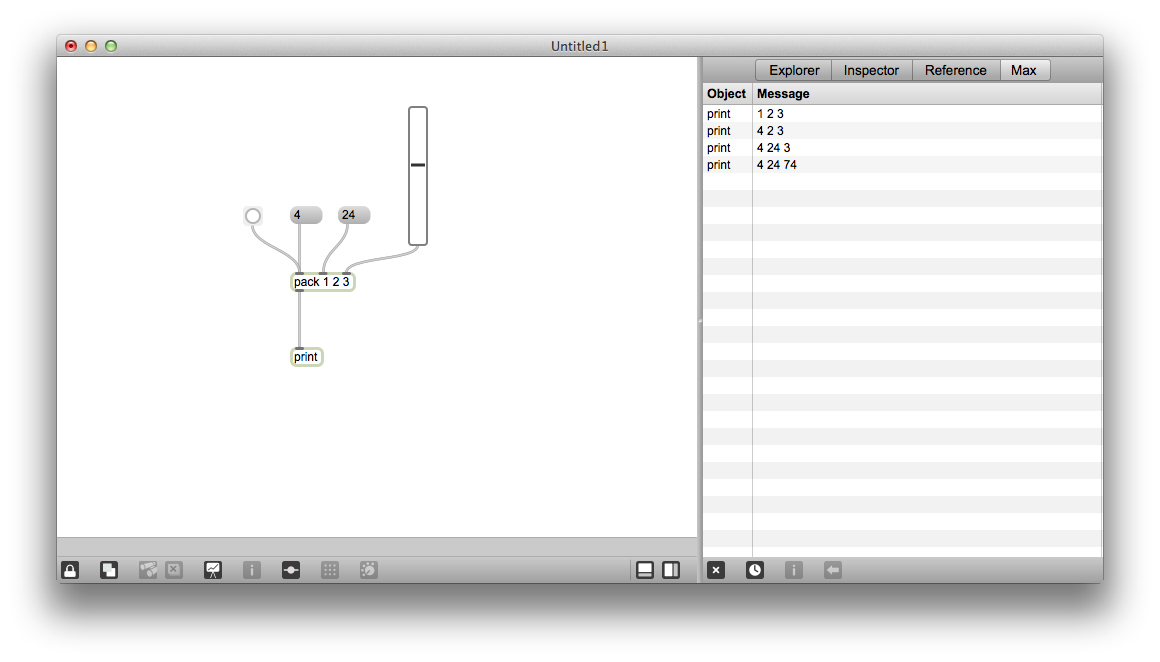
You can make longer lists by adding arguments to the pack object. The number of arguments you add to the pack object will dictate the length of list that pack creates and also sets the default values for each index of the list. Experiment with creating lists of different sizes and sending messages to the any number of the cold inlets before triggering output.
Unpack is the opposite of pack. Create an unpack object with three arguments and use it to parse the output from pack. Swap is another interesting object to use with lists. Wire up swap between two outlets of an unpack and two inlets of a pack to switch the order of those elements in the list.
----------begin_max5_patcher----------
721.3oc4WF0aaCBDG+Y6OEHdNqx.1j3819bLMUQhYszkfirwsYqpe2Gb1oIs
q1Am5Qi1TjvBLA9e+tiiyOFGgWVtSViQeF8UTTziwQQvPtAh55Gg2H1sZsnF
lFV2rYorBOq8UeuTapU+R5dEgdUR2vkMl0Ri4maksKMVoM3YH7Rg9FL5acyx
tTJscdvBS5Fbqvr5Vk9lqqjqLs+a1hT6JiH4D2irDWK0197BoJ.oUt7tOQoG
KMsXCn.7WpTh03C6aq.gMl97FWYmsQVcsTKVtF9eItW8TbrqYV3Az1JYsTaD
FUo9Xdv.DvnL2ijtlwiUF+JZ1LTZpObM4eetR4oSAWoySFAWIe3bU9fUH62K
ibGXFVFAnaPZ6MQXLfHYoY.fSGhHj7wRjozpEq9AJw8arAZ8jVi4AUHPbBmO
HUVLVpPlNpT+fX6Ydvy83sIC8zmfX7bHdIePxLezmftLyp2c3flMIY0YIKNc
1GB++gr57VtlNIY08iqYWnY0azPFtzLDggl+NNSO3QaOtJflN2Avb1fXjMVL
xNCTUuVUbHDz2D6CcDLizFpP2ab1hWS6yFo8j9dhCHV1XLk5dsxyqxbRWk4Y
oGrzdcljo6dpMx5ZwMx+H7llNQWaO3kS4GYyVer0SSV711LODWZ2GLBAKXDu
YA6Cr.FHoGAQQrvUVGMg4QYcuGn.KHdsR+5ufGTka7WRp5xlpU6Mr84dPGzU
gr1nzv8mGMI5KmzsphBI798LqPU6RLUzelIe0i6iLOodbUBa8jAQODe0CIH5
wUp6QaUO9qjf4u.8bx3GR3zyBe7W4gSOLeieBjd39nm4gKdNyW8DP+E8T5gG
V8bpy6uBh+U0iOtKV3jiOWeQB1sEDhmxILzgcQoFtmp4bR7zVGjX616kU0cK
IHDasg2UV45xmAcU51tvmzfqj2q1OenfNrnxVMmwVJWSUakX6Vvwwt84o3eC
TZqv0C
-----------end_max5_patcher-----------
Downloads
Step Sequencer
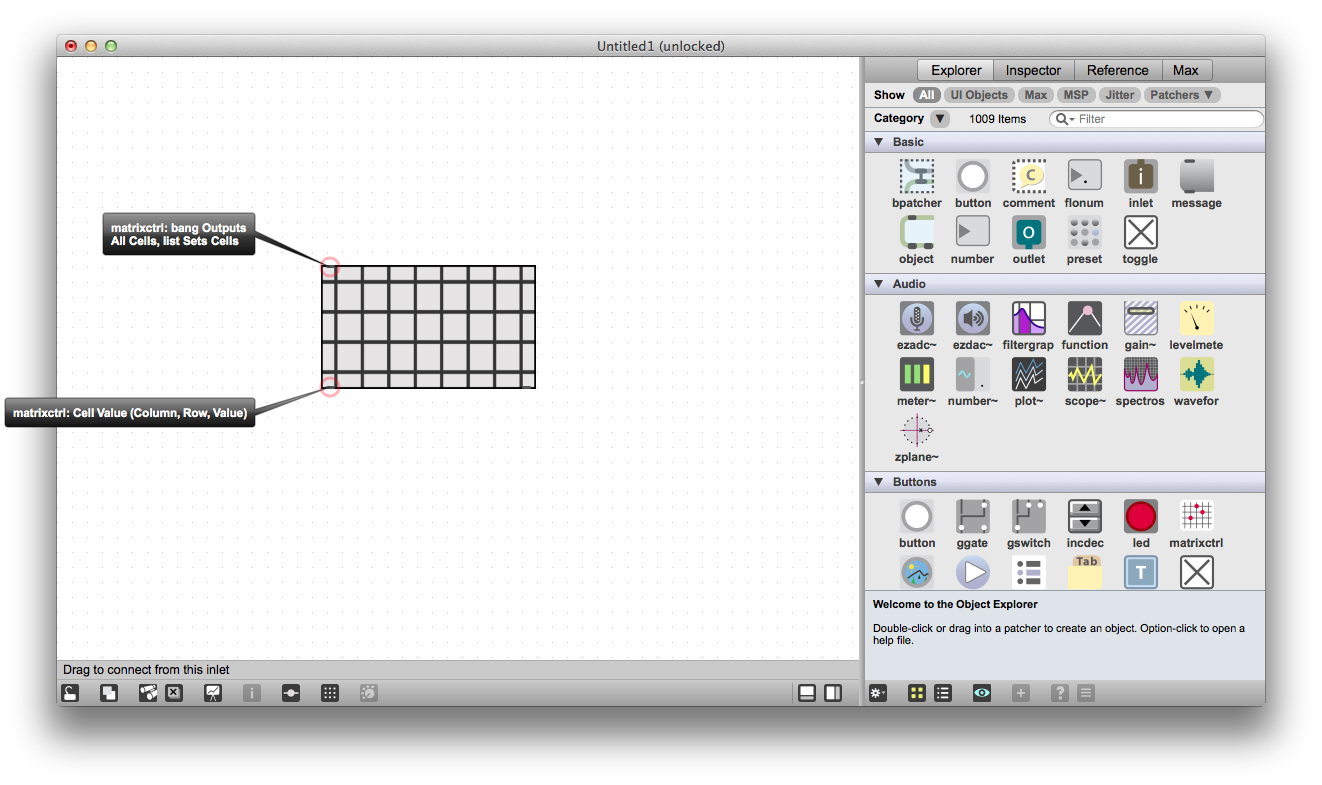
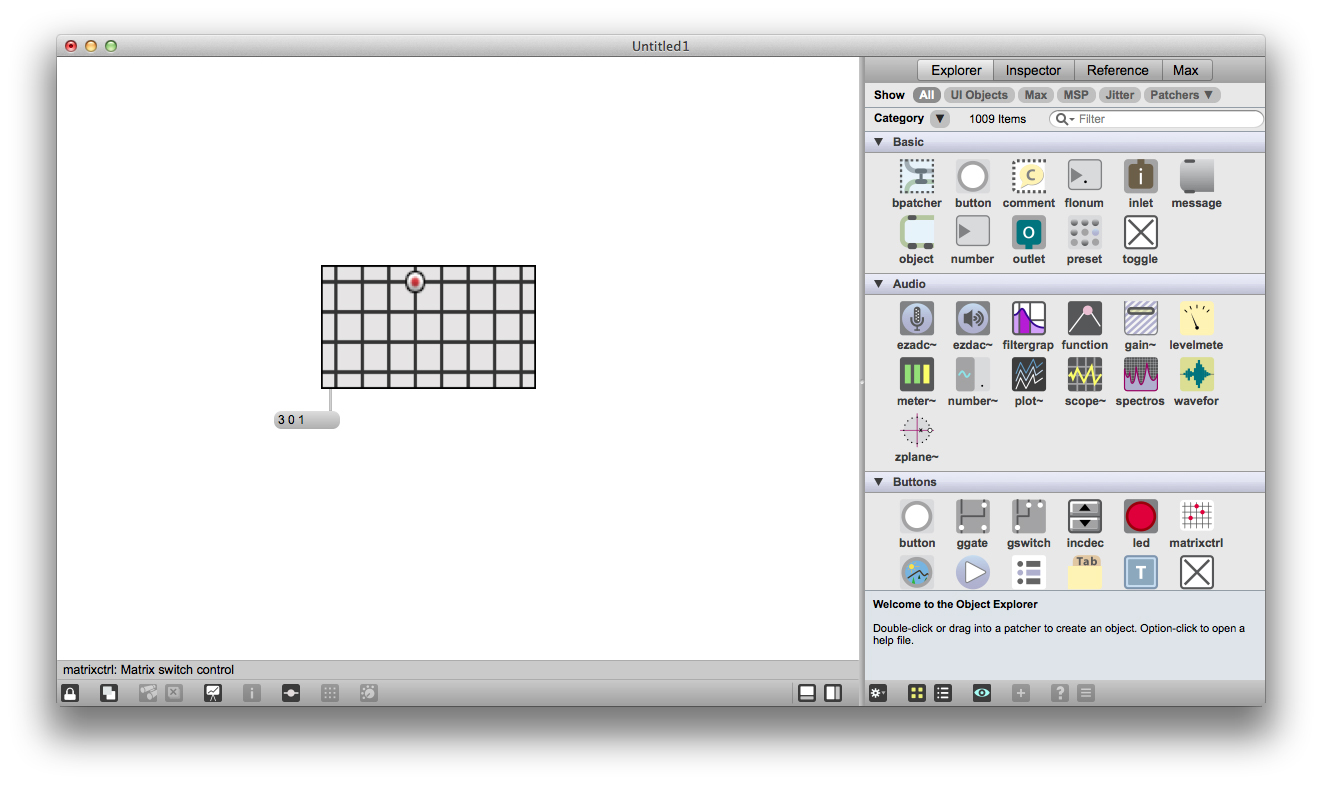
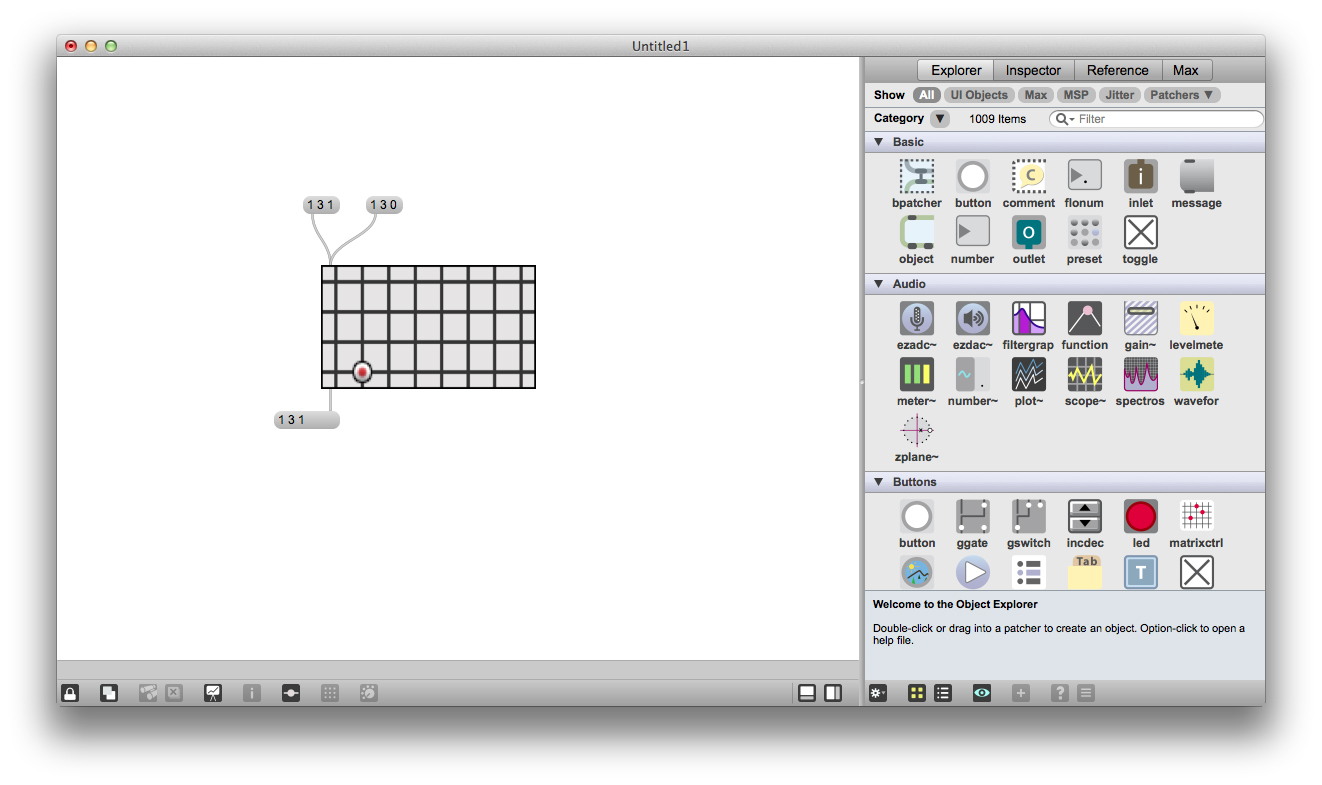
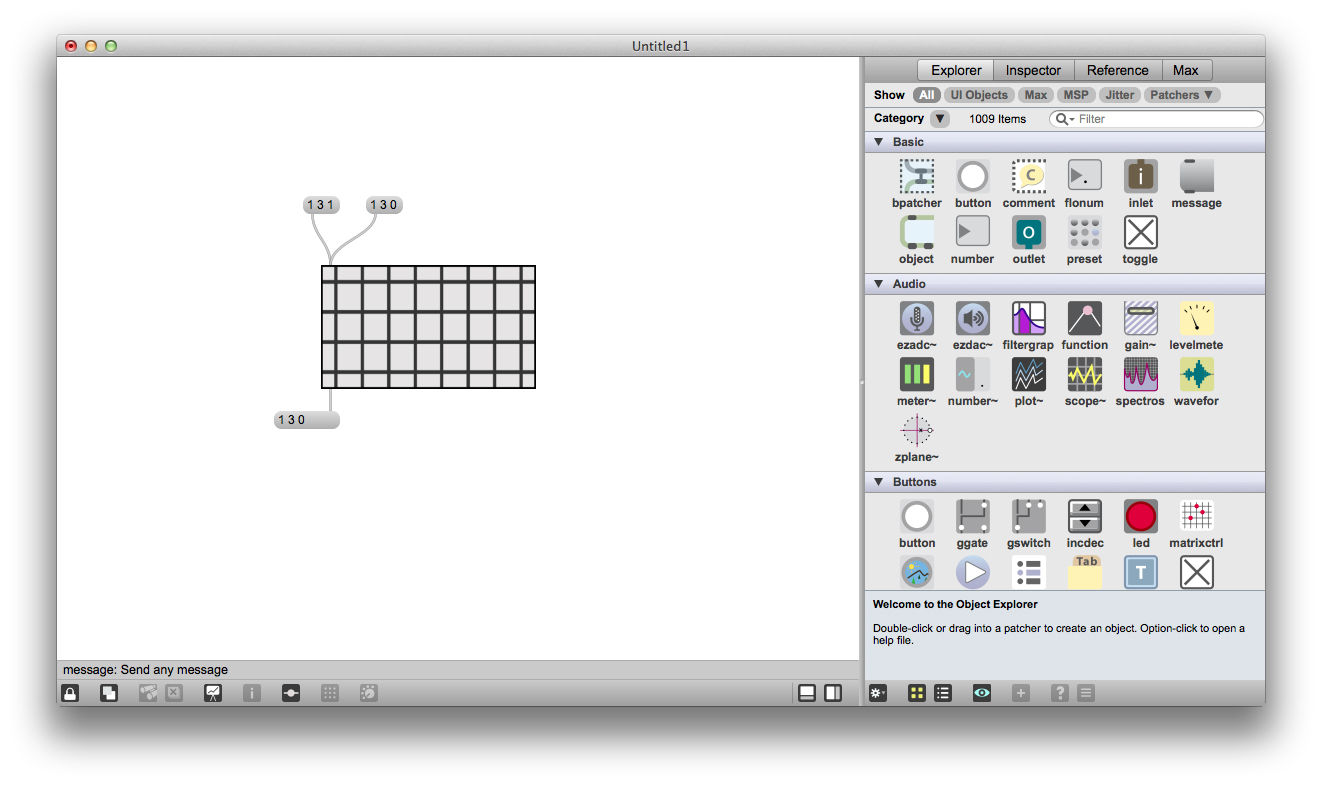
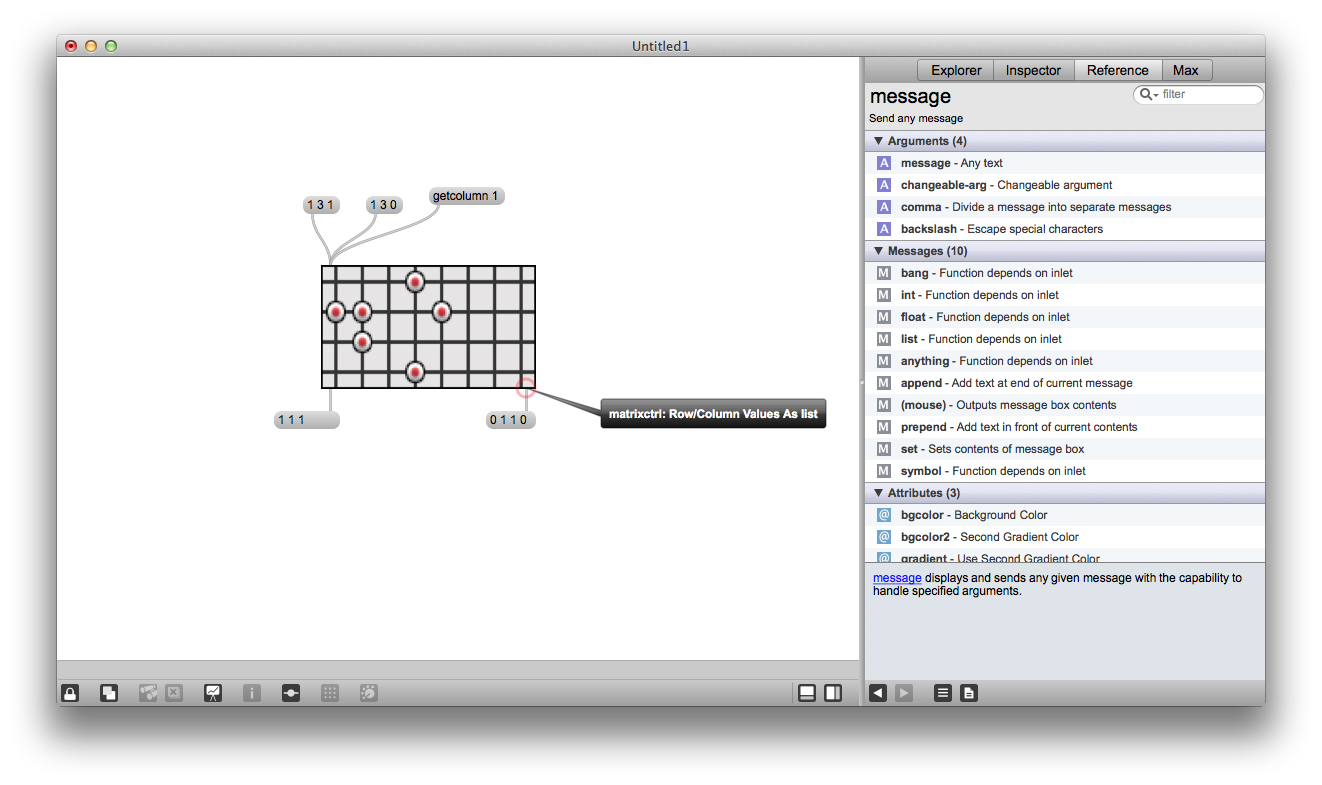
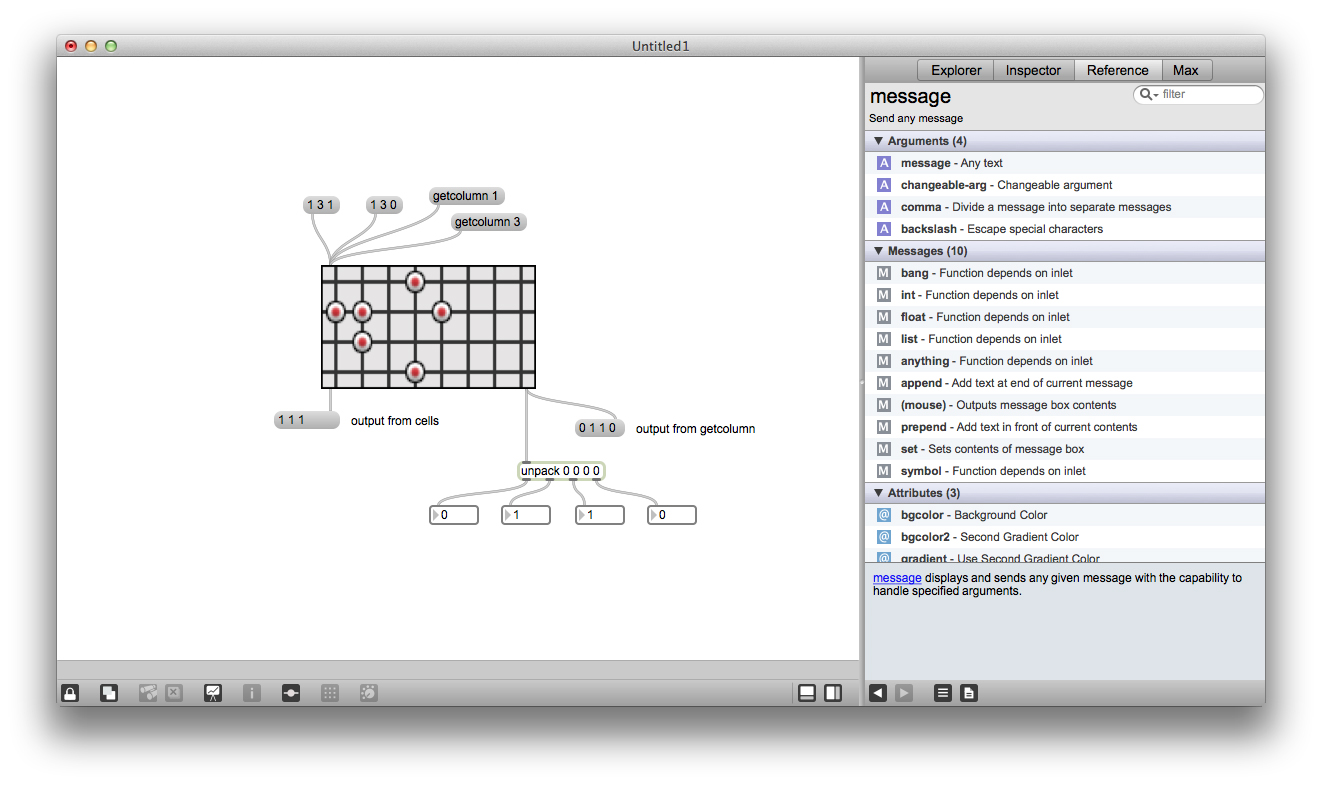
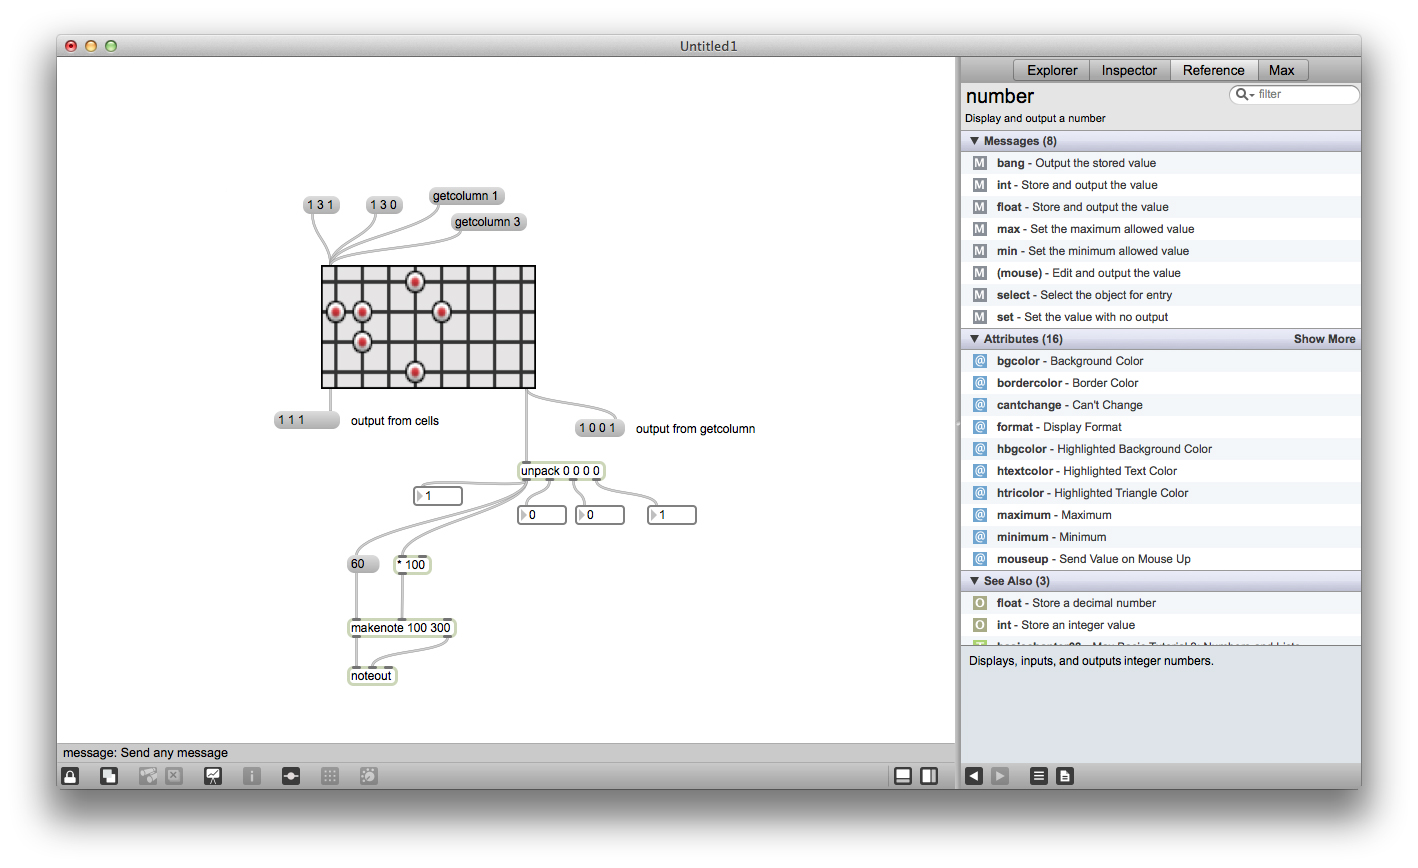
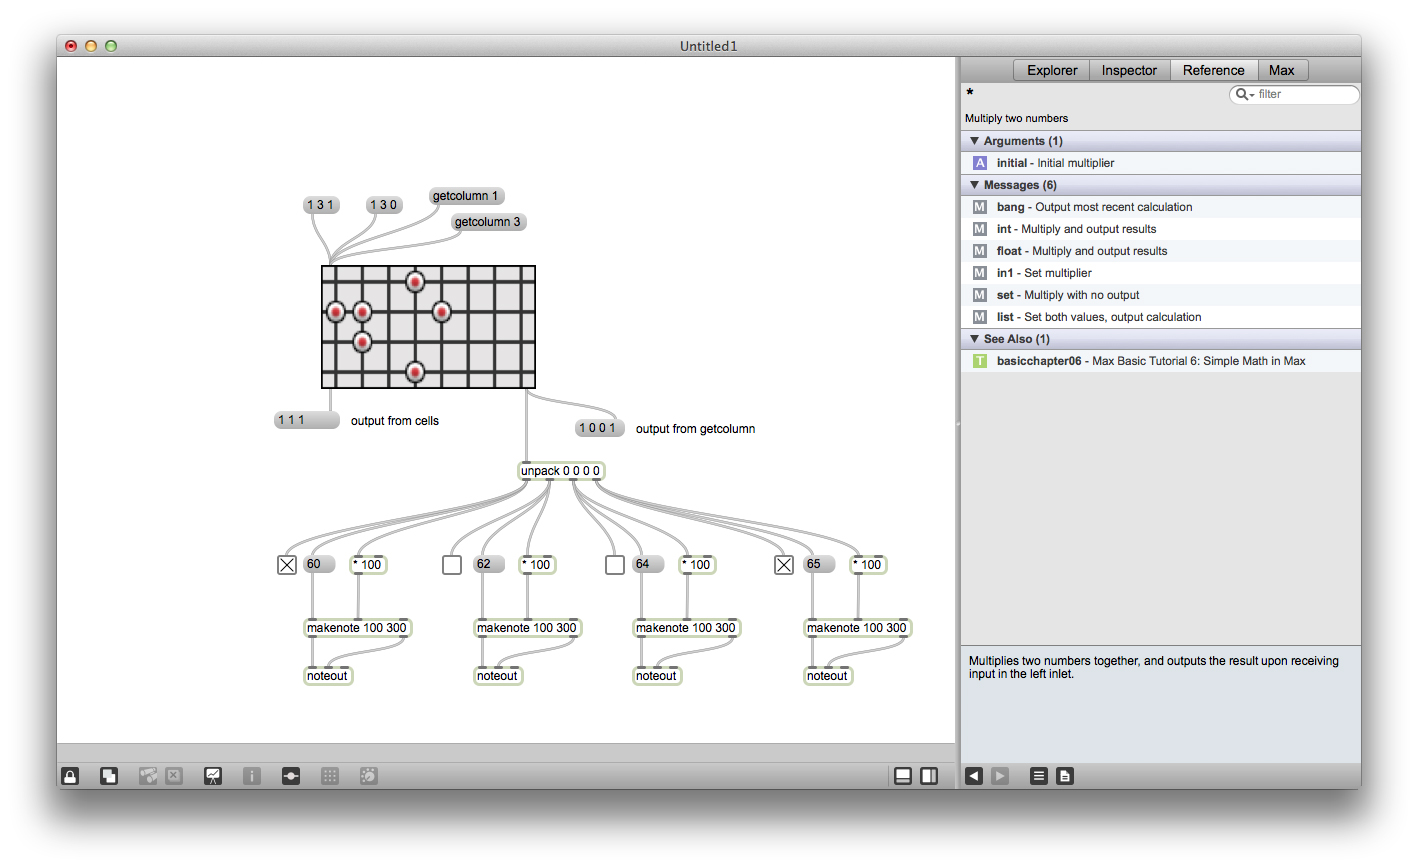
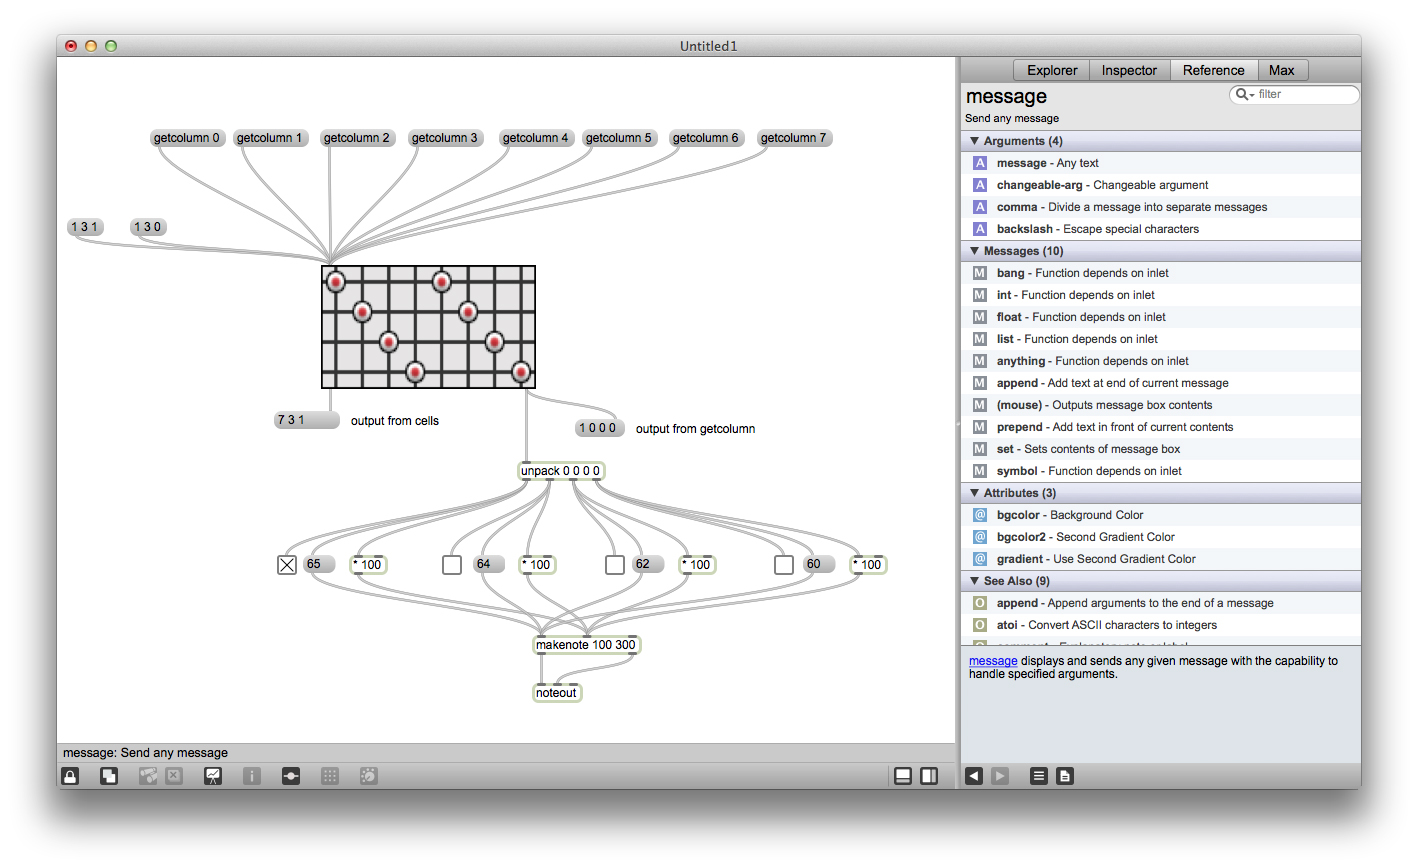
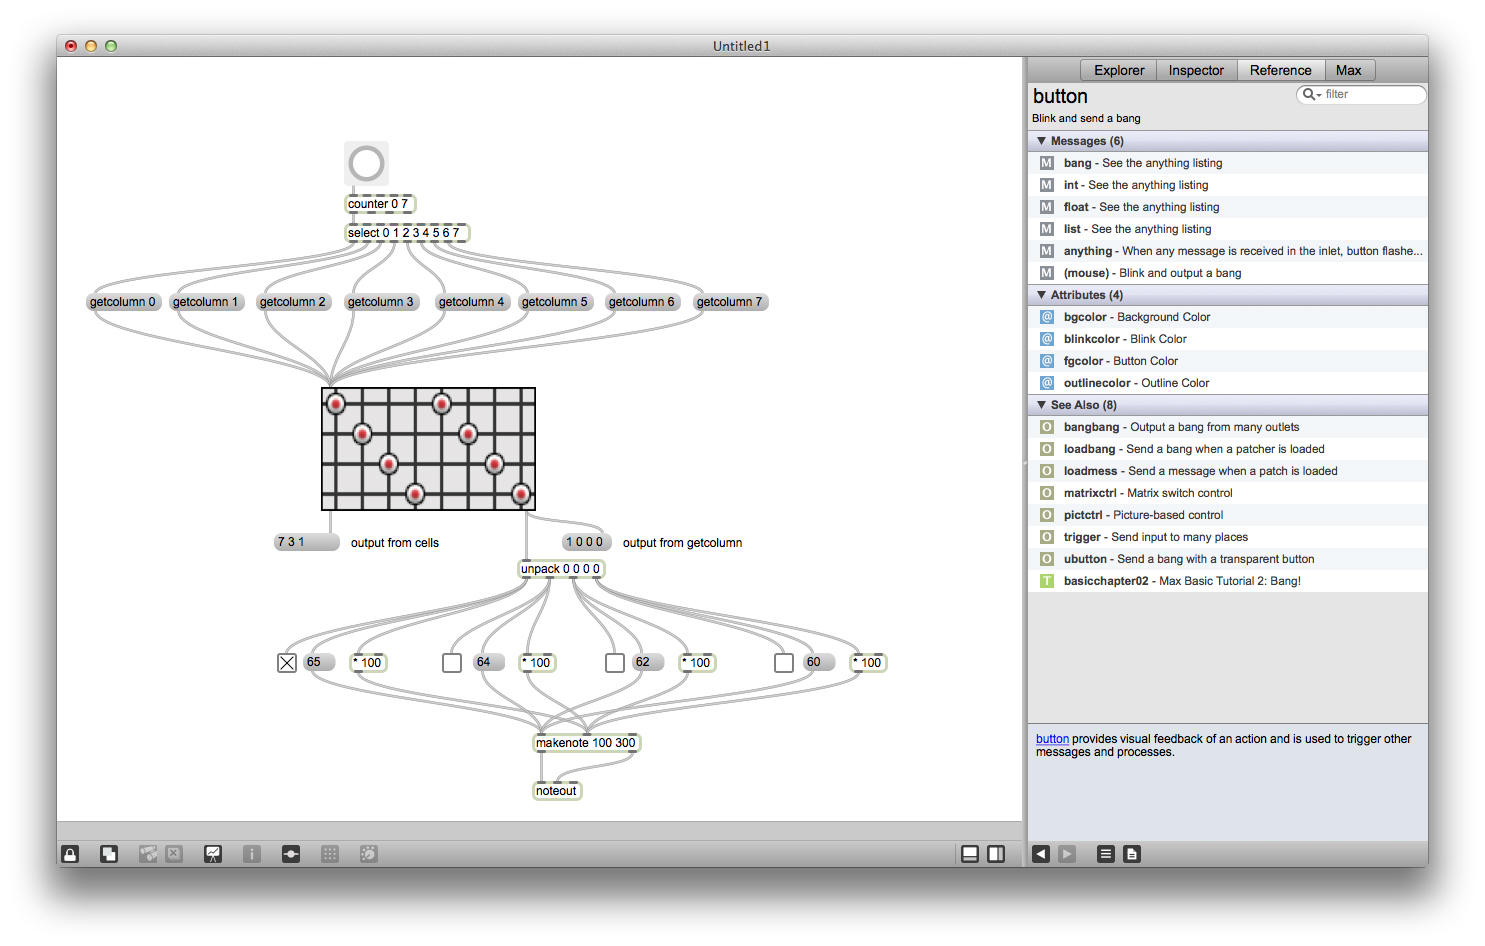
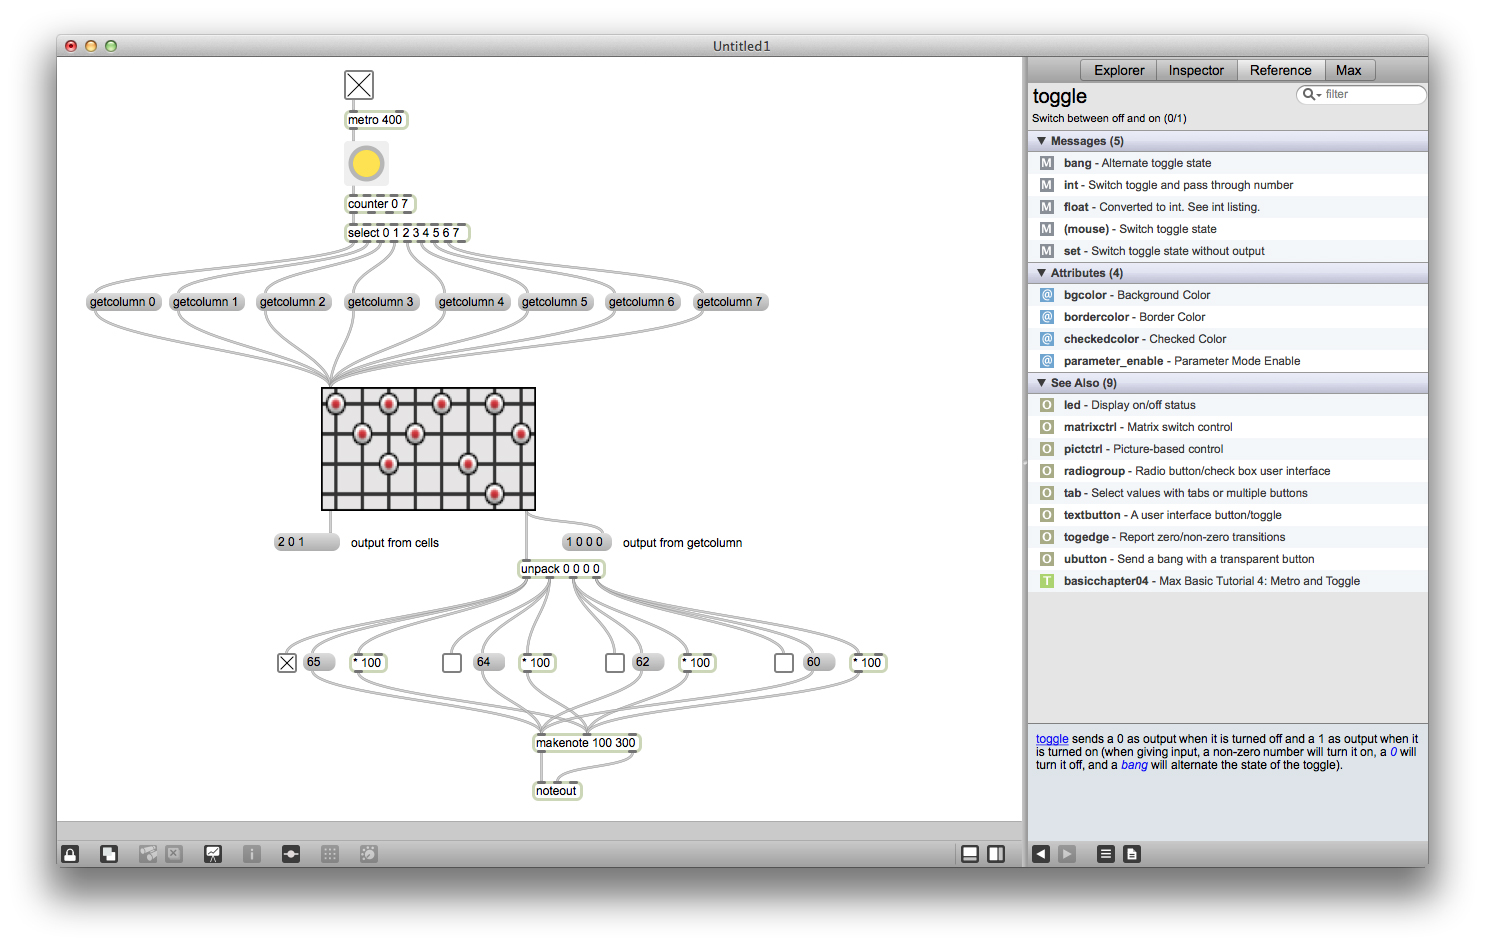
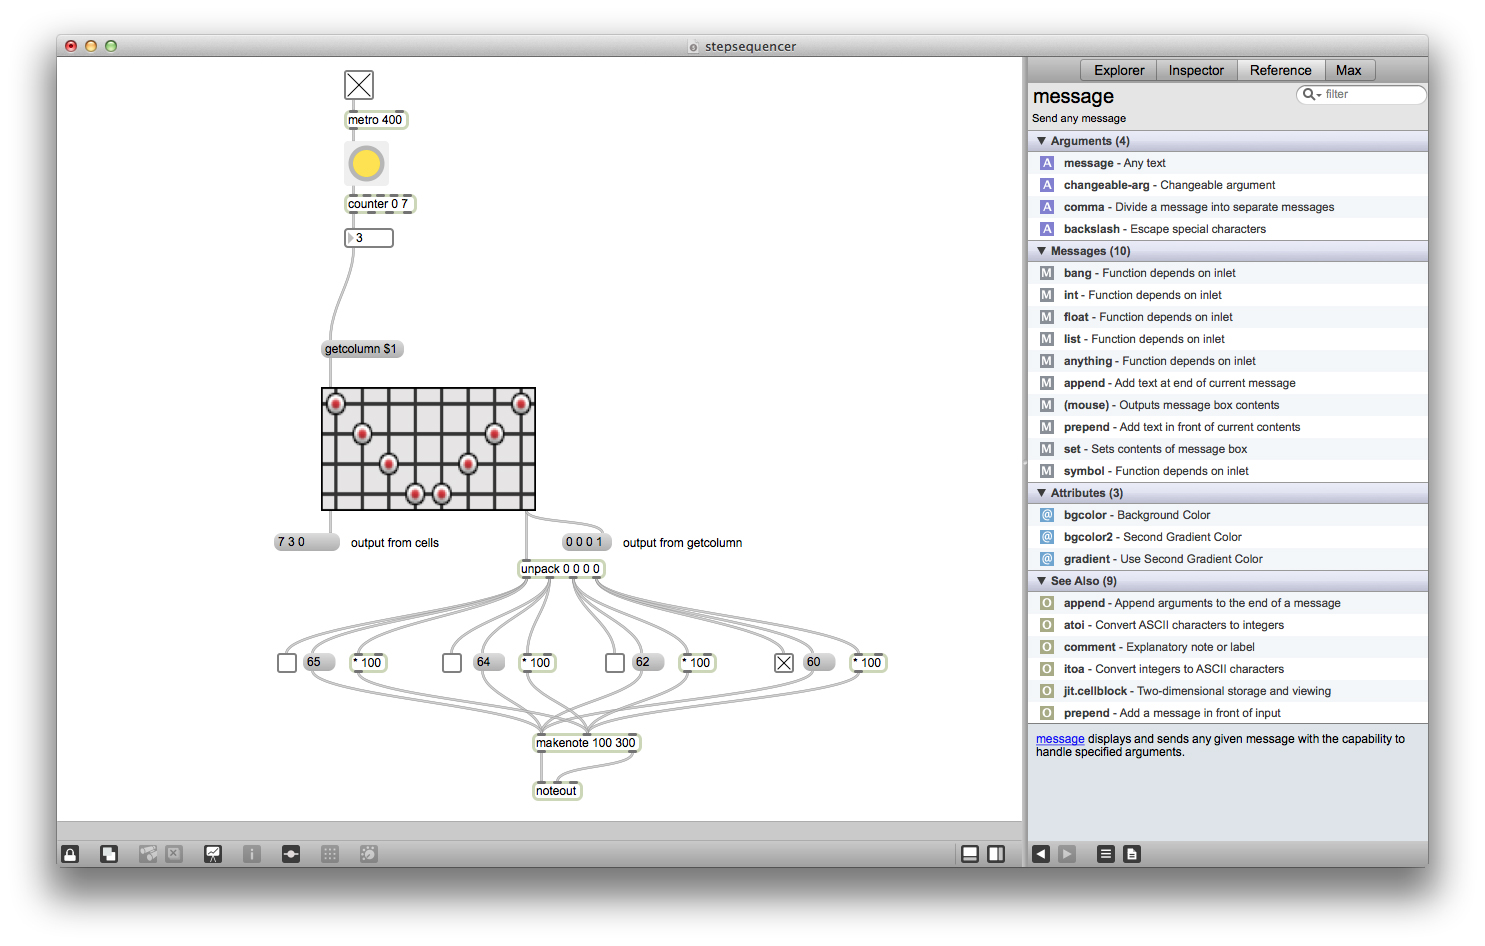
Matrixctrl is one of my favorite objects in Max, it's really useful if you ever want to create a grid interface or sequencer. Matrixctrl objects store an array of states and provide a graphical interface for interaction. You can send messages (lists of the form x y state) into a matrixctrl through its left inlet and read changes in the matrixctrl out its left outlet. You can also send messages like "getcolumn 4" into a matrixctrl to read off all the states of column 4 at once, these states will be sent out the right outlet.
Wire up a matrixctrl as shown in the images above. Send the output from your getcolumn messages into an unpack object. The outlet of the unpack will output either 1 or 0 depending on the state of the corresponding node of matrixctrl. Multiply the output from unpack by some number between 1 and 127 (I chose 100) and send this number into the velocity inlet of a makenote object. Also wire up the output from unpack to a message between 0 and 127 (I chose 60) and connect the output from the message into the pitch inlet of makenote. Wire up the pitch and velocity outlet of makenote into a noteout. Now this piece of the patch will send note on messages when it receives a 1 from unpack and noteoff messages when it receives a 0 from unpack. Do the same thing for all 4 outlets of unpack.
Create a "getcolumn #" messge for every column in your matrixctrl (mine has 8 columns so I made getcolumn 0-7). This way you can ask matrixctrl to output the state of each of its column in series. Wire these messages up to a metro, counter, and select to cycle through all the columns at a constant tempo.
Now lock the patch, turn on the metro, and click on the matrixctrl to change the notes in the sequencer.
----------begin_max5_patcher----------
1341.3oc0Z1siahCEG+5jmBKtb0ri72F165yQUUEgwSFZSfHvo6raUe2WrMI
MyLIw.N33UUEl.H7e+yGe74bL+b4hjU0uJaS.+E3yfEK94xEKLWRegE8+dQx
17WK1j2ZdrDU850ajIOXuU09skUajJy8P8WbWtp3kxp0esQVnruabp3Q3C.D
Qej.ObD7ke+dp2qd+Kp7ISSVu5a+oPjb7s2juUpjMeUVkupSJcOBr+d12g5e
1IsMaRYUm.9h9l+Z4R8gGFX2rR92cM6g1TIe0zQR5Z3lZ.EBObmmqqTsk+qo
8P3GgmiKXmbgY3BmoOhGGWXmpjpNxXt0mZJy2jbIprJuZ8zvxp8JUc0DG8So
5iT1giinWRmg9xEFhaka5DN.BP.Lf.n.FfCDiY7Ny87.N2bBKbLhmcFVfm5H
9CS+7MkvE06q5l+1g3QgU1.buXNIHNnJ8LTEMApp8tngS++mrylsx1170xO.
p0RUQ8l8aq.Gs+20HakUpbUYc0I.fQQV.X55v9CG69d5khHRMDkXrZEVa2zw
LAlKl.dmKXxc.SAZNgIi5MLSiHXJbAyrrYDlbKE8AlYQDLYNfIGSdjMavjxg
52tGvT.iHXBc.STF1BS3b.SbluFl7HhkXGrjvw1Y4z4fknLugIKXv7sIHcoI
xYFFQyDmkWCMvZAxl9PF+PDOiM+ANMr4UMH5vXlEfYPnWzoekVenCIBoCERr
1NDunCoKcLAyO7fum3YvYeZ6Z9zOQQQwG9C.B5ZQMAGoWTiZ8XdqcDKxLu8d
TRxFOJY7Ilm0McgMtSLh314XyCFo7SrHI1vPF05YrvkOkGFibbuwnXVh8GC8
0XDGEFitBthI3WKXAeyGUv70Xj7+AiQZGEYWNnBuycB8H1OqQZZTXM5pTSTx
UCNyWNhXmFUxTLGoYQk4n24Q56RtTQTXWwtU.w6EOo76sARUsR10BigHjqLm
w5AWfMIeayc5JlHvORDx0VH7Ft6Y4eWp655oG.x3lh3t+y6KL.xUD93y.foT
9+m2Tma1..6eLSkdg3pzKYlgcDiOKkwxtyJdT5E7ce119pc4EeG.s+aLFcnq
WrTyxflBeklM9sbB6wVN8wSSBXE0a2JqTefXcM6t8JvyM0aAExMaZOpzl0qL
9PNxqKXUhsE3hvXS1p7Zoz2W9rd6Q3Db4gg2VWdCAkGmTeYb5IXX15vd.LD7
3ACJ61BlK4gSuA6ib530xhAxNoiyfi2OEJlp2N5FgEDB44V5fn2crf0eLFNV
EDiXV+M3YYUPac16st3S.iAbWFyUMkuVnZ1L5BkxMQRPraHVOQQ5nJGdfToS
pRoaJaMKjYN+ldsok6td06+J0L5We82hh158MEGdsG9vw.+tC7jrUUVYrdN8
gXu4gdo7omjUmp3mJa0cBS+Dd1AkAqG1PzCMb5gND8fBmd5REAHbnG8l1GR8
vcomzvpGlqwKXX0C0EeDgUODG5QmSRH0C1EeXgUOHG5AQCqdb4+gGvwKzP7G
hClddmqtyqmv494cd5t2x4cN5t6zQDWxgEWxgGUxgMD4nKL3ItKmU8HFpdBD
evQFeHwEenowEenYwEez02zYjXbZX0iyHwHgUOthDiiCqdbFIVjY+v3QldDw
k8LCGY5IxleQSiL8jEWy2o7HSOga9EUDYquyiq02ICY7hfCqdPCQOgY7BGWo
6jN.5fQQkbzaIWfFrPznavxkZxlHbraoR9tc+P1z1+JMBIYa92paz+j+f4mk
U1eZ1ynjF4OJO77luFmj7lhWJUxB09F69Y8ZJOYotc90x+C.Do7pp
-----------end_max5_patcher-----------
Downloads
Logical Operators: If and Else
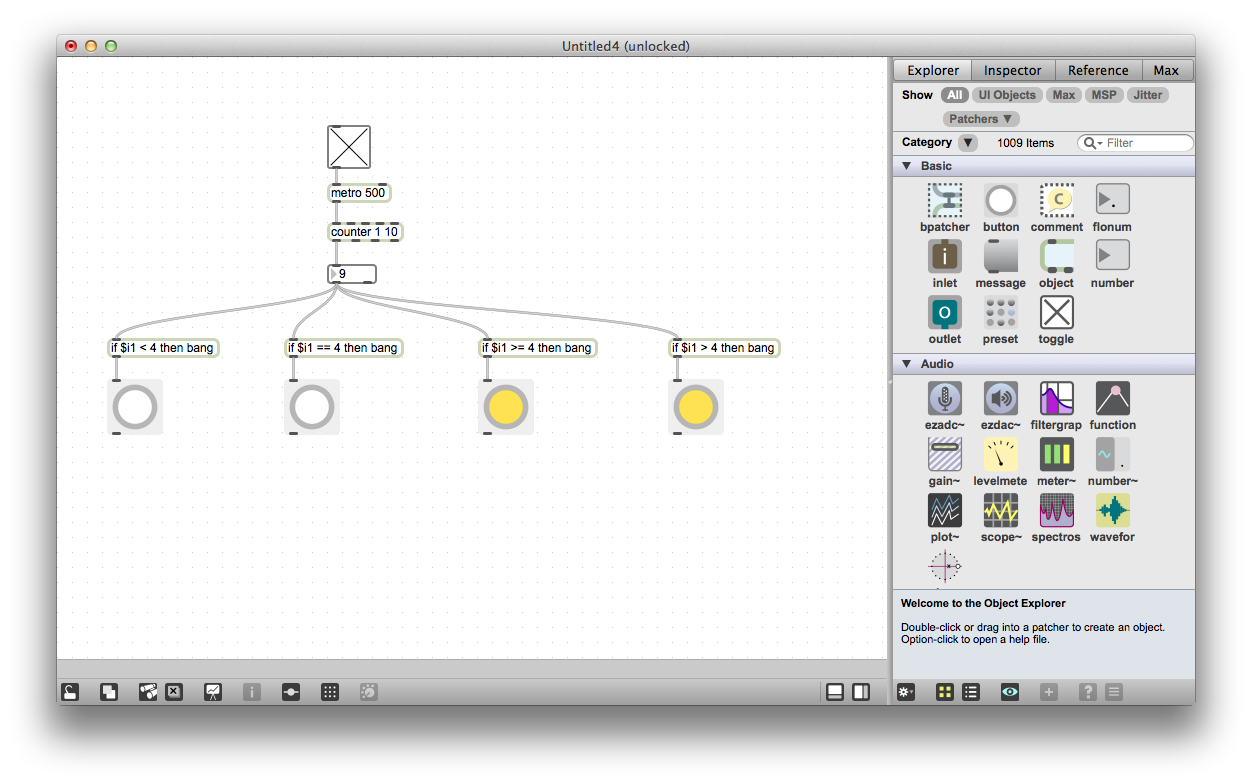
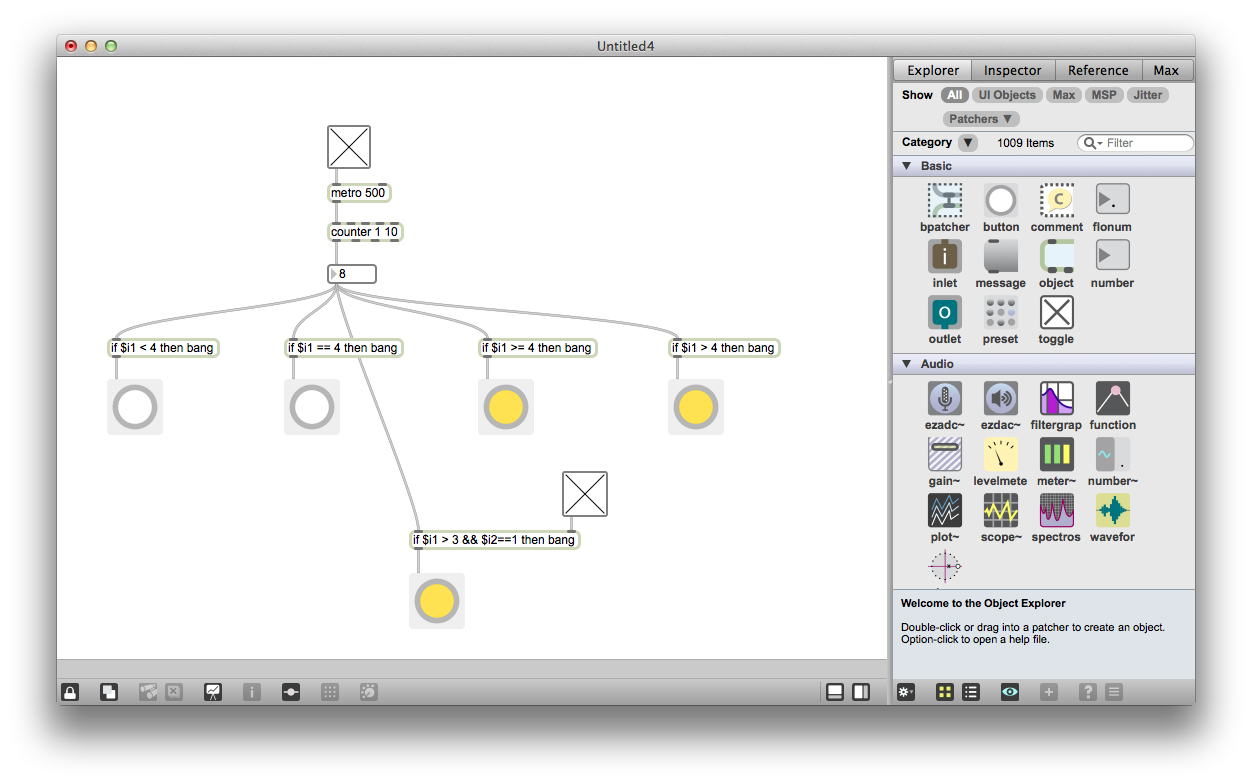
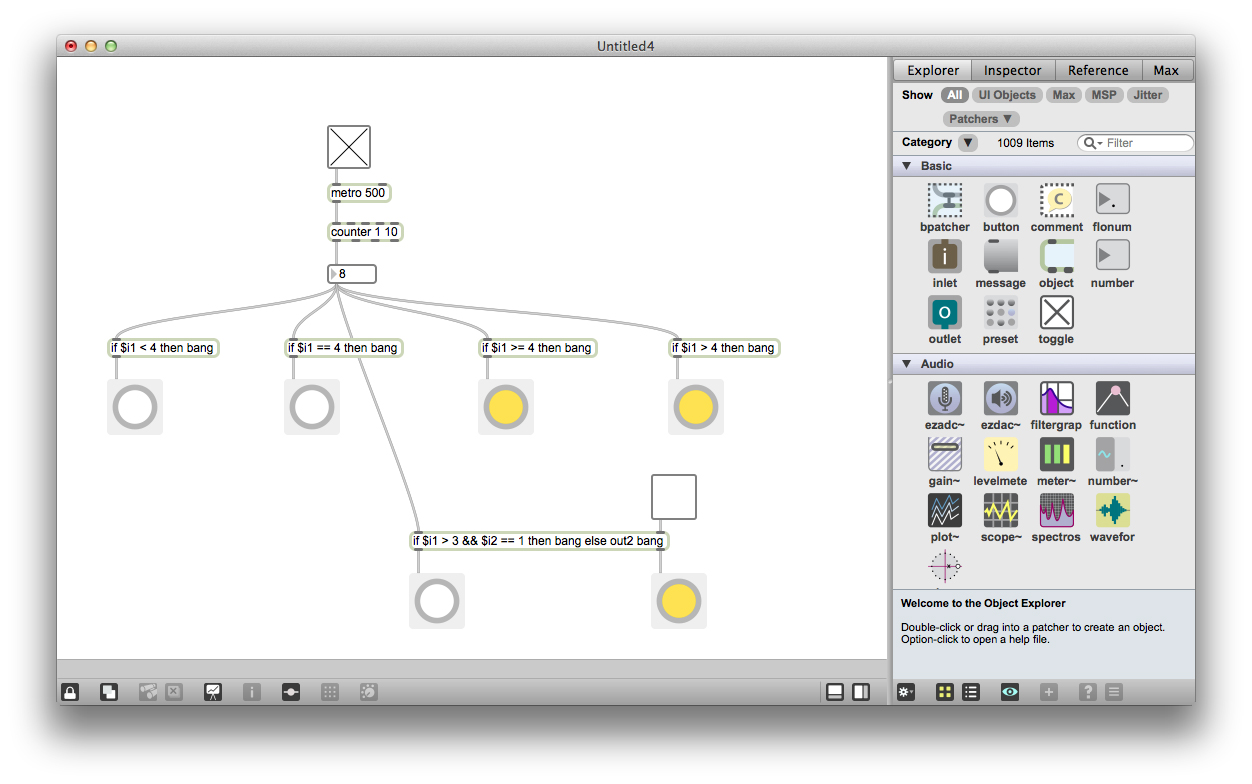
Logical operators can be a really effective way to route messages through your patch when no other object will accomplish the task easily. Copy the patch below to try out the if object for yourself. In this object you use the placeholders "$i1" for inlet 1, "$i2" for inlet 2 and so on, you can create an many inlets as you need. You can also create a second outlet by using the placeholder "out2". If you want to compare things from multiple inlets, use "&&" for "and" and "||" for "or" - if something1 and something2 are true or is something1 or something2 is true. You can also use "==" to test for equality.
Another great logic object is the gate. It allows you to selective open and close connections between objects. See the help files for more information.
Another great logic object is the gate. It allows you to selective open and close connections between objects. See the help files for more information.
----------begin_max5_patcher----------
749.3ocyXssiZCCD84juBKqp8ozpXmqTUpT+NpVsJ.dY8pfCxwYKsq1+85LI
gaEHl.xMOfM99YNy3iG3cWG7rhMrRL5qnehbbd20wA5ptCm11N3UYalmmUBS
COqRoJDXulgVKYkLgJSwKDOIYyUMaUTZ3W78PQjI0U9sEnG6VUlZ9Kbwx8Ww
j1UDCUaK2tFQ0JtHmo.TPZ6ju.vTwrW+LYBd2LKpTGO0ltT+dMq4.wyxDKwn
GqG8CW25Bu6IEDD4umAYBEDDQuQJH0ZTfpX4xbFtW+YHIAph6JM2XR1s6xrU
LES9DSjMKG.u+0YnbgZX1of8KMX5PhhsALOL+Yzm3Dz2QAnGdP+UJZ5TDAod
gIP0jJhkWxPZXPgl3dc5gI.cQiIPk+4HJ5IHpnts+4BgRnoJXneH4Y4mNdfd
NZB6o+r8fq2tR9efAIZTND5qZ0Ll7BlOMwuwfgvjH+Ka8mJLIreq27.H5kBf
71dg49QPFIkDSRq4k.J0TojPJYuULDojfwkZZX.XCAlqlFStUJfZMJnGUlon
vcRK3d85zTnhPGvsI+qUK4rrw8UGoGYXy3m1PhN9gDb87CYbxOFcGhFesxHM
5wC+Jz+sTxNwCMzjayVRGIpAeyvf812RGdrd73LTu2LOaSonIXOLrqzX6NZD
m2oFNxBsq0ue6mPgX73nqNgxf6li+tmtzYnk4EUBseRmANwDlogSRRtLyD8u
LC8ZYlvdxmr6SSbhsdubpoITzJZdKITXWQDXN3bt33+SCv3p6+PRqrnRNu6D
594Dncl2BVohKfGR2eRQGLoW3KVvD6qNrfWVKX.zvoceFimDSwCwN3IxD7jZ
O94PS+L3Yh0viIzSf0PSfAngZOekQ2s7GY3gLtvS7HidrFbnlflP6wN9lfG6
cU+n3zyfG6cYO1.3XOYYSHmg9nUSNGYqW+FSV1tk.Pzoj8ZgrtYrGzjKZZB4
3fkr23cyO.5ISpS.Soy9pR1jmzlzXra847g6eInTfqH
-----------end_max5_patcher-----------
Downloads
Floats
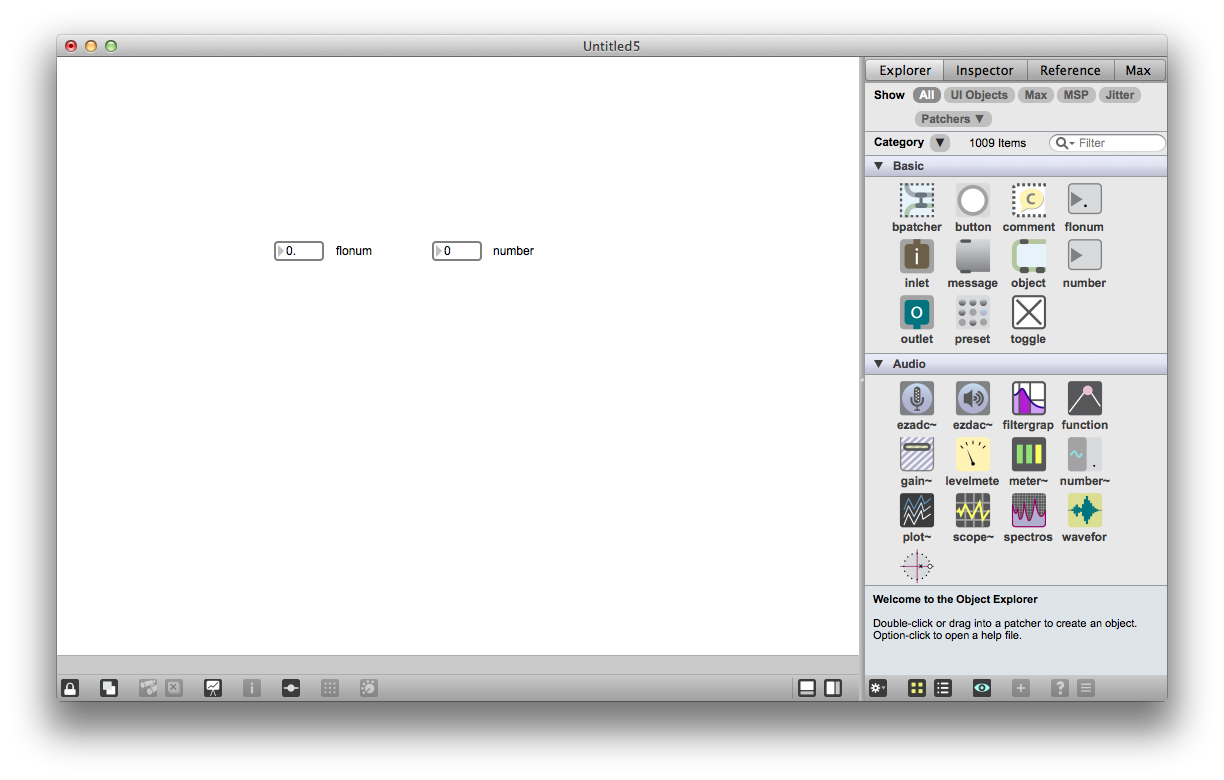
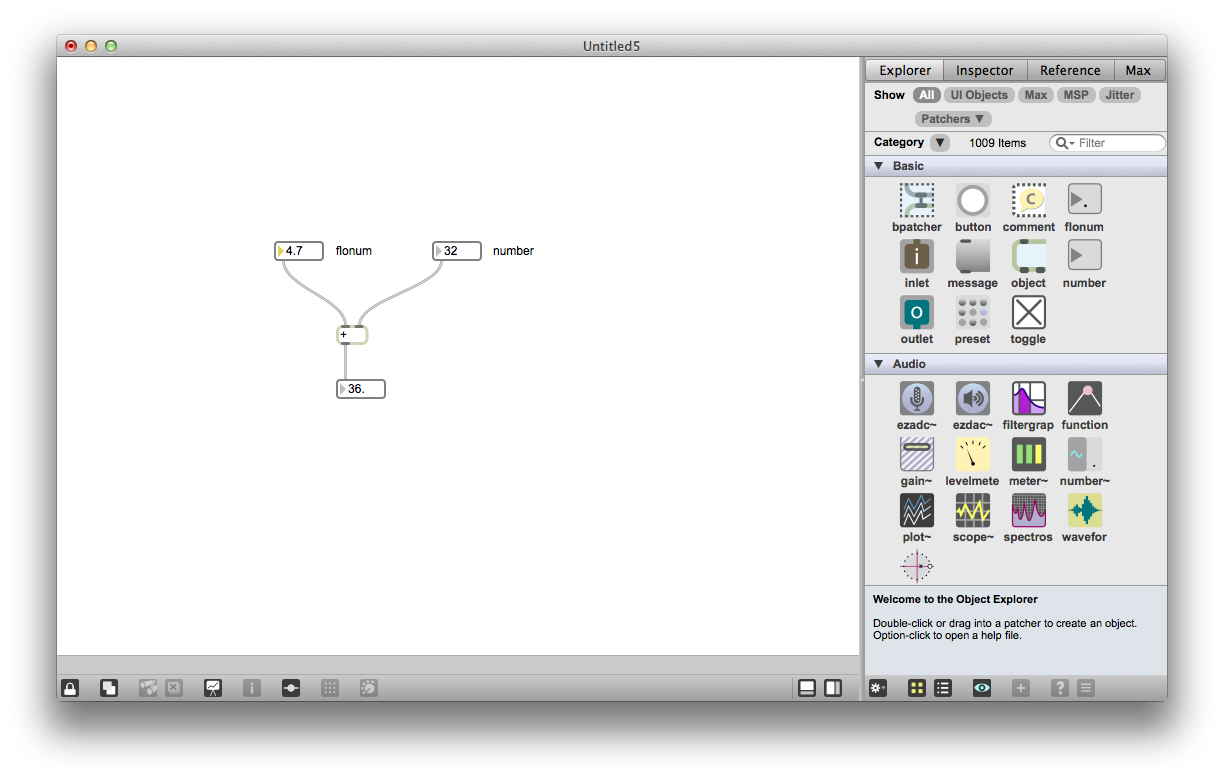
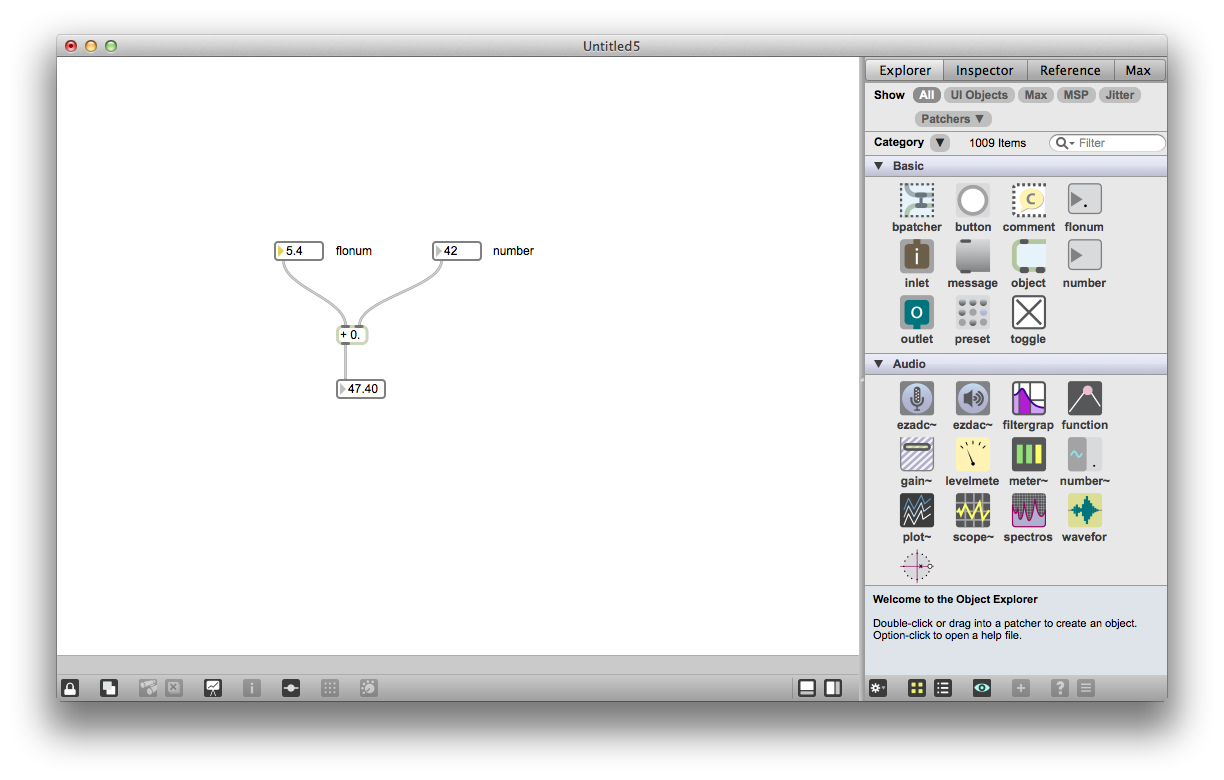
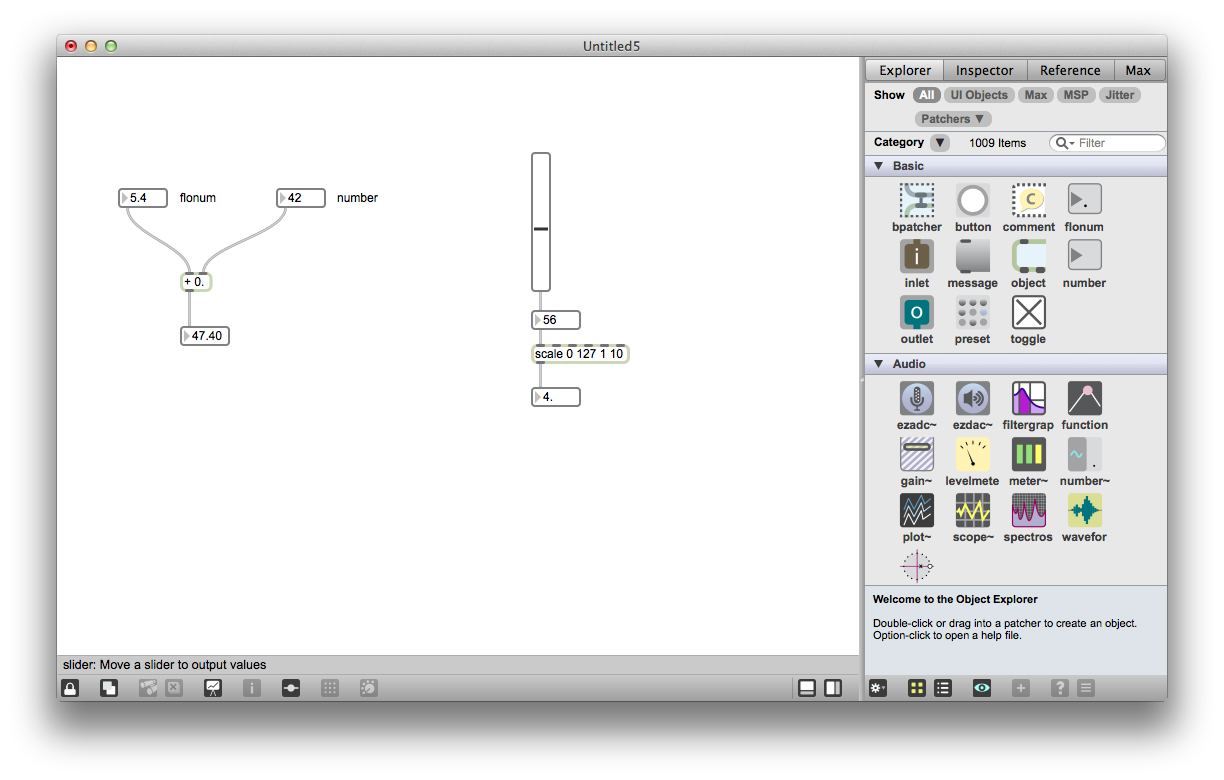
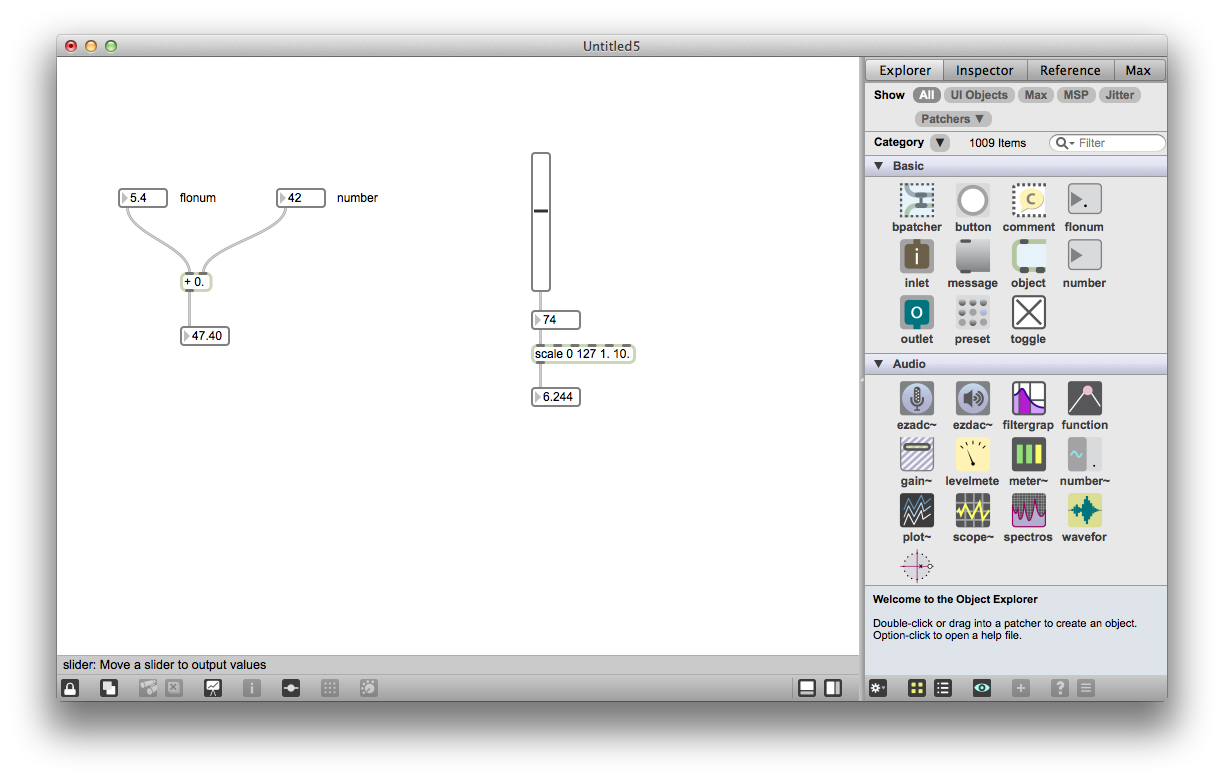
So far in Max we've only been passing integer messages between objects, but you can use number with decimals (called "floats") too. To view float in max, create an object called "flonum" (short for float number). A flonum is like a number object, but it displays floats; if you send a float into a number object, the number object will round off the message to the nearest integer and display an integer.
Try setting up the patches shown above. Notice how the + and will only output integers unless you tell it that you want them to output floats by setting its optional argument to a float (I used "+ 0.0"). The scale object is useful for converting one range of values into another range. But again, by default the scale object will round everything to integers unless you tell it not to by setting its optional arguments (notice the difference in behavior between "scale 0 127 0 10" and "scale 0 127 0.0 10.0".
Try setting up the patches shown above. Notice how the + and will only output integers unless you tell it that you want them to output floats by setting its optional argument to a float (I used "+ 0.0"). The scale object is useful for converting one range of values into another range. But again, by default the scale object will round everything to integers unless you tell it not to by setting its optional arguments (notice the difference in behavior between "scale 0 127 0 10" and "scale 0 127 0.0 10.0".
----------begin_max5_patcher----------
562.3oc2WtsbaBCDF9Z3oPitstLRhS18t9bzoSFAn3nLfviPj51L4cuRKfO0
DL1MglzaDCKKq18ie9G3QeObV8VQCF8Ez2PddO564AgbA75O2CWw2lWxafzv
2VVqZqvK5tzFtI+NoZ8MZQtoqLQoQAjEnvPh6PLrxrqnu2eO1aWpJEFndz9f
xBn50Y2+YZzP0usVYT7JAboupk7x86q1F2Hz2HT7rRHCx95W2ZF1.VeztPle
tQz0ltAgavKP3LtZMdW241yF4ufrnr.hK5S99tkESDQJwOrywPqZDaAxfax4
kBDwV0TDM.QIAmmhrkotCTR73XL4YvX34w3wnh9Rn50kNsUYB8DF83vqU.wl
EAjT81HeZJkESAPq1oIrBjnKBPzKGCiINthg7r1HTF73mkr5ZUAj+OsQ9DZT
iiAtQA0QHKHdLtw9Sts5Uy1nCMyp2AiBxEZH8JUMK+PacjWWUIb09DMyIbSK
ZrYwMxZ0g1JVwhicKAADoeYe6oWmAiZ.YD9mlbH+iuX9mbopOxaO8N1qZRbf
djNLJ8h4P7+PNbVu4D5e2KYz2oNyPN3Ro5zOIFXfK9wTqotUmOrcCe4AZOGJ
DMFoBdO6vjBOJo6jEEB0gyWgrwMx.ud9meSteBmR+DMe8CcJ8Ca95mIzNqls
tY4D6F5rzMqlxiJxUBmt2z3a17fP2zWSnSrNQ2Wq28KMXqQR2ofMBVKdPNje
HDgqstSFq0TqtyFY6xDruaedx+2.MU.bq.
-----------end_max5_patcher-----------
Downloads
MaxMSP and Audio
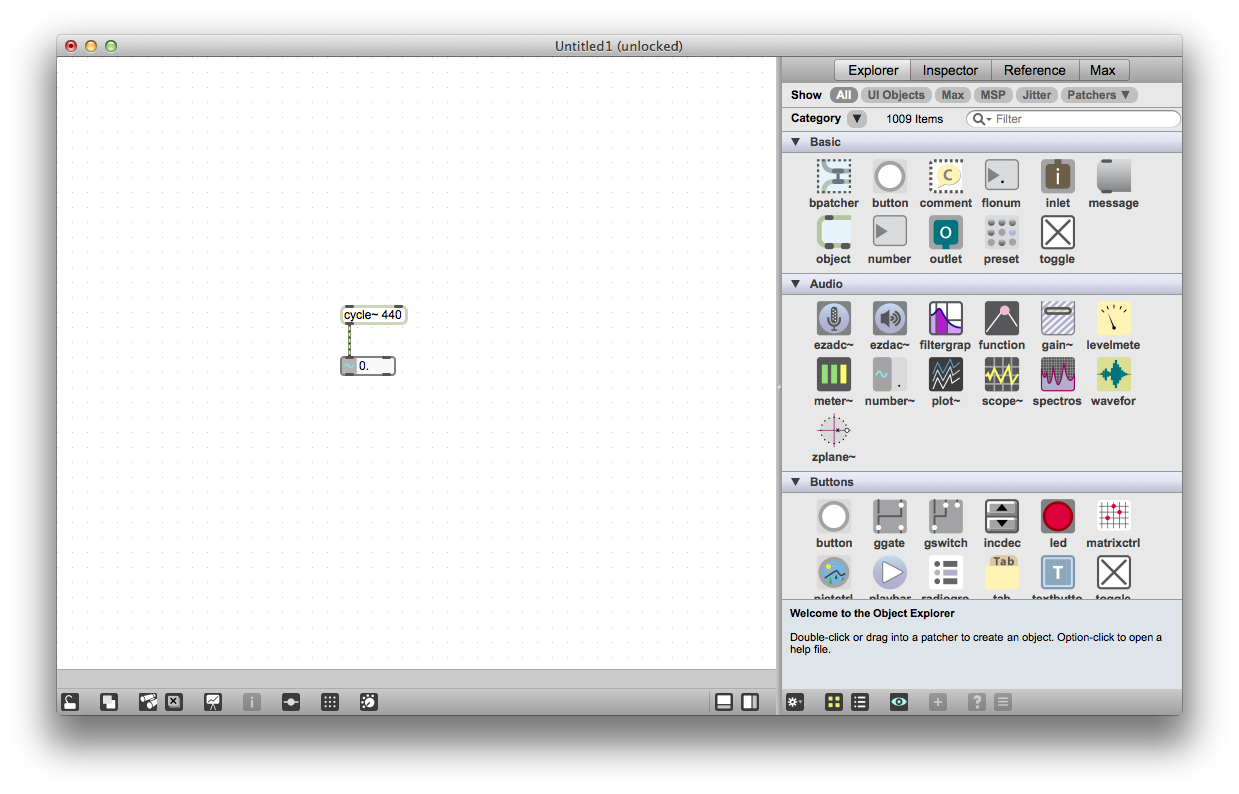
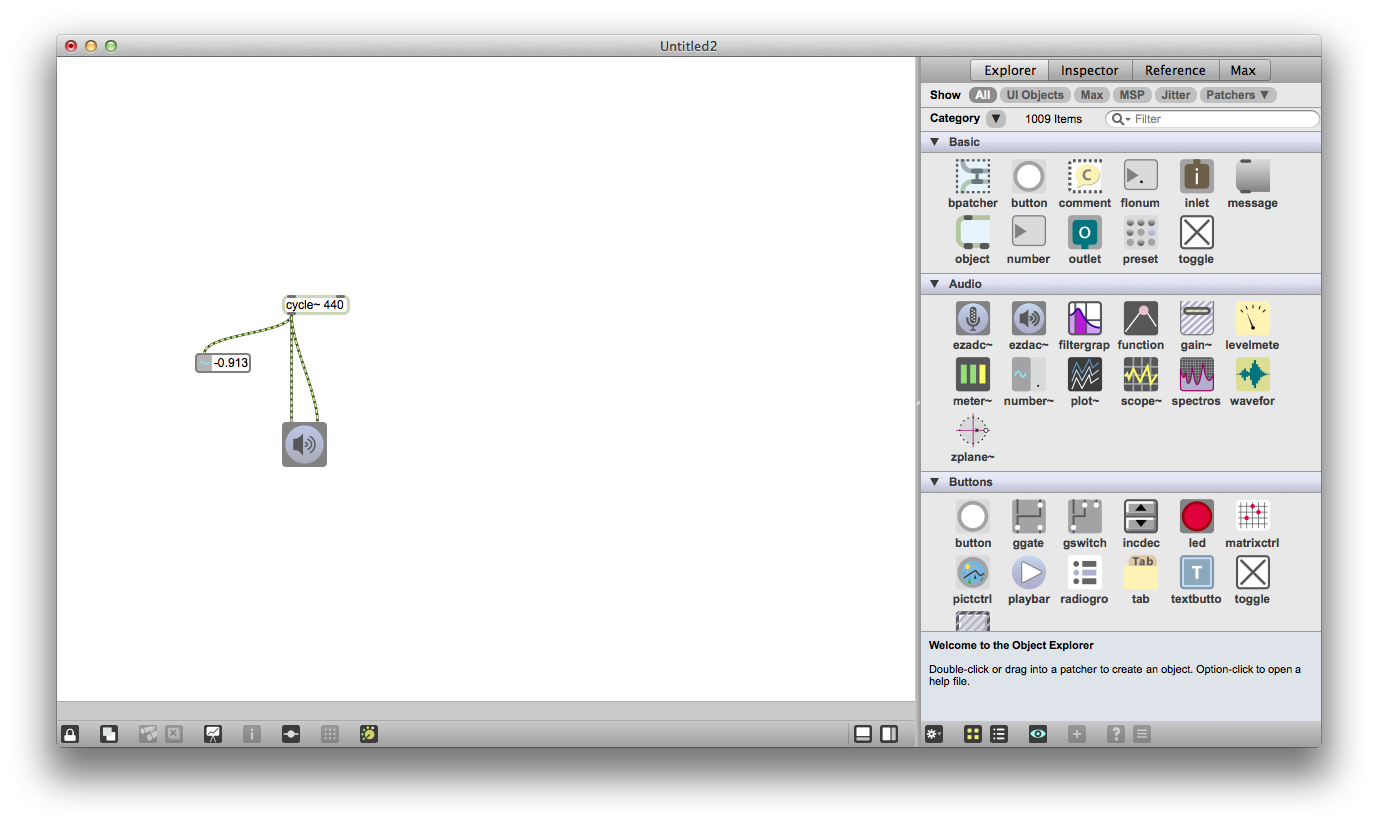
Objects in Max with a "~" at the end of their name are audio objects, instead of working with discrete messages, they do realtime digital signal processing.
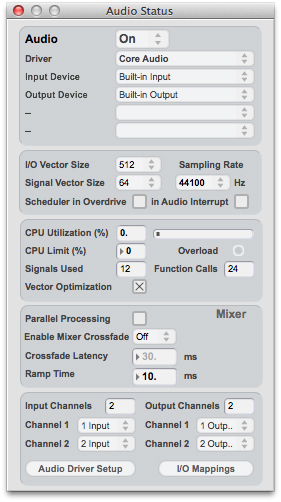
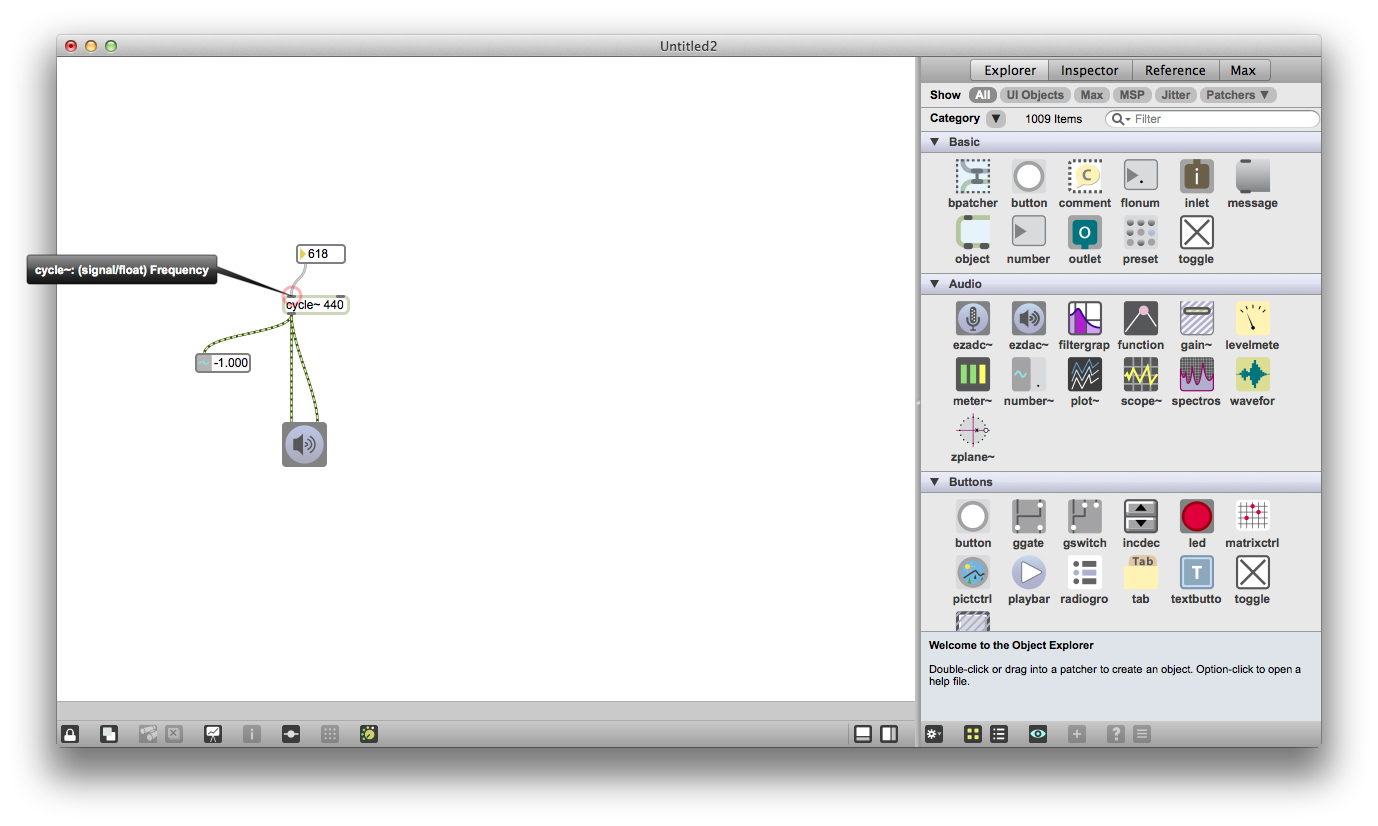
Create a sine wave generator object (called cycle~), set the default frequency to 440hz (A3). Connect the output from cycle to both channels of an ezdac~. ezdac~ sends a signal from Max to your speakers, you can configure the settings of the dac (digital to analog converter) by going to options>>DSP status in Max.
To turn on the dac, put the patch in lock mode and click on the ezdac~. You should hear a constant tone like a touch tone phone coming out your speakers - that is a sine wave. Use a number object connected to the left inlet of the cycle~ to change the pitch.
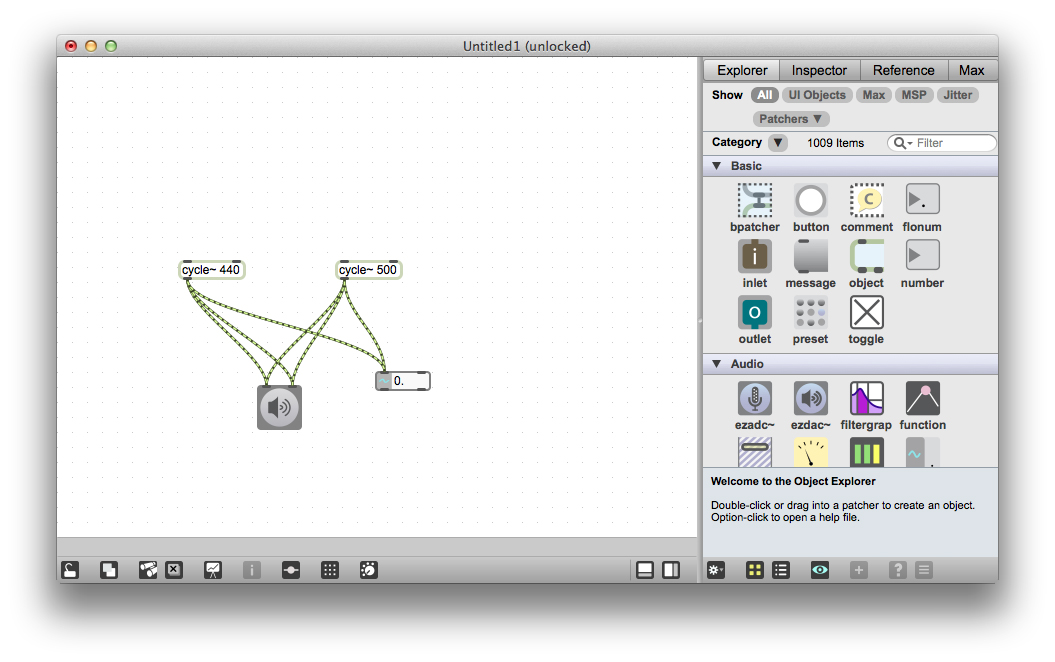
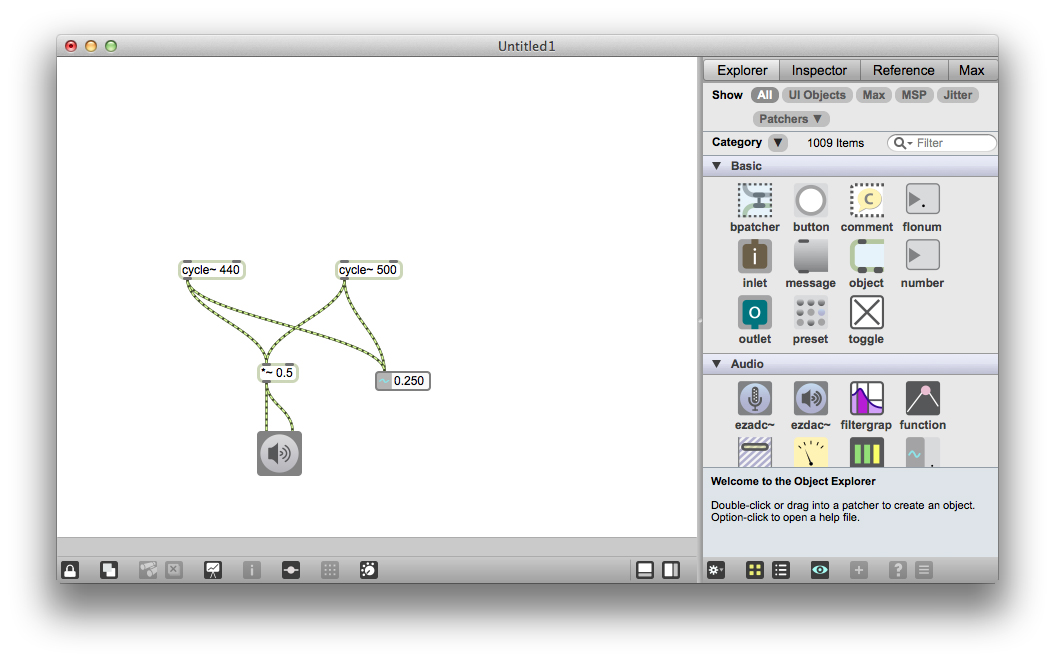
Try wiring up another cycle~ object of a different frequency to the ezdac~. You will hear the signals coming out your speakers, but they will be heavily distorted. In Max, you can only send signals between -1 and 1 to your speakers. Use a number~ object to view the combined output from the cycles (notice how a ~ is added to the end of the name, this is a number object that can display signals). By default, cycle~ object put out signals between -1 and 1, so two cycles object will combine to put out a signal between -2 and 2. You can scale the signal back down into the correct range using a *~ object. Make a *~ 0.5 to scale the signal down by 1/2. Wire up both signals into the left inlet of the *~ (this automatically sum them together before sending them into the object) and then send the output to the ezdac~. The distortion should be gone now.
----------begin_max5_patcher----------
493.3ocyUEraaCCC8r8Wg.ONjEHY6X61a66XXnP1lMUENRAxJcosn4aeRz1s
oCootccA4hDDME4iO9D8iwQPkYK1ArKY+jEE8XbTDYJXHZ3bDrRtstU1QtA5
MqpPKLq+SWaztN0CX3Shj47AydmLabsnitSxf00RW8MJ8xqrXsqOmhDg+RLw
hKBaK3g0D+J6WC2Q0PY0Tc62KgmiiUtBcn8JTKqZojOl49z5teM1m.PocvLF
TI0KgmiZ.1ZeLnX+CqR1BufbkdD3hfsmhiCKylJ+f+1C1wv4vsTkBeaGiOew
Gh1DuMskvIlJkmG1xRNFsU.uE0zoVp8U9GkUR9LrBoZ1MFuUlFbekw+pLJUT
R7gHijQ4GiOxGAgu7Ikyb96PPd4y0sFo6zvTGV+TeecKty+Bg+kogJJ6oozv
Vd4w3rryAMD9PirdGbv5j+9uUJHsQ1hw0CUmomn1XV1WVabXB5jZih+msQ5t
PqR+2+Og.cv9qoqNyFa8X9GluydA1MXmSokNkQumOhW4yMplFTue+uQ0E9i.
Ux7C11lJZJl.Z7xEl3rBMmFtQLAzTbxPS1YEZlB2jeVwMeVzz+fWtd8cnsaH
jDP7SBu0XCGymQGU59izXLvh2oF8OkrHs9oZN+HsM19INaKyg3PddJ9OHAxa
iC
-----------end_max5_patcher-----------
Downloads
Frequency Modulated Synth
At one point I actually built a pretty cool analog synthesizer with some friends, I made this video for my electronics class to show how synth patches are constructed:
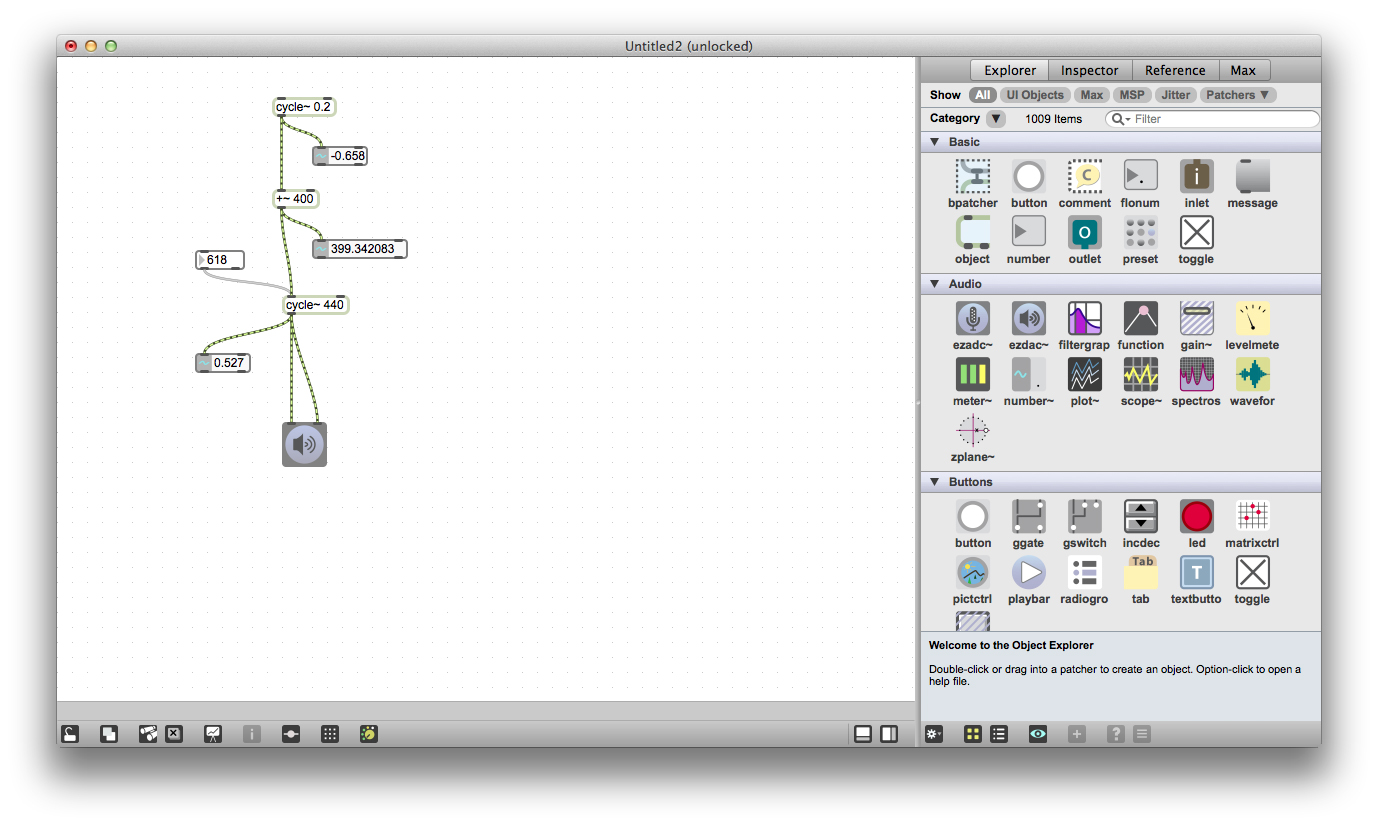
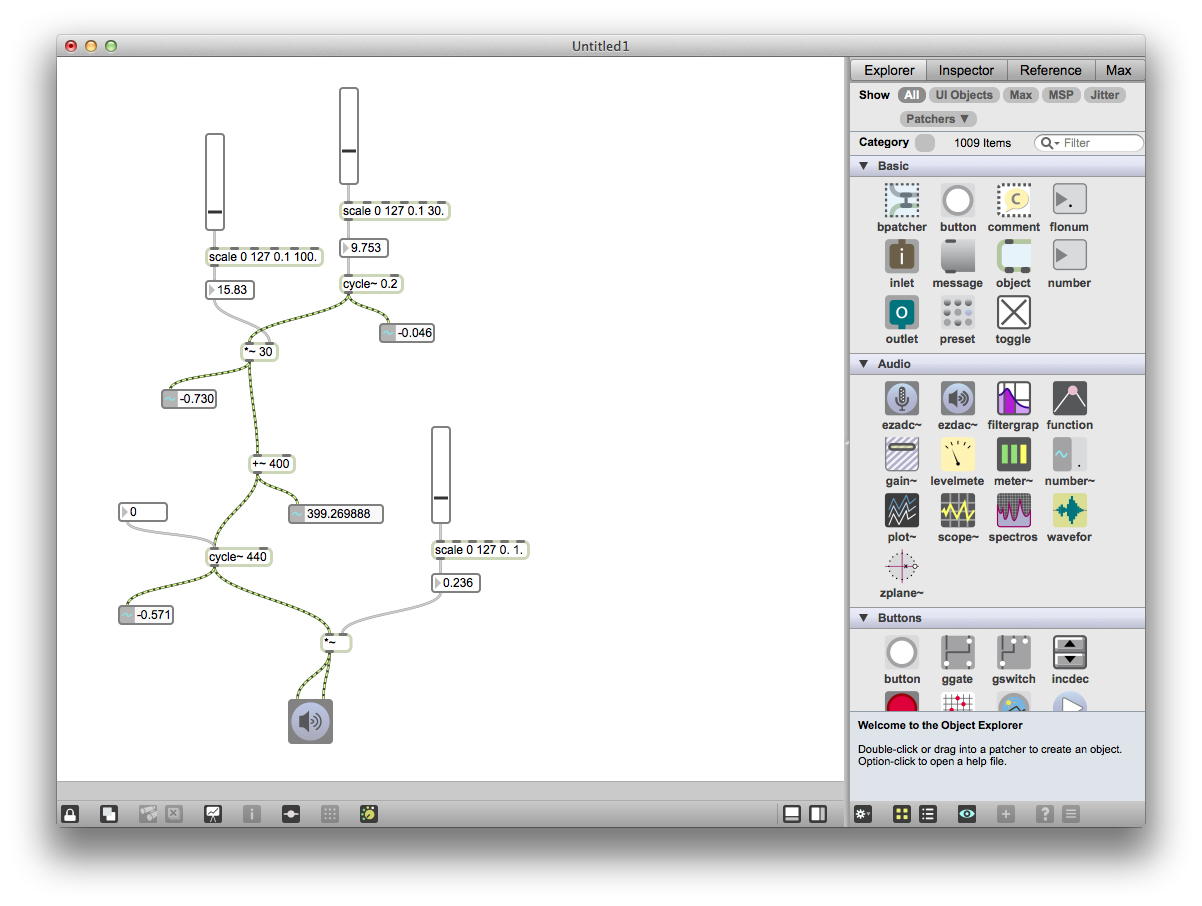
If you've ever worked with an analog synthesizer, this next project will be very familiar. We're going to start off with a simple sine wave again. If we hook up a number object to the left inlet of the cycle~ object, you can change the frequency of the sine wave. Put the patch in lock mode and drag on the number object up and down and listen to the output, this is called "frequency modulation".
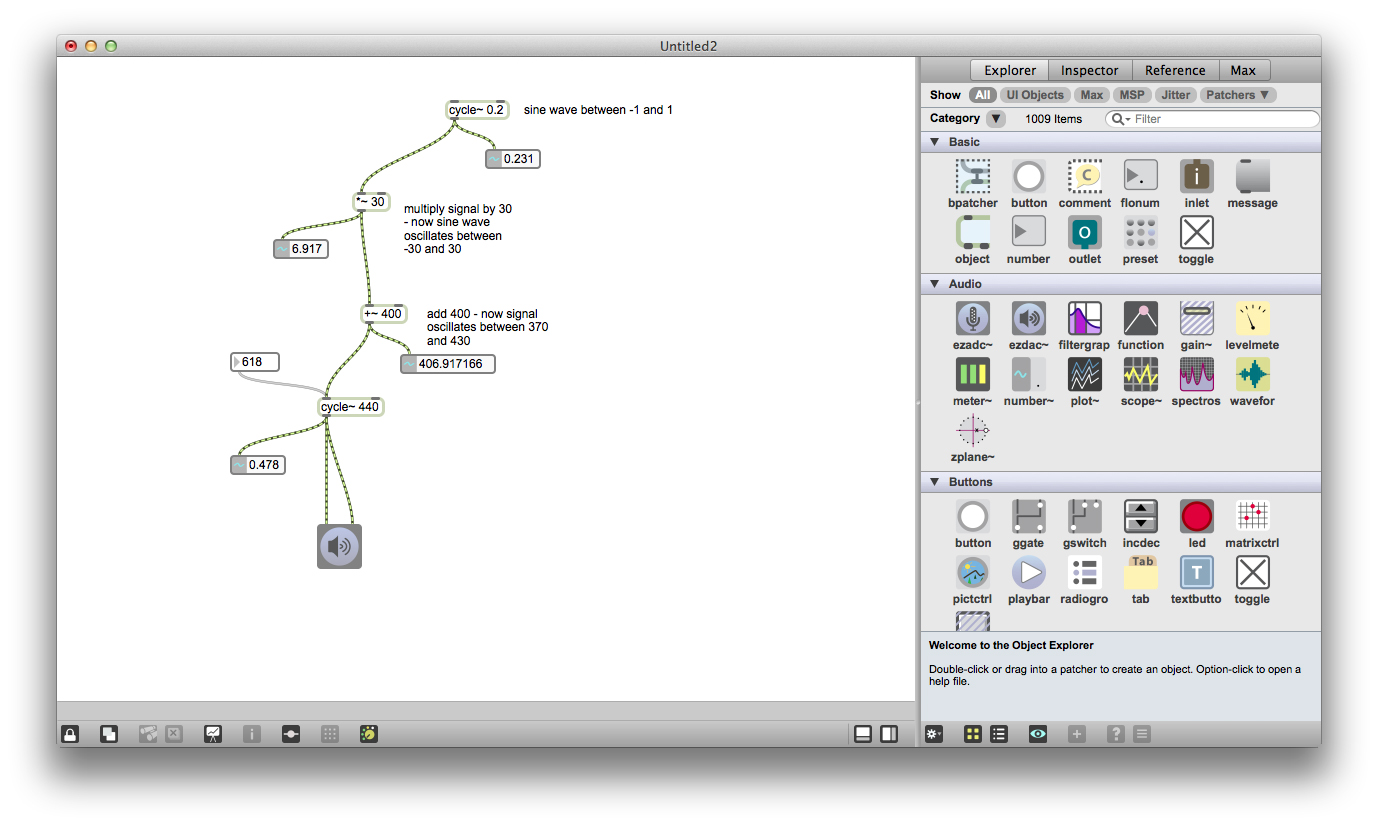
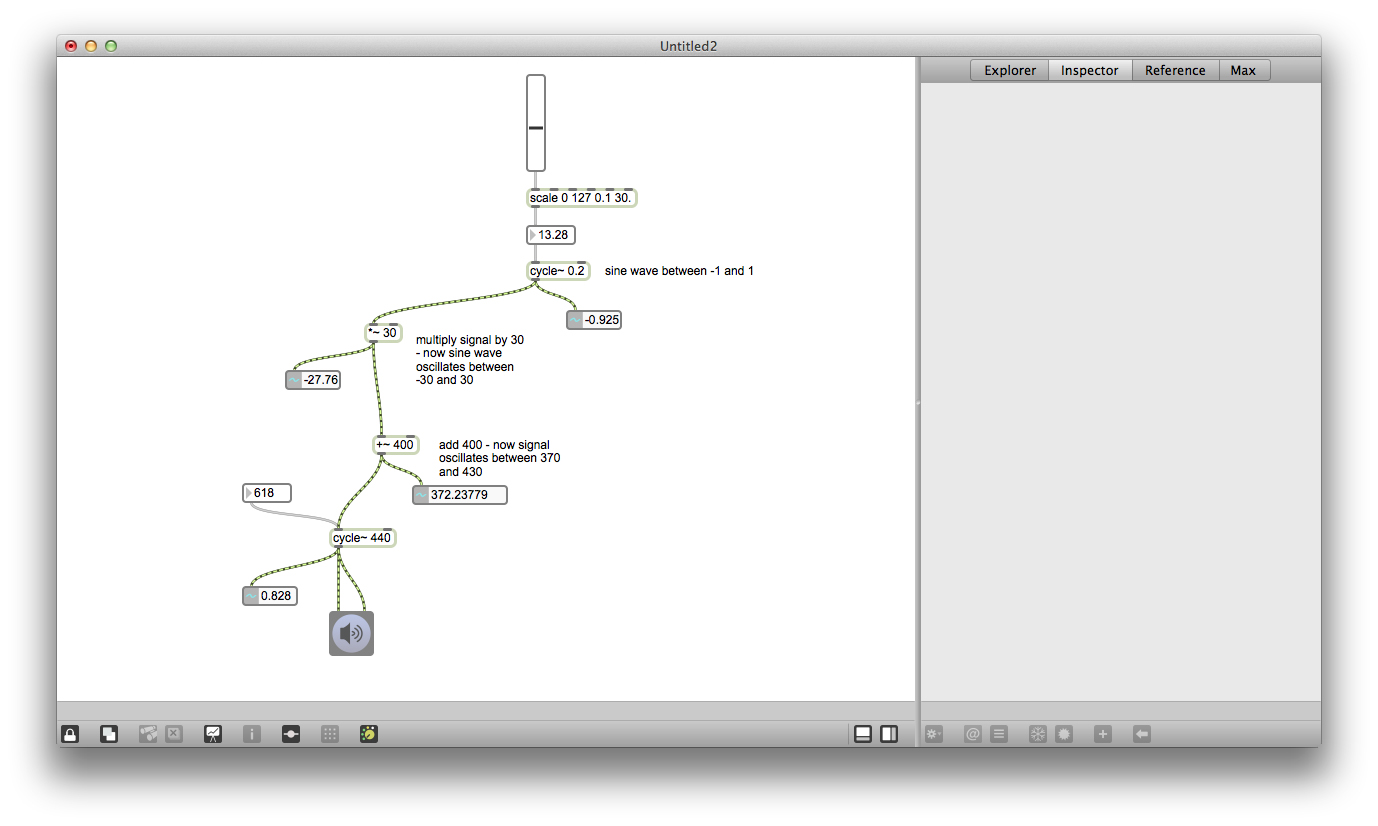
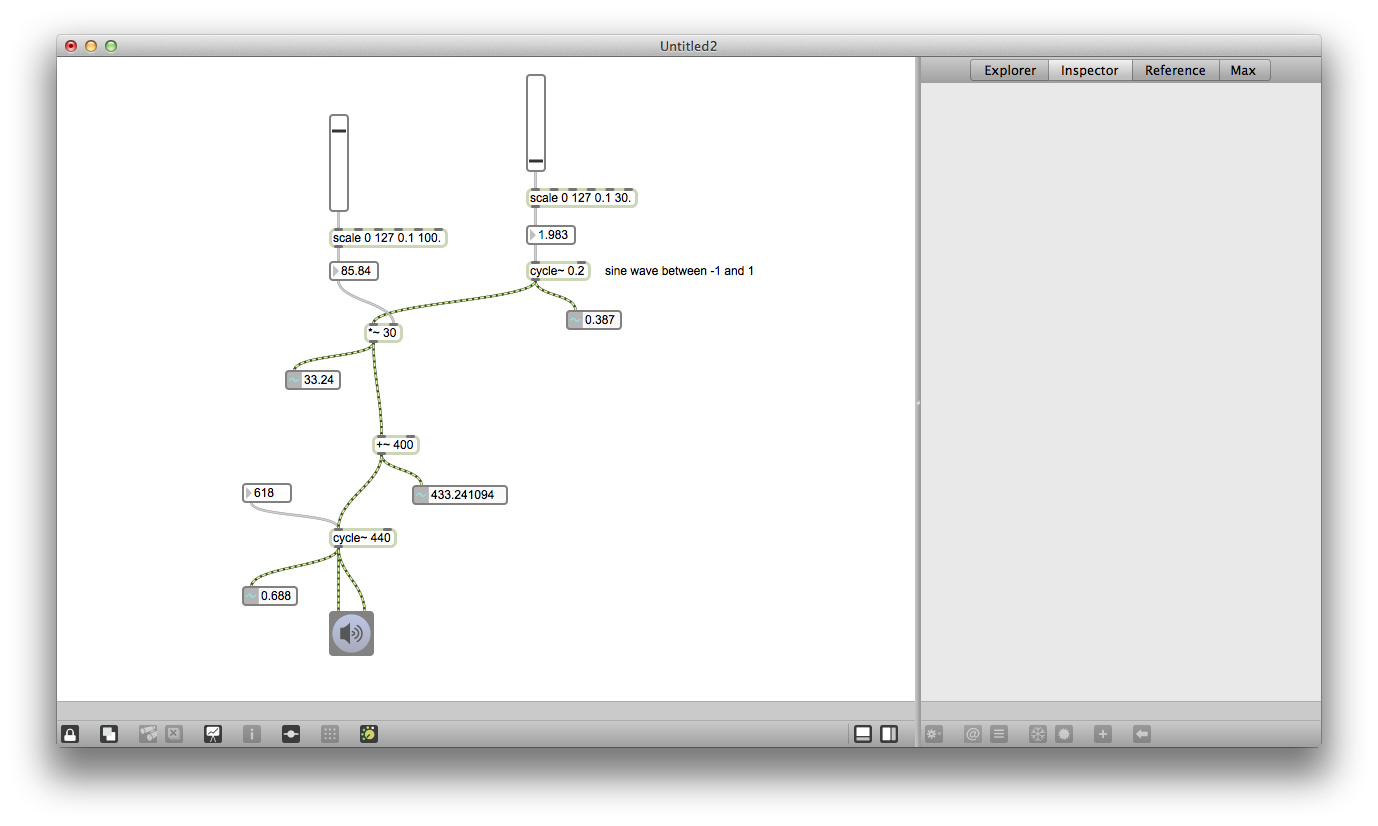
We can make this frequency modulation more automatic by sending a signal into the left inlet of cycle~. Create another cycle~ object, set this one to a very low frequency like 0.2hz so we can hear it more clearly. Add 400 to the signal with a +~ object and wire it into cycle. If you listen very closely you might hear the pitch of the output signal change very slightly, this is because by default the amplitude of the cycle!~ object is 1, so our frequency modulation is only swinging between 399 and 401, which is very small. Increase the amplitude of the modulation by multiplying the output from the 0.2hz cycle~ by 30 before adding it to 400, now the frequency of the second cycle~ object will swing from 370 to 430hz.
Some things you could try from here:
-use a saw~ object to modulate the frequency instead of cycle~
-change the amplitude and frequency of modulation
-change the center frequency (currently it is 400hz)
Copy the simple modulated oscillator below:
----------begin_max5_patcher----------
737.3oc2XF0biBBDG+YymBFd7tzNJPH581843la5fJMkNJlQIMIsSym8SVzF
60jTMWlVu9hLrtA9yOV1EySS7vwEajUXzOP+B448zDOOvj0fWSeObtXSRlnB
bCmTjmK0F7T26LxMFvtHMEw78QWgzEqQUpEZQFpnJQkkILxJTrzrVJ0H5bej
PW6K0ucLxTZYRwJMLPzFi2VtH112+Z+FKKElj6T5E2TJSLNIS475WiHr41lf
YVmQ1Nne27izqxU5LoADePiQUJH4h36uhPZUwsEZiVjKgW8yRkHCueLJVYZG
D+N9WodD7Ofbsu05ySlXeL8ejk4qxLpkYaawX7VDcOY0RzZwCxCA2qnN3dD1
xZIYorpddEFUgtKMIA.F4LaieyiWPY+1QXTXLXDnIHx1v8GvNRPzHbGYO0eA
0A.oCvCgNLNPmFF43LYPvI7SDN0CbrrbG9zQQD+YvpKZ9AihxKRAMPNNkHAv
o5fPHFZF+zThb.JwGJkZGDmIy1kRmTvtSf3oH7sYEhZA1pg5W75s6KAfkqqk
+aB991tNGnODuhbDmBMzngyqYCkWAuCu1mz3hG10i.nljPDWHXzYD.w9RE.8
8c1RymHBh5S6TGkENbfQ+ZEAwH.ChN6LPjuTAPIaSxj6pmJxoBhBC2WbiOav
LKZ7GBchUev7lbNvB2cSzAUZuGobVJJqsajk2H0h3LY2568LZRYubCBGKzK9
jOh0.LZT3YdFi9+4QL4iohjcmpbN28YLbWx3YsO6MXHG4lfW77ALl+6uNnLn
geFEU9LRH.9.e1ze8YwvJzZ+03ppXUYR67zdYJz9EYprxnzvkj65D8UNcmJM
Up6dbNUUYOgmd7MtKqd3eX5IpOxY1GGdn8QOiL4vFW6VjOL4vFWaV8PMV1DL
pTy3gMmaRPWNZwxkOHKqZFRPH0Eutunz1kOE5pzttPkAbo7AUq+v+yHVTVW0
xTWxZUoq5xlPNdhcdddxe763d2I
-----------end_max5_patcher-----------
----------begin_max5_patcher----------
855.3oc0Y00aaBCE8YxuBDO1kEg+.Cr21uiooJB31REwDAjtzV07aelqgzjJ
mEmVvi7BUwXrO93y8bu180YNdKK2xq8b+g6ubcbdcliCzTaCNc+1waUx1zhj
Znad2UTJ1rxat5U4YPikKe76A8scWonQjrhCu4mU4IE8uYcRkr8Fd0sbQxxB
nG9cuSNnkaZJ3Mvzf6ZU0Tyyq4JL1N8IMdyc8VlHt2y82GLm04u.8BgWzOnq
q30bQSRSdo31JdZiZTnDhrKtzn1d5528X+fIgRtnGIn8XuI8gbw8GLLjPZ6m
FfXvefwACCT6m71rYsOlaHuJ3+Qxh8LUCeKLId0oIEbWe4hJThQWzBMLO67L
+wrK5Tr6YIzinF1YoFZDPzwweIpotHOiWoYgGd4BKCV5+aQCgDLDhFBaOmH4
mngUzbyNcpD7fISpyuWH+nKRrfOMkfY3EgAxHnPHPhfWD7ETKmzfhflfNTlJ
aPzHPufI1xqA4h780Y2fimd9MczCJFHFDZjLbH9ihiyEJBTgIii0wG0.D8Rf
nomD.qxlinTkD.ONR.L8+pDnaUR7G.IvIcJwjqXmxdcPDZHbJ2rZIuRW5TjA
UcspLieHCHyaBzzhKjn5x2NumxFpDuHeUsHDfwBXiQRka149tq4g7WvTsbDj
pnUbDTnGIdrDPzqeADl.AYTZHXDMJBnusyk5qUAQlrJnXjR5DpNDzXofvW+J
HBVkmlwFOKnzmSK36jqYrFRLdxdpHUdLLBDQrfAPDoY4SsRl9bwvmmm0Y8DL
po4IW+gXJhJPYC8Eiv3ujkjpimv5CV9jITXTP6q1aaeNB1ATp1jJS1bJp8Op
5DtL84TfIyqHW7w6zEFv11OltpK2Tk1C3tKw0886zJiW2jKfKB6f9zdQRtn8
c5g7rLt3vM6r75VeBfT80tuYJbBMANG0mwDMLCPSf0PCx.zPrFZnFfFj0PSr
InAausJhI3gNwvyzZ2xhAVlXBhXSL7XuPcrIpmX6AGSrdZuvRagmHSvi81tZ
u8kyiGKteYR3NwdtODjo1OnISdcl8xc8go5DxmoGb9LaVpxmSVu9IdUc2PBH
QdthGKq1+OfvSVxt5mP0+dU7mx66OAZIoRV+dir38MUpSPrMh4Mqcdda1ewH
wW5v
-----------end_max5_patcher-----------
Downloads
MIDI and Audio

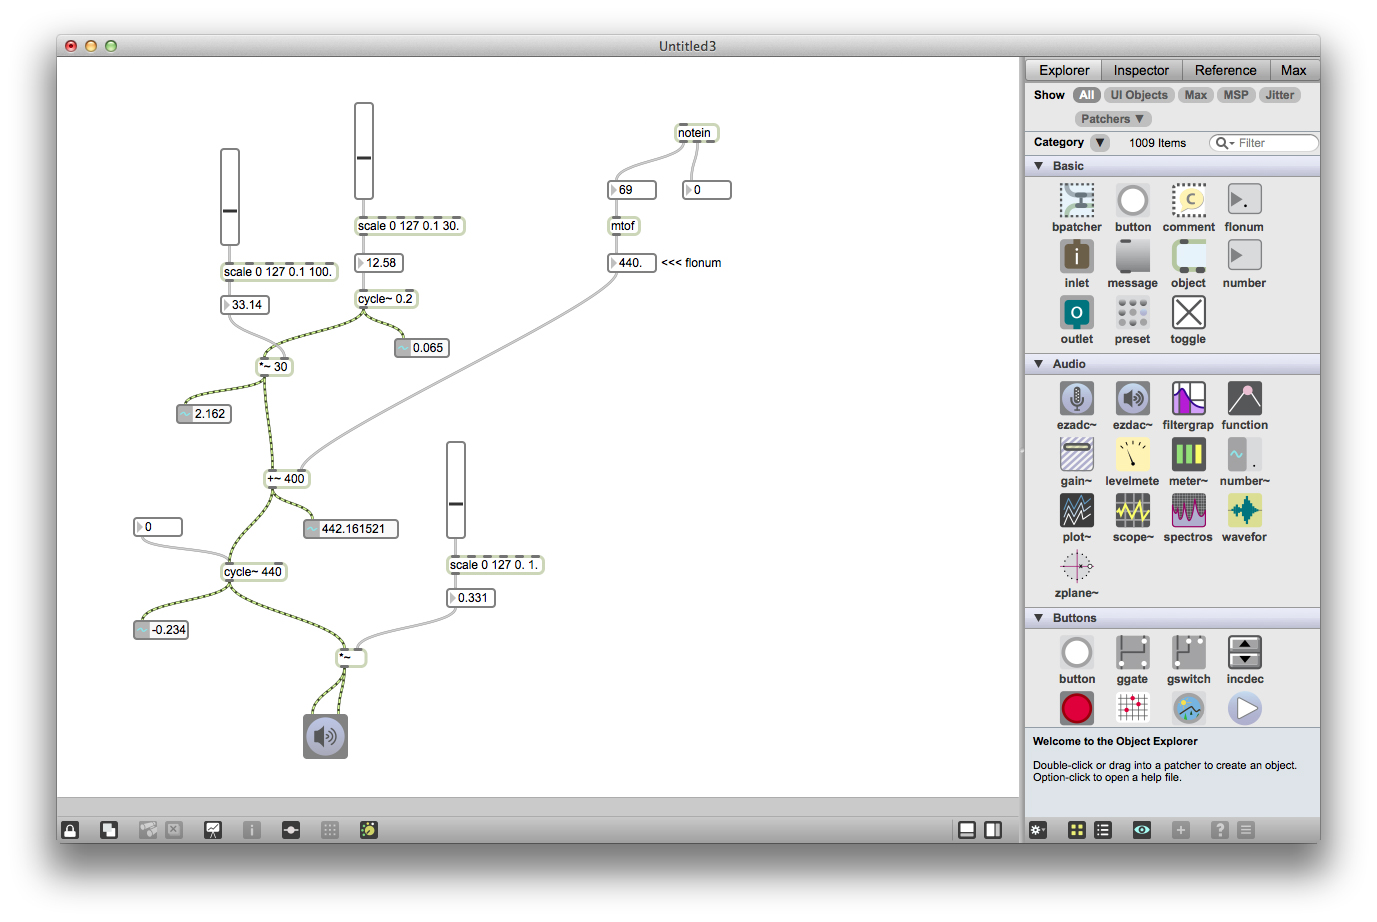
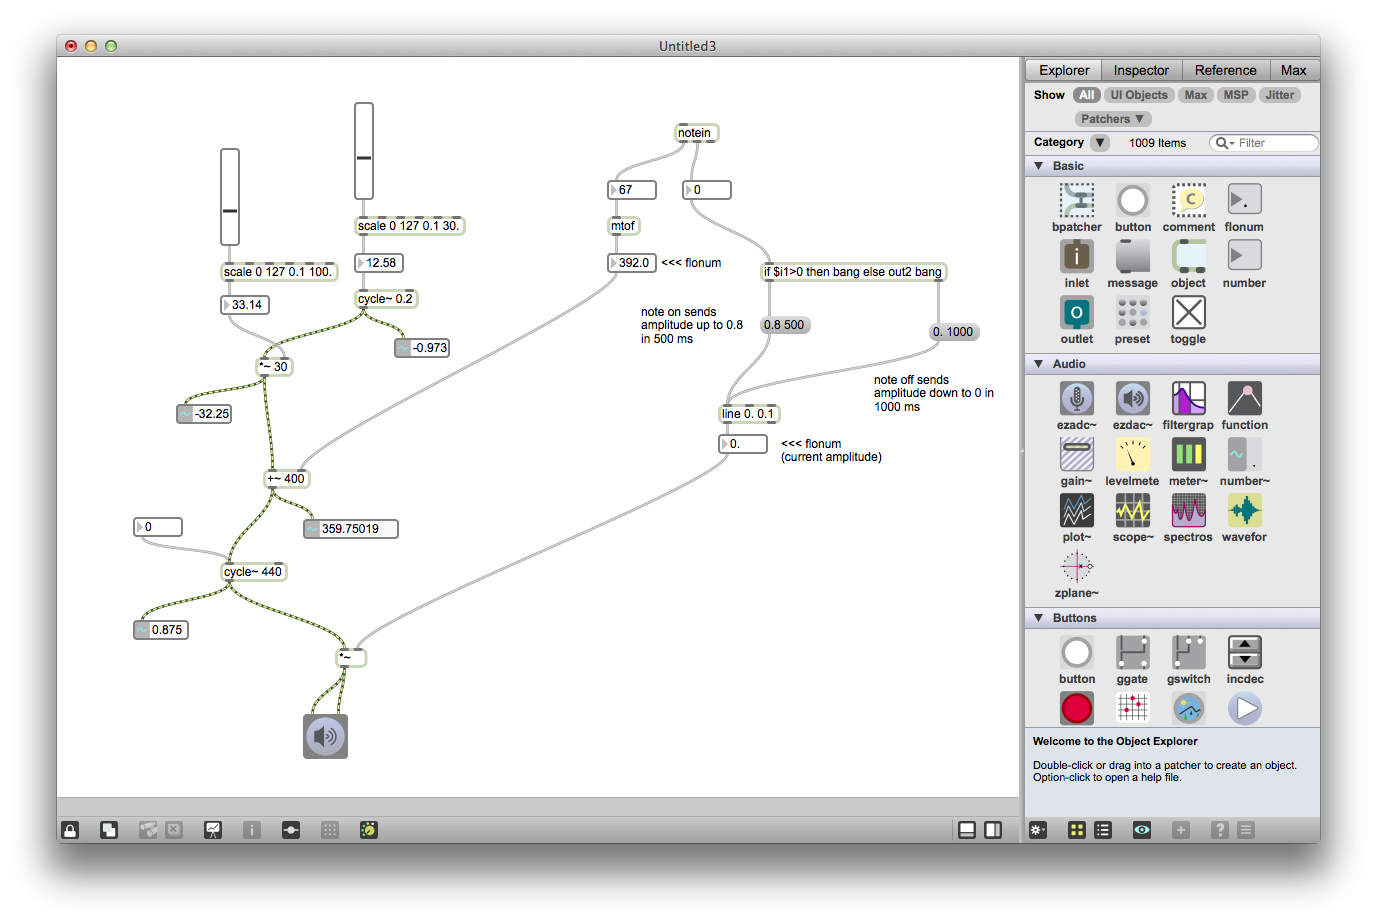
The midi to frequency object (mtof) is used to convert MIDI pitch values (0-127) into hertz (which is awesome bc the math involved totally sucks), so you can control your Max synth with a keyboard or other MIDI instrument.
Create a notein object and hook up the pitch and velocity outlet to number objects. Wire the output from pitch into a mtof and see what the conversion is with a flonum (frequency is always going to be a float, MIDI is an integer). Now wire the output from the mtof to the +~ object to change the center frequency of the synth. Lock the patch and press the keyboard, you should hear the pitch of your synth change with every keypress.
We can also use the velocity information to create discrete notes with this synth. To create a ramp to control the amplitude of the synth, use a line object. By sending messages of the form "value time" to the ramp, we can tell it to ramp from to a certain value over a period of time (in ms). Once it reaches that value, line will hold until it receives another message. Our note on message will be something like "0.8 500" and note off is something like "0.0 1000". Wire up an if statement that bangs out the left outlet if the velocity is > 0, and out the right outlet if it is not. Then connect the outlets of the if to the appropriate message objects and wire both messages into line. Use optional arguments to tell line that you want it to output a float (the first argument is it's current level and the second is the increments it will use to ramp).
Now delete the slider we were using to control the amplitude and wire up the output from line to the *~. Lock the patch and stary pressing keys on your keyboard, you should hear discrete notes played out the synth.
There's a ton of directions you can go from here, check out the right menu to see all the different audio effects you can use in Max - reverb, filters, etc. Add some more oscillators to see what that sounds like - phasor~ is a sawtooth wave, there's also tri~ and rect~. You could scale the velocity values from notein to have a variable effect on the amplitude, filtering, or any number of things in the synth. That way, hitting the keyboard harder will make the synth sound different.
Also take a look at "ftom~" if you want to change a frequency in hz to a MIDI note.
----------begin_max5_patcher----------
1256.3oc4ZttiiZCEG+yIOEVn9gdYZD1lqUipTeNppVQ.mLdEXh.ytytq17r
WeAxPxj.NrDBsQZTx.iw93e9bN+O1Lea4Bq04uRJs.+A3uAKV7skKVntk7FK
pudgUVzqwoQkplYEmmkQXbqmz+MN4Ut59rbNAjuYCnjvRJAQY6Ro7pDBHI+y
L.OGXCnL.z11FjU17zoTFINuho5Bb8M2jy3rnLhpa+qBZTZSyYUY4U7TBWYJ
1MsuX6Z00qra0Ckzup5AH5vs2UPDFGOhSyYenfDy0yae6vUtOAbQpuj8h7Cv
+71fRYMiIroqh3wuPYaa0MAhQR77XHV1CPbf7KG+V8DMQMkxW+weGGXIu22W
tT9wSiB6YuC8U6TfeUfD8t2QxaJCc8UqAHGG4WPDrSF5OlL74meFrIMWXofe
NtpnPzl2H4ubVrgtWNrPEkv9t09pCyg8P23qbXUiK.iu.rcGBr0.05J4D5fM
WHZMmT7ABKZcJoMC0Mm+kcD8jQNTQhUUf05H1VqCSgePGROOkKXMibUrFYeA
D4LDDwHeV7vuycjtA7ST3eZC3uPX.4bBPRKEQ4Ubj5xgB02ANIyFMd4ai0HR
4ZBCB5DXng.rLRYYzVx6Hl8Jk5x0xE3E4ReL4RQmBcD4jN.0ezIpC4De0yi7
7TddPMOOOHQ9iKHCjhESGHMEIMNWtgFfDuQLXTl0WrHJ9AdGC6v8mlxQklxC
2UTGBcajMslMEQDpz0fgpHm.Xmv.9PJq4pUxpQT2xZvvAEIUkslTLIHhxLGP
WHmsGRqWgv+PUTcb2zCVC9eDVuV+Ni.j+HlAWtCIJ6Z4FtG1z5qQqfSnNEtJ
vzwqS.AGQ.kwy2bmT7MveQq3ic5DG1iHN908iFLJoaYhGZrJBBI1Jhu73JB0
R9pCc3RLwC8PJuAqq.ReFL8rqswLJpLNJUTonvl8kEKJ2Pxp6TTkW+3odSZv
vNqPZPx+kozj2zoN+D7pbTrtZw35YY3g5+D+9E1r.19F5Cfmit.nP+VIVqO6
mK5BD7eTWf5Yoia+t.HmGxLkM9AlrQ.Dd3UrtenLRndd7lCyxSHctw5Z81mZ
P1XI7VmmrdO1tcWZl2nVKhHGxbsbDXnRiEaqbcvcJk.cencfPN0E0qR1F1sC
zXdVx+1dfi8r0CBYqwhVCxoySLF9XmBBi80GsLzfTPnQzCJ9Kwoj8BDflsdQ
ZgLDV4E441EZBe.O4E+5bO18qy67PGioAkqdyCcGhMnjQjulDEuu6iD+JUT7
baUlq7yyV813mNvwY9VVR85mdKtdcKpzlLpFndgOm7eEiZPj2+XbUlWUD2LI
peolh5oOLNIjRNkoNu4VMB4KZzaFyKzjDBqsGPBsTllPYj1mcgyT6A4czPcA
6AMc1i+LydPFXOXmIydNYnNu83crS1M0dLgOm3jcKsGXfIqWSm+CLz.6QT25
TsdAsMwdBmN9XR79IF8M0dfFje9Dmrat8zKelN8BSLG7rxZ7lvfcrIKVyLyY
5ztftllKbNYOSm1Exj0qoK0LxjRMPSWpPjIR6noy8AYhzNd5B2wlHsilN+Gr
QRWtSVoONypjydFU37jAGiMmogNFU07LybbGn4nOSgnc69DonrtOUVhUVzGy
KN7pZsxnL8kpiIwpf7IZS6U+qHYEUD+BkSh4UE5iZ40.4aZRLNee4+dYTeWA
-----------end_max5_patcher-----------
Downloads
Beat Slicer
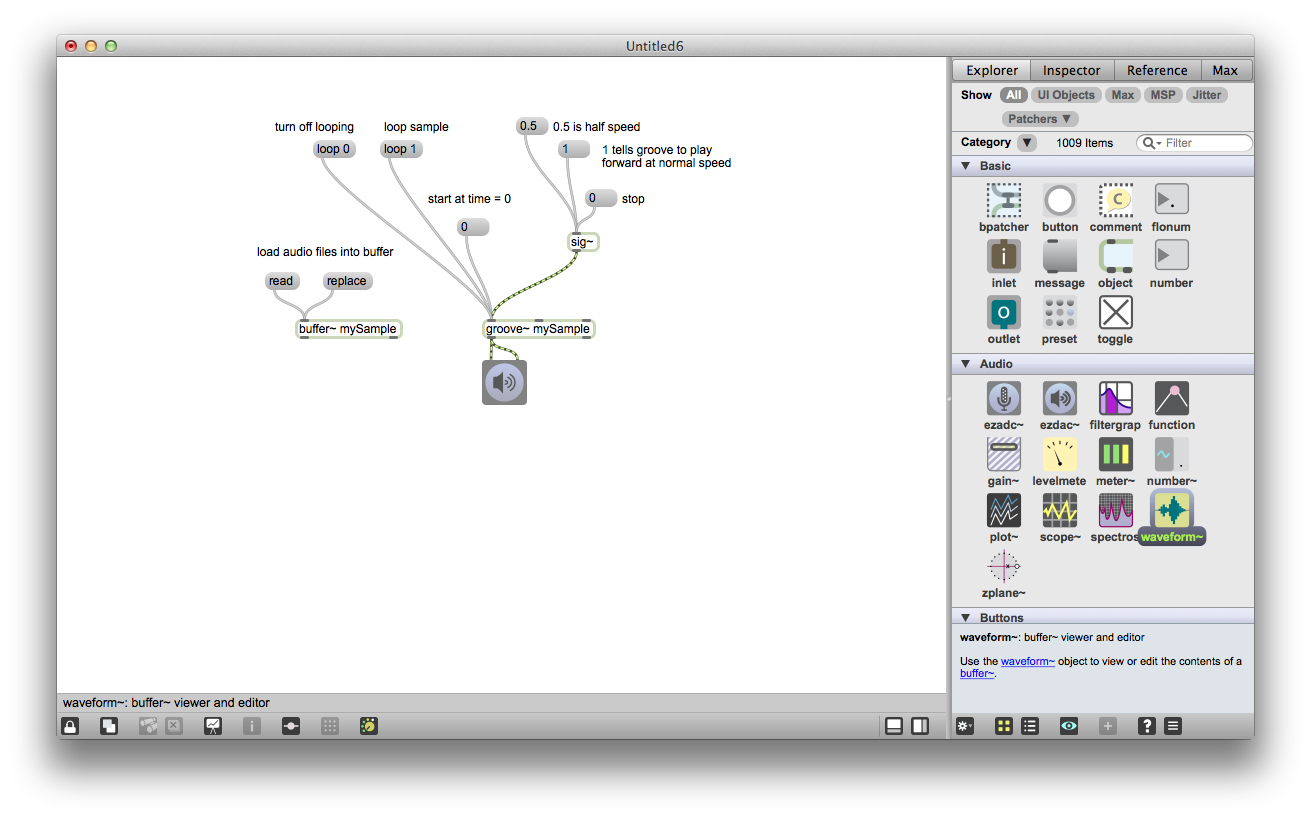
The beat slicer is a favorite of mine, basically it plays back a loopable sample, but allows you to cut it up, skip, mute, and sample different parts to potentially even create an entirely new beat. Here are some examples:
Generative beat slicer in Pure Data
Otoh: Circular looping interface
Monome: MLR, a grid-based multi-layered looping patch
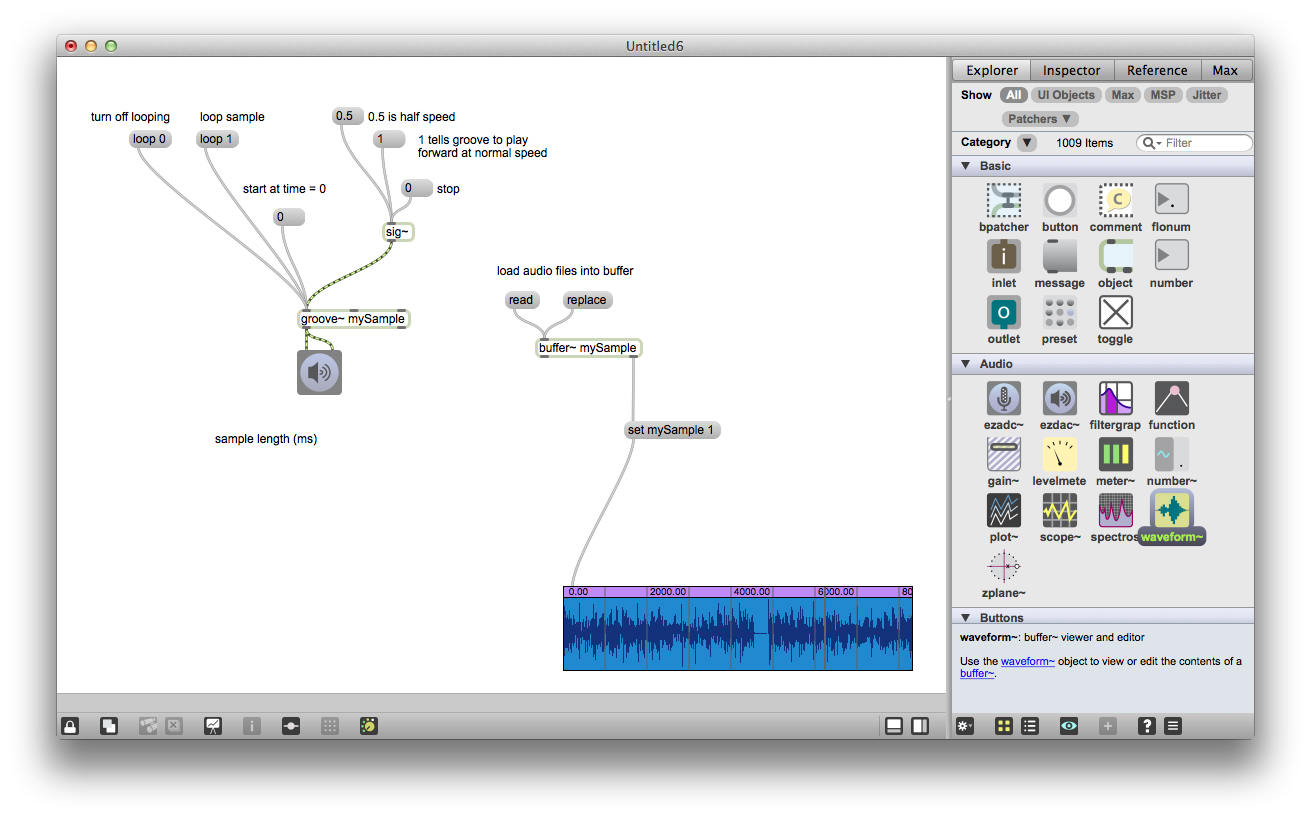
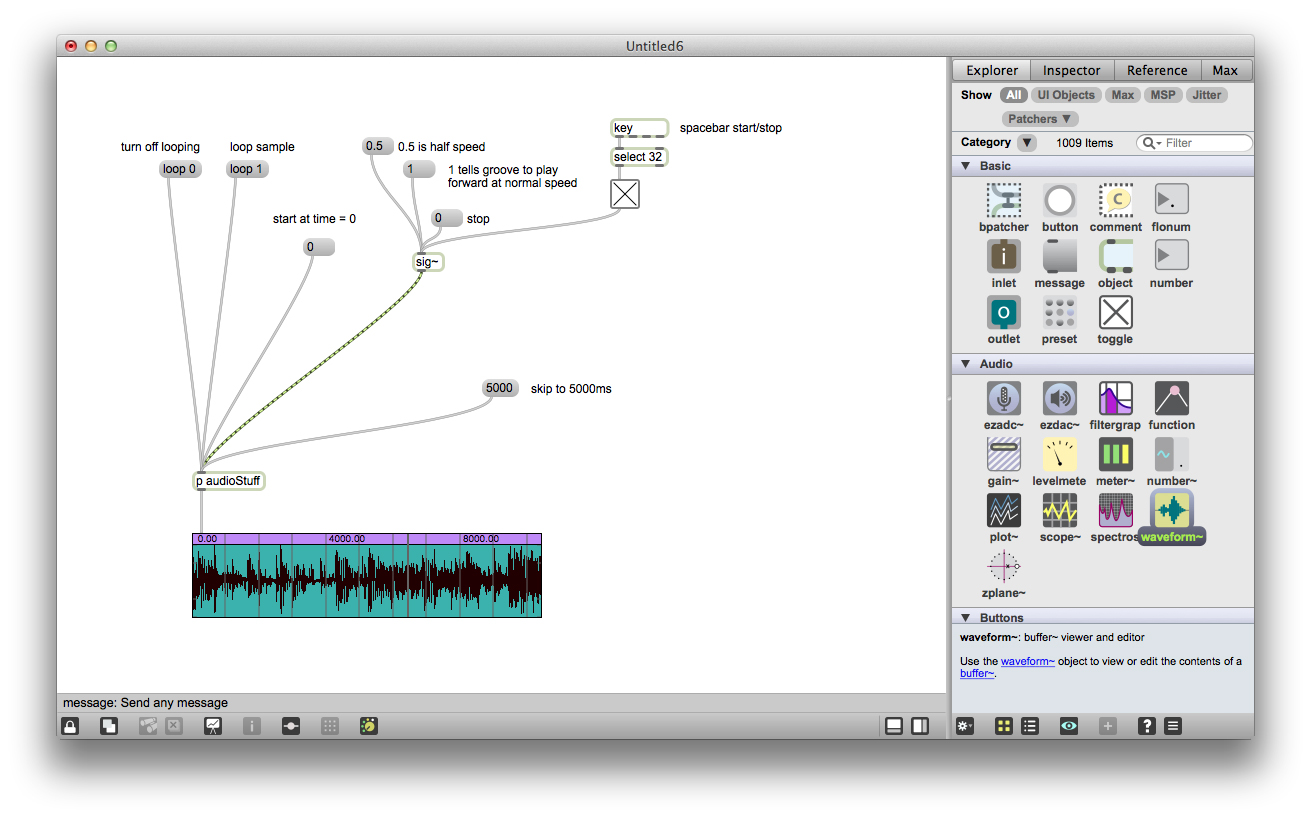
Audio sample in max are stored in an object called buffer~, and played back using an object called groove~. The default argument on a buffer~ and groove~ pair is an arbitrary name for your sample, I called mine "mySample". The sig~ object sends a signal into groove to tell it how to playback the sample. Sending a 1 message into sig~ plays the sample back at normal speed, 0.5 plays back at half speed, -0.5 plays back in reverse at half speed, and so on.... You can also send a message into groove telling it to skip to a certain part time (in ms) in the sample. I used a 0 message to play the sample from the beginning. You can also send loop 0 and loop 1 messages into groove~ to tell it whether or not to loop the sample when it reaches the end.
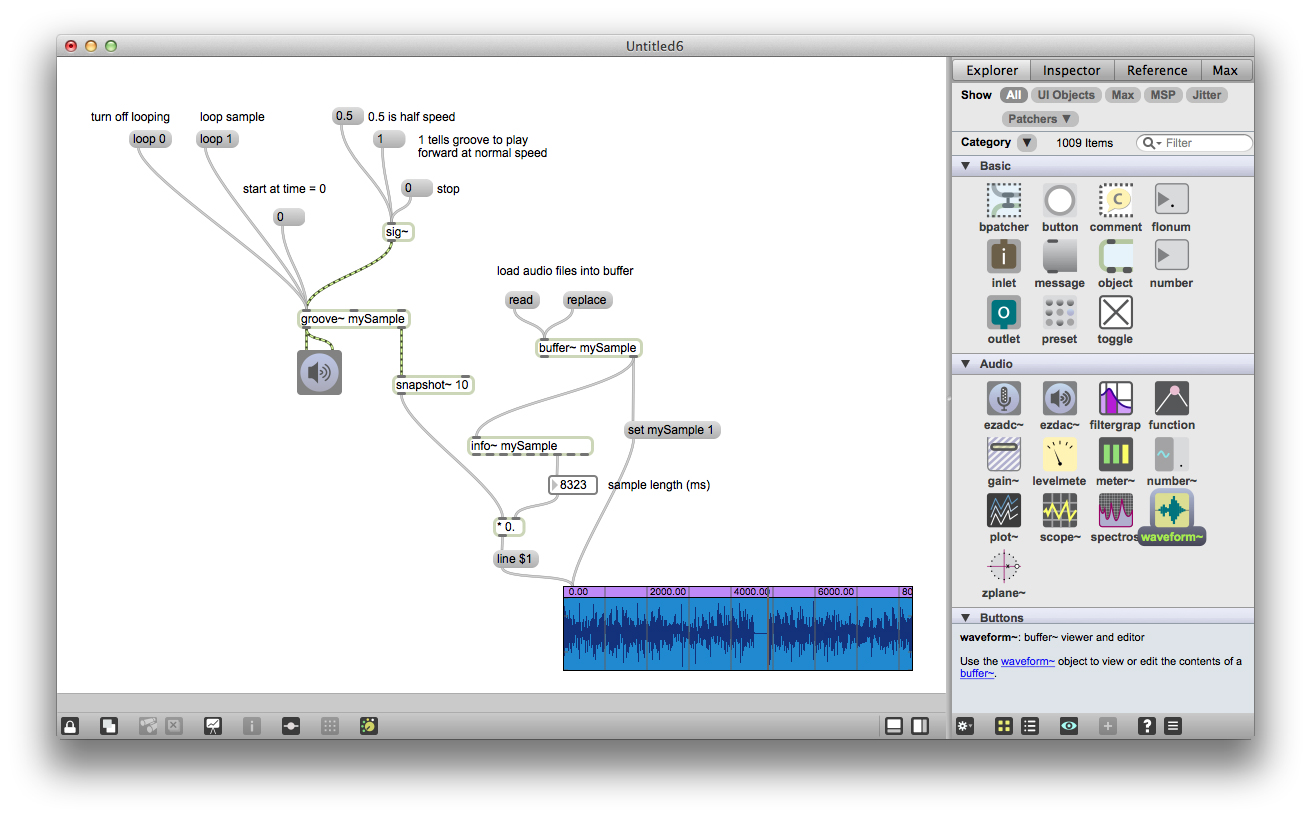
Use a waveform~ object to give some visual feedback of what your sample looks like and where it is playing. Wire up a message called "set mySample" (again where the word mySample is whatever arbitrary name you are using to tell buffer~ and grove~ what sample you are talking about) into the waveform to show the sample's shape.
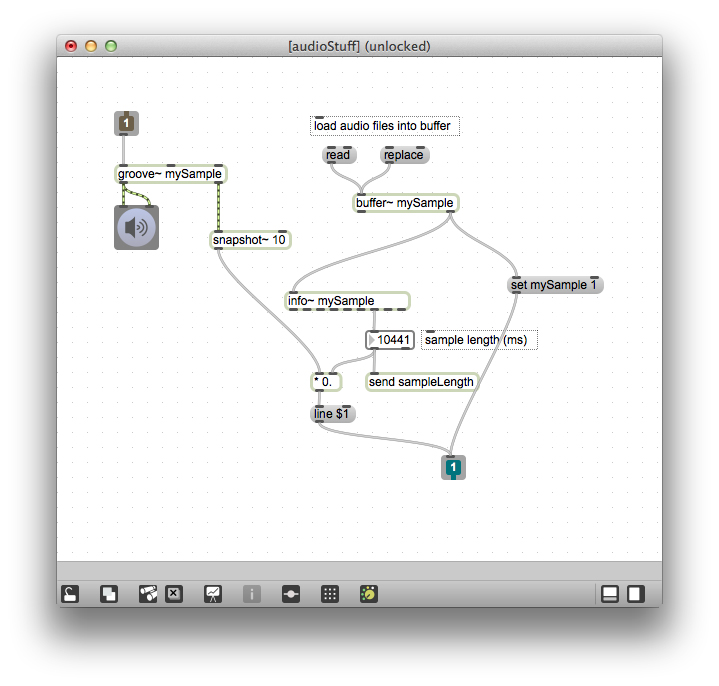
info~ is an object that gives back metadata about a stored sample. Use this to find the total length of your sample. In combination with the right outlet of groove~ you can even draw a playhead on your waveform object. I won't get into the details of exactly how this works here, you can look at the help files for each of these objects to find more information.
----------begin_max5_patcher----------
1160.3oc2Y00qiZCD84jeEVn9P6pzHrMl.UpOzeC8wpUqbBlDVA1Ham6G6p8
9auXaRfb2KDREgf5Cg.NDyYNdlyLi46KW3sU7BS4A9Cv+.Vr36KWrvNjYfE0
Wuvqf9xtbpxdadb1yhse0ak6mzrWz1gUbZo5fP+F.5e5GSEbsJ6aLyM.Qq8q
GlerPbTmyz1IDVOZIUu6PFe+WjrcZGfvQAU+IPfO17Uj8HxesO3y0+mrD6yt
BO+NAd5o5la8qkL2r3klKnUy3magJNsv9qd+kLil60.rL9IbgLi8ikKMGVMP
tofoTz8rehbxy3Lvu.GKdInhWHq.jMQV5IzbDF8w7RypwOwKSBkzg6xm.9qG
a5HfXHBLxbQWtIQy.ujpIXKSdSVOpaqmfisVuKHg32WPRvYyujJqLNMS9EFm
tM29z86hZx3ZuU.usT99alffimOSFOU7Fn30+lVTlytI9KtGuGRjg+BBsZMP
zl9Hvvq39rxDqqreedfgbh4igkmB1sKQJESelbAilVUXDzRuAwFdMdSeZUjf
GqV0NQQAy3q+dlwwI4L9d8AvuVn9syrib+VanyYhYP7keOgywjVgyPXutijK
R0dm7W5hUp7cS.ziIYBPZVNSApbfEfsGSSaItM57SsXOJx5OA6WuCSl.9g8s
D5t27tUCo1Bv0IwImN9gIwI267w6kBwSr+ipqnqakXWfOLnukKX2w+pr8byZ
14ytU8.7HpTJYk4zcrwRhjPrtzXXbSF7NKmC+XkH6lRnIiV8bwgs3CLoW9.M
KKu0oBN9gSDjiZBc076G0a0dWuXkIqjttRhnOJ4.QZJHWHJqr06WhiM1frXq
2j6Xm71FuGWUXFd.LZcPCgV+EHzkjA2WnTvLs5KKintLLZz8NfQ3F2indyRE
fefEcozhx6XwUHn0CIby.JtJ.9.CSFw8Xx19WsI617fthPvwyyju1HjQqis5
PgAoYf2LS6XSSkZ.UCzYELve1RPcziYPnMqQMdPww81PxiT6veMAjo.Gn4o.
UIikb+HELA0jm8ZMo4+H0QVSFMkDXbSJj9ERPQyyvFHPyxyU.W2ffp14qZz4
UPpP9LUlXhm3BYAM+R2GytauSbjqaW75cH4jOrktTsSEF2ACG9+gjSnPeqIG
GN.eJ+4YxoQKuDNzUbha8uex.FMKaKTks+sQiN13TUgmiC5YiUBu1FqLE8.9
L8IVkTRQG6UVXOs85V5CQ06Hf0ji5XyxPWus2dN4z122vHtd4OyIuuk9KnER
KZwNAVww289UsFnY7K4Jk3nb2IndpgLPiIlvT5LNUmI3stI3k2zgrjDFusRZ
Rlx7Bdr7i+GtpMT7XJ1aNgGih2bBOlnrYEdFB+flL3PBlUvIZHKV9SFbL9Ng
WANAQS2hEb.zyzAmfnABG3z.mKdReLZBmNxY.ngLgxNCBOvoEOWMRmLCwyz3
LadkRWEOSn6CZdAmAkmX5B1QyL7X1Sz6Gdb0PSKKehIU0yoEJUcV7Ug7baCd
U0f6tz1wjmj8T1o6GaGgJqZpPW0QwQoqN9WhB8VZdN+X4+h9TrIC
-----------end_max5_patcher-----------
MaxMSP Objects - Inlets, Outlets, and Subpatches

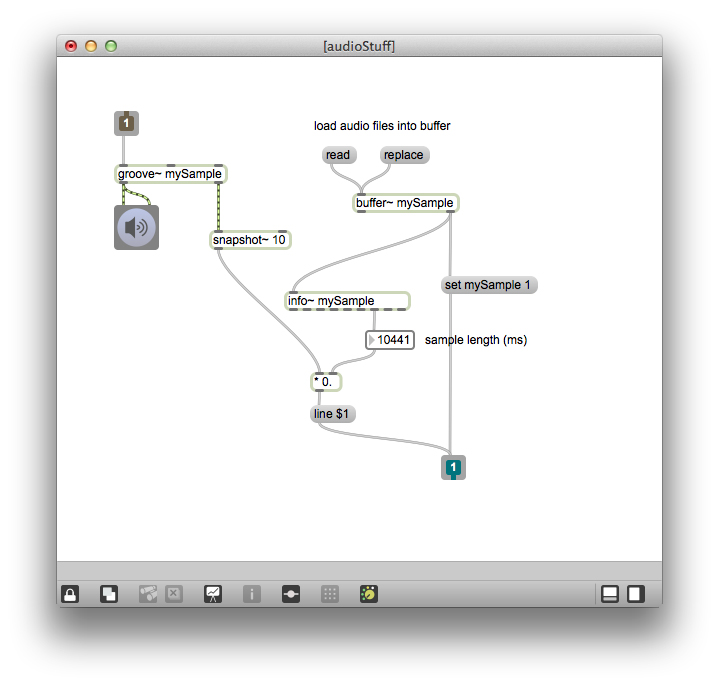
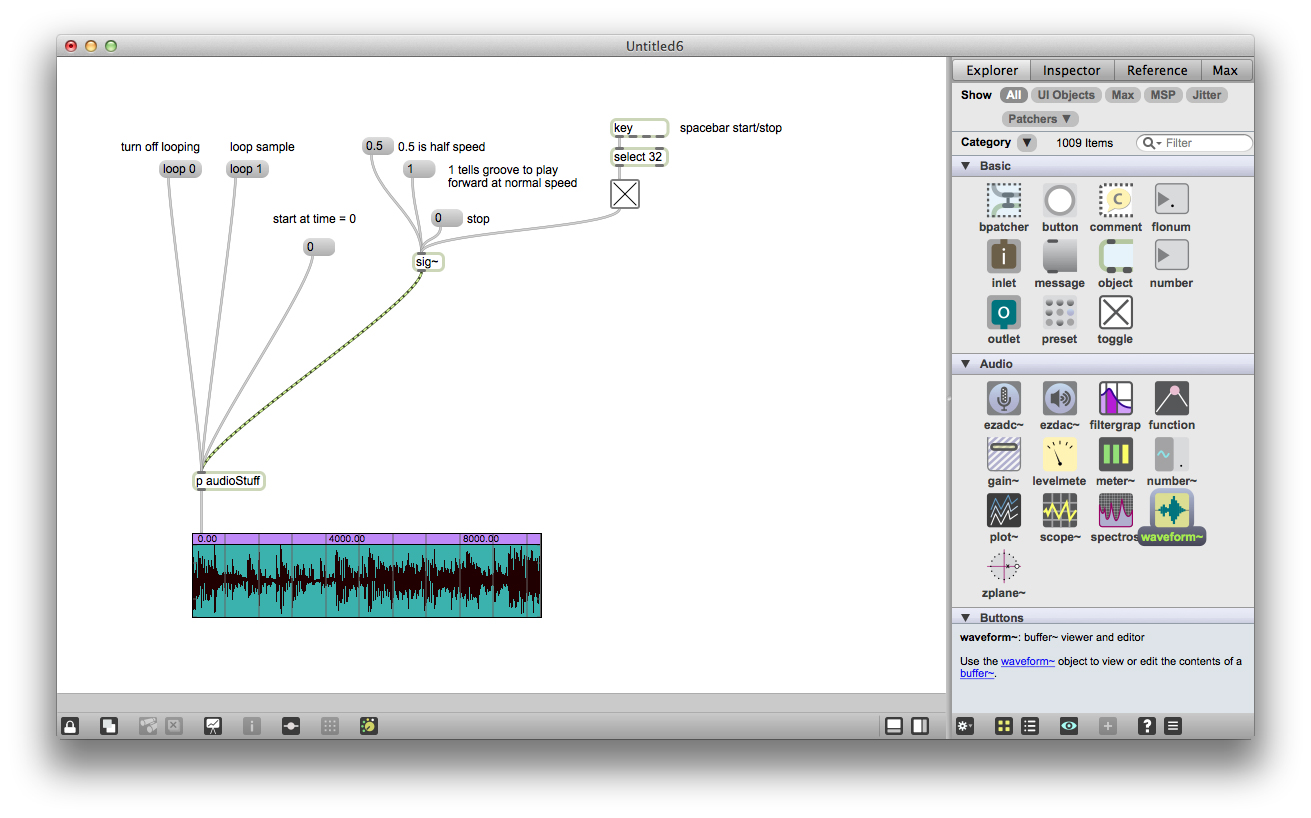
We did a lot of setup to get that all working, and now it's nice to hide many of these objects from the main window of the patch. We can do this using subpatches - a patch within a patch. Create a subpatch by making a patcher object. You have to name the patcher something, I named mine "audioStuff". When you create a patcher, Max will automatically open a new window for you. Copy the things you want into this subpatch - I threw the buffer and groove and info objects in there.
To connect to these object from the outside, create inlet objects and outlet objects. Each time you add an inlet to your subpatch, you will see an inlet appear on the top of the patcher object in your main patch, the same thing will happen with outlets. I connected my playhead drawing parts and my buffer~ object to my waveform~ object through an outlet in the patcher. I also connected the sig~ and other groove messages to the groove~ through an inlet in the patcher.
To connect to these object from the outside, create inlet objects and outlet objects. Each time you add an inlet to your subpatch, you will see an inlet appear on the top of the patcher object in your main patch, the same thing will happen with outlets. I connected my playhead drawing parts and my buffer~ object to my waveform~ object through an outlet in the patcher. I also connected the sig~ and other groove messages to the groove~ through an inlet in the patcher.
----------begin_max5_patcher----------
1657.3oc2ZkriihCF9bxSgEZNLSqLkv.lPFo4v7LzGa0pjSvjPO.FgcpktUW
O6iW.B6PRmTgZNToR981u+7+t8OVtvXK8EBy.7Wfu.Vr3GKWrPQRRXQ9uWXD
ieYWDlo5lwNZbLIgarR2Fm7BWQmeLKAPCB.QTZZXx9hNDjseqrClOXVPglvY
gemHoBsJImbLldjGQ3p0ofZJlu6fX5dLiriq4SuMOfVAfP4LB1fjeZI9N3q4
CIzWwPzse6OcVaTYQSvwpE03exBwQFmV2vjhkEJo8ykKkerZhHRLgwv6IsPD
IP.LMNmcMr+cMzFp1111xMri5SnWOaamhUUO27WSI5Ywvnr+SDQrt.DoOYDE
hvvwoQjam3AbiWE4COmAkOreGjO5CMXbZ5sCFbrc0hHVp+gLGDGf2Q8jqlJh
ios5jWukssz+n6cr8l6qJxfFMfWMiF45BSwng854oQCFGmwAXNfGFS.+cEKp
WccFKGqGrNIAsYyP5L12SaGlOf.gLvAbT.fkRH92NPw1csRrQaOcDCI1l2SC
IOftVJN11NUbhLroDKu4ohCDvIQQLv9LJ8IBfSAoQ3WAAzrmwY9RMpDZVLNp
t.TTXBYG8XhZNrtctmftUrLkKUI+QmHr6+GbOYsFI2xVP3DjoLmmtmtZdlrW
qCOQe9OLX.uyJXIjmErQaGSg6e6pAGd57XrPE5A8aiE51KbHXoDwF+bAE30C
TRA3i9gzOyOFDb0hhwUgJNZGQqGLhdWqqmrRMVhjkCF4ngXVBiHOQxXgzjJ8
dgANMsB4EUFhDB+FUMQtqJIElnIAKIkQdJrX71kTwYBfgKPkiYZN+EOWCcih
iskECsD0PJ3ZiJTFWSEDhLcNAahS38Qzc+KwuhsZAtkRRBSRyHLgSELOmMJa
1mDfOFwer6C05sGf2Q5cvcd.rvXeVnOMQxD0FojbwxI2aZuFU2LpdjfS6Xvh
PH4GYawYRXcaDohqMgnKkFUuoxSRgF.NILFyIxXOUixrbRCiSyB0tIKoQRvh
43.aWFMJp1Toa4oNZwWbXui7bnO+PMWrxVDcOLs3HvnDi7C2SX75z338r5Tp
UZmpRgUUsqQugJtRSnX55UisOsVs3GRqshJ9r77poCupqyX10ZqpZVogh3gT
fQAYk0sbUkKDNzbU+3g4v3gsmJ6TaQJYSBQfF8sYguCa1Zl2a32SnjwNP4uA
flU6POVDNaAGHRWxh0Jufds7E1DnPvAkcBhnXdcQm9M+zc7BWILsdPUMx6WD
1M32f2B7zBohtx1wS6EsYQ.ZI3YNHdNKfxADO+jvD5sDF09dzQrNjXo2GDoR
wDuUDbykfXViXwybsBjzJxsKbPqpPVCxRwYBvfSxdT66roI1VPpzY7JfwVbx
9KFXguOxngIAz2.wu94p0B+7v9MiHsZoxu1xV4+EZsdLv2cBhqqj1oXp+WRX
JeQ9mJToYvoxPFgYDd4gB3lXK1wYitF.pRKtY8X1hQNyeaw0q+TCDUikQjj8
7CfeOl8G0P0lkU57v5wB3x0th4GHbTU.TqvYtCxmCglB8Iec90.YxmLfPohB
1JR0tgA7aJtl6HDsom5A2plvnY.rR9tOd2aWbv65jYf4gPgJ9r2PnP26nfzE
88WzGi0j.Ey76GvYLAAnyTRxaU2o6cFxM1uStKxHoQxJbbC7SXaozw71bJxo
ACY2d96lXXjD6eShY204DLZiFEFs9Pm4i1QvsUm2Zi9hwxecAldiFT+zhq7p
G09oBCJSstm5fo1fx16F3YziY6JX0hTiA02p9DFOLorNoeor3MM52gPe+5kk
TWIOlL2FcEXmjTxYyxVSjkclOrr8GOV1YpBFhHC.vOf77LBmgSfmQyGMvop.
BmOhySFk+3wxtyGN1ahBFdyFSFcnU0OKOOPYjyGNW1RQT2o39a9fxSUTti.n
tLVF70kUu3aCF9Ih+ihkPDo5iXNOKb6QtNrup2Y+u5sSO9seeFWYamLw.Kde
K59H5VbT9qTnbrcbyvKOAhm4q83YA7FPyheynyGug6nOdCjoqNGL8qxF0yyd
p2GuwTJybQsoO8POzYDUBIMRLxX2AbBMHfQpdK90Ss.UArTSa8zIzXWSskbD
rczK0b9zmCpZwKzV8nspQqyxIyOdSfeZvz2R9wxbdgOVyL7Q9DsmS3i7QzOm
vGGm4E9zXo5letT1QaMpwiMSxIMdjYMdfYsebY88vxDqyOW9e0FocJ.
-----------end_max5_patcher-----------
Send/Recieve
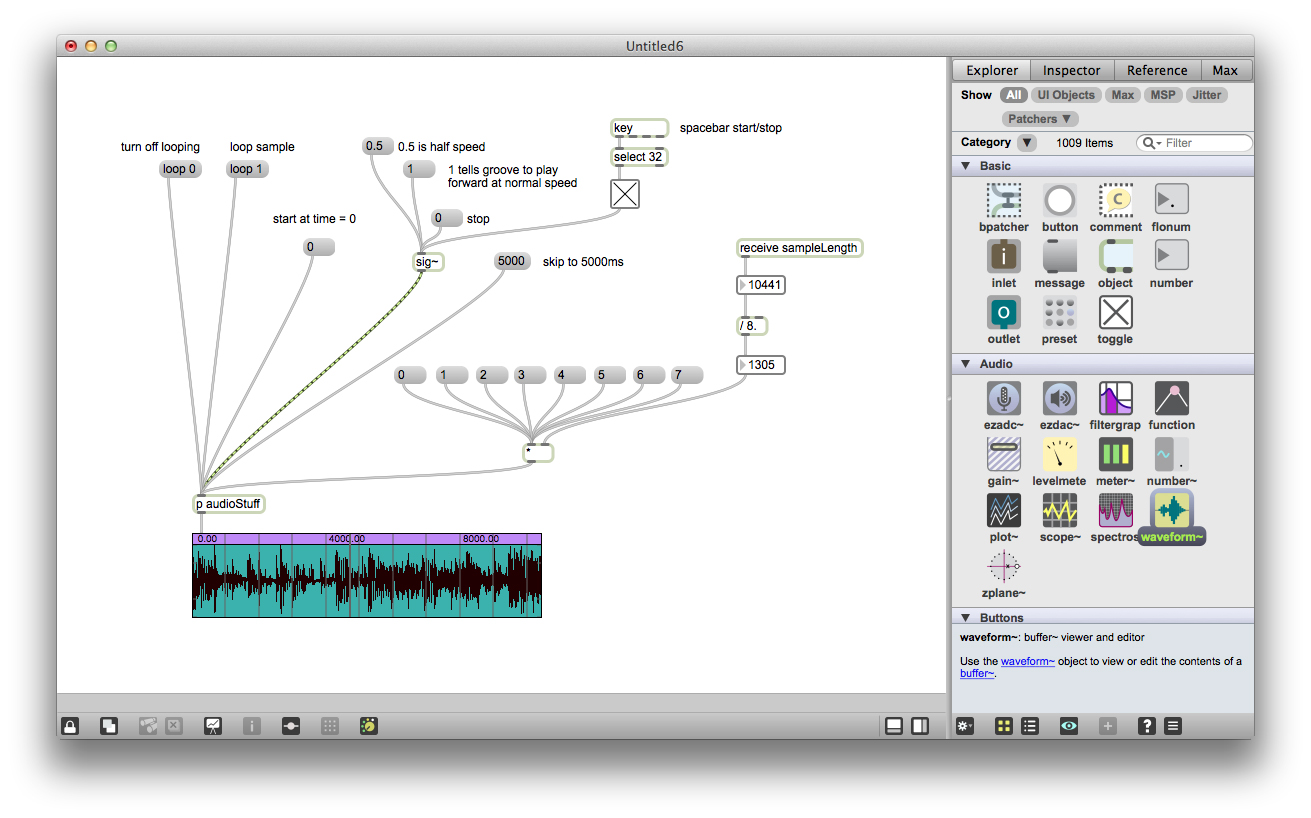
We saw earlier how we can send message directly into groove~ to immediately set the position of playback of the sample. I used a 0 message to set playback to the beginning of the sample, but we can send messages ranging from 0 to the length of the sample to skip to any section we want. For this patch, it makes sense to skip to one of the beats, so for a 4/4 time signature, we'll chop up the sample into sections of 4, 8, or 16.
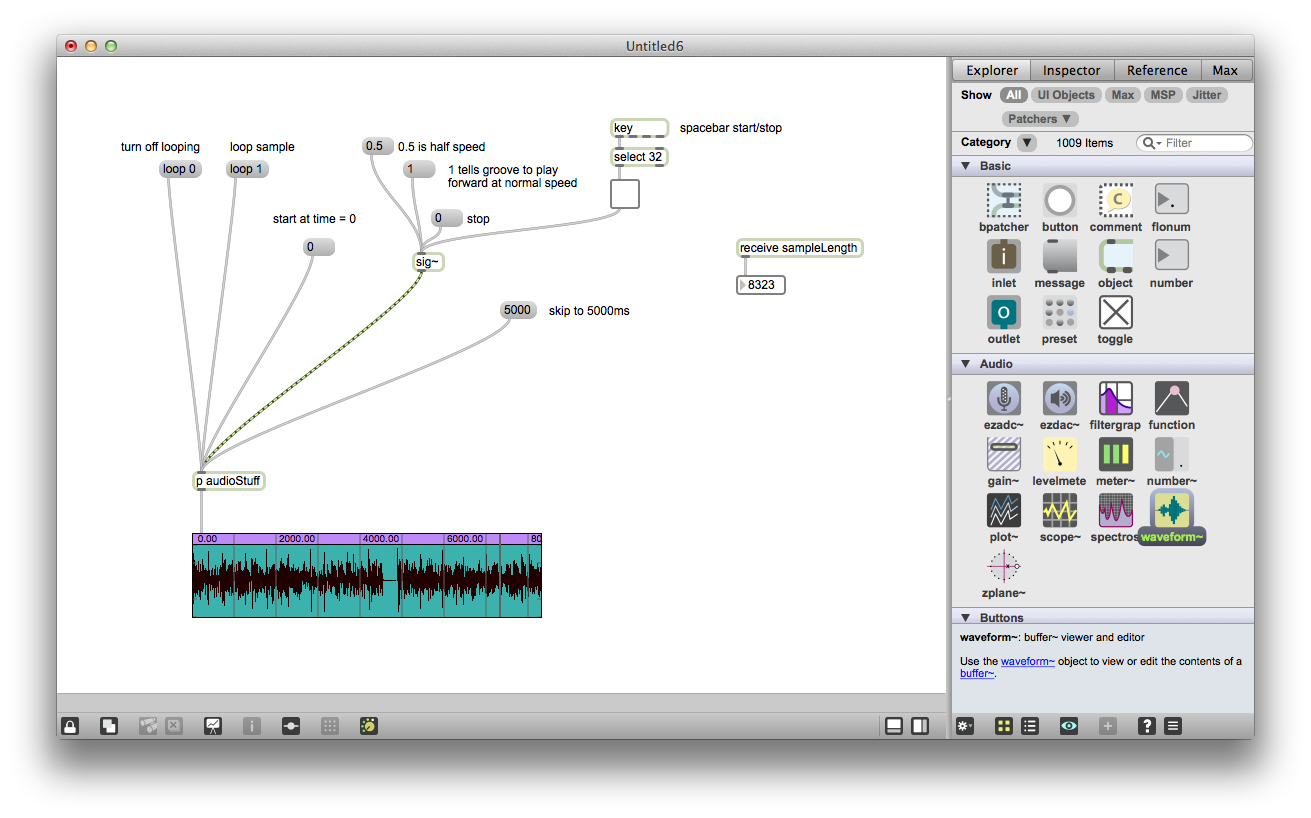
the first step in doing this is knowing what the total length of the sample is. We got that information previously from the info~ object (now located in the subpatch). If we want to work with this number in the main patch, we can do one of two things (try both!):
-create another outlet in the subpatch and send this number into the main patch through an outlet.
-use send and receive
I'm going to demonstrate send/receive here, but both options are equally valid. The send and receive objects allow you to wirelessly send message through your patch, even across subpatches. Wire up a send object to the total lenght output from info~. Now in the main patch, create a receive object and wire up a number object to it. Reload the sample and notice how the message gets sent to receive.
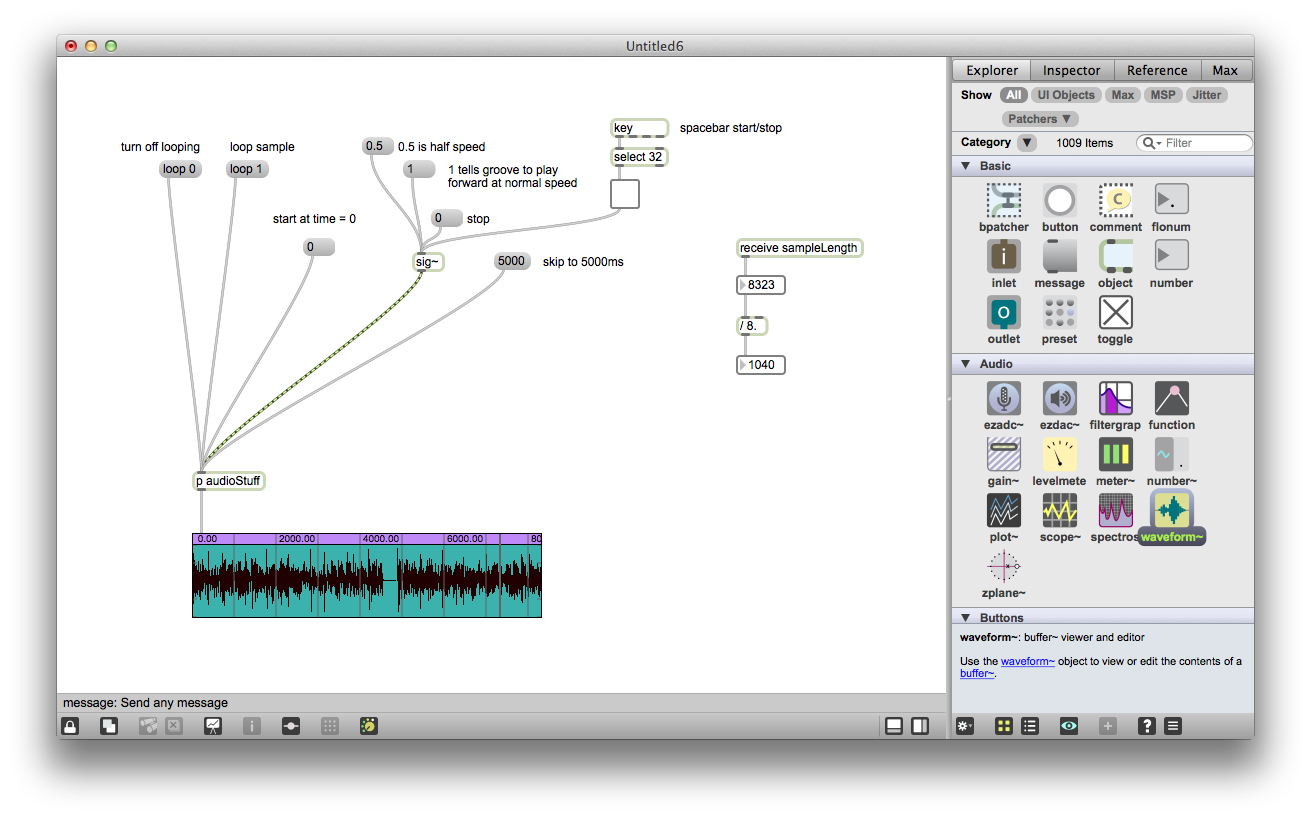
I'm splitting up my sample into 8 equal sections, so divide the output from receive to a / 8 object - this will give you the length of each of the 8 equal sections of the sample. Multiplying this number by integers between 0 and 7 will give you the correct time to jump to in the sample to get to the 0-7th beat. Wire this up and test it out for yourself.
----------begin_max5_patcher----------
2012.3oc2b1zjaZCF.9r2eEZX5g1LtaQRH9nyzC8dukiYxrirQ1lDLv.x6lO
lr+1qPBXArAj2fs0lCwdsvfd0id+RuRNe+tEVqR+BqvB72fO.Vr362sXgrox
FVT84EV6oeYcLsP90rVcfySSrVptTxg8oG3wLt7hvpVyn706hR19PNaMW8vc
8Q2auDf7wx2rqeE7wp6IJT93SW8o+Lvu9wqd17ulwTOEqUzjsVM2in2iRZ57
x19wc2U9xRMGLIrmDcXcuwYeQJsVuqtkMoI7hnuI6cX4.3LG0NAN26QVBbft
kCXL5dxHCa7fC6nD9Ki5RgJgtWdMq+MOhFacJdfdE7XOqnftkcDPrmKffc8j
f.G7BOf9mlG9vA4wMEFdyELbcbtGQzkFHyjFtyFMrc0W0.alvfLWvf35Jcbn
GMbLSZ3Laz.4du1vv1LgAd1ho36ouWCu.yjFnYiFNAZ60vy2LgAb1fg8Y.Cu
aKLDOfUr7yZjiFdj6UMxQ9kuQFM8RuFuzYzbwfiyxefkPWEK6c6wxAaY+LP0
DPyXto+Ev+94ReohZH+foyN0a37O1DmR4ucUZPN5nz.eKqzHFyrnGYfB59rX
1+wR1x2M2JQPX4aPkE3PXzcFcAa+J3y5z86YkyI8.Twmix.7TgRfs89hFzju
ckrmZnhVvxdjLYfpkAiHRXMtNmamUZbgzXFLUVAIls3RpU8UMpwxOLTbIWxs
MtzPZH7C4IfzMa.wooYhg2kSGQ3MtLtMTpaDPFSCw4VpgTBBvroi.wP4vFKK
PjCdLcDGGyTGQRDkO1Km5ALvuk9guyn5G3qf9wf9T4oYWNL3fcUpHHM7j5.u
g1IymaTarJidzzo2iMzE9IMQlsE7TaKniSCrmY5znfSy4.JGvi1y.+SKOpyt
MCxAIKcPkFTPvX1L3aouC66IfnBvNZ7FPQFiEd4fRUIoq7mNgiDr8szQx8yV
8EwXmVAQF2UBx2LMbf.NKNt.rMOMUr1FQ16YwzuB1jl+DMOrzhJIMeOMtqBT
bTBac5gDd6EGdABOAca4YpRqp7Cmjvt+JDdB4QjEPPsPvIzor+EuTbXOU5Ip
4+wgA7FafMPQCJh197rgCeR6U.hGyGKzcPbHDoDw.+FVIkL.8PXT564G1rY1
xhwURkpUI6MZF8ty31.1QjX4UvnhFhmRTL6QVdQTZRqu8BKZVVqlWz5VJQ3m
RkOH2kMMEknZB1zTN6wn56G2zJMW.FtfJGxUR9W7csTWTLscW8s1PMhDWAxT
YbsIpZ347B1DyvaiSW+YVXKe0BtkwRhRxxYEhfJTdkXzb4P1F5gX9CmdRs60
2PWyF7lO4DvBqs4QgoIkBQm6rr45tqbrohZzdvH+FIzrSbyhTH4GJVQyKwZU
IIQ0WjmlF28RMyjBK.ZRzdJmUl6o7tradnQ6yxiTgIaZSUwycEqySii67nTW
4wSbkPwj8Z1SQg7ccBwVdEwWOJqdJvpgQgQaYE7tswoaK51RmitRasv1l1cZ
umItzRn9wMnE6fkxSp9QTVqj5Walu5Gvqc+L5463DE5r0EpSFRRh5lkt1prS
dkrPIRCCC6wgA1WtzTbfud3.ZMzfEdEFrc7s2KnmvBqXWJ+Y.zt8WX.2AmsV
CjnpWgmLDn+QAB6CJBbTEmta8x3N+GHYgYhocynp2h9E4bC9M3kfmHhL0JrZ
Obbb6WAfiT7rGkmFAJGQ87cB+mWRLpB7b7NAdzor3MhVYmML77HFZBOd1dRH
oLjOtpAGUBxNHajMQT+MR7bAK75niFkrI8Yv9u991EB+7XevDZqpyCDB6n1x
QuofuqFpqKK8SUHeuoAc9ix+cT76azrxXNgKX7lIEvEwWb4YwQV..YcEC7lx
WLww78E2s3S8HphkwxsSG766K9iNTseMkNOVOUBWt3VtefvIMAHGkNyMP+bL
ZJrmBUKtFTtxyBfvnJErRrN6dNvunbsJPHIXfhAeTAgIF.VYeKjt94Wcx6pU
x.qRghT+5foPQt0YAop36OYLFjVPwtZyAblRQ.NtyrpJWs7nZXct5M3qT3hb
VVbY4Mt.wIvHoMl5TmoLwFMkcr4GlXbRRCuH4r657BFwjIwH5M8JeTABtr17
n.0thUczBr8mLod8xqb1yZ+kpBVtz5AJBlb.Vd8SC9hzC4qqE05kFC5NTCYE
7njlhj9glh2z66sKJLraMIUkwqnbsMgMGVuI0RNaQFooH6XNhL9smH6nqhgH
y..7MnLaPbFpgLSLGKPcM.gli5r1T9smH6ZNRrulJF9FiKiSXUMrHaFTl37l
KjcoJpqNg+LGJqqp7IRf50IxfOdW6c81pf9HK7AQWHxT8AJmmGs5.Wk1W6Mr
+mcqomdquOi8q8jBwHc9Pc513zUz3pinPy8dhsE9tWf3YdTOdRf2Mo46e9z+
uZf6jmbCR0OcY0ZY8ICblml3GP03kYtt1zubJOTqHpAI8VXj05czjzMaJXs2
B+tKsfzBVxGa2kSnXWeqkJBdjURPGyjALQ75js0wlGGaZbzbo1xCVC4wEc0j
GeGMjmdB8EUdvFl7fLL4AZXxisYIOk+zxMJ4w2vjGOCSdH5JOvqi7fLq3Ed5
Xu6c8hW3pU7T30SdHlU7TnqgIO5Le0SnujxCx1r3Cxv3C1yr3CNvr3iiiYwG
WchW7ZEG0pe5cx1Kkjdmn8dml8iOI6CcJ1E8yOt6+Aby5vPB
-----------end_max5_patcher-----------
Key

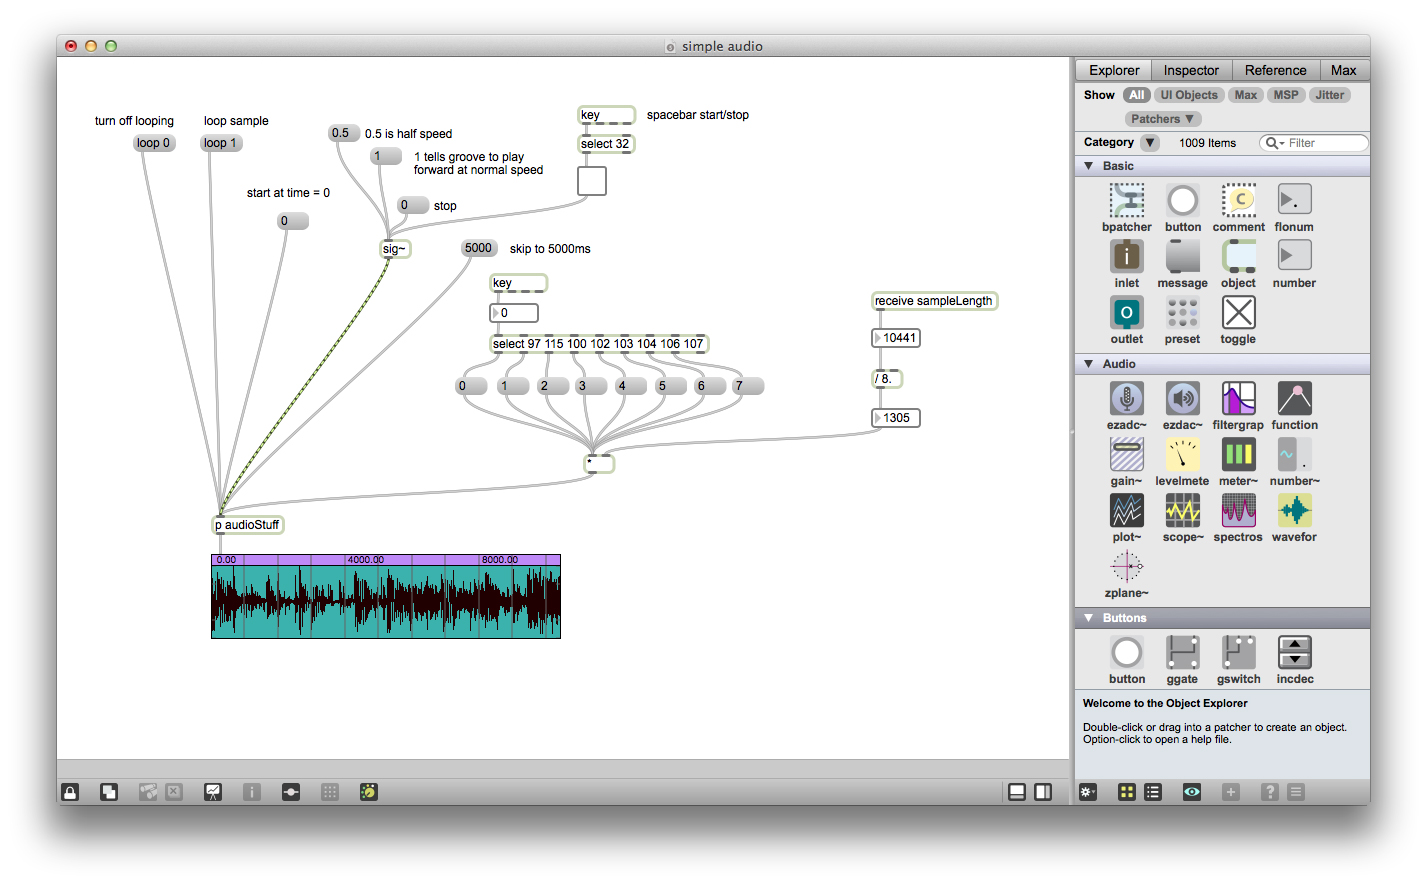
Key controls are a really nice final touch to add to this project. Create a key object and wire up a number to it. Now put the patch in lock mode and press different keys on your computer's keyboard to see what the key object outputs. You'll see that each key has a unique number that identifies it.
Wire up a select to the key object and look for the number 32, which corresponds to the spacebar key. Wire the output from the select to a toggle and wire that toggle up the sig~. When the spacebar is pressed, it will turn the toggle on, which sends a 1 message to the sig~ (remember, 1 will cause the sample to play forward at normal speed). Pressing the spacebar again will turn the toggle off, sending a 0 to the sig~ (this will cause the sample to stop). So now you're made a simple keyboard control for start/stop.
Extend this further by connecting keyboard controls to each of the messages that skip to various beats in the sample. I used select to look for the keys a-k and wired each of these to a different beat in my sample. You'll find this type of control is a lot more natural than using the mouse.
----------begin_max5_patcher----------
2227.3oc4btzjiZqFFds6eEpnNKRR0mN5BhKmpNKN6ytrLUptjMxtICFn.4d
lIoR+aO5BFC1bQtOdjYlYgsmQXfWd36l9Pt+qGV4st3S7ZOv+A7afUq9qGVs
ROjZfUM++Ud6YeZSFqV+07x4erX8e38nYSB9mD5gq4Y7MBPbH.gn.DDJegku
HxW9xWAxWgG2qhChLtP74Rt4L6slkuy6w2+mdfeu4PusHWTm9m5CLB+DrY37
C6SykmS80P7oAMJo2nkLwlWRy28bk7BxnOe4Qh9H.SCjGP.Fize.eB1dZSSz
TPRl+MB40QK4r8Zs38+pRYYdpM72O7f5sGsE3G1ulW40ptJ4QTvqdlmyVmoO
1vwvZZtnkRWEgPCRH77DBSUngBmDPvaLfF1h7C7O6MCXt7iqhRvAoj+rTBEa
nTrFYiPoXm.oeZRDcUz.OHMPiSCJL3oPIAHgZ2JBdRbPts7XOutlsieAPfiB
juvzfDFqcZhiOACTzvvHB4FXDdufQfLRKlZKMvtgFA2MZntxsEFNxOgdufAM
LRG0vNZ36FZ3e2nAI5IqgAzMvfbufgujBVG0HL1Mz.e2nQ.x5nFgQtAFn6FL
vWALB+Nr.9PSMoDBb9B3CoNo1zeFD8zn1KayJXeoKPsgI3Xz70mFh+90nASs
wnA4DiFo33ouxA0r8kY7egmuS7xMJnC78Z+fHpOP3no3SvMND7lh864JKgya
TyGRKAhB4cKHbec64rZ2Z80X6k962fANUX3XcwaHStIzzlLAgNpVVIJtaS6K
xuKQHgZtLRlo.pirQJYa3qYUfZAqR7y0hhRGanPCL8F.GZicxMNzhnX2tL96
N1aqDs.AS1dDnFAQ5vFl7xjQH.M9FFBsoUtD7rsq8V3afmm.l1tRimxFfF98
ZSEORIiqxzMUj5n.HhCU4fhsaAYEEkoJiEmF8.4qf.Qm1sIG7H.w2QoXTb.b
2RxHcfZci7ISkgw22MFHZdXpQy01FXxIiCYx2oLNHNJcq6yuRnDSYGlVKNSB
Vez25MeGizcNpAGS2e.RrCiYb25XRiehMAMHgtxOQVMJfI.hz8bv+8T7TWE5
HHzXk.04ThmrfDhiBd.ehBRqAuvx1BpK47DGCEbyDX7CrHPBwQsfVBk6keCl
h0FI9AyGIA6n47i.BdVVMXWUQwqb0r+KyXeFrsn5irpDkGUdQ0dVVeCnrzb9
lhC4htbvU4mH9ZJFD2wpRkydPLF7Md5IrrDekYDw2BaJ323sxGGaJcIvhV4i
hbxrBqS281n3Ptwb4Y6FzI1oJfAh60FIxjK.m.mPkR.6PRZwuJNrc6MxX4p4
BhPM0unmbb3jk6GLUK76dJ3UMvngFxcHMi+JupNsHuifV4wJK6L7pN6hBg+Q
g9.E7X6Po4lgPsCUweM839SZGkUIuPExqxCUFQ9on.OyFk21d33t1RAp9xOV
QUP.rYMZ4eBCx6v6xJ17AdRm3xx6Vk77z7xJdsLqBSzHi1Mmv2xNjIdd36b8
29V1F9n67frdk2tpzjhbkH5smpgOd5TWalLDcuXzeibV4.6rrFRwg50rJEVa
5lG93FEEEY82T6cRoG.KOcOSvUEep2KX6AMceYUpIOY6XllE9R8lphrrdGJy
VdcfsjHuYug+wzDwK8xwp1h7qmVd7VfWKiRR2wqE8GSv1U2ejdqxytVgccs6
M9Tt3m2tv7jgdbKS3TOpi83EILdfuP8z4aLCPWzsmKJA8b4MP7uUGiA13P8N
gl9xq6oax1EOZq.GOh23qQFsGtIZG836iQDbWIdrDRs4yMjEFw6c6u+GYZmS
bjcWrHWbwNk2hLrT8KEh2.sKCVad.2WkyD98Z2fn5LDnPSywHy4KQQtyYpec
nm0oD4LU.+Kzj7zwnTMMPkcou1trYxwQSXWBcGJmv77mjIcVblkGYoI39kqC
iKVnaNDkcWlFy83Bse4ZbixchsJ2I13teYmatnMvQKBazz7sEuA1+4es6iOX
Jq0GUQHp0e1NfM+iye9c2n6JwyXsi0OsFrYx9Hyi0apaKAKifv0bQ6MEvhJV
ruu4ghhzcLHNbtXwTe2Qz9sr6LhZXYltpZvOru9G6oqy6DmiJ3NfzInABMq4
IEtLnozqNwzQBfZ550.oqcAX8gsa6G.+Nw0ljbz3QZi9Eyig5Nrx+yD1l27t
dGSnMySA0TiD836iViD0QYXL8I2xbLM826wK5z2UY2PduIwaXHz7AxeN6Fj+
xHcQEuLS0SnETdBBV6BFEepbnIKYmrTHIKYQM0m.+SXzz+0IwHdQTUoIQv0V
W4cnpcbru4gAYlSILZ1x1ud9dpUppoVORmC0ZSs8gAecwgpMGAVyzx.8EYBu
Vjl21X4e6zTgO6K9RZRR+F4Z58YsZFVldVakUx0JYYo0f.KjrezhQxphWsCy
KGIirTxKGJ6GcERF80kjIKGJeA7FVwAe0o3A7RuWRFaa7hkijQViYzxRyVwY
5WoZdYDlCQrTyKHyY7WeRF53pL.+9CcWcCd0rW4IOKOCx5helIDUoqOHLUp1
cgY7+6RPX9k3vU7b4GTDSbxG6jtKqXMKqYonztuC73+e3DDuxkzyGk3caQ09
2l4Gf6zMP+XW2G4mDEcvUySyxgoYBYsWdmMuLuMuvxK1tslKlaU61rDfZ9qL
iYd8QzQV8bcW+S5uP+Y.YX24dKMD7RuDk0eX64YjJD648eo6wktFWbu7pzSv
b5g3V8PmSO9tUO9yoGna0CYF8n9CYgK0CdN8D4V8flSOgtUOv4rePtSOPKzC
xc5I1F43N2qXhE5IvcgmOKR2v5I1cgmiHKL8fWX5AsvzCbYomv3EldhVX5Ib
goGps5A4F8Xi+9Yh9KpdrweOzc4KBrwdNzco2CnKq7oA1X+3N4Psp7m.2oGa
B+Pc2rKn1X9PcW0799KKyYxBy9gDtr3CNZYwGLbYwGzBiOmcptw7wz7ty9A3
ojxY+v6N6Gc2k+f6F6Gam7772O7O.hYkttA
-----------end_max5_patcher-----------
Downloads
Presentation Mode
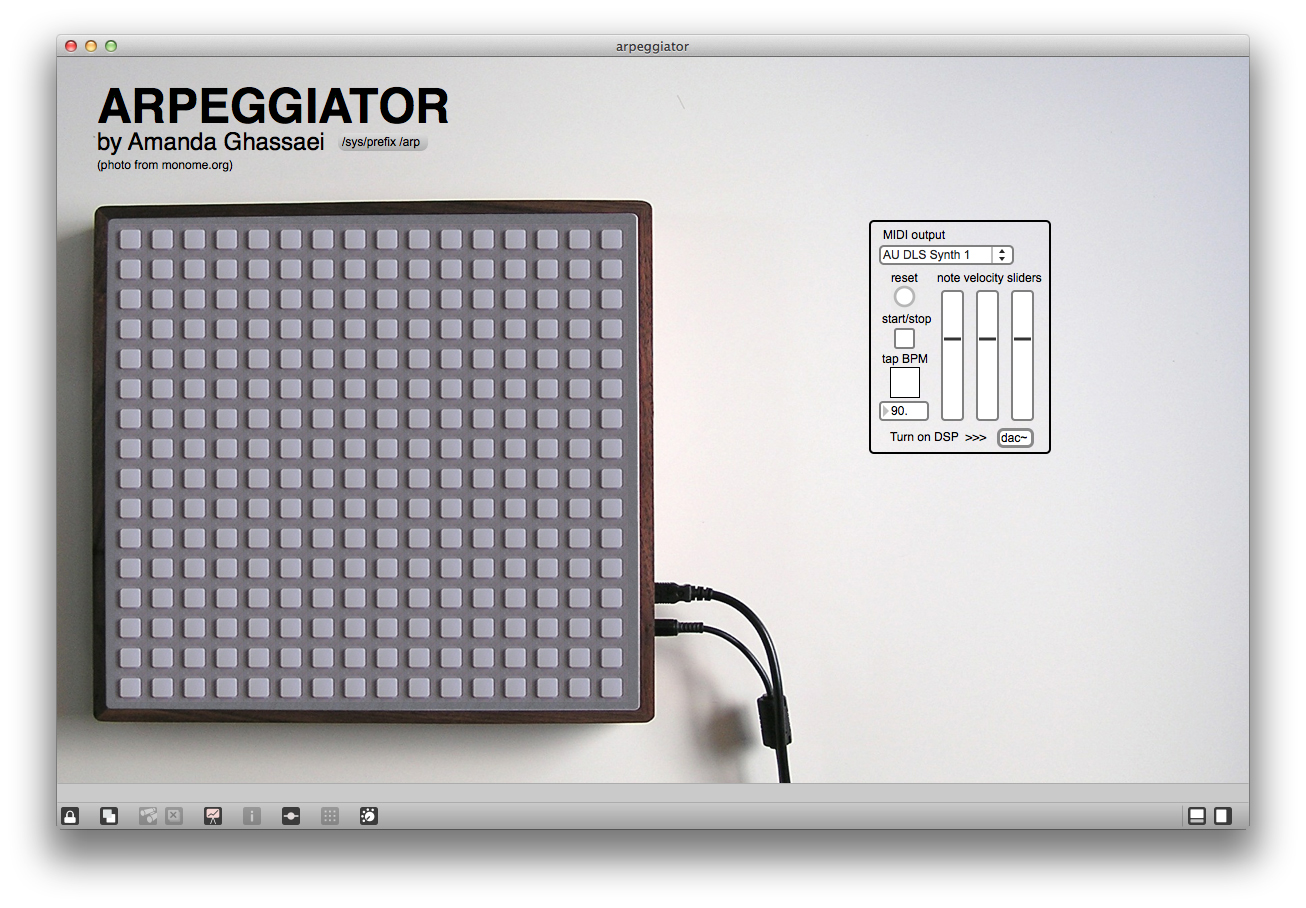
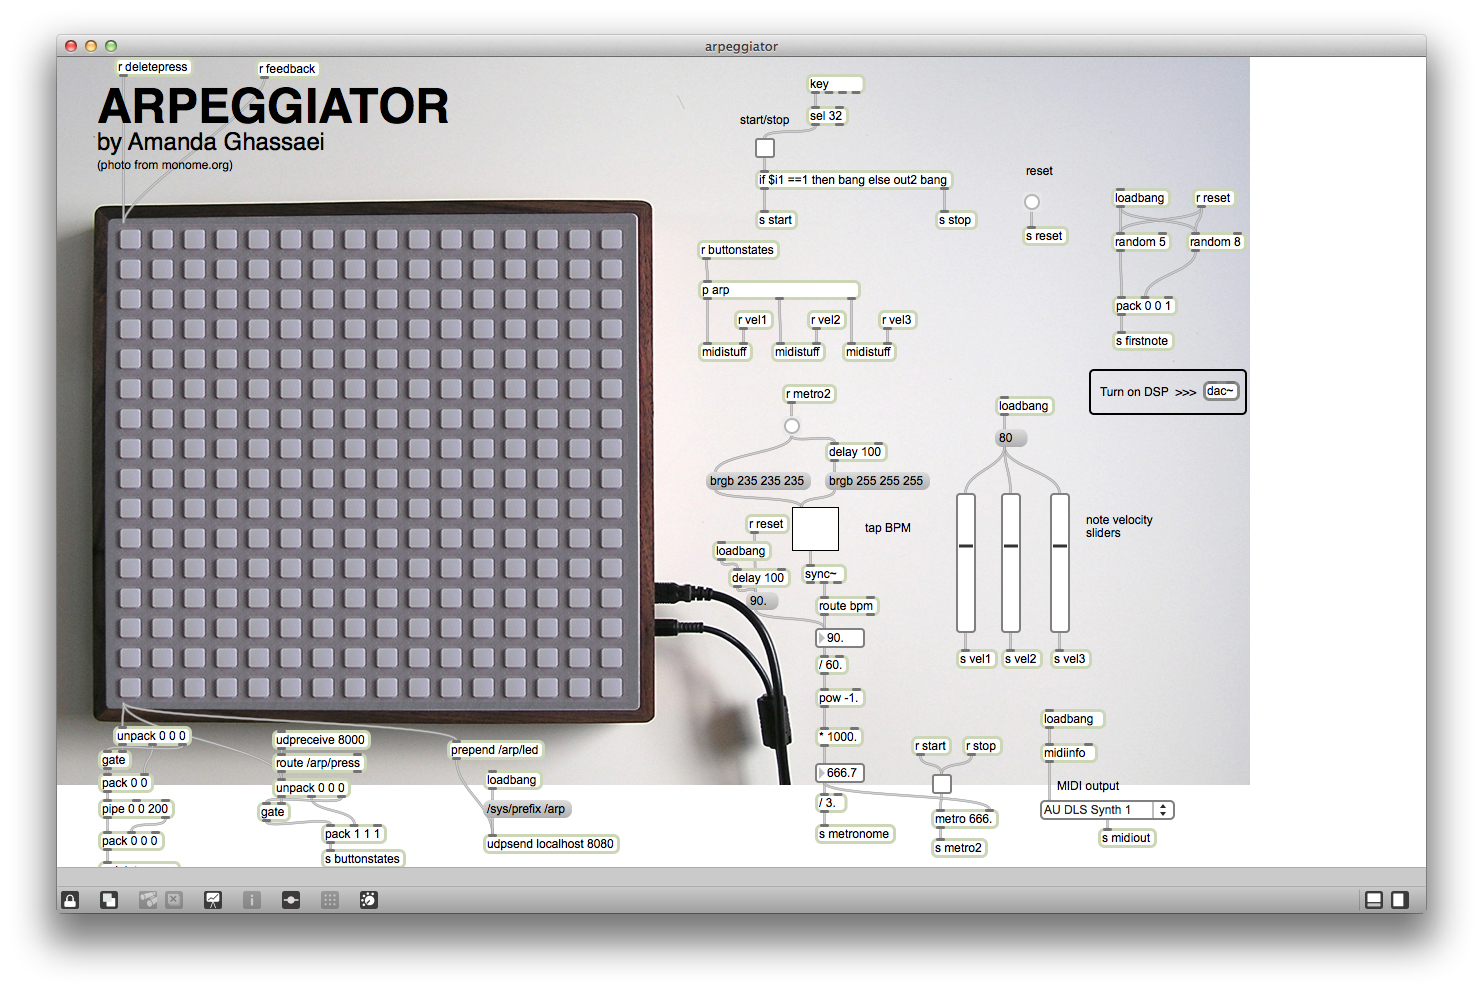
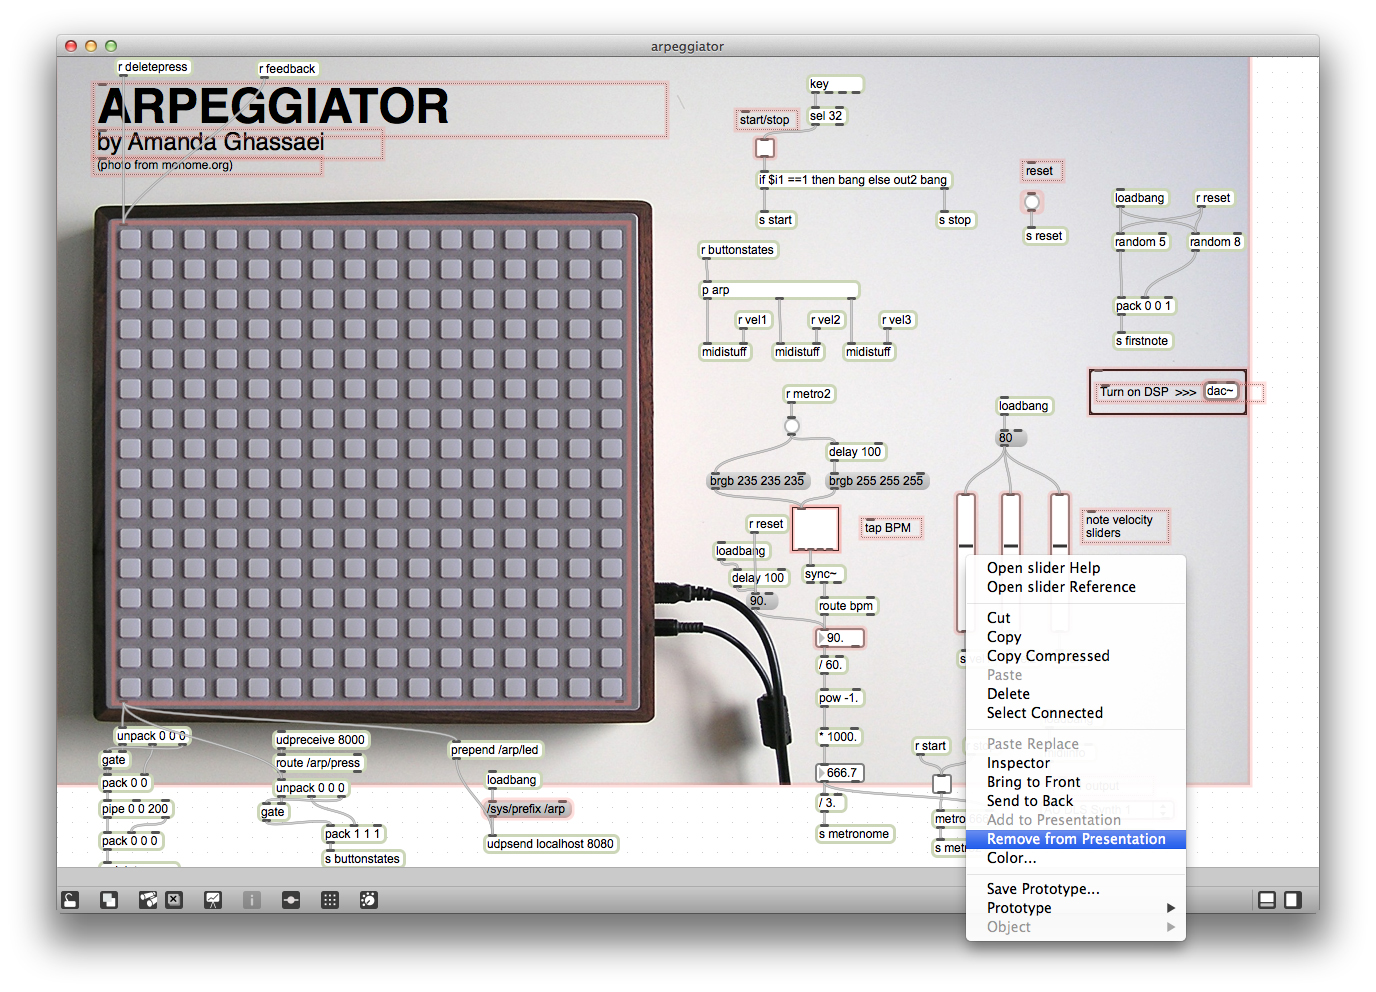
Presentation Mode is a setting that you can add to your patch to make it into a clean, user friendly UI. By default, all objects in your patch are not included in Presentation Mode, to change this, right click on any object and click "Add to Presentation". Then lock the patch and click on the presentation icon at the bottom left corner of the window to put the patch in presentation mode. You can unlock and rearrange elements in Presentation Mode without changing their position in non-Presentation Mode. In the example above, I've only included the controls necessary to run my patch in presentation mode, the rest of my objects are invisible. Also notice how I've pulled in an image as my background, and customized the look of matrixctrl to create a really nice looking interface - all of these options are available in the Inspector.
Find this patch attached below.
Find this patch attached below.
Downloads
Assignment
Try to synthesize some of the elements discussed in this Instructable. Some ideas:
-wire up the step sequencer with 4 copies of the simple audio playback patch shown in step 8 to play a short audio sample (like a drum sample) instead of a midi note each time a node in the sequencer is triggered. Make sure that each copy of buffer~ and groove~ have their own sample name (ie buffer~ amandasSample1 goes with groove~ amandasSample1, and buffer~ amandasSample2 goes with groove~ amandasSample2)
-use a few copies of the beat slicer to create a multilayered beat slicer. Wire this up to your keyboard so that keys a-k control one layer, keys q-i control another layer, and so on. (See the note above about sample names for buffer~ and groove~)
-use an ezadc~ to route an external audio signal into your patch. Use the modulation techniques discussed in the frequency modulated synth patch to change the way the signal sounds.
-use logical objects (if/gate) and metro to make a patch that composes and plays MIDI pop songs. Start off with a simple set of base chords and give the patch some rules about how it can generate its own melodies on top.
-or create an audio patch in Max using an object not covered in this Instructable. Here are some good objects to check out:
ezadc~ like ezdac~, but this allows you to pull a signal into your max patch from an outside source, like you're computer's line input.
alternatives to cycle~: phasor~, tri~, rect~
some kind of filter - I like lores~ for low pass filtering with resonance
spectroscope~ see the frequency spectrum of a signal
dropfile - drag and drop interface for loading files into your patch
tapin~/tapout~ delays
noise~ white noise generator
also try adding external objects into your library, there are tons of people out there making their own custom max objects, you can download them and load them into your copy of Max. I like one called pitch~ by Tristan Jehan, it allows you to perform a fast Fourier transform on a signal.
sfrecord~ record audio from your max patch directly into a file on your computer.
Continue on to the last part in this workshop series: how to get hardware like the Kinect, Arduino, Novation Launchpad, and many more to talk to Max.