Interfacing Force Sensor (FSR) With Arduino in Tinkercad
by Yogesh_Bawane in Circuits > Arduino
3242 Views, 2 Favorites, 0 Comments
Interfacing Force Sensor (FSR) With Arduino in Tinkercad
.png)
In this project we will be interfacing the Force sensor or force sensing resistor (FSR) to the Arduino Uno. Also, we have interface three different LEDs with Arduino.
in this tutorial you will learn how the force sensor works and how to interface with Arduino in tinkercad. The force is use to detect the pressure, amount of weight applied on the sensor, there are many applications of force sensor like it is used in electronic drum, gaming devices, industrial electronics etc. These sensors are good for measuring pressure but not highly accurate for measuring the weight.
Supplies
Components Required:
Arduino UNO
Force sensor
Resistor-01
Red LED
Yellow LED
Blue LED
Connecting wires
Connection:
The hardware a part of this project is quite simple and easy to place together. First of all, make the connections for the force sensor with the Arduino. The connections for the force sensor with the Arduino given in the above circuit diagram.
The force sensor we used here has size 2 inch. force sensor has two pins one is connected to the GND pin of an Arduino and another pin is connected to the digital pin of an Arduino using the voltage divider across this pin.
Connect the one terminal of force sensor to the GND of an Arduino.
Connect the other terminal of FSR to resistor for creating the voltage divider.
Connect the voltage divider output is connected to the analog input pin A0 of an Arduino.
Connect the red LED anode pin to digital pin 5.
Connect the yellow LED anode pin to digital pin 4.
Connect the blue LED anode pin to digital pin 3.
Connect the cathode pin of all LEDs to the GND pin of an Arduino.
Code Explanation (Block Based)
.png)
First of all, we create a variable named forcesense to store the sensor value . For declare the variable click on the variable block and create a variable, see the below picture.
Defining Analog Pin
.png)
After declaring the variable drag out the set block and set it to the read analog pin A0
Printing Sensor Data to Serial Monitor
.png)
Take out the serial monitor block to print the sensor value on the screen
Conditional Statement
.png)
.png)
.png)
Let’s use the main conditional statement of the program that is ‘if’ block
first if statement block:
In this if block we will use the less than “<” comparison operator.
Condition:
If the FSR value is less than 30 then pin 5 will be and pin no 4 and pin no 3 will be Low. This will make blue LED to turn on and other two LEDs will turn off this indicates the low pressure applied.
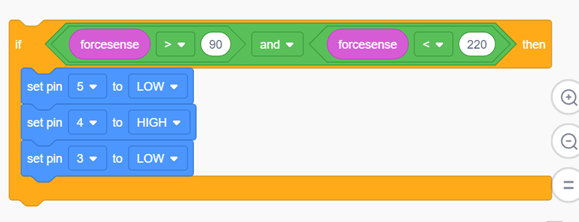
Second if statement block:
In this, if block we will use the three different operators two comparison operator that is less than “<” comparison operator and “>” greater than comparison operator and last the logical operator that is “&&” (and) operator
Condition:
If the applied force value is less than 220 and also If the applied force value is greater than 90 then pin 4 will be high and pin no 5 and pin no 3 will be Low. This will make yellow LED turn on and other two LEDs will turn off this indicates the medium range force is applied on FSR.