Interactive Dungeon and Dragon Table
by Lena912 in Living > Toys & Games
19170 Views, 87 Favorites, 0 Comments
Interactive Dungeon and Dragon Table


Welcome to my interactive Dungeon and Dragons table project! This table is designed for the ultimate role-playing experience, featuring a range of innovative functions that elevate the game to a whole new level.
At the heart of the table is a large screen that displays the current game map. Thanks to an integrated touch frame, players can move their figures directly on the screen, enabling intuitive and dynamic interaction. Each figure is equipped with an RFID chip, allowing players to log in at their individual panels. These panels provide each player with personalized information and enable direct communication with the game master.
The ESPs communicate with each other via WiFi, ensuring seamless and fast data transmission. The game master has full control over the system through a specially developed website, which allows them to manage the map display, communicate with players, and adjust the game environment in real-time.
A standout feature of the table is the built-in LED strip, which enhances the game's atmosphere by visually supporting the current scene. Whether it's dark dungeons or radiant castles, the lighting adapts flexibly to create an immersive environment. Another LED strip indicates the order of players, so everyone knows exactly when it's their turn.
This table is more than just a game table – it's a gateway to a world full of adventure and fantasy. It creates an interactive and captivating environment that intensifies the shared gaming experience and makes it unforgettable.
This is a suggestion on how to use the whole project, but each part of it can also be used individually. Whether you need just a board game table or a way to communicate with your players, build what you like and what suits your needs.
I built the table in the HRW Fablab.
Supplies
Interactive Table:
- Board game Table
- Screen (I used an old one that I still had at home)
- IR Touch Frame equal to the size of the screen
- Wood
Electronics:
- at least one ESP 32 (D1 MINI)
- multiple D1 MINI
- OLED - 1.3"
- RFID
- WS2812B LED strip
- cable
Other Materials:
- 3D printing PLA
- 3D printing resine
- screaws
- Magnete Ø10xØ3,5x5 mm
- Wood
- Acryle
- Computer
Design the Table

In this guide, I'll show you how to build your own gaming table.
You can also use a ready-made table. If you do, skip the design and table-building steps and start with installing the screen.
Otherwise, I'd be happy to show you how I built my table. Here are a few helpful questions:
First, I thought about how big my table should be. Here are a few helpful questions:
- How many people do we want to play with?
- How much space do I have for the table?
- How big is my screen?
To get a feel for the whole thing, I laid the frame and beams on the floor and tried out how big it could be. I decided on the dimensions 1.8 m by 1 m.
Then I created a sketch in Fusion.
Design of the Holding System
Next, I considered how to attach the components to the table. I decided to use a combination of clamps and magnets. To do this, I attached a metal strip to the middle board of the side sections. All holders, panels, etc., will have magnets. Additionally, they are 18 mm thick, which is about the same thickness as the gap between the board and the top.
However, there are a few things to consider. Not all wooden boards are exactly 18mm thick, and even during printing, things can be a bit thicker. Therefore, it is helpful to allow for a bit of play or to sand everything down by 0-1mm. The magnets will ensure that everything fits together nicely regardless.
Assembling the Table


Tabletop Instructions
For the tabletop, I used a birch plywood panel. I used a CNC router to cut a hole where the screen will be inserted later. The inner support beams are also made of birch plywood. All other wooden parts are made of oak, as they are visible from the outside.
For the legs, I used oak beams measuring 10 cm x 10 cm x 80 cm. I attached the other beams to these legs. For the outer cladding, I used wooden beams measuring 9 cm x 2 mm. The beams for the interior were halved, and I inserted a satin-finished acrylic beam in the middle to integrate the lighting.
For the top cover, I used the same beams. To attach the legs, I laser-cut and bent metal plates so that everything could be screwed together. I then attached the other beams to the frame with screws.
Use the Table As a Normal Table


To use the table as a regular table, I bought oak laminated boards from the hardware store and cut them to the correct dimensions. For easy assembly and disassembly, I divided them into five boards. These can be reattached using the tongue and groove principle, with additional magnets ensuring a secure hold. When the boards are not needed, they can be stored in their holder.
Adding Screen and Touch to the Table


I mounted the screen under the table by bending two metal beams that run exactly along the wall mount to screw the screen to the tabletop. The frame fits perfectly into the milled hole and holds its position through press fit.
For the lighting, I cut the LED strip to the appropriate length (in my case, 300 LEDs) and then attached it to the inside with the adhesive side of the LED strip. I routed the cables under the table to a D1 Mini. Then I glued two wooden beams and a 10 cm thick milky acrylic beam together. This is then screwed to the bottom of the table.
Setup Computer for Foundary
The TV is connected via HDMI, and the touch frame is connected via USB to the laptop, which has Foundry installed. In Foundry, I created a world and installed the following libraries.
https://github.com/Oromis/touch-vtt
https://gitlab.com/riccisi/foundryvtt-dice-so-nice
https://github.com/mclemente/fvtt-dice-tray
https://github.com/ghost-fvtt/fxmaster
https://github.com/MaterialFoundry/LockView
https://www.patreon.com/tabletoprpgmusic
https://gitlab.com/sasmira/dnd-ui
Kommunikation


How Communication Works
I set up a network using ESP-NOW. See the tutorial here.
I created a master-slave network where the master can communicate with all slaves, and all slaves can communicate with the master. See the diagram. The master also hosts the website, which can be transferred to the ESP using LittleFS.
The master (brain) receives data from the website and sends the information to the corresponding slaves.
The LED Strip Table:
- Registers with the master as soon as it starts.
- Waits for the color and mode to be displayed.
The Player Order:
- Registers with the master as soon as it starts.
- Waits for the number of players and can then display whose turn it is.
- Can receive messages to manipulate the count (add or subtract) or end the initiative.
The Player Panel:
- Registers with the master as soon as a player logs in with their RFID chip.
- Waits for a message from the master, then blinks the LED and displays the message on the OLED.
For the master, I use an ESP32 powered via USB. The directory structure for the master is organized as follows.
- Brain
- Brain.ino
- data
- index.html
- css
- chat.css
- color.css
- general.css
- initativ.css
- ruels.css
- script
- script.js
- src
- symbol.jpg
Downloads
Webseite


Website Interface
The website is the interface for the game master. Through it, they can communicate with the players, determine the player order, and control the table lighting.
Communication with Players:
- The game master can type a message into the text field (maximum 168 characters).
- They must then select which players should receive the message.
- The game master can choose to send the message to all players or only to specific ones.
Initiative:
- The game master can set the number of initiative
- Then he can add or sub payerso or end the initiative.
Lighting:
- The game master can create the ambiance for the current scene.
- They can choose from pre-set scenarios like forest, water, battle, and tavern, or select a color and lighting behavior to be sent to the corresponding ESP.
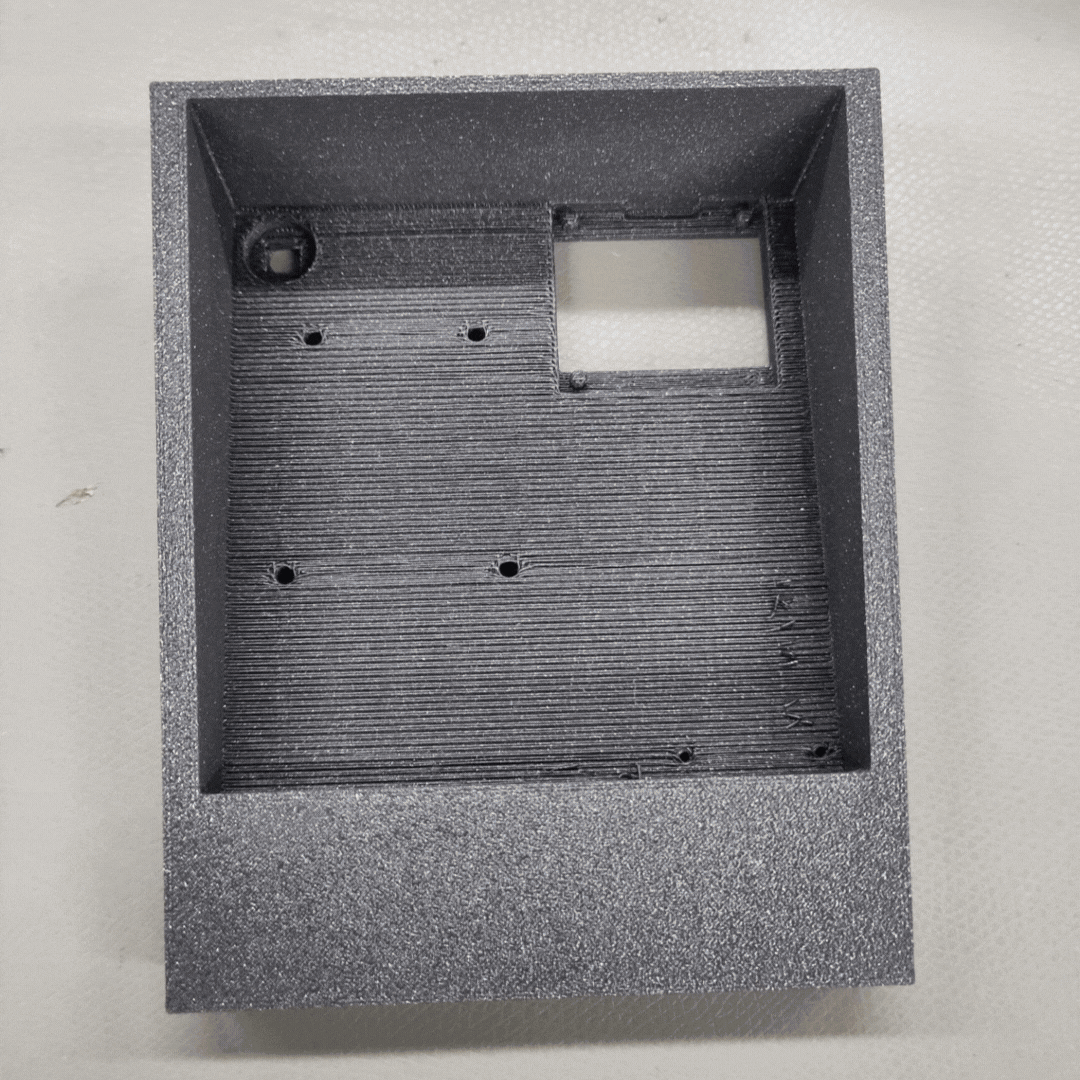
Build Player Panel

.gif)
Building the Player Panels
To build the player panels, you need the following components. For the 3D holder, you can choose between A or B, depending on whether it will be mounted inside or outside the table.
Components:
- ESP8266
- RFID reader with SPI interface
- OLED
- WS2812B LED
- Cables
- 3D holder (Player A or B)
The electronics are connected according to the circuit diagram. For power supply, I use a USB cable that can be connected to the table. I built five for my table, but you can build as many as you have players, up to a maximum of 120.
Downloads
Build Initative Anzeige


Player Order Display
For the player order, I equipped a wooden holder with a WS2812B LED strip. After the first test round, we added a button.
Components:
- ESP8266
- WS2812B LED strip (26 LEDs)
- Wooden holder for acrylic plates
- Acrylic plates for players
- 3D holder for D1 mini player order
- Button
The electronics are connected according to the circuit diagram. For power supply, I use a USB cable that can be connected to the table. My initiative display consists of 34 LEDs. Two LEDs are needed to illuminate each acrylic plate, so the display can show a maximum of 17 characters. I used frosted white acrylic plates for the players and red ones for the enemies.
Downloads
Build Electonic LED Tisch


Inside the table, I installed an LED strip all around behind milky acrylic to illuminate the table. The LED strip is controlled by an ESP 2866 and powered by an external power supply.
Components:
- ESP 2866
- WS2812B LED strip (300 LEDs)
- 3D holder for D1 Mini
- 1000uF capacitor
The electronics are connected according to the circuit diagram. For power supply, I use a USB cable that can be connected to the table. My setup consists of 600 LEDs
Downloads
Setup Dungeon Master


For the Game Master, I also built a mini table and a screen. The screen consists of three wooden panels connected with hinges. Inside, I attached metal plates covered with leather, and on the outside, I painted foam to look like wood. Inside, the Game Master can use magnets to attach everything they need, such as dice holders, monster cards, and the initiative tracker. On the bottom left, there are cables for the laptop: HDMI for the display, USB for touch, and power for the laptop. I also decorated the back with a dragon head that I 3D printed and painted. I used Flexi Paint and mixed the paint with wood dust to create a stone effect.
Add Extstra Stuff

To enhance the gaming experience and usability, I built a few extras: holders for drinks and a stand for the tabletop panels.
PlayerPanel


For the players, I also built small side tables. I made these from a board using a CNC milling machine. Underneath, I attached two boards to create slots so that the board can be attached to the table on one side, and on the other side, the holders can be attached like on the table. In the milled holes, I inserted 3D-printed parts for dice, pens, and cards.