IPhone X Minimalistic
by thesilentcanvas1910 in Design > Digital Graphics
882 Views, 2 Favorites, 0 Comments
IPhone X Minimalistic

This year, we saw Apple pull off a rather shocking release – the iPhone X. The device that is “all about the screen” sports a design that is completely new by Apple standards, and while they claim its a device that will bring in a new revolution in the smartphone world, many feel it is more of a desperate move by the Cupertino giants, most probably in an attempt to catch up to the competition. Be is as it may, we, at The Silent Canvas decided to try and make a minimalistic tribute to the iPhone X, and today, we want to share the same with all of you.
Disclaimer – The version of Adobe Illustrator we have on hand is the CS6, if you are using a version above this, a few features may seem different. So, bear with us. So, without further ado, lets get started –
Set Up the Document

Lets set up a new document – To do that go to FILE — NEW . You will be greeted by a document setup window.
In that , name the file as per requirement, we named it iPhone X.
Set the units to Pixels.
Set the Width and Height to 1000 pixels. Set the colour mode to RGB and click OK. You will now see your blank workspace. With this setup, lets begin the design.
Creating the Body ( Part 1 )


First, create a Rounded Rectangle of the following specifications :-
Width: 438 px
Height: 850 px
Corner Radius: 55 px
Using the Align tool, align this rounded rectangle to the center of the artboard ( Horizontal Align Center and then Vertical align center ). Now, add a fill to the rectangle. Use the code #666666. Remove the stroke. You should have the following result on your screen.
Creating the Body ( Part 2 )


Next, create another Rounded Rectangle of the following specifications:
Width: 418 px
Height: 830 px
Corner Radius: 55 px
Fill in the new rectangle with the colour #000000. Remove the stroke.
Using the Align tool, align the rectangle to the centre of the artboard ( Horizontal Align Center and then Vertical align center ). You should have the following result.
Creating the Body ( Part 3 )


Follow this up with a third rounded rectangle of the following specifications:
Width: 408 px
Height: 820 px
Corner Radius: 55 px
Fill in the new rectangle with the colour #FFFFFF. Remove the stroke.
Using the Align tool, align the rectangle to the centre of the artboard ( Horizontal Align Center and then Vertical align center ). You should have the following result.
Creating the Notch


To make the notch, first we will make a rounded rectangle of the following specifications :
Width: 245 px
Height: 65 px
Corner Radius: 55 px
Give this rectangle any random fill. Remove the stroke, and place it on the white rectangle as shown.
Now, select the white rectangle and new rectangle and using the Pathfinder tool, click on Minus Front. You will get the following result. Once we have finished the notch. Lets now make the buttons.
Creating the Buttons ( Part 1 )

Lets start the buttons. For the lock button, create a rounded rectangle of the following specifications :
Width: 27 px
Height: 47 px
Corner Radius: 55 px
Fill it with the colour #333333 and Remove the stroke.
Creating the Buttons ( Part 2 )

Now for the volume rockers, we will create one rounded rectangle and then duplicate it. Alternately, you can simply create two rounded rectangles and proceed. Use the following specifications:
Width: 27 px
Height: 78 px
Corner Radius: 55 px
Fill it with the colour #333333 and Remove the stroke.
Creating the Butons ( Part 3 )


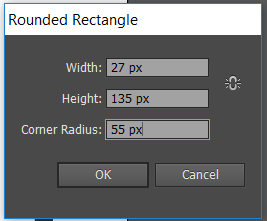
Finally, create one last rounded rectangle of the following specifications:
Width: 27 px
Height: 135 px
Corner Radius: 55 px
Fill it with the colour #333333 and Remove the stroke.
Once you have created the rectangles arrange the buttons as shown.
Arranging the Buttons


Once the buttons are placed, select them, Right click —Arrange—-Send to Back. Alternately, you can press Ctrl+Shift+[ to send them to the back. If successful, you should see something like this.
Then, select each button and move it 7 px inwards using the direction key on your keyboard. The end result should be something like this.
Finishing Touches

We are now ready to add colour to the display portion of the iPhone X. You can apply whatever gradient you wish. However, if you want to stick to the tutorial, you can create and apply the following gradient.
The specifications are as follows:
Colour code – #A11EF3 Location – 0%
Colour code – #FF8700 Location – 47.12%
Colour code – #D48E00 Location – 70.73 %
Colour code – #D40076 Location – 99%
After applying the gradient, you will have the following result.
Conclusion

You can further apply custom backgrounds as per requirement and taste, and then export the file as .png or .jpeg or any other desired supported format.
So, there you are, the iPhone X, in all its minimalistic glory. Do try this out and let us know if it was helpful. We would also like to see your variations, so feel free to give us a shoutout on any of out social handles.