ILI9341 Display and LOLIN D32 Carrier Board
by Arnov Sharma in Circuits > Arduino
8957 Views, 22 Favorites, 0 Comments
ILI9341 Display and LOLIN D32 Carrier Board

.gif)
.gif)

Greetings.
So this is the Carrier Board that is basically a connection board for connecting ILI9341 Display with Wemos Lolin D32 Pro Board.
The goal for preparing this project was to make a setup for connecting the display with the ESP32 board without using wires and a breadboard for preparing display-related projects.
This board serves as a replacement for the breadboard setup that we do for connecting the display with ESP32 Board.
This Instructables contains the built process of the Carrier Board along with ESP32 and ILI9341 Display implementation with the tft_eSPI Library.
Let's get started!
Supplies
.gif)
Following are the stuff required in this built-
- ILI9341 Display
- Wemos Lolin D32 Pro
- Custom PCB (that were provided by PCBWAY)
- Female Header Pin Connector for Display and ESP32 Board
About the Ili9341 Display

ILI9341 is a 262,144-color single-chip SOC driver for a TFT liquid crystal display with a resolution of 320x240 pixels.
ILI9341 can operate with 1.65V ~ 3.3V I/O interface voltage and an incorporated voltage follower circuit to generate voltage levels for driving an LCD.
The Display Module used in this project has a touch interface inbuilt with an SD card reader slot that we can use to read SD card data.
Following are ILI9341 Pinout-
- PIN1- VCC
- PIN2- GND
- PIN3- CS
- PIN4- RESET
- PIN5- DC
- PIN6- MOSI (LCD)
- PIN7- SCK (LCD)
- PIN8- LED
- PIN9- MISO (LCD)
- PIN10- T_CLK
- PIN11- T_CS
- PIN12- T_DIN
- PIN13- T_D0
- PIN14- T_IRQ
Using ESP32 Lolin D32 Pro
.jpg)
Wemos Lolin D32 Pro is being used to drive the display in this project.
It's based on the ESP32-WROVER module with 16MB/4MB FLASH, 4MB PSRAM and has an SD card reader on board with a Display port and an I2C connector.
Wiring Connection
.jpg)
As for basic wiring between ESP32 Board and ILI9341 Display, we connect both of them by following the wiring diagram.
- VCC of the display to 3.3V
- GND to GND
- CS (LCD) to D27
- RESET to D26
- DC to D14
- MOSI to D23
- SCK to D18
- LED to 3.3V (this is for backlight)
- MISO to D19
- Touch CLK to D18 (SCK)
- Touch CS to D21
- Touch DIN to D23 (MOSI)
- Touch DO to D19 (MISO)
PCB DESIGN


To Prepare the Carrier Board, we use the wiring connections and prepare a simple schematic that breakouts all the pins and adds Header Pins for connecting the Display with ESP32.
Also, there's a CON2 for adding an external battery for powering this setup along with an LED connected with D2 of the ESP32.
After finalizing the Schematic file, we convert it into a board file and prepare the PCB in a 96mm x 55mm form factor.
the ILI9341 Display is added on TOP Side and the ESP32 is on the Bottom Side, we add additional connectors near the display port and ESP32 connections so we can add header pins to these connectors for using ESP32 GPIO Pins or use Display pins.
After finalizing the Board, we check it one last time and then export its Gerber data so we can send it to a PCB Manufacturer for samples.
PCBWAY
.gif)
.gif)
.gif)
After finishing the PCB Design and exporting the Gerber data, we upload it on PCBWAY's Quote page for placing an order.
RED Soldermask is being used for this project as we already have tired RED PCBs in past projects and it looks pretty, Also the display has RED PCB so using RED Soldermask just seems right.
PCBs got delivered in a week which was super fast.
As for the quality of the PCBs, each PCB were made properly and there were no error or misprints anywhere.
Next, we prepare for the board assembly process.
Assembly Process
.gif)
.gif)
.gif)
.gif)
.gif)
.gif)
.gif)
.gif)
We first gather all the components that we need for the assembly process that including header pins for ESP32 and LCD Screen along with Custom PCB and a PCB Holding Jig for the soldering process.
- We start first by adding PCB to the PCB Soldering Jig.
- Next, we add header pins for the display on the TOP Side of the PCB, we add Kapton tape to keep header pins in their place while soldering. (Kapton Tape is a thermal resistive tape used in electronics, also known as golden tape, used in batteries or cells)
- We solder the connector from the bottom side.
- After this, we redo the above process for adding ESP32's header pins by placing the pins in their pads and using Kapton tape to hold the connectors during the soldering process.
- We then solder a Flat 3V LED on the LED connection Pad in the right polarity.
- The Board is now completed
Result So Far
.gif)
.gif)
.gif)
.gif)
Here's how the board looks.
We now add ESP32 and Display to the carrier board and prepare the software part of this project.
Library TFT_eSPI

For driving the ILI9341 Display, we use the popular TFT_eSPI Library by Bodmer.
https://github.com/Bodmer/TFT_eSPI
TFT_eSPI is an amazing library that supports all major displays that are used, like ILI9430, ST7735, and even the round LCD GC9A01.
Do check out my previous project about GC9A01 Display if interested, both are similar.
https://www.instructables.com/ESP32-and-Round-OLED-Smart-Watch-Concept/
- We first go to its Github Page and download the RAW files.
- Next, we extract the folder in Documents>Arduino>Libraries where we keep all our custom libraries.
- We Open the Arduino IDE and see the TFT_eSPI added in the library manager.
For using Different types of displays, we make changes in the User_Setup file of this library, the default one is set for ILI9341 Display so we dont have to change anything for using the current display but if we want to use a different display like GC9A01 Round LCD, then we have to edit User_Setup.h file.
Note- If you're using ESP32 for the first time, Arduino IDE Doesnt contain ESP32 boards by default, you have to add them by putting the below link in the preferences of Arduino IDE and then adding them through the board manager.
Example Sketches
To Test the setup, we first connect the ESP32 Board with Arduino IDE through a USB Cable and change the board to Lolin D32 Pro and also choose the right port.
We goto File>Examples> TFT_eSPI>320x240 and select any sketch for uploading it into the ESP32.
Matrix
.gif)
We first choose the TFT_Matrix Sketch that displays random numbers and alphabets scrolling from TOP to BOTTOM side of the display just like in the movie matrix.
Here's the sketch-
// A fun MATRIX-like screen demo of scrolling
// Screen will flicker initially until fully drawn
// then scroll smoothly

// Needs GLCD font

/*
 Make sure all the display driver and pin comnenctions are correct by
 editting the User_Setup.h file in the TFT_eSPI library folder.

 #########################################################################
 ###### DON'T FORGET TO UPDATE THE User_Setup.h FILE IN THE LIBRARY ######
 #########################################################################
*/

#include <TFT_eSPI.h> // Hardware-specific library
#include <SPI.h>

TFT_eSPI tft = TFT_eSPI();       // Invoke custom library

#define TEXT_HEIGHT 8 // Height of text to be printed and scrolled
#define BOT_FIXED_AREA 0  // Number of lines in bottom fixed area (lines counted from bottom of screen)
#define TOP_FIXED_AREA 0  // Number of lines in top fixed area (lines counted from top of screen)

uint16_t yStart = TOP_FIXED_AREA;
uint16_t yArea = 320 - TOP_FIXED_AREA - BOT_FIXED_AREA;
uint16_t yDraw = 320 - BOT_FIXED_AREA - TEXT_HEIGHT;
byte     pos[42];
uint16_t xPos = 0;

void setup() {
  Serial.begin(115200);
  randomSeed(analogRead(A0));
  tft.init();
  tft.setRotation(0);
  tft.fillScreen(ILI9341_BLACK);
  setupScrollArea(TOP_FIXED_AREA, BOT_FIXED_AREA);
}

void loop(void) {
  // First fill the screen with random streaks of characters
  for (int j = 0; j < 600; j += TEXT_HEIGHT) {
    for (int i = 0; i < 40; i++) {
      if (pos[i] > 20) pos[i] -= 3; // Rapid fade initially brightness values
      if (pos[i] > 0) pos[i] -= 1; // Slow fade later
      if ((random(20) == 1) && (j<400)) pos[i] = 63; // ~1 in 20 probability of a new character
      tft.setTextColor(pos[i] << 5, ILI9341_BLACK); // Set the green character brightness
      if (pos[i] == 63) tft.setTextColor(ILI9341_WHITE, ILI9341_BLACK); // Draw white character
      xPos += tft.drawChar(random(32, 128), xPos, yDraw, 1); // Draw the character
    }
    yDraw = scroll_slow(TEXT_HEIGHT, 14); // Scroll, 14ms per pixel line
    xPos = 0;
  }

  //tft.setRotation(2);
  //tft.setTextColor(63 << 5, ILI9341_BLACK);
  //tft.drawCentreString("MATRIX",120,60,4);
  //tft.setRotation(0);

  // Now scroll smoothly forever
  while (1) {yield(); yDraw = scroll_slow(320,5); }// Scroll 320 lines, 5ms per line

}

void setupScrollArea(uint16_t TFA, uint16_t BFA) {
  tft.writecommand(ILI9341_VSCRDEF); // Vertical scroll definition
  tft.writedata(TFA >> 8);
  tft.writedata(TFA);
  tft.writedata((320 - TFA - BFA) >> 8);
  tft.writedata(320 - TFA - BFA);
  tft.writedata(BFA >> 8);
  tft.writedata(BFA);
}

int scroll_slow(int lines, int wait) {
  int yTemp = yStart;
  for (int i = 0; i < lines; i++) {
    yStart++;
    if (yStart == 320 - BOT_FIXED_AREA) yStart = TOP_FIXED_AREA;
    scrollAddress(yStart);
    delay(wait);
  }
  return  yTemp;
}

void scrollAddress(uint16_t VSP) {
  tft.writecommand(ILI9341_VSCRSADD); // Vertical scrolling start address
  tft.writedata(VSP >> 8);
  tft.writedata(VSP);
}
Digital Clock
.gif)
Next, we use the Digital_Clock Sketch to display real-time which was taken by the MCU from the computer before uploading.
If we reset or unplug the device and restart it from an external source, time will reset.
/*
 An example digital clock using a TFT LCD screen to show the time.
 Demonstrates use of the font printing routines. (Time updates but date does not.)

 It uses the time of compile/upload to set the time
 For a more accurate clock, it would be better to use the RTClib library.
 But this is just a demo...

 Make sure all the display driver and pin comnenctions are correct by
 editting the User_Setup.h file in the TFT_eSPI library folder.

 #########################################################################
 ###### DON'T FORGET TO UPDATE THE User_Setup.h FILE IN THE LIBRARY ######
 #########################################################################

 Based on clock sketch by Gilchrist 6/2/2014 1.0

A few colour codes:

code	color
0x0000	Black
0xFFFF	White
0xBDF7	Light Gray
0x7BEF	Dark Gray
0xF800	Red
0xFFE0	Yellow
0xFBE0	Orange
0x79E0	Brown
0x7E0	Green
0x7FF	Cyan
0x1F	Blue
0xF81F	Pink

 */

#include <TFT_eSPI.h> // Hardware-specific library
#include <SPI.h>

#define TFT_GREY 0x5AEB

TFT_eSPI tft = TFT_eSPI();       // Invoke custom library

uint32_t targetTime = 0;                    // for next 1 second timeout

static uint8_t conv2d(const char* p); // Forward declaration needed for IDE 1.6.x

uint8_t hh = conv2d(__TIME__), mm = conv2d(__TIME__ + 3), ss = conv2d(__TIME__ + 6); // Get H, M, S from compile time

byte omm = 99, oss = 99;
byte xcolon = 0, xsecs = 0;
unsigned int colour = 0;

void setup(void) {
  //Serial.begin(115200);
  tft.init();
  tft.setRotation(1);
  tft.fillScreen(TFT_BLACK);

  tft.setTextSize(1);
  tft.setTextColor(TFT_YELLOW, TFT_BLACK);

  targetTime = millis() + 1000;
}

void loop() {
  if (targetTime < millis()) {
    // Set next update for 1 second later
    targetTime = millis() + 1000;

    // Adjust the time values by adding 1 second
    ss++;              // Advance second
    if (ss == 60) {    // Check for roll-over
      ss = 0;          // Reset seconds to zero
      omm = mm;        // Save last minute time for display update
      mm++;            // Advance minute
      if (mm > 59) {   // Check for roll-over
        mm = 0;
        hh++;          // Advance hour
        if (hh > 23) { // Check for 24hr roll-over (could roll-over on 13)
          hh = 0;      // 0 for 24 hour clock, set to 1 for 12 hour clock
        }
      }
    }


    // Update digital time
    int xpos = 0;
    int ypos = 85; // Top left corner ot clock text, about half way down
    int ysecs = ypos + 24;

    if (omm != mm) { // Redraw hours and minutes time every minute
      omm = mm;
      // Draw hours and minutes
      if (hh < 10) xpos += tft.drawChar('0', xpos, ypos, 8); // Add hours leading zero for 24 hr clock
      xpos += tft.drawNumber(hh, xpos, ypos, 8);             // Draw hours
      xcolon = xpos; // Save colon coord for later to flash on/off later
      xpos += tft.drawChar(':', xpos, ypos - 8, 8);
      if (mm < 10) xpos += tft.drawChar('0', xpos, ypos, 8); // Add minutes leading zero
      xpos += tft.drawNumber(mm, xpos, ypos, 8);             // Draw minutes
      xsecs = xpos; // Sae seconds 'x' position for later display updates
    }
    if (oss != ss) { // Redraw seconds time every second
      oss = ss;
      xpos = xsecs;

      if (ss % 2) { // Flash the colons on/off
        tft.setTextColor(0x39C4, TFT_BLACK);        // Set colour to grey to dim colon
        tft.drawChar(':', xcolon, ypos - 8, 8);     // Hour:minute colon
        xpos += tft.drawChar(':', xsecs, ysecs, 6); // Seconds colon
        tft.setTextColor(TFT_YELLOW, TFT_BLACK);    // Set colour back to yellow
      }
      else {
        tft.drawChar(':', xcolon, ypos - 8, 8);     // Hour:minute colon
        xpos += tft.drawChar(':', xsecs, ysecs, 6); // Seconds colon
      }

      //Draw seconds
      if (ss < 10) xpos += tft.drawChar('0', xpos, ysecs, 6); // Add leading zero
      tft.drawNumber(ss, xpos, ysecs, 6);                     // Draw seconds
    }
  }
}


// Function to extract numbers from compile time string
static uint8_t conv2d(const char* p) {
  uint8_t v = 0;
  if ('0' <= *p && *p <= '9')
    v = *p - '0';
  return 10 * v + *++p - '0';
}
Keypad 240x320
.gif)
.gif)
This is an interesting sketch, an interactive number pad sketch on which we can input any number and it will send that number to the serial monitor.
This Sketch utilizes the touch function of LCD Display.
/*
  The TFT_eSPI library incorporates an Adafruit_GFX compatible
  button handling class, this sketch is based on the Arduin-o-phone
  example.

  This example diplays a keypad where numbers can be entered and
  send to the Serial Monitor window.

  The sketch has been tested on the ESP8266 (which supports SPIFFS)

  The minimum screen size is 320 x 240 as that is the keypad size.
*/

// The SPIFFS (FLASH filing system) is used to hold touch screen
// calibration data

#include "FS.h"

#include <SPI.h>
#include <TFT_eSPI.h>      // Hardware-specific library

TFT_eSPI tft = TFT_eSPI(); // Invoke custom library

// This is the file name used to store the calibration data
// You can change this to create new calibration files.
// The SPIFFS file name must start with "/".
#define CALIBRATION_FILE "/TouchCalData1"

// Set REPEAT_CAL to true instead of false to run calibration
// again, otherwise it will only be done once.
// Repeat calibration if you change the screen rotation.
#define REPEAT_CAL false

// Keypad start position, key sizes and spacing
#define KEY_X 40 // Centre of key
#define KEY_Y 96
#define KEY_W 62 // Width and height
#define KEY_H 30
#define KEY_SPACING_X 18 // X and Y gap
#define KEY_SPACING_Y 20
#define KEY_TEXTSIZE 1   // Font size multiplier

// Using two fonts since numbers are nice when bold
#define LABEL1_FONT &FreeSansOblique12pt7b // Key label font 1
#define LABEL2_FONT &FreeSansBold12pt7b    // Key label font 2

// Numeric display box size and location
#define DISP_X 1
#define DISP_Y 10
#define DISP_W 238
#define DISP_H 50
#define DISP_TSIZE 3
#define DISP_TCOLOR TFT_CYAN

// Number length, buffer for storing it and character index
#define NUM_LEN 12
char numberBuffer[NUM_LEN + 1] = "";
uint8_t numberIndex = 0;

// We have a status line for messages
#define STATUS_X 120 // Centred on this
#define STATUS_Y 65

// Create 15 keys for the keypad
char keyLabel[15][5] = {"New", "Del", "Send", "1", "2", "3", "4", "5", "6", "7", "8", "9", ".", "0", "#" };
uint16_t keyColor[15] = {TFT_RED, TFT_DARKGREY, TFT_DARKGREEN,
                         TFT_BLUE, TFT_BLUE, TFT_BLUE,
                         TFT_BLUE, TFT_BLUE, TFT_BLUE,
                         TFT_BLUE, TFT_BLUE, TFT_BLUE,
                         TFT_BLUE, TFT_BLUE, TFT_BLUE
                        };

// Invoke the TFT_eSPI button class and create all the button objects
TFT_eSPI_Button key[15];

//------------------------------------------------------------------------------------------

void setup() {
  // Use serial port
  Serial.begin(9600);

  // Initialise the TFT screen
  tft.init();

  // Set the rotation before we calibrate
  tft.setRotation(0);

  // Calibrate the touch screen and retrieve the scaling factors
  touch_calibrate();

  // Clear the screen
  tft.fillScreen(TFT_BLACK);

  // Draw keypad background
  tft.fillRect(0, 0, 240, 320, TFT_DARKGREY);

  // Draw number display area and frame
  tft.fillRect(DISP_X, DISP_Y, DISP_W, DISP_H, TFT_BLACK);
  tft.drawRect(DISP_X, DISP_Y, DISP_W, DISP_H, TFT_WHITE);

  // Draw keypad
  drawKeypad();
}

//------------------------------------------------------------------------------------------

void loop(void) {
  uint16_t t_x = 0, t_y = 0; // To store the touch coordinates

  // Pressed will be set true is there is a valid touch on the screen
  boolean pressed = tft.getTouch(&t_x, &t_y);

  // / Check if any key coordinate boxes contain the touch coordinates
  for (uint8_t b = 0; b < 15; b++) {
    if (pressed && key[b].contains(t_x, t_y)) {
      key[b].press(true);  // tell the button it is pressed
    } else {
      key[b].press(false);  // tell the button it is NOT pressed
    }
  }

  // Check if any key has changed state
  for (uint8_t b = 0; b < 15; b++) {

    if (b < 3) tft.setFreeFont(LABEL1_FONT);
    else tft.setFreeFont(LABEL2_FONT);

    if (key[b].justReleased()) key[b].drawButton();     // draw normal

    if (key[b].justPressed()) {
      key[b].drawButton(true);  // draw invert

      // if a numberpad button, append the relevant # to the numberBuffer
      if (b >= 3) {
        if (numberIndex < NUM_LEN) {
          numberBuffer[numberIndex] = keyLabel[b][0];
          numberIndex++;
          numberBuffer[numberIndex] = 0; // zero terminate
        }
        status(""); // Clear the old status
      }

      // Del button, so delete last char
      if (b == 1) {
        numberBuffer[numberIndex] = 0;
        if (numberIndex > 0) {
          numberIndex--;
          numberBuffer[numberIndex] = 0;//' ';
        }
        status(""); // Clear the old status
      }

      if (b == 2) {
        status("Sent value to serial port");
        Serial.println(numberBuffer);
      }
      // we dont really check that the text field makes sense
      // just try to call
      if (b == 0) {
        status("Value cleared");
        numberIndex = 0; // Reset index to 0
        numberBuffer[numberIndex] = 0; // Place null in buffer
      }

      // Update the number display field
      tft.setTextDatum(TL_DATUM);        // Use top left corner as text coord datum
      tft.setFreeFont(&FreeSans18pt7b);  // Choose a nicefont that fits box
      tft.setTextColor(DISP_TCOLOR);     // Set the font colour

      // Draw the string, the value returned is the width in pixels
      int xwidth = tft.drawString(numberBuffer, DISP_X + 4, DISP_Y + 12);

      // Now cover up the rest of the line up by drawing a black rectangle.  No flicker this way
      // but it will not work with italic or oblique fonts due to character overlap.
      tft.fillRect(DISP_X + 4 + xwidth, DISP_Y + 1, DISP_W - xwidth - 5, DISP_H - 2, TFT_BLACK);

      delay(10); // UI debouncing
    }
  }
}

//------------------------------------------------------------------------------------------

void drawKeypad()
{
  // Draw the keys
  for (uint8_t row = 0; row < 5; row++) {
    for (uint8_t col = 0; col < 3; col++) {
      uint8_t b = col + row * 3;

      if (b < 3) tft.setFreeFont(LABEL1_FONT);
      else tft.setFreeFont(LABEL2_FONT);

      key[b].initButton(&tft, KEY_X + col * (KEY_W + KEY_SPACING_X),
                        KEY_Y + row * (KEY_H + KEY_SPACING_Y), // x, y, w, h, outline, fill, text
                        KEY_W, KEY_H, TFT_WHITE, keyColor[b], TFT_WHITE,
                        keyLabel[b], KEY_TEXTSIZE);
      key[b].drawButton();
    }
  }
}

//------------------------------------------------------------------------------------------

void touch_calibrate()
{
  uint16_t calData[5];
  uint8_t calDataOK = 0;

  // check file system exists
  if (!SPIFFS.begin()) {
    Serial.println("Formating file system");
    SPIFFS.format();
    SPIFFS.begin();
  }

  // check if calibration file exists and size is correct
  if (SPIFFS.exists(CALIBRATION_FILE)) {
    if (REPEAT_CAL)
    {
      // Delete if we want to re-calibrate
      SPIFFS.remove(CALIBRATION_FILE);
    }
    else
    {
      File f = SPIFFS.open(CALIBRATION_FILE, "r");
      if (f) {
        if (f.readBytes((char *)calData, 14) == 14)
          calDataOK = 1;
        f.close();
      }
    }
  }

  if (calDataOK && !REPEAT_CAL) {
    // calibration data valid
    tft.setTouch(calData);
  } else {
    // data not valid so recalibrate
    tft.fillScreen(TFT_BLACK);
    tft.setCursor(20, 0);
    tft.setTextFont(2);
    tft.setTextSize(1);
    tft.setTextColor(TFT_WHITE, TFT_BLACK);

    tft.println("Touch corners as indicated");

    tft.setTextFont(1);
    tft.println();

    if (REPEAT_CAL) {
      tft.setTextColor(TFT_RED, TFT_BLACK);
      tft.println("Set REPEAT_CAL to false to stop this running again!");
    }

    tft.calibrateTouch(calData, TFT_MAGENTA, TFT_BLACK, 15);

    tft.setTextColor(TFT_GREEN, TFT_BLACK);
    tft.println("Calibration complete!");

    // store data
    File f = SPIFFS.open(CALIBRATION_FILE, "w");
    if (f) {
      f.write((const unsigned char *)calData, 14);
      f.close();
    }
  }
}

//------------------------------------------------------------------------------------------

// Print something in the mini status bar
void status(const char *msg) {
  tft.setTextPadding(240);
  //tft.setCursor(STATUS_X, STATUS_Y);
  tft.setTextColor(TFT_WHITE, TFT_DARKGREY);
  tft.setTextFont(0);
  tft.setTextDatum(TC_DATUM);
  tft.setTextSize(1);
  tft.drawString(msg, STATUS_X, STATUS_Y);
}

//------------------------------------------------------------------------------------------
ON-OFF Button
.gif)
Next is the ON-OFF Button Sketch that I modified so that when the button is switched, the state of the LED can be controlled.
LED is connected with D2 and can be toggled by pressing the screen.
// Example of drawing a graphical "switch" and using
// the touch screen to change it's state.


// This sketch does not use the libraries button drawing
// and handling functions.


// Based on Adafruit_GFX library onoffbutton example.


// Touch handling for XPT2046 based screens is handled by
// the TFT_eSPI library.


// Calibration data is stored in SPIFFS so we need to include it
#include "FS.h"


#include <SPI.h>


#include <TFT_eSPI.h> // Hardware-specific library


TFT_eSPI tft = TFT_eSPI();       // Invoke custom library


// This is the file name used to store the touch coordinate
// calibration data. Cahnge the name to start a new calibration.
#define CALIBRATION_FILE "/TouchCalData3"


// Set REPEAT_CAL to true instead of false to run calibration
// again, otherwise it will only be done once.
// Repeat calibration if you change the screen rotation.
#define REPEAT_CAL false


boolean SwitchOn = false;


// Comment out to stop drawing black spots
#define BLACK_SPOT


// Switch position and size
#define FRAME_X 100
#define FRAME_Y 64
#define FRAME_W 120
#define FRAME_H 50


// Red zone size
#define REDBUTTON_X FRAME_X
#define REDBUTTON_Y FRAME_Y
#define REDBUTTON_W (FRAME_W/2)
#define REDBUTTON_H FRAME_H


// Green zone size
#define GREENBUTTON_X (REDBUTTON_X + REDBUTTON_W)
#define GREENBUTTON_Y FRAME_Y
#define GREENBUTTON_W (FRAME_W/2)
#define GREENBUTTON_H FRAME_H


//------------------------------------------------------------------------------------------
//------------------------------------------------------------------------------------------
void setup(void)
{
  Serial.begin(9600);
  tft.init();


  // Set the rotation before we calibrate
  tft.setRotation(1);


  // call screen calibration
  touch_calibrate();


  // clear screen
  tft.fillScreen(TFT_BLUE);
  pinMode(2, OUTPUT);


  // Draw button (this example does not use library Button class)
  redBtn();
}
//------------------------------------------------------------------------------------------
//------------------------------------------------------------------------------------------
void loop()
{
  uint16_t x, y;


  // See if there's any touch data for us
  if (tft.getTouch(&x, &y))
  {
    // Draw a block spot to show where touch was calculated to be
    #ifdef BLACK_SPOT
      tft.fillCircle(x, y, 2, TFT_BLACK);
    #endif

    if (SwitchOn)
    {
      if ((x > REDBUTTON_X) && (x < (REDBUTTON_X + REDBUTTON_W))) {
        if ((y > REDBUTTON_Y) && (y <= (REDBUTTON_Y + REDBUTTON_H))) {
          Serial.println("Red btn hit");
          digitalWrite(2,false);
          redBtn();
        }
      }
    }
    else //Record is off (SwitchOn == false)
    {
      if ((x > GREENBUTTON_X) && (x < (GREENBUTTON_X + GREENBUTTON_W))) {
        if ((y > GREENBUTTON_Y) && (y <= (GREENBUTTON_Y + GREENBUTTON_H))) {
          Serial.println("Green btn hit");
          digitalWrite(2,true);
          greenBtn();
        }
      }
    }


    Serial.println(SwitchOn);


  }
}
//------------------------------------------------------------------------------------------


void touch_calibrate()
{
  uint16_t calData[5];
  uint8_t calDataOK = 0;


  // check file system exists
  if (!SPIFFS.begin()) {
    Serial.println("Formating file system");
    SPIFFS.format();
    SPIFFS.begin();
  }


  // check if calibration file exists and size is correct
  if (SPIFFS.exists(CALIBRATION_FILE)) {
    if (REPEAT_CAL)
    {
      // Delete if we want to re-calibrate
      SPIFFS.remove(CALIBRATION_FILE);
    }
    else
    {
      File f = SPIFFS.open(CALIBRATION_FILE, "r");
      if (f) {
        if (f.readBytes((char *)calData, 14) == 14)
          calDataOK = 1;
        f.close();
      }
    }
  }


  if (calDataOK && !REPEAT_CAL) {
    // calibration data valid
    tft.setTouch(calData);
  } else {
    // data not valid so recalibrate
    tft.fillScreen(TFT_BLACK);
    tft.setCursor(20, 0);
    tft.setTextFont(2);
    tft.setTextSize(1);
    tft.setTextColor(TFT_WHITE, TFT_BLACK);


    tft.println("Touch corners as indicated");


    tft.setTextFont(1);
    tft.println();


    if (REPEAT_CAL) {
      tft.setTextColor(TFT_RED, TFT_BLACK);
      tft.println("Set REPEAT_CAL to false to stop this running again!");
    }


    tft.calibrateTouch(calData, TFT_MAGENTA, TFT_BLACK, 15);


    tft.setTextColor(TFT_GREEN, TFT_BLACK);
    tft.println("Calibration complete!");


    // store data
    File f = SPIFFS.open(CALIBRATION_FILE, "w");
    if (f) {
      f.write((const unsigned char *)calData, 14);
      f.close();
    }
  }
}


void drawFrame()
{
  tft.drawRect(FRAME_X, FRAME_Y, FRAME_W, FRAME_H, TFT_BLACK);
}


// Draw a red button
void redBtn()
{
  tft.fillRect(REDBUTTON_X, REDBUTTON_Y, REDBUTTON_W, REDBUTTON_H, TFT_RED);
  tft.fillRect(GREENBUTTON_X, GREENBUTTON_Y, GREENBUTTON_W, GREENBUTTON_H, TFT_DARKGREY);
  drawFrame();
  tft.setTextColor(TFT_WHITE);
  tft.setTextSize(2);
  tft.setTextDatum(MC_DATUM);
  tft.drawString("ON", GREENBUTTON_X + (GREENBUTTON_W / 2), GREENBUTTON_Y + (GREENBUTTON_H / 2));
  SwitchOn = false;
}


// Draw a green button
void greenBtn()
{
  tft.fillRect(GREENBUTTON_X, GREENBUTTON_Y, GREENBUTTON_W, GREENBUTTON_H, TFT_GREEN);
  tft.fillRect(REDBUTTON_X, REDBUTTON_Y, REDBUTTON_W, REDBUTTON_H, TFT_DARKGREY);
  drawFrame();
  tft.setTextColor(TFT_WHITE);
  tft.setTextSize(2);
  tft.setTextDatum(MC_DATUM);
  tft.drawString("OFF", REDBUTTON_X + (REDBUTTON_W / 2) + 1, REDBUTTON_Y + (REDBUTTON_H / 2));
  SwitchOn = true;
}
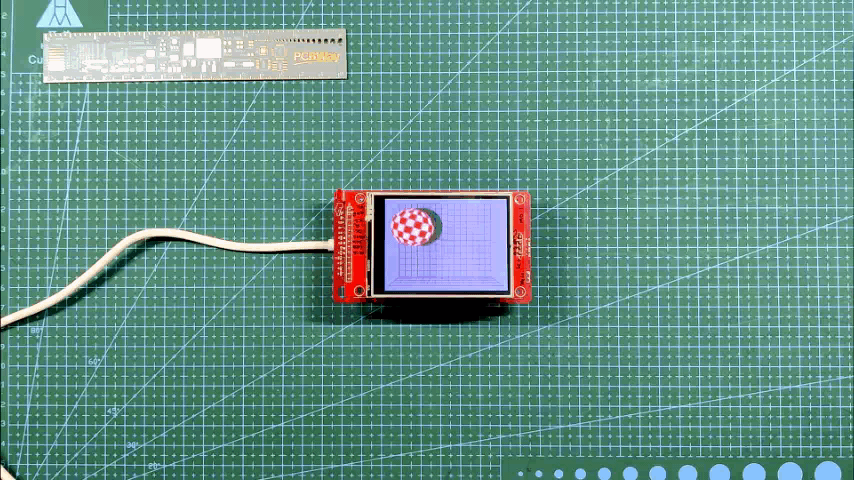
Boing Ball
.gif)
.gif)
.gif)
Here's a demanding sketch that uses the processing power of the ESP32 to its fullest, the Boing Ball Animation Sketch.
It contains an additional Header file that is attached.
// 'Boing' ball demo

// STM32F767 55MHz SPI 170 fps without DMA
// STM32F767 55MHz SPI 227 fps with DMA
// STM32F446 55MHz SPI 110 fps without DMA
// STM32F446 55MHz SPI 187 fps with DMA
// STM32F401 55MHz SPI  56 fps without DMA
// STM32F401 55MHz SPI 120 fps with DMA

// STM32F767 27MHz SPI  99 fps without DMA
// STM32F767 27MHz SPI 120 fps with DMA
// STM32F446 27MHz SPI  73 fps without DMA
// STM32F446 27MHz SPI  97 fps with DMA
// STM32F401 27MHz SPI  51 fps without DMA
// STM32F401 27MHz SPI  90 fps with DMA

// Blue Pill - 36MHz SPI *no* DMA 36 fps
// Blue Pill - 36MHz SPI with DMA 67 fps
// Blue Pill overclocked to 128MHz *no* DMA - 32MHz SPI  64 fps
// Blue Pill overclocked to 128MHz with DMA - 32MHz SPI 116 fps

// ESP32     - 8 bit parallel     110 fps (no DMA)
// ESP32     - 40MHz SPI *no* DMA  93 fps
// ESP32     - 40MHz SPI with DMA 112 fps

#define SCREENWIDTH 320
#define SCREENHEIGHT 240

#include "graphic.h"

#include <TFT_eSPI.h> // Hardware-specific library

TFT_eSPI tft = TFT_eSPI();       // Invoke custom library

#define BGCOLOR    0xAD75
#define GRIDCOLOR  0xA815
#define BGSHADOW   0x5285
#define GRIDSHADOW 0x600C
#define RED        0xF800
#define WHITE      0xFFFF

#define YBOTTOM  123  // Ball Y coord at bottom
#define YBOUNCE -3.5  // Upward velocity on ball bounce

// Ball coordinates are stored floating-point because screen refresh
// is so quick, whole-pixel movements are just too fast!
float ballx     = 20.0, bally     = YBOTTOM, // Current ball position
      ballvx    =  0.8, ballvy    = YBOUNCE, // Ball velocity
      ballframe = 3;                         // Ball animation frame #
int   balloldx  = ballx, balloldy = bally;   // Prior ball position

// Working buffer for ball rendering...2 scanlines that alternate,
// one is rendered while the other is transferred via DMA.
uint16_t renderbuf[2][SCREENWIDTH];

uint16_t palette[16]; // Color table for ball rotation effect

uint32_t startTime, frame = 0; // For frames-per-second estimate

void setup() {
  Serial.begin(115200);
//  while(!Serial);

  tft.begin();
  tft.setRotation(3); // Landscape orientation, USB at bottom right
  tft.setSwapBytes(false);
  // Draw initial framebuffer contents:
  //tft.setBitmapColor(GRIDCOLOR, BGCOLOR);
  tft.fillScreen(BGCOLOR);

  tft.initDMA();

  tft.drawBitmap(0, 0, (const uint8_t *)background, SCREENWIDTH, SCREENHEIGHT, GRIDCOLOR);

  startTime = millis();
}

void loop() {

  balloldx = (int16_t)ballx; // Save prior position
  balloldy = (int16_t)bally;
  ballx   += ballvx;         // Update position
  bally   += ballvy;
  ballvy  += 0.06;          // Update Y velocity
  if((ballx <= 15) || (ballx >= SCREENWIDTH - BALLWIDTH))
    ballvx *= -1;            // Left/right bounce
  if(bally >= YBOTTOM) {     // Hit ground?
    bally  = YBOTTOM;        // Clip and
    ballvy = YBOUNCE;        // bounce up
  }

  // Determine screen area to update.  This is the bounds of the ball's
  // prior and current positions, so the old ball is fully erased and new
  // ball is fully drawn.
  int16_t minx, miny, maxx, maxy, width, height;
  // Determine bounds of prior and new positions
  minx = ballx;
  if(balloldx < minx)                    minx = balloldx;
  miny = bally;
  if(balloldy < miny)                    miny = balloldy;
  maxx = ballx + BALLWIDTH  - 1;
  if((balloldx + BALLWIDTH  - 1) > maxx) maxx = balloldx + BALLWIDTH  - 1;
  maxy = bally + BALLHEIGHT - 1;
  if((balloldy + BALLHEIGHT - 1) > maxy) maxy = balloldy + BALLHEIGHT - 1;

  width  = maxx - minx + 1;
  height = maxy - miny + 1;

  // Ball animation frame # is incremented opposite the ball's X velocity
  ballframe -= ballvx * 0.5;
  if(ballframe < 0)        ballframe += 14; // Constrain from 0 to 13
  else if(ballframe >= 14) ballframe -= 14;

  // Set 7 palette entries to white, 7 to red, based on frame number.
  // This makes the ball spin
  for(uint8_t i=0; i<14; i++) {
    palette[i+2] = ((((int)ballframe + i) % 14) < 7) ? WHITE : RED;
    // Palette entries 0 and 1 aren't used (clear and shadow, respectively)
  }

  // Only the changed rectangle is drawn into the 'renderbuf' array...
  uint16_t c, *destPtr;
  int16_t  bx  = minx - (int)ballx, // X relative to ball bitmap (can be negative)
           by  = miny - (int)bally, // Y relative to ball bitmap (can be negative)
           bgx = minx,              // X relative to background bitmap (>= 0)
           bgy = miny,              // Y relative to background bitmap (>= 0)
           x, y, bx1, bgx1;         // Loop counters and working vars
  uint8_t  p;                       // 'packed' value of 2 ball pixels
  int8_t bufIdx = 0;

  // Start SPI transaction and drop TFT_CS - avoids transaction overhead in loop
  tft.startWrite();

  // Set window area to pour pixels into
  tft.setAddrWindow(minx, miny, width, height);

  // Draw line by line loop
  for(y=0; y<height; y++) { // For each row...
    destPtr = &renderbuf[bufIdx][0];
    bx1  = bx;  // Need to keep the original bx and bgx values,
    bgx1 = bgx; // so copies of them are made here (and changed in loop below)
    for(x=0; x<width; x++) {
      if((bx1 >= 0) && (bx1 < BALLWIDTH) &&  // Is current pixel row/column
         (by  >= 0) && (by  < BALLHEIGHT)) { // inside the ball bitmap area?
        // Yes, do ball compositing math...
        p = ball[by][bx1 / 2];                // Get packed value (2 pixels)
        c = (bx1 & 1) ? (p & 0xF) : (p >> 4); // Unpack high or low nybble
        if(c == 0) { // Outside ball - just draw grid
          c = background[bgy][bgx1 / 8] & (0x80 >> (bgx1 & 7)) ? GRIDCOLOR : BGCOLOR;
        } else if(c > 1) { // In ball area...
          c = palette[c];
        } else { // In shadow area...
          c = background[bgy][bgx1 / 8] & (0x80 >> (bgx1 & 7)) ? GRIDSHADOW : BGSHADOW;
        }
      } else { // Outside ball bitmap, just draw background bitmap...
        c = background[bgy][bgx1 / 8] & (0x80 >> (bgx1 & 7)) ? GRIDCOLOR : BGCOLOR;
      }
      *destPtr++ = c<<8 | c>>8; // Store pixel color
      bx1++;  // Increment bitmap position counters (X axis)
      bgx1++;
    }

    tft.pushPixelsDMA(&renderbuf[bufIdx][0], width); // Push line to screen

    // Push line to screen (swap bytes false for STM/ESP32)
    //tft.pushPixels(&renderbuf[bufIdx][0], width);

    bufIdx = 1 - bufIdx;
    by++; // Increment bitmap position counters (Y axis)
    bgy++;
  }
  //if (random(100) == 1) delay(2000);
  tft.endWrite();
  //delay(5);
  // Show approximate frame rate
  if(!(++frame & 255)) { // Every 256 frames...
    uint32_t elapsed = (millis() - startTime) / 1000; // Seconds
    if(elapsed) {
      Serial.print(frame / elapsed);
      Serial.println(" fps");
    }
  }
}
Downloads
Conclusion
.gif)
.gif)

The display works with the ESP32 through the carrier board.
Making a display-driven project or even preparing sample code for this display is now much easier because we are using a proper dedicated setup for programming the display.
For now, this project is complete, no further improvements are required or needed at the moment.
As for its use, I'm preparing a project that includes running animations on this display so I'll be using the carrier board as a base for the next project.
This is it for today folks, if you have any problem regarding this project, leave a comment.
Special thanks to PCBWAY for supporting this project, you guys can check them out for getting great PCB Service for less cost.
Stay tuned for the next project!
Peace