How to Open a Light Bulb Without Breaking It
by Electrospark in Circuits > Reuse
285271 Views, 1154 Favorites, 0 Comments
How to Open a Light Bulb Without Breaking It

.jpg)
.jpg)
.jpg)
.jpg)

In this instructable I am going to show you how to open a standard incandescent light bulb that can be used for many awesome projects.
It all started when I was looking at peoples projects made with opened light bulbs and the step on how to do open them was never well explained so I decided to make an instructable that only focus on that.
This instructable is to help you learn how to open a light bulb to use in your projects and if you ever make an instructables about it, all you'll have to do is post a link to this instructable and if possible, give me some credits in the step.
Disclaimer! I am NOT responsible for any accidents or damage caused by this project! This project involve breaking glass that can cause glass particles to jump around and work with sharp glass! Never attempt to open or break a Mercury-Filled light bulb like a CFL (Compact Fluorescent Light) As mercury is highly toxic and is not something you want to mess with. Use common sense and be smart about it and everything should go well. :P
Let's start recycling old light bulbs! :)
Tools and Materials
.jpg)
.jpg)
.jpg)
.jpg)
.jpg)
.jpg)
.jpg)
Here's the things you'll need.
- Small precision flat crew driver
- Nose pliers
- Needle nose pliers
- Small square screw driver
- Pair of protective gloves
- Safety goggles
- box to keep your workspace from being full of broken glass particles
- Salt or sand
- Funnel
An Understanding About the Light Bulb's Parts
 (JPEG).jpg)
This incandescent light bulb diagram I made will help you know how the light bulb is built and if lets say I tell you to break the Stem, you'll know what I'm talking about. :P
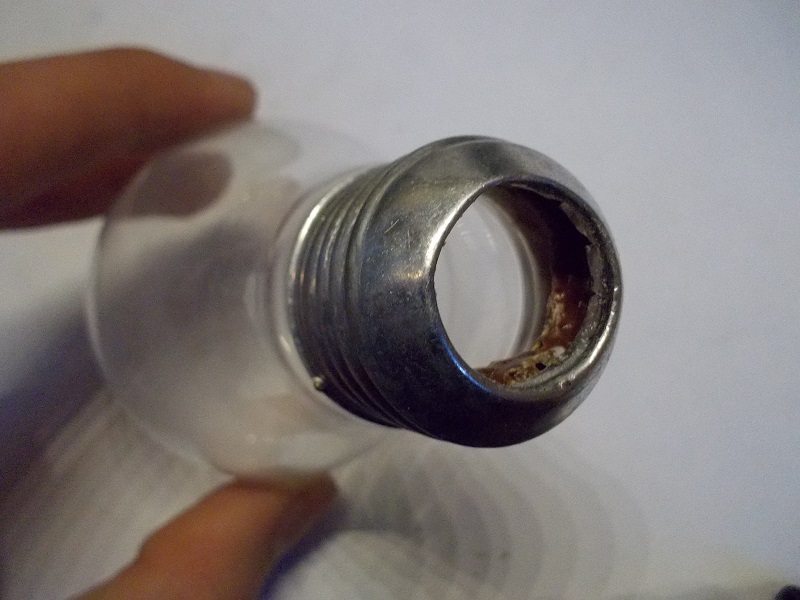
Remove the Bottom Terminal Contact
.jpg)
.jpg)

.jpg)
.jpg)
To remove the bottom terminal contact, take your small precision flat screw driver and gently lift one side of it. Then take your pair of nose pliers and lift it off. If it doesn't want to come, twist it and it should come instantly.
Remove the Base Glass Insulator
.jpg)
.jpg)
.jpg)
.jpg)
.jpg)
.jpg)
To remove the glass insulator, take again your small precision flat head screw driver and stick it in the small opening in the center but not deeper than 1/4 inch deep and with your safety gloves and goggles, hold the light bulb so the base faces downwards or away from you and start prying around until it breaks in a few pieces that can be pried off one by one easily.
Break the Pressure Discharge Tube
.jpg)
.jpg)
.jpg)
.jpg)
.jpg)
.jpg)
To break the pressure discharge tube, take your pair of nose pliers and facing the base away from you, give it some pressure to the left or right and it will break or crush under the pliers pressure.
This step is quite scary at first because all you can think of is that the light bulb will break into a million pieces but because it's round, It's way more solid than it looks.
Have no fear and do it!
The rest of the pressure discharge tube can now be removed using your small square screw driver and push it to one side until it breaks completely leaving the Stem press and Stem intact.
Break the Stem Press
.jpg)
To break the Stem press, Take your small square screw driver and place it in the Stem and while giving a VERY gentle pressure, twist left and right a few times and it'll break leaving a piece or the whole Stem.
Break the Stem
.jpg)
.jpg)
.jpg)
to break the rest of the stem, Take your square screw driver and push on the stem all around breaking it leaving only a glass ring.
Break the Glass Ring (rest of the Stem)
.jpg)
.jpg)
.jpg)
.jpg)
.jpg)
.jpg)
.jpg)
To break the glass ring, first of all using your pair of needle nose pliers, detach the wire lead that is attached to the metal base and that is holding the broken Stem press.
Now take your pair of nose pliers and stick it in the base and turn it all around moving it back and forth to break the glass ring completely.
Once you've done this, using your pair of needle nose pliers you can stick it not more than 3/4 Inch deep and while holding it open with gentle pressure, twist it a few turns to remove any sharp edges.
Remove the White Powder Coating With Salt or Sand
.jpg)
.jpg)
.jpg)
.jpg)
.jpg)
.jpg)
.jpg)
First of all empty the light bulb completely from any broken glass and with a funnel (if you have one) put about 2-4 table spoon of salt or sand in the light bulb and while blocking the opening with your thumb, shake it until all the Kaolin powder is completely removed. Wait about 5 Seconds for the fine Kaolin dust to settle down as I don't think you'll appreciate breathing light bulbs Kaolin clay dust. :P Now hold your light bulb with the base facing down to empty the salt or sand and tap on the sides to remove any Kaolin powder left.
And You're done!
It takes me about 1:45-3:00 Minutes per light bulbs but it took me about an hour to figure it out the first time. :P
NOTE: The trick of using salt or other similar products to remove the Kaolin powder doesn't come from me and can be found in many other instructables and I have no idea who is the first to do it so I can't credit him/her... :(
Hope You Enjoyed and Take the Time to Donate for More Great Projects!

Hope you enjoyed this instructable and if you want to support me to buy parts and materials for more instructable projects, You can!
Just click on the Make donation Link and click on the Donate button on my funding site to send me a donation directly to my PayPal account.
All donations and new followers are very appreciated! :)
Feel free to comment, share and follow.
Have fun!
Electrospark