How to Make a Simple House Drum Pattern (128 BPM)
40775 Views, 24 Favorites, 0 Comments
How to Make a Simple House Drum Pattern (128 BPM)

Hello everybody! I have not posted an Instructable in a long while, so today, I will be teaching you how to create a simple house drum pattern.
You will need:
You will need:
- A computer
- Any DAW of your choice (DAW = digital audio workstation)
Step One: the Kick
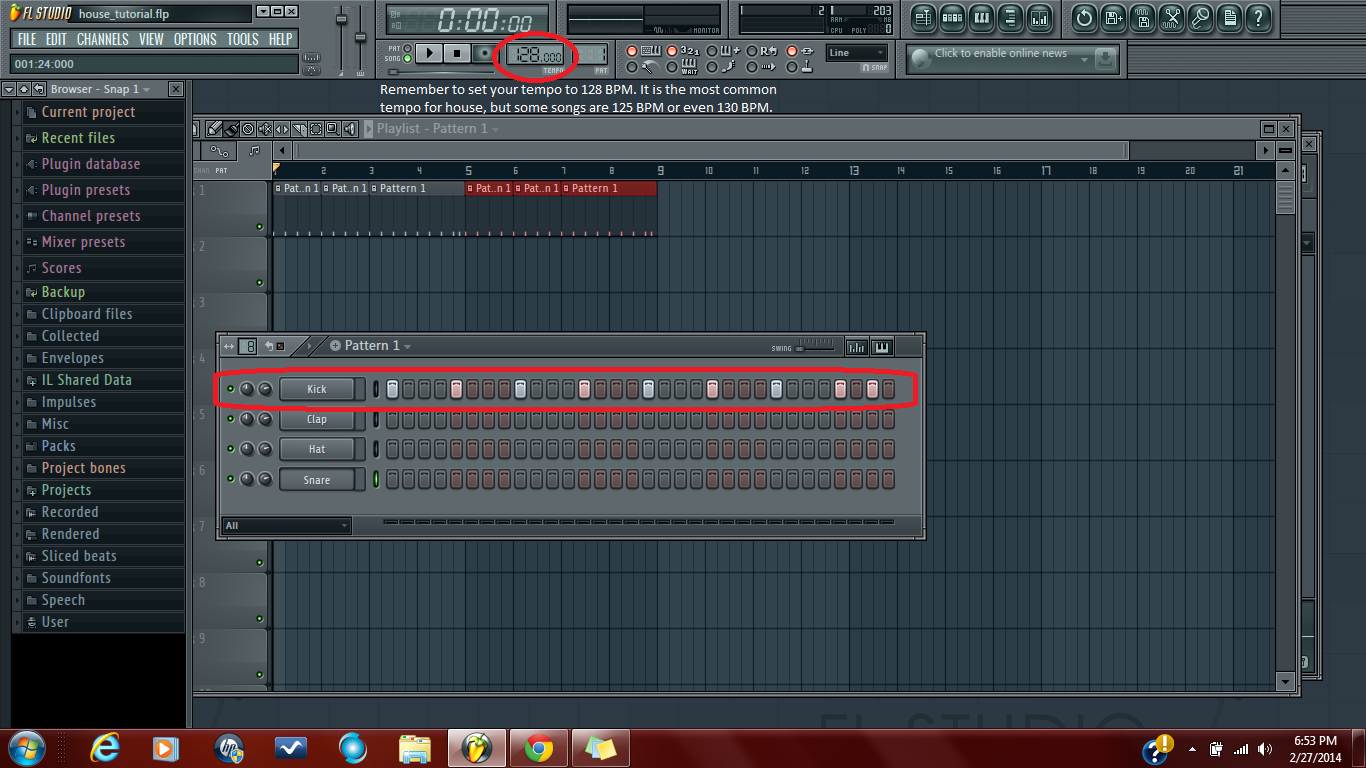
[The first thing before actually getting into adding your kicks is setting your tempo of the track to 128 BPM (beats per minute). After that, you will add your kicks.] The kick is what gives energy to your song, and it gets people dancing. It is the core of any house song, so make sure it is perfect (and one that you like. You should be making what YOU like, not what other people tell you to make). In house, a general pattern is used usually, a.k.a., four-on-the-floor. This means every beat there will be a kick.
When you pick the right kick and get in place, add an EQ (equalizer) to it and boost any frequencies you like so it sounds good. I like to boost the bass the most so that I can feel it when it is pumping out of a speaker. You can also boost the mid and high range as well, but do what you want to your own taste. If it sounds good to you, keep it.
When you pick the right kick and get in place, add an EQ (equalizer) to it and boost any frequencies you like so it sounds good. I like to boost the bass the most so that I can feel it when it is pumping out of a speaker. You can also boost the mid and high range as well, but do what you want to your own taste. If it sounds good to you, keep it.
Step Two: Hi-Hats
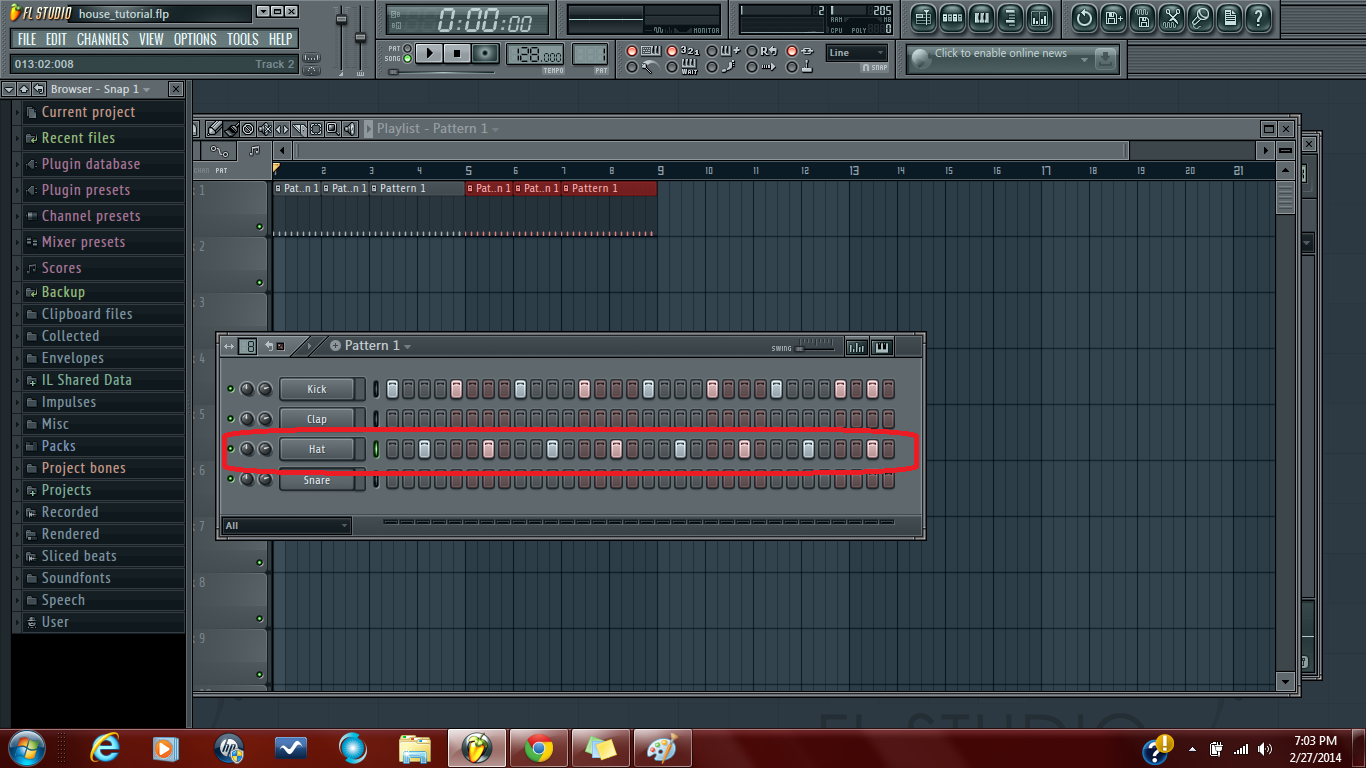
Adding hi hats can help add momentum to your track. I add them offbeat to the kick, but you can create whatever pattern you like. You can use open hats, closed hats, or a combination of both. Remember: it's your song. Even though I am giving step-by-step instructions on how to create a simple beat, feel free to elaborate and express yourself.
After setting your hats in place, proceed to EQ them, removing the low frequencies as they make the hi-hats sound too thick. Also, boost the high frequencies a little bit to make them "bright."
After setting your hats in place, proceed to EQ them, removing the low frequencies as they make the hi-hats sound too thick. Also, boost the high frequencies a little bit to make them "bright."
Step Three: Snares And/or Claps
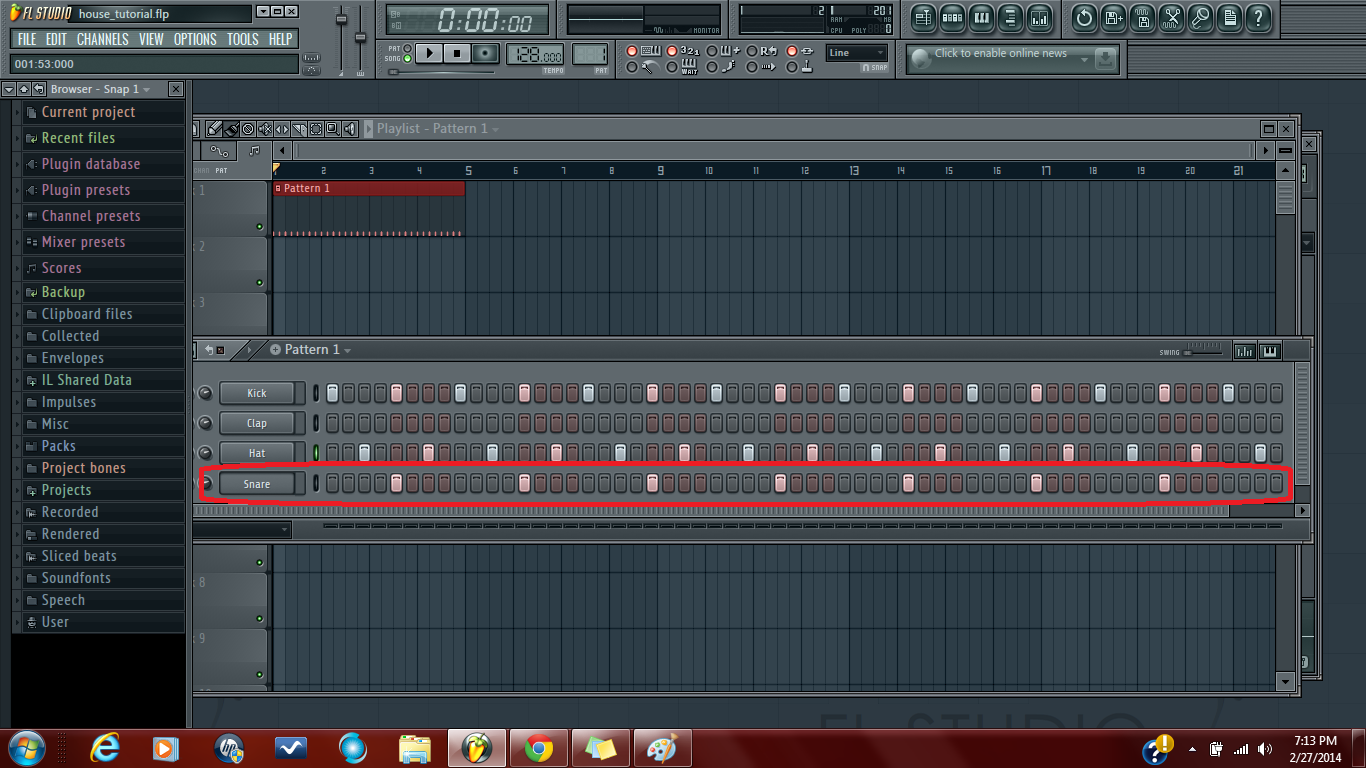
In this tutorial, I only use a snare for the drum pattern. I did not add claps, but you may add claps. It is up to you, not me. It is your song. If you add both a snare and clap, be sure to pan one to the left and one to the right to create a stereo image. Also, this helps to not completely overlap them. If you were to listen to the song in your headphones, you don't want everything crammed straight in the middle. Have the claps to one side and snares to the other since they sound similar and generally fall into the same frequency range.
I added my snares to every other kick drum beat. You may want to boost the mids or highs on the EQ, but do not drop out the lows too much as it can make the snare sound too "empty."
I added my snares to every other kick drum beat. You may want to boost the mids or highs on the EQ, but do not drop out the lows too much as it can make the snare sound too "empty."
Step 4: Equaliztion
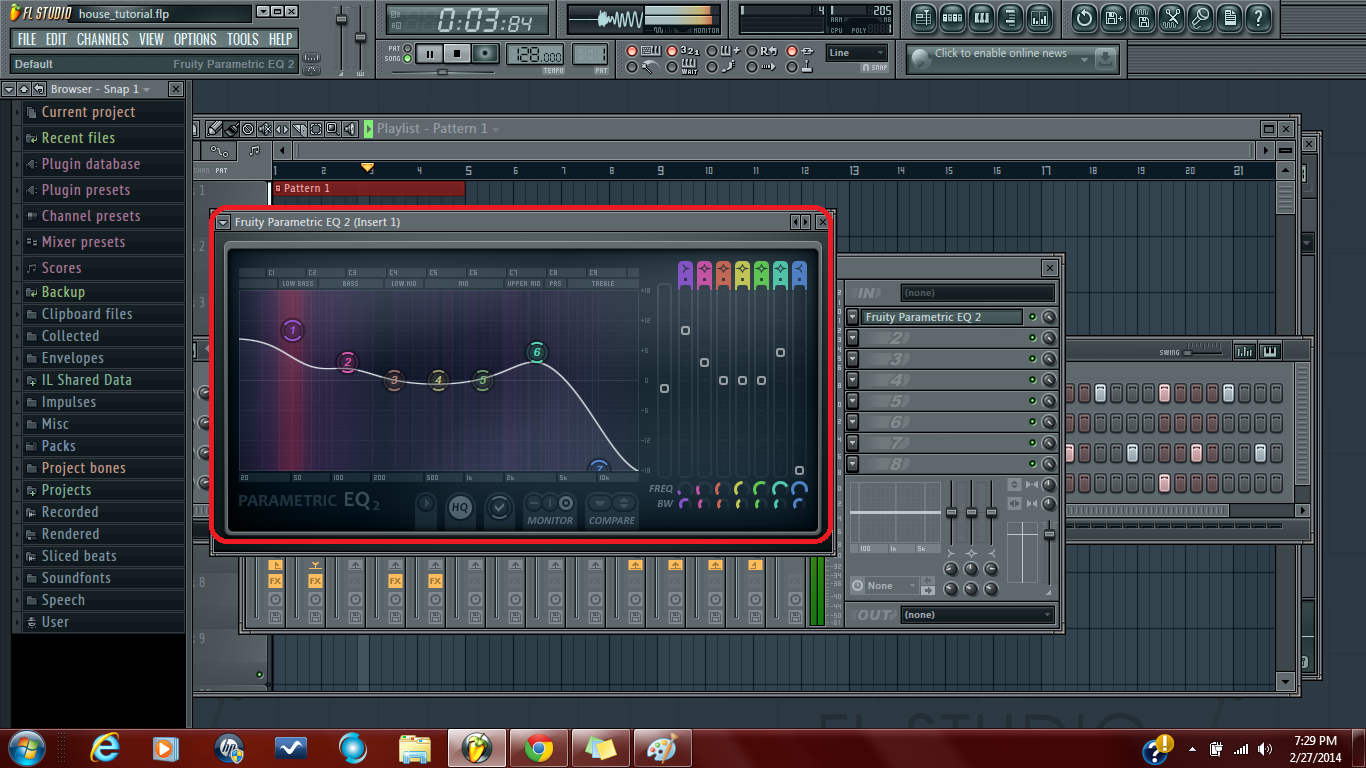
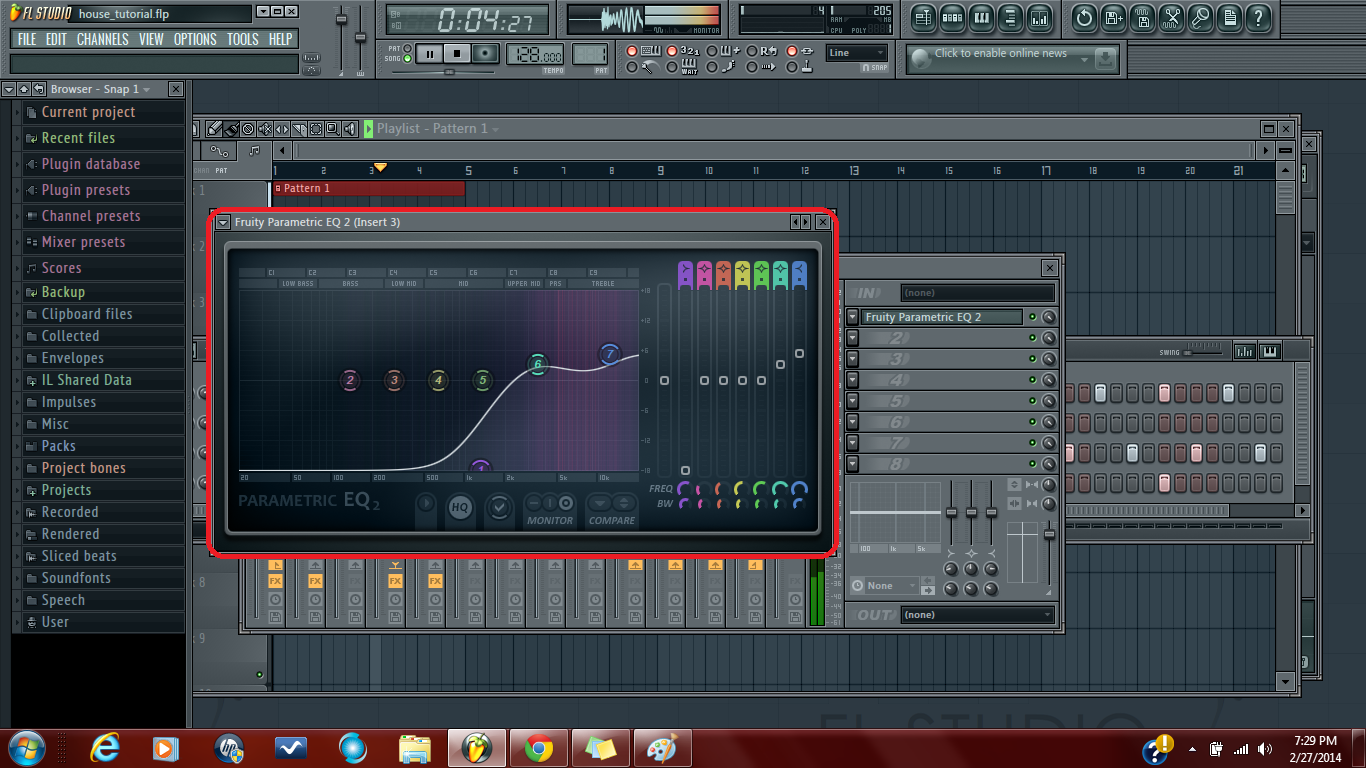
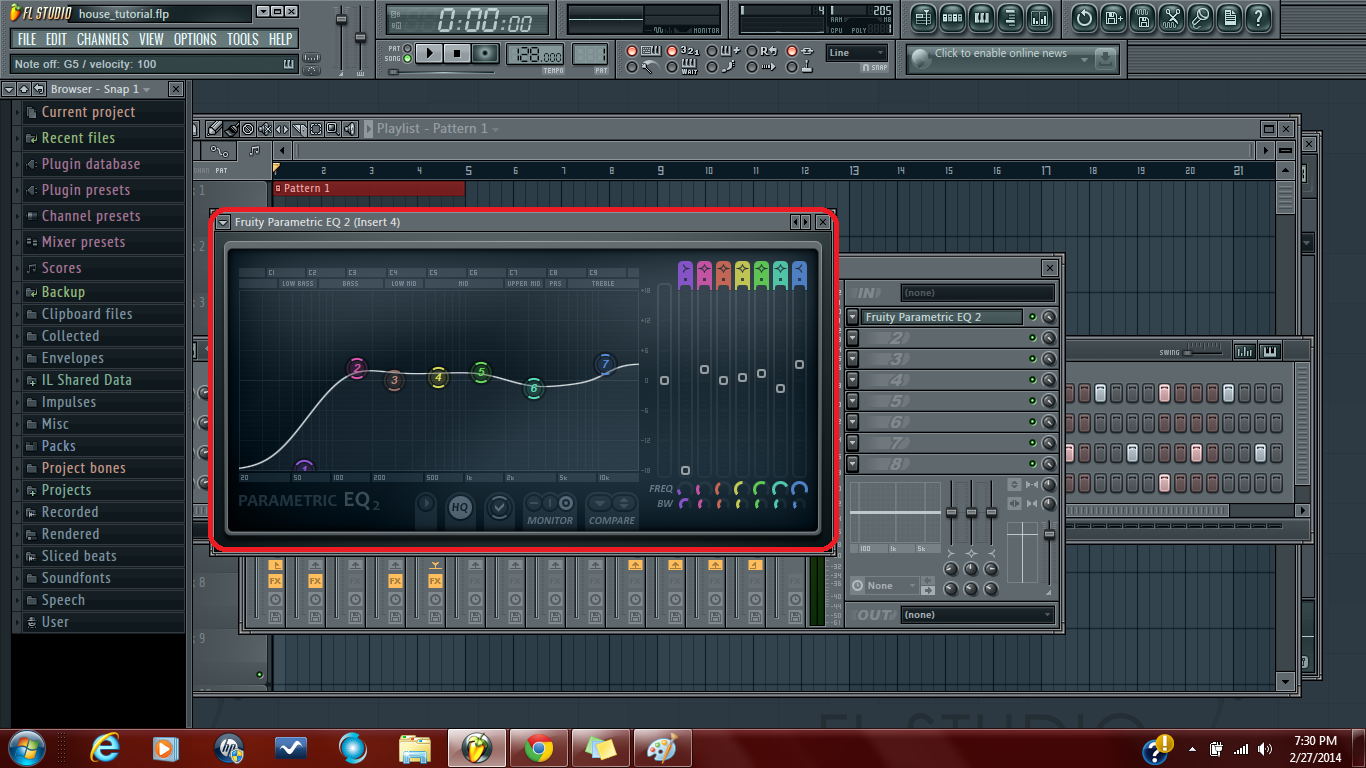
I have mentioned EQ'ing before in this instructable, but now I will attempt to go more in-depth. I am not a professional in mastering sound or equalization, but I can still help to make your song sound even better.
- Kick: For my kick, I boosted the frequency at approximately 50Hz so that the low bass is more prominent and the kick deep. I also slightly boost around 130Hz which is not as low as the 50Hz bass, but it still falls under the bass range. This also helps with the punch of the kick. I also boosted around 3500Hz (upper mid range) so that the kick does not sound too murky or muddy when I cut out the high frequencies. For this project, I cut the frequency immediately after the 3500Hz boost.
- Hi-Hats: Since these have higher frequency than the kick, you can go ahead and cut out anything below the upper mid range (around 3000Hz). If your hat does not sound too good after doing this, you can move the cutoff to a slightly lower frequency until you reach the desired sound. I boosted up the frequencies between 3000Hz and 20000Hz so I can make the hats sound brighter.
- Snares: I cutout any frequency below 150Hz. I boosted the frequency at the 150Hz mark just slightly and boosted the other frequencies after that just a little bit. I dropped the frequency at around 3300Hz just a little under 0dB and brought up the frequency at 11000Hz a little higher than all the other boosted frequencies.
Video
Here is a video that follows the steps I have shown you guys today. Sorry if I go too fast. I was trying to keep the video short as there is a 15-minute limit for recording on the software I use. (NOTE: In the video, the kick and snare seem to distort when they play together. I do not know why this happens. In the actual project, it does not do that. I think when the software I used to record rendered it into a video file, it may have lowered the sound quality or distorted it a little bit. Sorry. I hope you can still learn something from this).