How to Fix the Headphone Jack Problem, on the Slacker G2
by Greasetattoo in Circuits > Apple
4738 Views, 2 Favorites, 0 Comments
How to Fix the Headphone Jack Problem, on the Slacker G2


Hello,
This instructable is on how to fix the annoying headphone jack on the Slacker G2.
Mic keeps cutting in and out, and popping!
Very annoying!
Very common problem.
I had to fix my Slacker, myself, as Slacker would not replace it.
grrrrrrr.
So, this is a pretty easy fix.
You will need some soldering skills!
I put my Slacker on LOCKED mode.
As, when you take apart the Slacker G2,
there is still power going to the unit!
Ok, now the materials you will need!
Onto step number 2.
*** I am not liable for any damage or injury that occurs from the following this instructable. The Slacker G2 is a piece of advanced equipment and can be irreparably damaged. Though the risk of breaking your SlackerG2 is highly unlikely if you follow the steps correctly.
THIS will probably VOID your warranty! ***
Tools Needed to Take Apart the Slacker G2


You will need:
to fit the very tiny phillips head screws.)
- Solder iron
- Flux
- Solder
- Tiny screwdriver set
to fit the very tiny phillips head screws.)
- Loupe set (magnifiers)
Removing the Back Smaller Black Cover.

On the back of the Slacker G2 there is a tiny slot.
Put one of the small screwdriver into the slot and twist.
The tiny black cover should come off, exposing part of
the Slacker G2.
Now onto the next step!
Put one of the small screwdriver into the slot and twist.
The tiny black cover should come off, exposing part of
the Slacker G2.
Now onto the next step!
Removing the Tiny Screws.


You will now, need the tiny phillips head screwdriver.
I modified one of my flat tipped, to fit into the phillips.
Remove the screws in the order of the numbers.
The first screw will be to hold the back silver plate on.
Watch for the very tiny black screws.
Screw numbers 2 and 4.
I modified one of my flat tipped, to fit into the phillips.
Remove the screws in the order of the numbers.
The first screw will be to hold the back silver plate on.
Watch for the very tiny black screws.
Screw numbers 2 and 4.
Open Slacker G2 Case

Once all 4 screws are out.
Take the tiny flat head screw driver and just un-SNAP the
two halves apart.
Be careful and NOT TO PULL the halves apart.
All that is holding the the two halves together is the
battery wires.
I kinda spun the bottom half around.
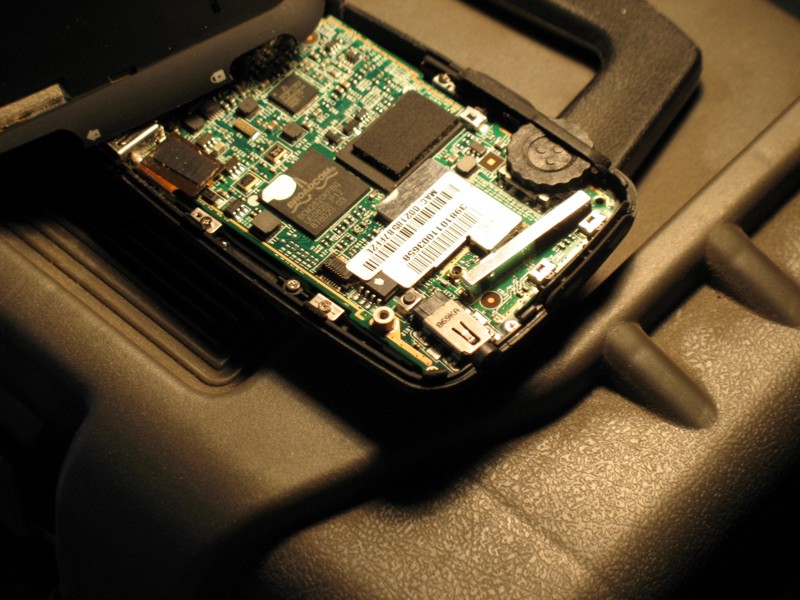
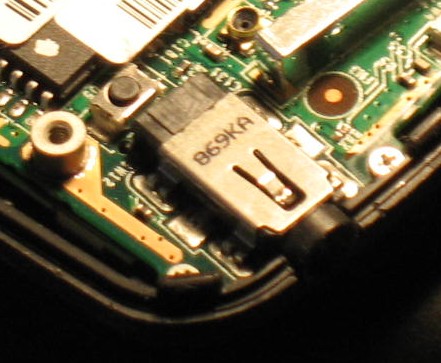
We will be soldering on the Mic holder.
What I did, was take the loupe and look at the mic holder, very
closely, and put a mic jack into the mic holder and watch for any
looseness.
My two center pins were very loose.
And, I mean very loose.
All the solder was worn away.
Ok, next step....
1/2 way there....
Soldering the Loose Joint and Re-assembly

Now, to solder the mic holder.
If you noticed any play in the mic holder solder joints,
you will have to solder them.
My 2 center joints were loose.
I only had to solder these two spots.
There are 6 solder points.
I just barely touched the solder on the joint, but
you want enough solder to hold it well.
Once soldered, you can put the Slacker G2 back together
like you took it apart.
Just reverse the steps.
I have a dedicated set of headphones for my Slacker G2.
This way, you are not continually using the headphone jack.
I believe that is why they wore out the first time.
Well, good luck on your fix!
Now, to go and listen to some music, without the popping and cutting
in and out!
Ahhh, to have my G2, Back!
Don't forget to vote for me!
*** I am not liable for any damage or injury that occurs from the following this instructable. The Slacker G2 is a piece of advanced equipment and can be irreparably damaged. Though the risk of breaking your SlackerG2 is highly unlikely if you follow the steps correctly.
THIS will probably VOID your warranty! ***