How to Use the MPU6050 With the Raspberry Pi 4
by mahmoodmustafashilleh in Circuits > Raspberry Pi
12106 Views, 0 Favorites, 0 Comments
How to Use the MPU6050 With the Raspberry Pi 4
.png)
In this quick tutorial learn how to learn how to easily connect the MPU6050 Accelerometer with the Raspberry Pi to start getting readings in Python!
Where to Buy MPU6050:
ShillehTek: shillehtek.com
Amazon: Amazon Store ShillehTek
Code:
https://github.com/shillehbean/youtube-p2/blob/main/mpu6050_test.py
Library Link:
https://github.com/m-rtijn/mpu6050
Other MPU6050 Tutorials:
How to Calibrate:
https://www.youtube.com/watch?v=5xLHZEl0h10https://www.youtube.com/watch?v=hoNeIaXc0vs
How to Connect to Arduino:https://www.youtube.com/watch?v=BkqZWeC_xCg
How to Connect to ESP32:https://www.youtube.com/watch?v=H9e1Up7xHjc
-----
Before we delve into the topic, we invite you to support our ongoing efforts and explore our various platforms dedicated to enhancing your IoT projects:
- Subscribe to our YouTube Channel: Stay updated with our latest tutorials and project insights by subscribing to our channel at YouTube - Shilleh.
- Support Us: Your support is invaluable. Consider buying me a coffee at Buy Me A Coffee to help us continue creating quality content.
- Hire Expert IoT Services: For personalized assistance with your IoT projects, hire me on UpWork.
Explore our Stores for Premium Products:
- ShillehTek Store: Access exclusive discounts on Arduino, Raspberry Pi sensors, and pre-soldered components at our ShillehTek Website.
Shop on Amazon:
Supplies
Raspberry Pi 4B (Or Other Models)
Enable I2C on the Raspberry Pi
You must enable I2C on the Pi manually by configuring it and rebooting the device.
Run this command in the command line:
- sudo raspi-config
- Select Interfacing Options > I2C.
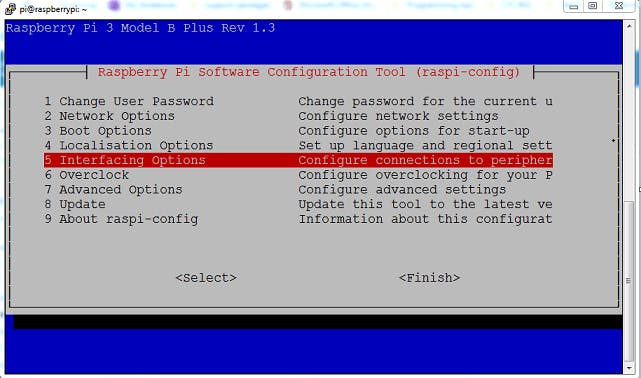
- Select Yes when prompted to enable the I2C interface.
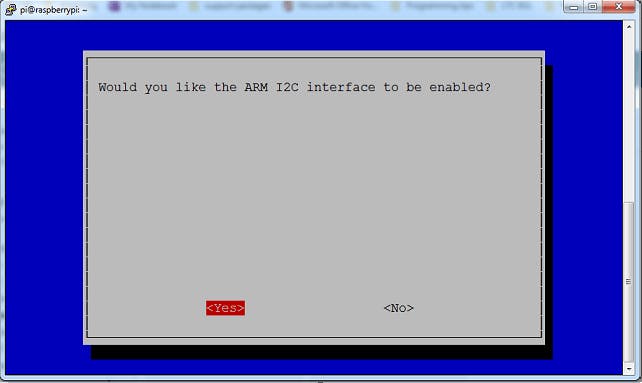
- Select Yes when prompted to automatically load the I2C kernel module.
- Select Finish.
- Select Yes when prompted to reboot.
You can also reboot by running 'sudo reboot' in the command line if you would like.
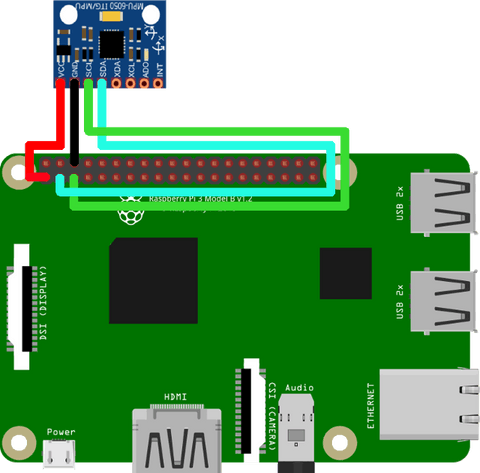
Physical Connection
Connect the MPU6050 respectively as shown in the diagram below. It must be pre-soldered; you can purchase MPU6050 pre-soldered at our Amazon Store in the link above!
Code
You will first need to install the respective library.
Run the following commands:
sudo apt install python3-smbus

pip install mpu6050-raspberrypi
This should be all you need to have the setup to run the code sample below.
https://github.com/shillehbean/youtube-p2/blob/main/mpu6050_test.py
I go through the code explanation in the video in more detail, but we simply create an MPU6050 object with the library and pull the values every second. You can use any editor to run the code. In my case I used Thonny.
Conclusion:
Hope this was quick and you got set up with ease. If you did, do not forget to subscribe to our channel and leave a comment. Also, let us know if you ever have any questions. Thanks for following ShillehTek.