How to Use PyCharm With Raspberry Pi Pico W and MicroPython
by mahmoodmustafashilleh in Circuits > Raspberry Pi
6130 Views, 3 Favorites, 0 Comments
How to Use PyCharm With Raspberry Pi Pico W and MicroPython


Learn how to get set up and start writing code in MicroPython using PyCharm IDE.
-----
Before we delve into the topic, we invite you to support our ongoing efforts and explore our various platforms dedicated to enhancing your IoT projects:
- Subscribe to our YouTube Channel: Stay updated with our latest tutorials and project insights by subscribing to our channel at YouTube - Shilleh.
- Support Us: Your support is invaluable. Consider buying me a coffee at Buy Me A Coffee to help us continue creating quality content.
- Hire Expert IoT Services: For personalized assistance with your IoT projects, hire me on UpWork.
Explore our Stores for Premium Products:
- ShillehTek Store: Access exclusive discounts on Arduino, Raspberry Pi sensors, and pre-soldered components at our ShillehTek Website.
Shop on Amazon:
Supplies
Raspberry Pi Pico or Raspberry Pi Pico W
Download PyCharm
https://www.jetbrains.com/pycharm/download/#section=mac
The community version is fine for this work.
Install MicroPython on Pico
- Plugin the device into the computer while holding the bootsel button.
- Go to https://micropython.org/download/ and download the latest version for the Pico or Pico W
- Drag the UF2 file onto your Pico once it is done downloading. *It should show up on your Desktop as RP1-RP2.
- Once it is done, the RP1-RP2 will disappear.
- Unplug and replug the Pico (without holding the bootsel). You need to do this so PyCharm can find the device.
Install MicroPython Plugin in PyCharm
- Open PyCharm, go to Plugins, and download the MicroPython plugin.
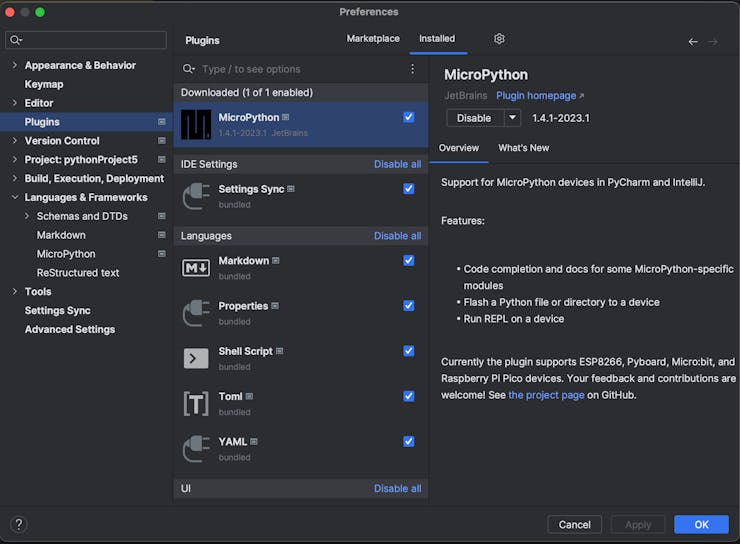
- Restart the IDE
Write Code
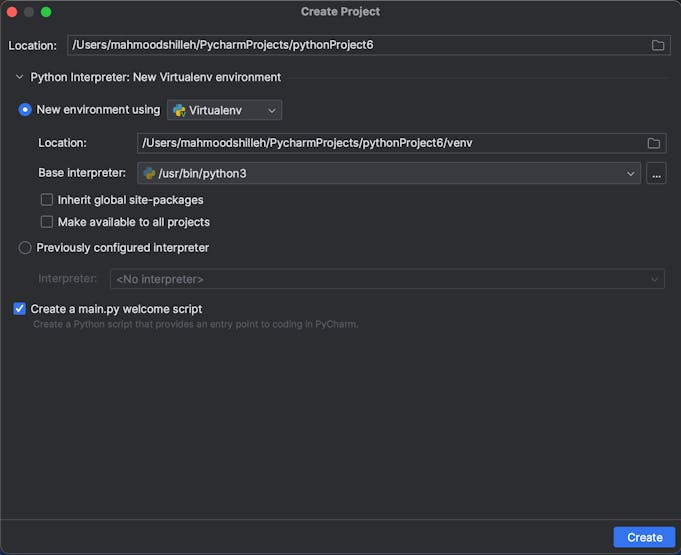
- Go to File > Create Project. Create an environment as shown above.
- Go to Preferences and enable MicroPython as shown here below.
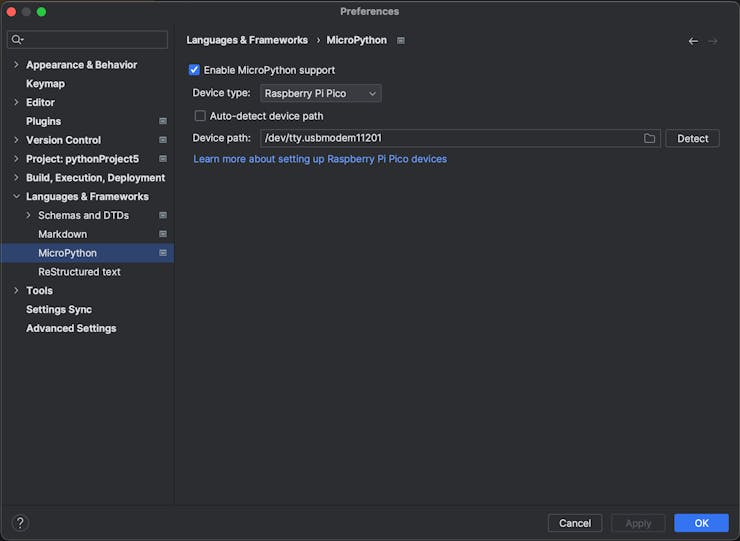
- You can find the device path on a Macbook in the terminal using the command
ls /dev/tty.*
- On a Windows this would be a COM port.
- You can now run code on the device by right-clicking the file and selecting “Run ‘Flash <filename>‘“
- Add the following code to check if it works by blinking the LED
import machine
import time

led_pin = machine.Pin("LED", machine.Pin.OUT)  # GPIO pin 25 controls the onboard LED

while True:
    led_pin.toggle()  # Toggle the LED state
    time.sleep(0.1)    # Wait for 1 second
If you run it and you see the LED blinking you did everything correctly, congrats!
Some Pros:
- Very easy to set up, and benefits of IntelliSense in PyCharm
- Good for very simple projects
Some Cons:
- You cannot edit files directly on the device with the IDE
- You can only run code in the main.py file
- You cannot run files if you are connected with another IDE like Thonny
Conclusion:
If you learned something here please subscribe to the channel. Let me know if you have any questions, thanks!