How to Use ESP8266 As Webserver
by iamrachelle in Design > Websites
5944 Views, 4 Favorites, 0 Comments
How to Use ESP8266 As Webserver

Hi, I'am currently using windows 10, NodeMCU 1.0 and here is the list of Software I used and installation guides i followed:
Library used:
I used NodeMCU as a server to serve an HTML File I made from this tutorial. To serve this file, I uploaded the file to the nodemcu file system using Spiffs. The HTML file sends data to the nodemcu using websockets to be printed on the serial monitor for this.The fast bidirectional communication via websockets of the server and client enabled this to be used as remote control. On the following steps, ill be explaining how my code works
Supplies
NodeMCU
Make It Work
Here's the steps on how it works
- Download the attached file and open the mousebot.ino file
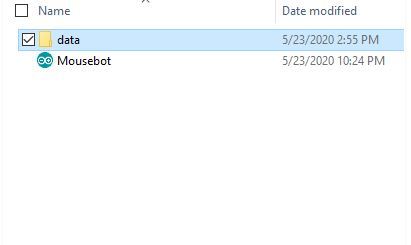
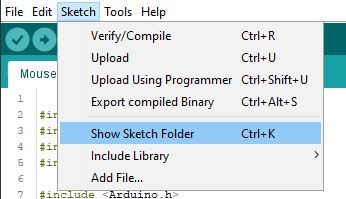
- Go to sketch>show sketch folder and make a new folder named data
- Save the html file from this tutorial in the folder named. I named mine as "Joystick"
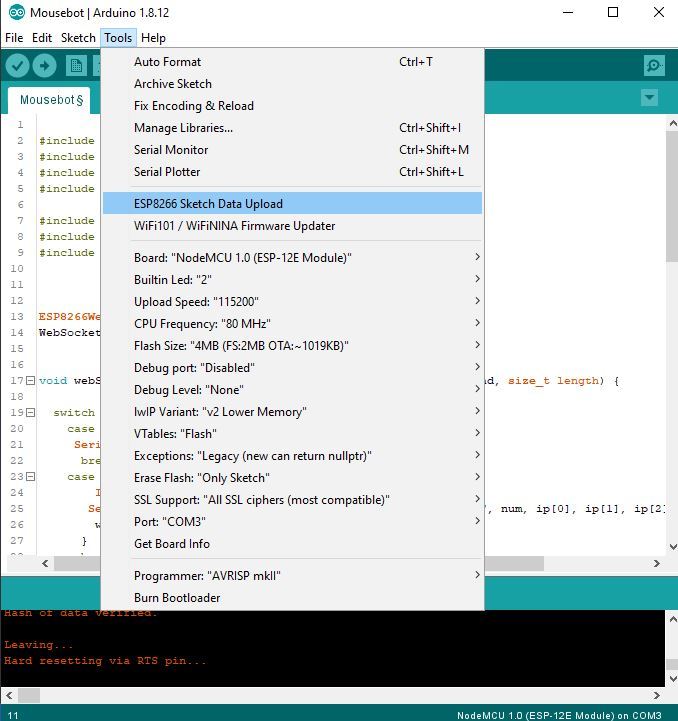
- Ensure that your spiff is already functional by going to tools ans seeing the "esp8266 sketch data upload"
- Upload the html file to nodemcu by clicking "esp8266 sketch data upload"
- After file upload, upload to the nodemcu the mousebot.ino file by oing to the arduino IDE and pressing ctrl U
Downloads
How the Code Works
First, we include the libraries this code will use
//to enable the ESP8266 to connect to the WIFI
#include <ESP8266WiFi.h>
#include <WiFiClient.h>
#include <Arduino.h>

//Enables the ESP8266 to act as a server
#include <ESP8266WebServer.h>

//enables communication with the server and the client(your conected device)
#include <WebSocketsServer.h>
#include <Hash.h>

//To open the uplaoded file on the nodemcu
#include <FS.h>
Set the esp8266 as a webserver opened on port 80. Ports are pathways the data will pass through. As a server port, It will send the HTML file to the client(the deivces connected to it).
Adds a websocket connection using port 81 to listen for messages from the client
The websockets has the parameter num,WStype_t, payload and size. The num determines the client numeber, payload is the message it send, size is the length of the message and WStype_t is for differents events such as
- WStype_DISCONNECTED - on disconnection of a client.
- WStype_CONNECTED: - when a client connects
WStype_TEXT - Received data from the client
Depending on the event type different actions are done and is commented here
void webSocketEvent(uint8_t num, WStype_t type, uint8_t * payload, size_t length) {
  switch (type) {
    case WStype_DISCONNECTED:
     Serial.printf("[%u] Disconnected!\n", num); //prints data to the serial monitor
      break;
    case WStype_CONNECTED: {
        IPAddress ip = webSocket.remoteIP(num); //gets the IP of the client
       Serial.printf("[%u] Connected from %d.%d.%d.%d url: %s\n", num, ip[0], ip[1], ip[2], ip[3], payload);
        webSocket.sendTXT(num, "Connected"); //sends "conencted" to the browser console
      }
      break;
    case WStype_TEXT:
     Serial.printf("[%u] Data: %s\n", num, payload); //prints the client number in %u and the data received as strings in  %s\n
     break;}}
Set the NODEMCU As Server
sets the ssid and password you'll use to connect to it later
const char *ssid = "Try";
const char *password = "12345678";
on the set up, we specifiy the rate at which it our nodemcu and pc will communicate , which is 115200.
void setup(void){
  Serial.begin(115200);
  Serial.print("\n");
set to true too see the wifi diagnostic output on the serila terminal
Serial.setDebugOutput(true);
initaliaze the filesystem
SPIFFS.begin();
Set up the nodemcu as an accesspoint with ssid and password defiend earlier and prints the ip of the nodemcu that you'll connect with earlier. by default it is 192.168.4.1
Serial.print("Configuring access point...");
  WiFi.mode(WIFI_AP);
  WiFi.softAP(ssid, password);
  IPAddress myIP = WiFi.softAPIP();
  Serial.print("AP IP address: ");
  Serial.println(myIP);
Initialize the websocket on the nodemcu, whcih is pur server
webSocket.begin();
Calls the function webSocketEvent when an websocket event occurs.
webSocket.onEvent(webSocketEvent);
For debugging, print "WebSocket server started" on a new line. This is to determine the line of code the nodemcu is processing
Serial.println("WebSocket server started.");
when a client visits 192.168.4.1, it will call the function handleFileRead and send with it the parameter server URI which in this case is our nodemcu information. The function handleFileRead will serve the html file from the nodemcu file system
 server.onNotFound([](){
    if(!handleFileRead(server.uri()))
if it cant be found it will show "FileNotFound"
  server.send(404, "text/plain", "FileNotFound");
  });
Begins the server and print HTTP server started.
  server.begin();
Serial.println("HTTP server started");
On our void loop, we enable the server to contiuosly handle client and its websockets communictaions as follows:
void loop(void){
  server.handleClient();
   webSocket.loop();}
Load HTML File
we will use a function named handleFileRead to open and the html file from the nodemcu file system. it wil return a boolean of value to determine if its loaded or not.
When "192.168.4.1/" is open by the client we set the file path to "/Joystick.html, the name of our file in the data folder
bool handleFileRead(String path){
  Serial.println("handleFileRead: " + path);
  if(path.endsWith("/")) path += "Joystick.html";


  if( SPIFFS.exists(path)){
    File file = SPIFFS.open(path, "r");
    size_t sent = server.streamFile(file, "text/html");
    file.close();
    return true;
  }
  return false;
}
Check if the file path"/Joystick.html" exist
if( SPIFFS.exists(path)){
If it exist, open the path with a purpose of reading it which is specified by the "r". Go here for more purposes.
File file = SPIFFS.open(path, "r");
Sends the file to to server as with a content type of "text/html"
size_t sent = server.streamFile(file, "text/html");
close the file
file.close();
the function handleFileRead returns true
return true;}
if the file path doesn't exist, the function handleFileRead returns false
return true; }
Try It!

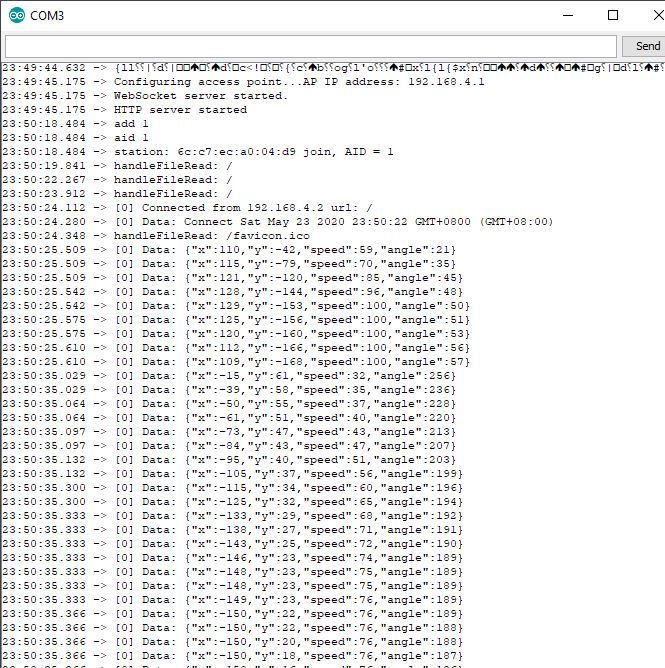
Connect to the nodeMCU and go to "192.168.4.1" and try it! :)