How to Use Arduino IDE With Raspberry Pi Pico W
by mahmoodmustafashilleh in Circuits > Raspberry Pi
3260 Views, 4 Favorites, 0 Comments
How to Use Arduino IDE With Raspberry Pi Pico W


Learn how to code in Arduino on your Raspberry Pi Pico.
You can easily start coding in Arduino on your Raspberry Pi Pico or Pico W. This can be advantageous for people who prefer using the Arduino IDE or the Arduino programming language which is a variant of C/C++. In this tutorial we will go over the quick steps on how to do this, the only thing you will need is a Pico or Pico W and the Arduino IDE installed on your computer.
-----
Before we delve into the topic, we invite you to support our ongoing efforts and explore our various platforms dedicated to enhancing your IoT projects:
- Subscribe to our YouTube Channel: Stay updated with our latest tutorials and project insights by subscribing to our channel at YouTube - Shilleh.
- Support Us: Your support is invaluable. Consider buying me a coffee at Buy Me A Coffee to help us continue creating quality content.
- Hire Expert IoT Services: For personalized assistance with your IoT projects, hire me on UpWork.
Explore our Stores for Premium Products:
- ShillehTek Store: Access exclusive discounts on Arduino, Raspberry Pi sensors, and pre-soldered components at our ShillehTek Website.
Shop on Amazon:
Supplies
Raspberry Pi Pico or Pico W
Install the 3rd Party Board Manager.
Because this board is not managed officially by Arduino, you will need to add the board yourself. To do so, add the following link to Additional Boards Manager URLs in the preferences.
Link:https://github.com/earlephilhower/arduino-pico/releases/download/global/package_rp2040_index.json

On a Mac you can find this here:

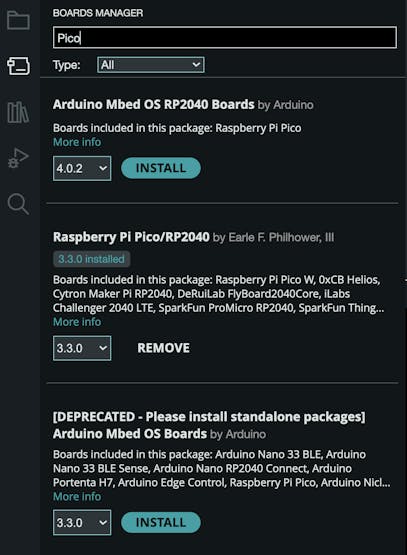
Once you click okay, you should be able to find the Raspberry Pi Pico board in the Boards Manager. Go ahead and install it.
Connect Board and Example Code
Now that you installed the Board you need, you can begin connecting to the physical device and write code.
- First, we will be working with the Raspberry Pi Pico W board. To select it go to Tools > Board and find the Pico W you are working with.
- Next, select the example we will be working with today. Go to File > Examples > WiFi > ScanNetworks. This example only works with the Pico W but it allows us to scan and see what nearby internet networks are available. You do not need to modify this code
- Next, plug in your Pico W while holding the bootsel button, we need to mount the device so Arduino IDE can generate a COM port for it the first time you are using it.

- Once you plug in your device you should select the appropriate port. Go to Tools > Board > UF2 Board.
- Next hit the upload button, it will not work the first time since the Arduino IDE still needs to generate a COM Port, but you need to click the button regardless in order to establish a port.
- Go back into Tools > Board > <Your New Comm Port>. You will recognize which port to select as it did not show beforehand. Re-upload the code after selecting the new communication port and you should be able to see the results in the serial monitor if you selected the correct port. Good job!
Note, if you do not hold the bootsel button and mount the device as stated you will probably get a Driver error, so keep this in mind.
Conclusion
You should now be ready to go to write your own C/C++ code on the Pico or Pico W, all thanks to Earle Philhower who wrote the library to do this. I hope you got this working appropriately and if you have any questions let me know, do not forget to subscribe and even better donate! Thanks for your time!