How to Upgrade Normal Wall Socket to Wifi Wall Socket ?
by coorinassistant in Living > Life Hacks
471 Views, 2 Favorites, 0 Comments
How to Upgrade Normal Wall Socket to Wifi Wall Socket ?

1 / Why is this way and how much more savings?
The wifi socket to control the device via the smart phone is so convenient, the problem is that a 2-gang socket of this type is also around 24$, too expensive, the other type is a 1 gang socket of nearly 9$, If you buy and install it, but you have to throw away the old socket or install a new device to the old one, the wifi socket is very convenient but expensive for the socket, so many houses are less used.
After a while of searching, I found a way to create a 3 gang socket, the price is around 6$, calculated to be 3 times cheaper without having to remove the old socket. So good to do it.
Supplies
1 x NODEMCU v1.0
3 x Module 1 Relay 5V
1 x AC-DC 5V 700mA
Prepare Hardware
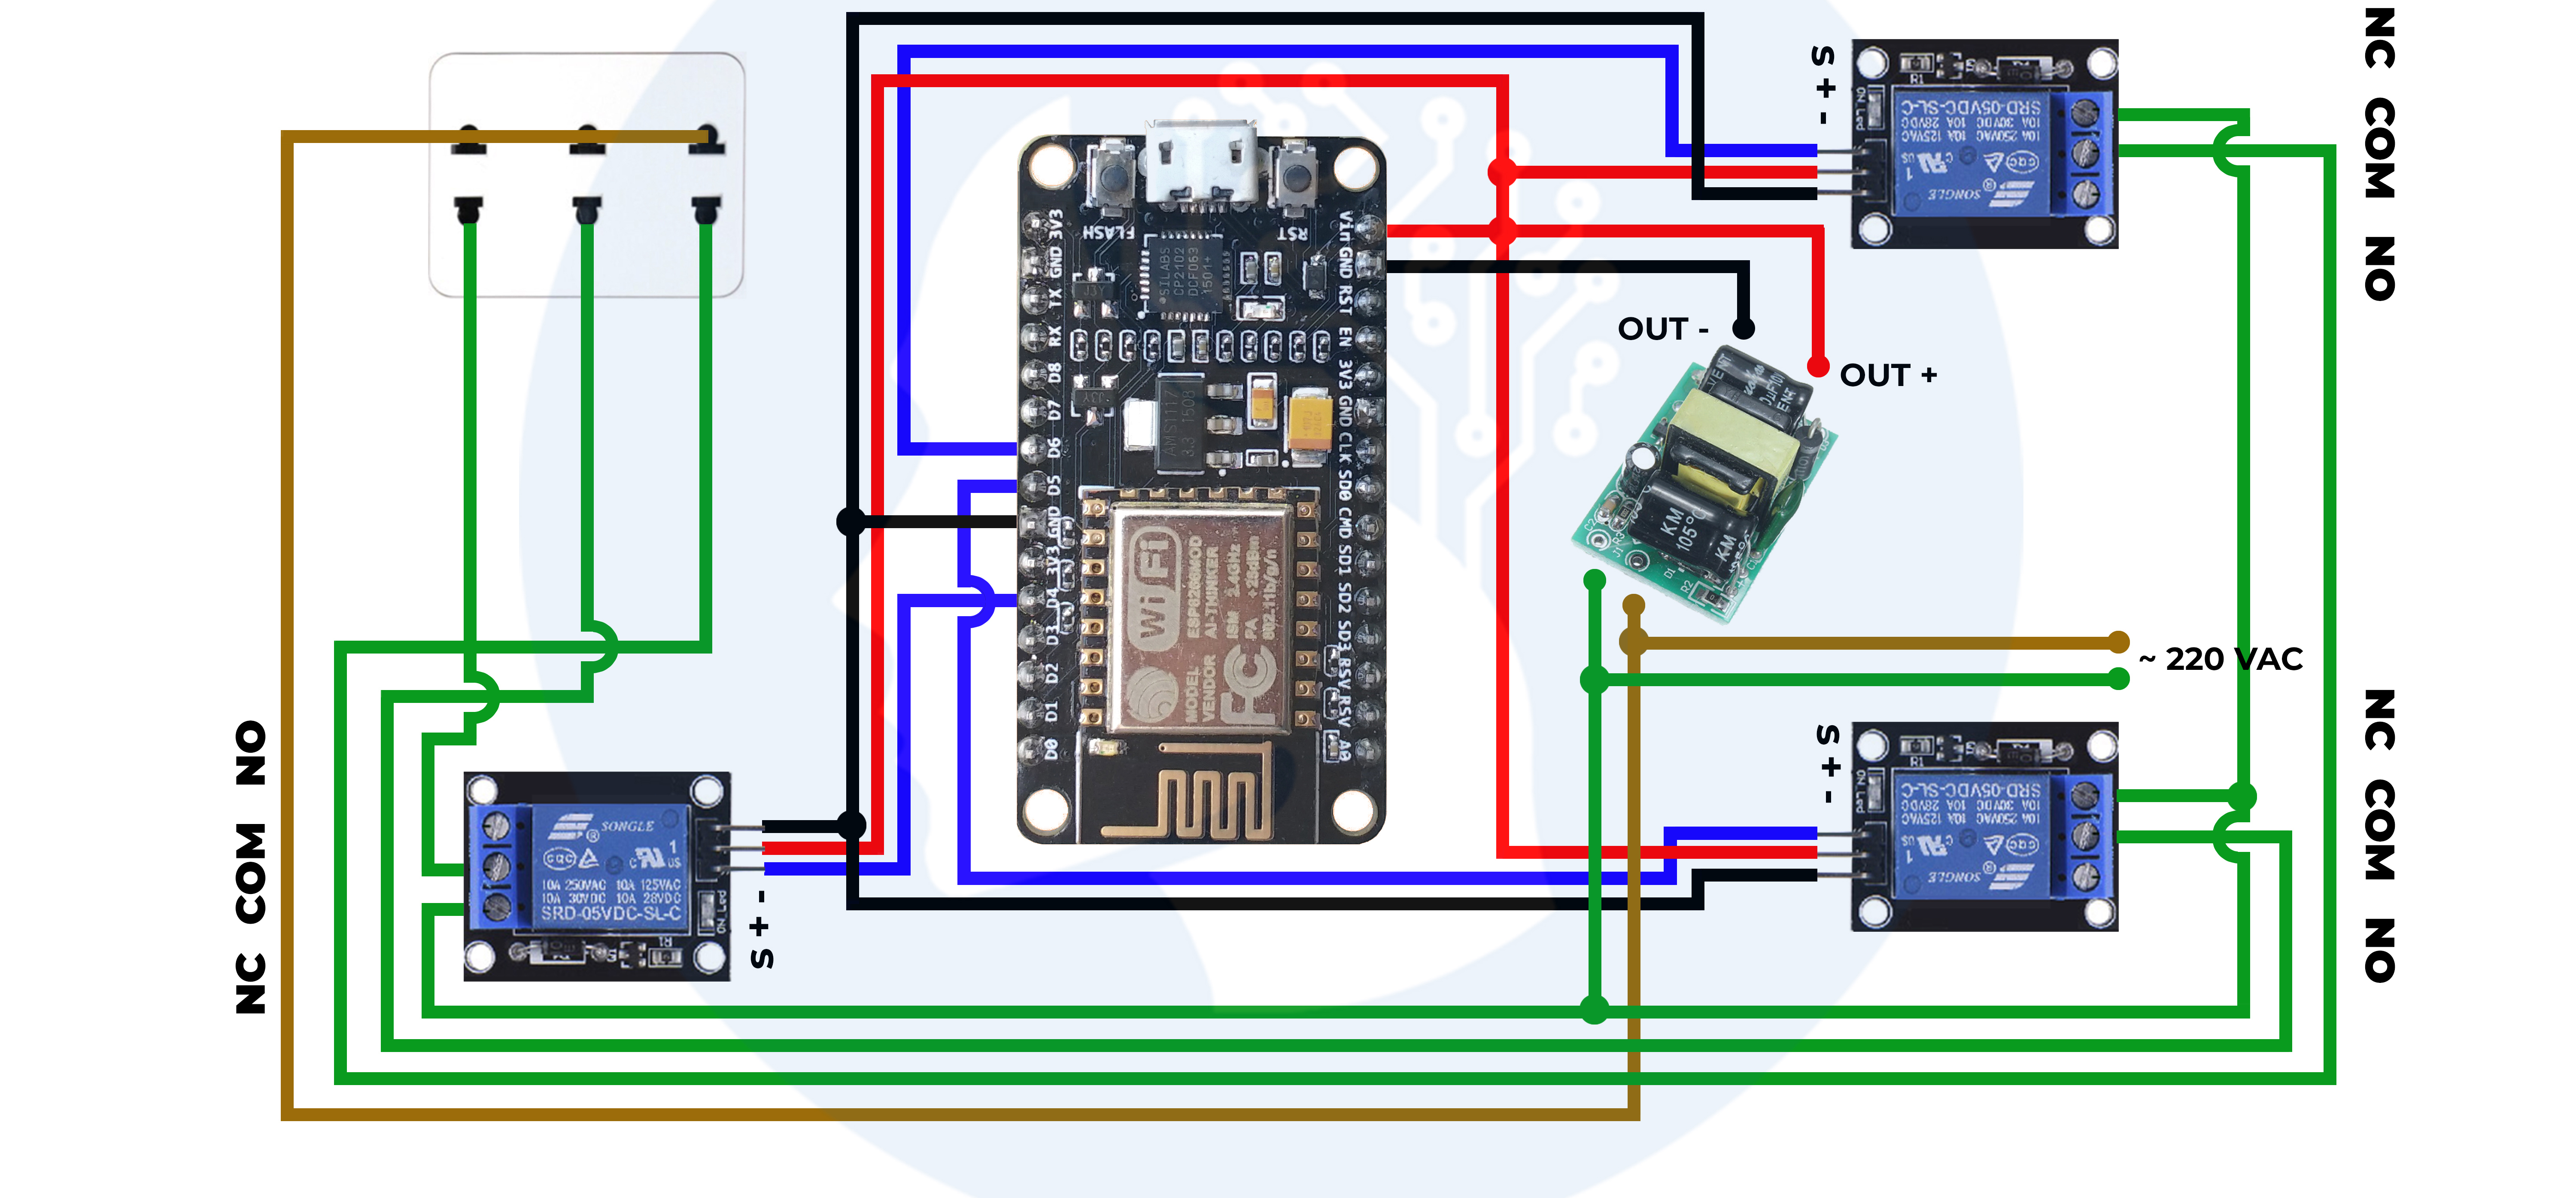
![[Coorin Assistant] Wifi socket - Step 1/3](/proxy/?url=https://content.instructables.com/FF4/DO7J/K39CROK2/FF4DO7JK39CROK2.jpg&filename=[Coorin Assistant] Wifi socket - Step 1/3)
You need some tools including pliers, soldering iron, screwdriver, black tape.I soldered circuit according to the diagram in the attached image
Create App and Get Application ID
![[Coorin Assistant] Wifi socket - Step 2/3](/proxy/?url=https://content.instructables.com/F68/M97J/K39CROT3/F68M97JK39CROT3.jpg&filename=[Coorin Assistant] Wifi socket - Step 2/3)
This App you go to CH Play, type Coorin Assistant to download, register for a user account, then enter the promotion code is four number 9 to use the free trial. Then we create a wifi socket application, here we create a 3 gangsocket, ie "3 gang socket", if you want 2 gang or 1 gang, then choose corresponding. After creating the app, we will see some buttons to control, every time I touch it, "vibra" , excited, the upper right corner has an exclamation circle where I can get the application ID code, click and see , This secret code does not reveal to anyone else.
Final Step: Download the Program and Upload to the Socket
![[Coorin Assistant] Wifi socket - Step 3/3](/proxy/?url=https://content.instructables.com/FDL/YLA9/K3E8TP41/FDLYLA9K3E8TP41.jpg&filename=[Coorin Assistant] Wifi socket - Step 3/3)
First I visit www.coorin.com you will see the item to select the application, I click on it and select the wifi socket, then click download.Unzip and open the readme file and follow it. After uploading, we put the lid on. Bingo!
Note: This is a socket directly connected to the 220V source, very dangerous so you must be extremely careful to avoid electric shock.
First disconnect the power, then check again to make sure the cord has no power and then connect to a new outlet that has just been finished, put it in there and then turn on the power, then open the phone to find wifi source named "Coorin Assistant", click on it, it will lead to a page for you to enter your home wifi password for the socket, click on the wifi name of your home at that website, then enter the password is done. The socket will automatically reboot and automatically connect to your home wifi, the next time it will automatically connect to the wifi, so there is no need to worry, go to the phone app, plug the light into the socket and click enjoy it. Note, the above circuit diagram is that when the power outlet starts, the socket is always open, the light is on, the app is turned on and off, the light will turn on and off accordingly.
Good luck ! I turned on the app and turned off the lights, turned on the fan and go to sleep now.
Result !
![[Coorin Assistant] Ổ cắm wifi – Hướng dẫn sử dụng](/proxy/?url=https://content.instructables.com/FUP/A7EL/K3E8TPJN/FUPA7ELK3E8TPJN.jpg&filename=[Coorin Assistant] Ổ cắm wifi – Hướng dẫn sử dụng)
Now, we can enjoy it. Let we see yours !