How to Play Rock Paper Scissor With a Time of Flight!
by madmcu in Circuits > Arduino
618 Views, 2 Favorites, 0 Comments
How to Play Rock Paper Scissor With a Time of Flight!

Hello and welcome to this tutorial.
This time we will learn how to make a Rock Paper Scissor game using a time of flight and NanoEdge AI Studio to create a model to classify the sign we are making.
This tutorial is a simple version of this more detailed one made by STMicroelectronics:
Supplies
Hardware:
- Arduino UNO R4 Minima
- Time-of-Flight expansion board: X-NUCLEO-53L5A1
- USB Cable
Software:
- Arduino IDE
- STMicroelectronics NanoEdge AI Studio
NanoEdge AI Studio is a free to made by STMicroelectronics for embedded engineers to make AI model without knowledge in AI.
Setup and Strategy
A Time-of-Flight (ToF) sensor sends a matrix of distance values. You can think of it as an image, but with very low resolution (8x8 = 64 pixels).
These sensors emit short pulses of light that last only a few nanoseconds and measure the time it takes for some of the emitted light to return. Because it works with light pulses, it performs better in dark conditions than in bright ones. The maximum distance the sensor can measure in the dark is around 3 meters. In very bright light, the sensor may not function correctly or at all.
Logging good data with a ToF is difficult. To log good data you need to:
- Be in a not-too-bright environment
- Have a background
- Make sure to be in front of the ToF
- Check the logged data to see if you are not too close/far
Knowing this, we just need to plug the X-NUCLEO-53L5A1 into the Arduino Uno R4 WiFi. We also need to fix the ToF to something in order for it to face down. I my case, I fixed it under a table facing the ground. Then I play by placing my hand under the table. In the tutorial made by ST, they created a support, you can check it here:
To play Rock Paper Scissors, we need to collect data representing 4 actions:
- Nothing is played
- Rock
- Paper
- Scissors
Data Logger

When working with a Time-of-Flight (ToF) sensor, you can choose to work with a single matrix of distances or with a sequence of matrices to capture gestures, for example.
In this case, both should work, but in order to save memory usage, I chose to work with a single matrix.
I used the NanoEdge AI Studio tool to create code for collecting ToF data. The code is attached below, but here is what to do if you want to generate the same code:
- Open NanoEdge
- Go the Data Logger
- Select Arduino boards
- Select the VL53L5CX
I used the following parameters:
- Data rate (Hz): 15Hz (the maximum)
- Frame resolution: 64 (8x8)
- Frames: 1
Click Generate Data Logger and you will obtain a .zip file containing a .ino file with the code ready to be flashed onto the board.
Warning:
you need the SparkFun_VL53L5CX_Library Arduino library
Go to sketch > Include Library > Manage libraries... >SparkFun_VL53L5CX_Library
NanoEdge AI Studio


We will now create a project in NanoEdge AI Studio to collect data and create a model able to classify all the signs:
- Open a NanoEdge AI Studio
- Create a N-class classification project
In project settings:
Since the version 4.5, the project settings changed a little bit, you need to select if you are working with Time series or with cross sectional data. Basically if your data contains multiple sample at different point in time or not. In our case, we use a single frame/matrix, time is not involved: we use cross sectional data.
- Select the Arduino UNO R4 WiFi as target
- Select Cross sectional
- Select Time of Flight and 8x8 resolution
- Click Next
In Signals:
We need to collect data for each signs (Rock, Paper and Scissors, as well as nothing).
You need to make sure to collect data with your hand doing the sign in front of the ToF and make sure that you are not to close/far. If you are too close, the sensor willl only a big object (your hand) covering all his field of view.
Make sure that the sign that you are logging is in all frame (see image 2: scissors). Having good data is essential in this project.
To know if you are collecting data, it is pretty easy since the last update of NanoEdge, because you can see the matrix in the the signal step. After collecting data (see below), you can take a look at the collected matrix (see images attached).
For each class we will do as follow:
- Click on Add Signal
- Click on From Serial (usb)
- Select the right COM Port
- Try to be more or less in the zone before clicking start
- Log approximately around 200 signals of a single sign.
- Stop the logging
Repeat the same process for the 3 signs and the class nothing (when you don't place your hand in front of the sensor).
In Benchmark:
The benchmark is the heart of NanoEdge AI Studio. Here we will use all the data collect to try to find the best combination of preprocessing of the data and the best model able to distinguish the data.
- Click on New Benchmark
- Select all datasets
- Click start
The benchmark will iteratively try combination of preprocessing and model on the data and evaluate the performances. It split the data into a training and testing set multiple times to have robust results.
The benchmark can take hours to finish depending on the amount of data used. If the score reach 90% or more, you can pause/stop it and continue. The benchmark will try to optimize the model as much as possible but you can stop it when satisfied.
In Validation:
During the benchmarking process, every time a new best library is found, it will be added to the validation step.
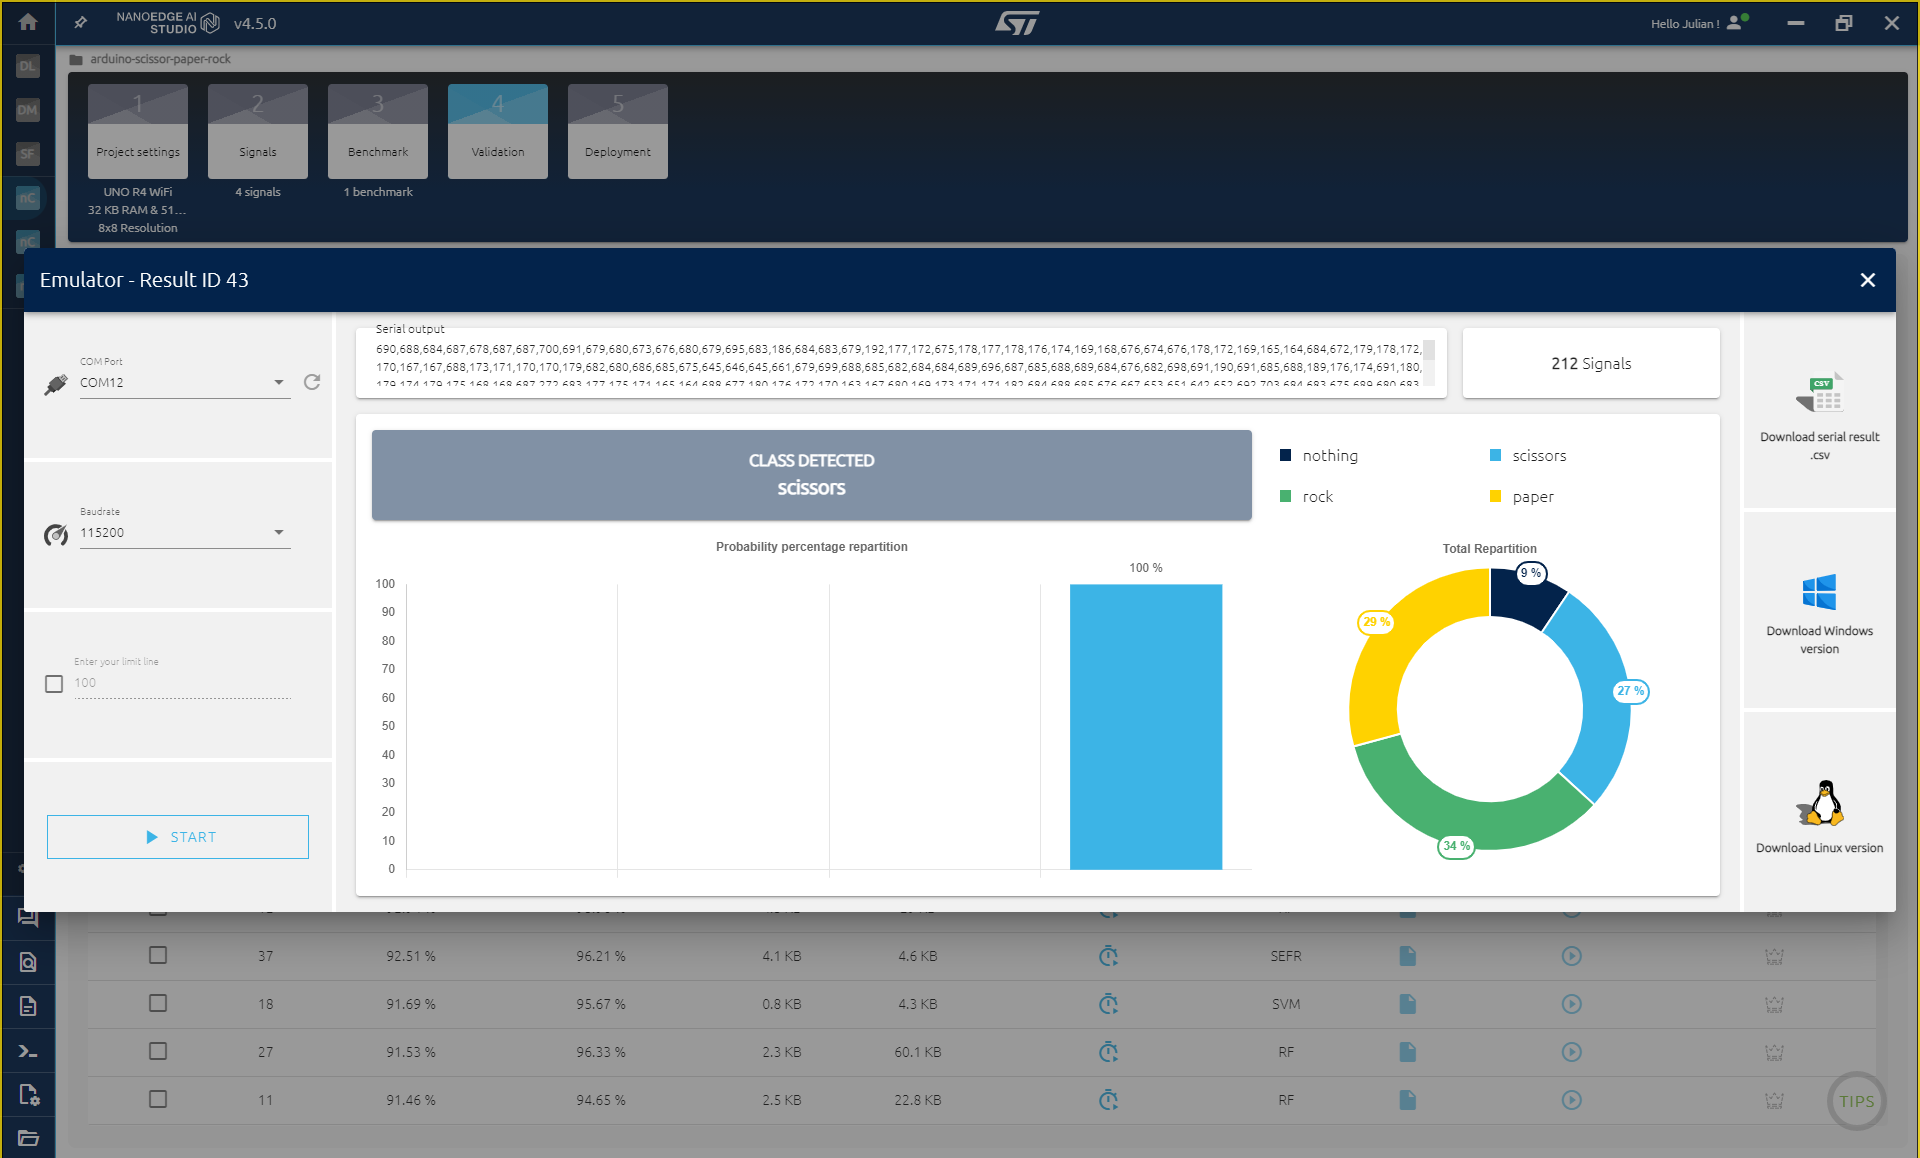
Once you have some good libraries, you can test them in real-time, as if they were deployed on the microcontroller, to see if they work well.
To do this, click the play button in the Serial Emulator column. Select the correct COM port and click Start. You will then be able to test the model and see if it performs well.
If you notice that some classes are having trouble being recognized, you can go back to the logging process and perform a new benchmark. I had some issues because my hand was too close of the ToF during the logging of the scissors class.
In Compilation:
Simply click compile to get the trained model.
Add the Model to Our Code
To add the AI to our Arduino code, here is what we need to do:
- Import the library to Arduino IDE
- Get the attached code
- replace the id2class variable
That it!
1 - Add the library to Arduino IDE:
First we need to import the library to Arduino IDE, to avoid error that may happen if you already imported a previous NanoEdge AI library, here is a safe way to do it:
- Get the .zip file you obtained after compilation in NanoEdge AI Studio
- Copy the folder nanoedge (YOUR_LIBRARY.zip\arduino\nanoedgeai_for_arduino.zip\)
- Paste it in Document\Arduino\libraries
2 - Attached code explanation:
Here is what is done in the attached code:
- Include NanoEdgeAI.h and knowledge.h (the model and function)
- Add variables used by NanoEdge
- Add an initialization function
- Add the detection
Here are the part added:
#include "NanoEdgeAI.h"
#include "knowledge.h"


/* Global variables definitions */
static uint8_t neai_code = 0;
static uint16_t neai_ptr = 0;
static float neai_buffer[SENSOR_FRAME_RESOLUTION * SENSOR_FRAMES] = {0.0};


/* NEAI library variables */
uint16_t id_class = 0; // Point to id class (see argument of neai_classification fct)
float input_user_buffer[DATA_INPUT_USER * AXIS_NUMBER]; // Buffer of input values
float output_class_buffer[CLASS_NUMBER]; // Buffer of class probabilities
const char *id2class[CLASS_NUMBER + 1] = { // Buffer for mapping class id to class name
};


void setup() {

  //some code

  /* Initialize NanoEdgeAI AI */
  neai_code = neai_classification_init(knowledge);
  if (neai_code != NEAI_OK) {
    Serial.print("Not supported board.\n");
  }

}


/* Main function: Code run indefinitely */
void loop() {

    //classification
    neai_classification(neai_buffer, output_class_buffer, &id_class);

   //actions to perform based on id_class (the detected class)

}
3 - Replace id2class:
In the code, a id2class variable contains the name of your classes and their order (depending on the order you logged them in NanoEdge AI Studio, your id2class will not have the same order).
You need to replace the one in the code attached by your variable in NanoEdgeAI.h in your .zip:
- YOUR_LIBRARY.zip\arduino\nanoedgeai_for_arduino.zip\nanoedgeai\src\NanoEdgeIA.h
Note:
If you get an error because of RAM, it may be because of the library in NanoEdge. Go back to the VALIDATION STEP in NanoEdge and select a smaller library (click on the crown on the right), then compile it and replace it in Arduino IDE.
Create the Game
Here for simplicity, we will play using the serial.
We need to:
- Create a loop to play the game
- Create a countdown to let the player know when to play
- Wait for you to play
- Use the model to detect what sign the player is playing
- Randomly pick a sign for the board to play (the adversary)
- Count the points (here the first to 3 wins the game).
The code is attached
Be careful, you will need to make sure that the order of the class and the way we are assign who wins match.
In my case, the id2Class variable is as follow:
const char *id2class[CLASS_NUMBER + 1] = { // Buffer for mapping class id to class name
 "unknown",
 "nothing",
 "scissors",
 "rock",
 "paper",
};
So the index of the scissor is 2, rock is 3 and paper is 4
To know who is winning the code is as follow:
    if (id_class == random_play) {
      Serial.println("Draw, play again!");
    } else {
      if (
        // scisoor vs paper
        (id_class == 2 && random_play == 4) or
        // rock vs scissors
        (id_class == 3 && random_play == 2) or
        //paper vs rock
        (id_class == 4 && random_play == 3)
      ) {
        Serial.println("You won");
        player_score ++;
      } else {
        Serial.println("You loose");
        arduino_score ++;
      }
You need to modify the rules based on the order of your classes.
That's it, you can now play the Rock Paper Scissors game on a Arduino Uno R4 WiFi using a Time of Flight!
Thank you for reading :)