How to Monitor Elderly People's Safety and Comfort
by danelijis in Circuits > Wearables
2280 Views, 22 Favorites, 0 Comments
How to Monitor Elderly People's Safety and Comfort
Hello makers!
We are Dan Elijis and Michelle Mendelzburg, two B.Sc. Computer Science students at Reichman University in Israel. During the last semester of our studies, we took part in an IoT course, led by Zvika Markfeld. In this course, we learned how to integrate fun and creativity to technology.
We realized that with the tools we were provided and the knowledge we acquired in this course, we can make an impact on our society, even in the smallest way.
Therefore, we decided to utilize our knowledge to help the elderly people with one of their biggest looming concerns: falls.
Naturally, as people age in their late decades, their physical and mental wellbeing becomes more fragile. As a result, it takes only a simple ground-level fall to lead to severe injuries in elderly individuals, and in worse cases, to death, whether caused directly or indirectly by this incident.
This subject is close to our hearts, since only a week before we started working on this project, Michelle’s grandmother fell, and this event reassured the need for an appropriate solution.
While we cannot prevent these unfortunate incidents ourselves, we have developed several capabilities that warn of a potential falling incident, or ensure high responsiveness during the first critical moments, if such an incident occurred.
~~~~~~~~~~~~~~~~~~~~~~~~~~~~~~~~~~~~~~~~~~~~~~~~~~~~~~~~~~~~~~~~~~~
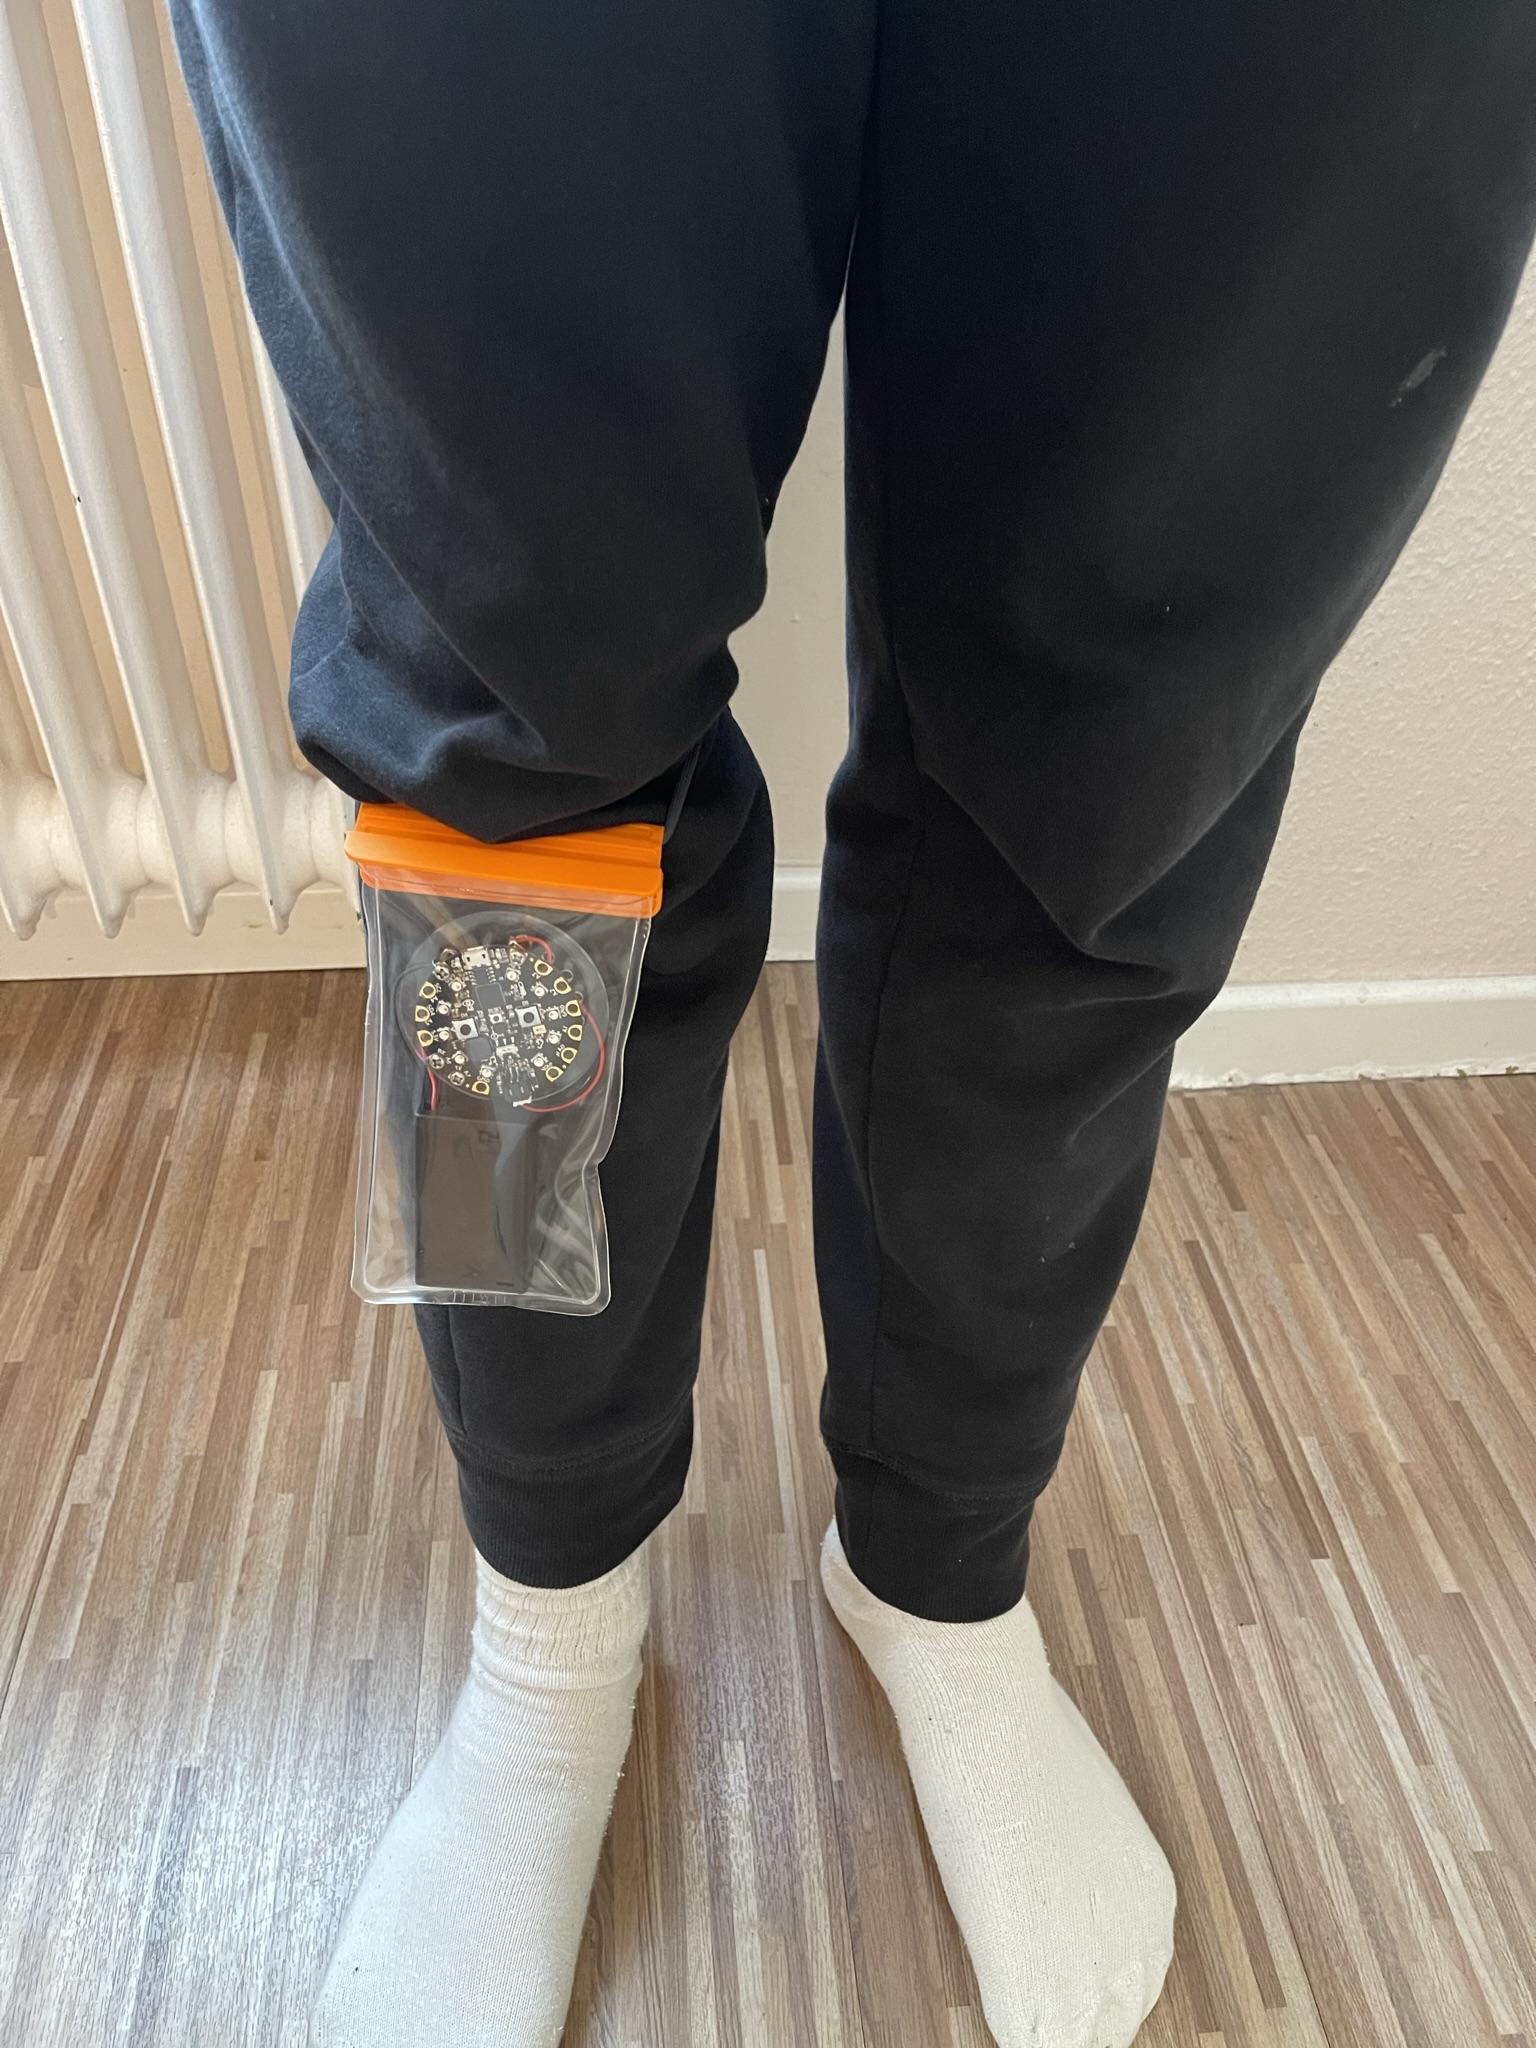
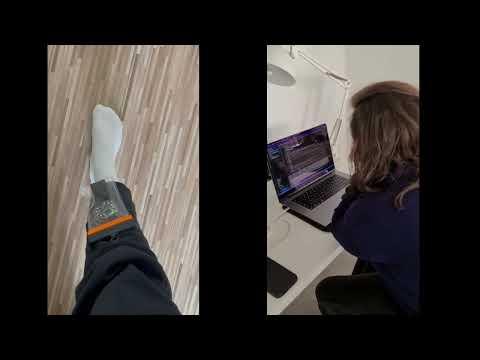
Meet `fellTell`, our extended solution to the presented problem. `fellTell` is a wearable tool, comprised of the following capabilities:
1) While attached to the elderly person's leg, `fellTell` will sense any slipping or falling incident. If such an incident occurs, `fellTell` will start beeping, to draw attention in case the elderly person is alone.
2) In case of slipping or falling, `fellTell` will also trigger an alert with high importance to a predefined emergency contact, requesting them to reply to that alert. When the reply is sent, `fellTell` will stop beeping.
3) If the elderly person fell, but feels ok, they can press a button, which will make `fellTell` stop beeping. `fellTell` will also trigger a message to a predefined emergency contact, letting them know that they are OK, but will still advise them to check up on the elderly person.
4) If the elderly person is lying in a cool space (cooler than room temperature), `fellTell` will trigger a message to a predefined emergency contact, advising them to check up on them, and make sure that they are warm and comfortable. To avoid alerting the guardian with an excessive number of alerts in a short time period, this type of alert is configured to be sent to them at most once, every 3 hours.
5) Every day, the elderly person receives a notification from a weather service to `fellTell`.The device will be illuminated in blue only if it is currently raining or snowing in their place, as a precautionary measure. This is because it is more likely to slip or fall in these weather conditions. An alert regarding these weather conditions will also be sent to a predefined emergency contact.
6) The events mentioned in paragraphs 2), 3) and 4), will automatically be logged to a Google sheet owned by the emergency contact, allowing them to monitor the elderly person's safety and comfort in the long term.
We encourage you to create `fellTell`, by following our tutorial step by step.
Supplies
.jpeg)
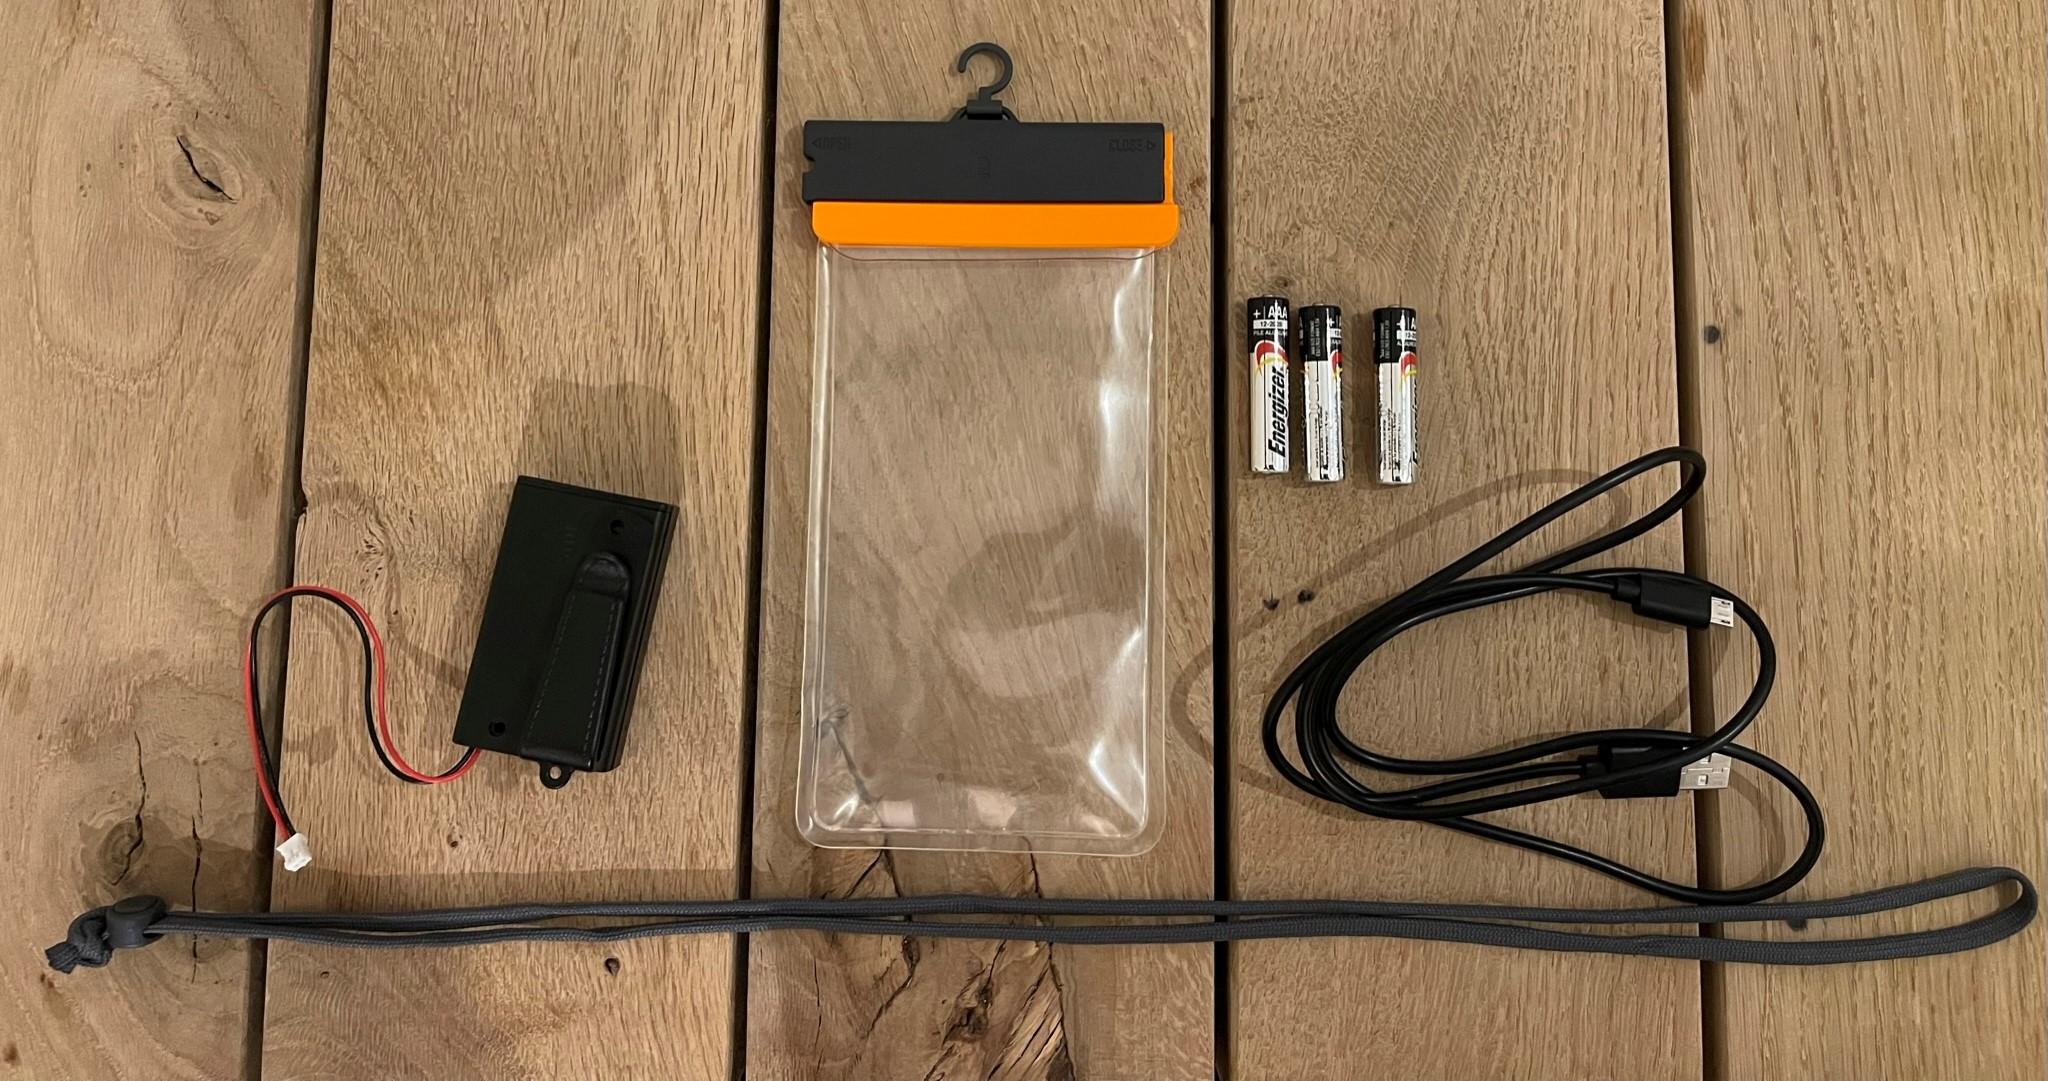
What will you need to make your own `fellTell`?
- The relevant code file for Arduino IDE. It is attached to this section.
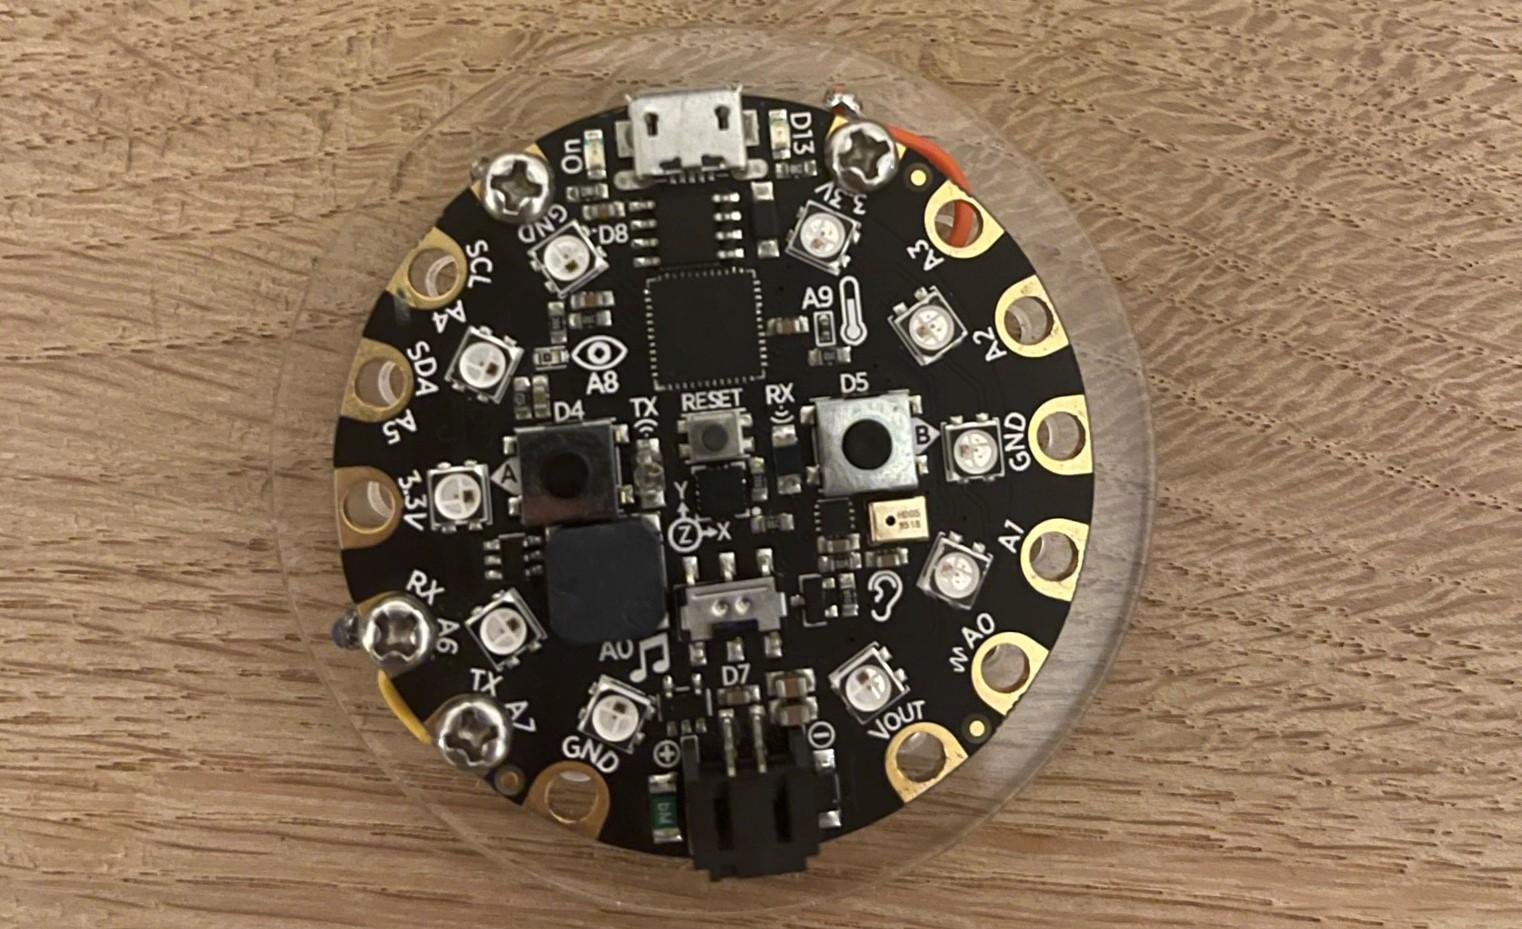
- An 'Adafruit Circuit Playground Express' board
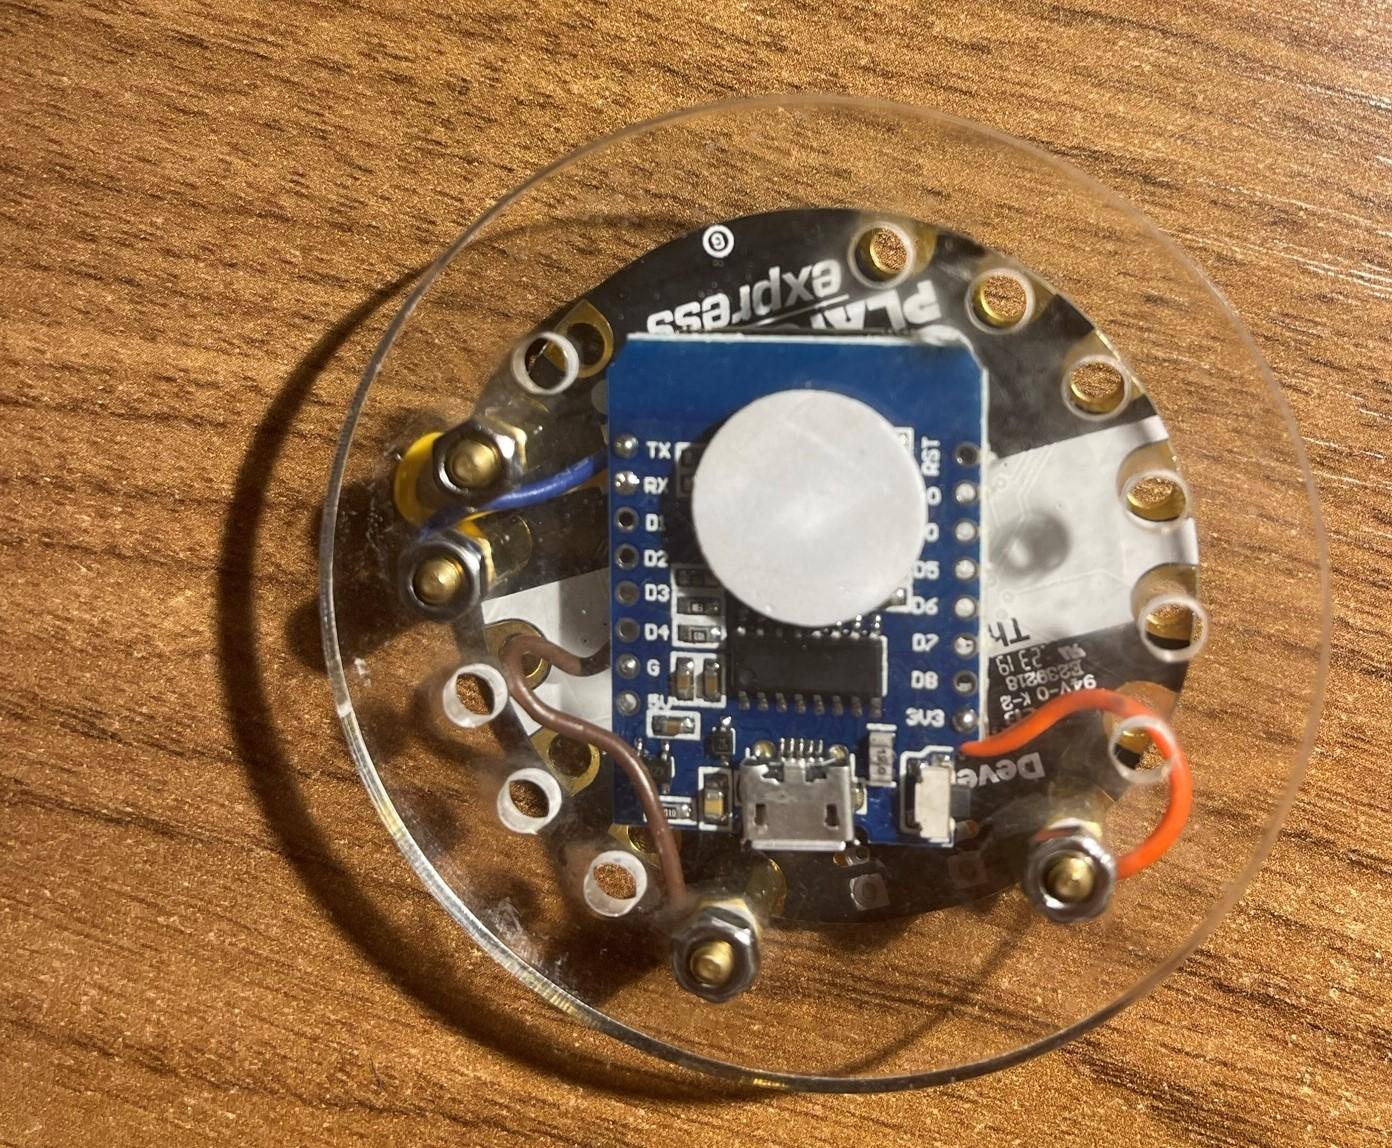
- ESP8266 (a Wi-Fi microchip), soldered* to the 'Adafruit Circuit Playground Express' board between the following pairs of inputs (ESP8266 - 'Adafruit Circuit Playground Express' board):
1) TX-RX
2) RX-TX
3) G-GND
4) 3V3-3.3V
- A USB cable
- 3 AAA batteries
- A battery storage case for 3 AAA batteries
- A transparent water-resistant phone case (ideal measures: 13cm height X 7cm width)**
- An elastic fabric band
- Access to an Email account
- Access to a Google Drive account
* The Soldering ensures bidirectional connectivity between the circuit and the internet network.
** Can be easily found online, or in different sporting goods retailers.
Downloads
Set the Environment Up
Arduino IDE
- Install Arduino IDE. Make sure that you download the desktop version, and not the editor.
- Install "adafruit_drivers_2.5.0.0.exe" (follow this step only if you have Windows OS).
- Follow the instructions under "Install SAMD Support".
- Install relevant "drivers" for the ESP8266 boards to your Arduino IDE.
- Install the following libraries:
- “ESP8266_Lib”
- ”BlynkSimpleShieldEsp8266”
- “Adafruit_CircuitPlayground”
make.com
- Sign up to make.com.
Blynk
- Sign up to Blynk Cloud.
Set Blynk Up
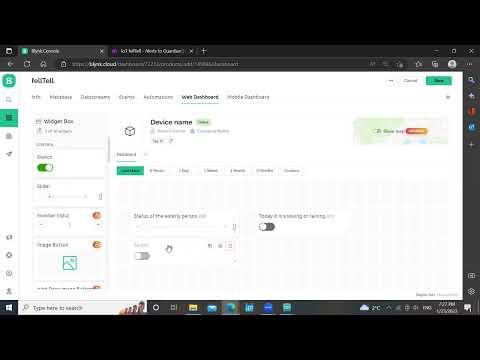
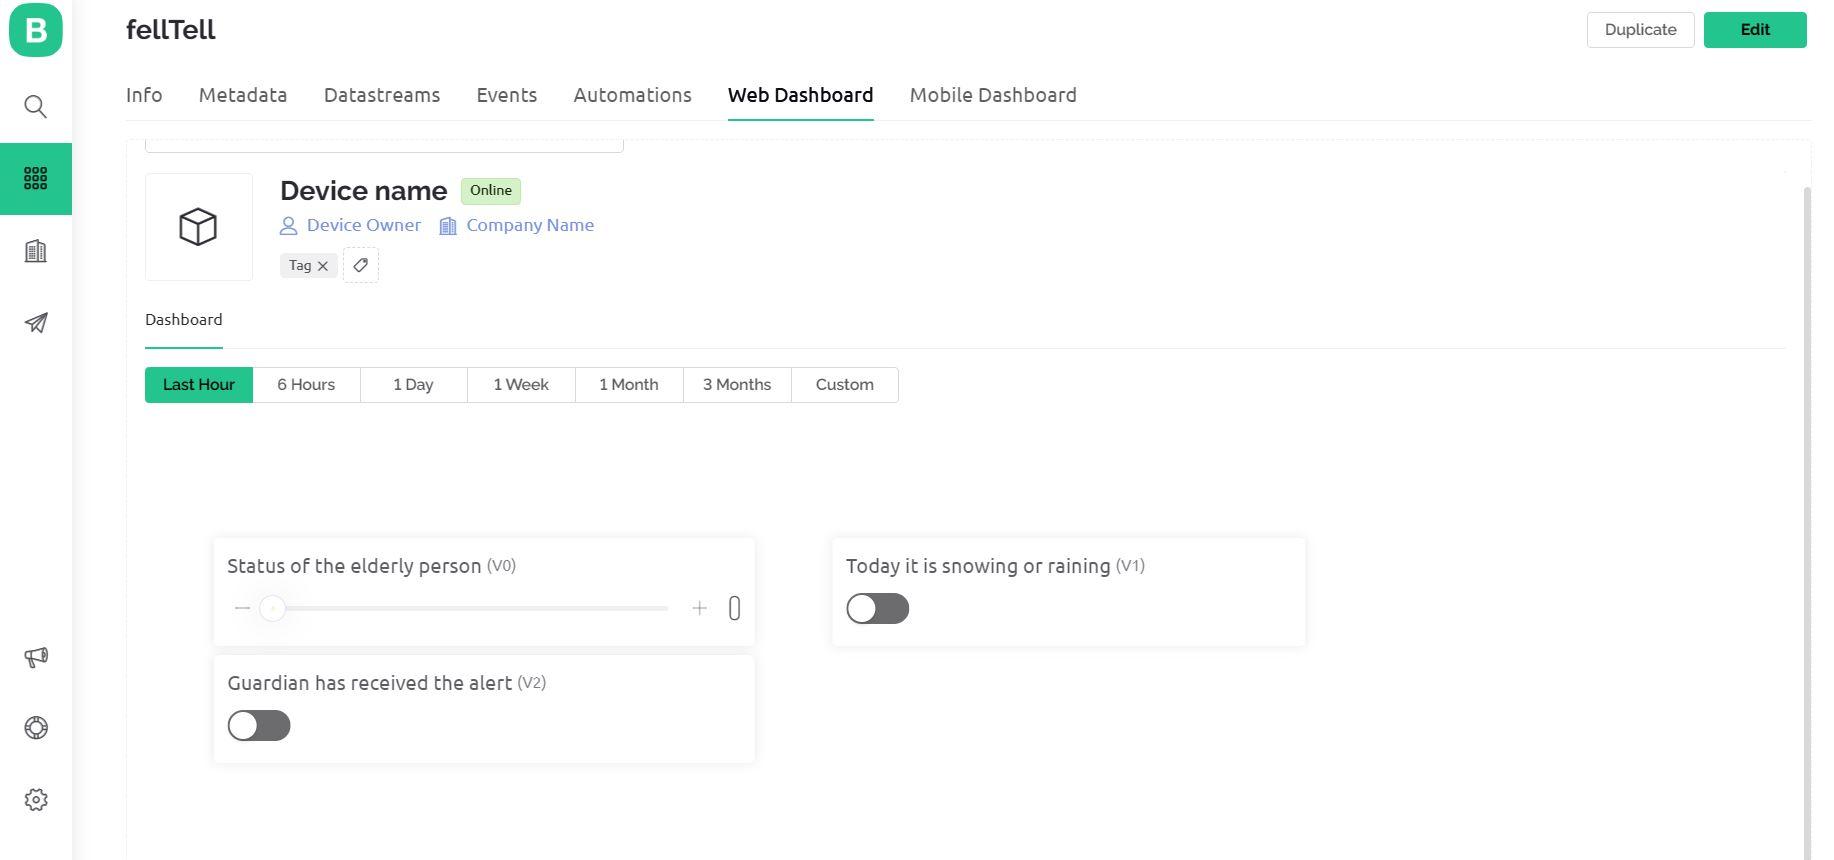
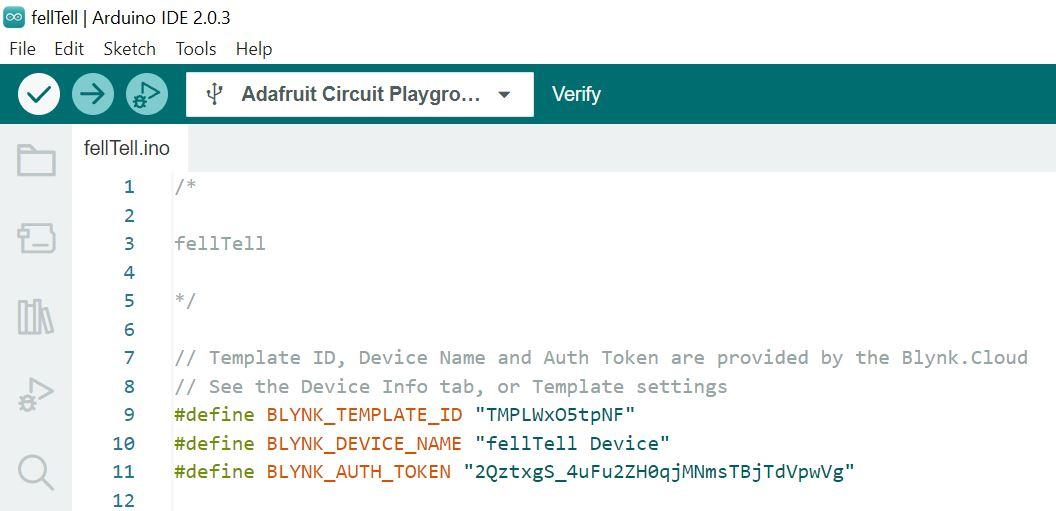
In this step, we will set Blynk environment up. This is an important step, as Blynk will be in charge of passing data from the circuit to the web servers, and from the web servers to the circuit.
To follow the instructions, you can read the text below and check the attached screenshots, or alternatively, watch the attached video.
- Sign in to your Blynk user account that you created in step 1.
- Go to Templates and click on + New Template.
- Type a name of your choice under Name.
- Choose Arduino as your Hardware and WiFi as your Connection Type.
- Go to Web Dashboard and drag a Slider to the board.
- Hover over the slider and click on settings, change the name of the slider and create a Datastream of type Virtual Pin.
- Change the Max value to 3, then set the Default Value to 0.
- Make sure that Pin is V0, and Data Type is Integer, then press Create and Save.
- Go back to the Web Dashboard and add a Switch to the board which will show if the weather is showing signs of snow or rain.
- Hover over the switch and click on settings, change the name of the slider and create a Datastream of type Virtual Pin.
- Make sure that Pin is V1, and Data Type is Integer, then press Create and Save.
- Drag another Switch that would indicate if the guardian received the alert of the fall of the elderly person.
- Hover over the switch and click on settings, change the name of the slider and create a Datastream of type Virtual Pin.
- Make sure that Pin is V2, and Data Type is Integer, then press Create and Save.
- Go to Search and click on + New Device and click From Template and choose the template you have just created.
- Download the Arduino code file provided under "Supplies" section.
- Change the device name, copy the configuration snippet, and paste it in the Arduino code file, instead what is written in lines 9,10,11.
Set Up Make.com and Create the First Scenario of Alerting in Case of a Fall
.JPG)
.JPG)
.JPG)
.JPG)
.JPG)
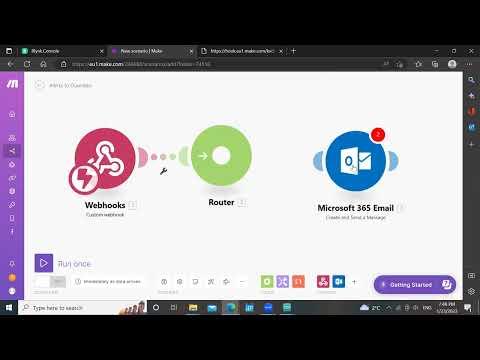
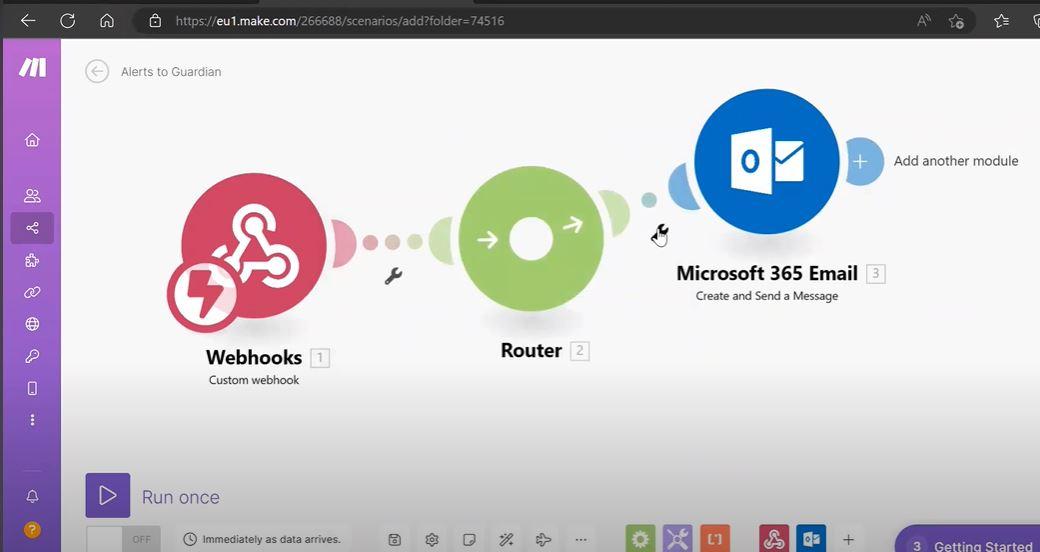
In this step, we will create our first scenario, in which a fall of the elderly person triggers an alert to their guardian.
To follow the instructions, you can read the text below and check the attached screenshots, or alternatively, watch the attached video.
- Sign in to your make.com user account that you created in step 1.
- Go to Scenarios and create a new folder.
- Go to the new folder you created and click on + Create a new scenario.
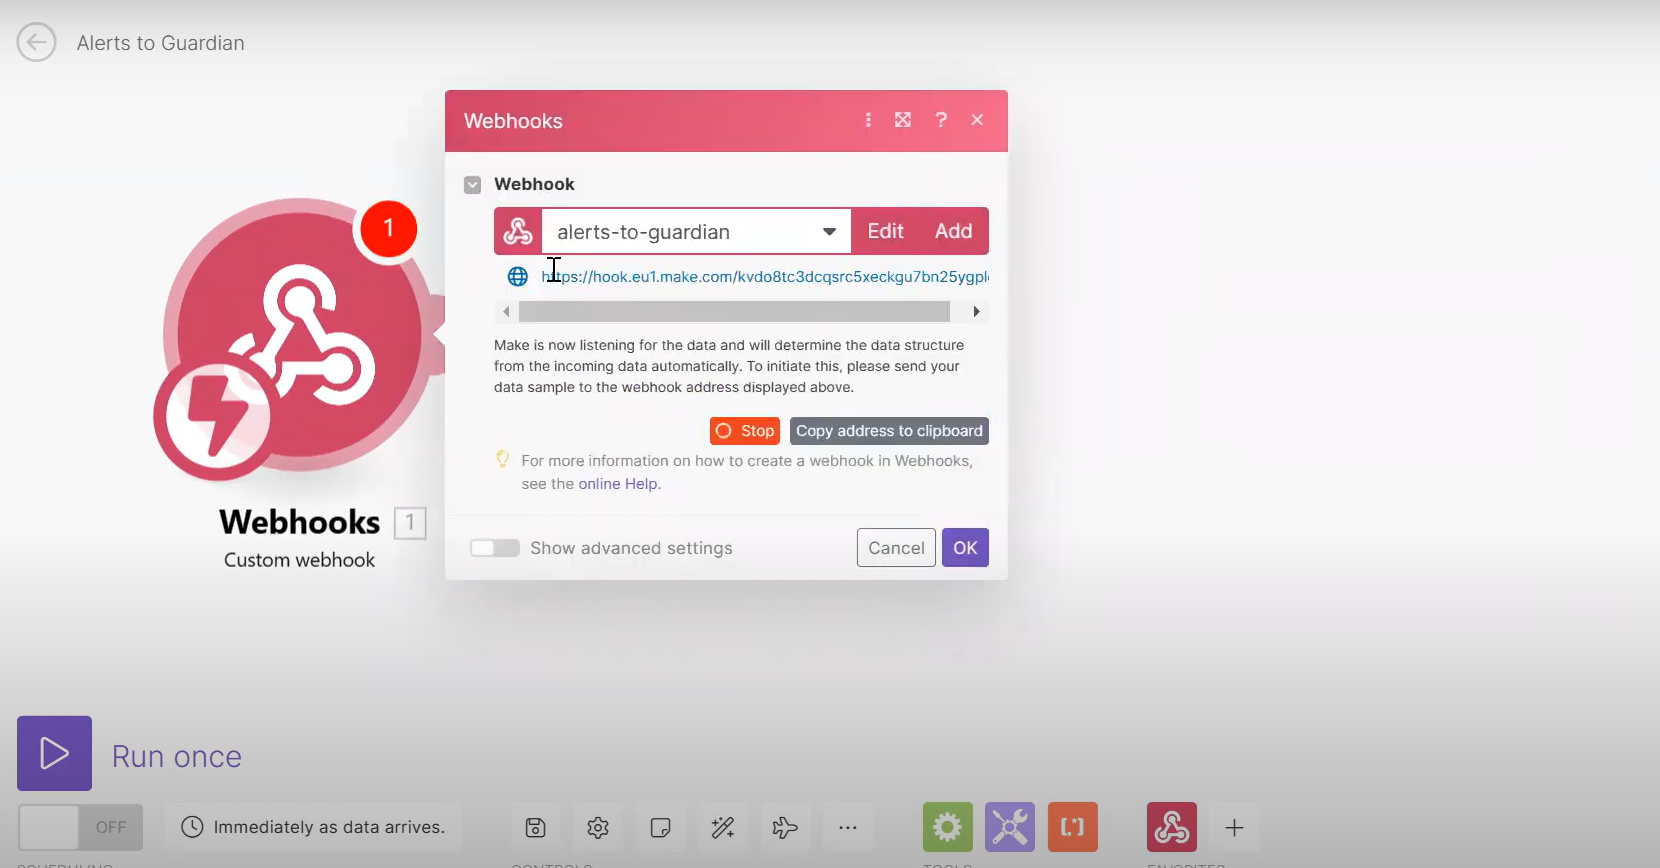
- Click on the +, choose Webhooks module of type Custom webhook, and edit its name.
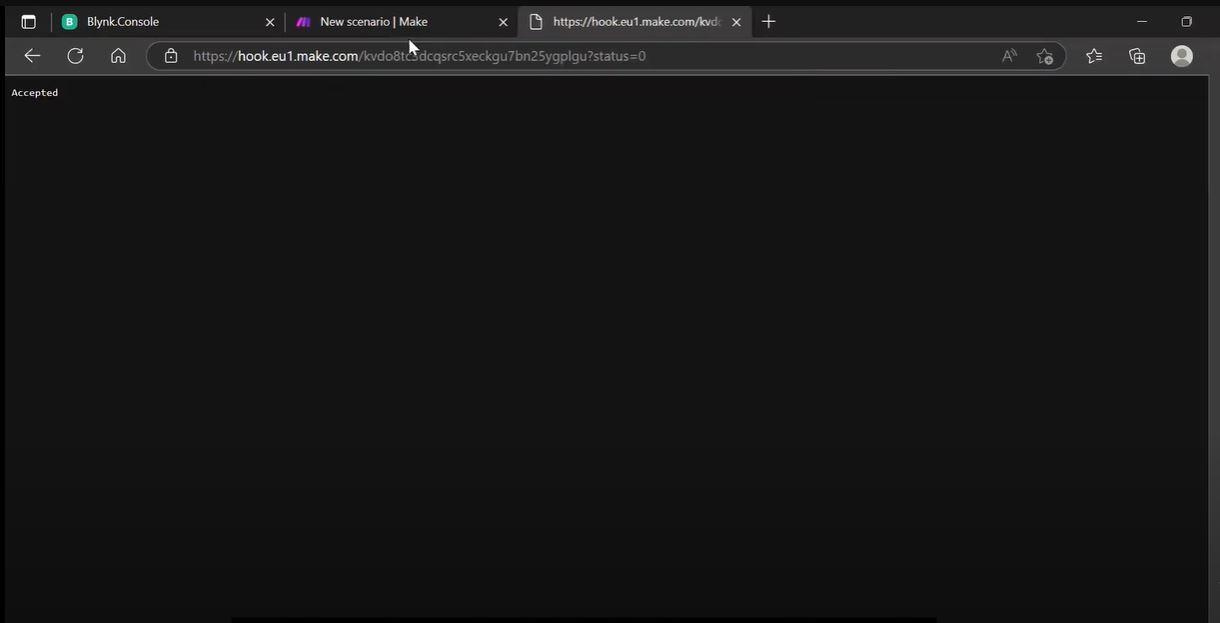
- Copy the URL address that you have just received, open a new tab on your browser, paste the URL address (don't hit enter just yet), and append to the end of the URL address the following string: "?status=0". You should see the following response: "Accepted".
- Go back to make.com, click on Tools on the bar, choose Router and attach it to Webhooks.
- Click on the + sign located on the bar, add a Microsoft 365 Email module * of type Create and Send a Message, and attach it to the router.
- Click on the newly created module, and under Connection, create a connection to the Email server.
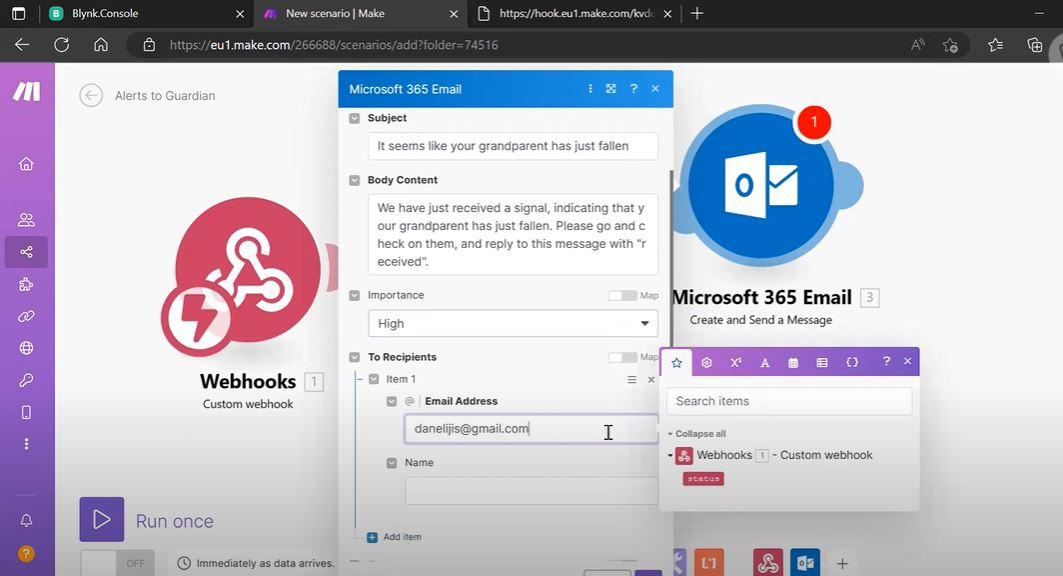
- For the falling alert, define the Subject, the Body Content (make sure that you ask to reply to this alert), the Importance and the Recipients.
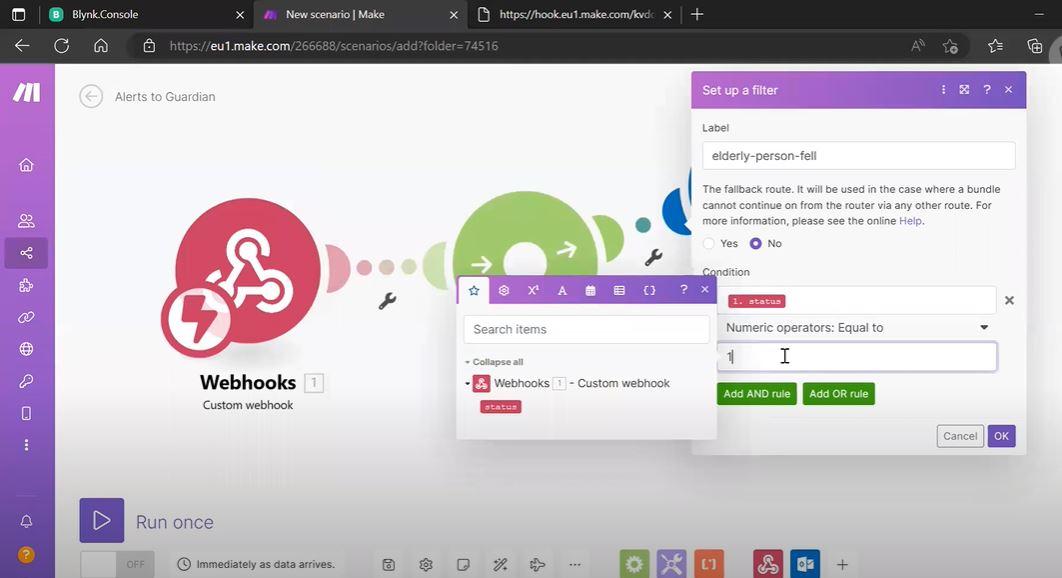
- Click on the adjustable spanner icon on the link between the router and the Microsoft 365 Email module to add a filter.
- Choose the label of the filter and configure a new condition with "status" (prompted by Webhooks) and the numeric operator to Equal to and write 1.
- Click on Webhooks and copy again the URL address.
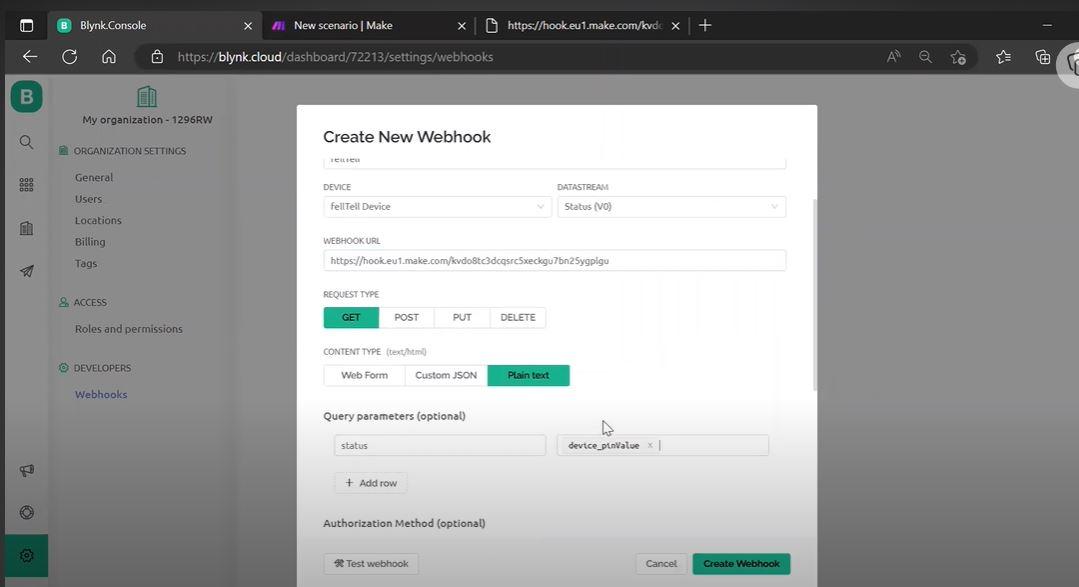
- Go to your Blynk user account that you created in step 1, and click on Settings (cogwheel icon).
- Go to Developers >> Webhooks >> + Create New Webhook. Under Webhook Trigger Event choose Device Sends Data To Datastream. Choose the webhook name, and connect it to the device name you created in step 2. Choose the datastream to be V0, and paste the webhook address that you have just copied, under Webhook URL.
- Configure Key under Query parameter to "status" (lower case!), and Value to device_pinValue (promoted), then click on Create Webhook.
- Finally, turn the scenario on.
* If you use an Email service different from Microsoft, then choose the right module for you under + sign.
Create a Second Scenario Where Guardian Replies to the Falling Alert
.png)
.png)
.png)
.png)
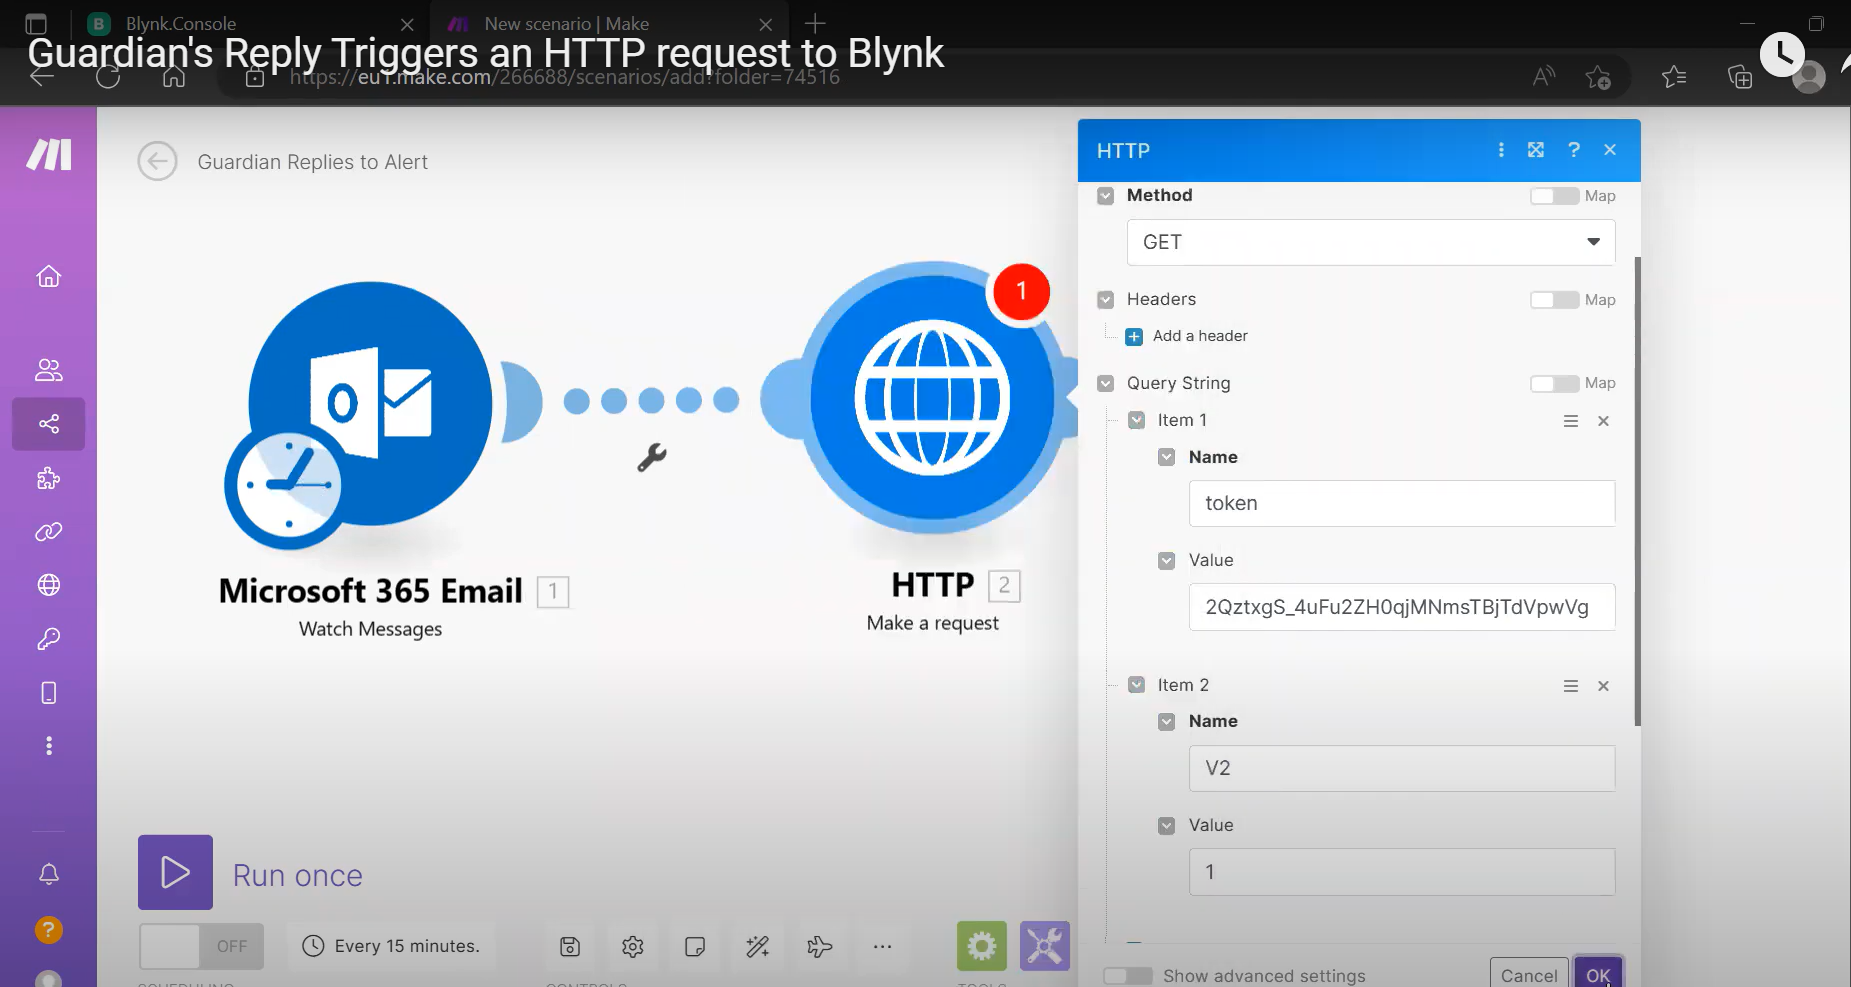
In this step, we will create another scenario, in which guardian's reply to the falling incident triggers an HTTP request to Blynk.
To follow the instructions, you can read the text below and check the attached screenshots, or alternatively, watch the attached video.
- Go to make.com and under Scenarios, go to the folder you created in the previous step and click on + Create a new scenario.
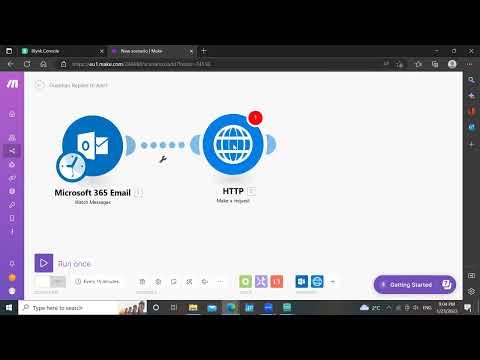
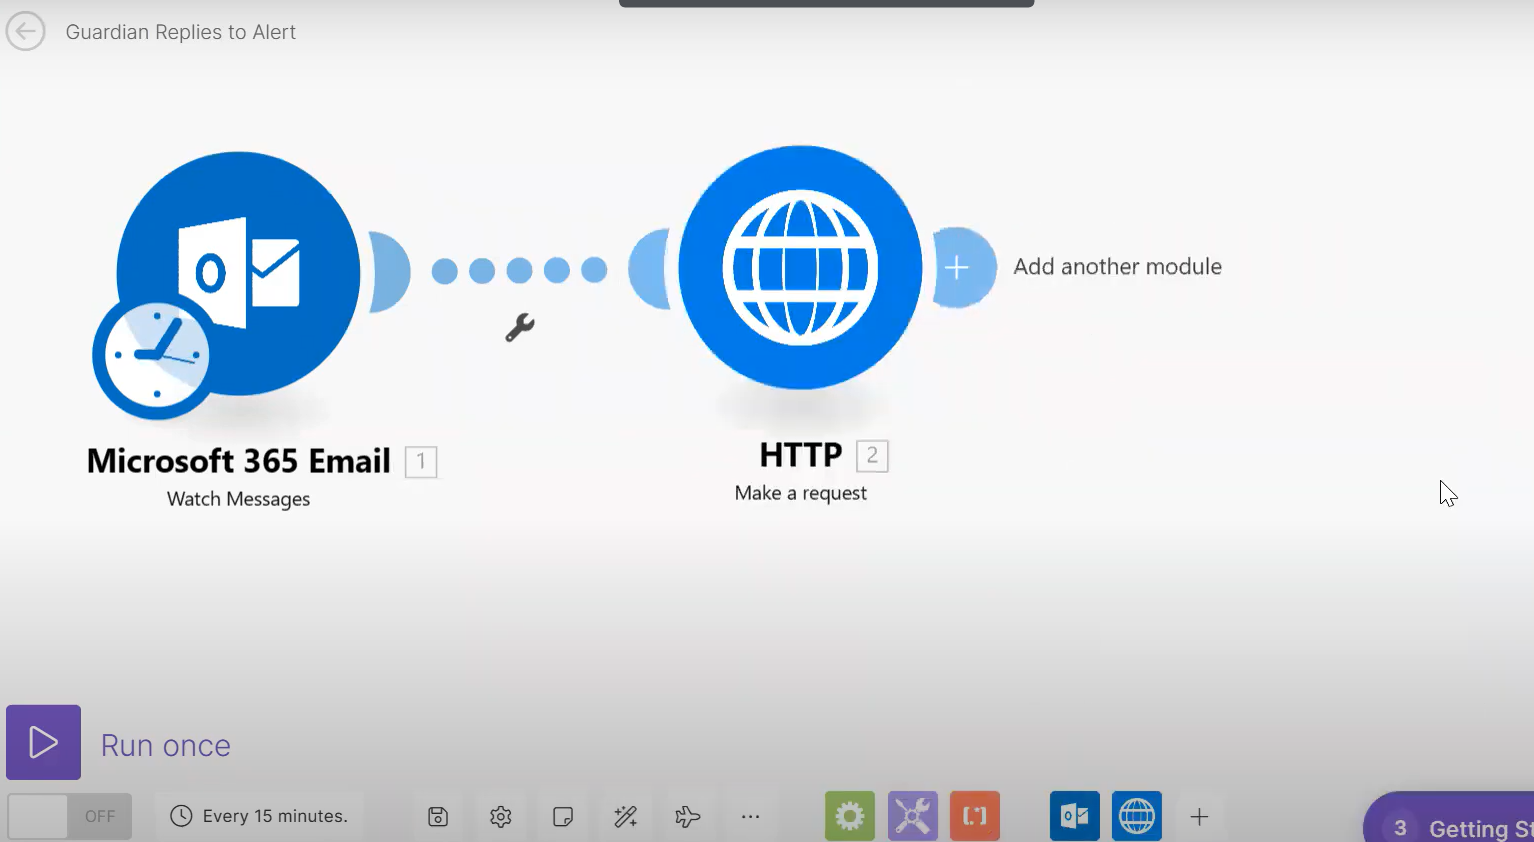
- Change its name and add a Microsoft 365 Email module of type Watch messages.
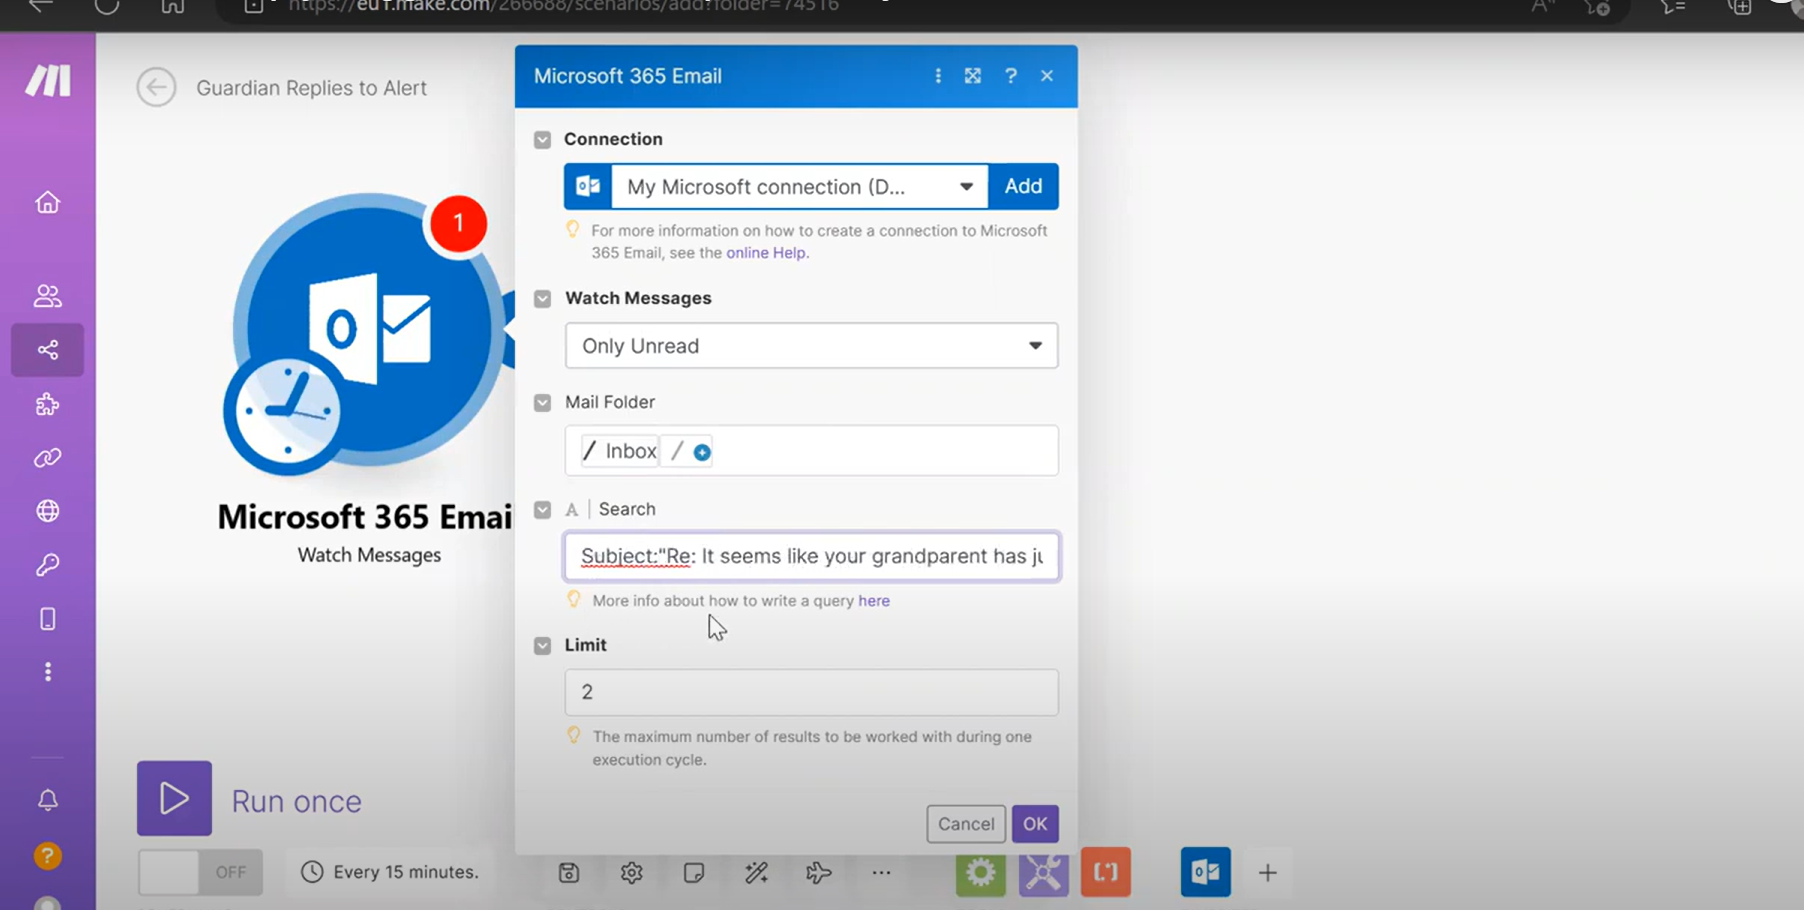
- Click on the module, and configure Watch Messages to Only Unread, Mail Folder to /Inbox/ and Search to: "Subject:Re: {configured subject from step 4}" (example shown in the video).
- Click on the + icon on the bar, add an HTTP module of Make a request type and link it to the previous module.
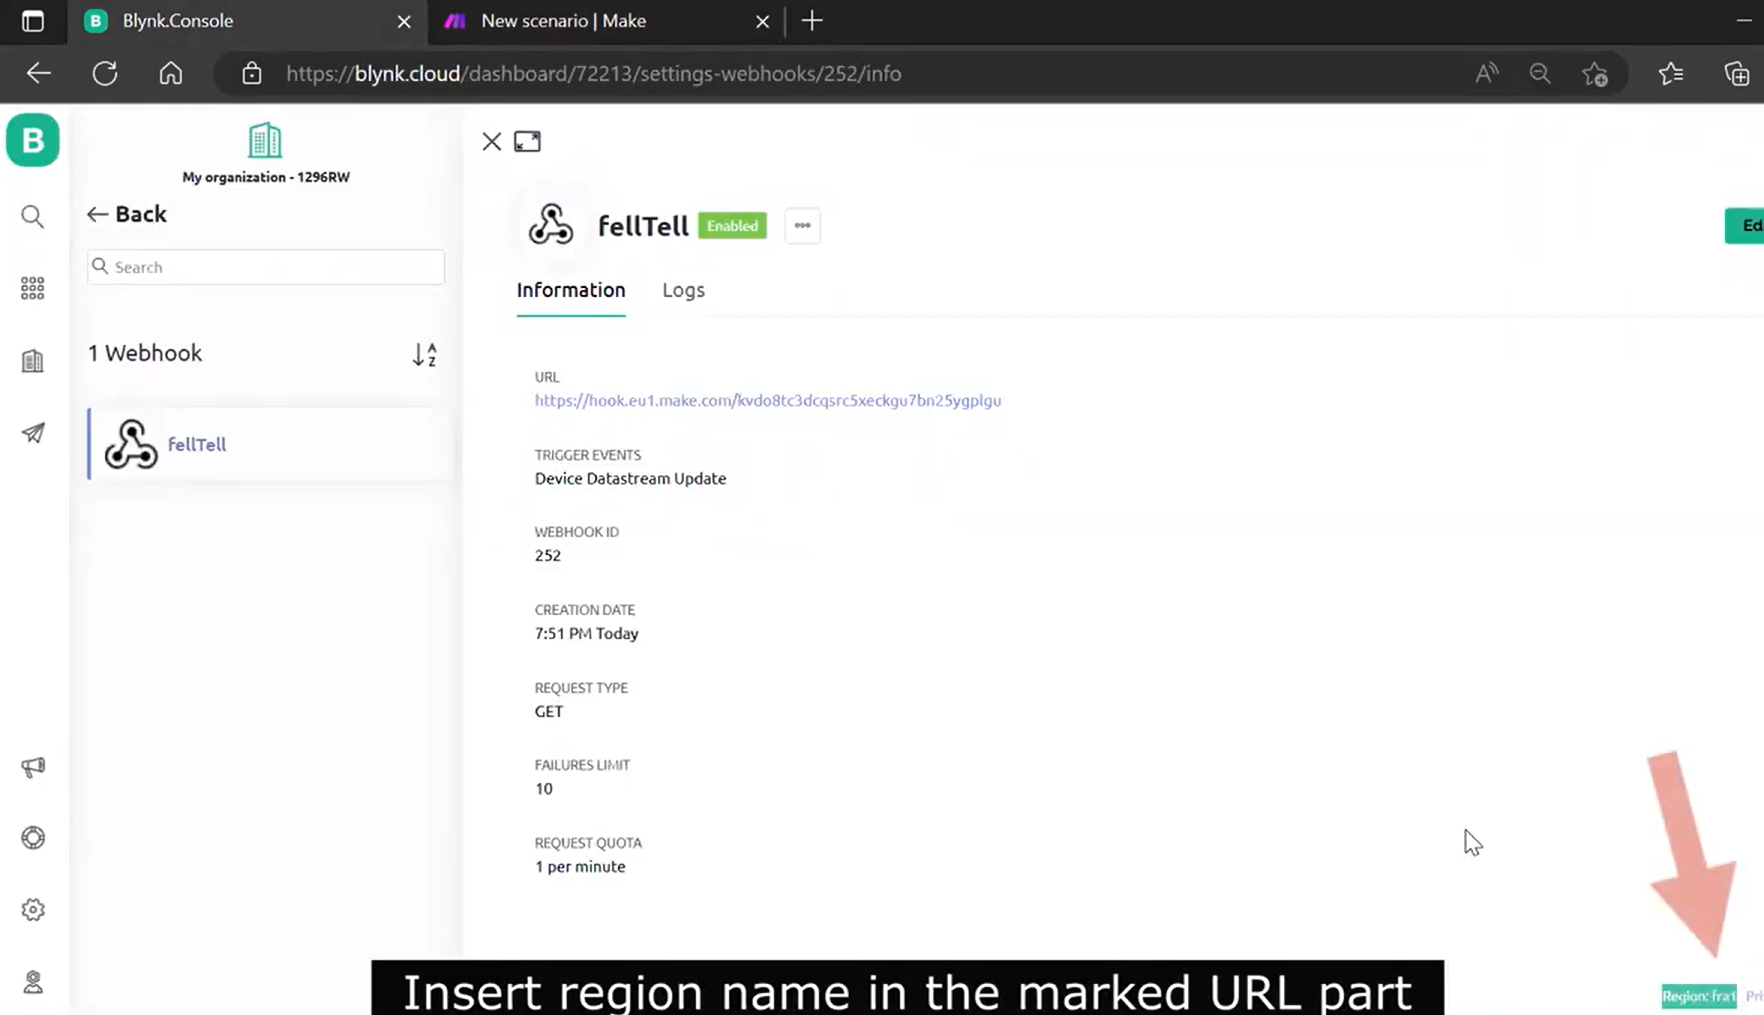
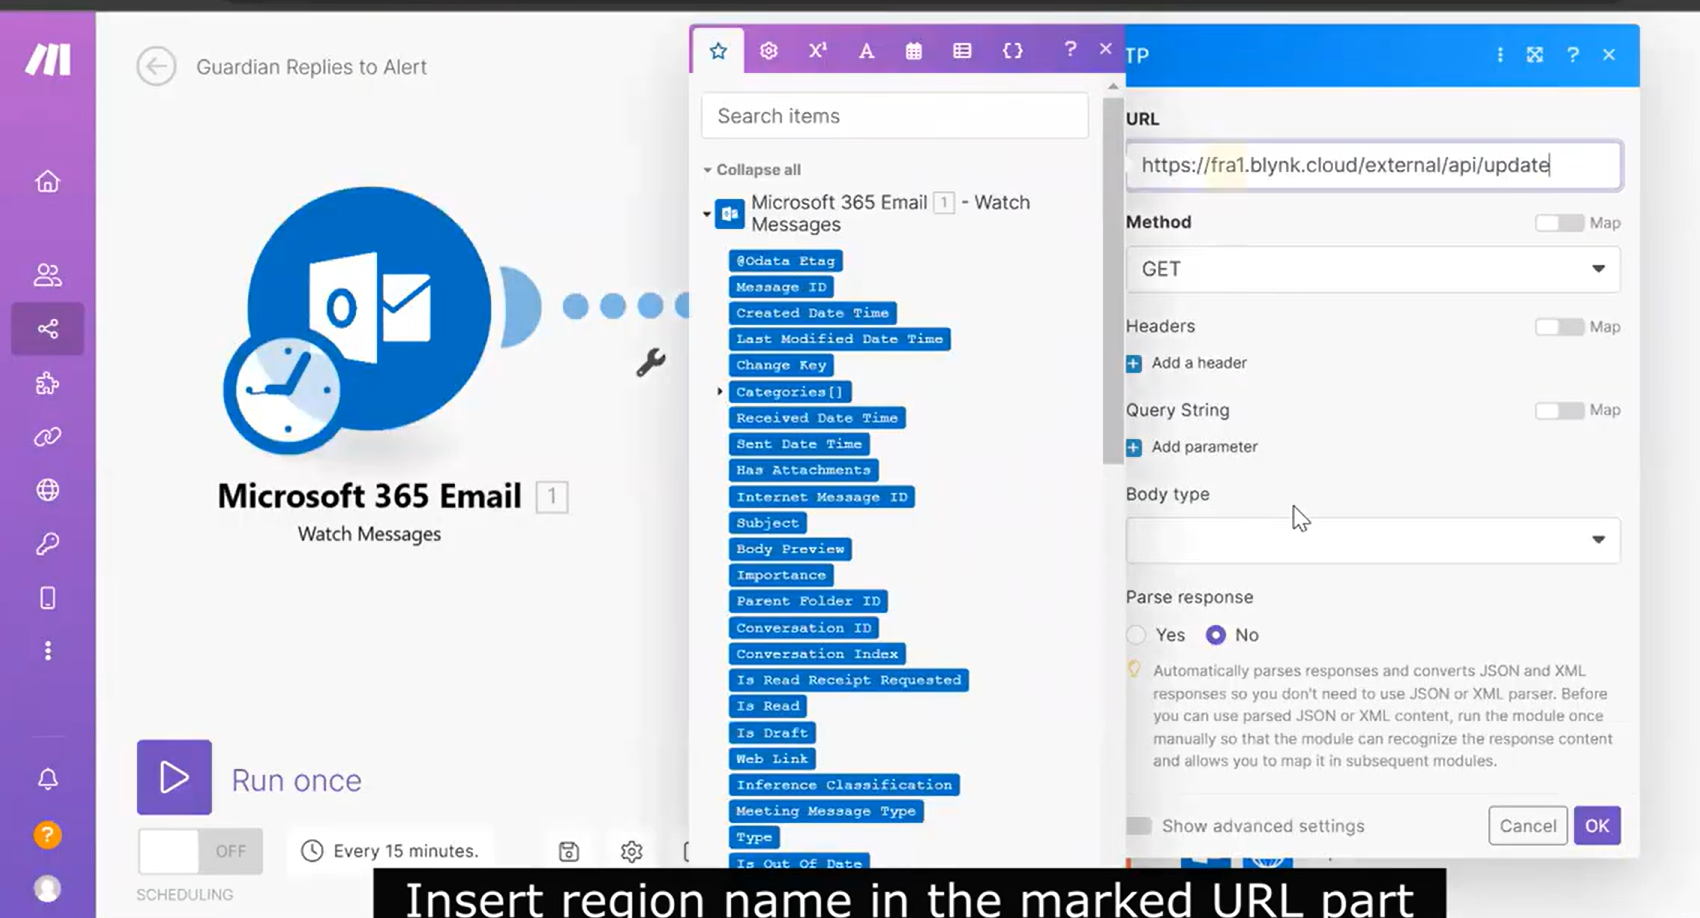
- Go to your account on Blynk. On the bottom right corner you will see: "Region: {region}". Copy {region} to the URL address shown in instruction number 6.
- Configure URL to: "https://{region}.blynk.cloud/external/api/update". Make sure that Method is configured to GET. Click on Add parameter under Query String, and configure Name to "token", and Value to BLYNK_AUTH_TOKEN value that was copied to your code file in step 2.
- Click again on Add parameter under Query String, and configure Name to "V2", and Value to 1.
- Finally, turn the scenario on.
Extend the First Scenario With: the Elderly Person Informs That They Are Ok
.png)
.png)
.png)
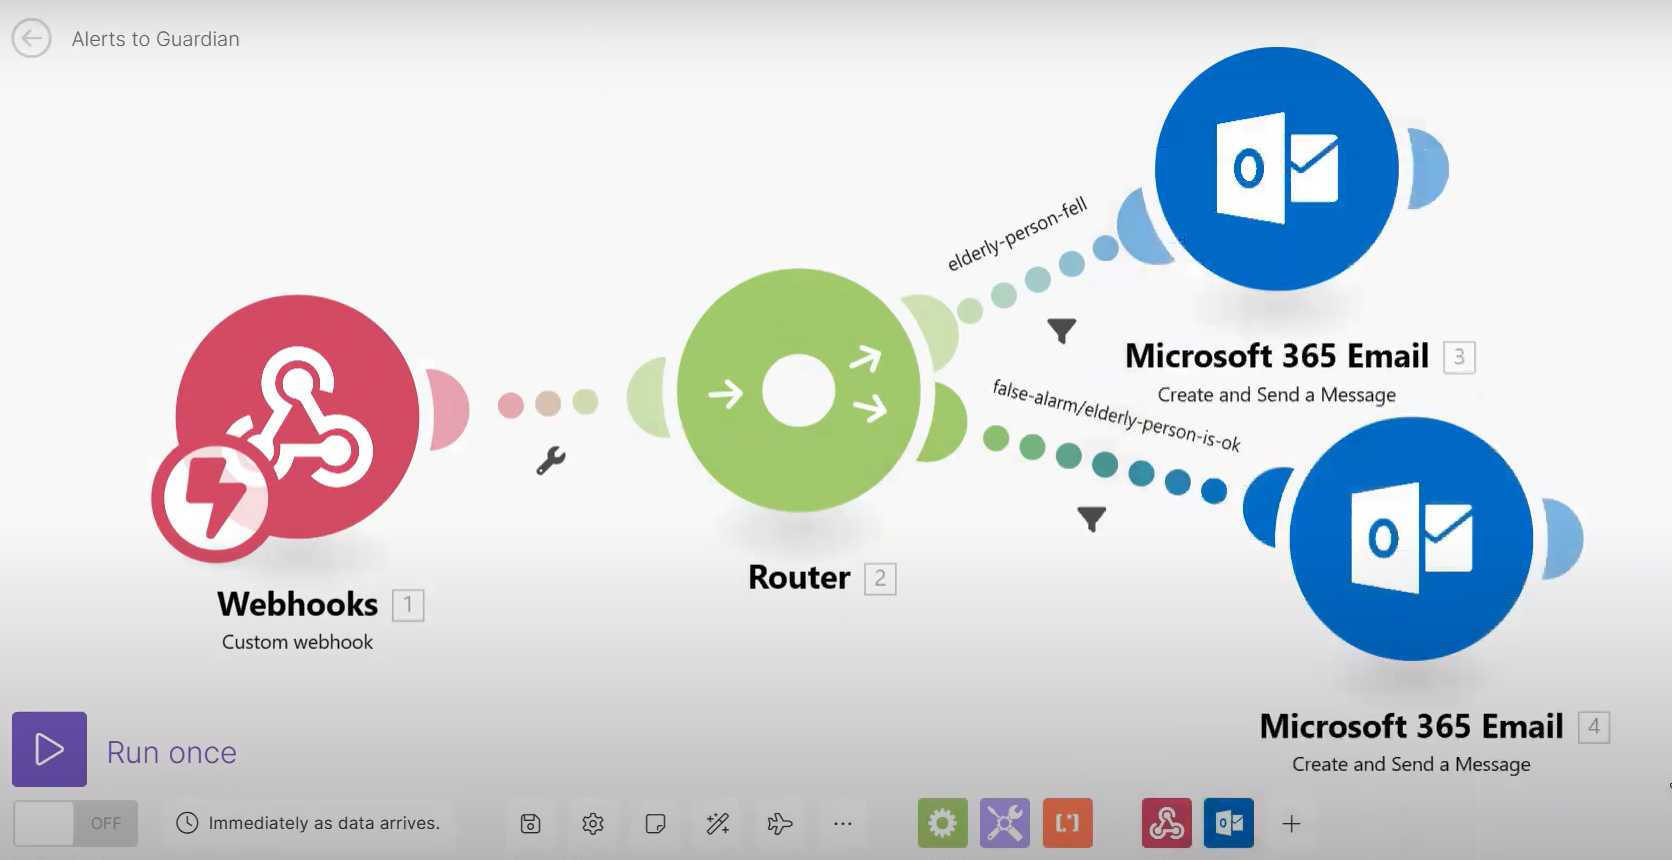
In this step, we will extend the scenario created in step 3, with a case where the elderly person informs that they are ok.
To follow the instructions, you can read the text below and check the attached screenshots, or alternatively, watch the attached video.
- Go to make.com and click on Scenarios, then go to the folder and scenario that you created in step 3.
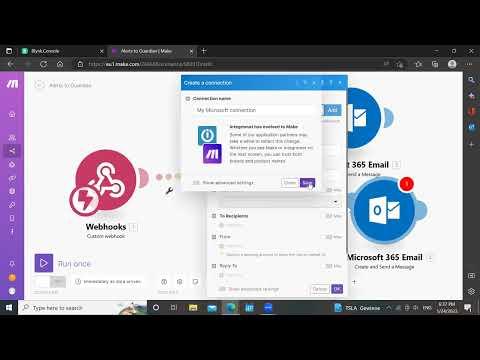
- Create another Microsoft 365 Email module of type Create and send a Message, and link it to the router.
- Click on the newly created module, and under Connection, create a connection to the Email server.
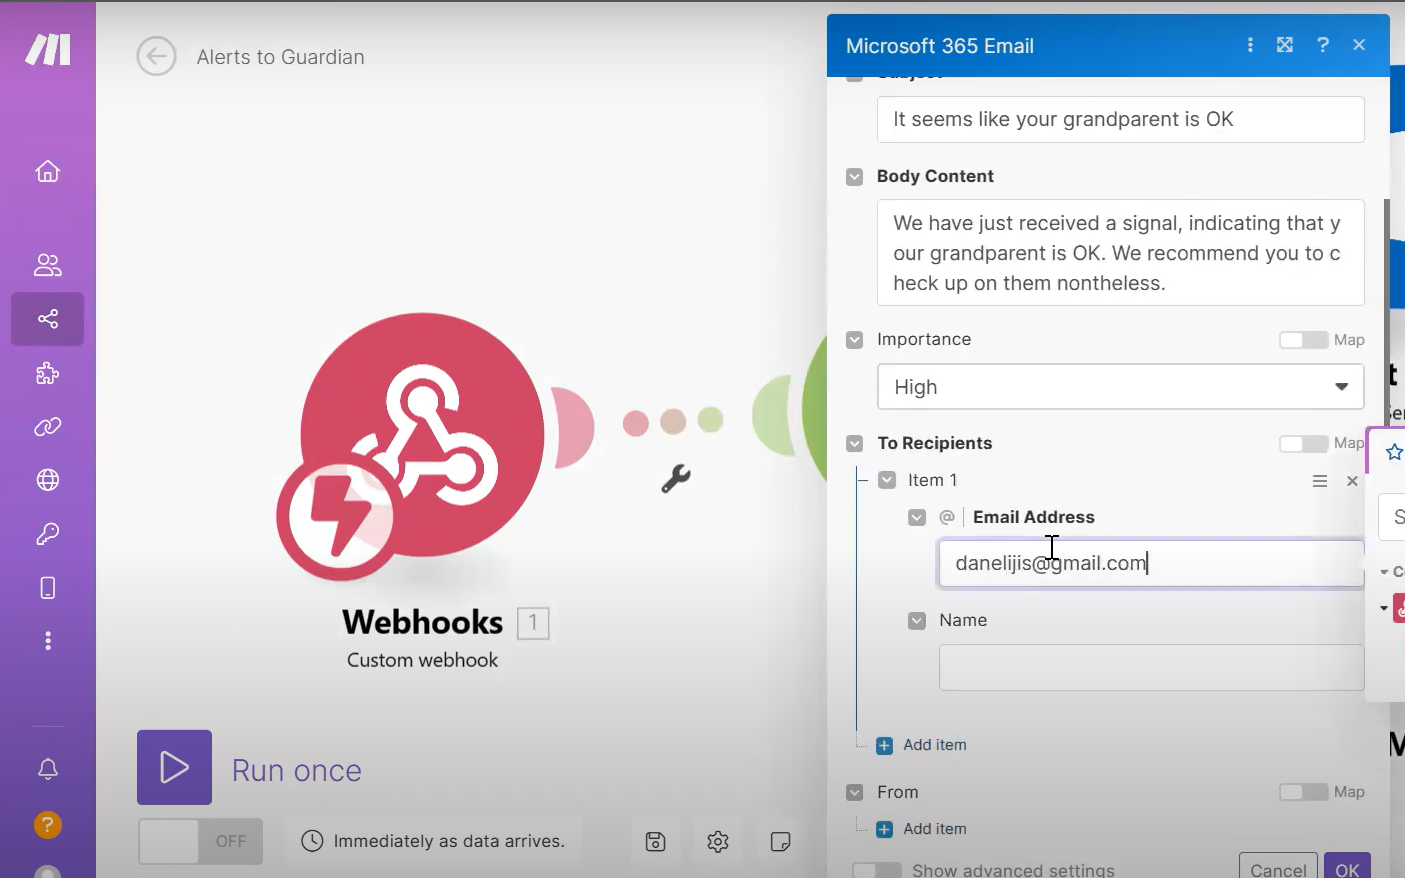
- To alert that the elderly person is OK, define the Subject, the Body Content, the Importance and the Recipients accordingly.
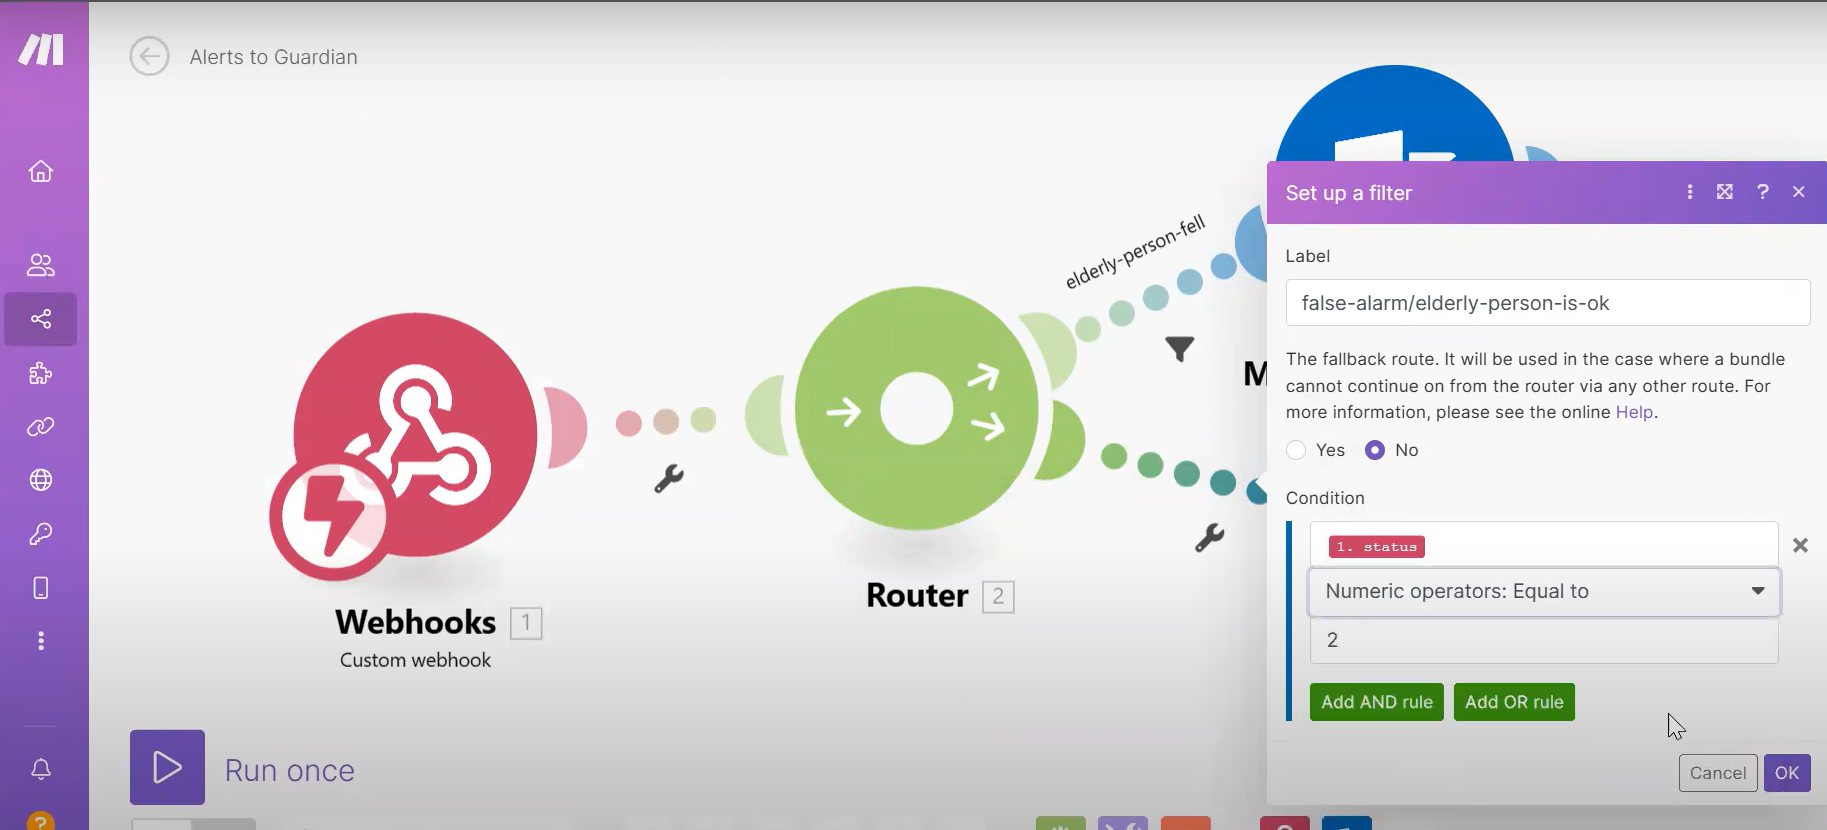
- Click on the adjustable spanner icon on the link between the router and the newly added Microsoft 365 Email module, to add a filter.
- Choose the label of the filter and configure a new condition with "status" (prompted by Webhooks) and the numeric operator to Equal to and write 2.
Extend the First Scenario With: the Elderly Person Is Cold
.png)
.png)
.png)
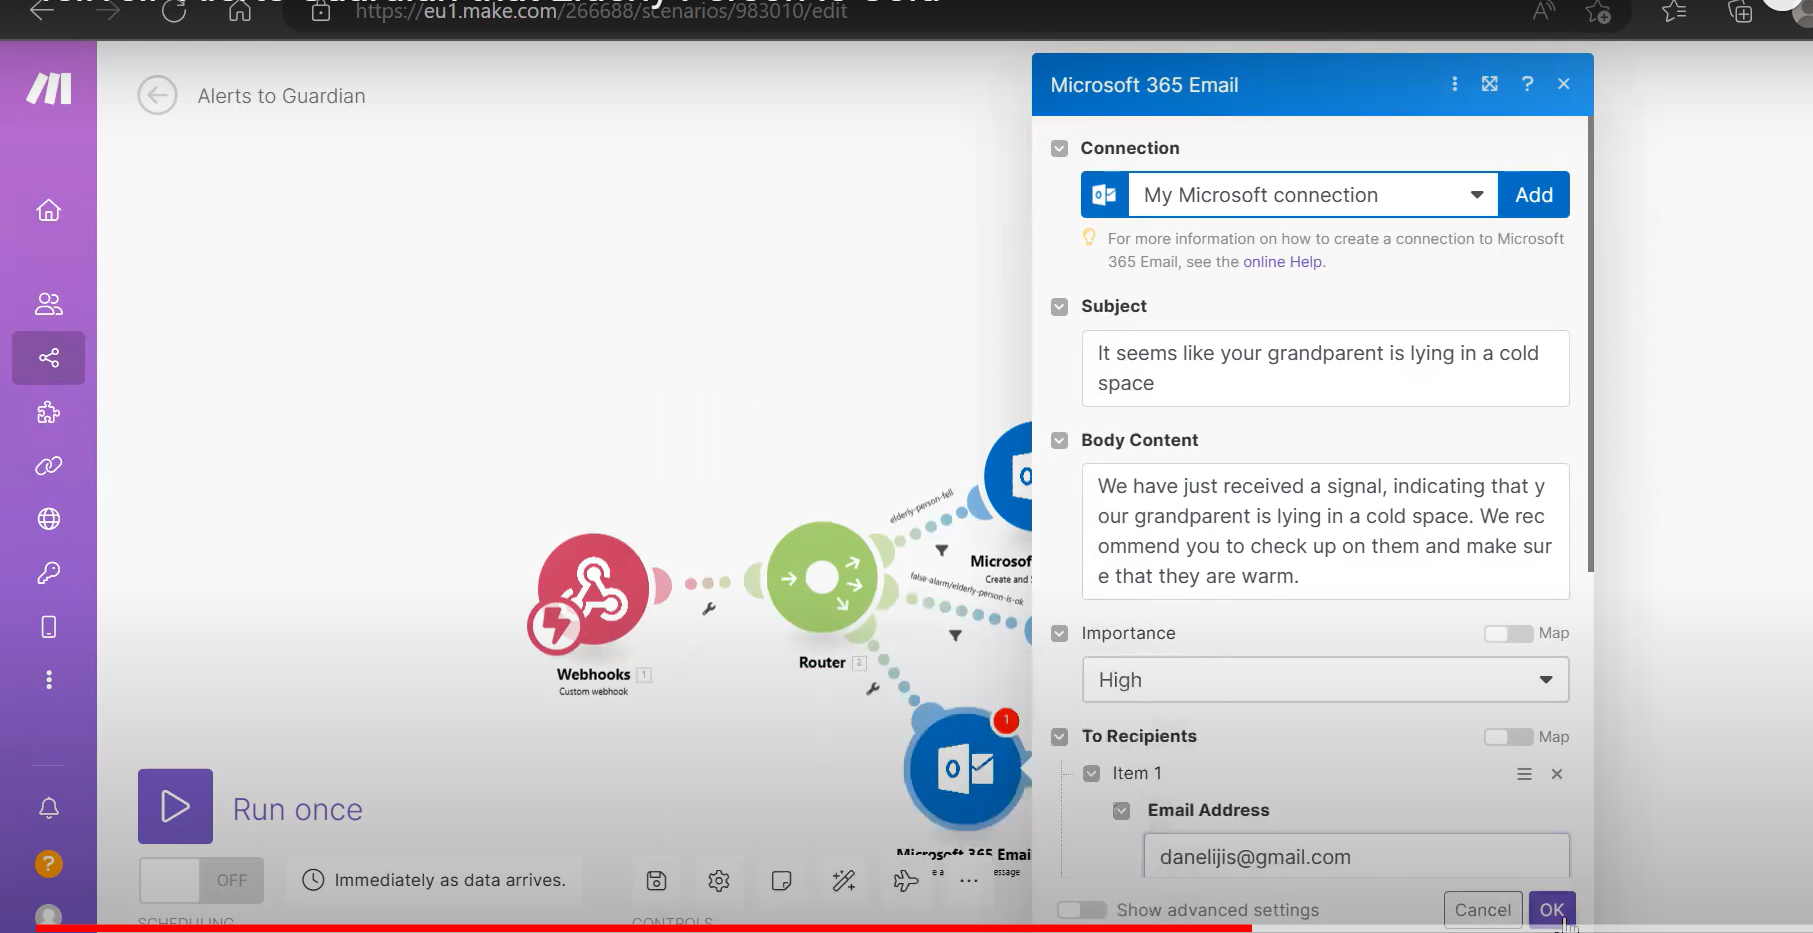
In this step, we will extend the scenario created in step 3, with another case where an alert is triggered to the guardian, if the elderly person is lying in a cold room.
To follow the instructions, you can read the text below and check the attached screenshots, or alternatively, watch the attached video.
- Go to make.com and click on Scenarios, then go to the folder and scenario that you created in step 3.
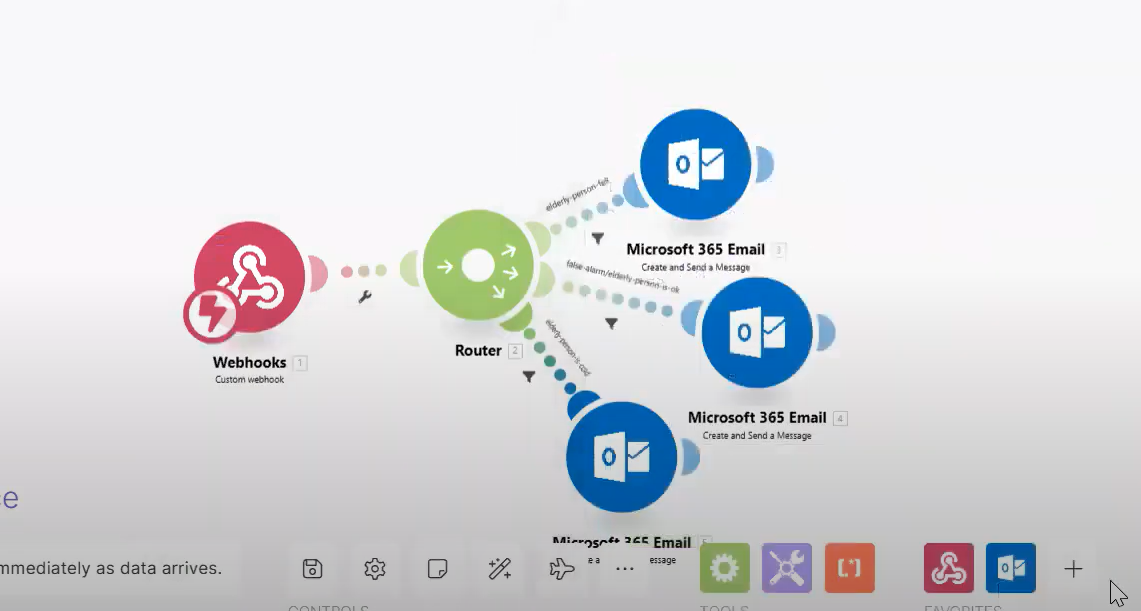
- Create another Microsoft 365 Email module of type Create and send a Message, and link it to the router.
- Click on the newly created module, and under Connection, create a connection to the Email server.
- To alert that the elderly person is lying in a cold room, define the Subject, the Body Content, the Importance and the Recipients accordingly.
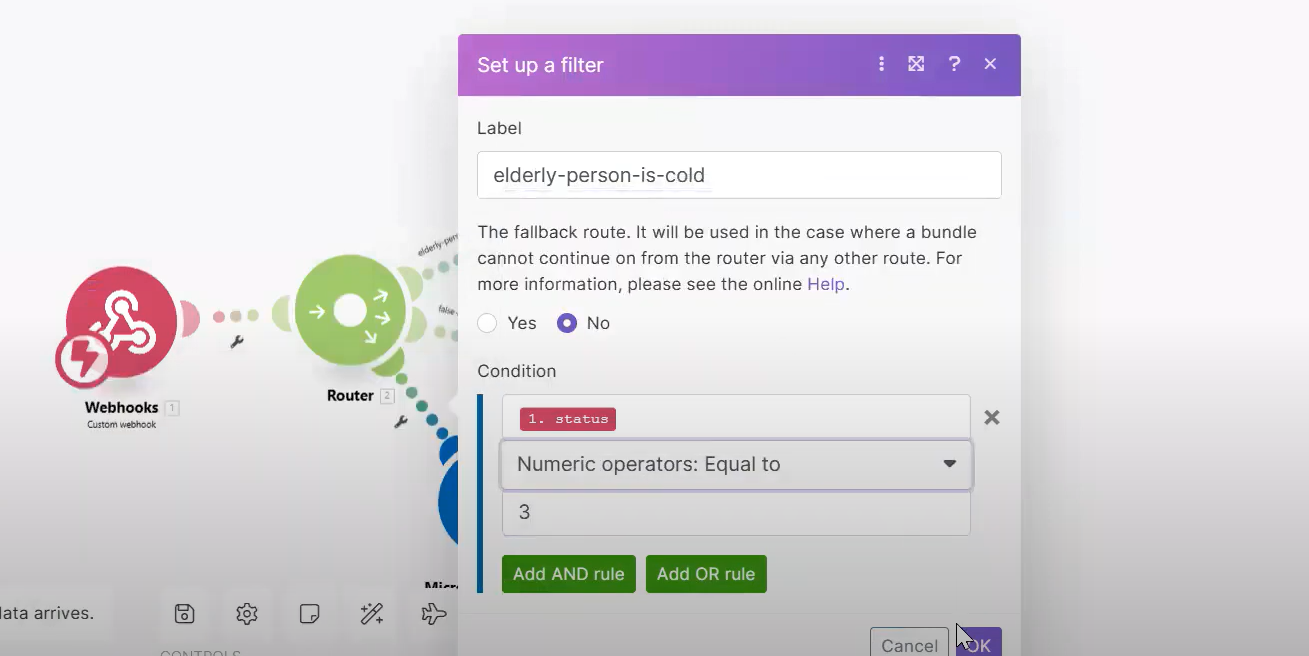
- Click on the adjustable spanner icon on the link between the router and the newly added Microsoft 365 Email module, to add a filter.
- Choose the label of the filter and configure a new condition with "status" (prompted by Webhooks) and the numeric operator to Equal to and write 3.
Create a Third Scenario Where Elderly Person Receives Rain or Snow Alerts
.png)
.png)
.png)
.png)
.png)
.png)
.png)
.png)
.png)
.png)
.png)
.png)
.png)
.png)
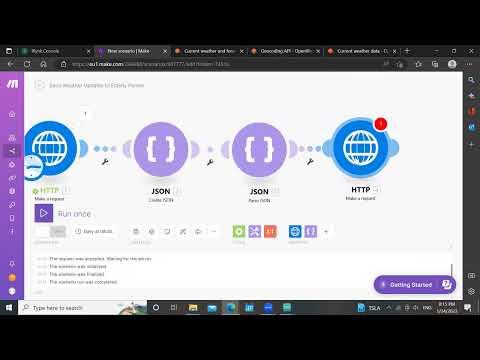
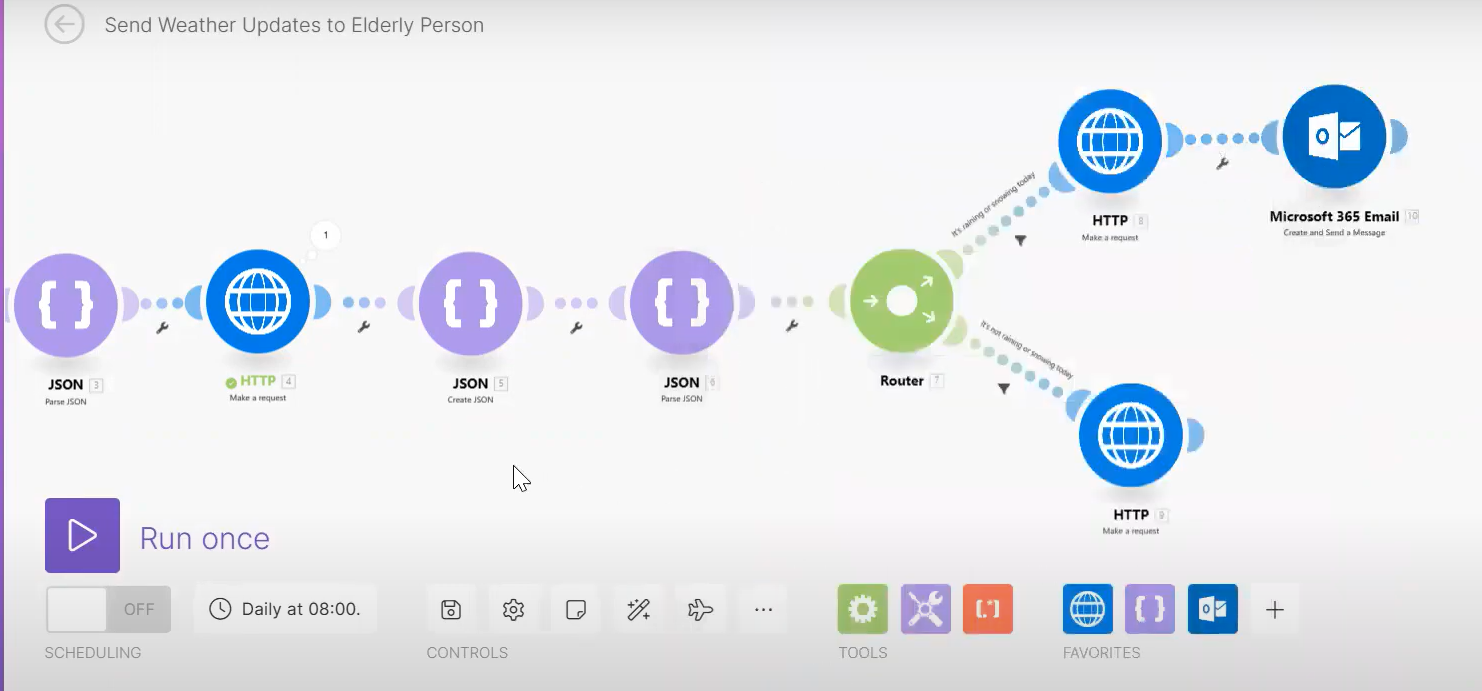
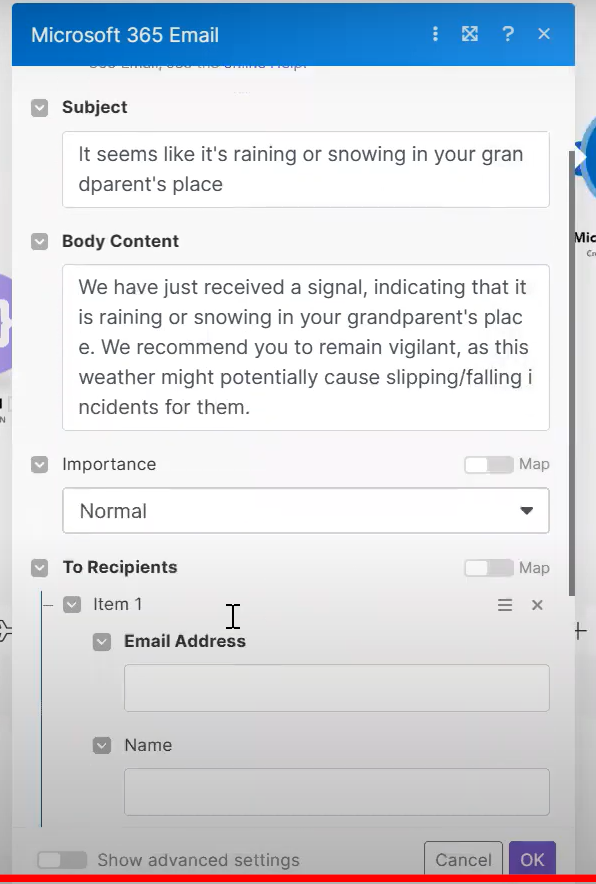
In this step, we will create our third and final scenario, in which the elderly person, as well as their guardian, receive an alert if it is raining or snowing in the elderly person's place.
To follow the instructions, you can read the text below and check the attached screenshots, or alternatively, watch the attached video.
- Go to https://openweathermap.org/ and create a user (it’s free). After signing up, you will receive an API key. You can find it under the confirmation email, or under your user details on openweathermap.org. Please note that it might take a few hours for your API key to get activated.
- Go to make.com, click on Scenarios, and go to the folder that you created in step 3.
- Click on + New Scenario, and change its name.
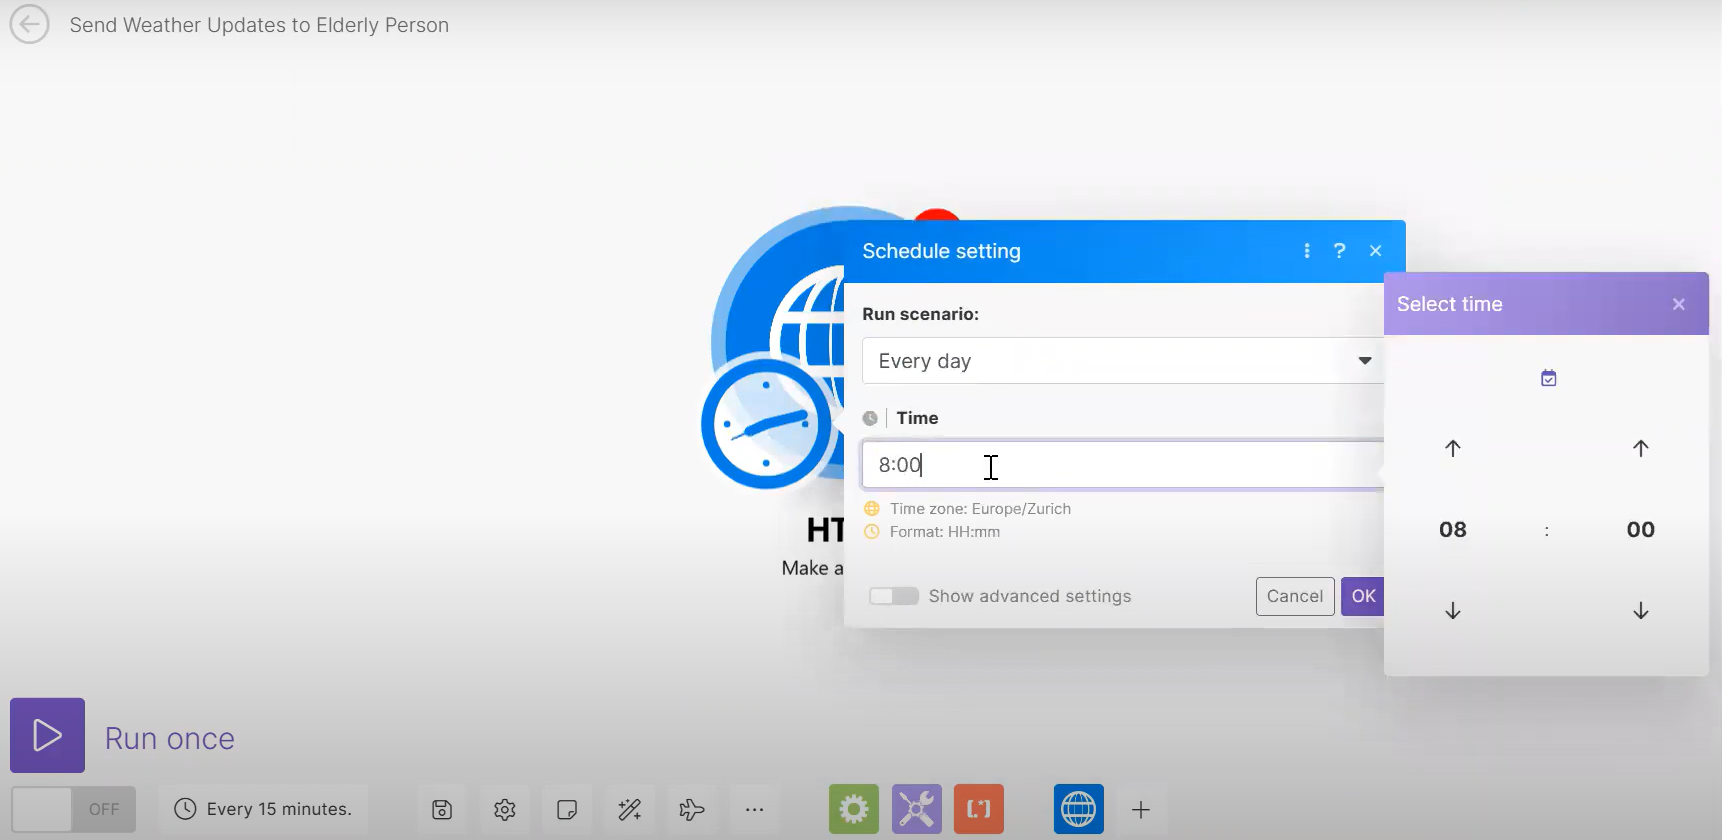
- Create an HTTP module of type Make a request, and schedule the request to fire every day in your preferred hour.
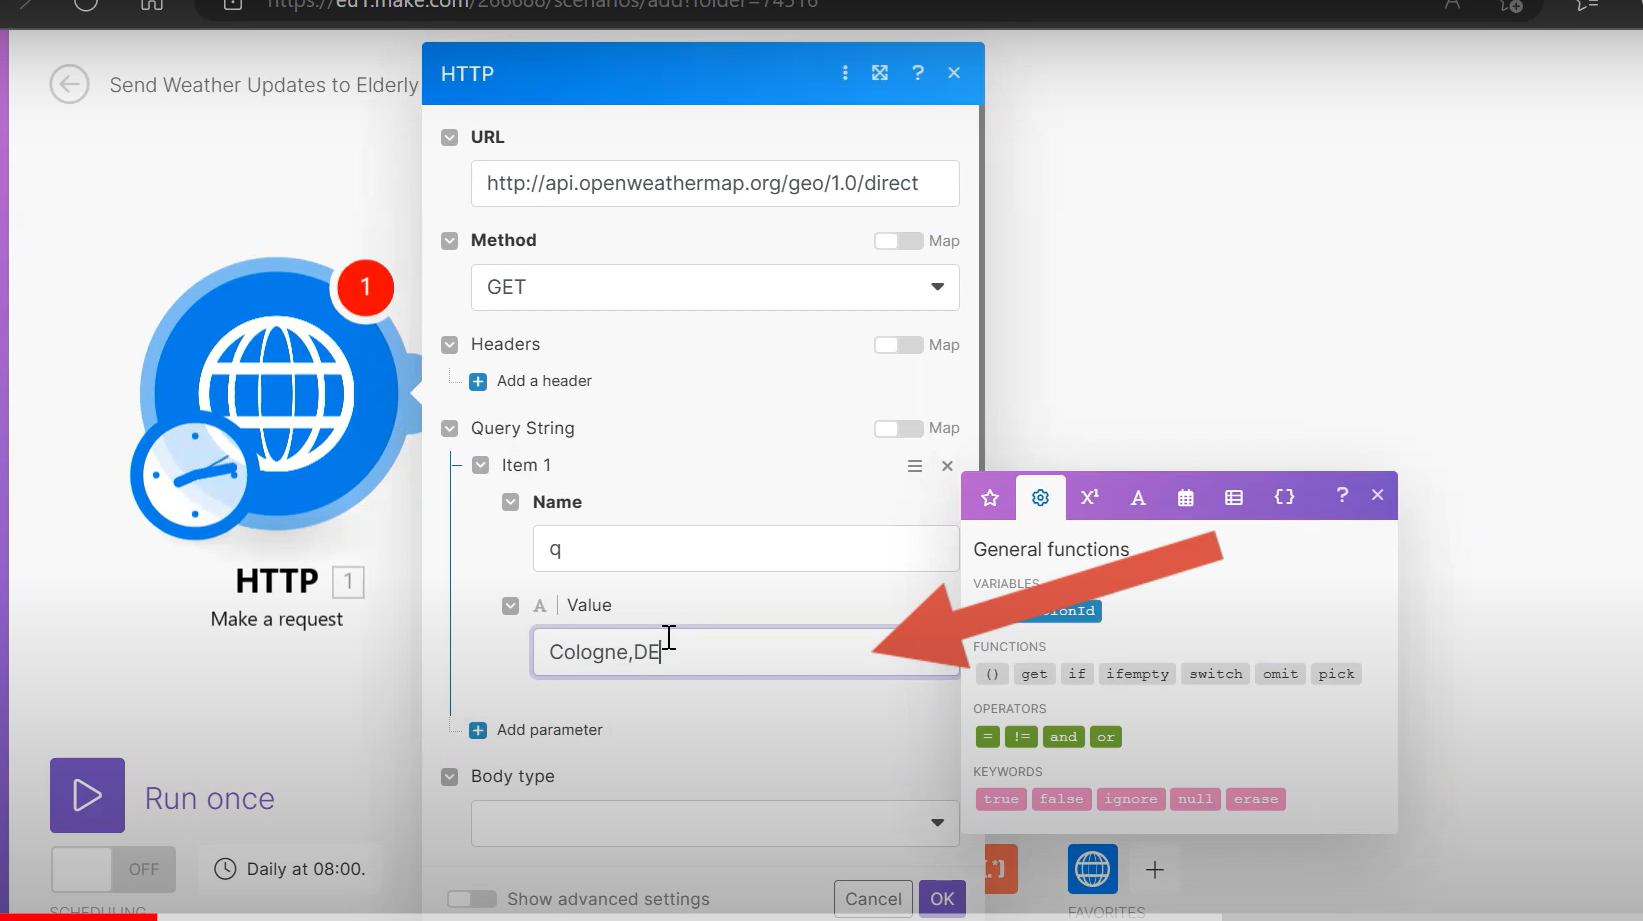
- Under URL, paste http://api.openweathermap.org/geo/1.0/direct to get the coordinates (latitude and longitude) of the elderly's person place.
- Under the Query String item, under Name type "q", and under Value type the city and country code of the elderly peron's place, in the following format: "{City/town name},{Country code}" (for example: "Toronto,CA", "Rome,IT").
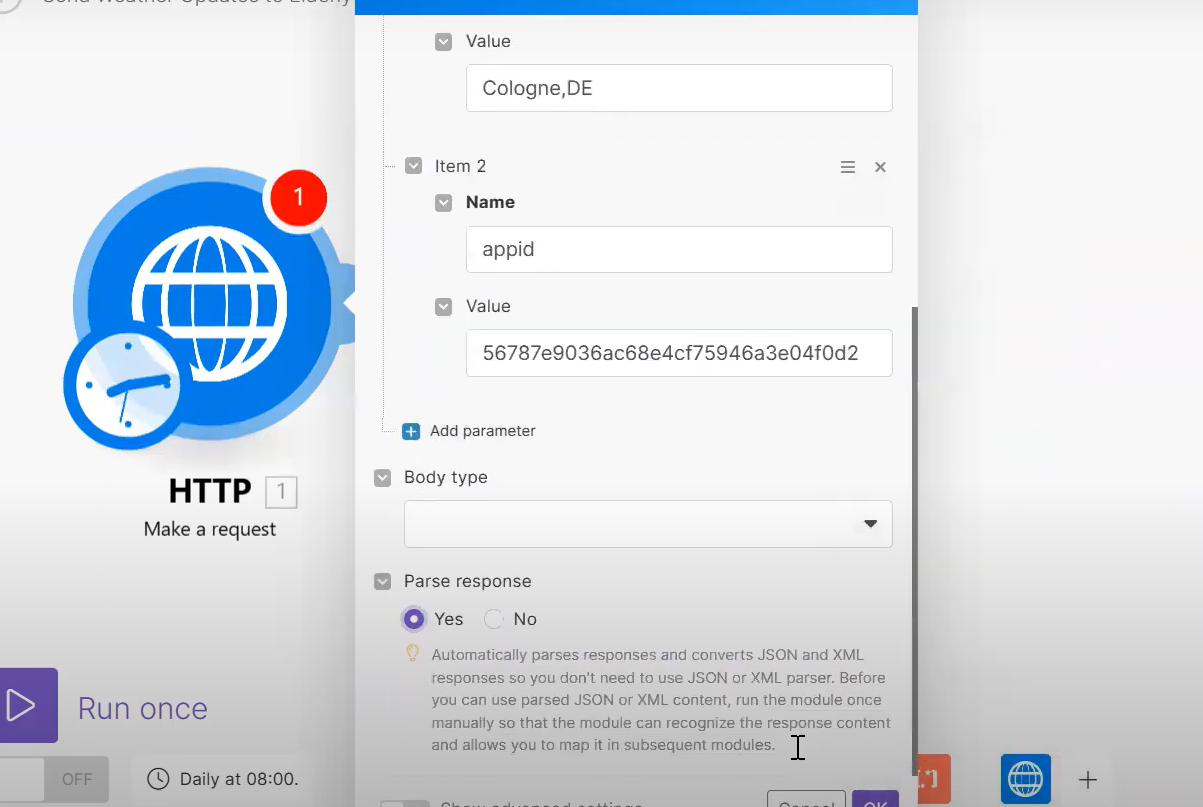
- Add another parameter, in which under Name type "appid" and under Value insert the API key that you generated in instruction 1.
- Under Parse response, check Yes.
- Click on Run once (it's an important step, don't skip it!).
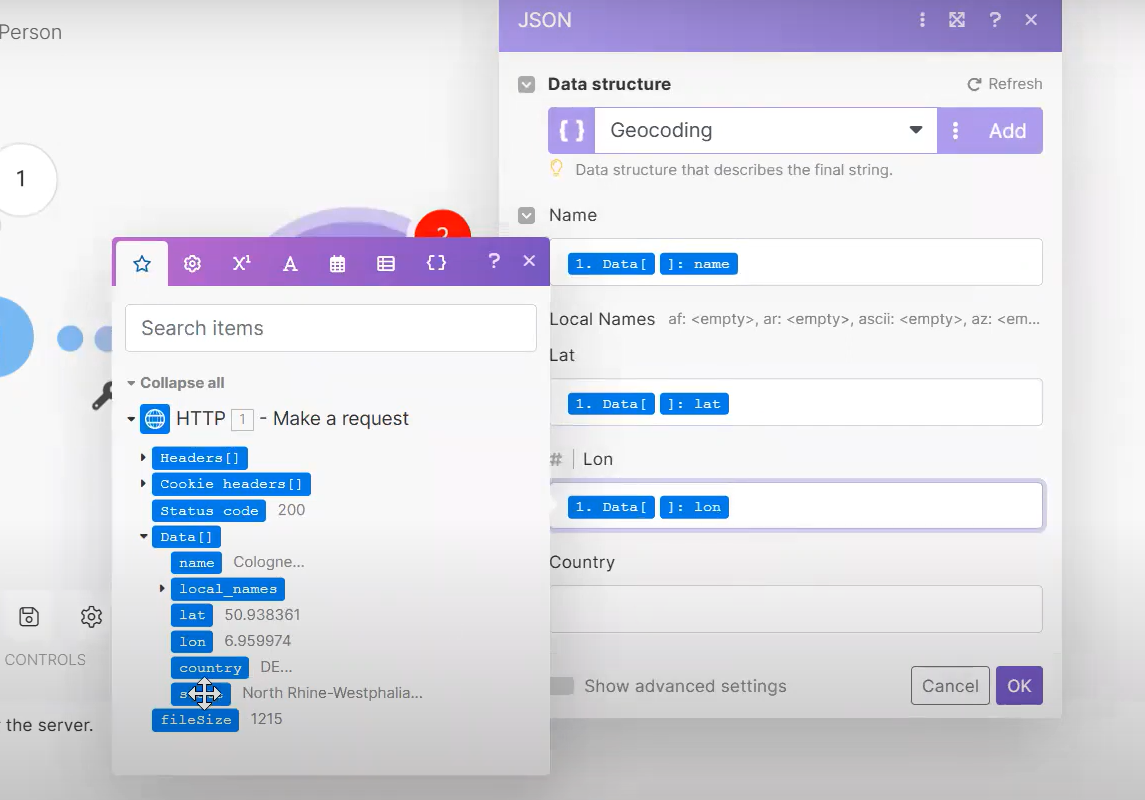
- Add a JSON module of type Create JSON, and link it to the HTTP module that you created in instruction 4. Click on Add, and choose a name for the data structure. Under Specification, click Generate. Go to Geocoding API - OpenWeatherMap, and copy the JSON sample data, which lies under Coordinates by location name >> Example of API response section. Paste it under the Sample data text box, which was prompted after clicking on Generate. Finally, click on Generate, and then on Save.
- Choose the data structure that you created in instruction 10. Under Lat choose lat (prompted under Data[]), and under Lon choose lon (prompted under Data[]).
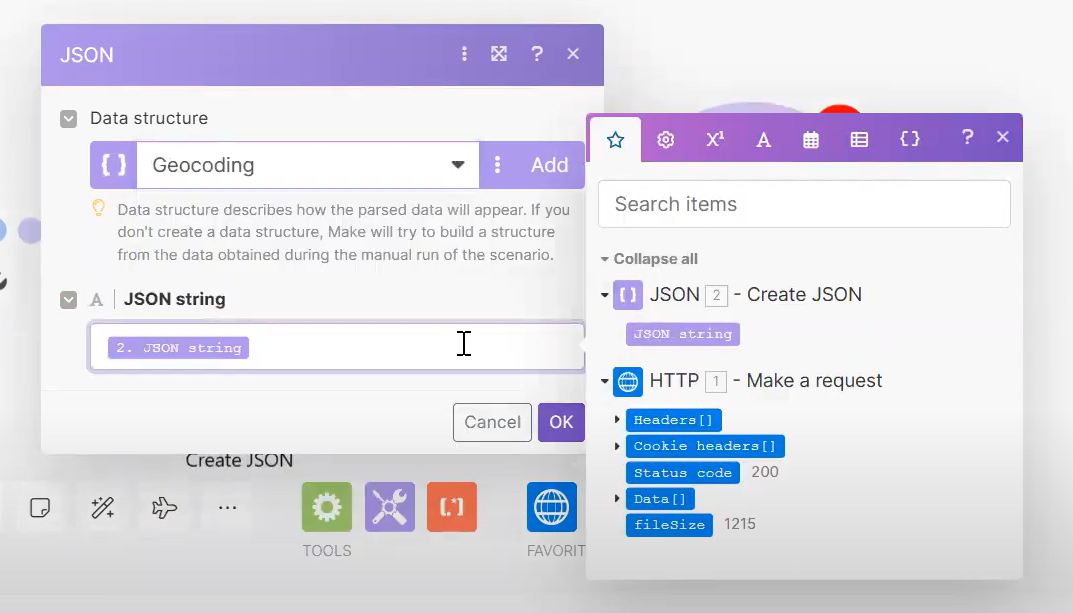
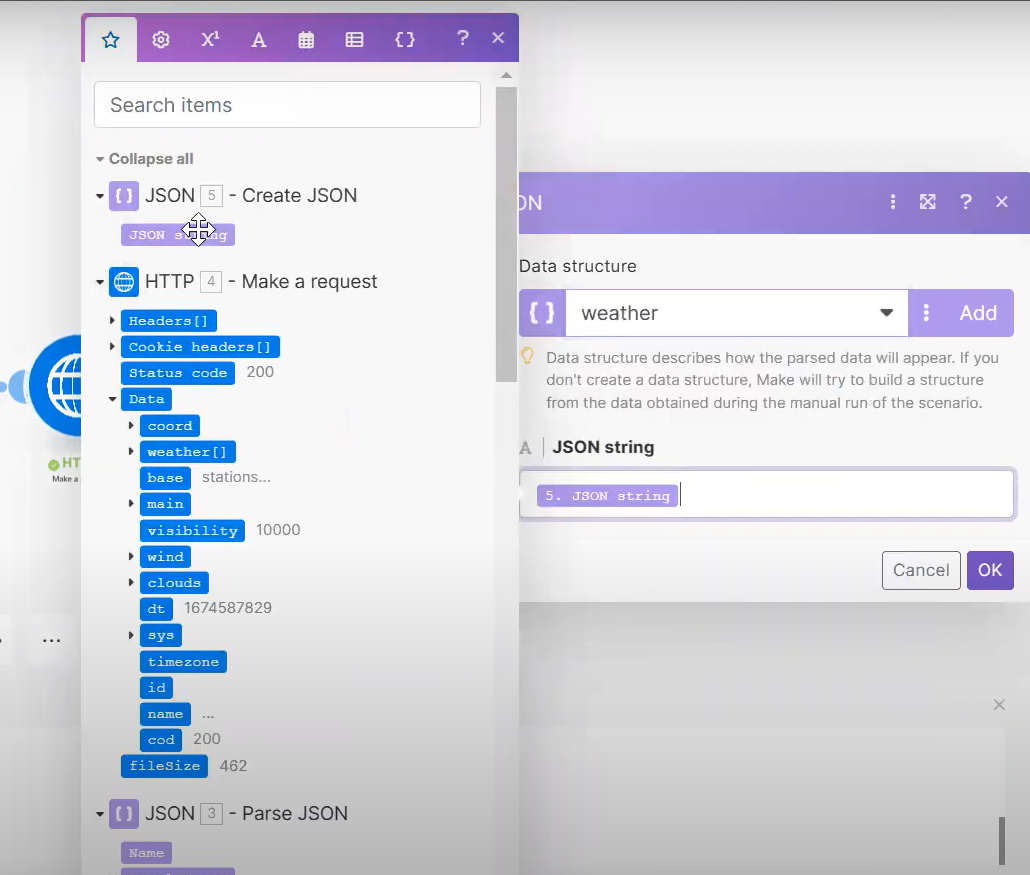
- Add a JSON module of type Parse JSON. Link it to the JSON module that you created in instruction 10. Under Data structure, choose the one that you created in instruction 10. Under JSON string choose JSON string (prompted).
- Add an HTTP module of type Make a request, and link it to Parse JSON module.
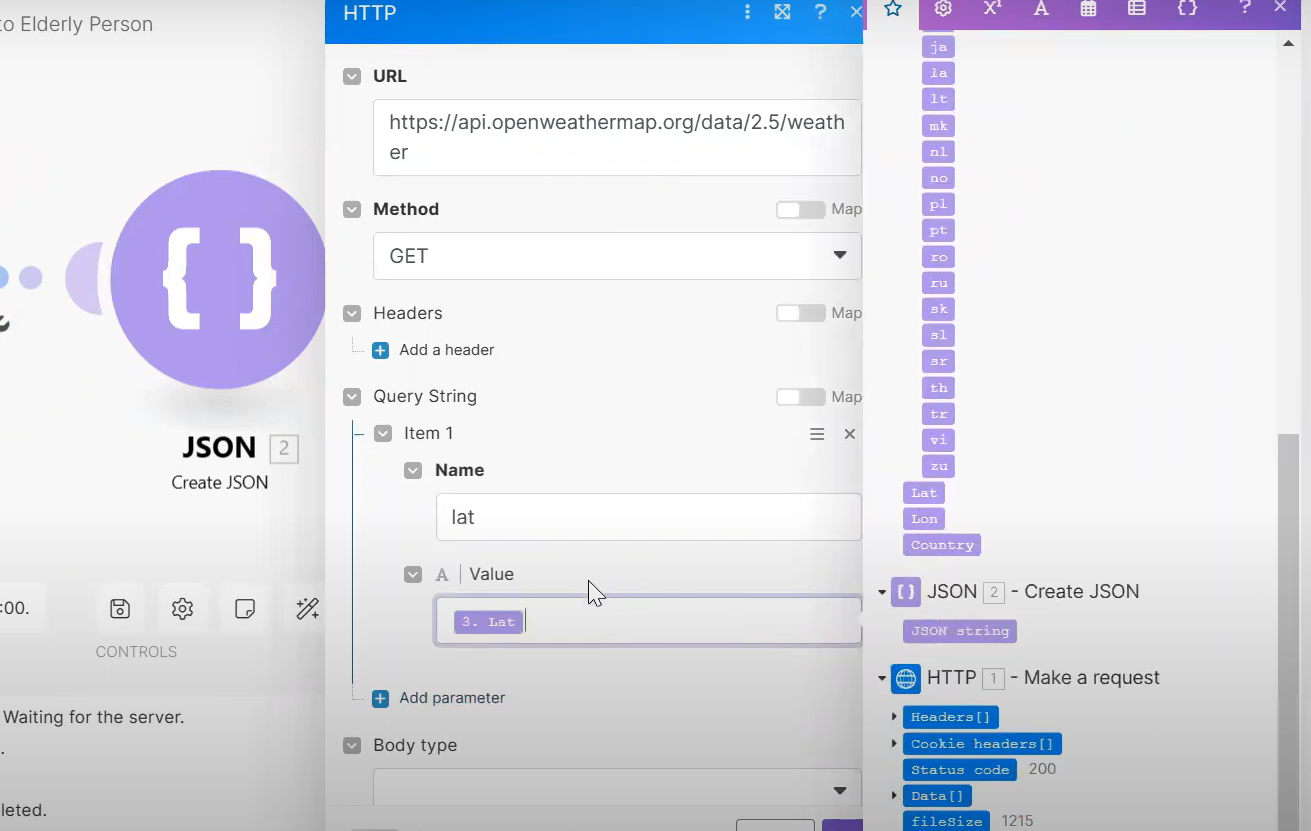
- Under URL, paste https://api.openweathermap.org/data/2.5/weather
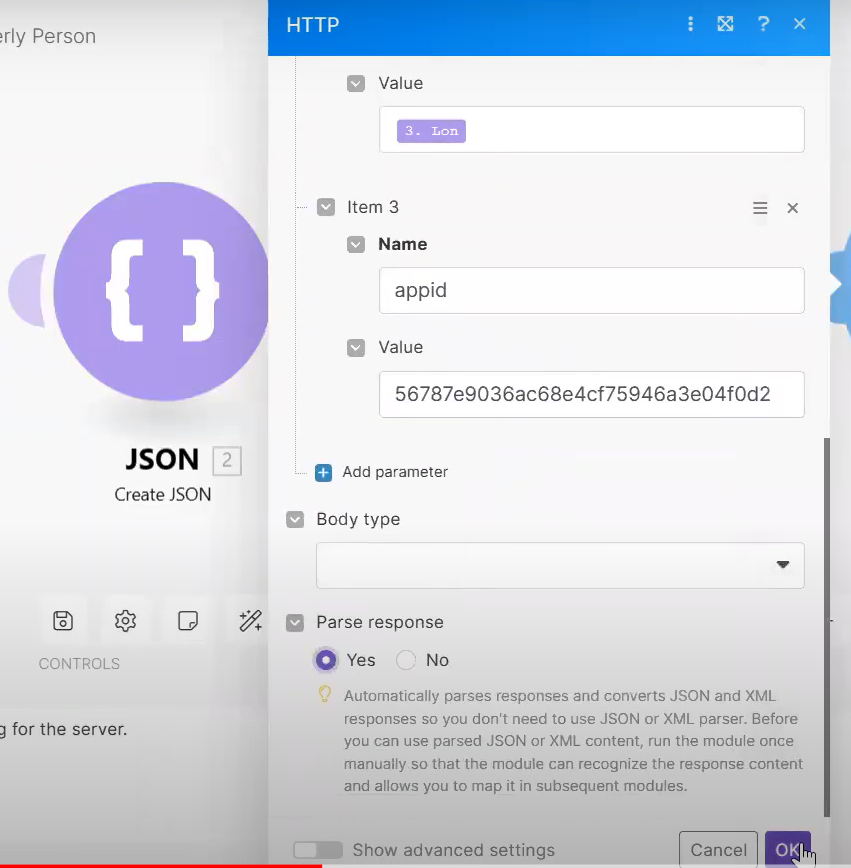
- Under the Query String item, under Name type "lat", and under Value insert Lat (prompted). Add another parameter, and similarly, under Name type "lon", and under Value insert Lon (prompted). Add another parameter, in which under Name type "appid" and under Value insert the API key that you generated in instruction 1.
- Under Parse response, check Yes.
- Right click on the HTTP module, and select Run this module only. You will be prompted to insert Lat and Lon values. Insert any numeric value for both of them and click OK.
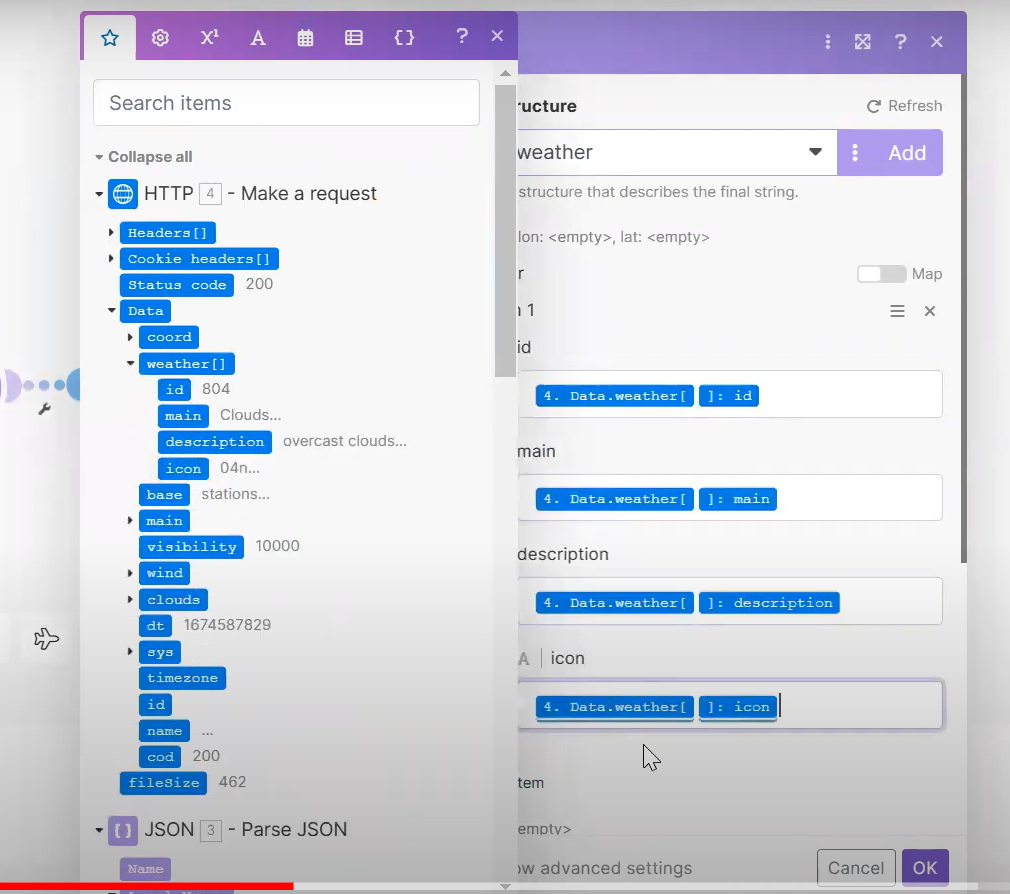
- Add a JSON module of type Create JSON, and link it to the HTTP module that you created in instruction 13. Click on Add, and choose a name for the data structure. Under Specification, click Generate. Go to Current weather data - OpenWeatherMap, and copy the JSON sample data, which lies under Weather fields in API response >> JSON section. Paste it under the Sample data text box, which was prompted after clicking on Generate. Finally, click on Generate, and then on Save.
- Choose the data structure that you created in instruction 18. Under Weather >> main choose Data.weather[]:main (prompted under Data[].weather[]).
- Add a JSON module of type Parse JSON. Link it to the JSON module that you created in instruction 18. Under Data structure, choose the one that you created in instruction 18. Under JSON string choose JSON string (the most recent one prompted).
- Add a Router tool and attach it to Parse JSON module created in instruction 20. Then, add an HTTP module of type Make a request, and link it to the router.
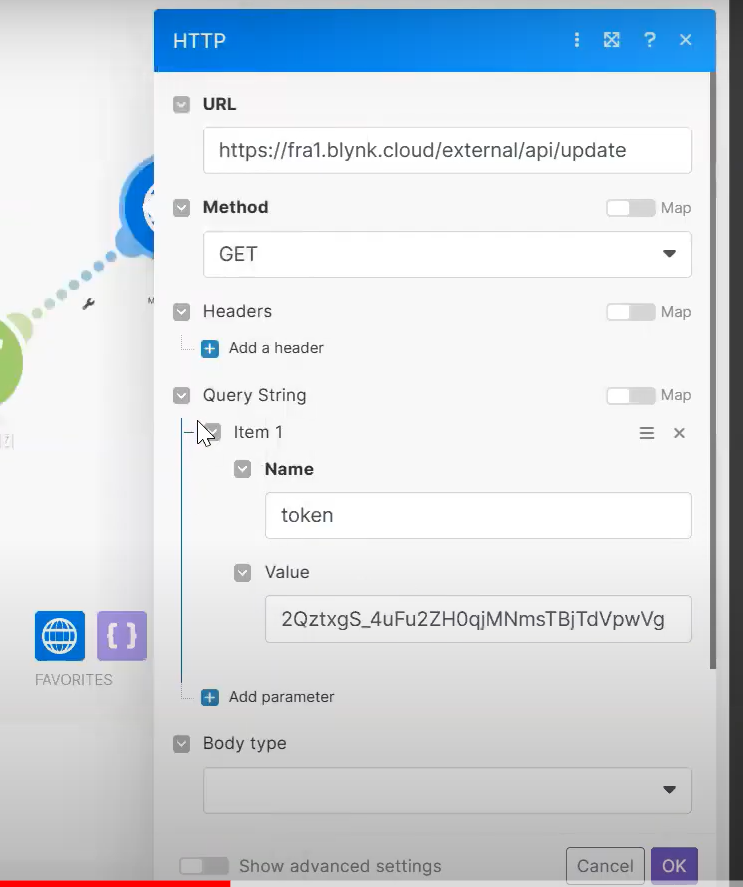
- Configure URL to: "https://{region}.blynk.cloud/external/api/update" ({region} is the same as in step 4, instruction 5). Make sure that Method is configured to GET. Click on Add parameter under Query String, and configure Name to "token", and Value to BLYNK_AUTH_TOKEN value that was copied to your code file in step 2.
- Click again on Add parameter under Query String, and configure Name to "V1", and Value to 1.
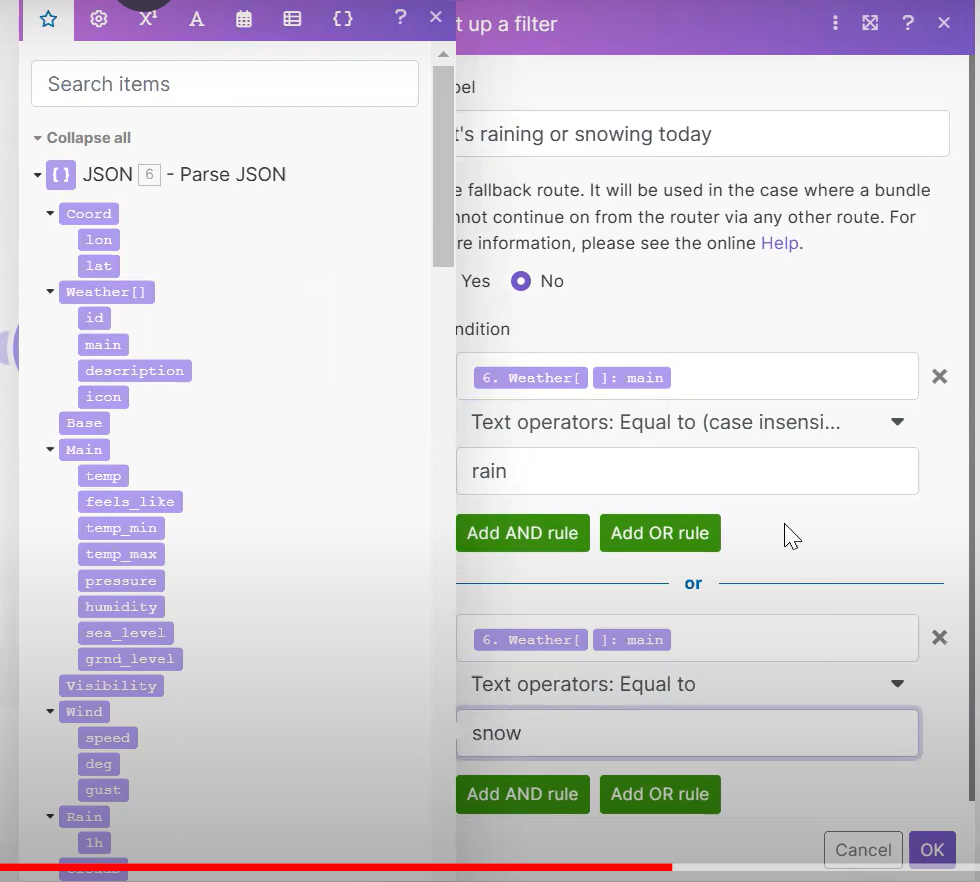
- Click on the adjustable spanner icon on the link between the router and the newly added HTTP module, to add a filter.
- Choose the label of the filter and configure a new condition with Weather[]:main: Weather[]:main Equal to (case insensitive) "snow" OR Weather[]:main Equal to (case insensitive) "rain".
- Right click on the newly created HTTP module, and select Copy module. Paste it, link it to the router, and change Value to 0 (where Name is V1).
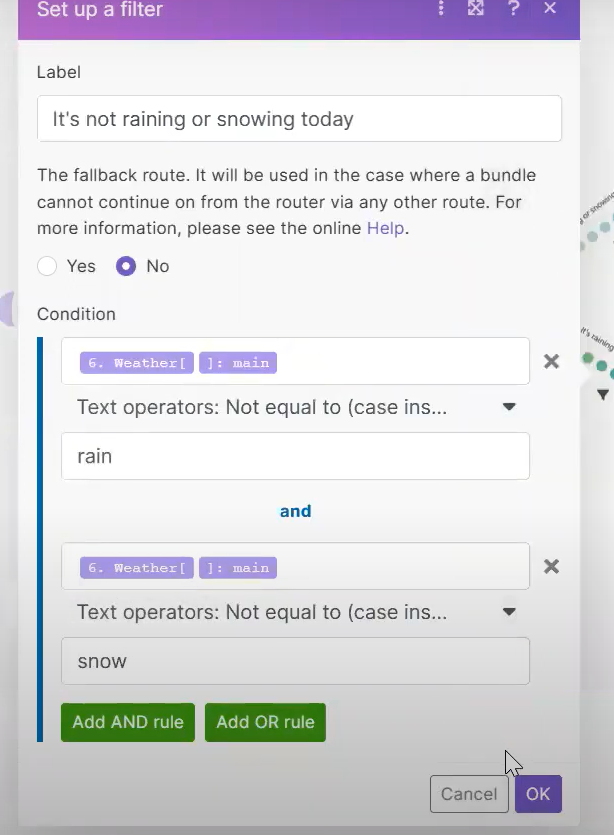
- Click on the fliter (funnel icon), change the label and configure a new condition with Weather[]:main: Weather[]:main Not equal to (case insensitive) "snow" AND Weather[]:main Not equal to (case insensitive) "rain".
- Create a Microsoft 365 Email module of type Create and send a Message, and link it to the HTTP module that you created in instruction 21.
- Click on the newly created module, and under Connection, create a connection to the Email server.
- To alert the guardian that it is raining or snowing in the elderly person's place, define the Subject, the Body Content, the Importance and the Recipients accordingly.
- Finally, turn the scenario on (if make.com limits you with the number of scenarios turned on, then run this scenario once a day).
Log in the Previous Events to a Google Sheet
.JPG)
.JPG)
.JPG)
.JPG)
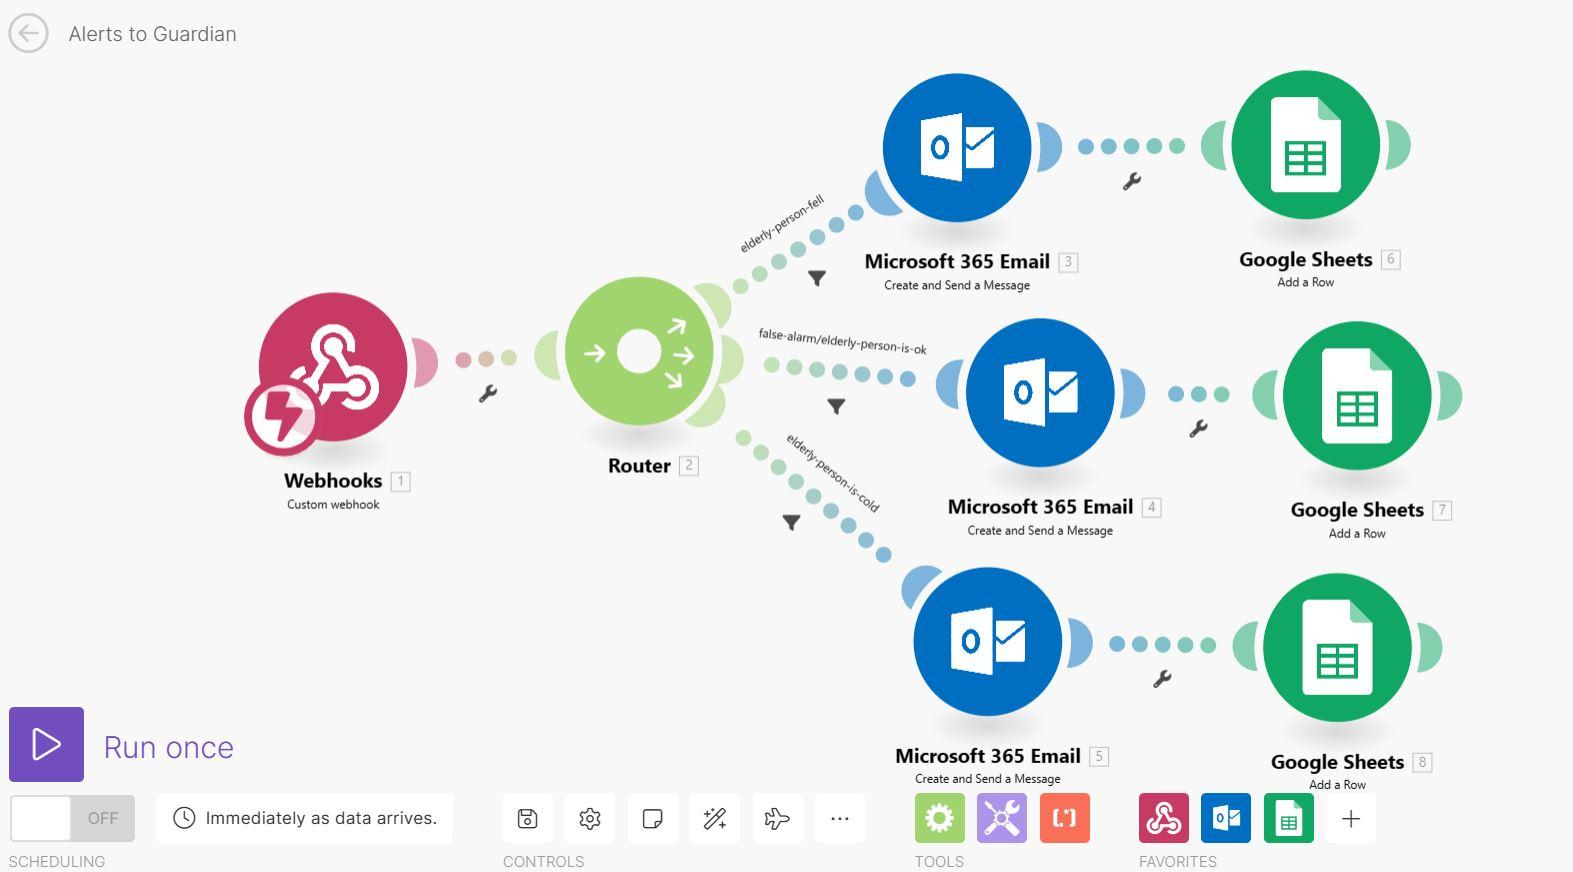
In this step, we will extend the scenario created in step 3, by logging the events described on steps 3), 5), 6), to a Google sheet owned by the guardian.
To follow the instructions, you can read the text below and check the attached screenshots, or alternatively, watch the attached video.
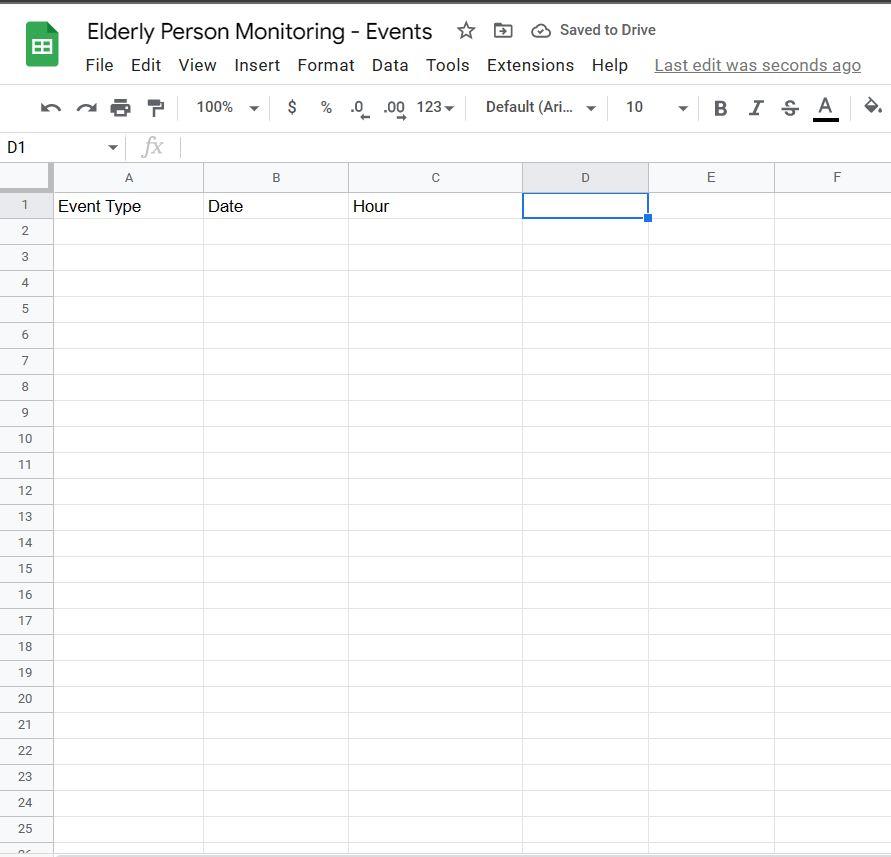
- Create a Google sheet under your Google Drive account, and save it under your favorite path.
- Insert titles to the columns A, B and C: Event Type, Date, Hour (respectively).
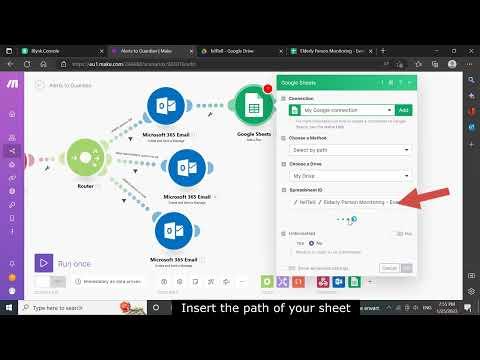
- Go back to the make.com, go to the scenario that you created in step 3, create a Google sheet module of type Add a Row, and link it to one of the Microsoft 365 Email modules (doesn't matter which).
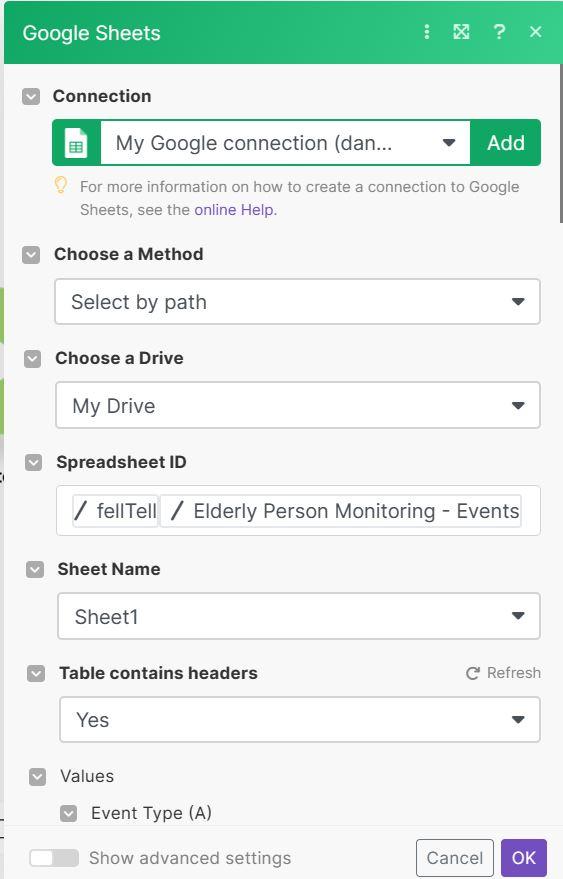
- Create a connection to your Google account, configure Choose my method to Select by path, Choose a drive to My drive, Spreadsheet ID to the path that leads to your sheet (prompted), Sheet name to the sheet name, and Table Contains Headers to Yes.
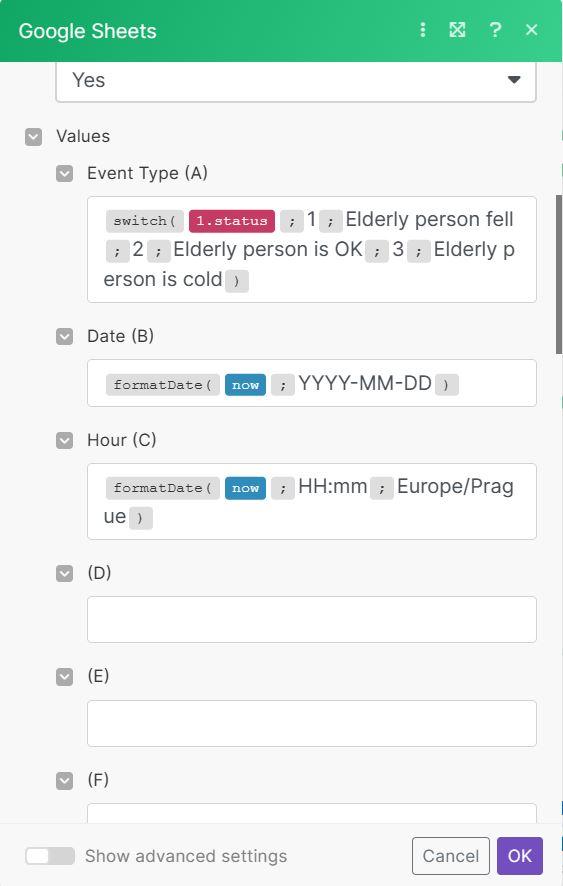
- Click on the text box under Event Type, and a window will be prompted. Go to General functions section (under the cogwheel icon), and click on switch function. Build the brackets as the following: "(1.status; 1; Elderly person fell; 2; Elderly person is OK; 3; Elderly person is cold)". Note that 1.status is prompted under the star icon.
- Click on the text box under Date, and the same window will be prompted. Go to Date and time section (under the calendar icon), and click on formatDate function. Build the brackets as the following: "(now; YYYY-MM-DD)". Note that now is prompted under Date and time section. Of course, you may use another date format, if you wish.
- Click on the text box under Hour, and the same window will be prompted. Go to Date and time section (under the calendar icon), and click on formatDate function. Build the brackets as the following: "(now; HH:mm; {your time zone})". Note that now is prompted under Date and time section.
- Right click on the newly created Google sheets module, and select Copy module. Paste it twice, and link each of them to the remaining Microsoft 365 Email modules (one pasted module for each Microsoft 365 Email module).
Run the Arduino File
.jpeg)
.JPG)
.JPG)
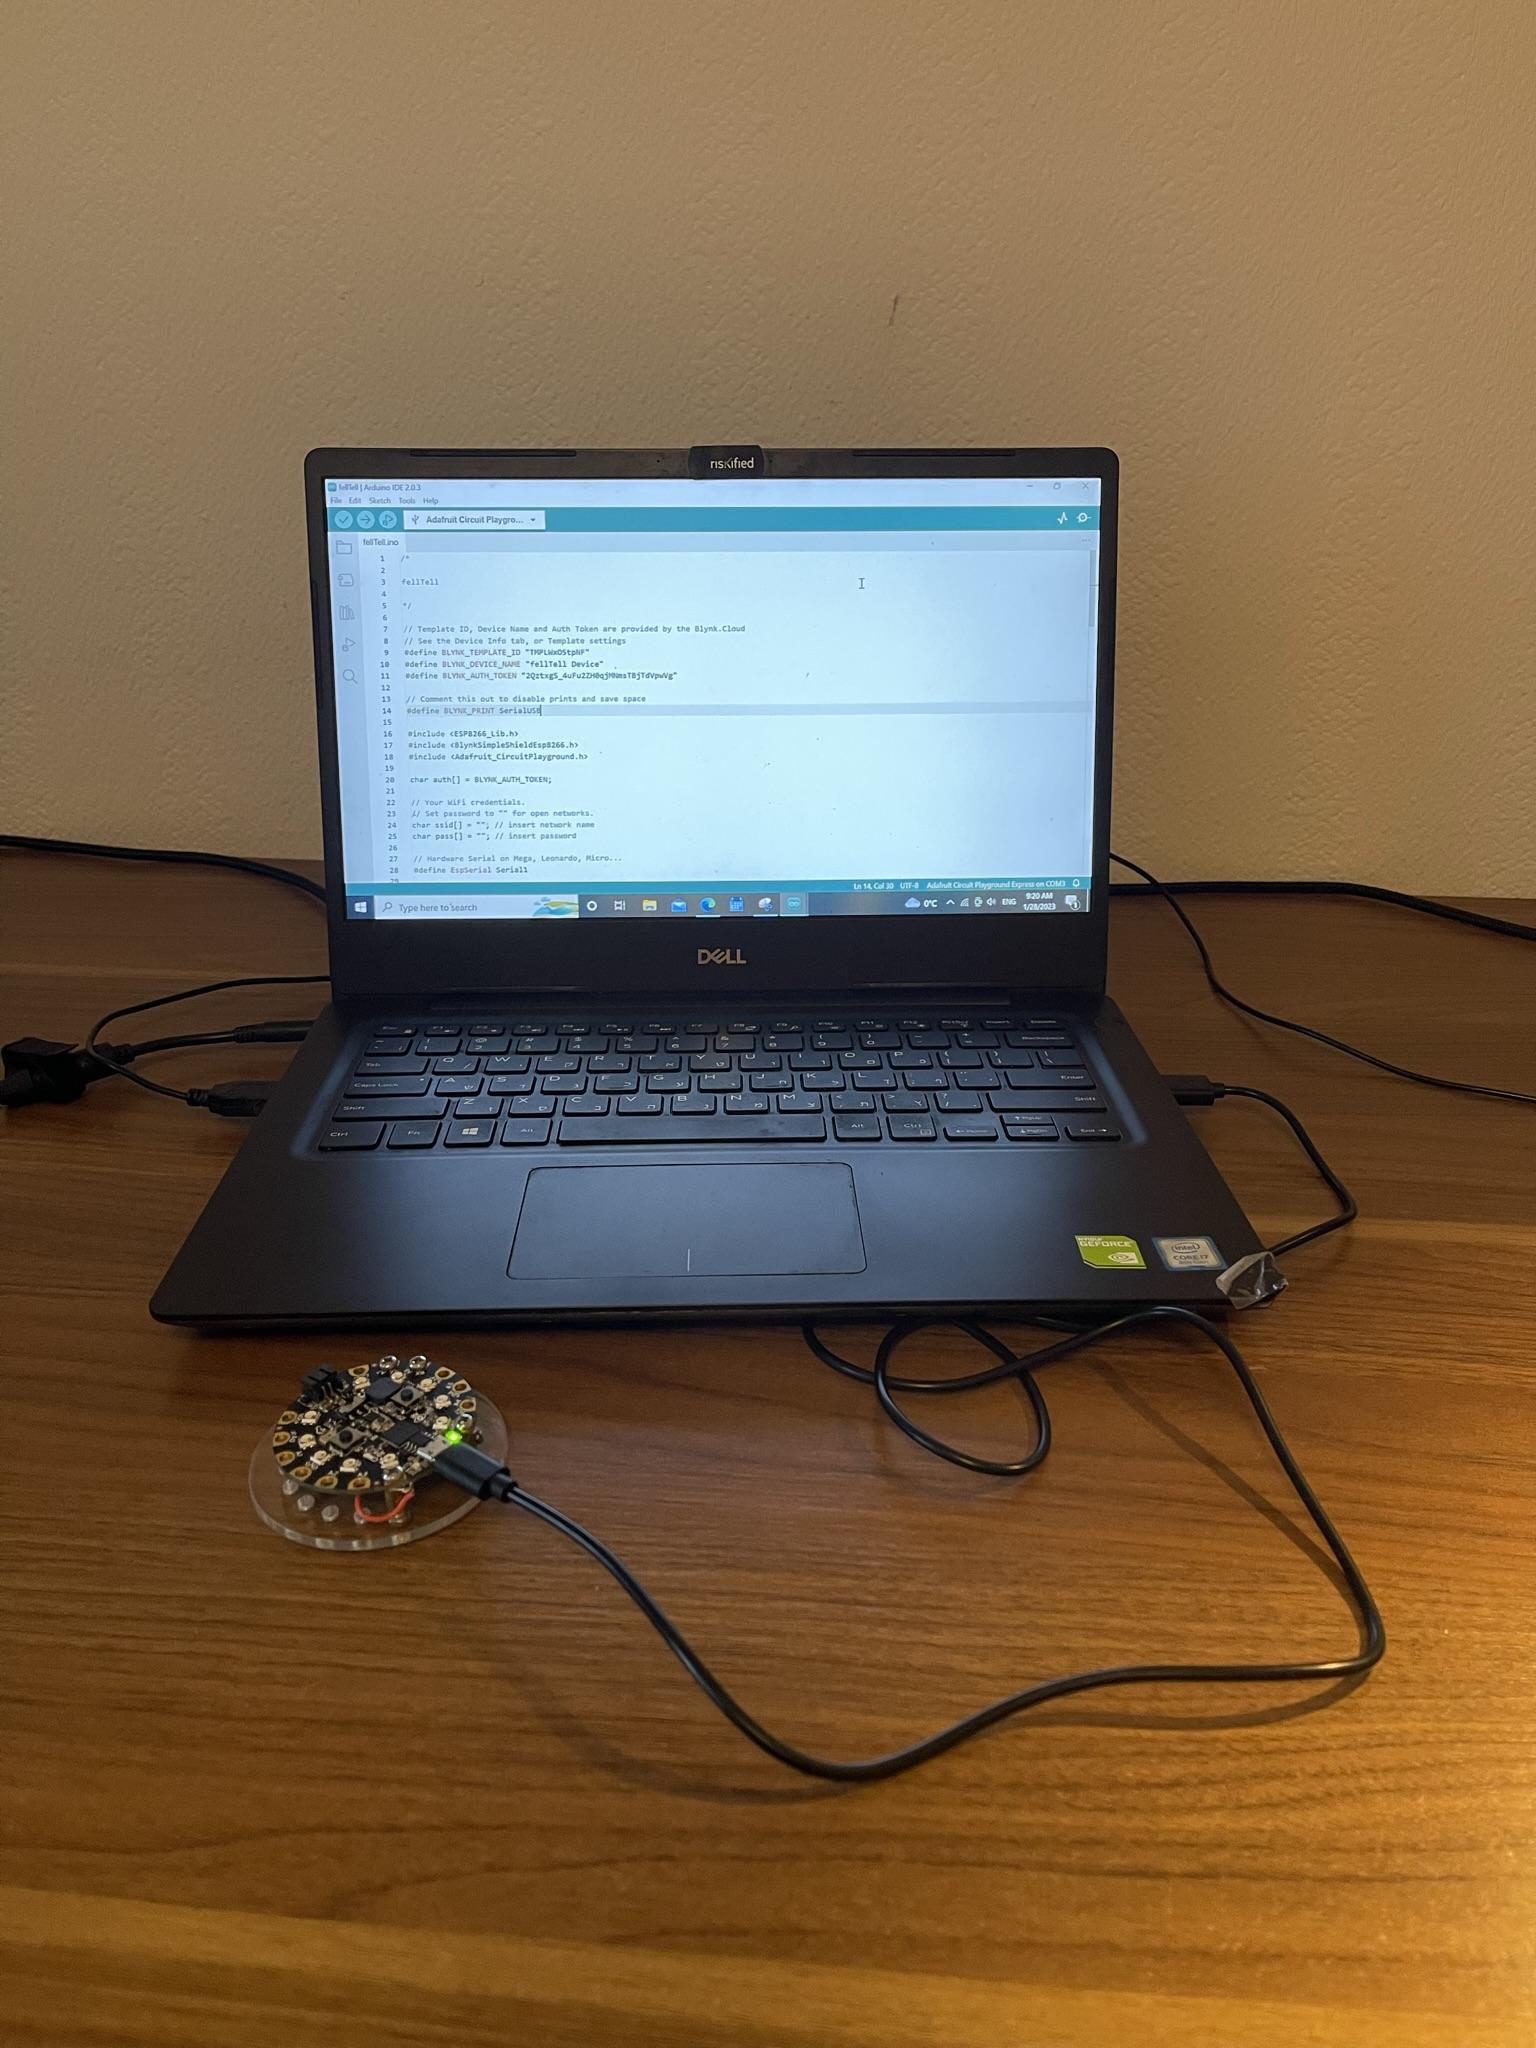
- Open "fellTell.ino" code file that you were provided under Supplies section.
- Insert your network name and your password name in lines 24,25 (respectively). Make sure that they are inserted between quotation marks ("{insert}").
- Connect the board to your PC, using the USB cable.
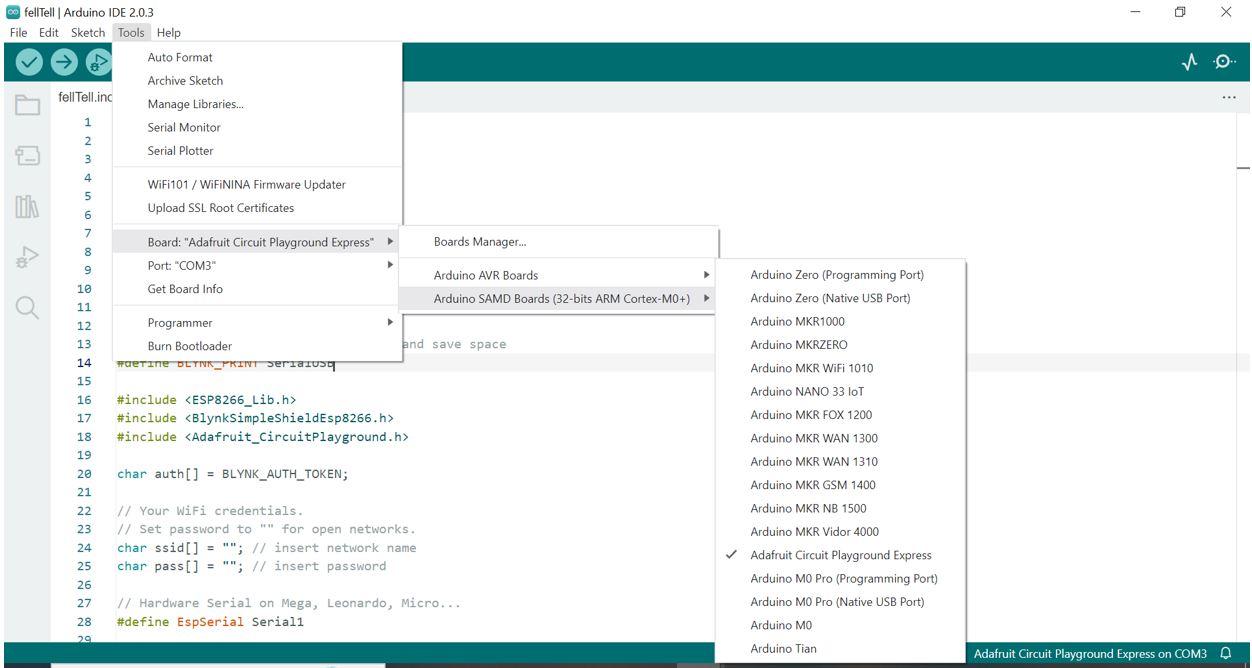
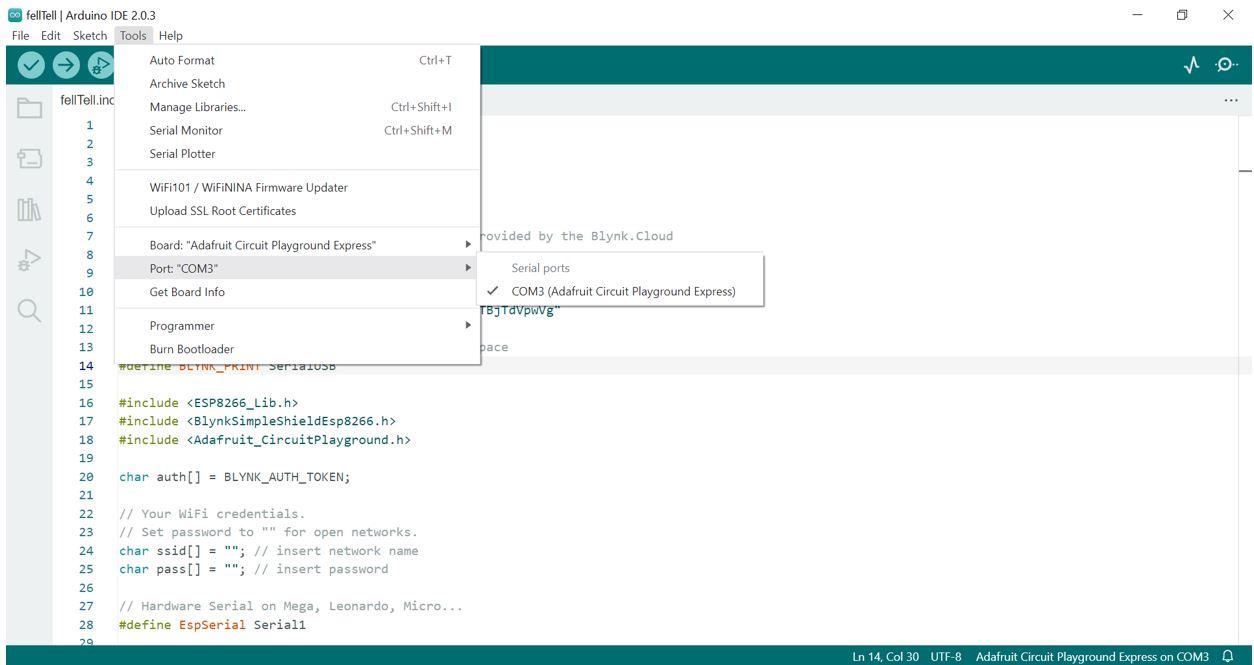
- Configure your board under: Tools >> Board: >> Arduino SAMD Boards (32-bits ARM Cortex-M0+) >> Adafruit Circuit Playground Express
- Configure your port under: Tools >> Port: >> COM{number} (Adafruit Circuit Playground Express) ({number} could be any number offered by the Arduino, so just pick whatever is prompted).
- Click on the Upload button on the top-left part of the screen (a button with an icon of an arrow pointing to the right), and wait for the program to be fully uploaded.
Prepare the Hardware of the Device
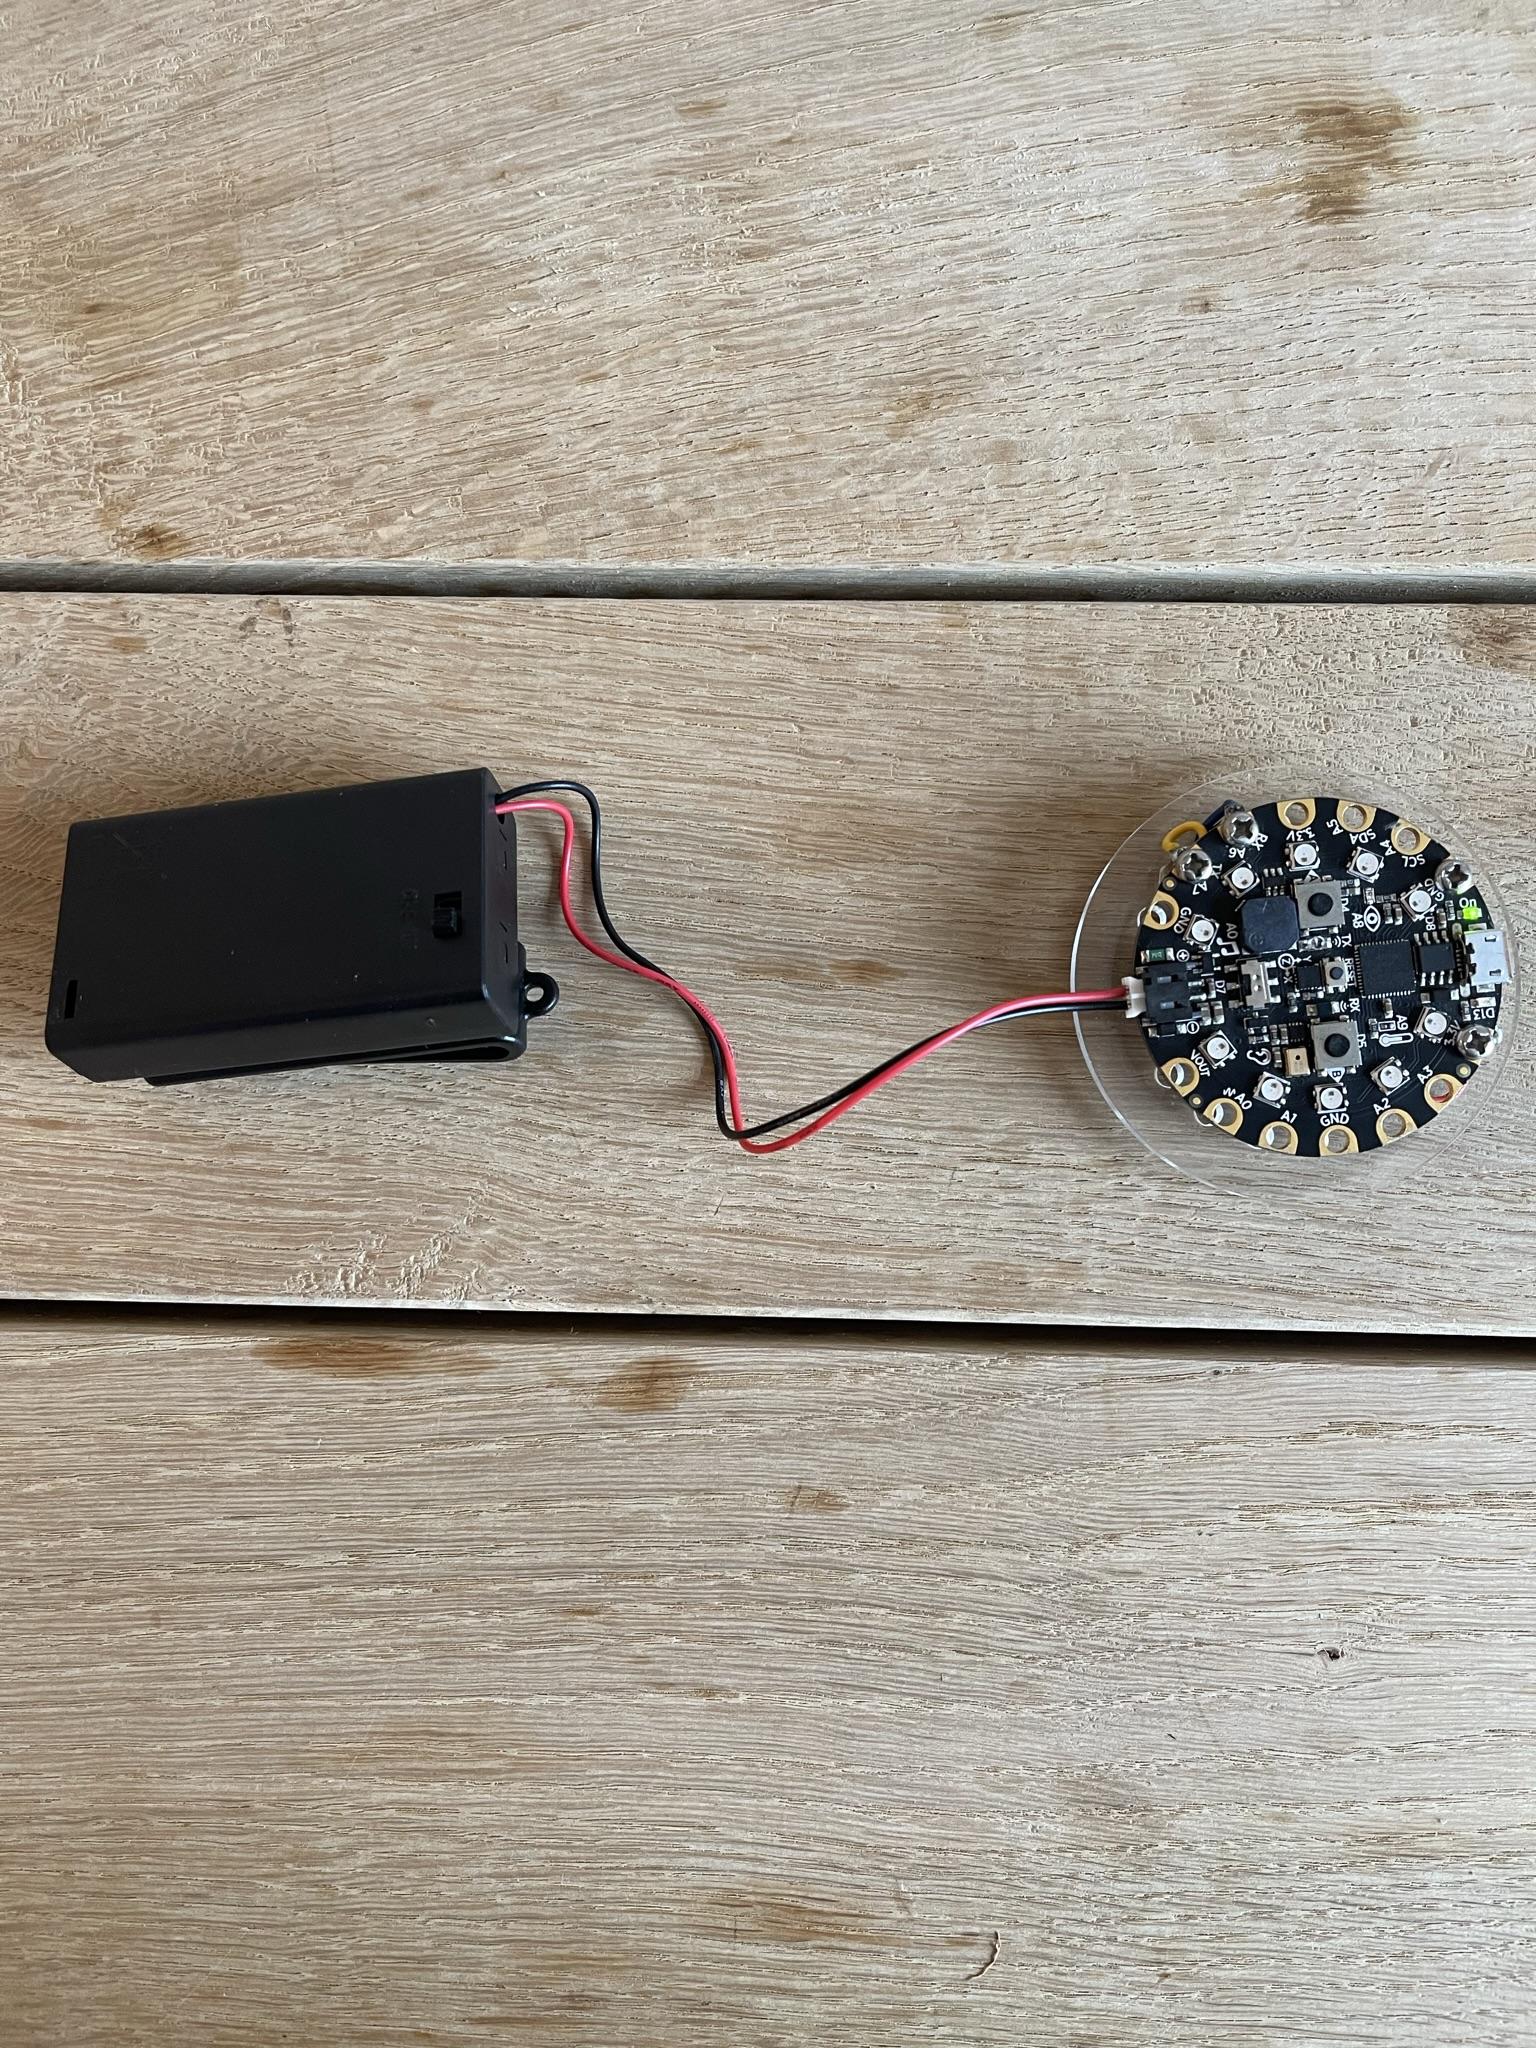
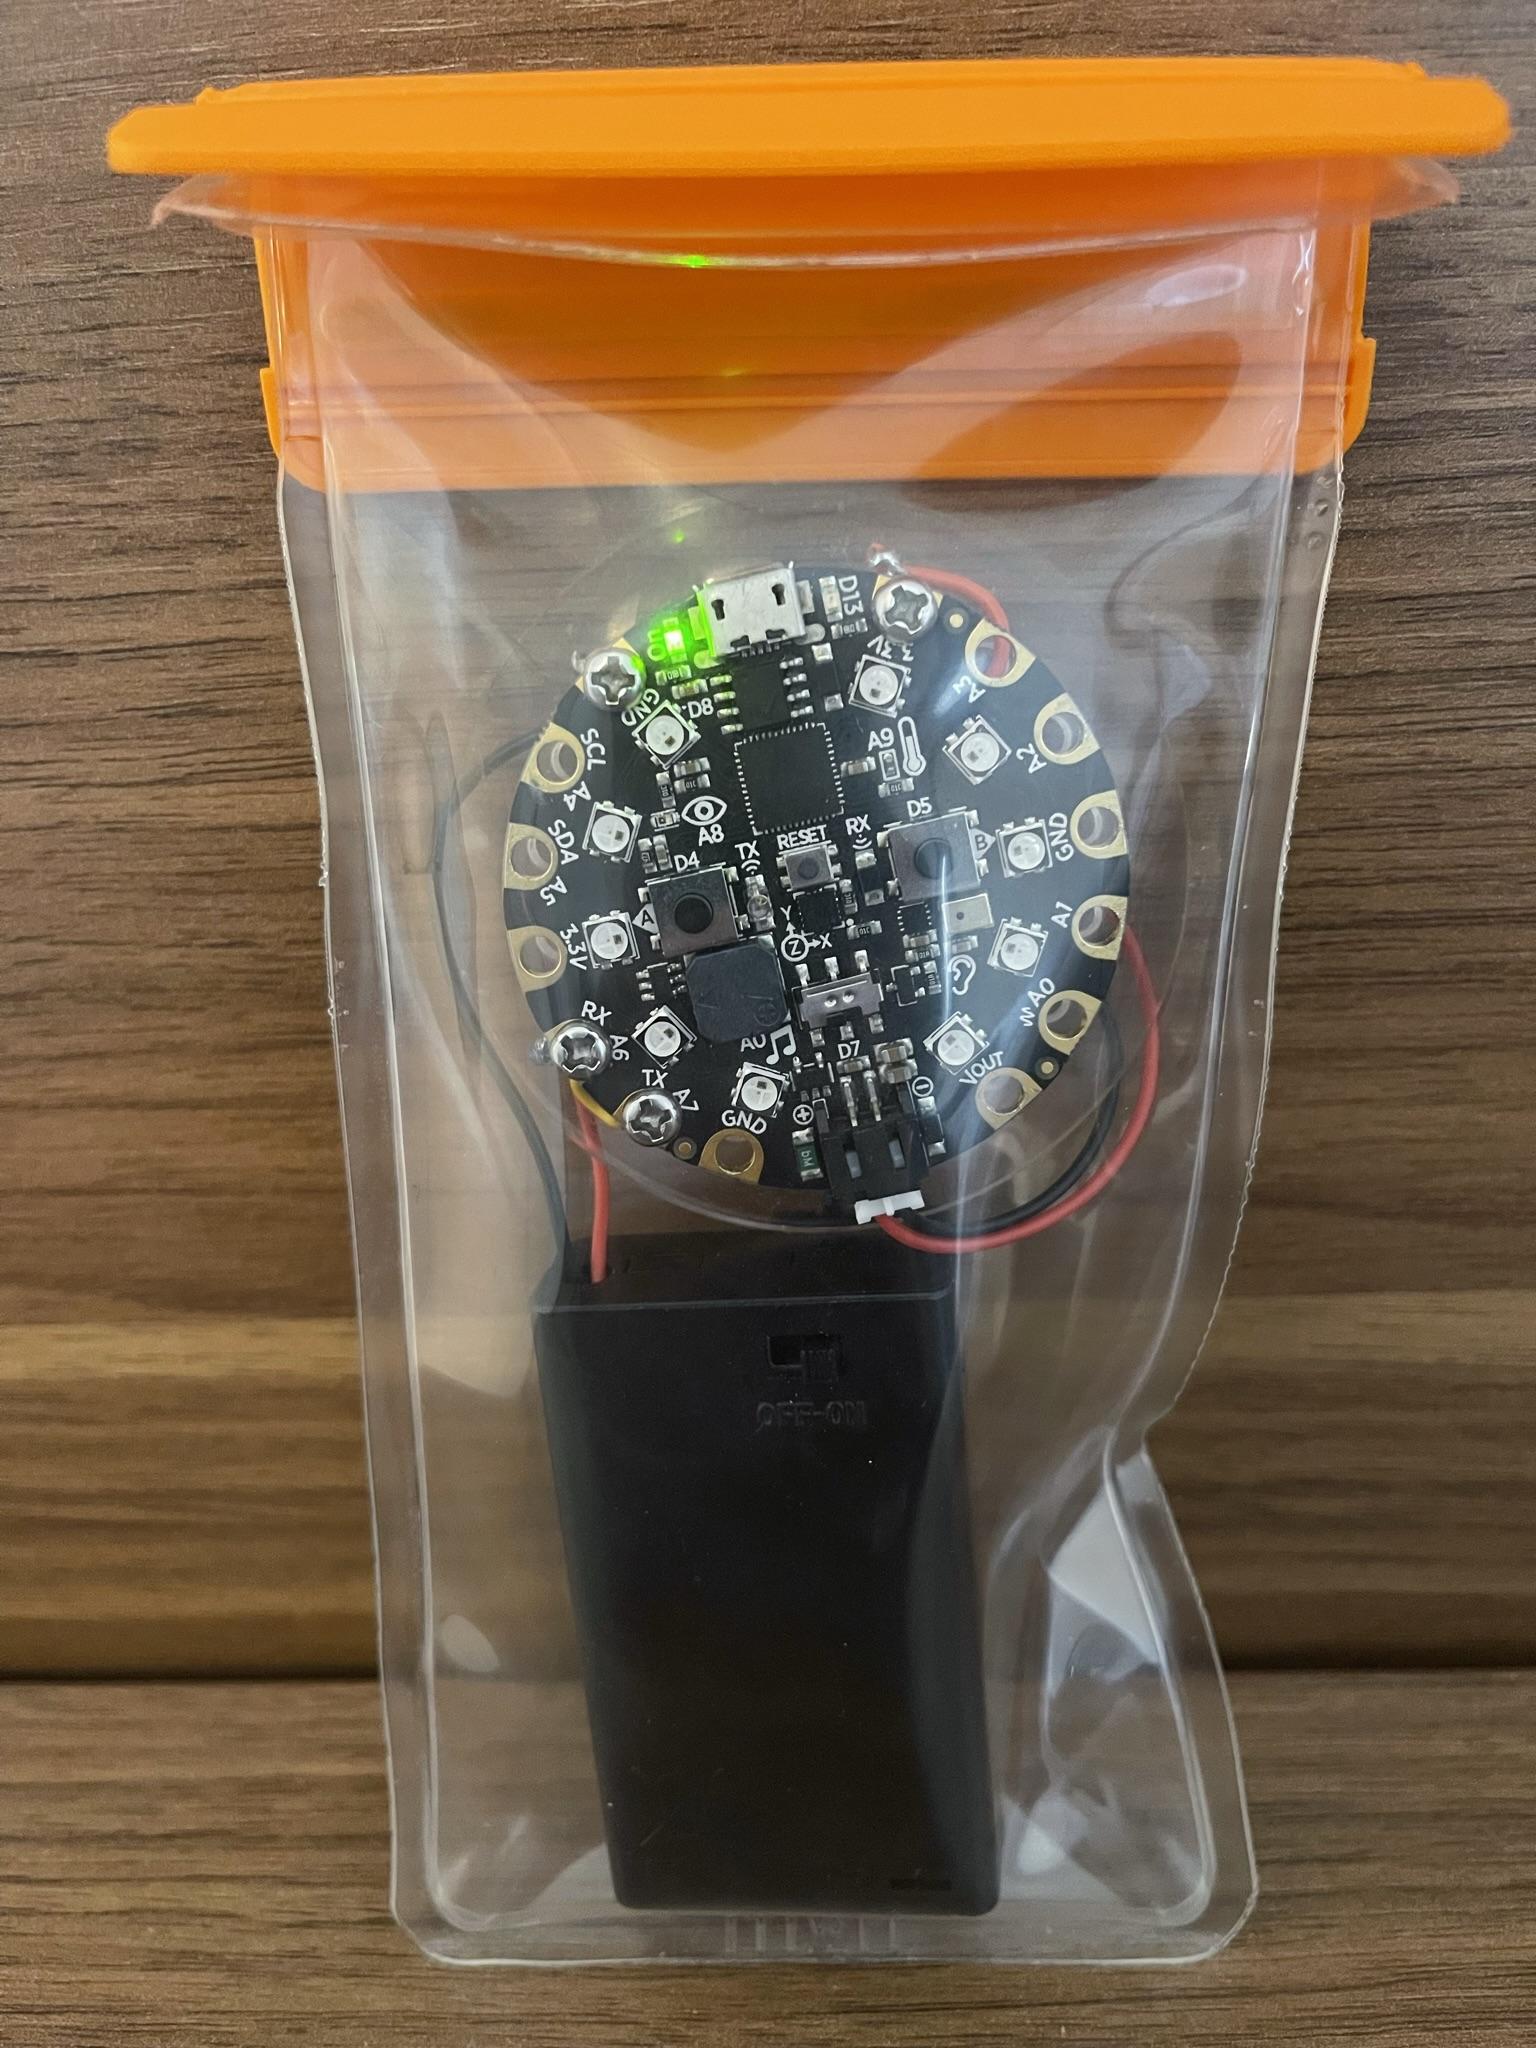
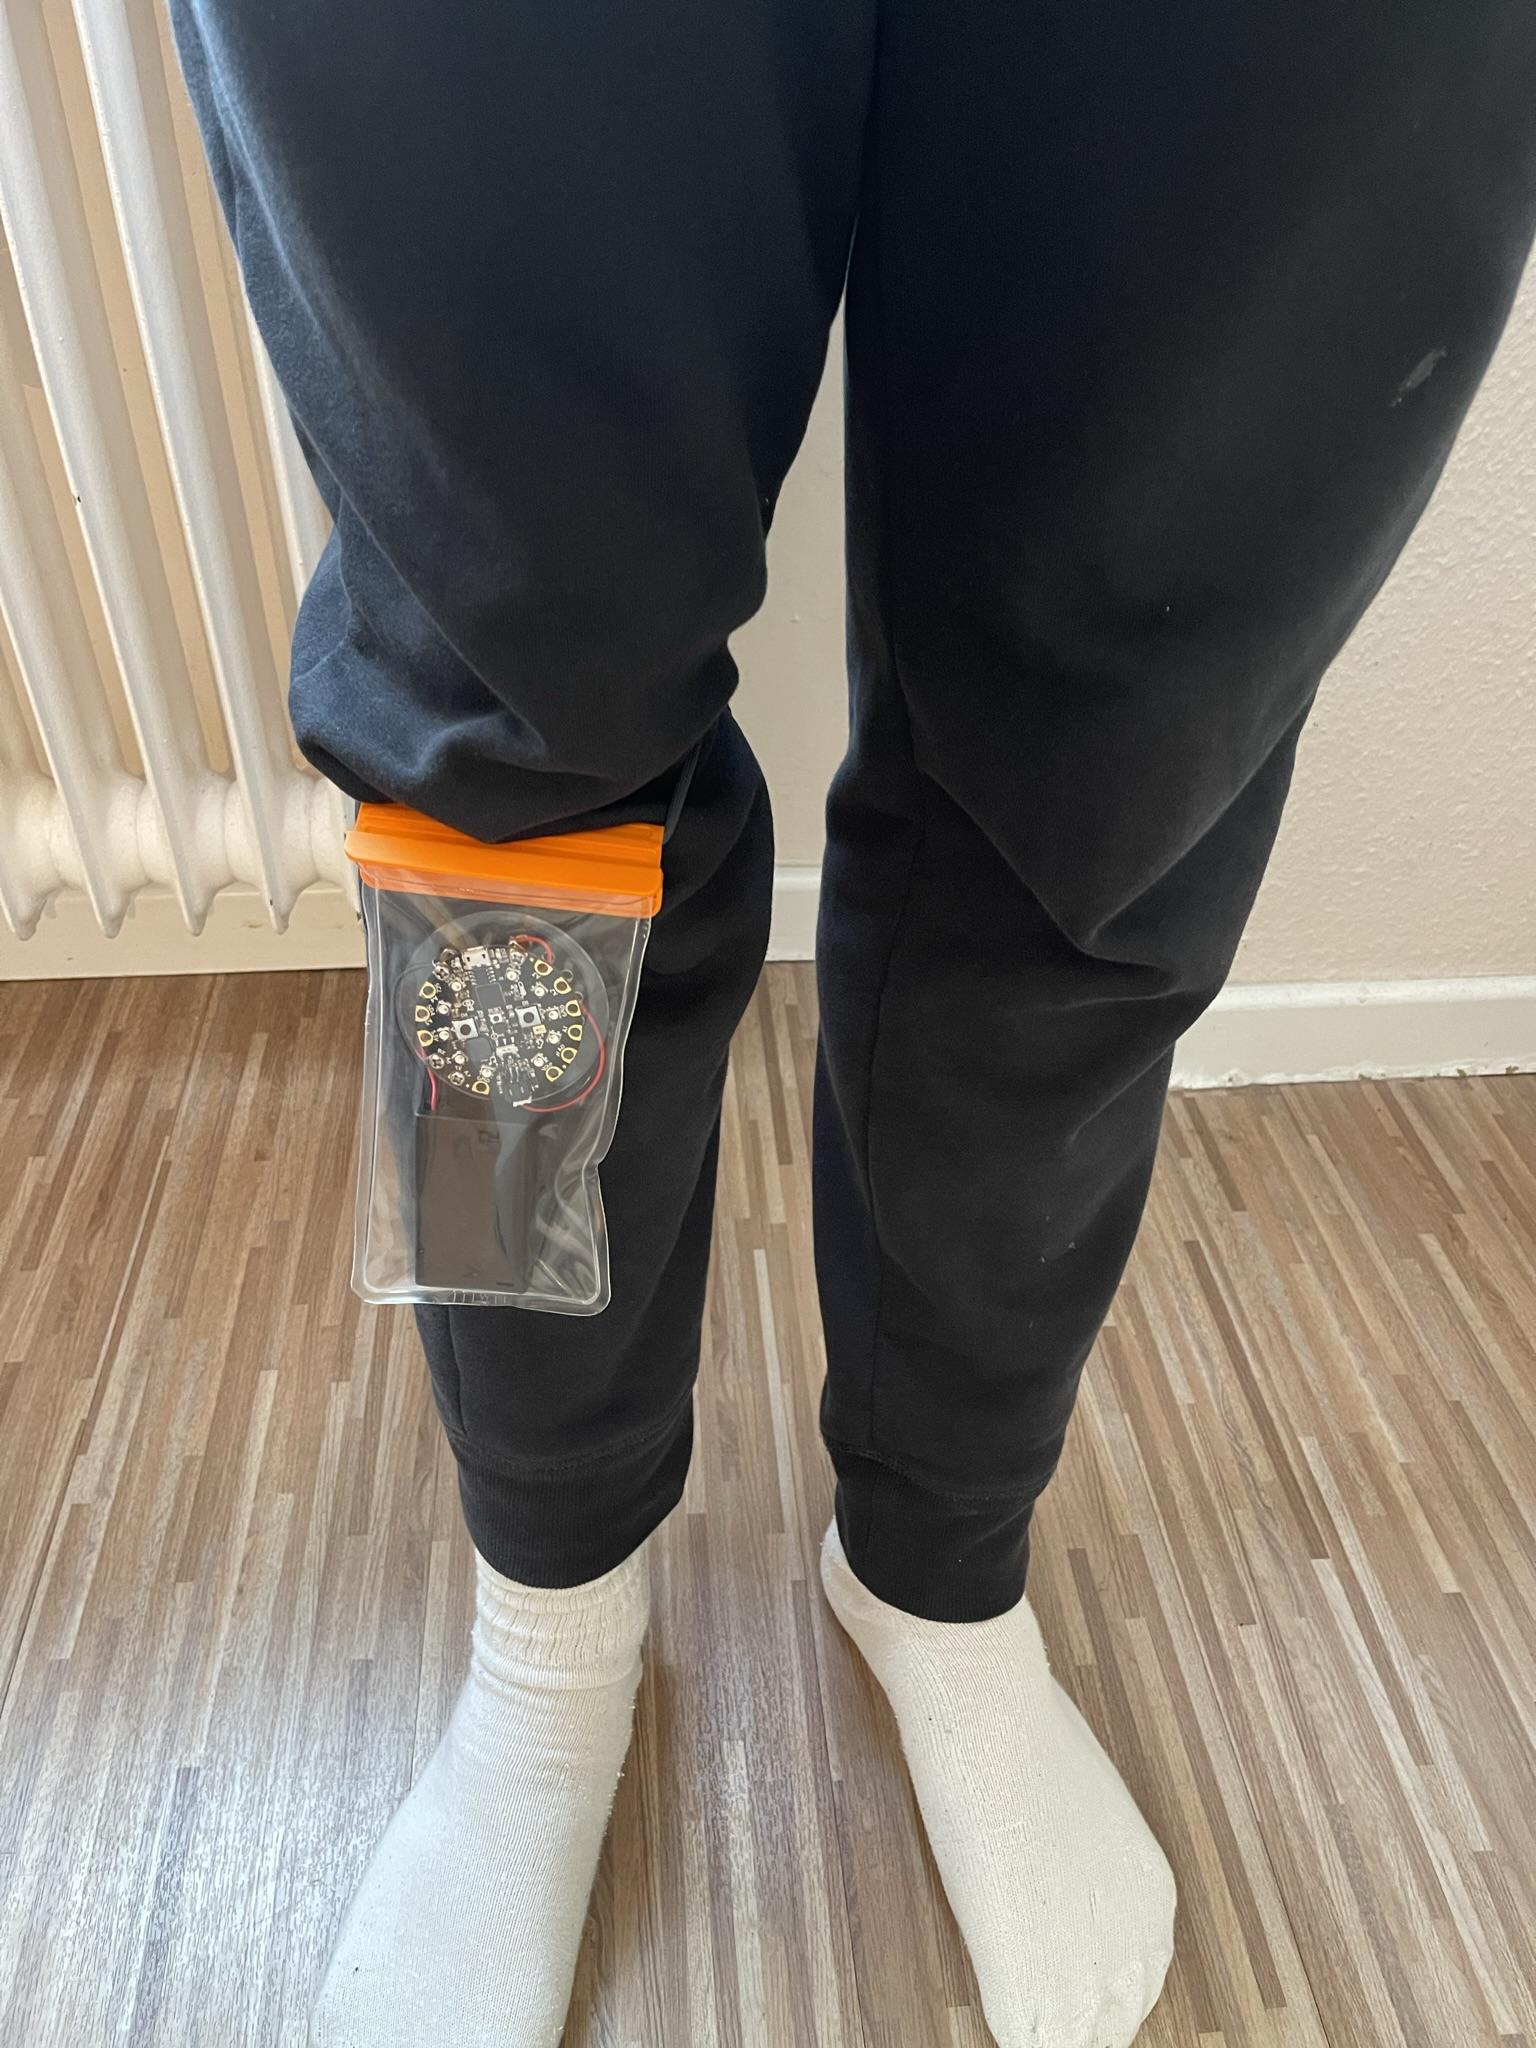
- Unplug the USB cable from the board, and connect it to the battery storage case. Then, gently insert both the board and the battery storage case, to the transparent water-resistant phone case.
- Make sure that the case is sealed.
- Tie the elastic fabric band to the sealed phone case.
- Wrap the band to the elderly person's leg, and make sure that it is not too tight nor too loose.