How to Make an Arduino Guitar Tuner
by 22turner7870 in Circuits > Arduino
1236 Views, 2 Favorites, 0 Comments
How to Make an Arduino Guitar Tuner
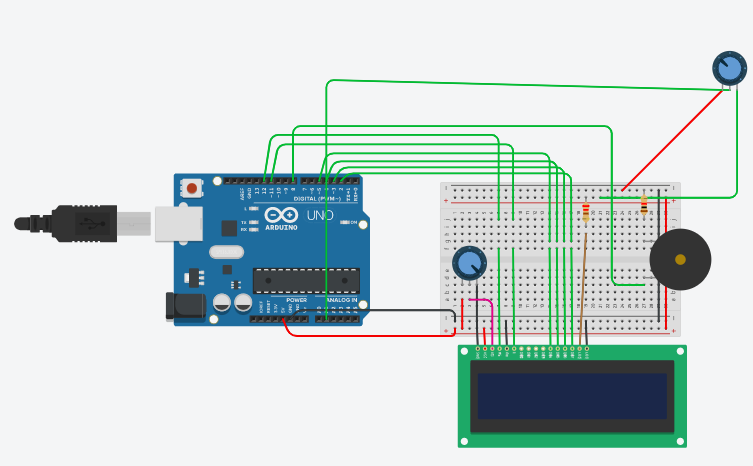
These are the instructions to make a guitar tuner out of an Arduino and several other components. With basic knowledge of electronics and coding you will be able to make this guitar tuner.
First things first you have to know what the materials are.
Materials:
- 1 Arduino ( I used an Arduino 1)
- 1 LCD Display (16x2)
- 1 Potentiometer
- 1 Electret Microphone
- 1 250 Ohm Resistor
- Several Wires
-Soldering Iron
- 1 Piezo
Soldering Pins
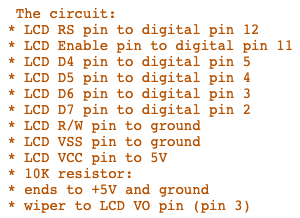
The first thing you need to do is solder the pins to the LCD, however you have to make sure that they are soldered the correct way. In the image above, it shows which pins should go connected where. The GND pin should go connected to a terminal of the potentiometer like in the Tinkercad diagram. (NOTE: It is very important that you connect the pins the way that is instructed, otherwise the tuner will not work.)
Connecting Everything
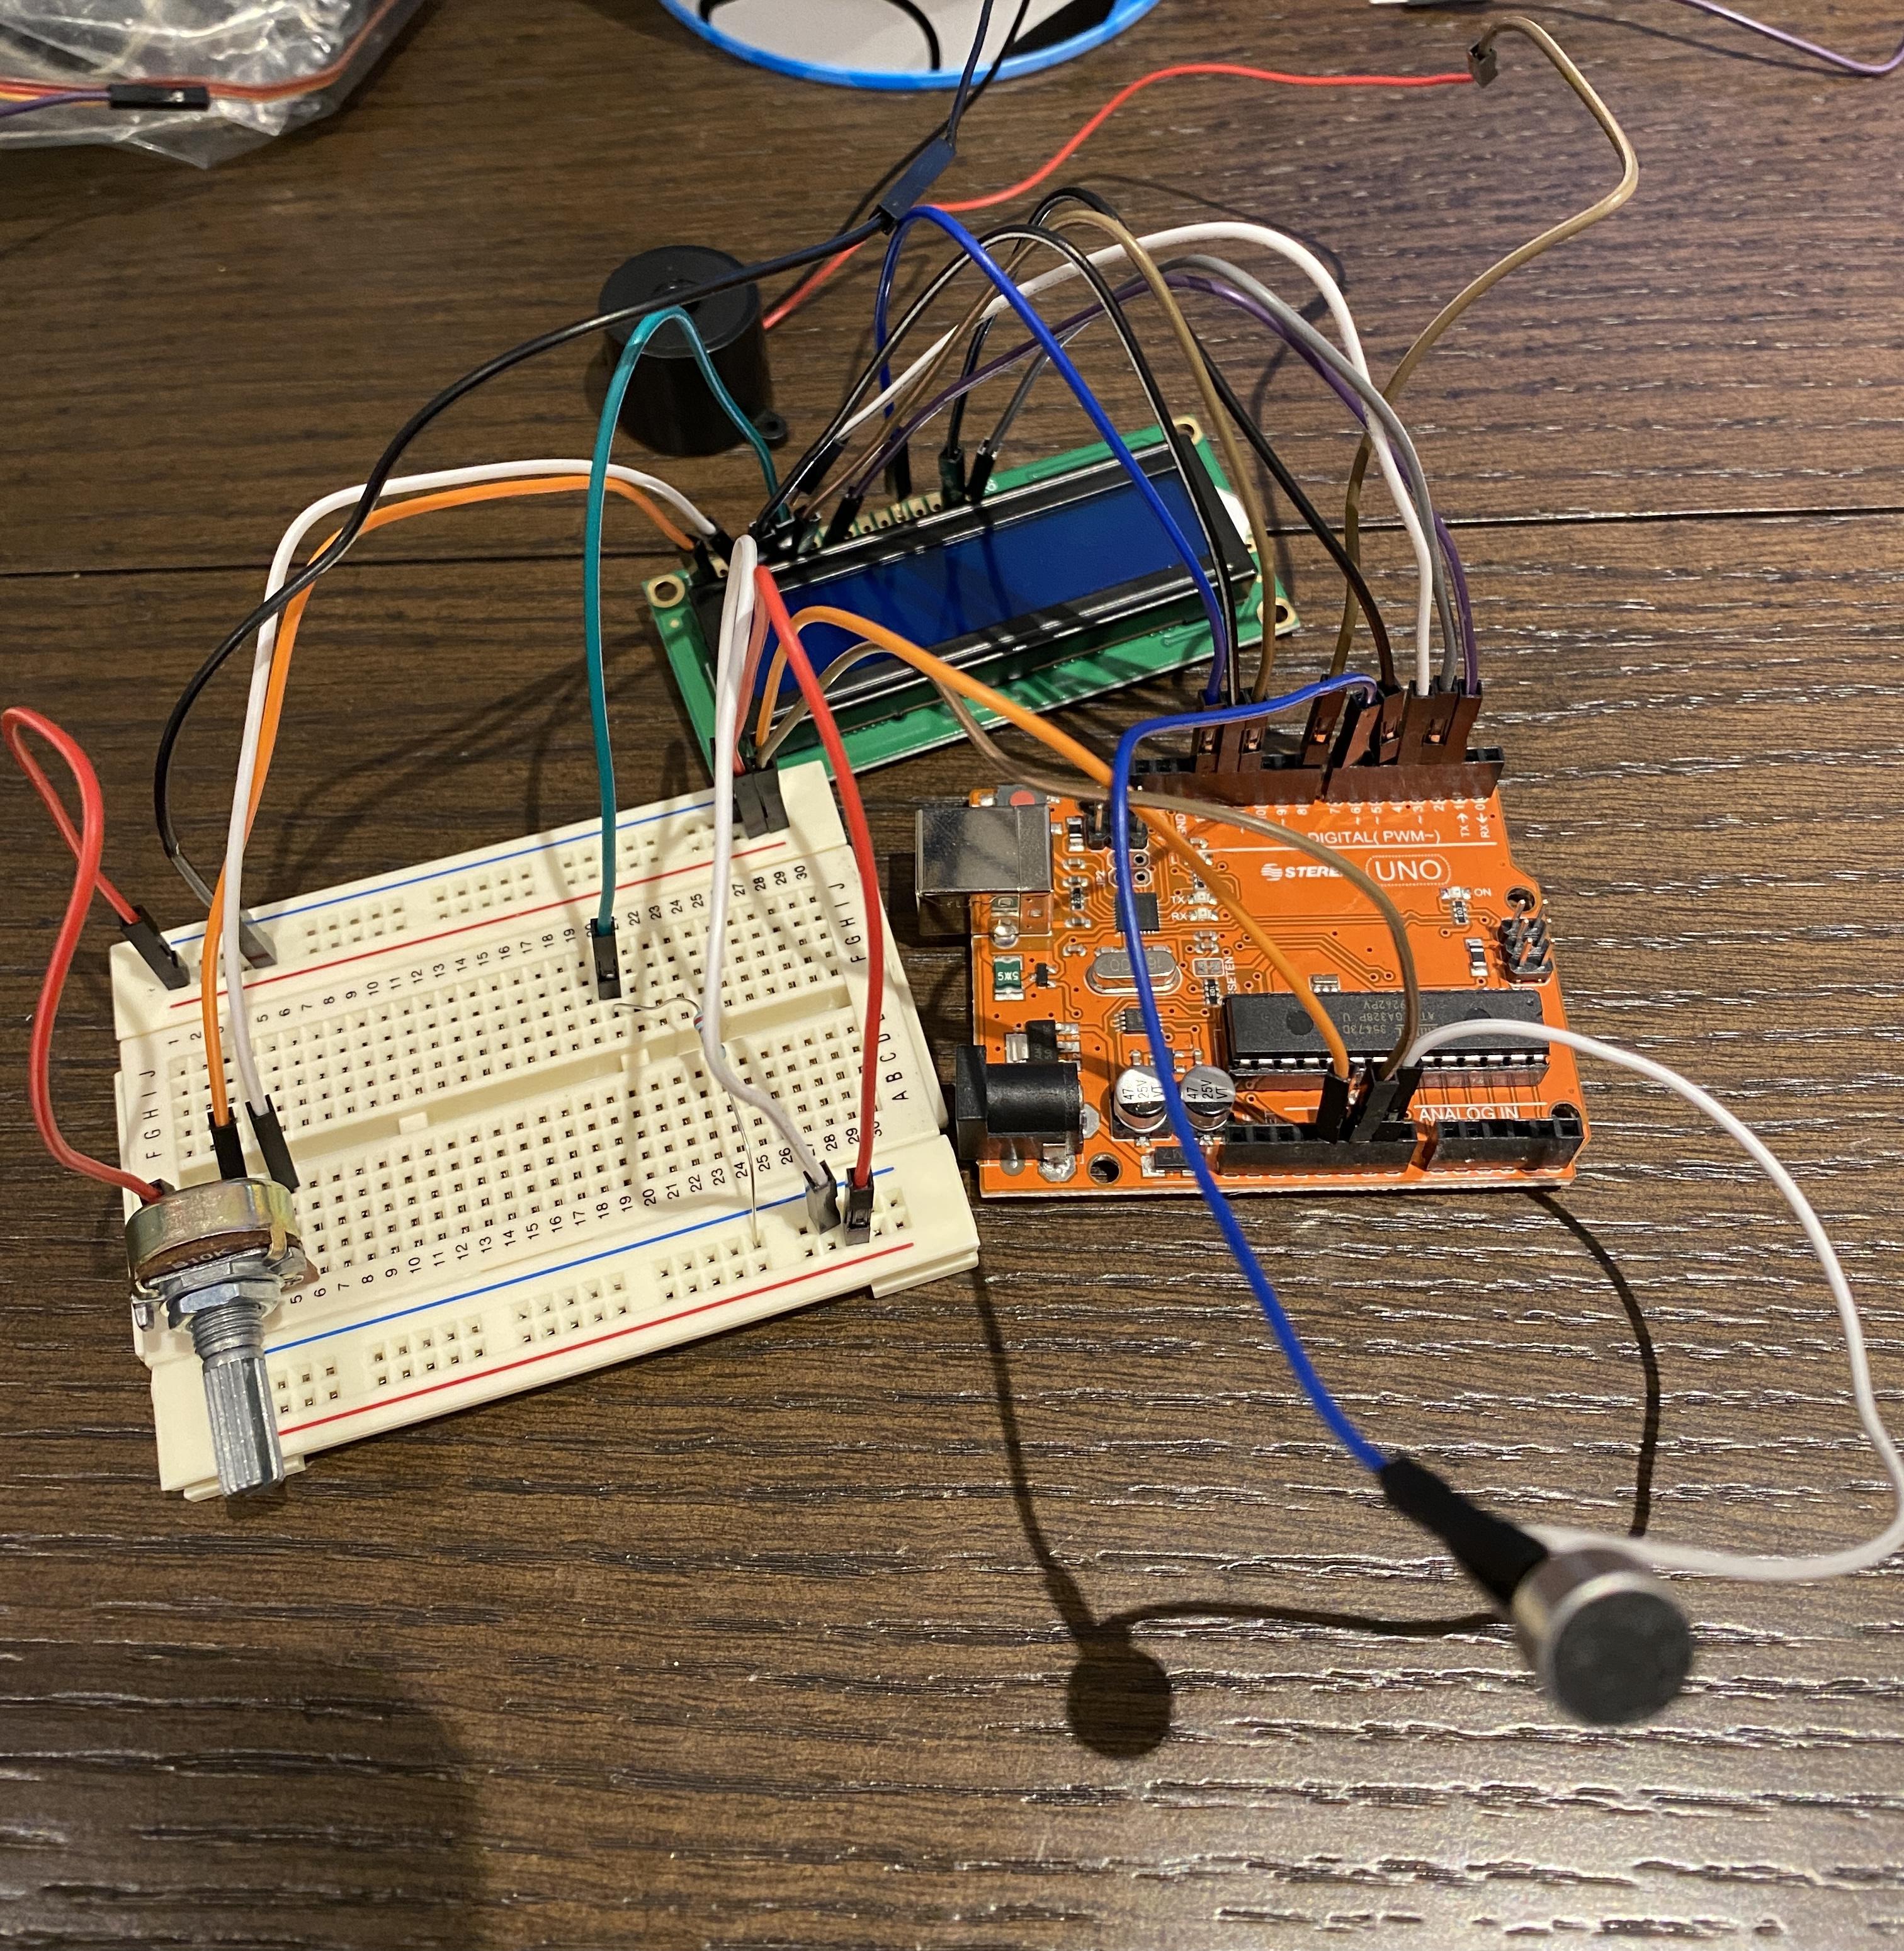
After soldering the wires to the LCD there are several other wires that you need to connect.
1.) The first thing you need to do is connect the GND and 5V on the Arduino to the breadboard allowing it to have power. Then connect the electret to the digital pin 7 and GND.
2.) Then connect the piezo to the breadboard for GND and connect it to digital pin 6.
3.) After that goes the potentiometer, you connect terminal 1 to a positive strip on the breadboard and terminal 2 to a GND strip on the breadboard, you then connect wiper to the contrast pin on the LCD.
Coding

Once you have connected everything the correct way, you need to program the tuner so that it actually does its job. Below is the code
// include the library code:
#include
// initialize the library with the numbers of the interface pins LiquidCrystal lcd(12, 11, 5, 4, 3, 2);
int A = 440;
int B = 494;
int C = 523;
int D = 587;
int E = 659;
int F = 699;
int G = 784;
int highA = 880;
int buzzer = 8; int functionGenerator = A1 ;
void setup() {
// set up the LCD's number of columns and rows:
lcd.begin(16, 2);
// Print a message to the LCD.
lcd.print("hello, world!");
Serial.begin(9600);
//clear everything in LCD, then set cursor, the printt
lcd.setCursor(0, 1); }
void loop() {
Serial.println(analogRead(functionGenerator));
delay (50);
//set the cursor to column 0, line 1
//(note: line 1 is the second row, since counting begins with 0):
if (analogRead(functionGenerator) == 450) {
lcd.clear();
lcd.setCursor(8,1);
tone(buzzer, 250);
lcd.print("A");
delay(1000);
}else if (analogRead(functionGenerator) == 494) {
lcd.clear();
lcd.setCursor(8,1);
tone(buzzer, 250);
lcd.print("B");
delay(1000);
}else if (analogRead(functionGenerator) == 523) {
lcd.clear();
lcd.setCursor(8,1);
tone(buzzer, 250);
lcd.print("C");
delay(1000);
}else if (analogRead(functionGenerator) == 587) {
lcd.clear();
lcd.setCursor(8,1);
tone(buzzer, 250);
lcd.print("D");
delay(1000);
}else if (analogRead(functionGenerator) == 659) {
lcd.clear();
lcd.setCursor(8,1);
tone(buzzer, 250);
lcd.print("E");
delay(1000);
}else if (analogRead(functionGenerator) == 699) {
lcd.clear();
lcd.setCursor(8,1);
tone(buzzer, 250);
lcd.print("F");
delay(1000);
}else if (analogRead(functionGenerator) == 784) {
lcd.clear();
lcd.setCursor(8,1);
tone(buzzer, 250);
lcd.print("G");
delay(1000);
}else if (analogRead(functionGenerator) == 880) {
lcd.clear();
lcd.setCursor(8,1);
tone(buzzer, 250);
lcd.print("A");
delay(1000);
}else if (analogRead(functionGenerator)>400&&digitalRead(functionGenerator)<449) {
lcd.clear();
lcd.setCursor(4,1);
tone(buzzer, 250);
lcd.print("A");
delay(1000);
}else if (analogRead(functionGenerator)>451&&digitalRead(functionGenerator)<470) {
lcd.clear();
lcd.setCursor(12,1);
tone(buzzer, 250);
lcd.print("A");
delay(1000);
}else if (analogRead(functionGenerator)>471&&digitalRead(functionGenerator)<493) {
lcd.clear();
lcd.setCursor(4,1);
tone(buzzer, 250);
lcd.print("B");
delay(1000);
}else if (analogRead(functionGenerator)>495&&digitalRead(functionGenerator)<509) {
lcd.clear();
lcd.setCursor(12,1);
tone(buzzer, 250);
lcd.print("B");
delay(1000);
}else if (analogRead(functionGenerator)>509&&digitalRead(functionGenerator)<522) {
lcd.clear();
lcd.setCursor(4,1);
tone(buzzer, 250);
lcd.print("C");
delay(1000);
}else if (analogRead(functionGenerator)>524&&digitalRead(functionGenerator)<556) {
lcd.clear();
lcd.setCursor(12,1);
tone(buzzer, 250);
lcd.print("C");
delay(1000);
}else if (analogRead(functionGenerator)>557&&digitalRead(functionGenerator)<586) {
lcd.clear();
lcd.setCursor(4,1);
tone(buzzer, 250);
lcd.print("D");
delay(1000);
}else if (analogRead(functionGenerator)>588&&digitalRead(functionGenerator)<620) {
lcd.clear();
lcd.setCursor(12,1);
tone(buzzer, 250);
lcd.print("D");
delay(1000);
}else if (analogRead(functionGenerator)>621&&digitalRead(functionGenerator)<658) {
lcd.clear();
lcd.setCursor(4,1);
tone(buzzer, 250);
lcd.print("E");
delay(1000);
}else if (analogRead(functionGenerator)>660&&digitalRead(functionGenerator)<679) {
lcd.clear();
lcd.setCursor(12,1);
tone(buzzer, 250);
lcd.print("E");
delay(1000);
}else if (analogRead(functionGenerator)>680&&digitalRead(functionGenerator)<698) {
lcd.clear();
lcd.setCursor(4,1);
tone(buzzer, 250);
lcd.print("F");
delay(1000);
}else if (analogRead(functionGenerator)>700&&digitalRead(functionGenerator)<742) {
lcd.clear();
lcd.setCursor(12,1);
tone(buzzer, 250);
lcd.print("F");
delay(1000);
}else if (analogRead(functionGenerator)>743&&digitalRead(functionGenerator)<783) {
lcd.clear();
lcd.setCursor(4,1);
tone(buzzer, 250);
lcd.print("G");
delay(1000);
}else if (analogRead(functionGenerator)>785&&digitalRead(functionGenerator)<845) {
lcd.clear();
lcd.setCursor(12,1);
tone(buzzer, 250);
lcd.print("G");
delay(1000);
}else if (analogRead(functionGenerator)>846&&digitalRead(functionGenerator)<879) {
lcd.clear();
lcd.setCursor(4,1);
tone(buzzer, 250);
lcd.print("A");
delay(1000); }
else { noTone(buzzer); } delay(10); }
Connecting It to Power
For the final step all you need to do is find a power source and connect it to the Arduino, one you have that you can start using the tuner.