How to Make a Speedometer/Tracker for a Bike
by jonathanhliu21 in Circuits > Raspberry Pi
1785 Views, 14 Favorites, 0 Comments
How to Make a Speedometer/Tracker for a Bike


Using a Raspberry Pi and an Arduino, I made a speedometer and tracker for my bike, called “Bike Dashboard”, that displays the speed, date, and time on an OLED display and can also track the bike’s route. Below is a tutorial on how to make your own “Bike Dashboard”. This tutorial is not meant to be followed exactly and you are encouraged to make your own changes so it will suit you the best!
Background
Over my spring break in April 2021, I made a “Bike Dashboard” (Github Repo) using an Arduino Nano, an LCD screen, and a GPS. I made this so I could check the time while biking more safely, and I also wanted to track the route that I biked without a phone. I thought that pulling over my bike to check my phone for the time was inconvenient and dangerous. In addition to this, I was also interested in viewing the speed while biking.
However, that design had many problems:
- I could not put that many features on it because the Arduino Nano did not have much memory.
- The speed on the LCD updated very slowly.
- The LCD screen was very big and captured attention.
- Even though it could track, I had no way of viewing it on a map. Because of these problems, I wanted a new design.
This design
This Bike Dashboard features a Raspberry Pi Zero W connected to an Arduino. The speed, date, and time are displayed on an OLED and an LED panel. The Raspberry Pi can get the data much quicker, and it can also host a local website that displays the route you tracked on a map.
My previous design did not have a case for the Bike Dashboard, but this design includes a basic wooden case. However, you don’t have to make it out of wood, and I encourage you to come up with your own design for a case.
The Bike Dashboard is split into 2 pieces: The central piece and the handle piece. The central piece is where the Raspberry Pi and the GPS are, and it handles most of the operations. This piece and the battery are mounted on the center of the bike. The handle piece is where the displays and the buttons to start tracking are located. This piece is mounted on the right handle of the bike, where I can easily see the screen and press the buttons.
I added an LED panel for the Bike Dashboard to display speed in another way, and I plan on implementing other features with it.
Supplies
Electronics
- Raspberry Pi Zero W (This links to a kit)
- Arduino Nano
- Neo-6M GPS module
- 128x64 SSD1306 OLED display
- 22 LEDs: 20 white, 1 red, 1 green
- Tactile pushbutton switch
- Breadboard (if you don’t want to solder, recommended for testing before soldering)
- Perfboard or stripboard (for a more permanent build)
- Jumper wires
- 2 10k ohm resistors and 2 220–330 ohm resistors
Hardware
These are what I used:
- Basswood (I got a much harder and thicker type of wood. This wood should be easily cuttable with a razor blade or an x-acto knife.)
- X-acto knife
- Hand saw
- Hot glue, hot glue gun
- Gorilla glue
Wiring

Information on wiring can be found here.
If you do not feel like soldering, you can use a breadboard.
Instead of designing a custom PCB, I soldered all of these components onto a prototype PCB. I may design a custom PCB later. Soldering the LED panel is optional as all information displayed there will be displayed on the OLED.
Case and Mount


This section only shows what I did for the case and mount. You probably have to make your own design as our bikes are different.
For the central piece and mount, I cut 6 pieces of wood such that it could enclose the central piece electronics and PCB, and I cut holes in the wood so that the ports were exposed and wires (USB to Arduino, USB to power bank, and I2C to OLED) could come out of the electronics.
The “box” was designed in 2 pieces so I could take them apart: the flat bottom piece that would be attached to the bike, and the top piece (the 5 other pieces glued together) that would act as a lid that encloses the electronics. They are screwed together.
For the mount, I cut 3 pieces of wood that would go around the top tube of the bike, and I glued them together. Then, I took two screws and two nuts and attached the bottom piece of the “box” onto the mount.
The process for the handle piece was roughly the same. I cut 5 pieces that would enclose the electronics for the handle piece, but instead of making a 6th piece that would go on top, I cut and glued a clear binder sheet on top so I could see the displays.
To mount it, I glued it to the mount for a front bike reflector. I couldn’t do this for the central piece as the top tube was much bigger and in a different shape than the handle.
Software Installation
There will be two steps during installation: configuring your Raspberry Pi so the software will work, and installing the software. However, before that:
If you haven’t installed the Raspberry Pi OS, follow the instructions below. Make sure to install “Raspberry Pi OS (32 bit)” and not any other OS as they might not come with Python, cURL, or git.
Setting up the Raspberry Pi headless
Python installation if you do not have it installed:
sudo apt update
sudo apt install python3 idle3
cURL installation if you do not have it installed:
sudo apt update
sudo apt install curl
Git installation if you do not have it installed:
sudo apt update
sudo apt install git
The source code is also linked here.
Configuring
Git:
git config --global user.name "Your name"
git config --global user.email "your@email.com"
Replace “Your name” and “your@email.com” with your actual name and email.
Configuring the pins:
1. Type in "sudo raspi-config"
2. Go to “Interface options” and select "I2C", then select "Yes".
3. Return to “Interface options” and select "Serial Port". When it asks "Would you like a login shell to be accessible over serial?", select "No". It will then ask, "Would you like the serial port hardware to be enabled?" and select "Yes".
4. Click Finish.
5. Reboot the Raspberry Pi: "sudo reboot"
Installing
Before installing, make sure everything is wired onto the Raspberry Pi. Look in the schematics section to see how to wire up the Raspberry Pi.
Run this command, preferably in your home ("~" or "/home/pi") folder.
curl -sO https://raw.githubusercontent.com/jonyboi396825/BikeDashboardPlus/master/install.bash
After running this, you will have to figure out the serial port of your Arduino. Type "ls -l /dev" to see all serial ports. The port for the Arduino should be "ttyUSB*" or "ttyACM*". The best way to check which port the Arduino is located on is to plug in the Arduino, take note of the ports that are "ttyUSB*" or "ttyACM*", then unplug the Arduino, and see which of those ports disappeared. That port would be the Arduino.
After getting the path to the serial port (e.g. "/dev/ttyUSB0" or "/dev/ttyACM0"), type this command in:
bash install.bash /dev/port
Replace "/dev/port" with the actual path to the serial port. The installation process should take around 1–2 minutes on a Raspberry Pi 4 and around 8–10 minutes on a Raspberry Pi Zero.
2. Make a backup of "/etc/rc.local":
sudo cp /etc/rc.local /etc/rc_backup.local
3. Edit "/etc/rc.local":
- Type "sudo nano /etc/rc.local"
- Scroll down. Type in 'su pi -c "bash /path/to/BikeDashboardPlus/run.bash" &' before the "exit 0". You can see what the path is by typing "cat ~/BikeDashboardPlus.txt". Make sure to add the ampersand or the Pi will not boot. This line will make the Raspberry Pi run the program when it boots. The "su pi -c" runs the program as the "pi" user so you can access the files in the program later.
- Save and exit: Press ^X (Control-X), then Y, then enter.

4. Reboot the pi: "sudo reboot"
From now on, the program should run after you boot up your Raspberry Pi.
Usage
There are 2 modes to the Bike Dashboard: Bike mode, and server mode. Bike mode is the mode that you set when you are riding your bike. The OLED display will display time, speed, etc., and you can track your route. Server Mode sets up a server where you can configure your Bike Dashboard and view the maps of your tracked routes.
To turn the Bike Dashboard on, power on your Raspberry Pi and wait 30 seconds to 1 minute to let it boot up.
To turn it off, press button 2 on the central unit (the one wired to BCM pin 18 on the RPi).
Bike Mode
The Bike Dashboard automatically goes into Bike Mode when it boots up.
After displaying some setup text, the OLED will display the things you will see in Bike Mode. This diagram will show what each component displayed on the OLED represents:

This is how the LEDs on the LED panel are numbered:

How it works: If the configuration “LED” is 0, then LED n (on the panel) will light up if you are going n mph, km/h, or m/s. If “LED” is set to 1, then LED n/2 will light up if you are going n mph, km/h, or m/s.
To start tracking, press the button wired to pin D4 on the Arduino Nano. The green LED on the Arduino will light up and a “T” will show up on the bottom right of the OLED display to indicate that you are currently tracking. Note that tracking is not possible if you are disconnected i.e. the red LED is on or it says “M:D” on the OLED.
Once you have started tracking, it will immediately write to a new track file. If you have started this by accident, don’t worry, you can delete this later.
To pause tracking, press the button wired to pin D5 on the Arduino. Indicators that you have paused are the green LED blinking instead of staying constantly on and the OLED display a “P” on the bottom right corner. To resume, press the same button.
To end tracking, press the same button as the one you pressed when you started tracking. The green LED will turn off and there should be nothing displayed on the bottom right corner of the OLED.
Server Mode
To get into server mode from bike mode, you need to shut it off and turn it back on again. To do this, press button 2 on the central unit (the one wired to BCM pin 18 on the RPi).
When the “Setup” screen comes on the OLED, press and hold button 1 on the central unit (the one wired to BCM pin 17 on the RPi). When the “Server mode” screen comes on, you are in server mode, and the Raspberry Pi is hosting a website on your network. Note that if there is no internet connection, server mode would fail and it would go into Bike Mode.
Go to the website shown on the OLED. It should be "http://{your.pi.IP}:7123".
On the home page, you should see this (the version number will be different):
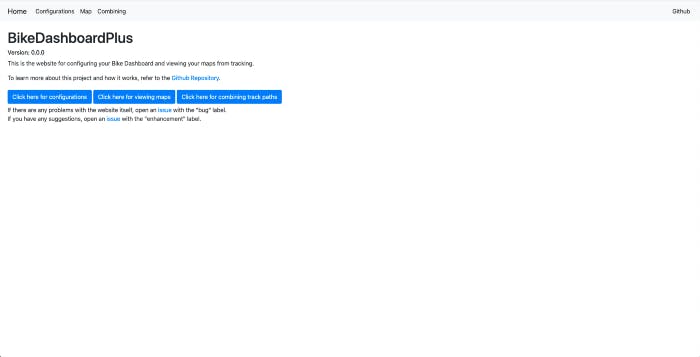
There are 3 options: the configuration page, the map page, and the combining page. I will go through what each one does.
Configuration
The configuration page should look like this:

It is a table showing all the configurations, what they mean, and what value you have to enter. You have to enter that value into the text box on the right column of the table.
For the time zone, you should copy and paste from the list in the link rather than typing it out as you have to type it out exactly like it is in the table.
At the end, click submit.
Map
You should not be able to see anything on the map page if you do not have any track files. If you do, the link name will be something like:
Started tracking at: <date> <time> UTC
When you click on it, it should look like this:

(Don’t worry, I don’t live here.)
If you see a message advising you to delete the file, then there was some error writing/reading the tracking file and you should delete it.
The data should not be as precise as shown above as that was copied from Google Maps.
On the map, you should be able to see your route. There are a start marker, an end marker, and multiple pause/resume markers depending on where you paused.
On the bottom of the map, you should see how far you have traveled depending on your “UNT” configuration.
- If “UNT” is 0 (mph), then it shows in miles and feet
- If “UNT” is 1 (km/h) or 2 (m/s), then it shows in kilometers and meters
If you accidentally started tracking and you want to delete the file, press “Delete this file” at the bottom of the page.
Troubleshooting
What if my program is always quitting?
If the program is quitting before entering bike mode, and both your OLED and Arduino are connected, it may be that the port to the Arduino in the "port" file is wrong.
If this happens, ssh into your Pi, then go here and go under "Installation" to find out which serial port your Arduino is connected to. After that, type in
nano raspberrypi/port
then change the port in the file to the new port of the Arduino. Then save and close the file (press ^X, then Y, then enter).
What if my Arduino or OLED got disconnected?
If your Arduino is disconnected, the OLED should display something beginning with “Oh no!”.
Reconnect your Arduino, wait ~5 seconds, then press button 1 (the one wired to BCM pin 17 on the RPi). If it still displays “Oh no!”, then try to disconnect the Arduino and reconnect it again, wait ~15 seconds, then press button 1. If the problem persists, then try to shut it down and start it up again, making sure the Arduino is connected. If it is still happening, then go to “What if my program is always quitting?”.
If your OLED got disconnected, it should be a blank screen, or the time on the OLED does not match the actual time and the TX and RX LEDs on the Arduino are not rapidly flashing.
Try pressing button 1 to restart your OLED. If it quickly disconnects again, then try unplugging your OLED and plugging it in again. If the problem persists, then restart your Pi making sure the OLED is connected.
Combining tracking files
If your GPS got disconnected whilst tracking, and you had to restart the tracking, leading to 2 or more separate tracking files, you can combine them in the “combining” page. However, on the map, it will indicate that you paused at the end of one tracking file and resumed at the start of the next instead of drawing one continuous line between the two.
Note that you cannot separate files after combining them.
Click the checkboxes in the order you want to combine the files. You will see the order of the file numbers below so you can confirm your choices.
Click submit to combine the files.
Shutting down
Press the button wired to BCM pin 18 to shut the Pi down.
Conclusion
In case you want to disable or uninstall BikeDashboard from your Raspberry Pi:
Disabling
This prevents the program from running whenever you start up your Raspberry Pi.
- Type sudo nano /etc/rc.local
- Delete the line that you added when installing (shown in the image above).
- Save and exit: Press ^X (Control-X), then Y, then enter.
- Reboot the Pi: sudo reboot.
To re-enable it, just type that line back into /etc/rc.local at the same place.
Uninstalling
- Disable the program (See “Disabling”)
- cd into the directory you installed BikeDashboardPlus in.
- You can check by typing cat ~/BikeDashboardPlus.txt
3. Type rm -rf BikeDashboardPlus to delete the folder and all of its contents.
4. Type rm ~/BikeDashboardPlus.txt
5. Reboot the Pi: sudo reboot
Closing Thoughts
You don’t have to follow this tutorial exactly, because this only goes over what has worked for me. I encourage you to modify the code and find your own way to make the case and mount so it works for you.
If you notice any issues, please report them here. Be sure to read the contributing page before submitting an issue.