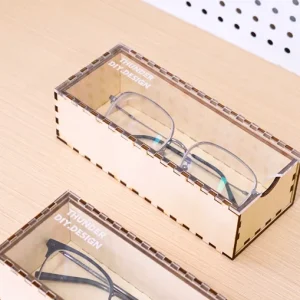
How to Make a Special Wooden Glasses Case With Laser Machine
by thunderlaser-nolan in Workshop > Laser Cutting
659 Views, 8 Favorites, 0 Comments
How to Make a Special Wooden Glasses Case With Laser Machine

Everyday essentials deserve a home of their own—and for many of us, that means a safe spot for our glasses. Instead of leaving them on the desk, why not create a custom storage box that’s both protective and stylish? With a laser cutter, you can turn a simple sheet of wood or acrylic into a sleek, well-fitted box designed just for your eyewear.
Ready to roll into your next creative idea with style and precision? Hold on and keep reading!
Supplies
Machine Used
Thunder Bolt
Material Needed
3mm Basswood
3mm Acrylic
Settings
Engraving-1
- Speed:500mm/s
- Power:40%
- DPI: 300
- Number of Passes:1
Cutting-1
- Speed:15mm/s
- Max Power:75%
- Min Power:10%
- Number of Passes:1
Cutting-2
- Speed:10mm/s
- Max Power:75%
- Min Power:5%
- Number of Passes:1
Downloads
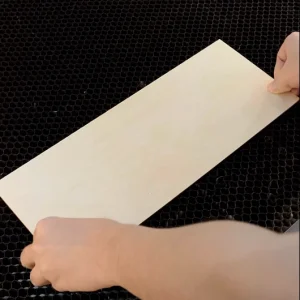
Prepare and Place the Wood on the Laser Bed
Choose the right material for your box—plywood, MDF, or acrylic are common options. Make sure the sheet is flat and clean, as warps or dust can affect the accuracy of your cuts. Peel off any protective film (if using acrylic) before placing it on the laser bed. Use pins or magnets to hold the sheet securely in place.
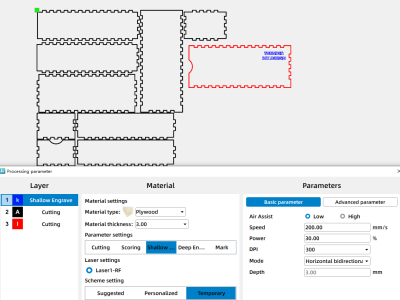
Import and Adjust Your Design
Open your laser software (I use LaserMaker) and import the box design file. Adjust the dimensions to fit your glasses, ensuring the interior has enough depth and width. Double-check the slot and tab sizes so they match your material thickness.
For the laser cutting layers, pay extra attention to the minimum power setting. If the min power is too low, it will cause the cutting corners will not cut through; if the min power is too high, the laser cutting will be bad at the corners.
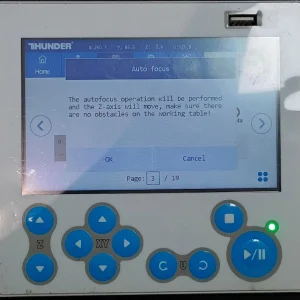
Focus Your Laser Machine
Proper focusing is essential for achieving crisp engravings and smooth cuts. If your machine supports auto focus, a single click will set the correct distance for flat wooden boards. If you prefer manual focus, use the focus stick to adjust the laser head until it just touches the surface of the wood at a perfect vertical angle. Spending an extra moment on accurate focusing will pay off with professional-looking results.
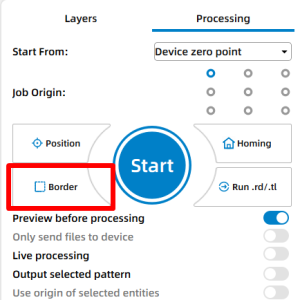
Frame the Design and Start Laser Cutting
Before cutting, use the “Frame” function (also called “border”) in your laser software. The laser head will trace the outline of your design with a guiding beam, allowing you to double-check the position on your material. This ensures your glasses box pieces will be cut exactly where you expect them to be. If the outline doesn’t line up, adjust the material or the file until everything looks right.
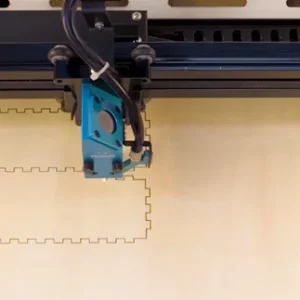
Monitor the Laser Cutting Process
Once you’re satisfied with the framing, it’s time to begin cutting. Hit “Start” and let the laser do its work, carefully following the paths of your design. Stay nearby to monitor the process for safety and to ensure the cuts remain clean and accurate. When finished, let the material cool briefly before removing it from the work bed.
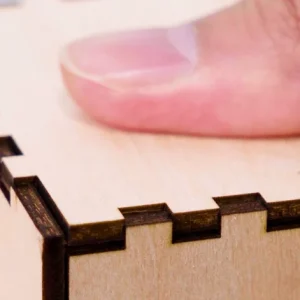
When the cut is complete, wait a few seconds before opening the lid to let fumes clear. Carefully remove the pieces from the bed. If there are burn marks or residue, lightly sand the edges (for wood) or wipe with a soft cloth (for acrylic).
Assemble the Box
Arrange the cut pieces according to your design. Apply wood glue (for plywood/MDF) or acrylic adhesive (for acrylic) to the joints when necessary. Carefully align and press the pieces together, making sure the corners are square. Hold or clamp the box until the adhesive sets.
Complete the Laser Task
Once the glue is fully dry, your glasses box is ready to use. You can leave it minimalistic, or add finishing touches such as varnish, paint, or even personalized laser engravings on the surface for decoration.