How to Make a Simple Radar Using Ultrasonic Sensors
by MrSottong in Circuits > Arduino
595 Views, 3 Favorites, 0 Comments
How to Make a Simple Radar Using Ultrasonic Sensors

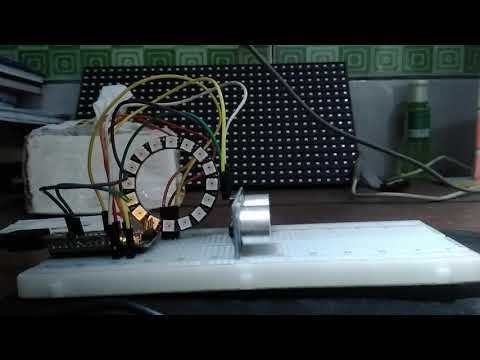
In this article I will make a simple radar using Arduino Nano. The purpose of this radar is, when there is an approaching item, the LED will light. and when there is no object approaching, the LED will off.
I use an ultrasonic sensor to detect approaching items. and for the display I used RGB ring WS2812.
I suggest reading the 2 articles below first before continuing reading this article.
Required Components


This is a list of components prepared to make this simple radar:
- HC-SR04 Ultrasonic sensor
- 16 Bit WS2812 RGB LED.
- Arduino Nano V3
- Jumper Wire
- project board
Library required:
Assemble All Components


follow the instructions below to assemble all the components:
Arduino to Ultrasonic Sensor
+5V => VCC
D11 => Trig
D12 => Echo
GND => GND
Arduino to Neo Pixels
D6 => IN
+5V => VCC
GND => GND
Programming
Enter the sketch below into the sketch that you made. then click upload
#include
#ifdef __AVR__ #include #endif#define PIN 6
#define NUMPIXELS 16
Adafruit_NeoPixel pixels(NUMPIXELS, PIN, NEO_GRB + NEO_KHZ800);
const int trigPin = 12; const int echoPin = 11; long duration; int distance;
void setup() { #if defined(__AVR_ATtiny85__) && (F_CPU == 16000000) clock_prescale_set(clock_div_1); #endif
pixels.begin(); pixels.setBrightness(10);
pinMode(trigPin, OUTPUT); // Sets the trigPin as an Output pinMode(echoPin, INPUT); // Sets the echoPin as an Input Serial.begin(9600); // Starts the serial communication
}
void ultra (){ digitalWrite(trigPin, LOW); delayMicroseconds(2);
digitalWrite(trigPin, HIGH); delayMicroseconds(10); digitalWrite(trigPin, LOW);
duration = pulseIn(echoPin, HIGH);
distance= duration*0.034/2;
Serial.print("Distance: "); Serial.println(distance); } void loop() {
ultra();
if(distance < 8){ for(int i=0; i 8) { for(int i=0; i
Downloads
Result

the results can be seen in the video above
When an object approaches. The red LED will turn on.
thank you for reading this article, if you have questions just write it in the comments column.