How to Make a Multiplayer Game With Arduino Controllers
by Abbad Hossam in Circuits > Arduino
1037 Views, 2 Favorites, 0 Comments
How to Make a Multiplayer Game With Arduino Controllers
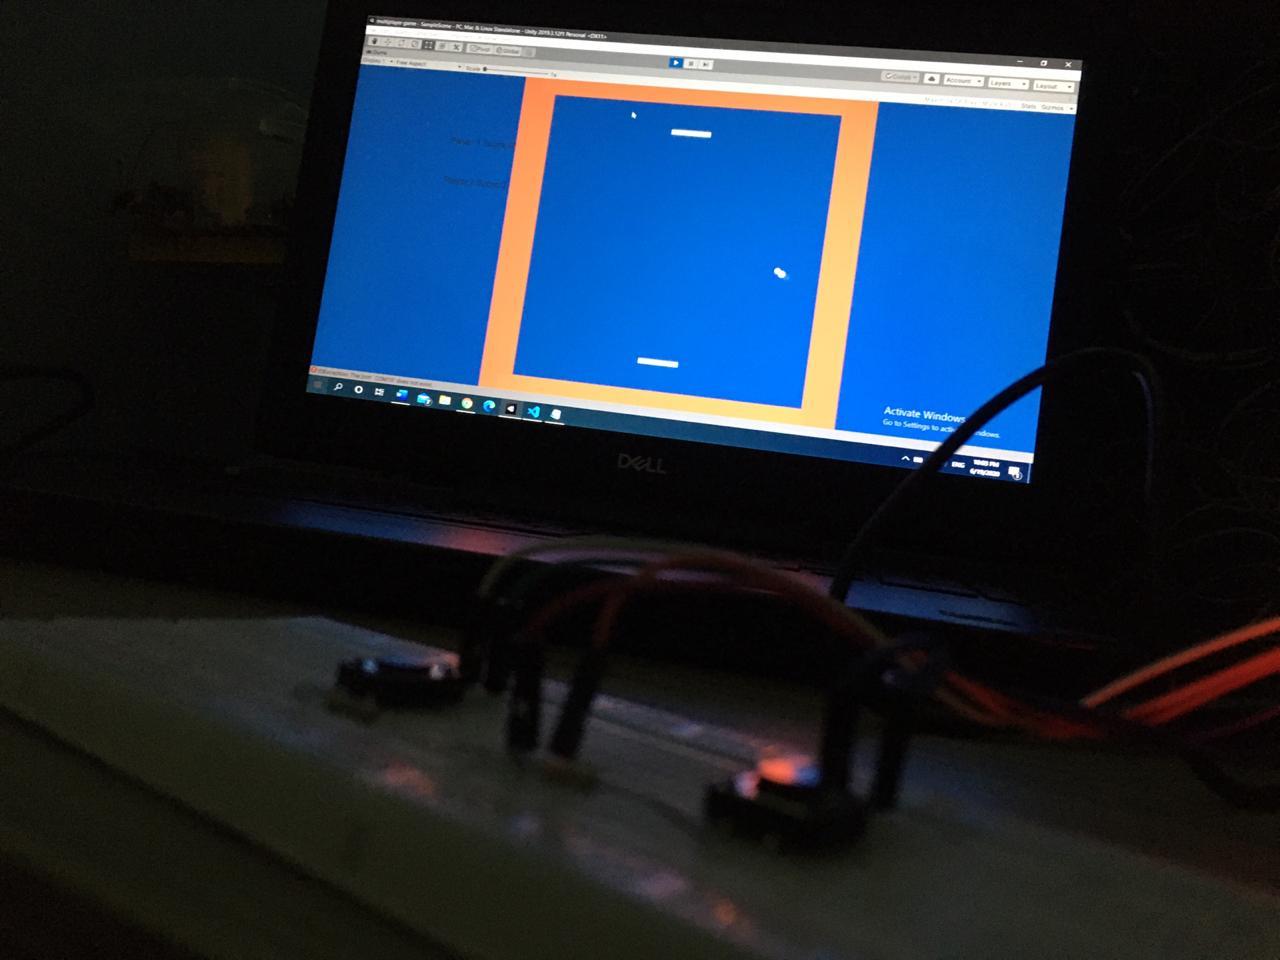
Have you ever wondered how game developers create amazing games that people worldwide enjoy playing? Well, Today I am going to give you just a small hint about it by making a small multiplayer game that will be controlled by either an Arduino controller that you will also make. So, let us get started.
Supplies
You will need:
- A Laptop
- Unity Engine
- A C# IDE that works with Unity such as visual studio or Atom. (I will be Using Visual Studio Code)
- 2X Arduino Nano
- 2X Big Bread Board
- 2X Small Bread Board
- 4X Tack Switch (Push Button)
- 4X 200Ω Resistor
- 12X Male to Male Jumper Wires
- Arduino IDE
It will be helpful if you have a basic understanding of using Unity, however it will not affect your progress as you will get familiar with it while going on with making the game.
Link for downloading Unity Engine:
https://store.unity.com/download-nuo
Link for downloading Visual Studio Code IDE:
https://code.visualstudio.com/download
Link for downloading Arduino IDE:
Setup the Game's Borders
First of all, you need to download unity
Once that is done you can start setting up your game’s view.
Open a new Unity project, name it and select 2D game.
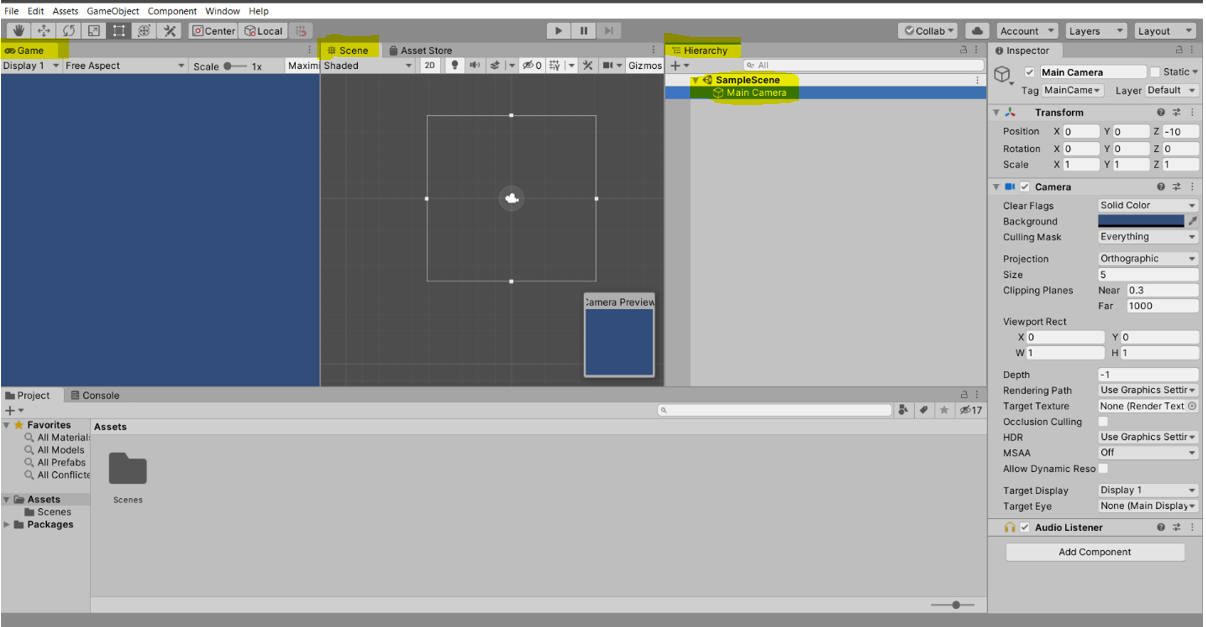
When the project opens, notice that there are 3 main sections called
- Hierarchy (this is where all your game objects and details will be added).
- Scene (where you setup the game’s view).
- Game (where you can test how the real game will go like).
Notice that under the hierarchy there’s your scene and under the scene there’s the “Main Camera”. When you select the camera from the hierarchy it will be selected in the scene
(Anything within the borders of this camera will show in the real game).
Look at picture 1
Our game consists of two boards, a ball that moves around,
and borders that limit the movement of the boards and the ball.
Let’s start by creating the borders.
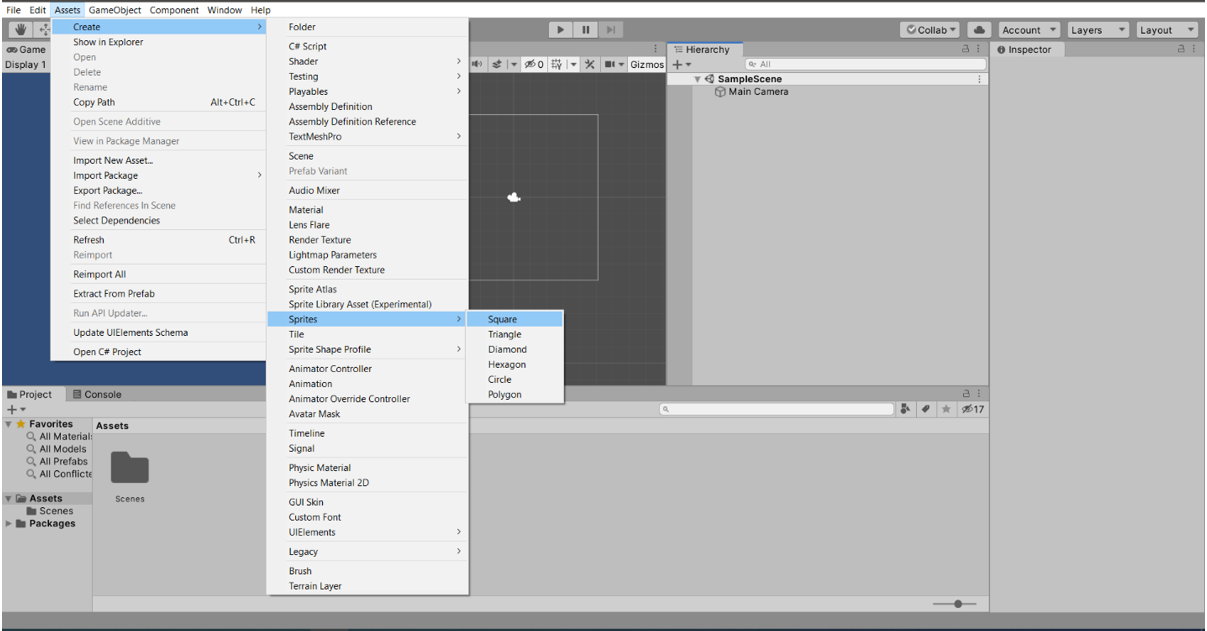
- To create a new game object, select Assets>Create>Sprites>square (name it “right and left borders”) Look at picture 2
- Drag and drop right and left borders to the hierarchy and a square will appear in the scene.
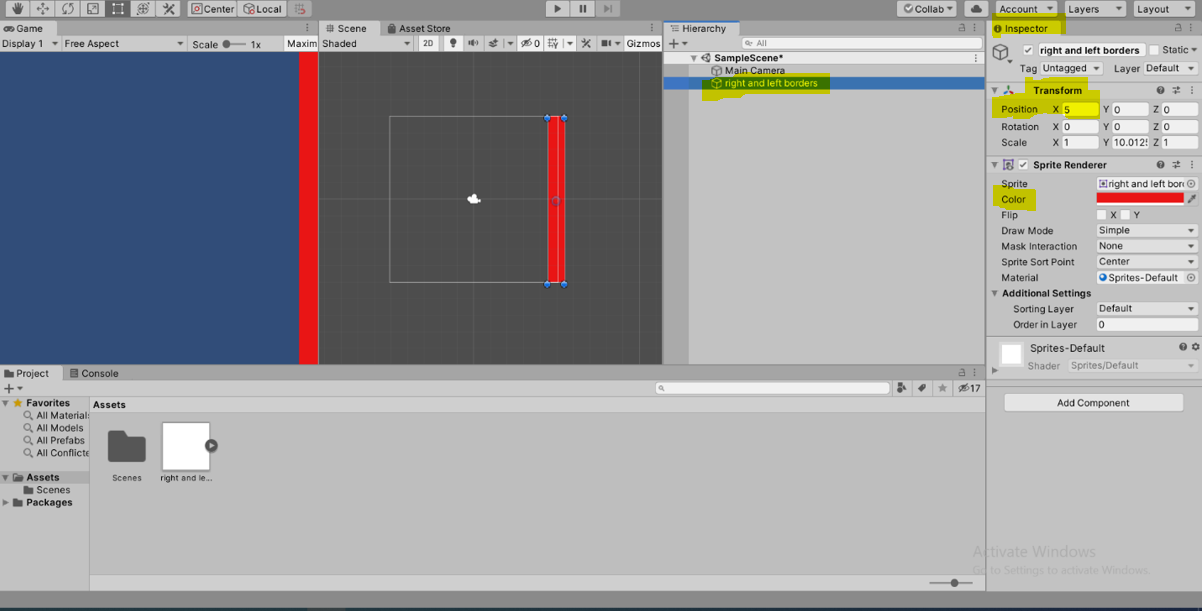
- Adjust its x axis position to (5) “right and left borders”>inspector>transform>position>X. Look at picture 3
- Then adjust its scale so its big enough to cover the camera’s borders (drag the upper and lower sides of the square to stretch it).
- Adjust its color “from right and left borders”>inspector>sprite render>color. Look at picture 3
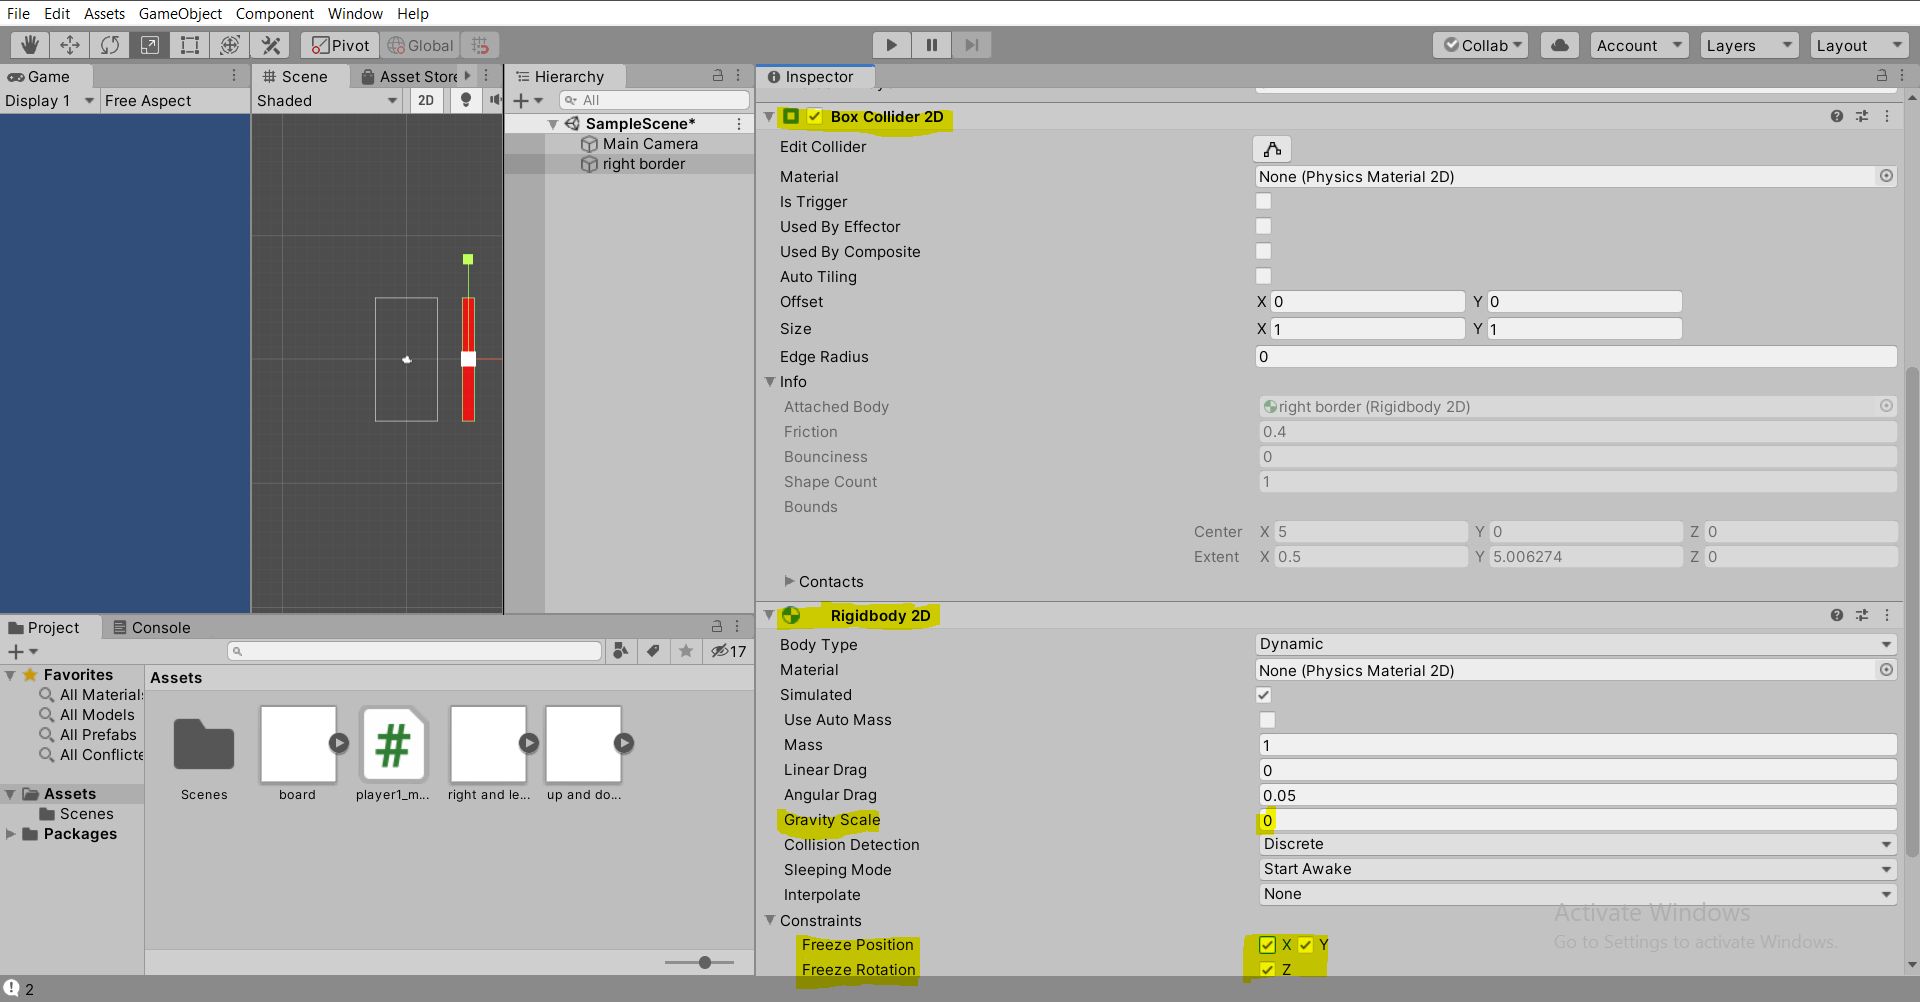
- Scroll down in the inspector and select add component then type Rigidbody2D and press enter, this will basically add physics to your game object as it gives it mass,gravity and collision detection. However we don't need gravity in our game so make the gravity 0 instead 1. You will also need to freeze the position and rotation so the border doesn't move when it's collided. Look at picture 4
- select add component then type Box Collider 2D and press enter this will add an area around the game object where collisions can be detected. Look at picture 4
- Now select right and left borders and press (ctrl+d) to duplicate it.
- Rename it “left border” and rename the first one (“right border”).
- Select left border and adjust its x axis position to (-5) with the same way in step 3. Now you have right and left borders.
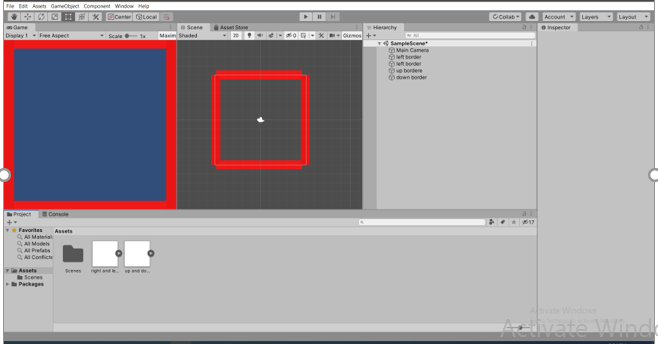
Repeat the previous 10 steps with the up and down borders and change the square’s y position instead of the x position. The final preview should be something similar to the one in the picture.
Look at picture 5
Adding Boards and Making Controllers
Adding Boards
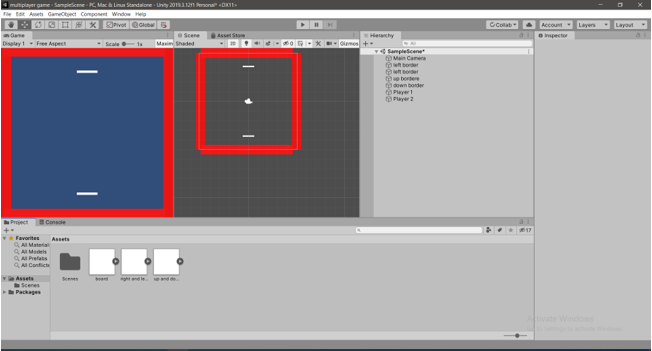
Make a new game object and name it player 1.
Adjust:
- Scale: X(1.2), Y(0.15), Z(1)
- Position: X(0), Y(-3.6), z(0)
- Add BoxCollider2D
- Add Rigidbody 2D and freeze the y and z axes.
Duplicate(ctrl+d) and rename the copy player 2.
Adjust:
- Scale: X(1.2), Y(0.15), Z(1)
- Position: X(0), Y(3.6), z(0)
- A BoxCollider will be already there.
- A Rigidbody 2D will already be there and the y and z axes will be already freezed.
Look at picture 1
Making Controllers
You will need:
- 2X Arduino Nano
- 2X Big Bread Board
- 2X Small Bread Board
- 4X Tack Switch (Push Button)
- 4X Resistor
- 12X Male to Male Jumper Wires
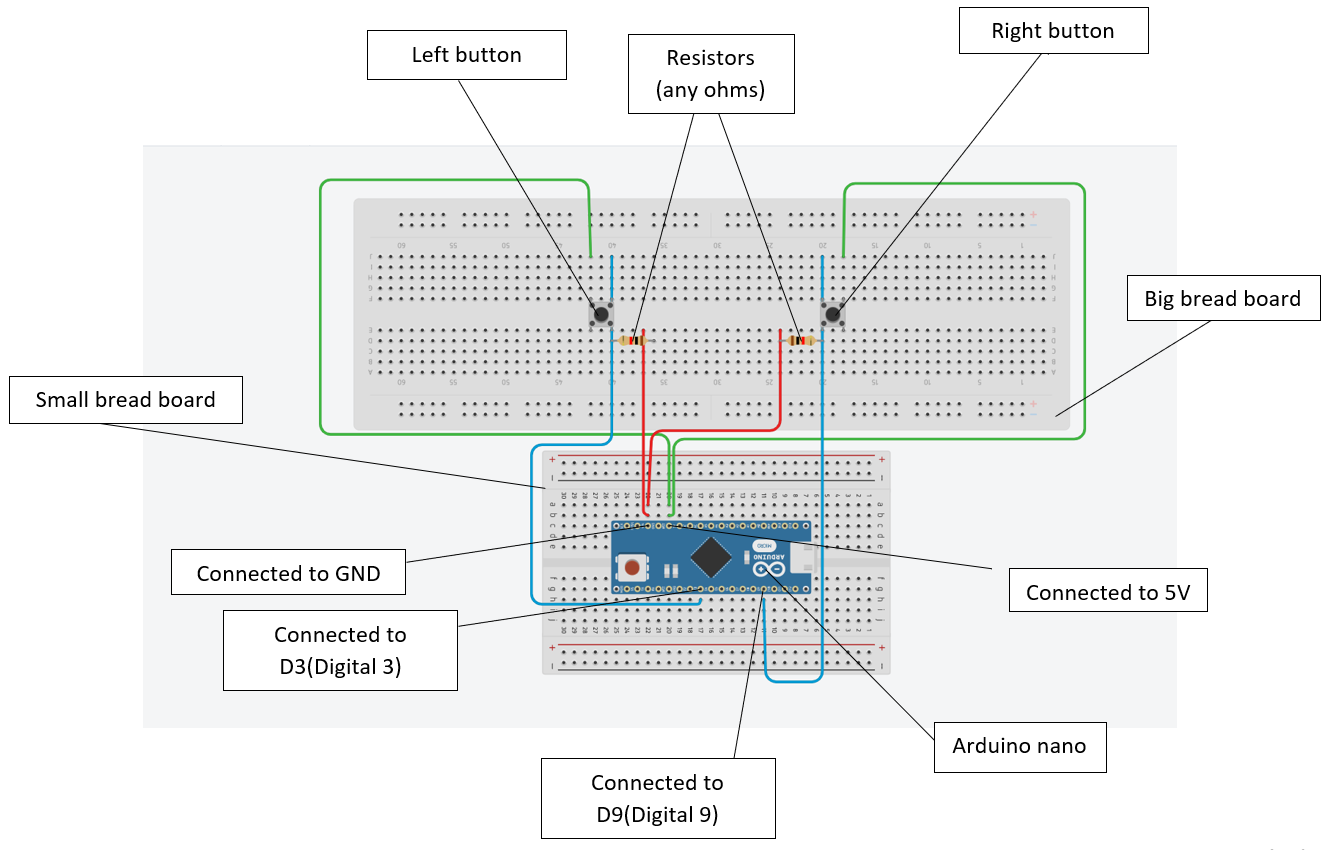
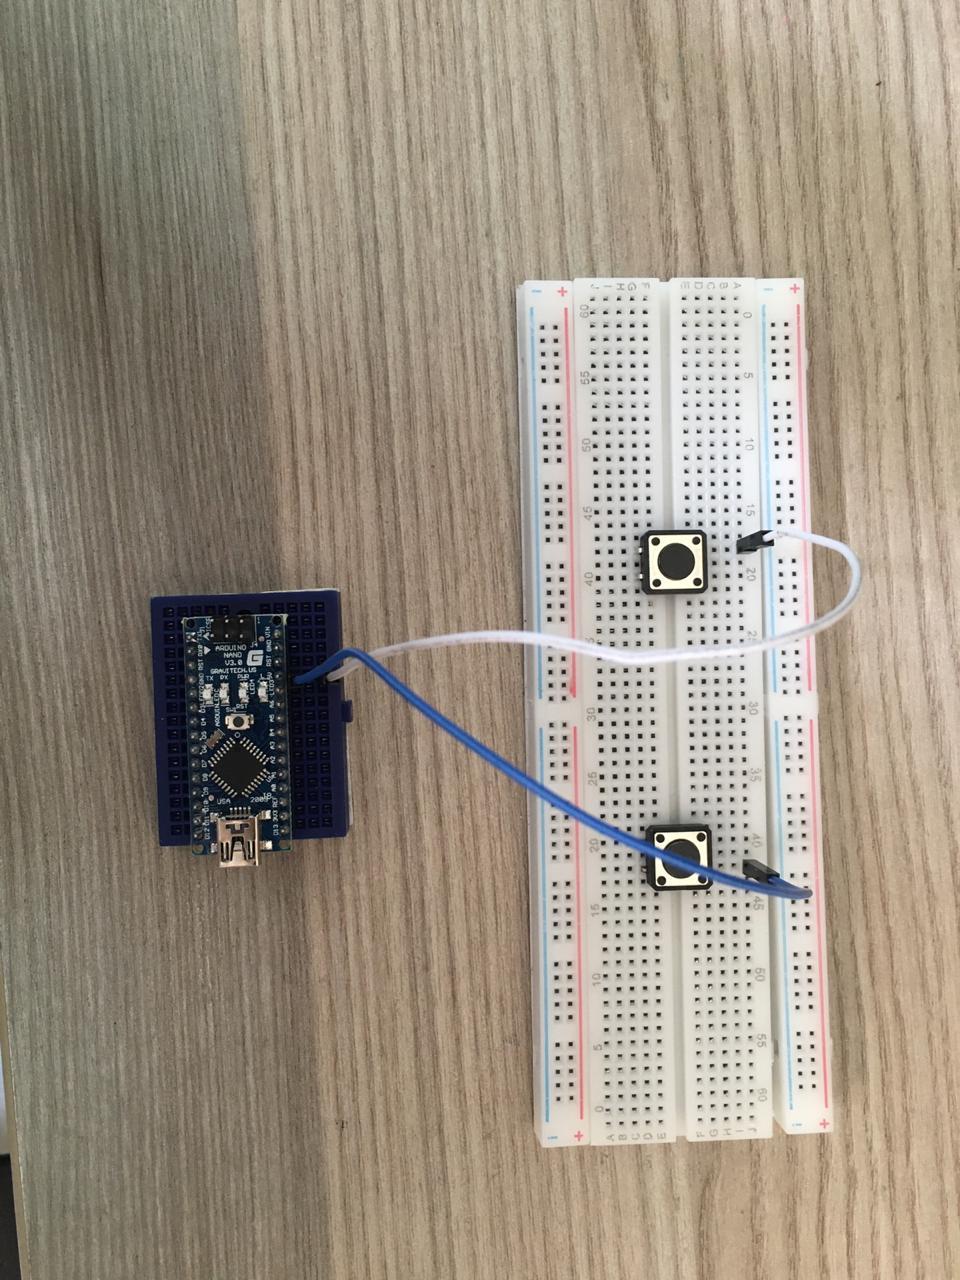
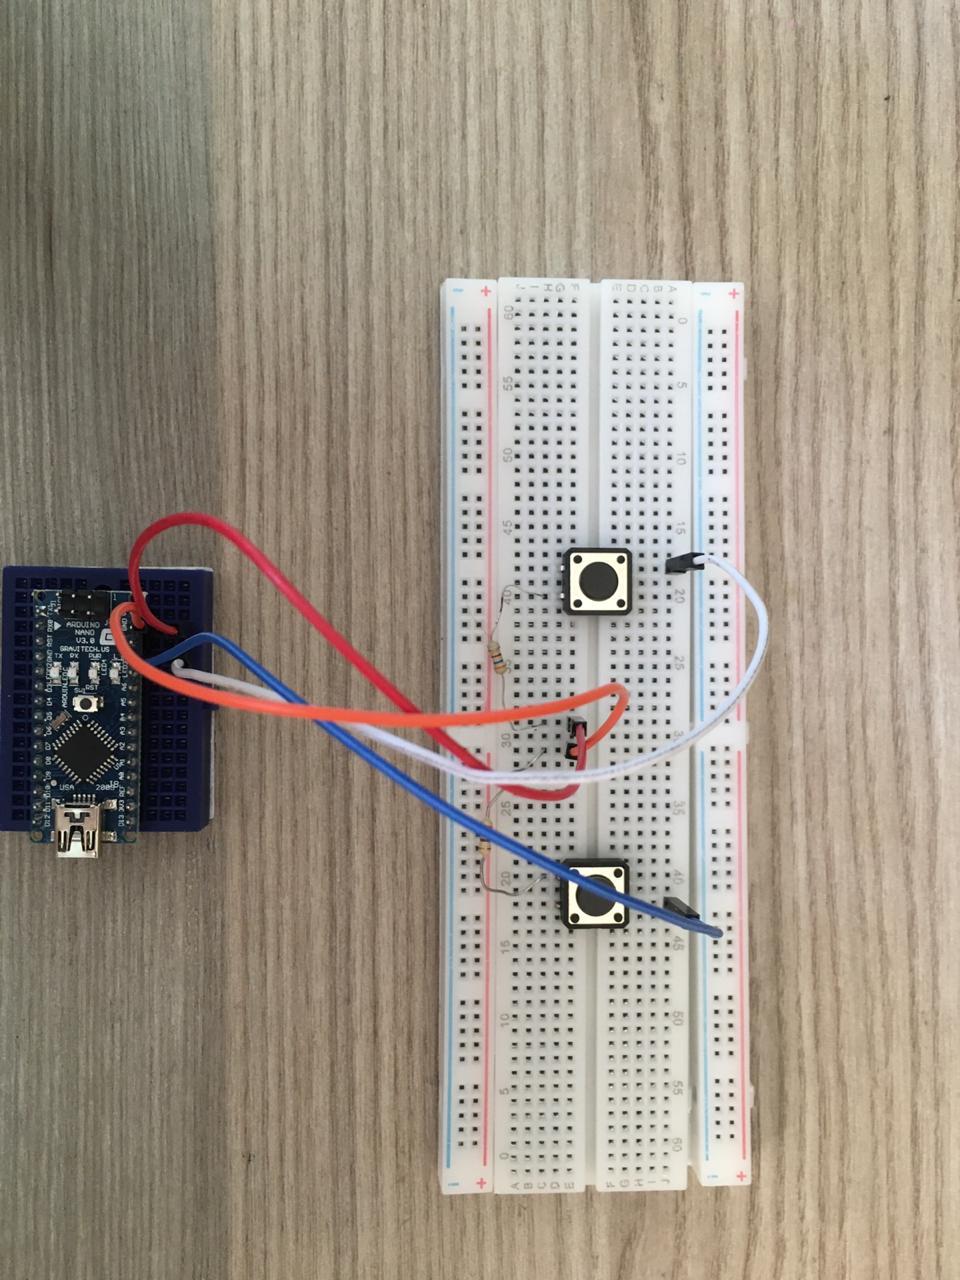
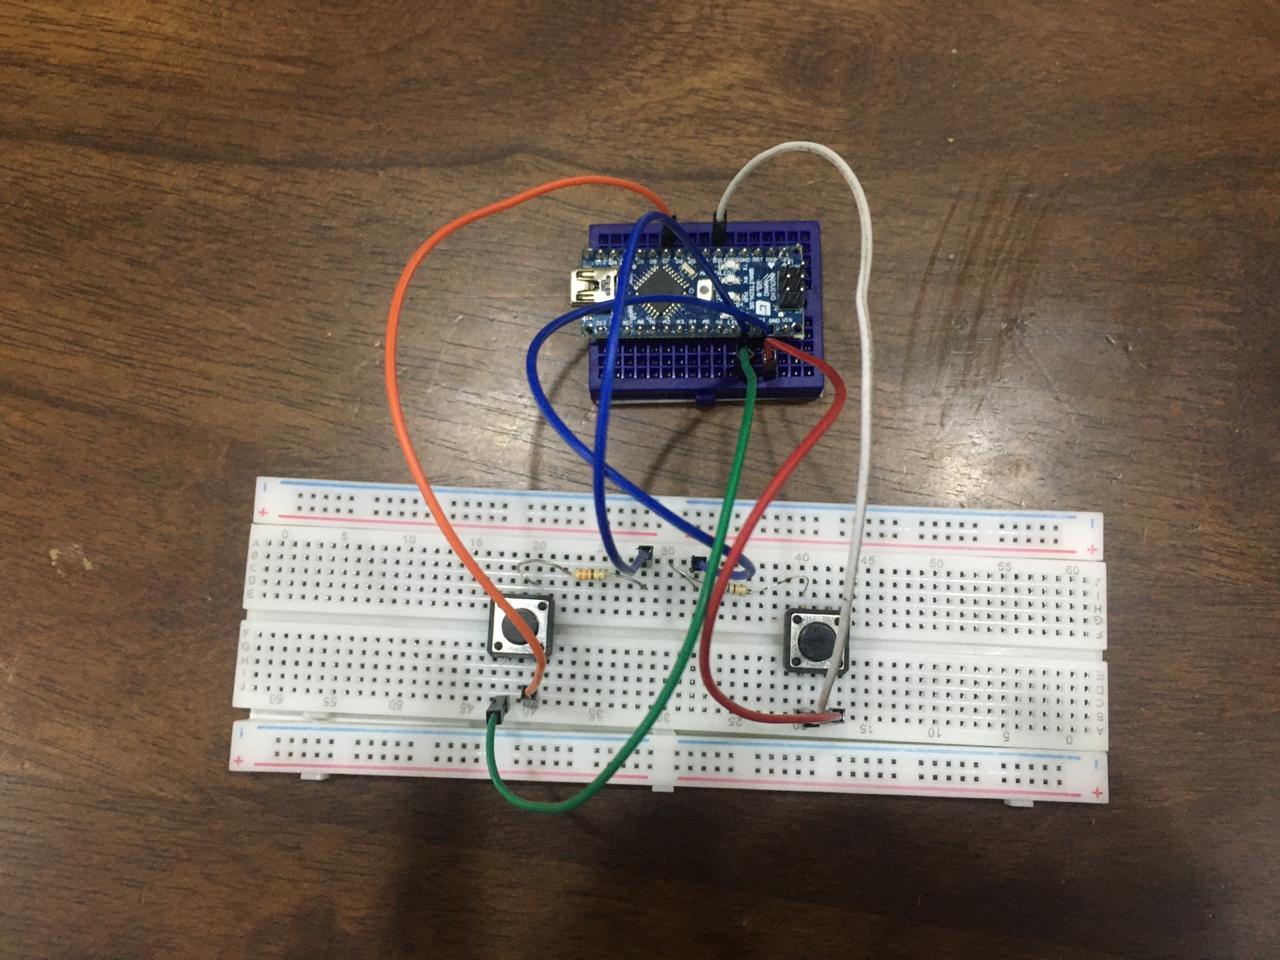
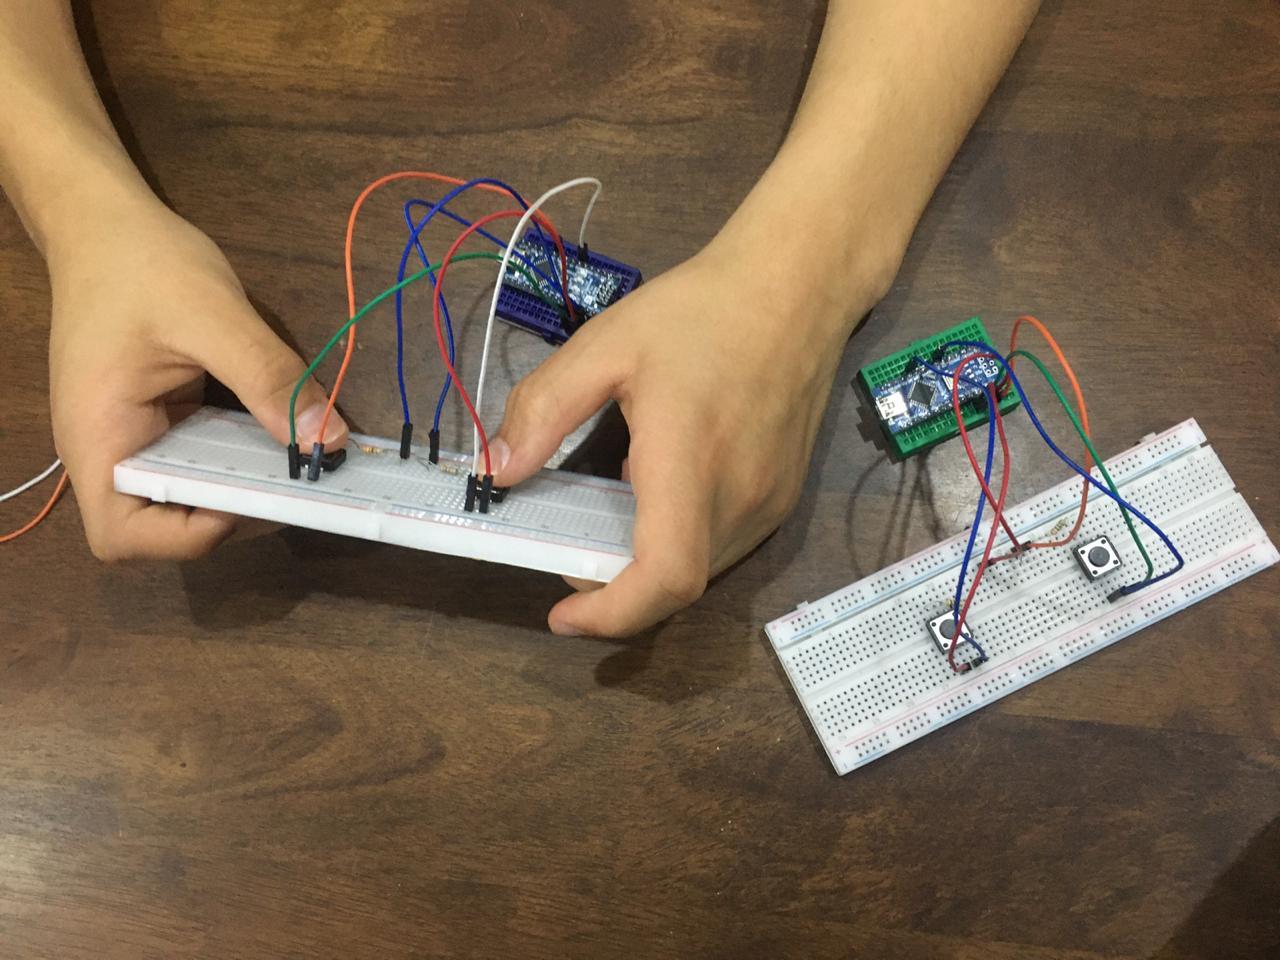
Now look at the bread board photos and mapping to assemble the joysticks.
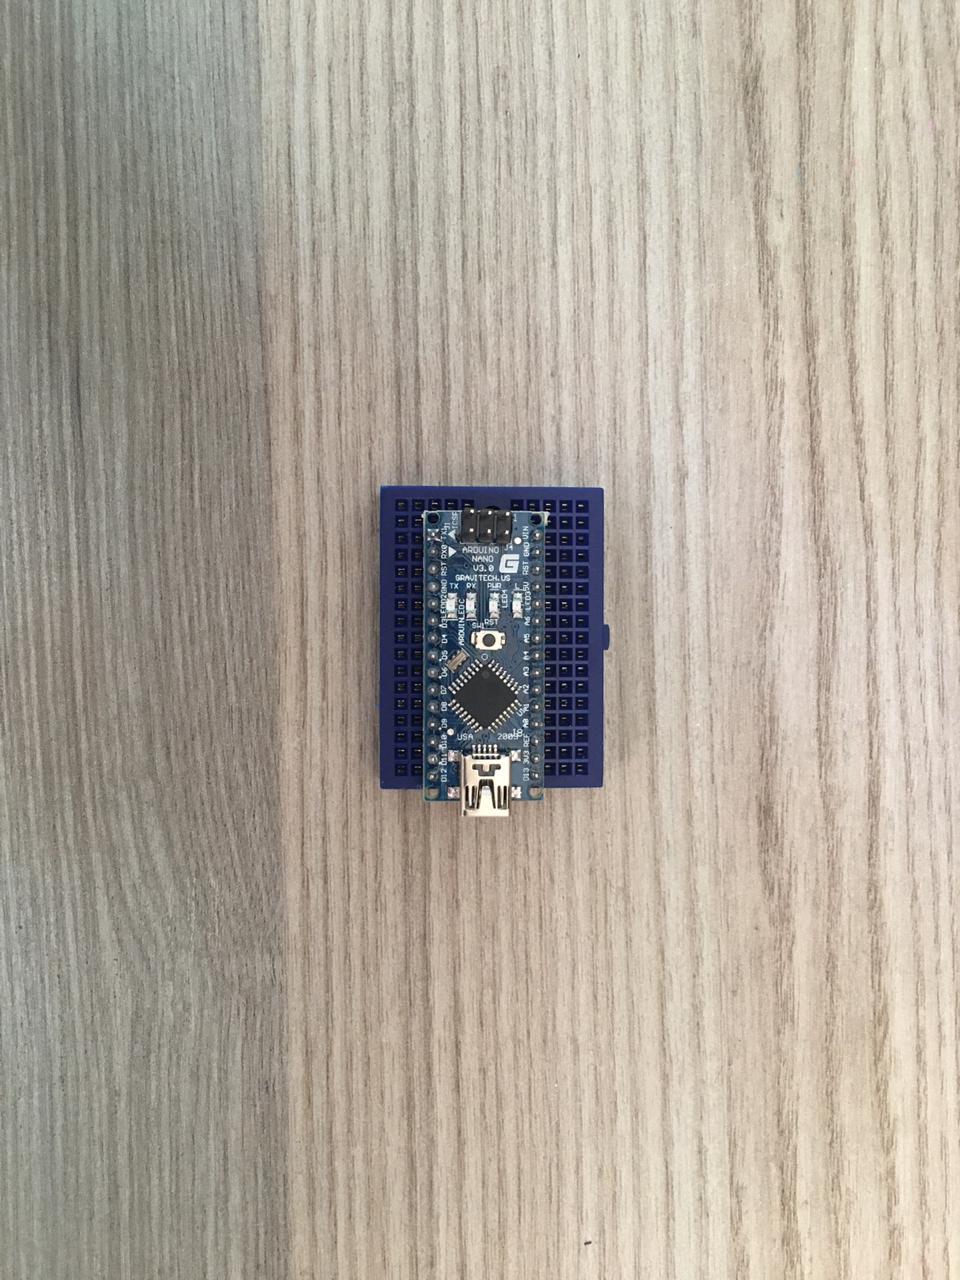
- Attach one Arduino Nano chip with a small bread board.
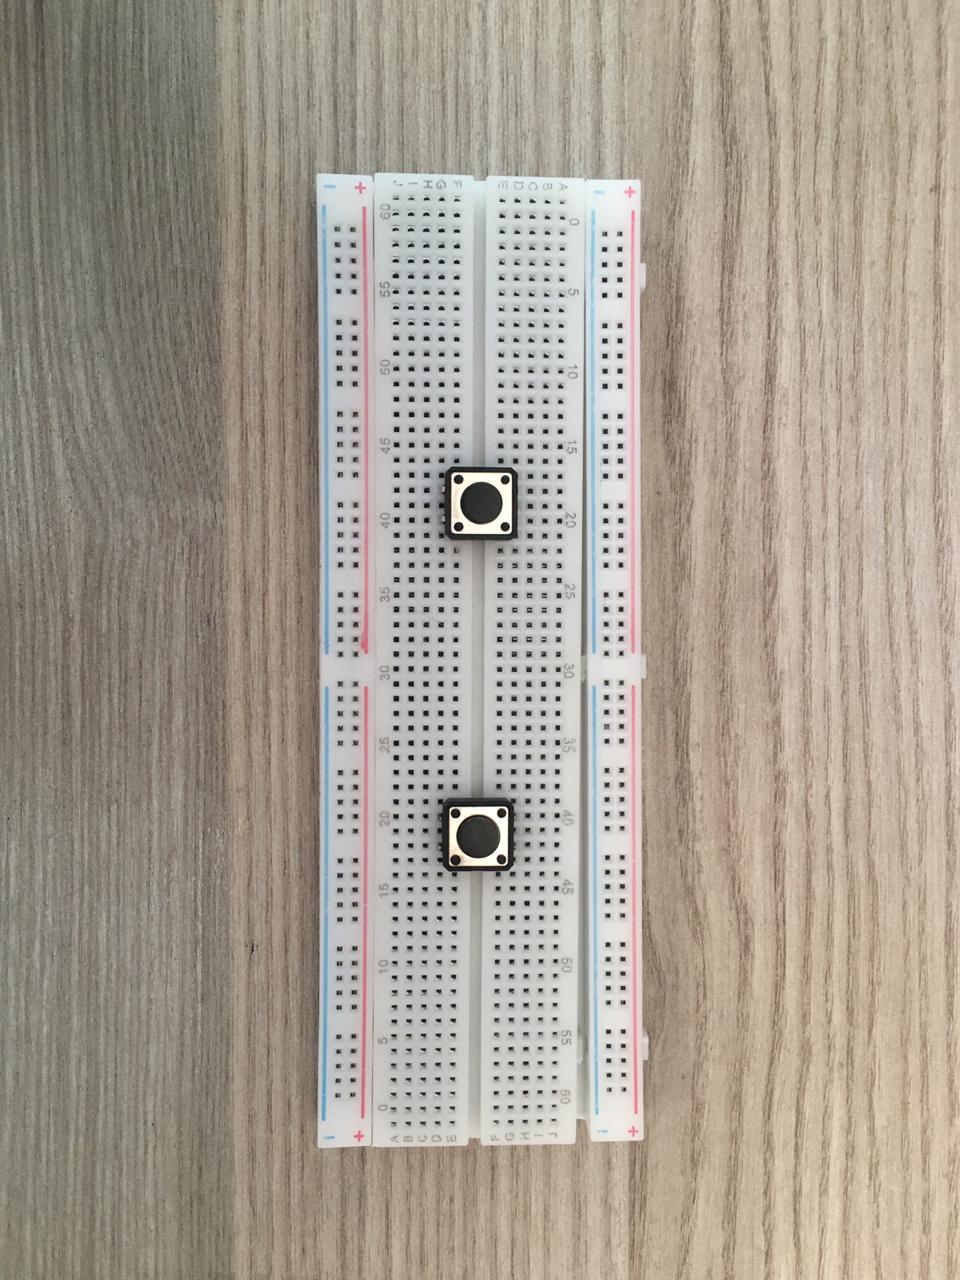
- attach 2 Tack switches on the big bread board as shown in the picture.Try to keep the right hand side of the bread board symmetrical to the left hand one as this will make the joystick look better (You can use the 30th column as a symmetry line)
- Connect the top-left pin of the left button with the 5V pin in the Arduino on the small bread board(things that are connected with the same column in the breadboard are connected to each other).
- Connect the top-right pin of the right button with the 5V pin in the Arduino.
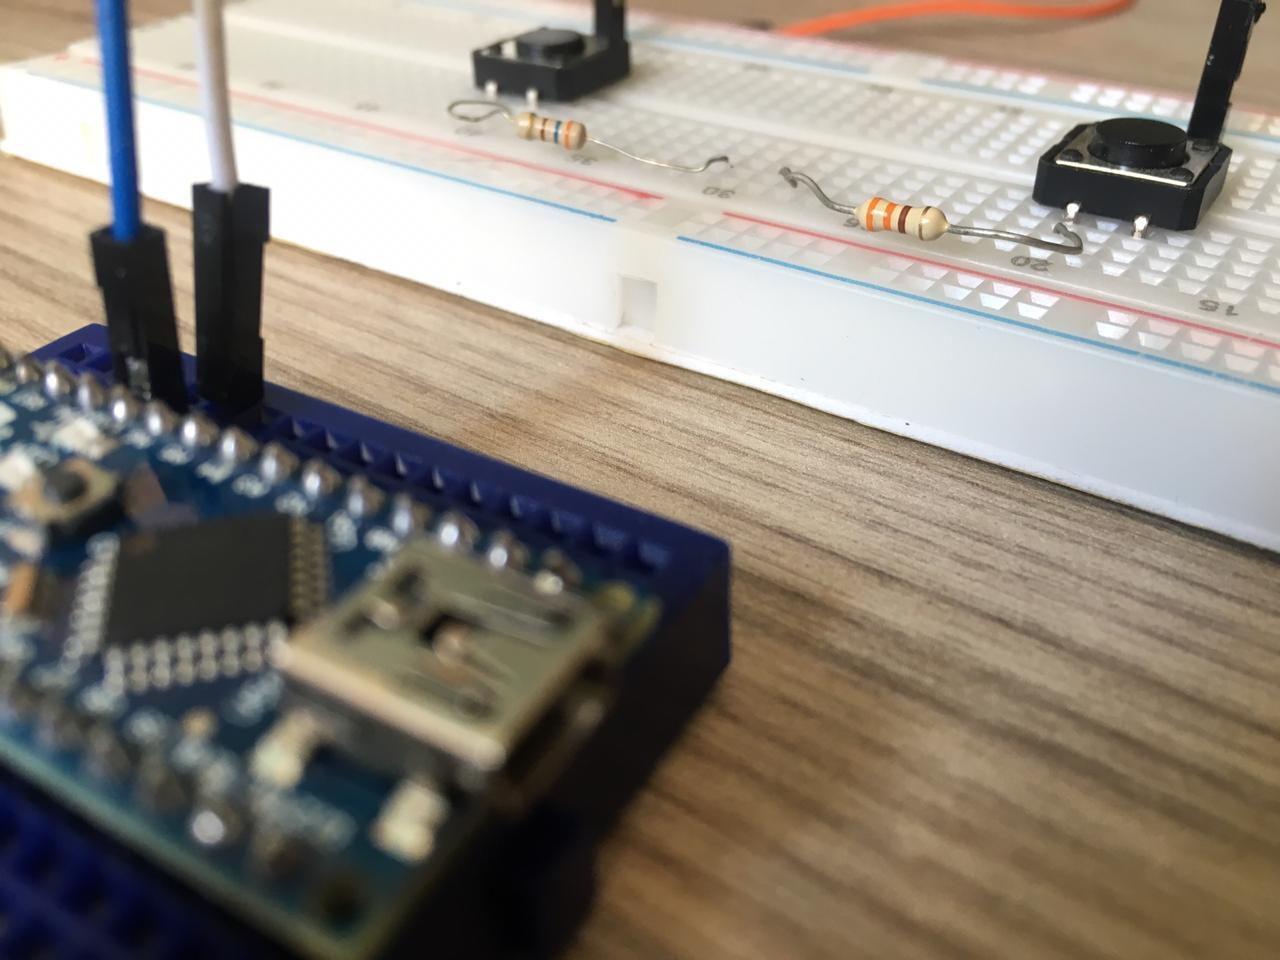
- Connect the bottom-right pin of the left button with a point on the 31st column using a resistor.
- Connect the bottom-left pin of the right button with a point on the 29th column using a resistor.
- Connect the resistors with the GND pin in the Arduino.
- Connect the top-right pin of the left button with the D3 pin in the Arduino.
- Connect the top-left pin of the right button with the D9 pin in the Arduino.
- Now repeat these steps and make the second controller.
Connecting Arduino to the Serial Port
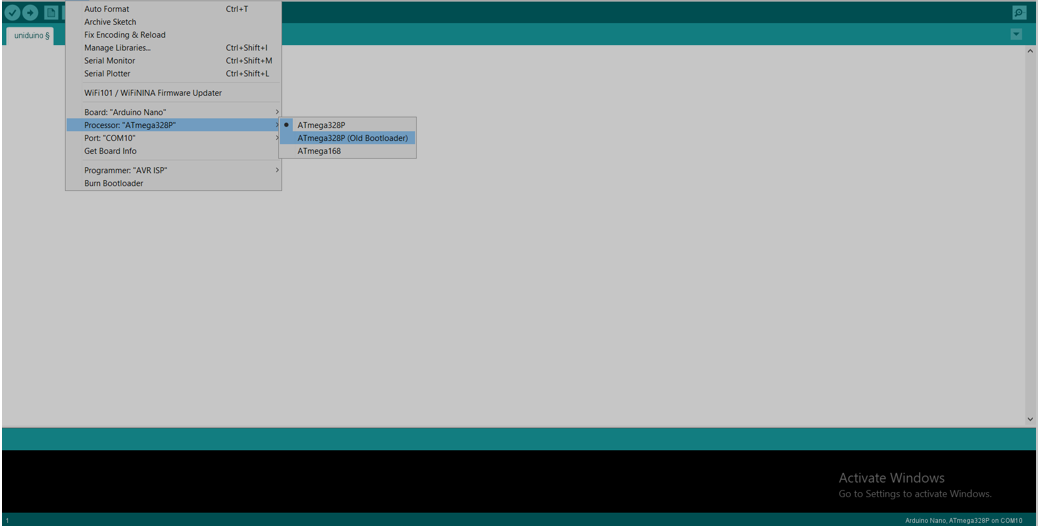
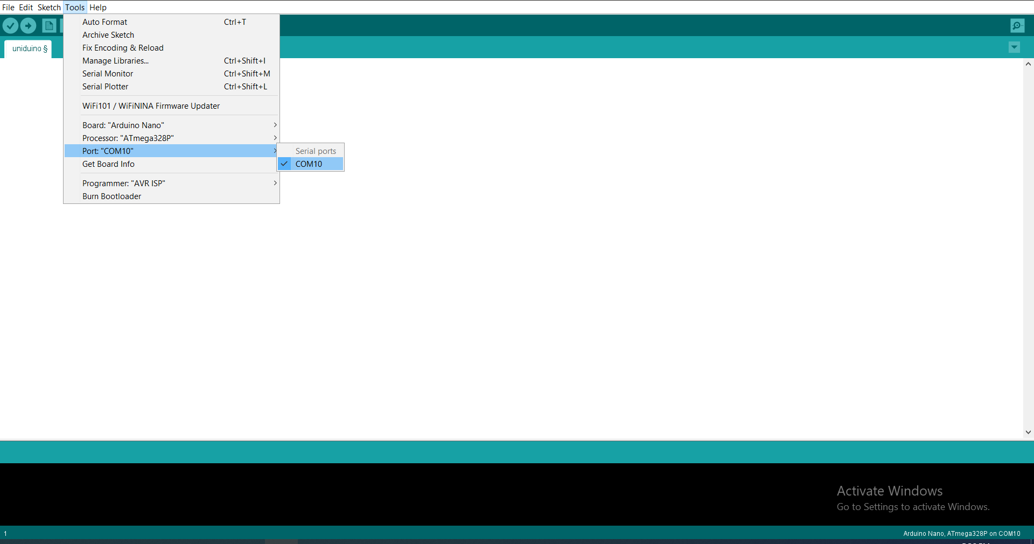
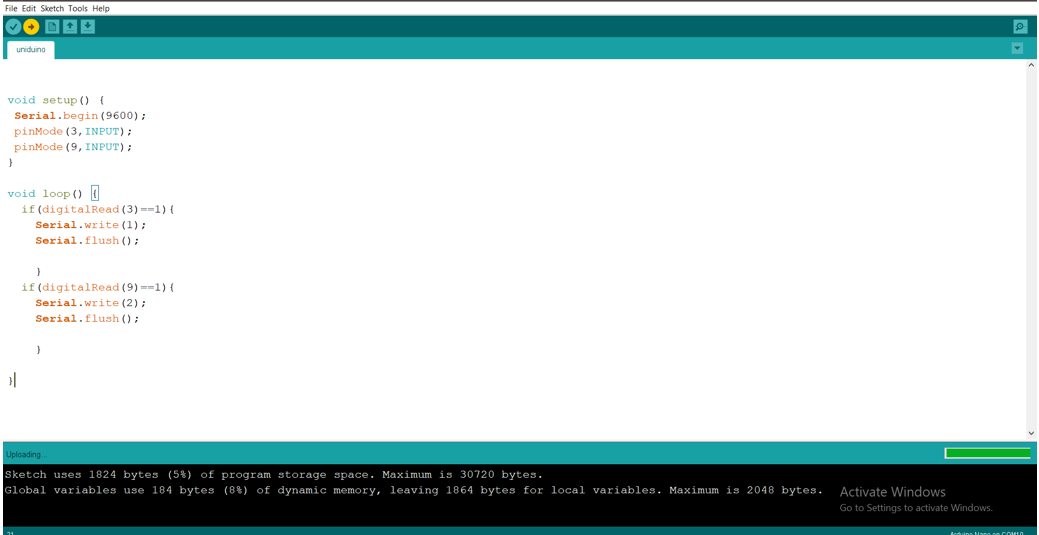
Firstly you will need to install the Arduino IDE.
Once they're installed, you can start off by making an Arduino program that receives inputs from the buttons and store them in a Serial port(COM port). When an Arduino board is connected to your laptop, the operating system automatically recognizes the board as a serial port, which programs can be uploaded to. The values stored in the serial port can be used in the next step when we connect Unity Engine with the serial port.
Now let's connect the Arduino with the Serial port.
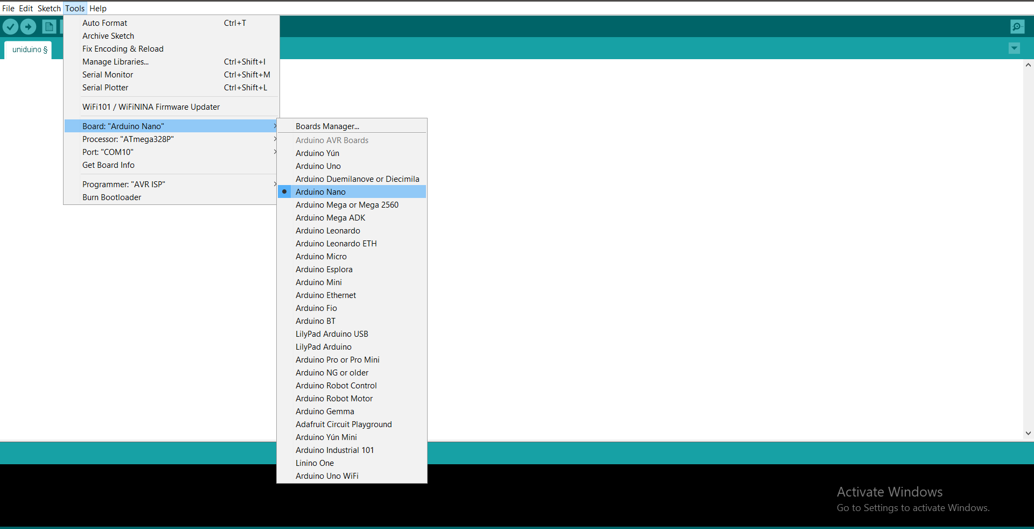
Look at the pictures
- Connect an Arduino with your laptop
- Tools>Board>Arduino Nano
- If your Arduino chip is recent(2018-2020) Tools>Processor>ATmega328P(Old Bootloader).
- If your Arduino chip is not recent(before 2018) Tools>Processor>ATmega328P
- Tools>Port>COM(whatever number appears, in my case it is 10). * This is the serial port where values will be stored.
- Copy the code and paste it in the Arduino IDE and press ctrl+u to upload the program.
- Repeat with the second Arduino. (when doing step 5 make sure to choose another COM port so both controllers won't be connected to the same serial port).
Code:
void setup() {
 Serial.begin(9600);
 pinMode(3,INPUT);        //Telling the Arduino to receive an input from pin D3
 pinMode(9,INPUT);	  //Telling the Arduino to receive an input from pin D9
}

void loop() {
  if(digitalRead(3)==1){		/* If the Arduino receives an input of 1
    Serial.write(1);				 from pin 3 Output a value of 1
						 to the serial port
    Serial.flush(); 			*/
    delay(2);

}


  if(digitalRead(9)==1){		/* If the Arduino receives an input of 1
    Serial.write(2);				  from pin 9 Output a value of 2
						  to the serial port
    Serial.flush();			*/
    delay(2);<br>
}
}
Program's explanation:
This code simply takes an input from the D3 pin and the D9 pin in the Arduino, which are connected to the buttons. The buttons are either pressed or unpressed which means that the readings that are taken from them are either 1(pressed) or 0(unpressed). If the input from the right button (from D9) is 1(pressed) store a value of 1 in the Serial port. If the input from the left button (from D3) is 1(pressed) store a value of 2 in the Serial port.
Connecting Unity With the Serial Port
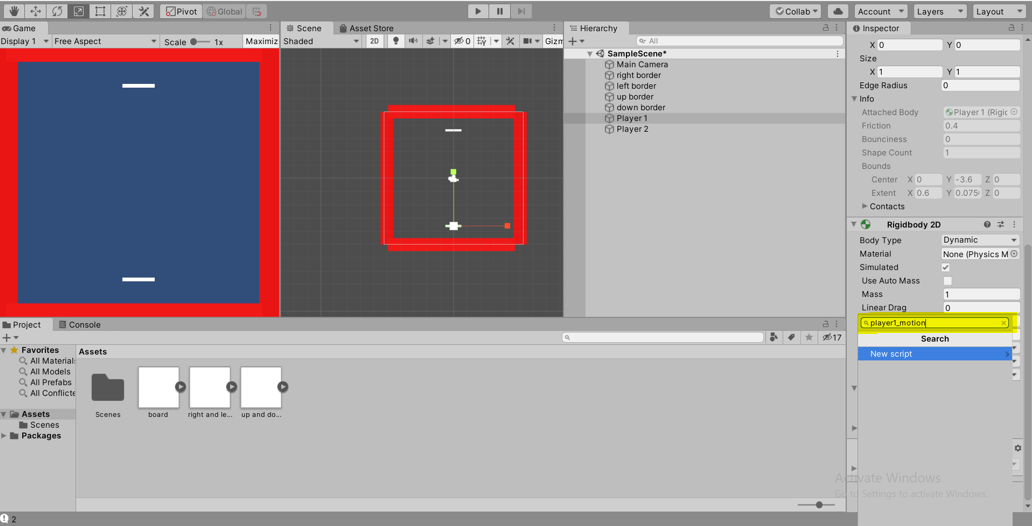
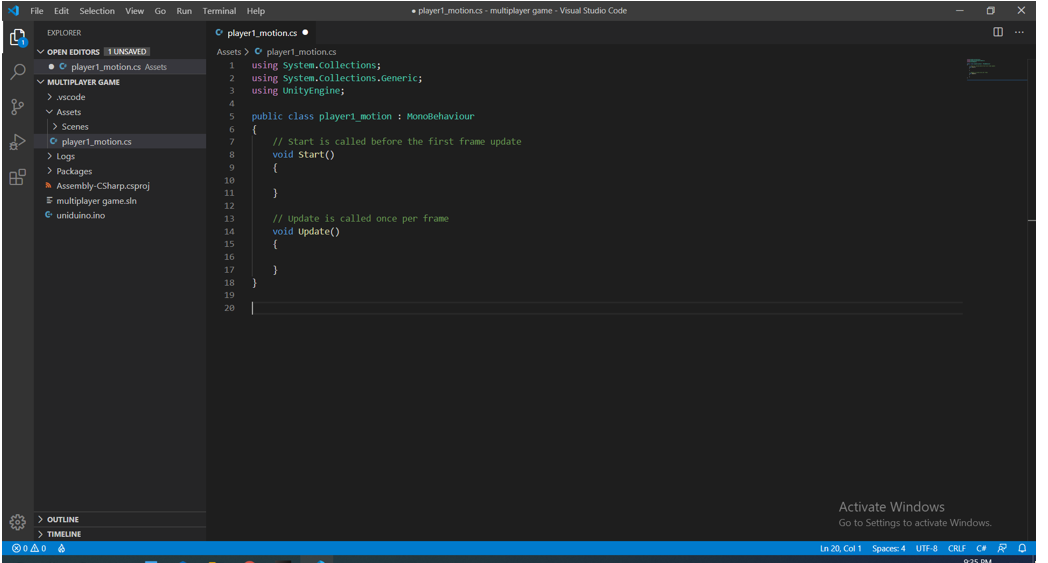
For this step we are going to identify the serial port in Unity so it can receive the inputs from Arduino when the buttons are pressed. Install Visual Studio Code on your laptop. Then go to Unity, select player 1 from the hierarchy, scroll down and select add component and type player1_motion then press enter. Look at picture 1
A C# script will be created in the inspector, right click on it and select edit script, visual studio code should open and will show a default code that looks like picture 2.
Copy the following code then change "SerialPort sp = new SerialPort("COM10",9600);" with SerialPort sp = new SerialPort("COM port that your Arduino is connected to",9600); you can find his by going back to your Arduino code and goning Tools>Port>COM(whatever number appears).
Code:
using System.Collections;
using System.Collections.Generic;
using UnityEngine;
using System.IO.Ports;

public class player1_motion : MonoBehaviour
{
    float speed = 8;
    private float amounttomove;
    SerialPort sp = new SerialPort("COM10",9600);
                                                        // Start is called before the first frame update
    void Start()
    {
      sp.Open();
      sp.ReadTimeout = 1;
    }
                                                       // Update is called once per frame
    void Update()
    {
          amounttomove = speed*0.01f;
          if(sp.IsOpen){
            try
            {
              moveObject(sp.ReadByte());
              print(sp.ReadByte());
            }
          catch(System.Exception){
          }
          }
    }
    void moveObject(int Direction)
    {
      if(Direction == 1){
        transform.Translate(Vector3.left*amounttomove, Space.World);
      }
      if(Direction == 2){
        transform.Translate(Vector3.right*amounttomove, Space.World);
      }
      }
    }
Code's Explanation:
This code tells unity to receive inputs from the serial port(COM 10). When the left button is pressed, the Arduino sends a value of 1 to the serial port, if unity receives 1 from the serial port, a velocity is added to the game object "player 1" in the left direction. When the right button is pressed, the Arduino sends a value of 2 to the serial port, if unity receives 2 from the serial port, a velocity is added to the game object "player 1" in the right direction. if the serial port doesn't receive a value from the serial port, no velocity is added in neither directions therefore, the board stays stationary.
After you copy the code press F5 to build and run the code. Go back to unity and press the play button, player 1 should move right when you press right and left when you press left.
Now, do the same steps once again but with player 2 and make sure to write in the 'Add component' player2_motion instead of player1_motion and to identify the second COM port that the second controller is connected to, not the same serial port.
You will also need to change "public class player1_motion : MonoBehaviour" to "public class player2_motion : MonoBehaviour" in the code itself.
Adding the Ball
- Add a new game object, but this time choose a circle instead of square.
- Rename it "ball".
- Drag and drop in the hierarchy.
- Adjust the scale (X:0.2 - Y:0.2 - Z: 0.2).
- Add a Rigidbody 2D and freeze the Z axis only.
- Change the mass to 0.0001
- Change the Gravity Scale to 0.
- Add a Box Collider 2D.
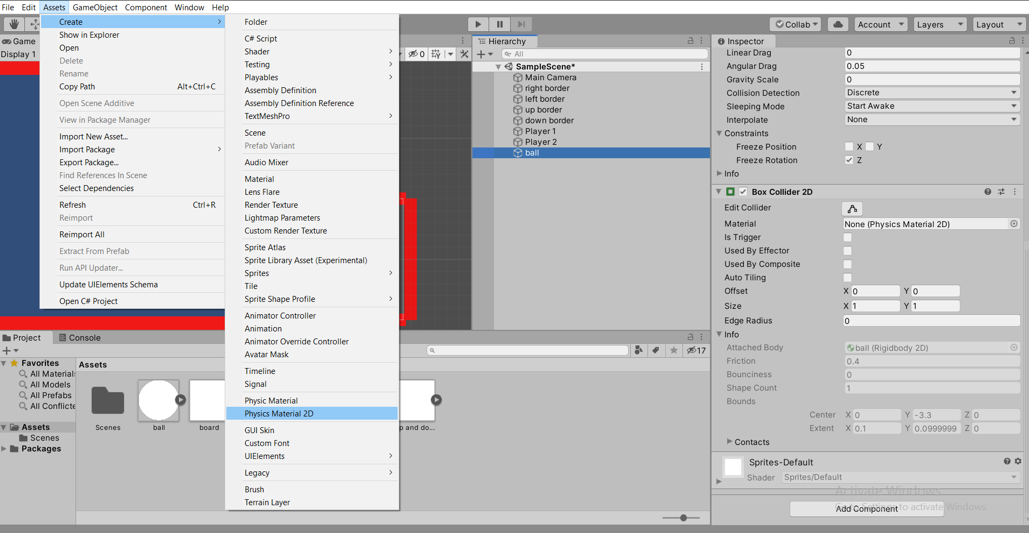
- Go to Assets>Create>Physics material 2D Look at picture 1
- change its name to "bounce"
- Change the friction to zero from the inspector
-
Change the bounciness to 1 from the inspector
-
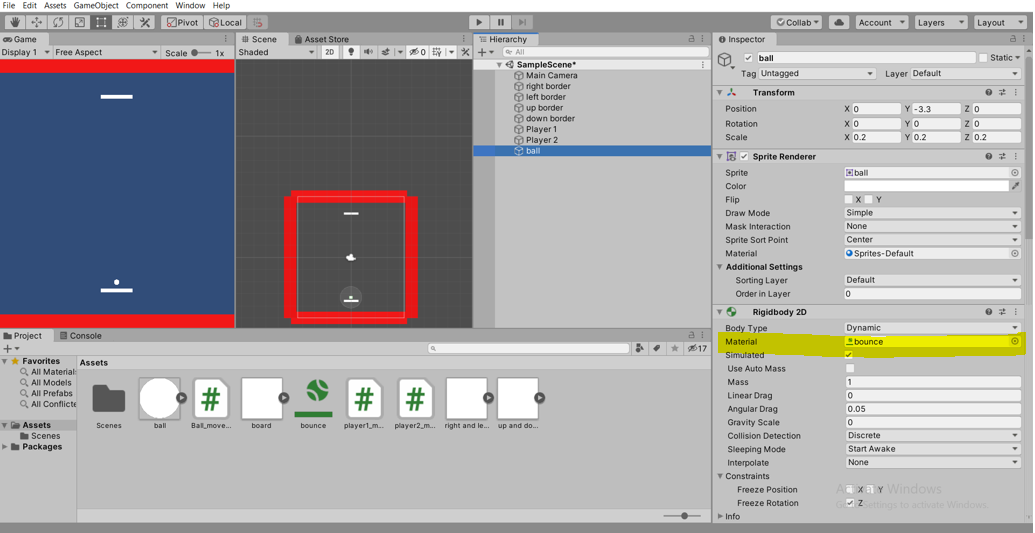
Drag and drop "bounce" into Rigidbody 2D>Material Look at picture 2
-
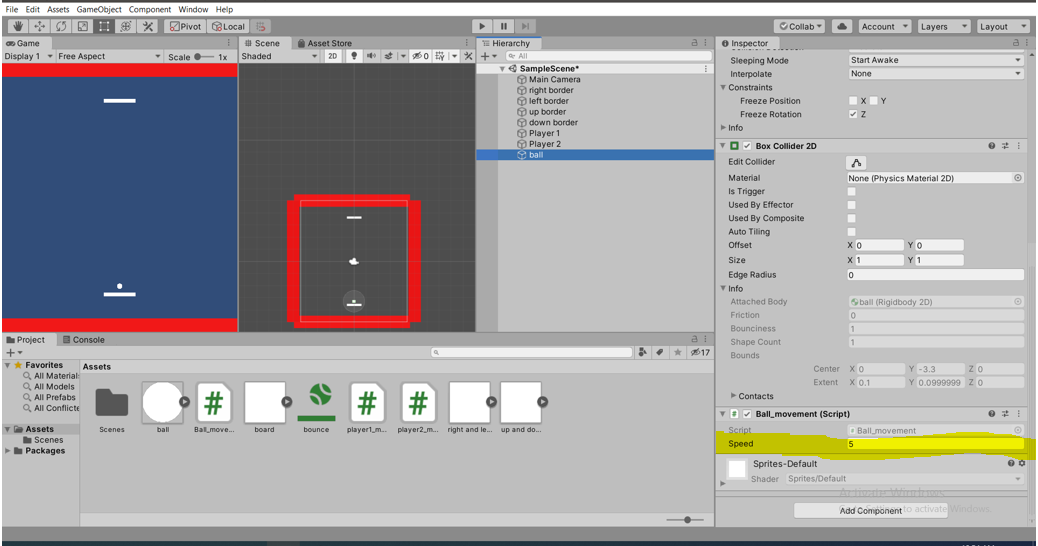
Select "ball" again from the hierarchy and go to add component and type Ball_movement then press enter.
- Right click on the script and select edit script.
- Copy the code below and press F5 to build and run it.
Code:
using System.Collections;
using System.Collections.Generic;
using UnityEngine;

public class Ball_movement : MonoBehaviour
{
    // Start is called before the first frame update
    private float force = 2;
    void Start()
    {
        StartCoroutine(move());
    }

    IEnumerator move()
    {
                yield return new WaitForSeconds(2);
                GetComponent<Rigidbody2D>().AddForce(new Vector2(1f,0.5f)*0.02f*force);
    }
}
Code' explanation
This code gives the ball a velocity in both directions the X direction and the Y direction with the same magnitude, which makes the ball move at a 45° angle. In step 8 we added a physics material to the ball and changed its bounciness, this maintains the ball's movement through out the game.
Finalizing the Game
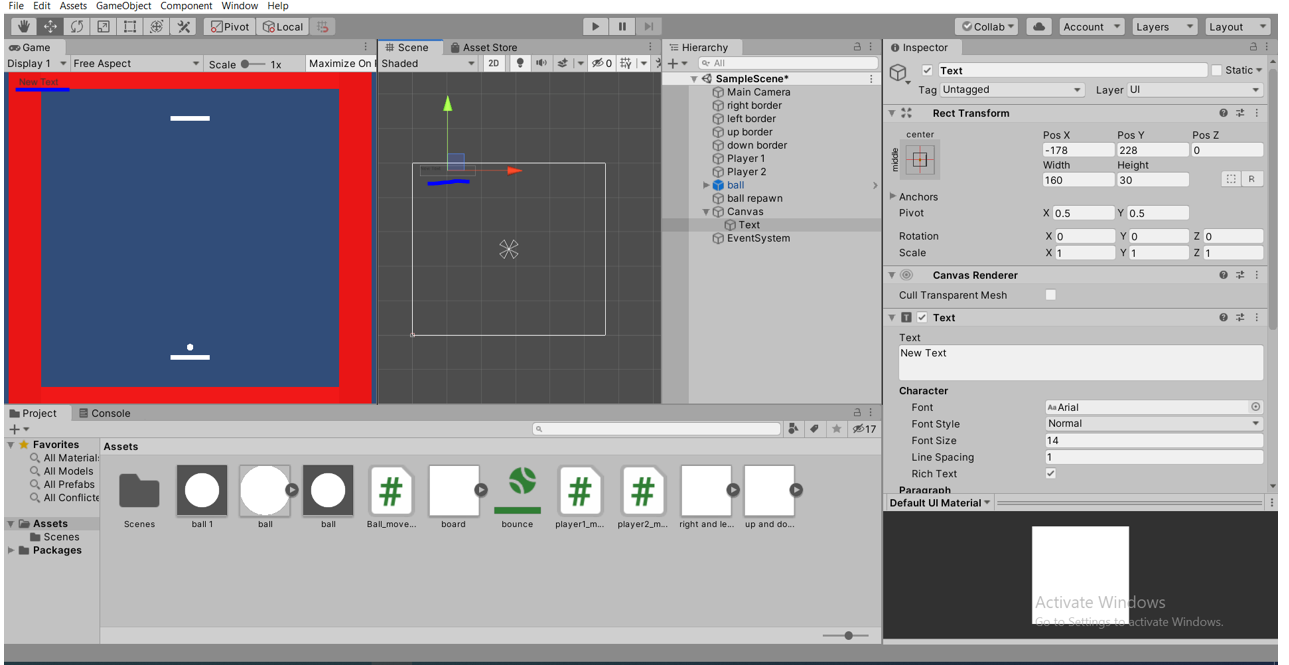
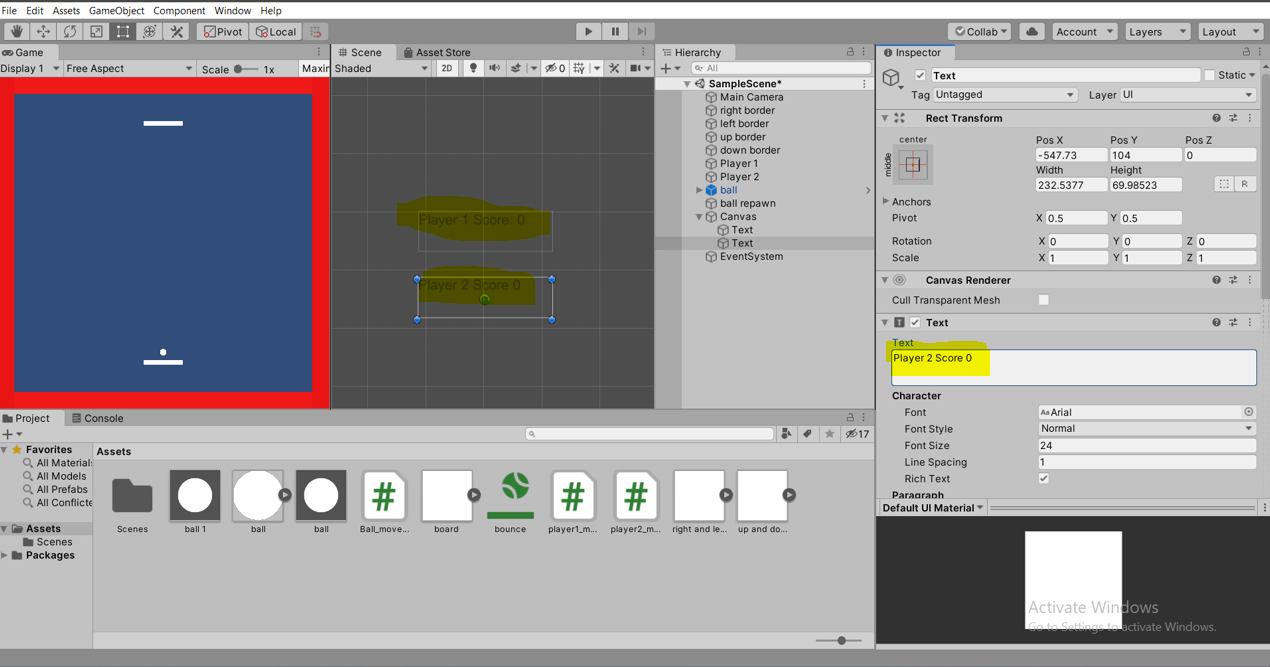
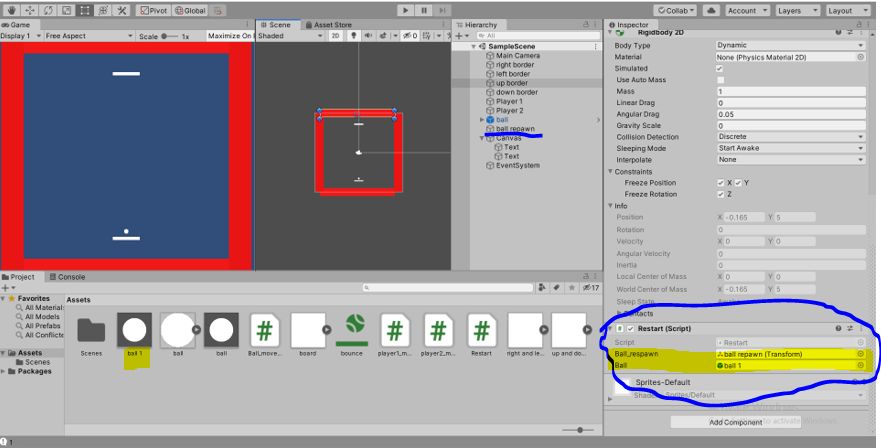
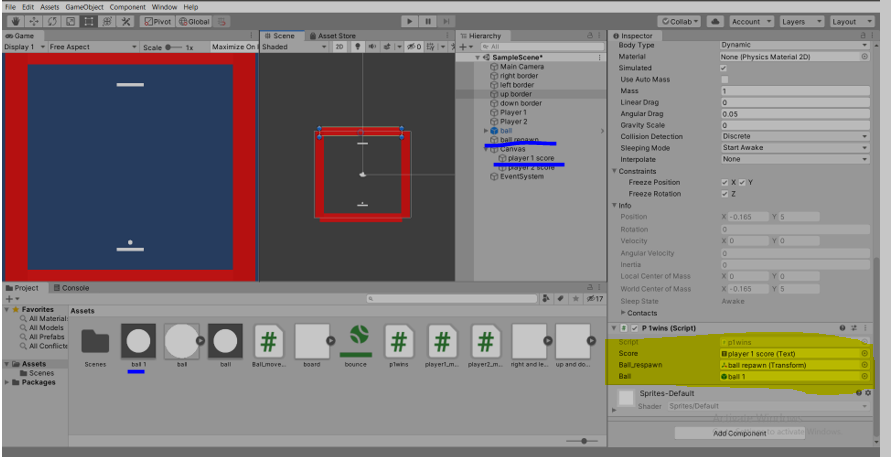
Now we need to make losing possible, if you run the game you'll notice that when the ball passes player 1 or player 2 it just bounces off the border and that isn't exactly what we need in our game. Instead we want to make a score counter that counts the score each time the ball collides with either the up or down borders and to reset the position of the ball.
- Drag and drop the ball from the Hierarchy to Project, You have made a prefab of the ball so you can use it later.
- Right click on the Hierarchy and select Create Empty. an empty Object will show up, rename it to ball respawn and change its position to be the same as the ball's position.
- Right click on the hierarchy and select UI>>Text. Notice that the text accompanies a canvas the position of the text in the game depends on the position of the text in the canvas, not in the borders of our game. (Look at picture 1).
- Change the position of the text to wherever you want it to be.
- Repeat steps 3 and 4 again for the score of the second player.
- Type in the first text "Player 1 Score: 0" and type in the second text "Player 2 Score: 0". (Look at picture 2).
- Create a script in the up border called p1wins and copy the following code.
Code:
    using System.Collections;
    using System.Collections.Generic;
    using UnityEngine;
    using UnityEngine.SceneManagement;
    using UnityEngine.UI;


    public class p1wins : MonoBehaviour
    {
        public Text score;
        public Transform ball_respawn;
        public GameObject ball;
        private int p1 = 0;
        // Start is called before the first frame update
        void Start()
        {

        }

        // Update is called once per frame
        void Update()
        {
            score.text = "Player 1 Score:" + p1;
        }

        void OnCollisionEnter2D (Collision2D other) {

            if(other.gameObject.tag == "Ball")
            {

                Destroy(other.gameObject);
                p1++;
                Instantiate(ball,ball_respawn.position,ball_respawn.rotation);
            }


        }

    }
8. Drag and drop the ball prefab fromproject in step 1 into the Ball parameter. (Look at picture 3)
9. Drag and drop the ball respawn from hierarchy to the Ball-rerspawn parameter. (Look at picture 3)
10. drag and drop player 1 score from hierarchy to the Score parameter. (Look at picture 3)
Code's Explanation:
When the ball collides with the upper border it destroys and respawns again at the ball_respawn position that we assigned in step 2. the aim of making the ball a prefab is to be able respawn it with all its features, otherwise, if we used the ball from the hierarchy it will respawn but it will not move. Also when the ball collides with the upper border a value that is originally equals 0 called p1 increases by 1. this value is displayed as text so when the ball collides with the upper border the score for player 1 increases by 1.
Now do steps 7,8,9 and 10 for the down border
for step 7, create a script called p2wins and copy the following code instead.
for step 10, drag and drop player 2 score from the hierarchy to the Score parameter.
Code:
    using System.Collections;
    using System.Collections.Generic;
    using UnityEngine;
    using UnityEngine.SceneManagement;
    using UnityEngine.UI;


    public class p2wins : MonoBehaviour
    {
        public Text score;
        public Transform ball_respawn;
        public GameObject ball;
        private int p2 = 0;
        // Start is called before the first frame update
        void Start()
        {

        }

        // Update is called once per frame
        void Update()
        {
            score.text = "Player 2 Score:" + p2;
        }

        void OnCollisionEnter2D (Collision2D other) {

            if(other.gameObject.tag == "Ball")
            {

                Destroy(other.gameObject);
                p2++;
                Instantiate(ball,ball_respawn.position,ball_respawn.rotation);
            }


        }

    }
<br>