How to Make a Hip-hop Beat in FL Studio
by MadisonW21 in Circuits > Art
86102 Views, 22 Favorites, 0 Comments
How to Make a Hip-hop Beat in FL Studio
In this instructable, I will show you how to make a hip hop beat in FL Studio. Music composition is a very broad topic with a lot of “correct” ways to achieve the goal of creating a song. This is just one way to make a hip hop instrumental, but it is a very straightforward way to come up with a quality final product. Much of this instructable is intended to be a jumping off point, as I barely scratch the surface of FL Studio’s possibilities in this tutorial.
You need:
- Computer with FL Studio installed
- Listening device (speakers/headphones)
Let’s get started!
Finding a Sample
Sample: a short audio clip taken from preexisting audio (song, performance, etc)
Hip hop comes in many forms these days, but the genre is traditionally based on sampling, or the art of combining samples into a new, unique song. Samples can come from many sources (old vinyl, live musicians, even YouTube), but for this example I will use the song “How Can You Believe” by Stevie Wonder, ripped straight from YouTube.
Note: Sampling with the intent of making free music is always fine, but if you intend to sell any music containing samples, you must first clear it with the original artist. Otherwise, you can be sued (see: Vanilla Ice’s “Ice Ice Baby”)
To download a song off YouTube:
- Find the video containing the song.
- In a new tab, open this: https://www.onlinevideoconverter.com/
- Click “Convert a Video Link.”
- Select .wav as the filetype for the best quality, then press start.
- When the video is done converting, press “download” to save it to your computer.
Set Up Your Drums
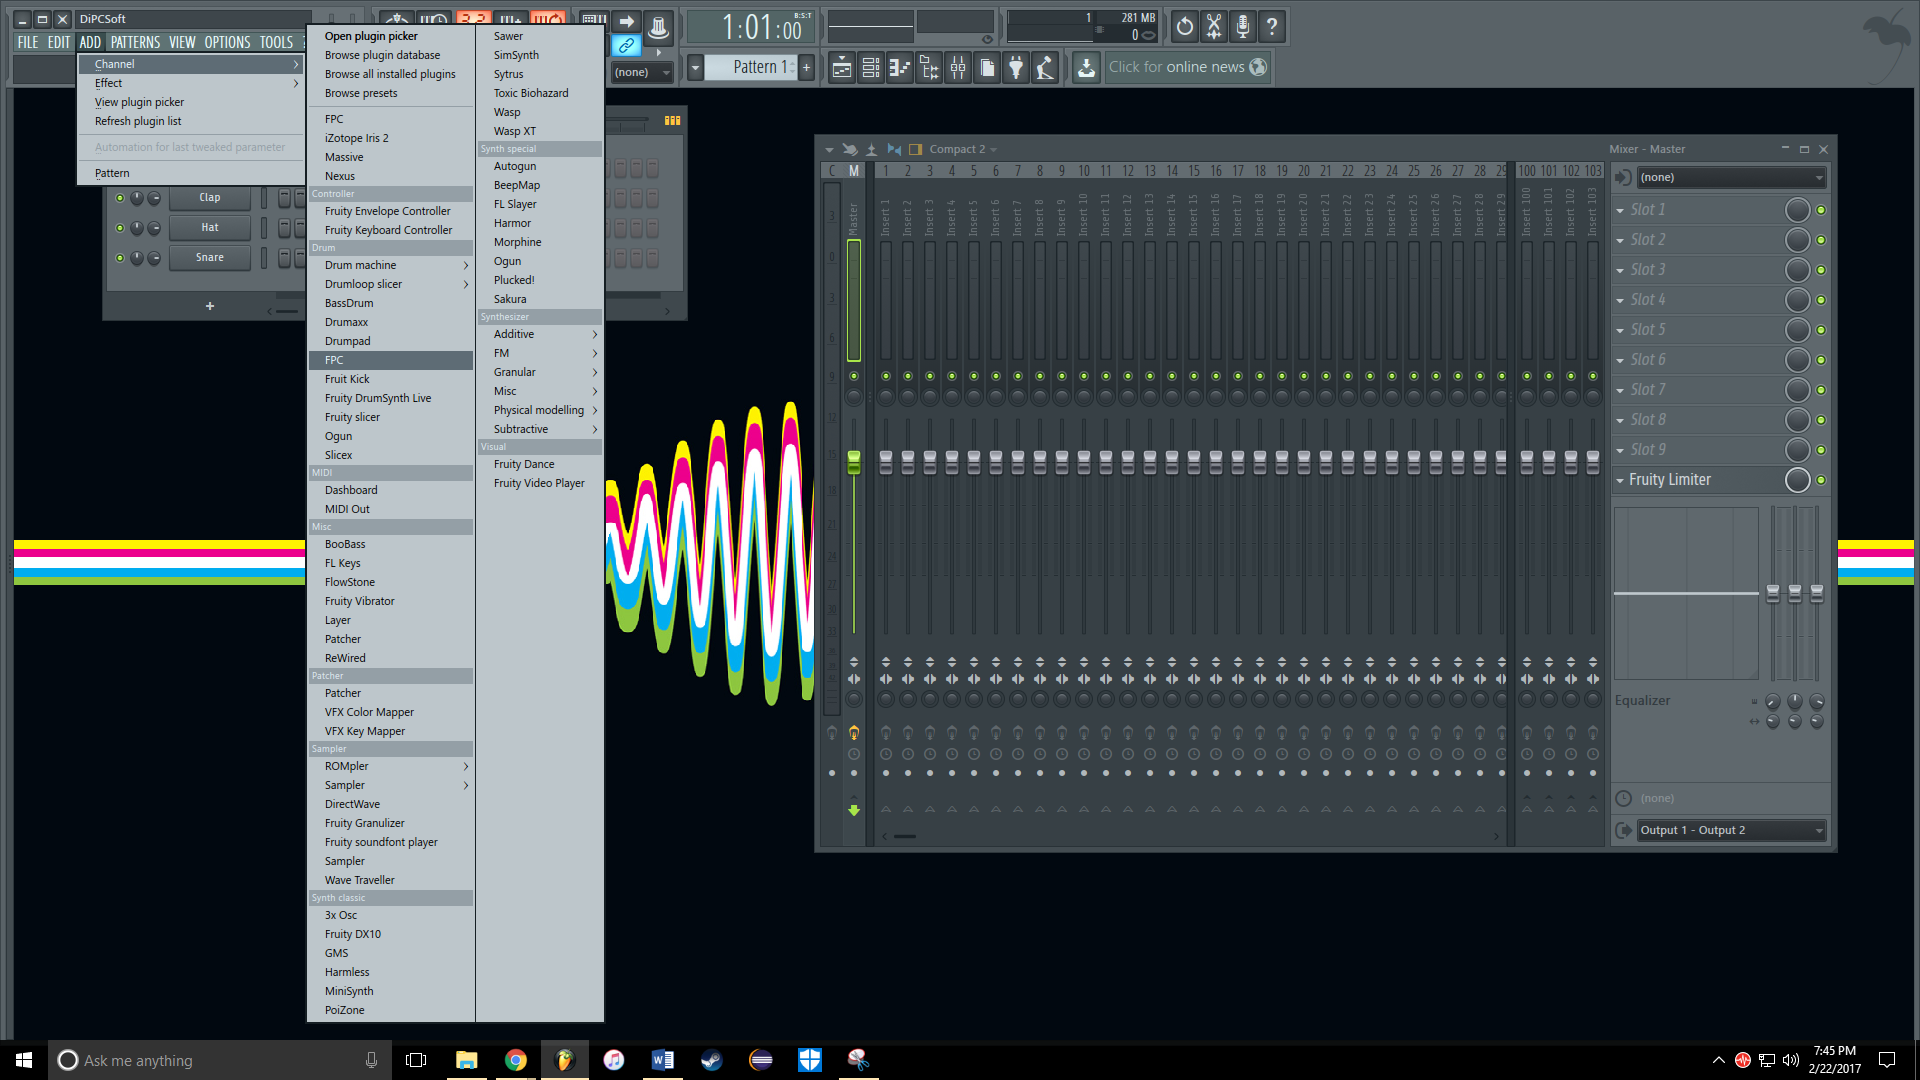
Hip hop is all about rhythm, and that starts with your drums. Open up FL Studio, and add a new FPC (Fruity Pad Controller) channel. FPC is a drum machine, which means it holds a collection of drum sounds that can be played individually through software – like a real drum kit! FPC has a Default setting, which loads a default set of drums.
Note: You can find more information on FPC from other locations. It is a very powerful drum machine which lets you load and layer up to five drum sounds per channel and manipulate them in various ways.
Sequence Drums
Steps 3, 4, and 5 can realistically be done in any order – it depends on what you want to do with your sample! In this case, I chose to add a basic drum beat first, and then fit my sample around the drum loop.
FPC uses MIDI, which stands for Musical Instrument Data Interface. MIDI lets you type out a sequence of notes, and then plays them back for you exactly as written. Cool, huh?
To input the MIDI drum sequence:
1) Choose the pattern in which you will place your drums – pattern 1 is fine. When you add more instruments, it is good practice to have them all in different patterns, because this way you have more control.
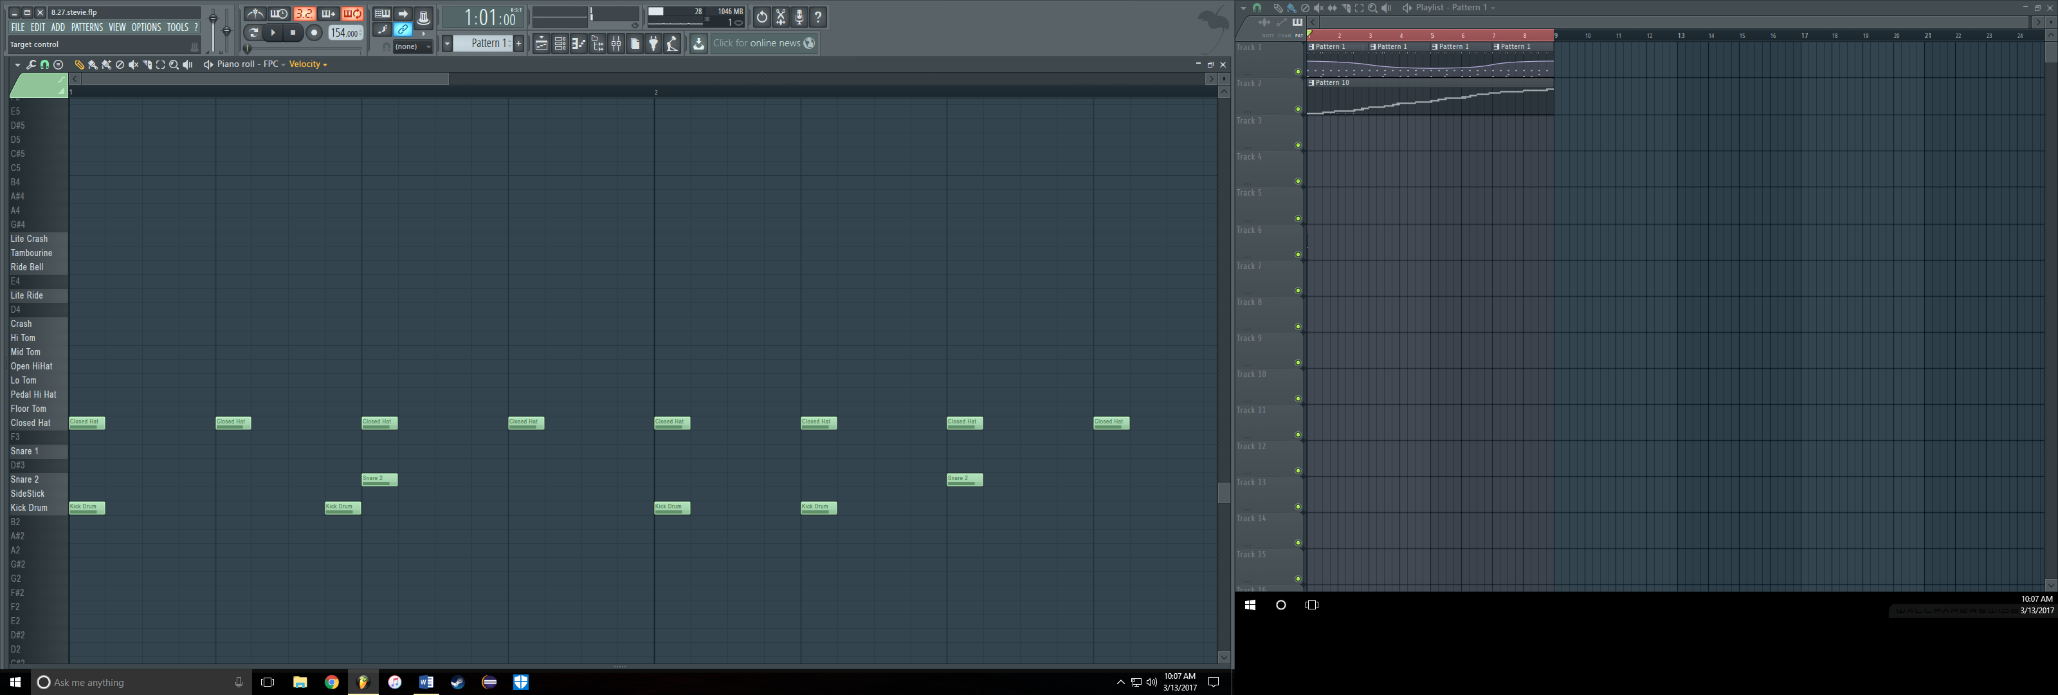
2) Right click on the FPC channel and select Piano Roll. This will open a blank window that looks like the one in the picture below.
3) Select the pencil tool in the top left corner (highlighted in yellow on the picture) and draw in the drums where you want them to be played!
4) You can see the names of the drum sounds on the left-hand side of the window. Place a note by clicking on a spot in the row corresponding to the drum you want. The vertical lines correspond to when the note will be played.
Pressing play will play your sequence of drums in the order you drew!
Load Sample Into Slicex
1) Add a Slicex channel to the project the same way you added the FPC channel, and click on it to open it.
2) Change the “track” number – like you did with FPC – to 2.
3) Click on the floppy disk icon near the bottom of the plugin (next to the play/stop buttons) and choose “Load Sample.”
4) Find the sample you downloaded in step 1, and open it.
5) At this point, you should see the waveform (a visual representation of the sample) inside the Slicex plugin.
6) To select an audio clip, simply click and drag on the audio. The selected audio will turn red, while unselected audio will be purple.
7) Listen to your sample and select the clip that you want to use in the beat! This is up to you and your taste – listen to the whole clip until you find a part you think will sound good played looped.
8) Select the audio you want to keep, then click the scissors icon and select “Trim.” This will cut away the audio you don’t want, and keep the audio you selected.
Chop/Manipulate Sample
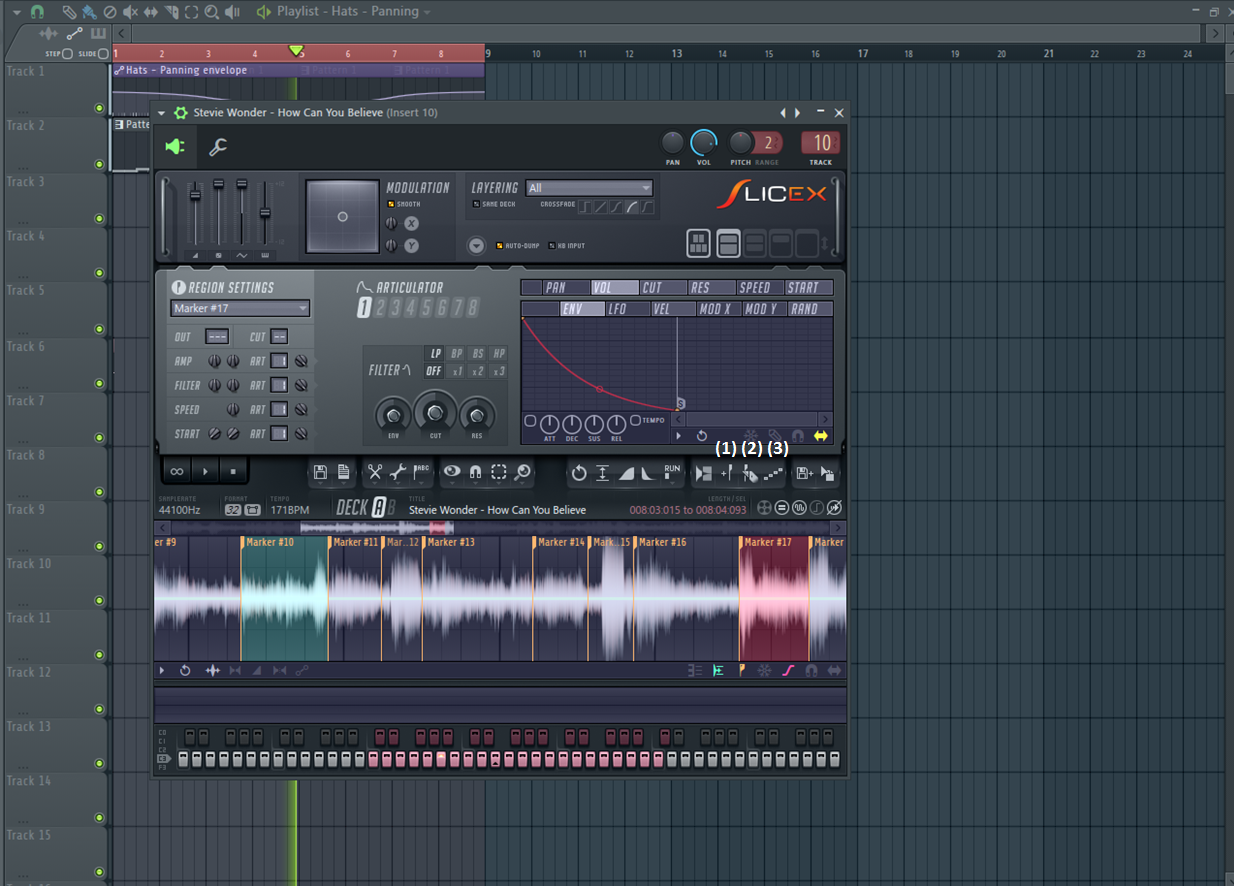
Now that you’ve got the sample you want, click on the Auto Slicing button (labeled 2 in the picture). This will “auto chop” your sample, or divide it into regions separated by markers. Each marker is mapped to a MIDI note, which means that you can play each region independently from all the others – much like the different drums in FPC.
If you right click on a region, it will play that specific region through your speakers/headphones. Listen to each region, and move the markers around so that you like the chunk of your original sample that it plays. You can also add manual region markers by selecting audio and clicking add marker – labeled 1 in the picture.
Once you are satisfied with your chopping, choose a pattern (separate from the one where you did your drums) and press “dump to piano roll” – labeled 3 in the picture.
Combine Your Patterns
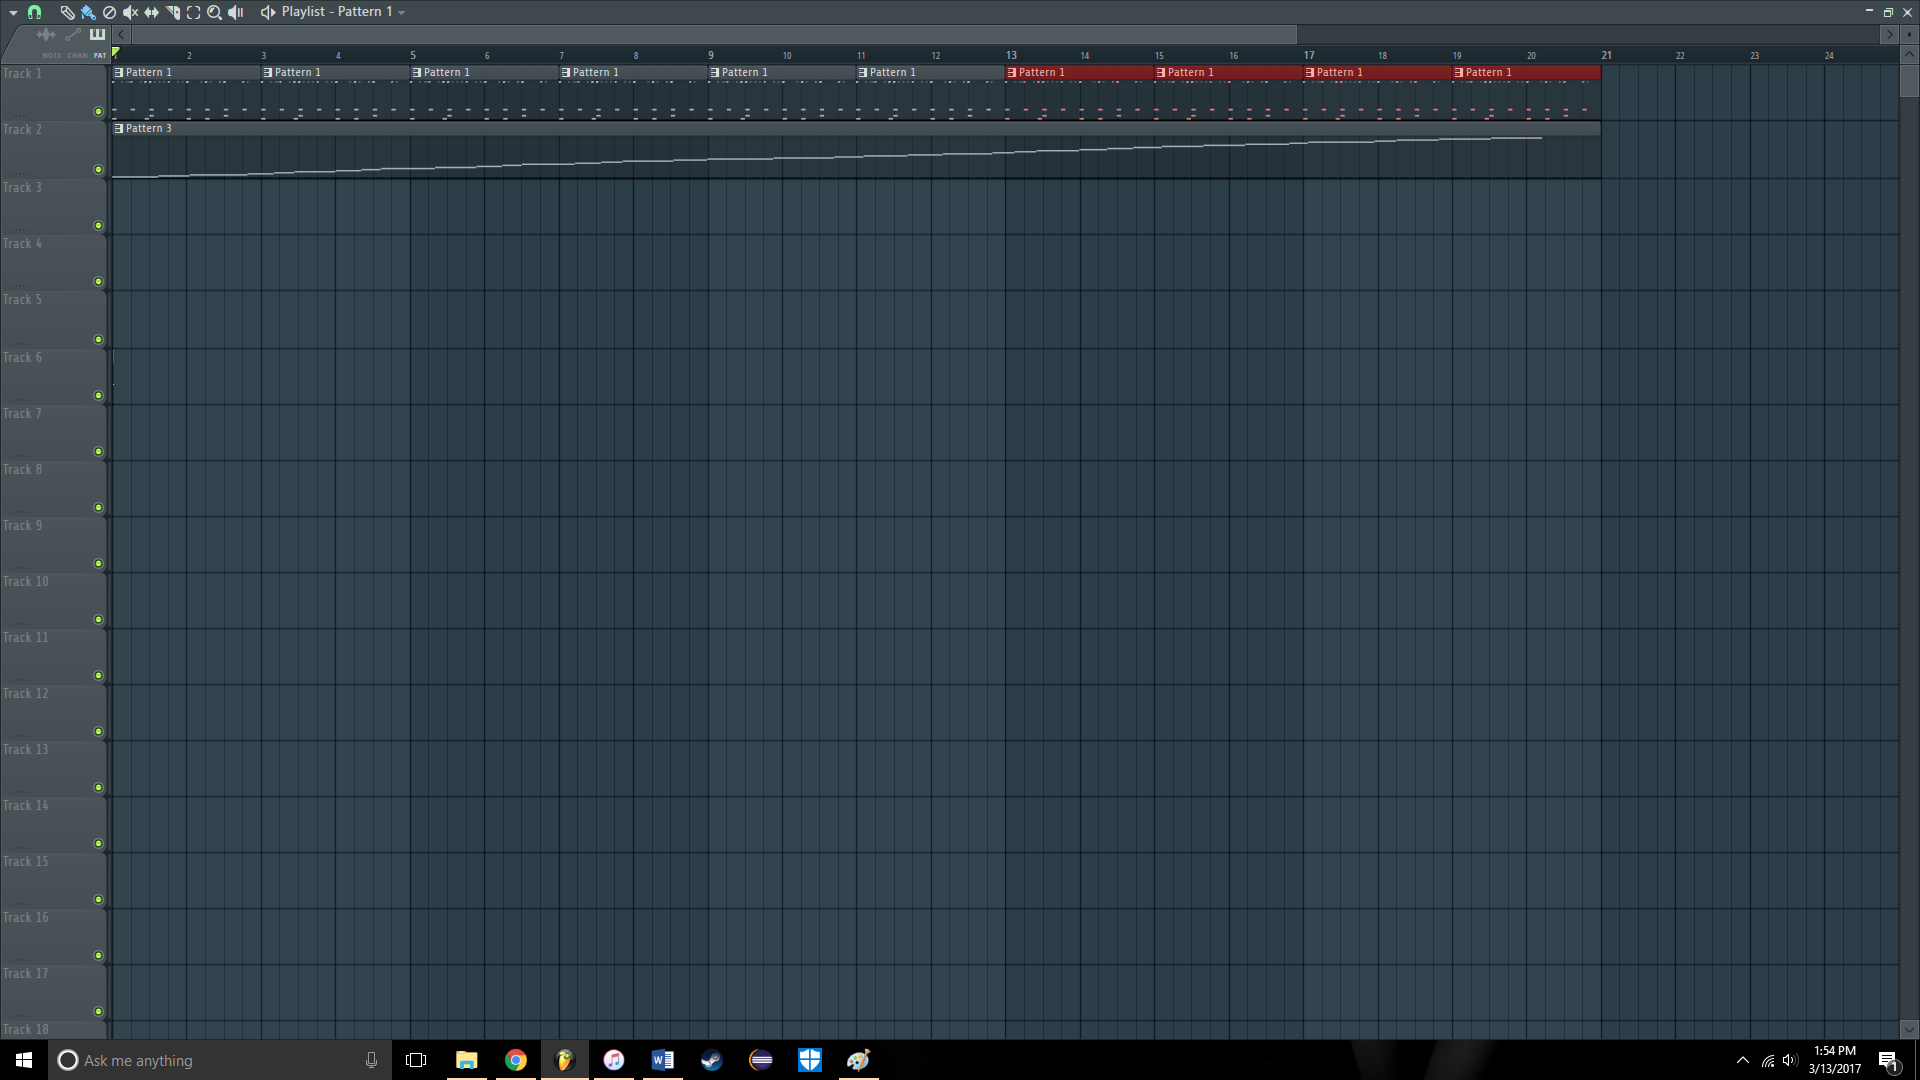
This is the part where you combine your drum loop and your sample chops.
Press F5 to open the playlist. This is where you can combine patterns in sequence to build your beat! This window works very much like the piano roll, only instead of using notes, you use the patterns you created.
1) In the second row, click the beginning of the playlist to insert the pattern where you dumped your chopped-up sample.
2) At the top of the window, click where it says “Pattern 1” in my picture to choose a different pattern to add. Choose the pattern containing your drums, and add it to the playlist in the first row by clicking it. Your sample pattern is probably longer than your drum loop, so add a fair number of drum loops in a row so that the drums always play while the sample does.
Sequence Your Chops
Unless you are extremely lucky or planned extremely well, the likelihood is that when you press play at this point your beat will sound very, well, off. The sample likely doesn’t line up with your drums. But don’t worry! This is why we chopped up the sample earlier.
1) Close the playlist by pressing F5 again, and open the piano roll for Slicex in the pattern where we dumped the chops the same way you did for FPC.
2) You should see more MIDI notes, but this time you’ll notice that instead of having drum names on the left side of your screen, you have marker numbers. These correspond with the places where you chopped your sample earlier.
3) Press play. Click and drag each note around so that it fits the rhythm of your drums. This can be tricky. A useful tip is to click the magnet in the top left hand corner and select “none”; this lets your move notes around freely instead of snapping them to beat markers. Using this feature lets you be as precise as you want with your chops.
4) Continue to do this until you have the whole loop sounding the way you like it.
Note: This is the part where you can get creative; the only rules come from your ears. If you can’t get something to sound right, try taking it out, or replaying a previous sequence instead. You don’t have to just fit the old song to your drums beat for beat!
Polish It Up!
At this point, your beat should be sounding pretty good. All that’s left is “mixing” – which is an art in and of itself, and I won’t cover too extensively.
To add effects to your sample or your drums, open the mixer by pressing F9. If you followed the instructions involving the “track” box in your plugins, you should see the audio from your drums in track 1, and your sample in track 2.
Click either track, and then click “Slot 1.” This will pull up a huge menu of possible effects to add. A very common effect to add is a delay, which repeats the sound at a lower volume – like an echo. Click on “Fruity Delay” to experiment with this effect, or choose any of the others to try as well.
You’re done! Congratulations, you’ve made a beat! If you want to add to it, you have plenty of options. You could load another sample, or add variations of the one you already have. You can try out some software instruments, or VSTs, to put your own melodies into your creation. You can also experiment with effects. The possibilities are nearly endless!