How to Make a Custom Ringtone for an IPhone Using ITunes on an Apple Computer
by hanparkshan in Circuits > Apple
13354 Views, 11 Favorites, 0 Comments
How to Make a Custom Ringtone for an IPhone Using ITunes on an Apple Computer

Did you know that you can have any song or sound as a ringtone for your iPhone? And that it is free? Using your Apple computer, if you follow these simple directions you can have any tone or song you want as your ringtone. All you need are:
An iTunes account with the latest software update
Apple Computer
iPhone 3 or later
NOTE: If you are using iTunes Plus, or MPEG-4 files, this process may not work for you.
An iTunes account with the latest software update
Apple Computer
iPhone 3 or later
NOTE: If you are using iTunes Plus, or MPEG-4 files, this process may not work for you.
Setting Up ITunes
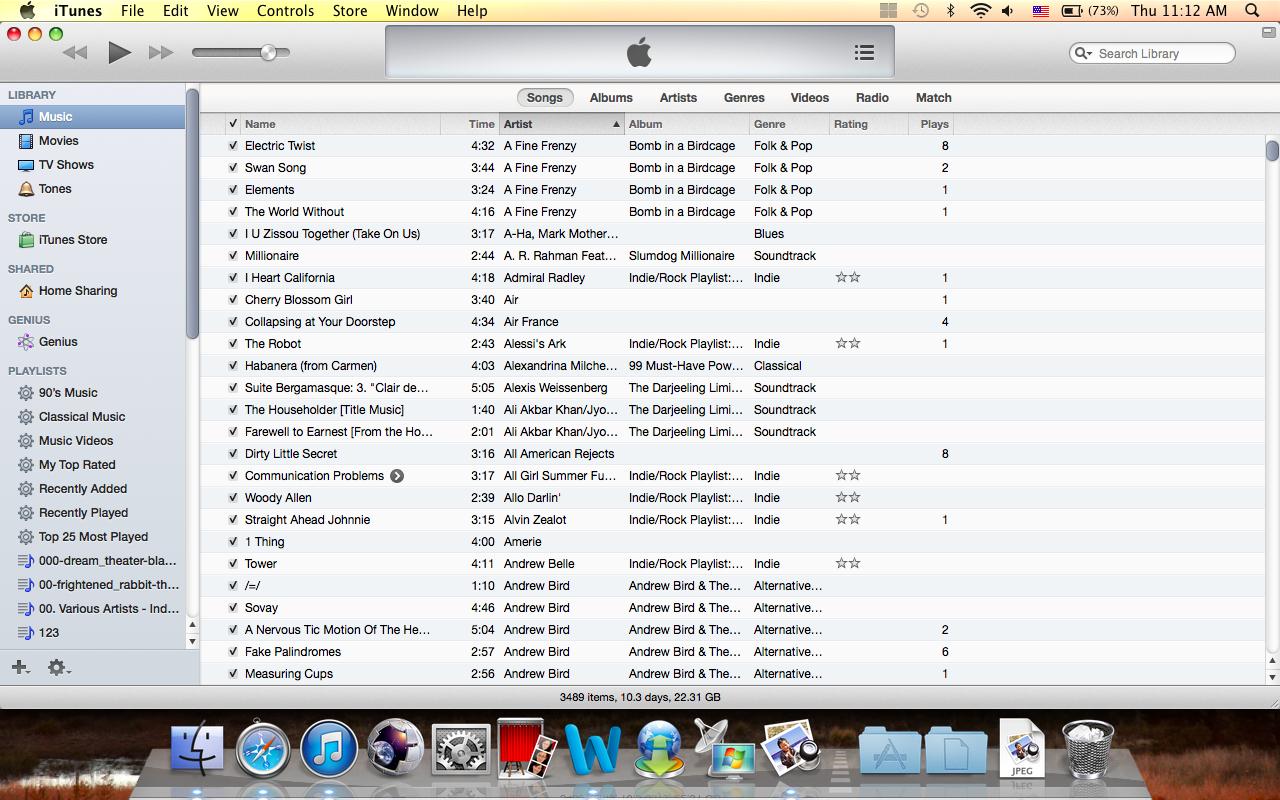
A) Open iTunes by clicking the iTunes icon. This process is easiest to complete when your iTunes library is in list format with the LIBRARY sidebar displayed, as in image 1.
Notice that the SONGS tab is selected, the music LIBRARY is shown in the left sidebar, and the songs are listed by name or artist. If your iTunes window looks like the image above, continue to step 2. If it does not, follow these next steps:
1. Click the “Songs” button in the upper iTunes toolbar.
2. Click on the “View” option in the toolbar at the top of your screen.
3. Hover your cursor over the “Column Browser” option in the dropdown menu. An additional side menu will appear.
4. Click on the “Hide Column Browser” option in the side menu.
5. Click on the “View” option in the toolbar at the top of your screen.
6. Click on the “Show Sidebar” option. Your iTunes window should now resemble the above image.
Selecting Audio
A) Select the song in your iTunes library that you would like to make into a ringtone.
B) Identify which section of the song you want to use. Important: The portion of the song you select cannot exceed 40 seconds in length.
1. Play the song.
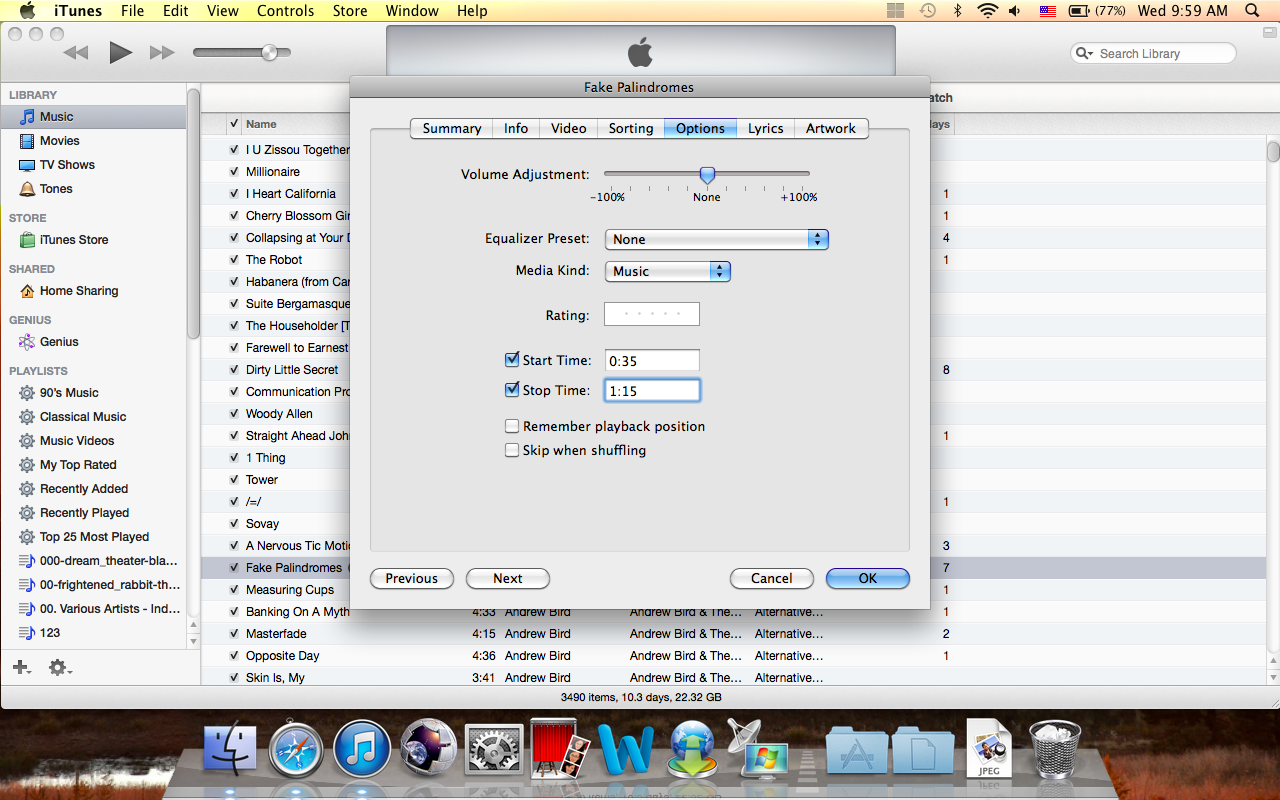
2. Write down when your chosen section begins and ends, recording these times in minute:second format. (For example, if you want to use the section of “Fake Palindromes” that is between 35 seconds and 1 minute 15 seconds, you write down 0:35 to 1:15. See image 2.)
C) Right Click on the track to bring up the right click menu. (Note: If you do not have a right click on your mouse, holding down Control and then clicking produces the right click menu
D) Select “Get Info.” You should now be looking at a small new window showing a summary of the song.
E) Select “Options” using the tabs at the top of the new window.
F) Find the “Start Time” and “Stop Time” section.
G) Check the “Start Time” box and type the start time for your song portion, using the minute:second format.
H) Repeat Step 10 for the “Stop Time” box, entering the stop time for your song portion.
I) Click “OK.” This should return you to your iTunes library with your song still highlighted.
Creating AAC File
A) Right Click on your highlighted song to bring up the right click menu.
B) Select “Create AAC Version”. This will produce a second copy of your selected song. The new AAC file will appear directly below the original on the song list.
C) Check the “Time” of this new audio file. If it is 40 seconds or less, proceed to part “D.” If it is over 40 seconds, you need to repeat step 2 (Parts F-I), using a smaller portion of the song.
D) Click once on the new AAC file so that it is highlighted.
E) Click once on the title of the AAC file; this should allow you to type in the file’s title box and rename your AAC file. Give your file a name that you will remember and recognize. (E.g., “My Fake Palindromes Ringtone”)
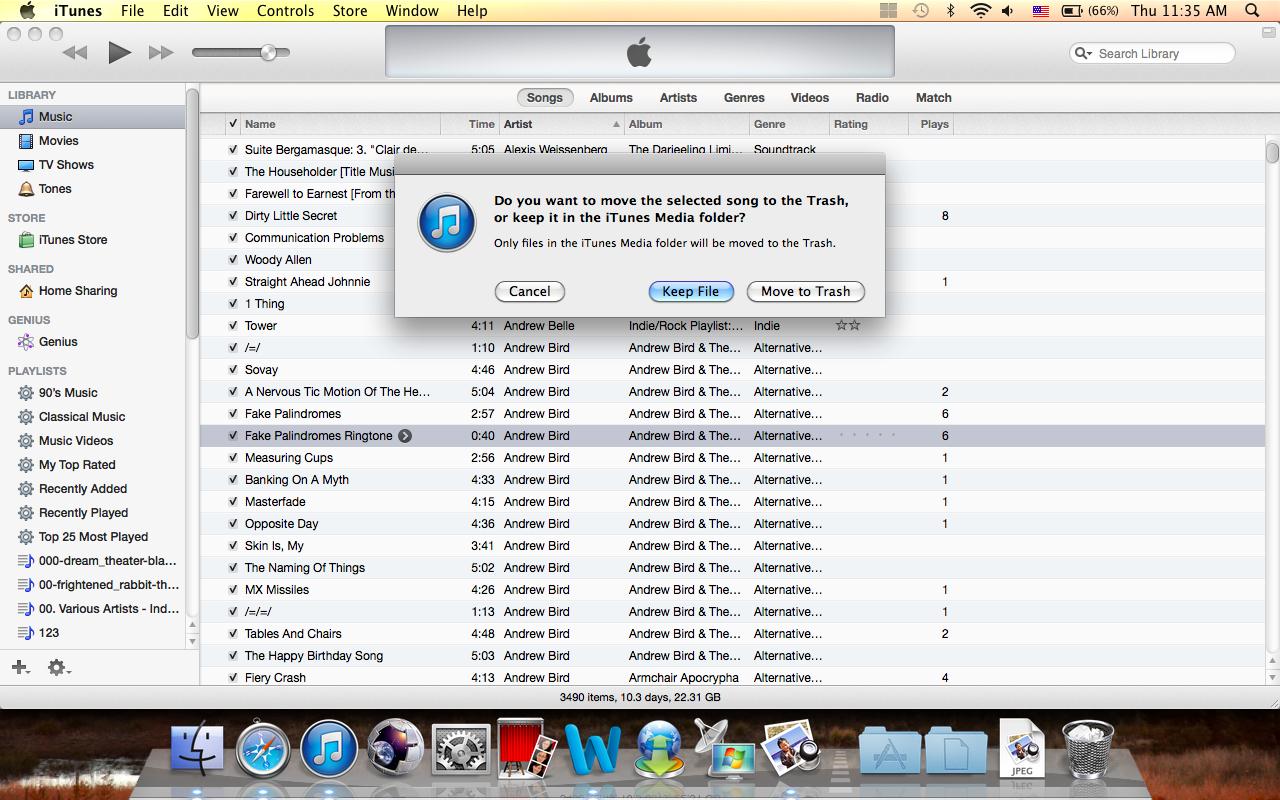
F) Right click on the new AAC file and Select Delete from the dropdown menu. Important: You must delete the AAC file from your iTunes library in order to continue.
G) Select “Delete Song” in the first window that pops up
H) Select “Keep File” in the second window that pops up, as in image 3.
Locating AAC File
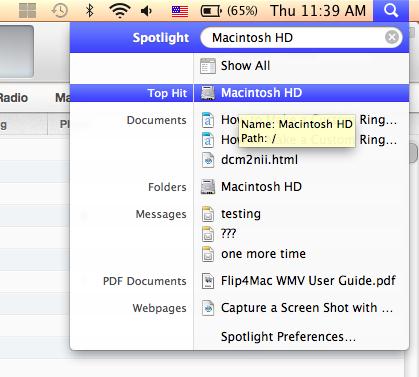
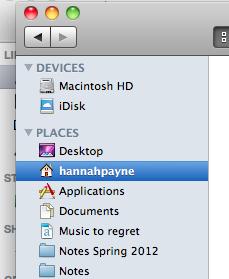
A) Locate your hard drive folder on your computer. (Note: Do this outside of the iTunes program.) The default name for this folder is “Macintosh HD,” but it is possible you have chosen to rename it. To be sure it is your hard drive folder, find the hard-drive icon highlighted in blue in image 4.
Once you have located this folder, continue to part “B”.
B) Open your User Home. This is located in the left sidebar menu once you open Macintosh HD. The icon for your User Home is a house, like the one highlighted in blue in image 5.
C) Open the “Music” folder.
D) Open the “iTunes” Folder.
E) Open the “iTunes Media” Folder.
F) Open the “Music” Folder.
G) Open the folder of your song’s artist. (If multiple folders appear for albums by the artist, open the folder of the album that contains the song you selected.)
H) Click once on your created and renamed AAC file.
***Important: If you have trouble with Step 4, you can go directly to your AAC file by searching for it using the magnifying glass in the top right of your screen. If you do this, you must enter the title of the AAC file exactly as you named it, or it will not show up.***
Changing Format
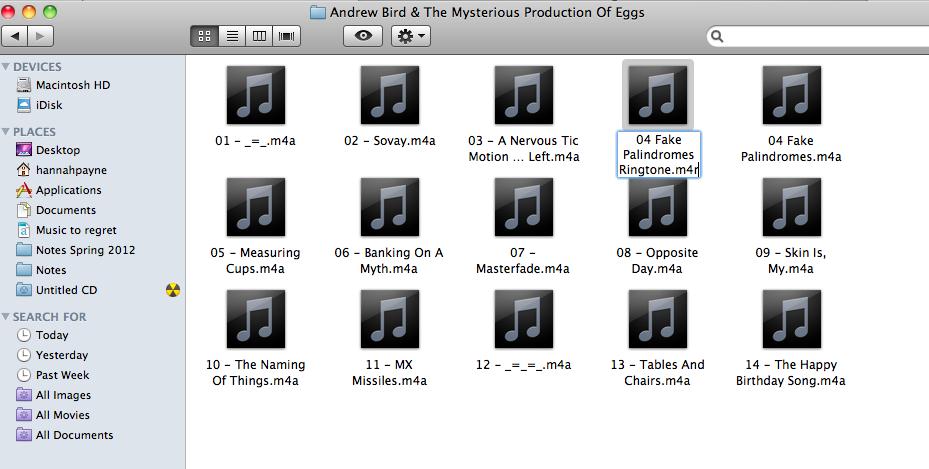
A) Click once on the name of your file so that you can type in its title box.
B) Change the file extension “.m4a” to “.m4r” as shown in image 6.
C) Click outside the text box.
D) Select “Use .m4r” when the window pops up and asks if you want to change the file’s extension.
E) Double click the new .m4r file so that it opens up in iTunes.
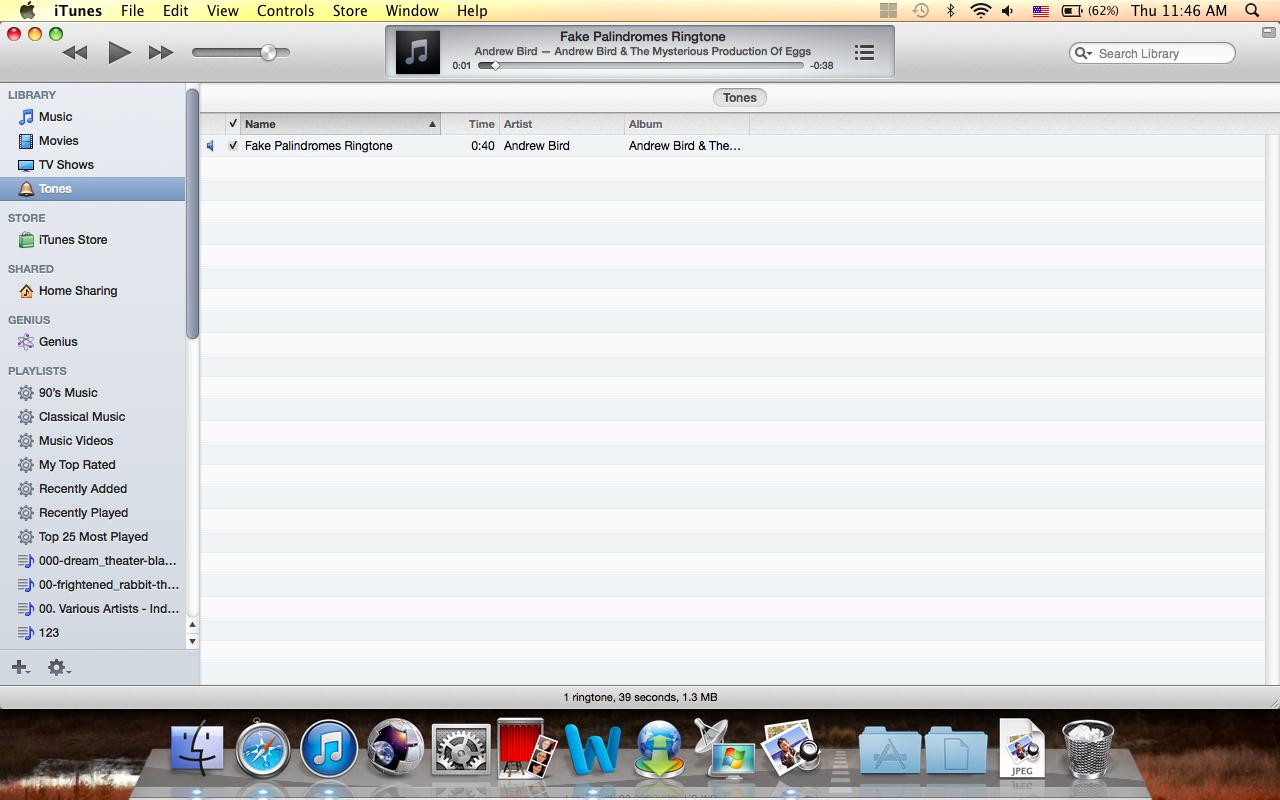
F) Click on your “Ringtones” or “Tones” folder in your iTunes library. Your created file should now appear in this folder. See image 7.
Adding Ringtone to an IPhone
A) Connect your iPhone to your computer. Your iPhone should show up in your sidebar under “Devices.”
B) Drag your created ringtone from the “Tones” folder in your iTunes library to the “Tones” folder on your phone. Do this by clicking on the file, holding the mouse button down, and moving the file over onto your phone’s Tones folder. Release the mouse button when you see a green plus (+) sign. This will add the ringtone into the folder.
C) Click on your phone’s “Tones” folder to be sure that your created ringtone is there. If it has not yet appeared, wait for the phone to finish “syncing” until you see the ringtone.
D) Disconnect your phone from your computer by selecting the “Eject” button next to the name of your iPhone in the sidebar and unplugging your phone.
E) Select “Settings” on your iPhone.
F) Select “Sounds.”
G) Select ”Ringtone.” Here you will see a list of default ringtones and your new custom ringtone.
H) Select your new ringtone to set it as your primary ringtone for every phone call.
Step 7: Setting Ringtones for Individual Contacts
A) Select “Phone” on your phone’s menu screen.
B) Select the “Contacts” tab at the bottom of your phone’s screen.
C) Select the contact you wish to customize.
D) Select “Edit” at the top right corner of the contact’s page.
E) Select “Ringtone.” This brings you to your list of custom and default ringtones.
F) Select the ringtone you want to hear whenever this contact calls. The phone will play the ringtone when you click on it.
G) Select “Save.” This will bring you back to the contact’s information page.
H) Select “Done” when you are finished. This ringtone will now play when this contact calls your phone.
I) Exit back to your phone’s main menu.
You can repeat this process for an infinite number of contacts and ringtones. Have fun!