How to Make a Bumpin' Electronic Track: Introductory Music Production for FL Studio
508 Views, 2 Favorites, 0 Comments
How to Make a Bumpin' Electronic Track: Introductory Music Production for FL Studio

Welcome!
This Instructable guide will aid beginner to intermediate music producers in using FL Studio to create various genres of Electronic Dance Music. It will run through the basic elements of creating a song, with the aim of detailing basic tips and tricks that new producers will find useful in breaking ground with FL Studio's intimidating interface.
While not every aspect of music production will be covered, some of the most important topics will be introduced. Intermediate producers will also benefit from an explanation of the creative process as well as mixing and synthesis tips.
What you need:
- · FL Studio 10 or later version
- · Software Synthesizer (Massive, Serum, etc.)
- · Perseverance!
Glossary
- Workflow – actual sequence of events of song creation; repetitive process for making patterns, song structure, and mixing
- Loop – sequence of sounds that is played over and over again, could refer to a creative decision within the track or a source sample
- Mix – the way sounds interact with one another; mixing is the process of adjusting sound levels and frequencies to ensure ease of listening. Likened to the way different paint colors transition and blend together on a canvas
- Wrapper – the window in which FL Studio opens different plugins
- Riser – A single or layered sound such as a lead or “sweep” that increases in pitch or volume slowly in order to create a build-up effect Downsweep – A transitional tool that is essentially the reverse of a riser
(Image source: https://www.image-line.com/press/presskitblog.php)
Prior to Beginning the Song
Note:
Many producers find it helpful to do some planning before actually creating sounds. If you are comfortable jumping right into the track, then by all means go for it. Also, keep in mind that there are NO rules when it comes to tempo or creative decisions for music production.
Begin by selecting a tempo that suits your preferred genre of music. Depending on your creative workflow, this might be the point that you decide which genre and subgenre the song is going to be. This tutorial will cover technical steps to achieving certain sounds, but they can be applied to many other genres.
Note:
Before creating more sounds, it is important to organize your project such that it will be easy to find each sample and its place in the mixer.
Organization
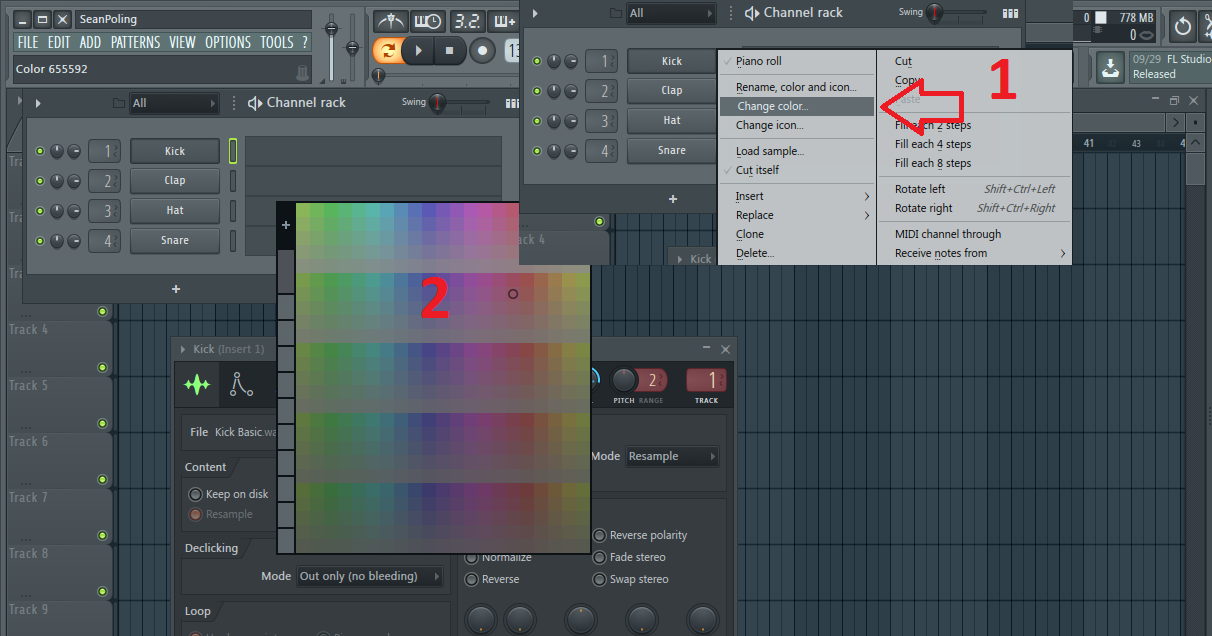
Make sure that each new sound or synthesizer has its own name, playlist track, and mixer channel, all of which can be renamed and color-coded!
- Name your patterns something descriptive so you do not have to go searching through them.
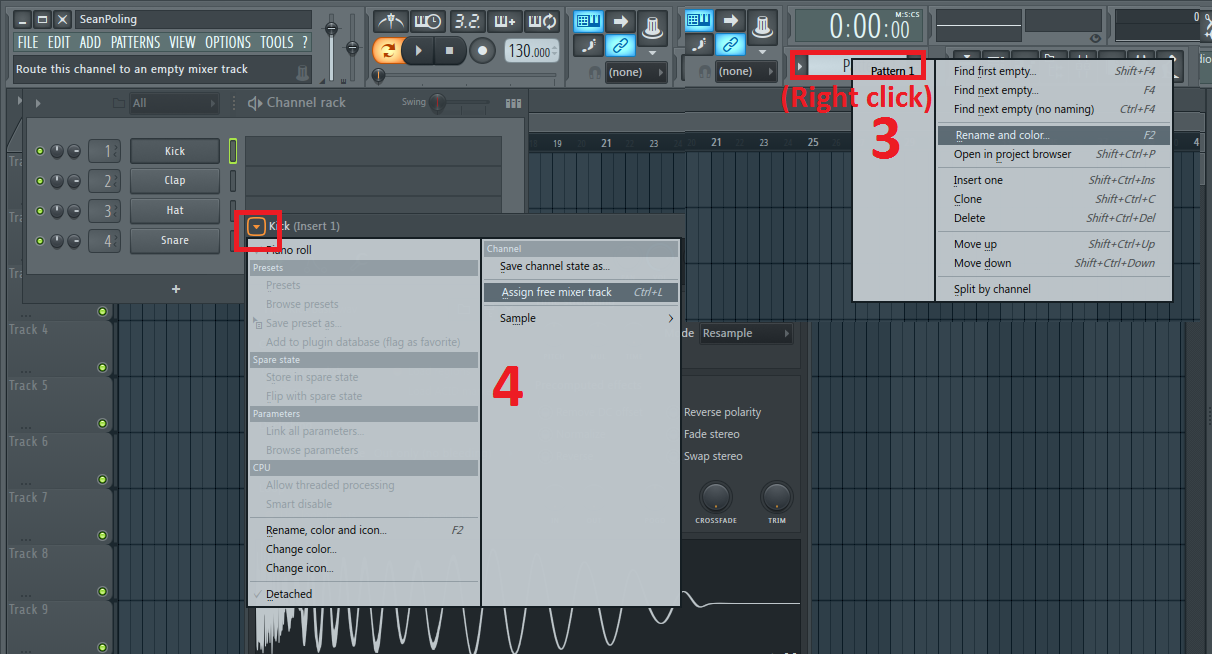
- Right clicking the item you want to change the properties of will allow you to select “rename/color”.
- Click on the synthesizer or sampler and click on the top left arrow of the wrapper, then select “free mixer track”, which assigns the synthesizer to the next open mixer channel. The mixer channel can also be renamed and colored for organizational purposes
You can also save your entire project as a new template so you don’t have to do this each time. In the top left of FL Studio, click File -> Save as Template.
Beginning the Song
Note:
Some people like to create drum loops first, but it is often helpful to do so farther along in the creative process to avoid perfectionism that distracts from the ultimate goals of the song, which are musicality and cohesion. Often, producers will listen to the same drum and melody loops repeatedly adjusting effects and equalization to get the “perfect” mix. Right now, the most important thing is getting as many ideas on the table as possible. Effects and equalization will be covered in a later section.
Sampling
There are multiple ways to begin a song, but one of the most popular methods is sampling. Online you will find an abundance of prior works and soundbites that provide a strong foundation melodically.*
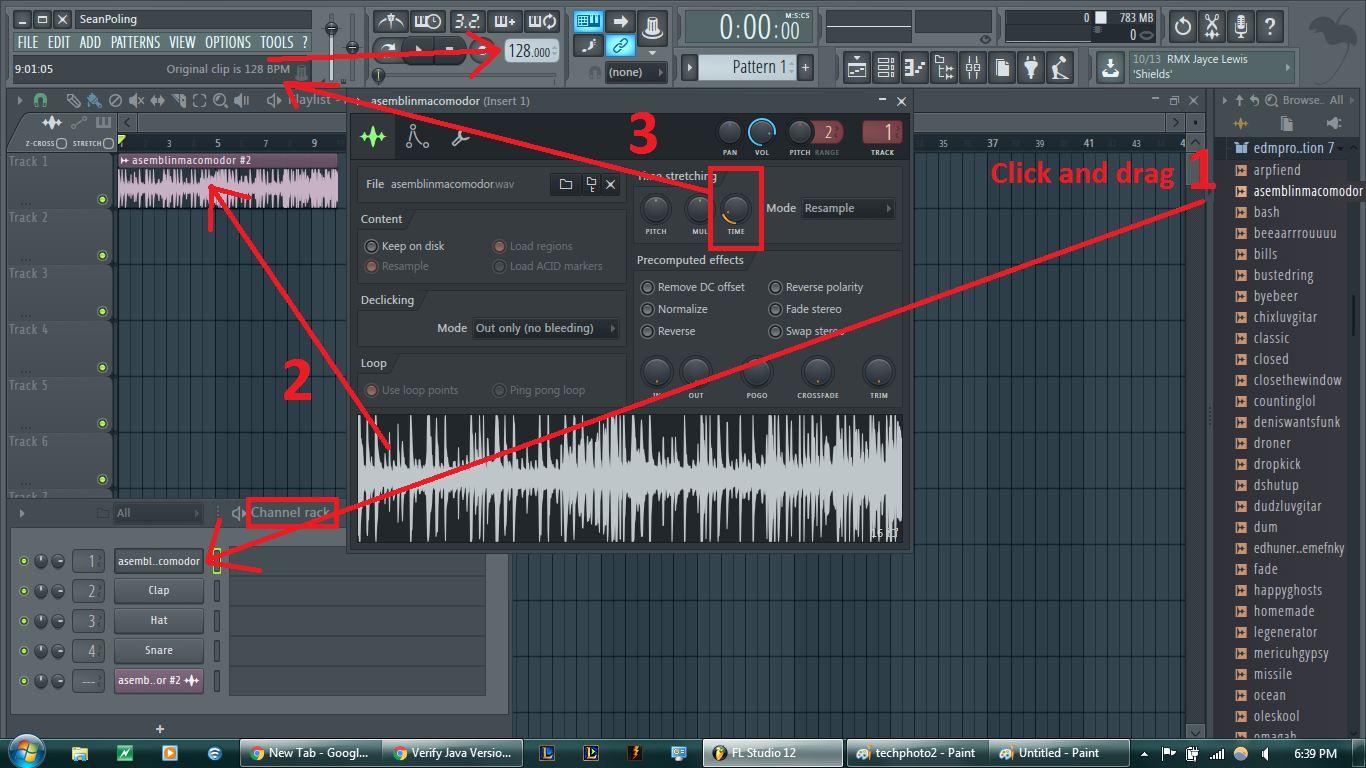
- Once you find a suitable sample, drag the .mp3 or .wav file into the "channel rack". It is helpful to know what key and tempo the original sample is in, so that the pitch and time stretching can be adjusted to suit your chosen tempo. Adjust the "time" knob such that your tempo matches the original clip's tempo, displayed in the top left.
- A great plugin for determining the key of a sample is “GTune” (Figure 1). Open this plugin on the "master" mixer track. Play the sample while looking at GTune's interface, and it will tell you what notes the sample contains!
- Drag the clip from the sampler to the playlist and adjusting the pitch until you achieve the desired key. You can adjust the time stretching algorithm for varying effects. It is helpful to click the magnet in the top left of the playlist and select “none”. This sample will form the basis for your melody and song structure. Make sure you turn back on snapping to "cell" once you are ready to place patterns on the playlist!
Track Layout
Note:
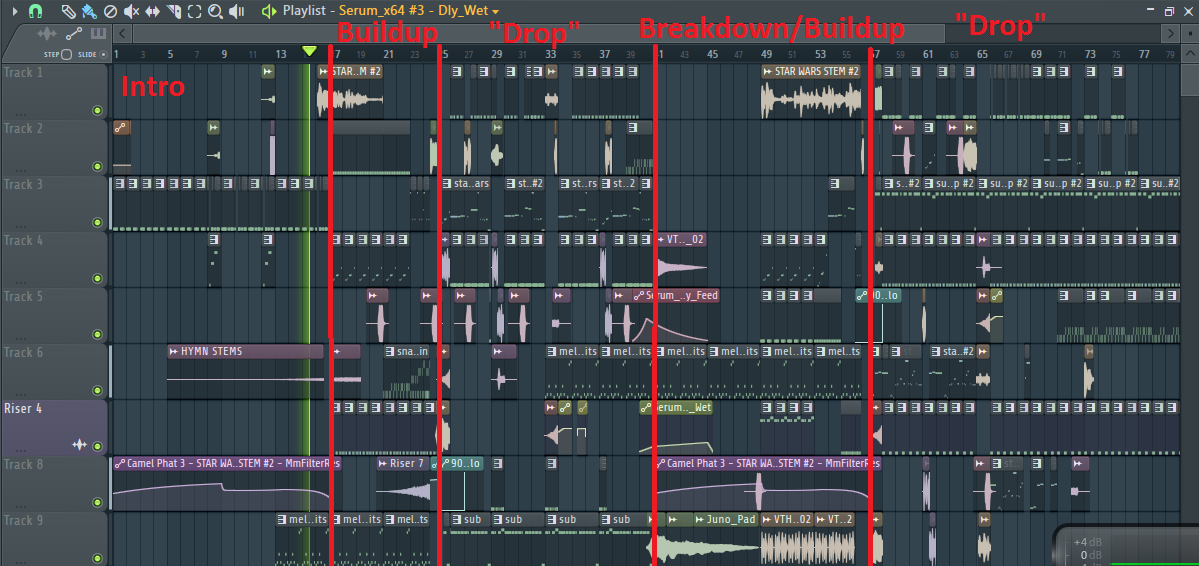
The actual intro of much electronic music is most often characterized by drum loops and sound effects that get increasingly more complex, until a melodic “breakdown” is introduced. This section is where you have some of the most flexibility in terms of length. It is important not to jump right into the “meat and potatoes” of the song though, especially if your goal is commercial success.
Song Structure
- Intro
- Breakdown
- Buildup
- Drop
- (Repeat 2-4)
It is important to transition smoothly between these sections of the song using risers, downsweeps, and drums. Depending on energetic you want your song to be, the entire breakdown can be a buildup to the drop. However, many artists find that a slow or simple breakdown provides breathing room for an otherwise complicated track. Common themes in a breakdown include piano chords, “plucky” synths, and vocal samples.
Building a Foundation
Basic Melody
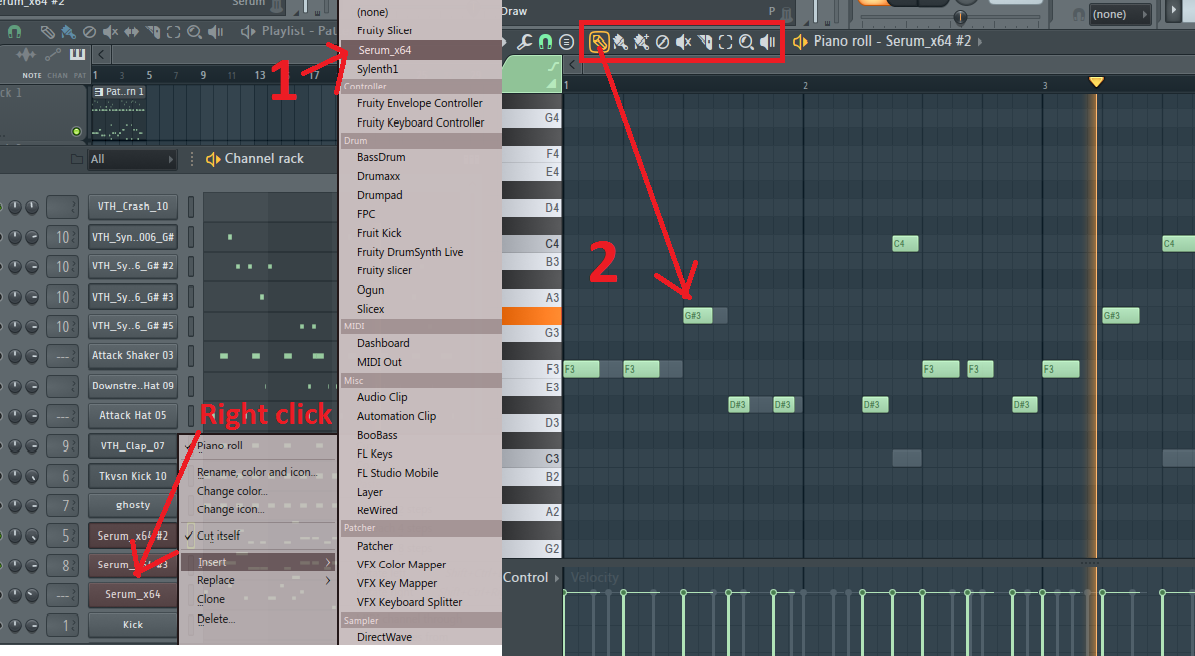
- Open up a synthesizer such as Sylenth1, Serum, or Massive, and select a simple preset such as piano or brass for ease of listening. For more progressive and longer songs, it is desirable to create a melody that is at least 8-16 bars so that it does not get too repetitive. For more energetic songs, a 4 bar melody that varies throughout could be sufficient if other sounds are being varied.
- Click on your synthesizer and open up the piano roll. You can place notes either using the pencil tool to place notes one at a time, or the brush tool to click and drag for multiple notes in a row. It might be helpful to play the sample while creating your melody to ensure that they stay in time and in key.
- Once you have a melody, you can start creating the synthesizer “patch”, or the characterization and timbre of the sound.
Melody Tips & Tricks
- Copying the melody and shifting it up or down an octave will give a “chord” effect – the quickest way to do this is press ctrl+A, then ctrl+C, then ctrl+V, and finally ctrl+shift+up or down arrow. (ctrl+up or down arrow shifts the selected notes by one semitone).
- House music is extremely diverse, and therefore melodies can be very simple or very complex. Try combining two different melodies with different synth sounds in key for a dynamic progression.
- Some synthesizers have a “legato” feature that will “swing” to the next note if it is triggered before the next one ends. Enable this feature on your synthesizer and extend the notes you desire this effect on to end after the next note begins.
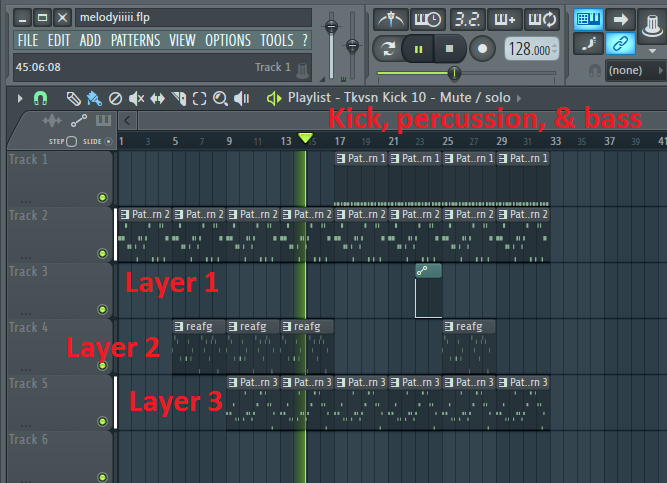
Here is an example of 3 layered melodies, and how they can easily fit into a melodic house song!
Synthesis
Note:
Serum and Sylenth1 are two powerful and affordable plugins that can be purchased on a payment plan of $10-13 dollars per month. It is not required to purchase synthesizers though, as some of the simplest free plugins from FL Studio are extremely powerful. While this Instructable shows Sylenth1, tips can be applied to any synthesizer though.
Leads
Your song will likely include multiple types of “leads”, which will be defined as higher frequency melodic instruments synthesized from one or many instances of different waveforms, the most basic of which include sine, saw, square, and triangle waves. Synthesis is an advanced process, so it is recommend that you read the instruction manual or become somewhat familiar with your chosen synthesizer in order to create your own lead. (If you are a beginner, it is acceptable to start out using the premade sounds that come with the synthesizer, found by pressing the white arrow in the top left corner of the wrapper.)
Super-Saw Lead
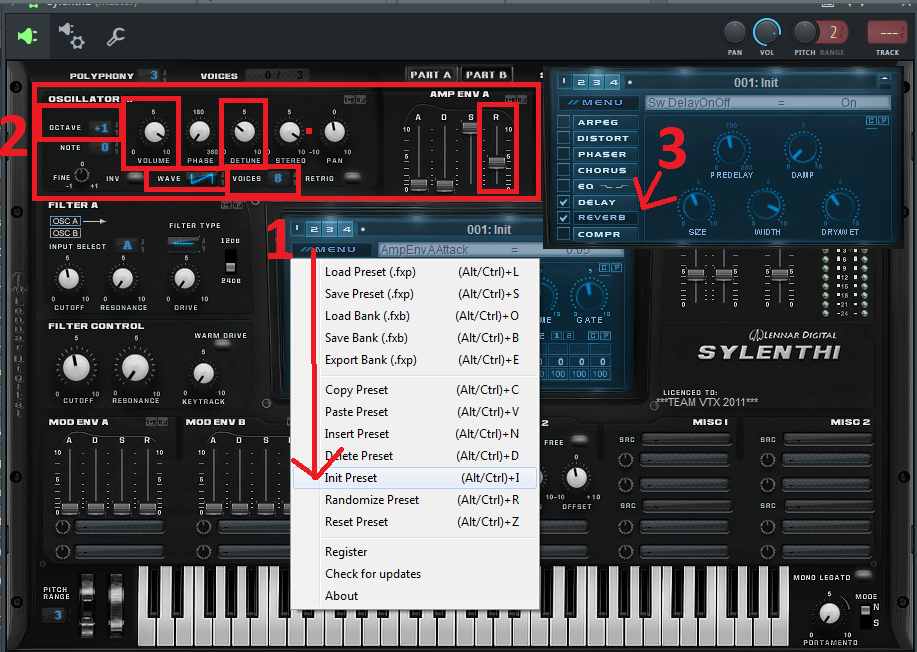
- Open up your chosen program and select the initial or “init” preset.
There are four “oscillators”, essentially machines that repeat certain waveforms very quickly. In Sylenth1, you can select from a variety of waveforms, each with their own distinct sound. Turning on multiple oscillators with different waveforms can create some cool sounding combinations. A useful feature is “voicing”, which will create further instances of the waveform to all be played at once.
- Turn up the volume knob all the way on one of the oscillators and make sure it is set to a saw wave.
- Turn up the voices on one oscillator to 8, and turn up the “detune” knob to about 1/3 of the maximum.
If the resulting sound is too “gritty”, turn the pitch up one octave on the oscillator interface. You now have a basic supersaw lead!
- Turn up the "R" slider where it says "Amp Env".
This will add "release" to the lead, or a short time period after ceasing to play a note that the lead will continue to play and trail off. Release is useful for sounding more natural and less abrupt. The next step will now be to put some effects on this lead so it sounds less “raw” or “dry”.
- Press the box next to "Reverb" and "Delay". The settings of these effects will not be explored in this guide, but it is easy to play with the settings to reach your desired sound.
Mixing
If you haven’t already done so, assign your synthesizer to a free mixer track. Ideally, each sound in your song will have its own mixer track so that you can easily adjust their volume levels. Mixing is a complicated topic, but its essential function is to ensure that the sounds in a song mesh well.
Every song consists of frequencies ranging from 20 Hz to 20 kHz, the effective range of human hearing. This range can be broken up into sub bass (20-80 Hz), bass (about 80-160 Hz), mid-range (160-3000 Hz), and high frequencies (3000-20000 Hz).
- The main tools to ensure that each frequency range has the right amount of loudness are volume control and equalization. Different instruments occupy different frequency ranges, and therefore must be adjusted individually and uniquely to the specific combination that you have chosen.
- There is no set of rules that govern exactly how to mix every time. A good rule of thumb is that if something sounds good then use it! The only issue with this is as a beginning producer your ear is untrained and you may not be able to identify what objectively sounds good.
Note:
The mixing process can be analogized as a canvas used for a painting. The different paint colors are your instruments, and the brushstrokes are your arrangement of these instruments. Intuitively, if a painter simply placed multiple colors over one another the resulting color would be something unlike the original colors, and would not look good at all! The same concept applies to your instruments and their frequencies. If two instruments occupy the same frequency, they will interfere with each other and not sound very good at all. If the combined total volume goes above zero decibels, the instruments will “clip” or become distorted. It is important to avoid unintentional clipping. This is where equalization and volume control come into play.
Equalization
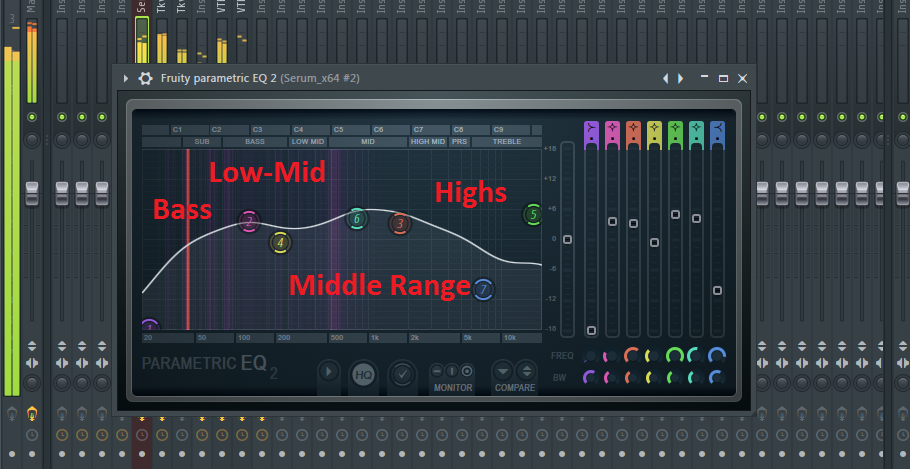
First, open up the mixer and choose the track, which the synthesizer is linked to. Click one of the arrows and select “Fruity Parametric EQ 2”. You are now able to adjust the volume of the entire range of frequencies. Generally, it is better to lower or “cut” frequencies rather than boosting them, in order to prevent clipping. Here are some general guidelines for equalization of different instruments.
- Leads – Cut the low end drastically, around 200-300 Hz to prevent clashing with drums and basses. When multiple leads are played at once, try to cut the mid-range frequencies of each sound that affect the character of the lead the least. Boost slightly around 10 kHz if a “noisy” or “swishy” effect is desired.
- Bass – Cut below 20-30 Hz to eliminate inaudible frequencies that will interfere with drums; this step is not essential but necessary for very large speakers such as clubs & concerts. Boost lightly from 40-160 Hz and cut moderately above 300 Hz.
- Kick – The equalization of a kick is mainly a creative decision depending on the tonality of the sample. Make sure your kick is boosted or around 60-200 Hz, which should not clash significantly with the bass since you generally will not play them at exactly the same time. Cut frequencies at your discretion from 200-2000 Hz, as this range carries the most risk of clipping and is the least important to the kick’s character. 2-10 kHz is the range which will determine how “punchy” your kick is, and frequency levels in this range are usually a creative decision.
- Snare – One of the most tricky sounds to equalize, boost lightly around 200-400 Hz. The 500-1000 Hz range often has undesirable frequencies and you should cut selectively in this range. Frequencies of 2-10 kHz are most important to the “crack” or “snap” of the snare, so experiment with boosting slightly at different frequencies in this range.
You should ideally equalize every sound in your song, even if it is just to cut undesired frequencies. It is always possible that something you can’t hear could be interfering with your instruments!
You now know the basics of creating a song in FL Studio. Good luck in your musical endeavors!