How to Make Your Computer Operate More Efficiently
by jl2018 in Circuits > Computers
916 Views, 14 Favorites, 0 Comments
How to Make Your Computer Operate More Efficiently
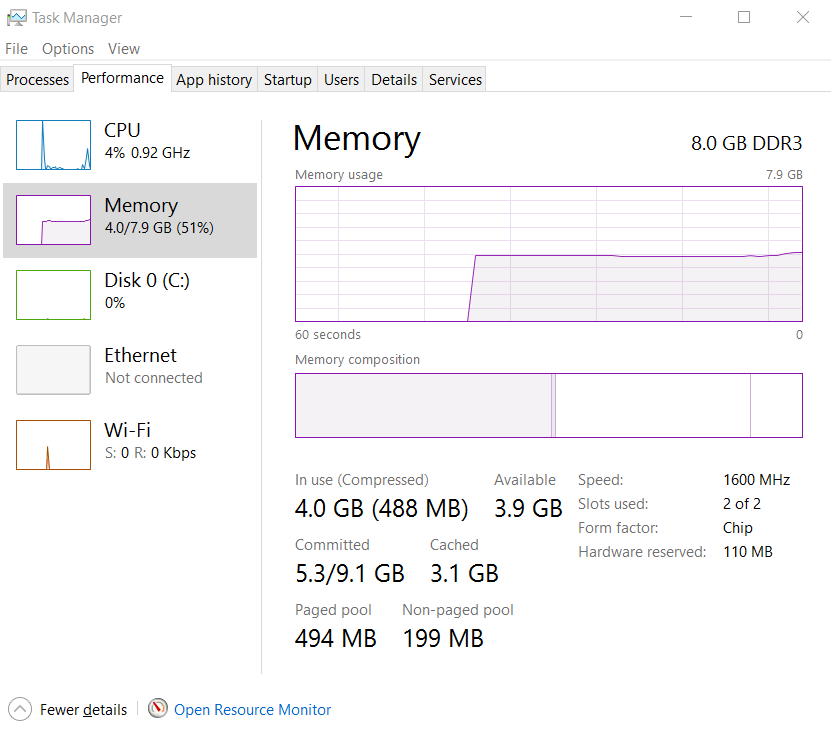
This guide will provide some helpful PC health and maintenance tips that should help any computer run more efficiently. Follow these steps at a regular interval to make sure your computer is running optimally. I have used all of the techniques listed in this guide, but I am NOT responsible for anything you do to your computer. I will be using Windows 10 for the remainder of this guide, but the steps will be similar for Windows 7 & 8.
Create a Restore Point
Before you install a program, uninstall a program, or make any other major changes to your computer, it is always a good idea to create a restore point first. That way, if something bad happens to your computer, such as the installation failed half way through, or you uninstall an important program by accident, you can save yourself some time and a headache by restoring your computer to a previous state. It should also be noted that performing a restore only affects program files, so your document files like Word and PowerPoint won’t be affected, but you should also back them up anyways.
To create a restore point:
1. Press the Windows Key.
2. Type “restore” to start the search.
3. Select “Create a restore point” from the listed options.
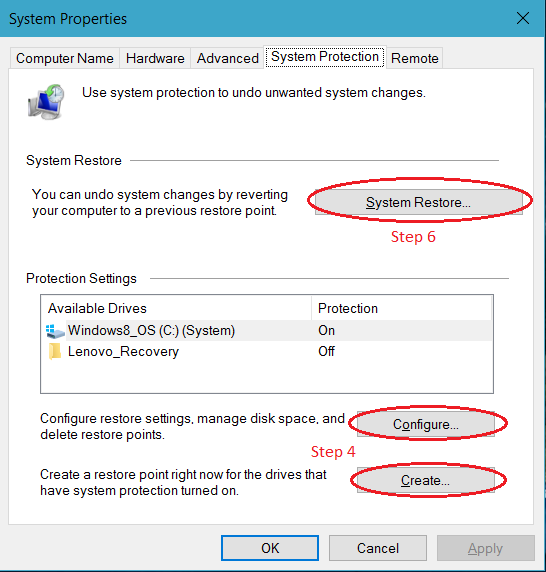
4. You may need to click “Configure” to allocate storage for restore points if you have never done this before. Click “Create” in the bottom right corner (Figure 1).
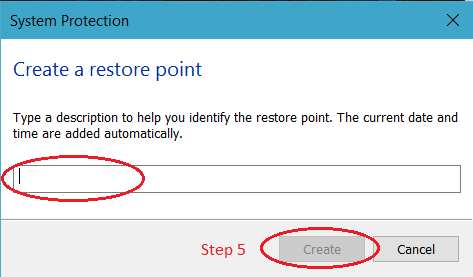
5. Name the restore point something meaningful. The date is automatically saved with the restore point. Click “Create” again (Figure 2).
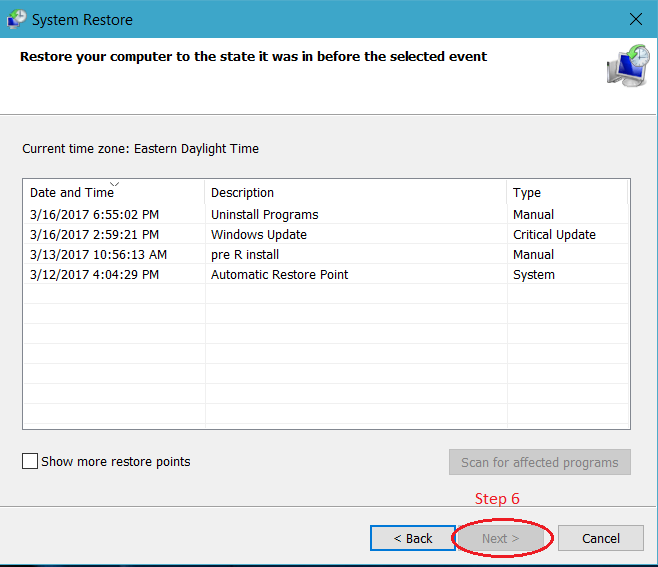
6. Once the restore point is created, you can find it by clicking on the “System Restore” button in the System Properties Window (Figure 1). Here you can select the point you wish to restore to. You shouldn't need to do this now, but you can follow the instructions in this window to execute the restore operation if you ever need to restore your system (Figure 3).
Clear Yout Downloads Folder
This step is intended to free up some space on your storage drive. You may have a bunch of files in you Downloads Folder and you may not even realize it. Generally, storage drives start to slow down if they are almost at their capacity, which will also slow down the rest of your system.
Remove Unnecessary Files From Your Desktop
Keep your desktop as clean as possible. Having a cluttered desktop with a bunch of files, folders, or program shortcuts on it can make your computer boot up slower. The less things you have on your desktop the better off you will be. I personally only have the Recycling Bin and occasionally some temporary files. You should pin any programs you frequently use to the task bar or the start menu.
Disable Programs From Running on Startup
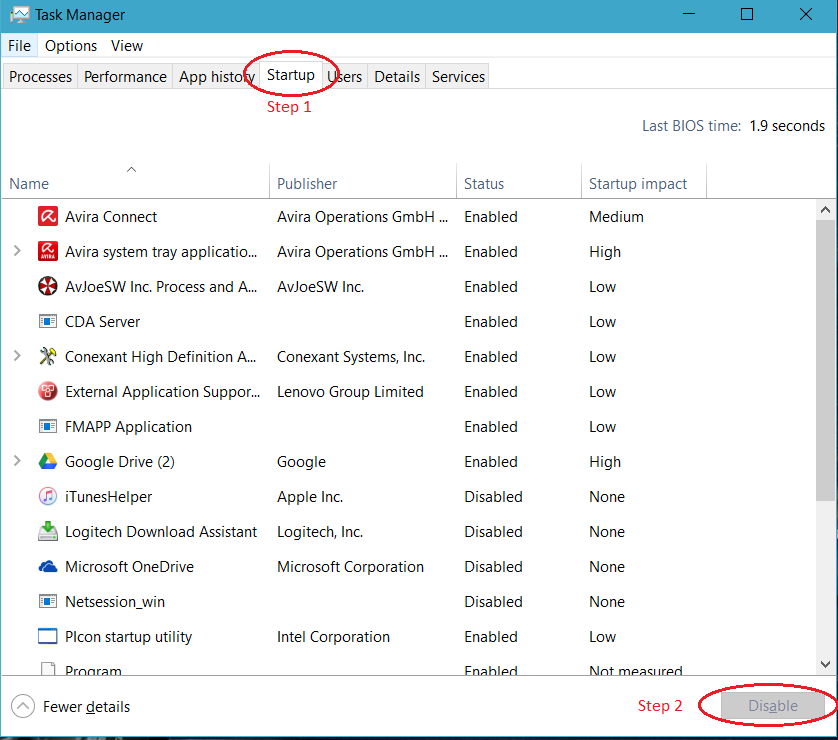
While we are on the topic of boot up times, you can significantly improve your boot time by disabling certain programs from starting when your computer turns on. If you know you won’t use a program every time you use your computer, you should disable it. On the other hand, if you always use a program when you start your computer, such as an anti-virus program, you should enable it.
To choose programs that run on startup:
1. Open Task Manager by pressing “Ctrl + Shift + Esc” and clicking the “Startup” tab.
2. To enable or disable a certain program, select it and press the enable/disable button in the bottom right corner.
Remove Malware and Install a Trusted Anti-malware Program
Malware can cause your computer to slow down. One method to keep your PC free of malware is to have an anti-malware program installed that has live protection and the option for manual scans. You can have these scans performed on a set schedule or you can run them manually every once in a while.
The best malware prevention tool is common sense and the easiest way to fight malware is to keep it from getting on your computer in the first place. Don’t visit risky sites and don’t download files from untrusted sources. Using an ad-blocker extension can also help with preventing malware.
On the other hand, while malware can cause your computer to slow down, so can anti-malware programs if they use a large amount of resources. Some notoriously slow and ineffective anti-malware programs are Norton and McAfee. Find an anti-malware program that offers good protection but doesn’t slow down the rest of your computer in the process.
Uninstall Unused Programs
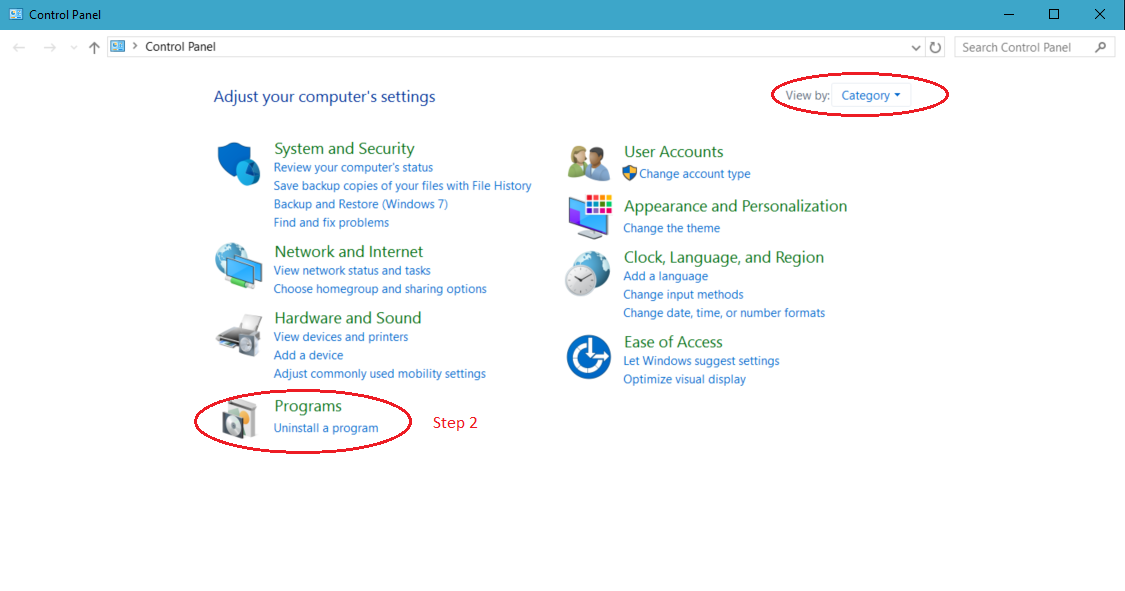
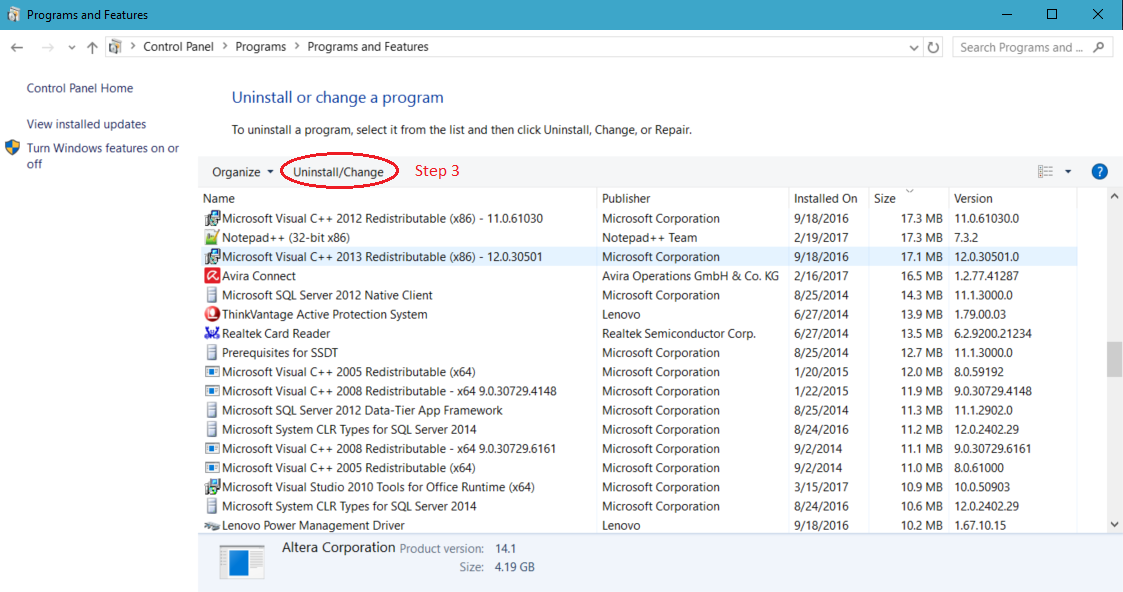
Many laptops and prebuilt computers often come with programs already installed. If your computer has programs that you do not use, it is best to uninstall them so your storage drive has more free space and can operate better. Be careful what you uninstall because some programs you may not knowingly use but they may be important and just running in the background. If you are unsure if it is safe to uninstall something, just run the program or google it to find out what it does. If you do accidentally uninstall an important program, you can just restore your computer to a previous point (Step 1).
To uninstall any unwanted or unused programs:
1. Open the control panel by pressing the Windows Key and typing “Control Panel” to search for it.
2. Click “Uninstall a program” (Figure 1). I have my Control Panel view set to Category.
3. Select a program and click “Uninstall/Change” at the top of the list (Figure 2).
4. If you want to uninstall programs that come with Windows 10 (Xbox app, Weather app, etc.), use Windows PowerShell and the commands found in step 5 of this guide: http://darrellx.com/buildapc/setting-up-your-new-...
Perform a Disk Cleanup
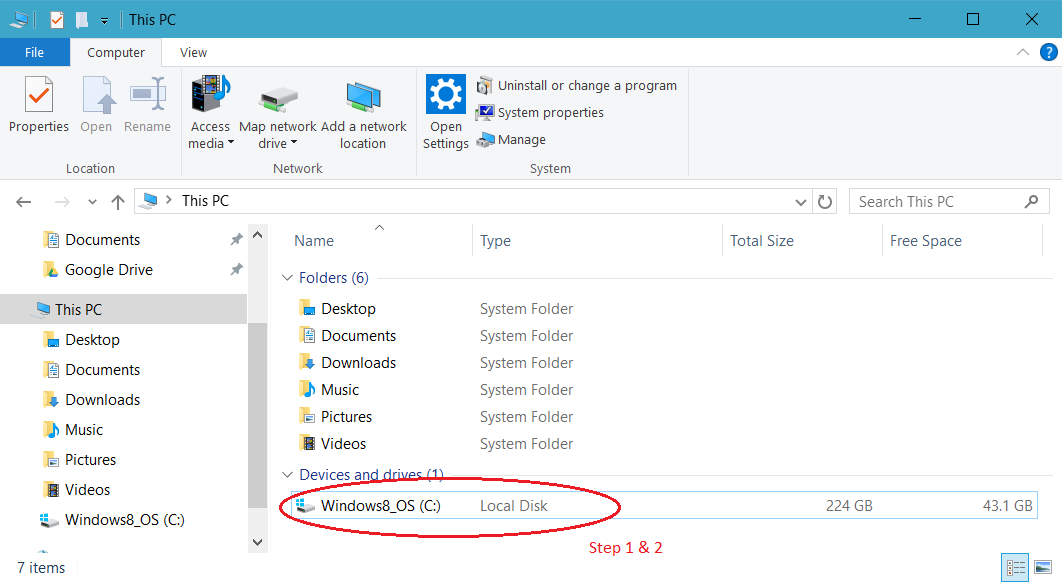
You should regularly perform a disk clean-up. Your computer will be slowed down if it has a bunch of extra files that it doesn’t need.
To perform a disk clean-up:
1. Open File Explorer with “Windows Key + E” (Figure 1).
2. Right click on the drive that you want to perform the clean-up on and select properties.
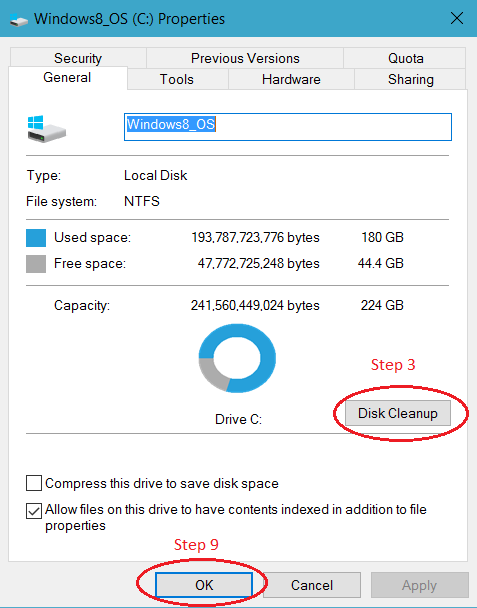
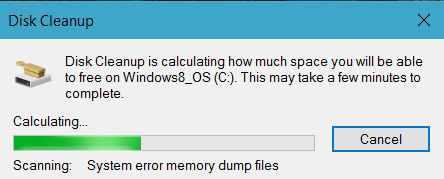
3. Click the “Disk Cleanup” button (Figure 2). A loading window should pop up then disappear shortly (Figure 4).
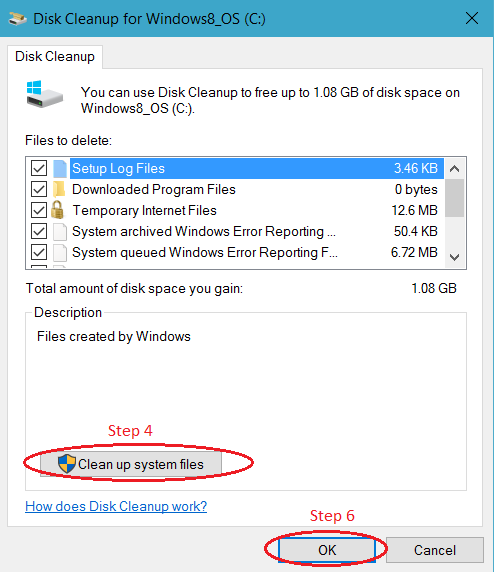
4. Select the items you wish to delete. You can safely delete all of them. Click “Clean up system files” (Figure 3). This window will show you the total amount of disk space you will gain.
5. Another pop up window will appear and disappear shortly (Figure 4).
6. Make sure all of the items you chose to remove are still selected. Click "Ok" (Figure 3).
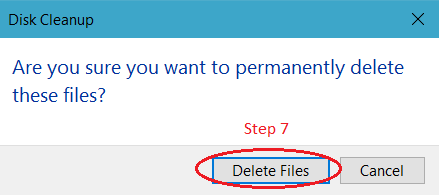
7. Click "Delete Files" (Figure 5).
8. Another pop up window should appear. This one may take longer to go away.
9. The cleanup is now complete and you can click "Ok" in the original Properties window to exit (Figure 2).
Defragment Your Hard Drive
If you have an HDD for storage, you should defragment regularly. However, if you have an SSD, you should NOT defragment it in this step and instead just let Windows take care of it.
To perform a disk defragmentation:
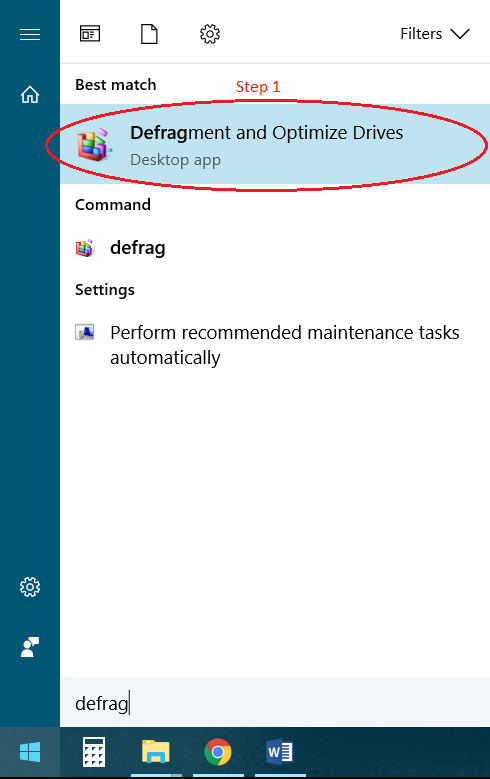
1. Press the Windows Key and search for “defrag”. Click the “Defragment and Optimize Drives” option (Figure 1).
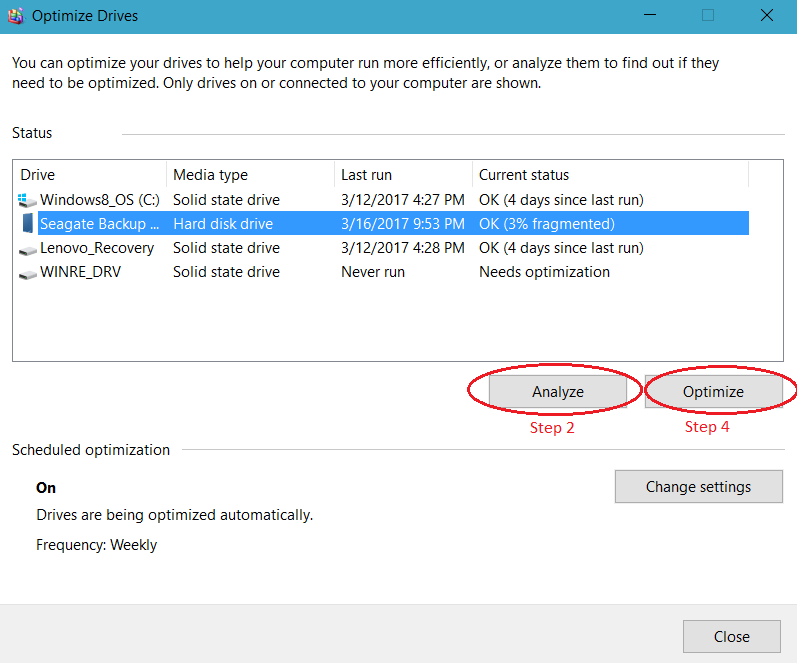
2. Select the hard drive to defragment and click the "Analyze" button (Figure 2). Remember, ONLY DEFRAGMENT HARD DISK DRIVES (HDD), not Solid State Drive (SSD).
3. If the percentage fragmented is above 0%, you may want to defragment it. The higher the percentage is, the longer it will take to defragment.
4. Click the "Optimize" button to defragment the drive (Figure 2). This may take a while and should be done when you aren’t using your computer for other tasks.
5. When the process is finished, the drive should show that it is 0% fragmented. You can now close this window or you can defragment another drive.