How to Make Pancetta
by Dan Zuccarello in Cooking > Main Course
77306 Views, 289 Favorites, 0 Comments
How to Make Pancetta

Until recently, if you had a craving for some thinly sliced, salty cured pork, your best bet was to head to the local grocery store. But with specialty cuts of pork particularly pork belly now becoming more widely available in most supermarkets, the door is opening for the adventurous cook to try his or her hand at making charcuterie at home.
I had been eager to try making charcuterie in my own kitchen for quite a while and finally decided it was time to get started. Looking for a simple first project, I quickly set my eyes on pancetta. A close cousin to bacon, pancetta has similar salty, rich pork flavors, but without the smoke. Moreover, pancetta is infused with bold flavors from the black pepper, dried herbs, and spices added to the curing mixture.
For a beginner in the world of home curing, pancetta was the ideal choice. As far as curing went, the method was pretty basic and didn’t require much hands-on time. Plus, the little equipment required and short grocery list made it perfectly suited for my small apartment kitchen.
A note on buying: Whole pork belly is usually sold in 11-pound slabs, though for my recipe, I stuck with about half of a slab (5 pounds) to keep things more manageable. If you are feeling particularly adventurous, you can buy a whole belly, cut it in half widthwise, then double the spice mixture to make two slabs of pancetta. In either case, pay close attention while selecting your pork and only choose belly that has a fresh, clean smell, light pink skin, and deep-red meat.
Skin It

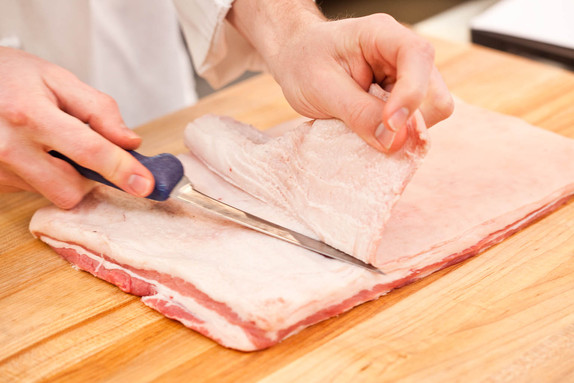
To prepare the pork belly for curing, remove the skin. To do this, I started by separating the skin from the fat layer in one corner of the pork belly. Then, holding the knife almost parallel to the belly with one hand and the corner of skin with my other hand, I made short horizontal cuts, pulling the skin back as I moved across the belly.
Trim It

Once the skin is removed, flip the belly over, trim it to a uniform thickness, and square off the sides. This helps produce a pancetta that rolls evenly. Once trimmed, set the prepared pork belly aside in a large nonreactive baking dish while mixing the cure.
Mix It

For a 5-pound pork belly, most reliable recipes I found called for ¼ cup kosher salt and 1 teaspoon pink salt (also known as curing salt). Since the balance of salt to protein can be delicate when it comes to achieving a proper cure, I kept to these quantities. Adding a variety of fragrant ingredients to the basic cure infuses the belly with flavor. I used black pepper, brown sugar, rosemary, juniper, garlic, red pepper flakes, bay leaves, thyme, and nutmeg. Mix them together thoroughly to make sure they are distributed evenly.
Rub It

Spread the cure over the belly and rub it into the sides and edges.
Sprinkle It

While researching recipes for my pancetta, I found one that called for sprinkling a little red wine onto the cure for added flavor. I gave it a try with one of my batches of pancetta and really enjoyed the added fragrance it brought. When you do it, make sure to sprinkle the wine gently to prevent the cure from washing away.
Cure It

Once the belly is coated with the cure and wine, wrap it tightly in plastic wrap and place it in the refrigerator to cure until the soft fleshy texture of the belly turns firm. Over the course of fully curing (it took me about 7 days), flip the belly daily and redistribute the rub mixture.
Rinse It

After the pancetta is fully cured, rinse off the cure mixture thoroughly, making sure to remove any herb or spice pieces that remain stuck to the meat. After rinsing, pat the belly dry with paper towels.
Spice It

With the meat side of the pancetta facing up and the long side facing you, sprinkle on 2 tablespoons coarsely ground black pepper a typical addition before rolling pancetta. The fresh pepper adds additional pungent notes to the final pancetta.
Roll It

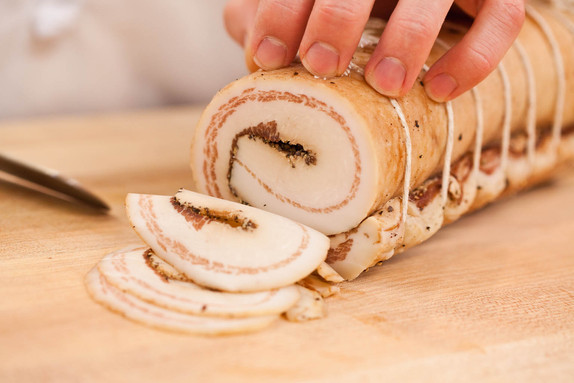
It’s important to roll the pancetta as tightly as possible to avoid any air pockets in the center of the cylinder, which could provide space for bacteria to grow. To roll the pancetta, start with the closest side and tightly roll it away from you.
Tie It

Beginning in the center of the pancetta and working your way out to the sides, tie the cylinder with kitchen twine at ½-inch intervals the tighter, the better.
Dry It

Once the pancetta is completely tied, trim away excess twine. After forming a loop on one end of the pancetta for hanging, hang it in a cool, humid place, away from sunlight, and let it dry for 2 weeks. The ideal conditions are somewhere around 60 degrees with 60% humidity (my basement was a good spot).
Slice It

After drying, your pancetta will be ready to slice.