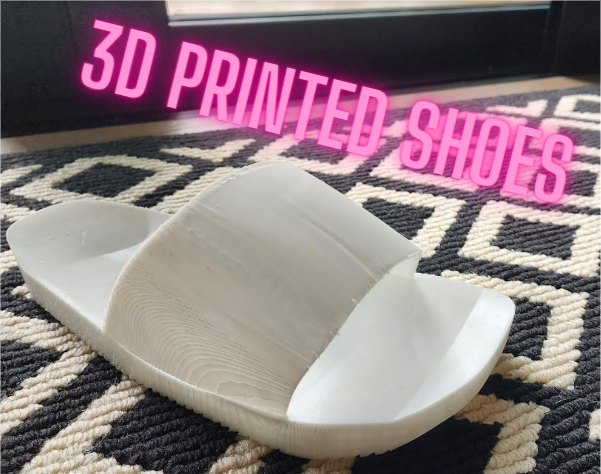
How to Make 3D Printed TPU Slippers
by weetuswotis in Workshop > 3D Printing
5034 Views, 7 Favorites, 0 Comments
How to Make 3D Printed TPU Slippers
Hello, my name is Pannawhath (Pun) Punwatanawit from Bangkok, Thailand. I am a rising senior at the International School of Bangkok (Located in Nonthaburi).
I have always been interested in 3D printing and have used Fusion 360 to design various objects such as small toys, vases, and adaptive devices for the disabled.
The reason that I chose to design a shoe is that 3D printed shoes are starting to come to market and gain popularity and it just seems cool to be able to manufacture one myself. I also want to improve my skills working with forms in Fusion 360.
Though it does not look as close to the shoes that make it to the news and may not be quite practical due to the printing time and the price/amount of material used, this is a proof of concept that a working shoe can be produced at home.
In this Instructable, I will try to make the steps to making it as detailed and as clear as possible so that there will not be confusion on the steps. Consequently, it is quite long and if you're experienced with Fusion 360, you are welcome to freestyle and skip a few steps.
Supplies
.png)
- 1x working computer with Fusion 360 Installed
- 1x FDM 3D printer, preferably with a bed of 250mm x 250mm area
- 300g of 95A TPU (at least, per shoe)
- 1x working smartphone with camera app and document scanner app installed
- 1x A4 piece of paper
- 1x Pencil
- Fruit dehydrator for drying TPU before printing (not required but recommended)
- 1x 12-inch/30cm ruler
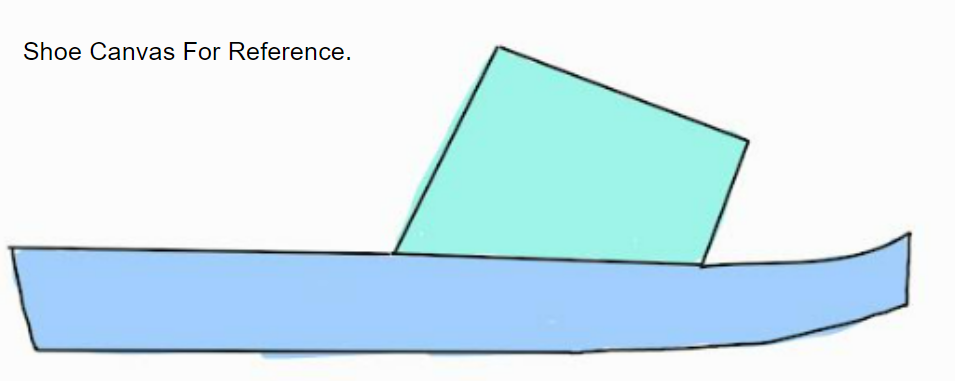
- Reference photo of sandal side used as a canvas on Fusion 360 shown above or your preferred type of shoe that you find online (please download as .jpg to computer)
- 1x flush cutter for removing supports
- 1x Heat gun or hairdryer for making removing supports easier
Trace the Bottom of Your Foot
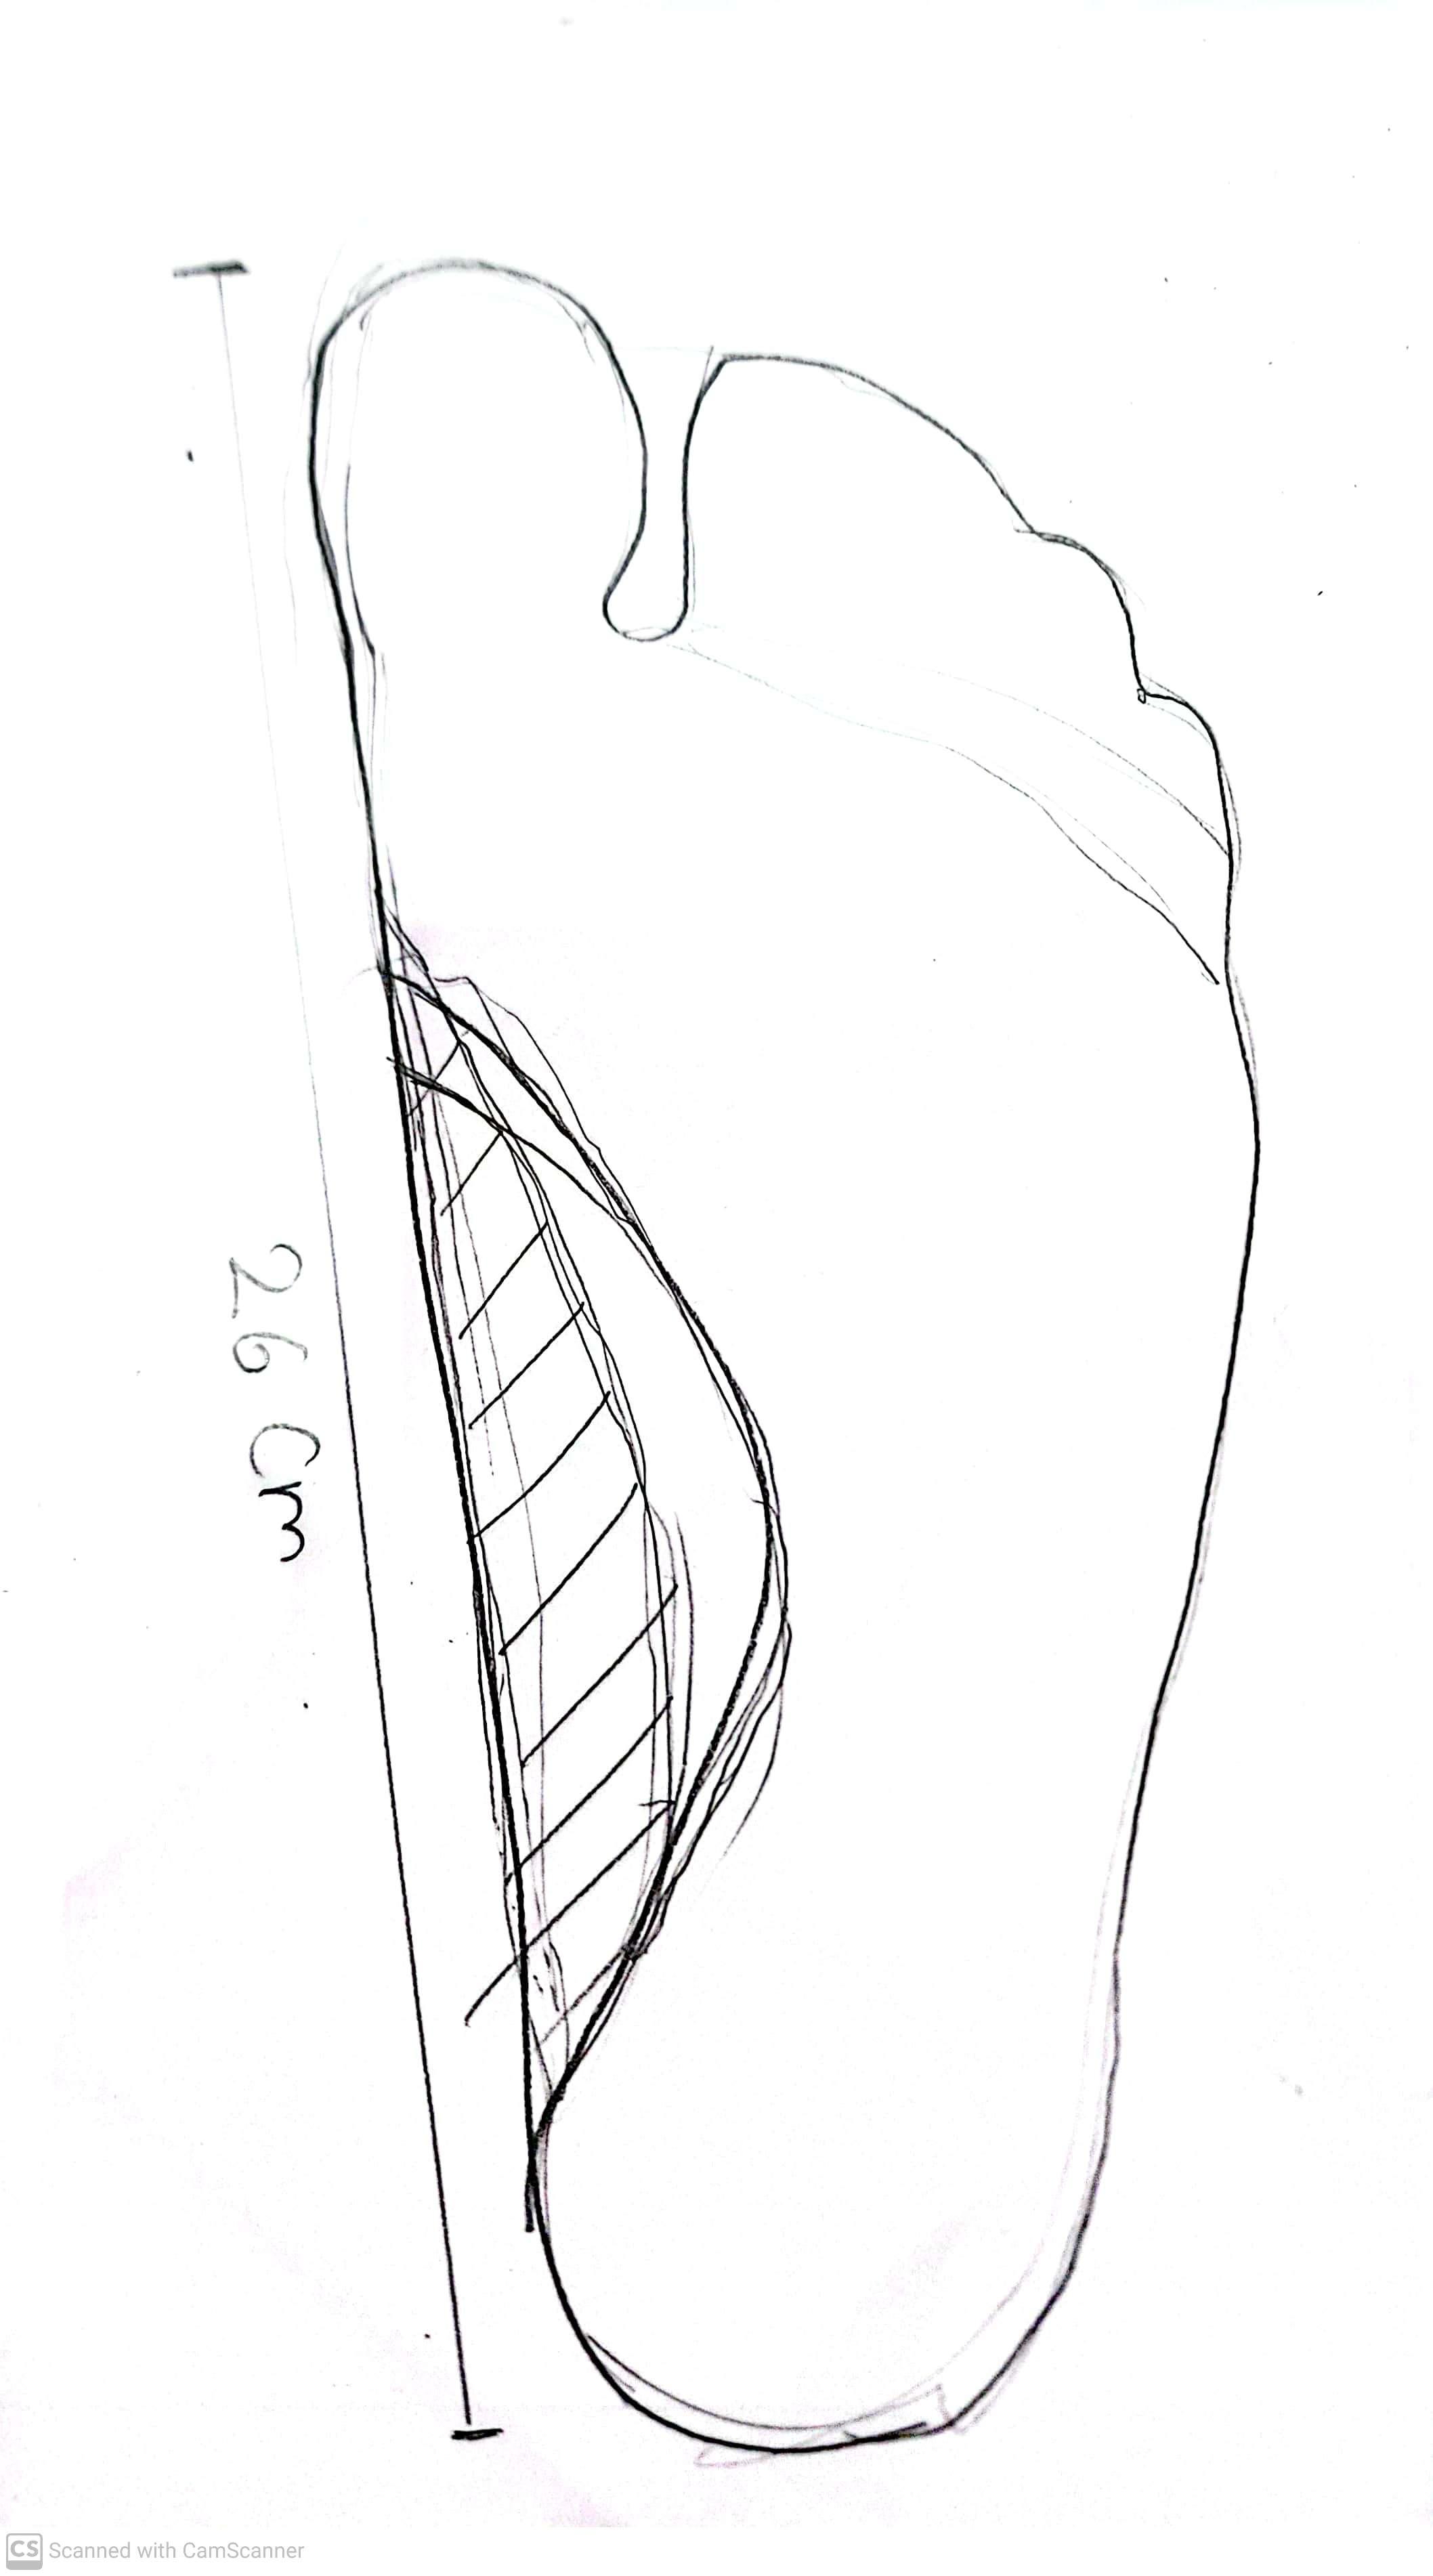
In this step, we will trace the outline of the bottom of our feet that we will use as a canvas for forming the shape of our slipper.
- Retrieve 1 A4 paper, 1 pencil, 1 ruler, and, 1 smartphone.
- Place your bare foot on the A4 paper (either left or right is fine).
- Take the pencil and draw an outline of your foot as shown in the photo above.
- Take the ruler and approximate the longest distance between the tip of the big toe to the heel of the foot. Take the pencil and draw a line approximating the distance and write the distance measured down on the paper as shown in the photo above.
- Load the document scanner app on the smartphone and scan the outline of your foot.
- Send the photo to your computer through the means you prefer.
Import Shoe Reference Photo Into Fusion 360
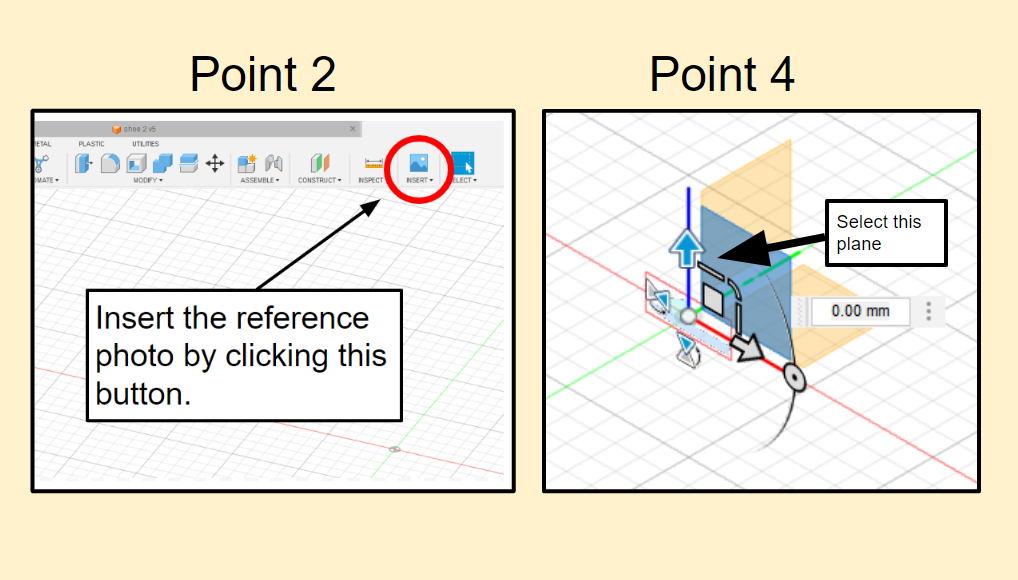
- Open Fusion 360 on your computer
- Press the button shown in the photo above on Point 2.
- Locate the shoe/slipper canvas on your computer and insert it into Fusion 360.
- Select the plane that is perpendicular to the default plane to insert the slipper canvas as shown in the photo above indicated on Point 4.
- Press OK on the canvas sidebar to confirm the place of the photo.
Resizing Shoe Canvas
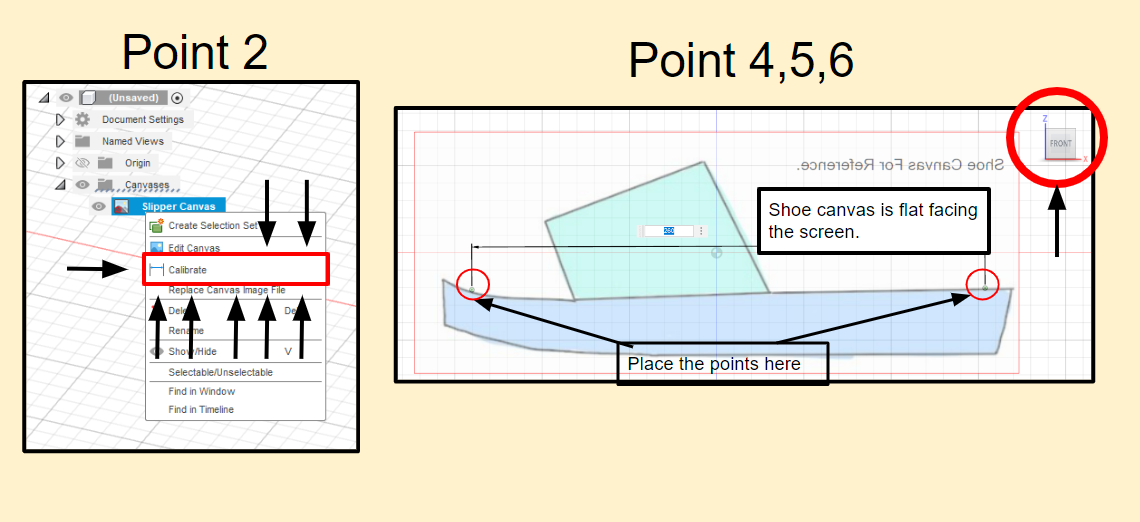
We will resize the slipper canvas photo to make it the size of your feet.
- On the sidebar BROWSER under canvases you will find the photo of your canvas.
- Right click on the photo and click on "calibrate" as shown in the photograph above.
- Use your scroll wheel on your mouse to zoom into the shoe canvas and fill the screen.
- Press on the viewing cube on the top right of Fusion 360 to make the canvas flat facing you and not angled. Refer to the photograph above.
- Place one point near the front of the shoe and one point on the heel of the shoe in approximate location as shown in the photograph above.
- A textbox will appear for you to tell Fusion 360 what the distance between the two points you have placed is to equate to. Input the distance that you have measured between the big toe to the heel of your foot in STEP 1 in correct units. Fusion 360 is likely set to millimeters(mm). Refer to the photo above.
- Press "enter" on your keyboard.
Importing and Resizing Foot Outline
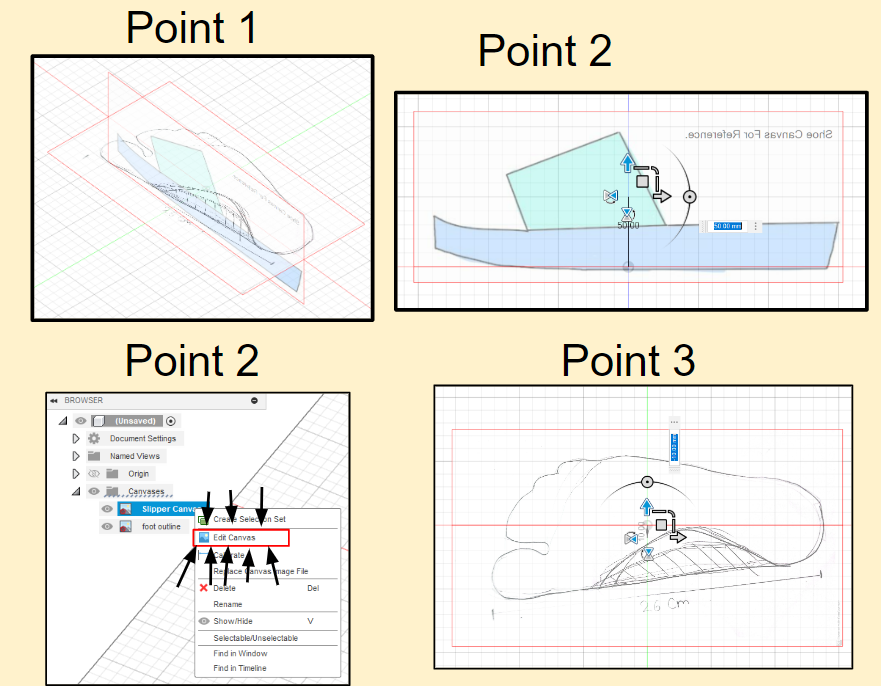
- Follow similar steps in STEP 2 and STEP 3 to import and resize the foot outline canvas. However, with the foot canvas, place the outline parralel to the default plane as shown in the photo above. Rotate the image as necessary. When resizing, calibrate the image to the actual written measurement of the toe to heel length on paper. In my case, I measured 26cm.
- Now, we must adjust the location of the canvases. To do this, right click the canvas file under BROWSER -> Canvases -> (your selected canvas). Start by moving the shoe canvas up so that it sits upon the default plane.
- Then, switch to birds eye view by selecting the viewing cube on the top right for "TOP" view. Now, click to edit the foot outline canvas and adjust it so that the shoe canvas disects the foot by approximately half.
Please refer to photos above.
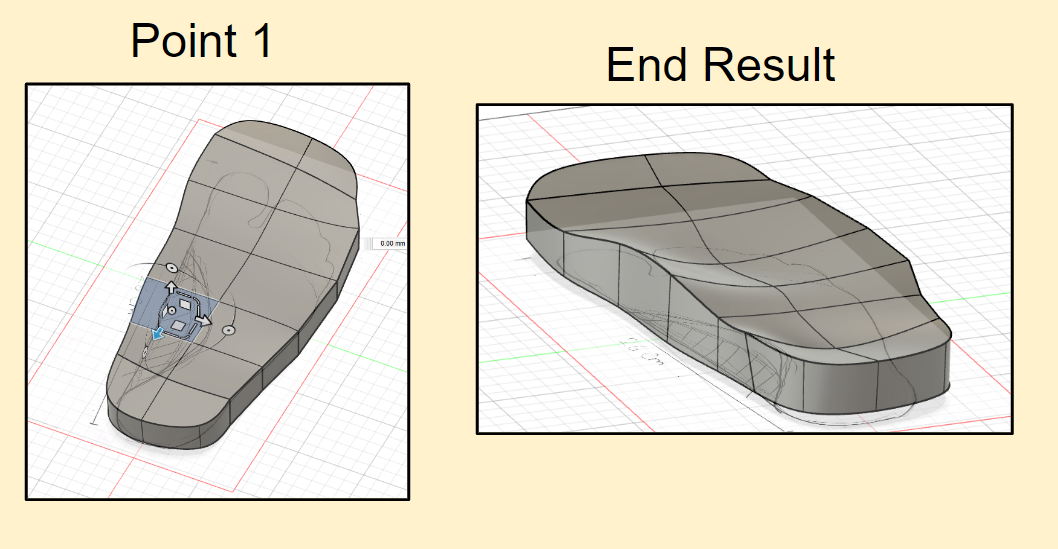
Creating the Form Outline for the Shoe Sole
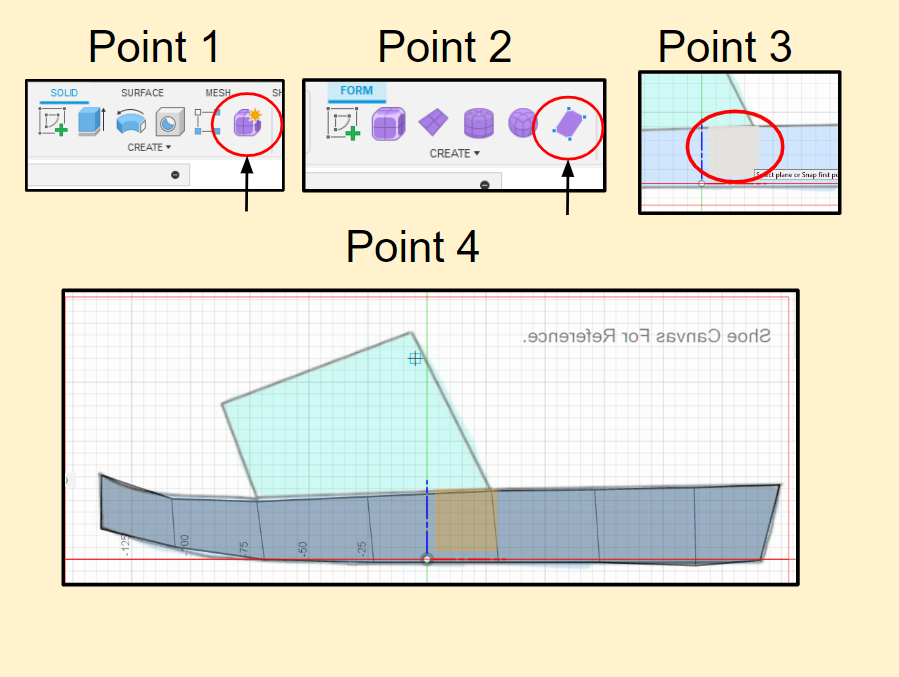
In this step, we will start creating the overall outline of the shoe sole that we will then, in further steps, make it form a sole structure.
- Click on the "Create Form" button. Refer to photograph above.
- Click on "Create Face" button. Refer to the photograph above.
- A face/plane selection will appear. Click on the plane that is parralel to the shoe canvas. Refer to the photograph above.
- The face tool will allow you to create a mask of planes over the shoe canvas. Each point clicked will determine and connect each point to make a 4-point plane. Connect these planes until you have a mask of the shoe sole similar to what is shown in the photograph above. You do not have to be too accurate with this. Also, do not make too many faces as it will be quite difficult to alter later.
- Once done, click ok on the window to the right to confirm that you have completed the faces. DO NOT CLICK FINISH FORM.
Creating 3D Form of Shoe Sole
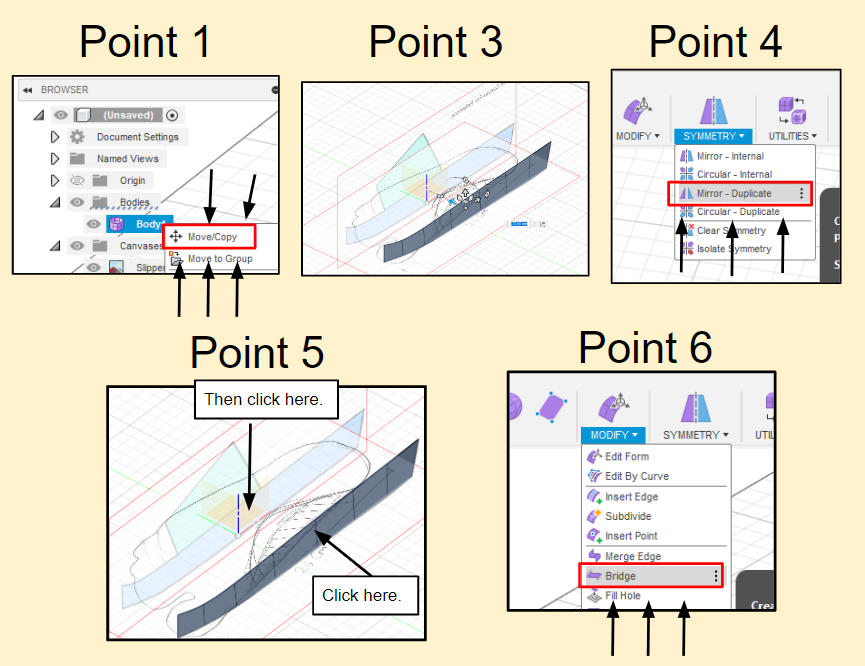
- Under BROWSER -> Bodies -> (Body1), right click and select "Move/Copy". Refer to the photograph above.
- Use the ruler to measure the widest part of your foot. Record this number
- Move the Body1/Form that we have just created in STEP 5 parralel but away from the shoe canvas by: (the number from point 2 + 1 cm) / 2. Ensure that you have converted to the correct units for Fusion 360. Refer to the photo above.
- For me, my widest part is 10cm. I have to move the body/form away from the canvas by 55mm.
- Press OK on the right window to confirm.
- Click the dowpdown "Symmetry" button and select "Mirror - Duplicate" button. Refer to the phograph above.
- Click the body to select the T-Spline Body that will be mirrored and duplicated.
- Then click the Mirror plane that the body will be mirrored and duplicated over. Select the plane that is parralel to the shoe canvas.
- Once done, click OK on the window to the right.
- Please refer to the photograph above.
- On the taskbar on top, under the "Symmetry" dropdown, select the "bridge" tool.
*This step is continued in Step 7
Creating 3D Form of Shoe Sole Continued
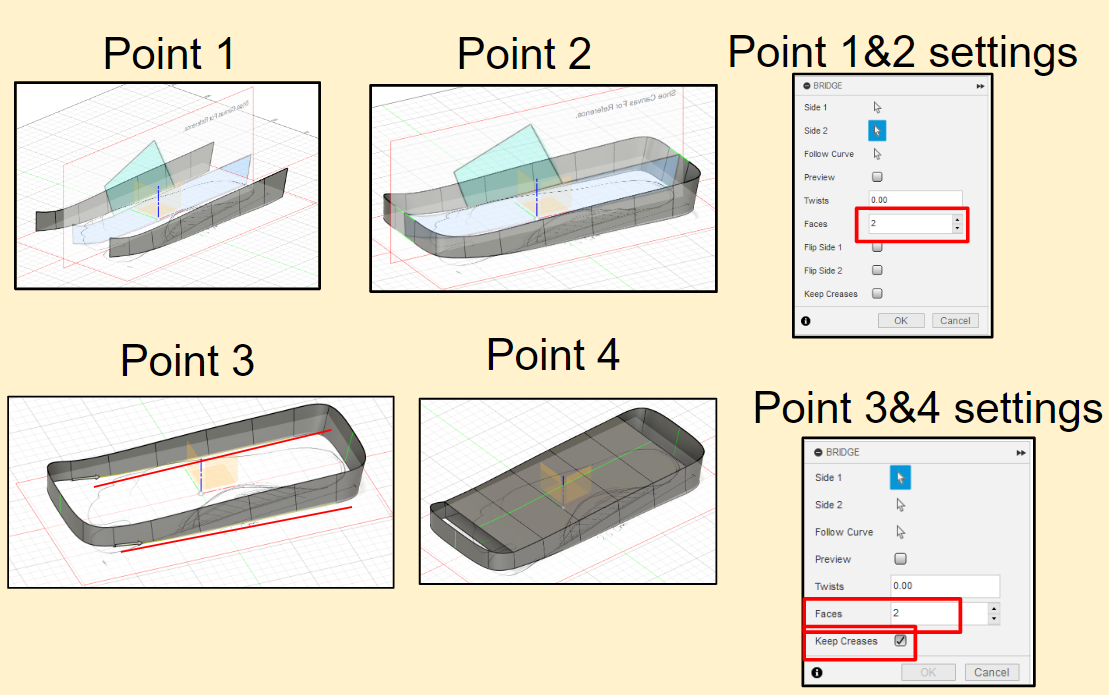
- Click on the two edges as shown on the photograph above as well.
- On the side window, change the face number to 2.
- Click OK to confirm bridge.
- Repeat the bridge process for the back edge as well. This requires clicking on the bridge tool again and selecting the bridge sides. The results are shown in the photograph above.
- Using the same bridge process. Select the bridge tool again. While holding "shift" on your keyboard, click all the edges of the faces on one side except for the corners, then do the same thing on the opposite side. This is shown in the photograph above.
- On the right window for the bridge settings, check the button that says "Keep Creases". This will make it so that the sole is flat.
- On the same window, change the number of faces to 2.
- Press OK to confirm.
- Repeat this process with the top edges, again, check to "Keep Creases". The expected results are shown in the photo above.
Check to confirm in the photos that you have done everything correctly.
Using "fill Hole" to Complete Solid Form
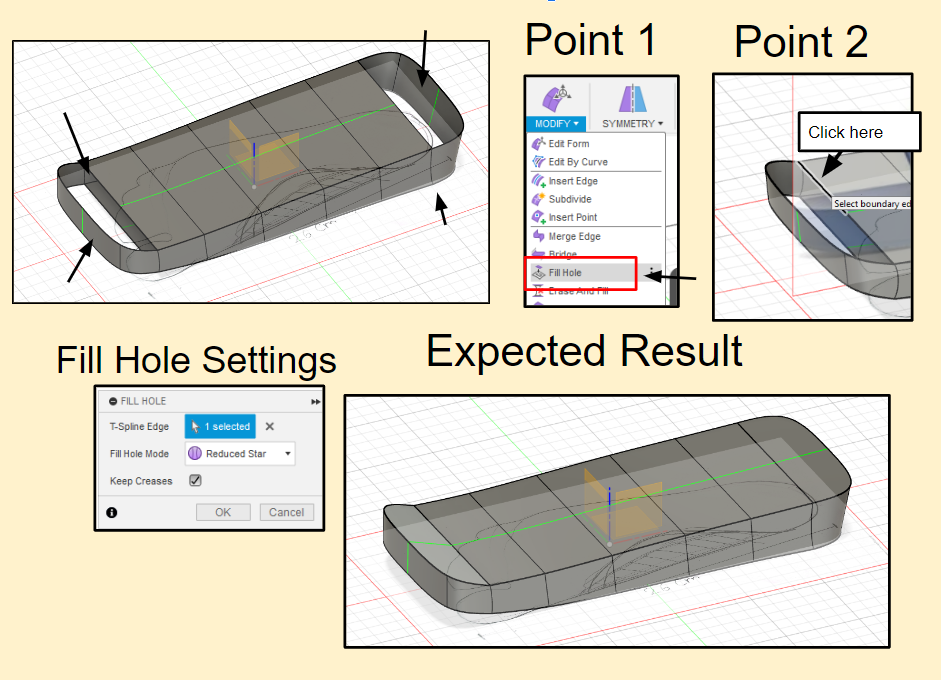
To complete and fill the shape of the sole, we must fill in the remaining empty spots with the "Fill Hole" Tool. In the photo above, where the arrows are pointing are the 4 places that need to be filled. 2 on top of the sole and 2 on the bottom of the sole.
- Under the "MODIFY" dropdown, click on the "Fill Hole" tool.
- Click/Select one edge that is on the hole. Shown in photograph above.
- Ensure that the settings match the one shown in the photograph where:
- "Keep Creases" is checked.
- "Fill Hole Mode" is "Reduced Star"
- Press "OK" to apply the tool.
- Repeat for all 4 holes on the sole.
Customizing the Shoe Sole to Fit Our Feet
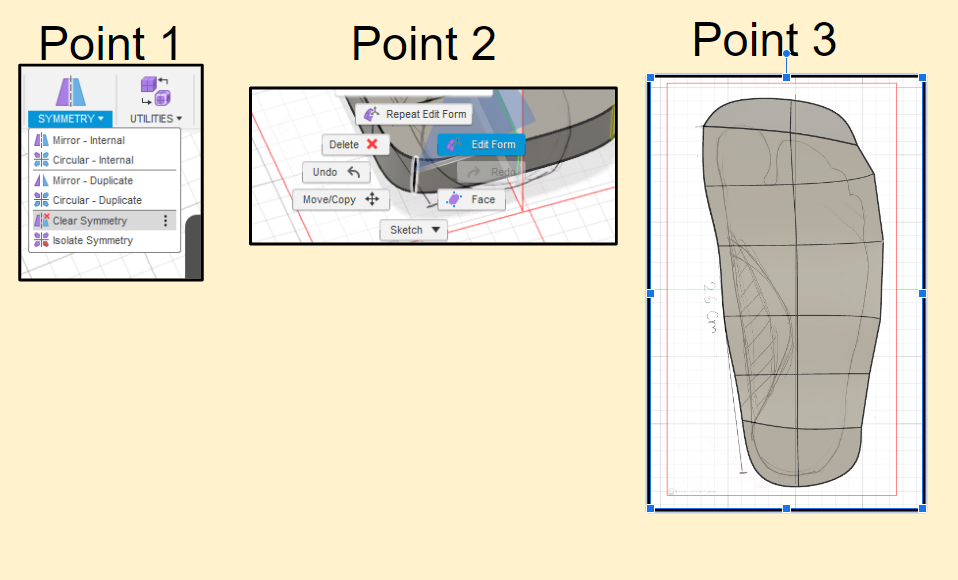
- Click on the "SYMMETRY" dropdown and select "remove symmetry"
- Right click on a side and click on "edit form".
- Switch to birds eye view by clicking on the TOP button of the view cube and adjust the form to fit the shape of the feet accordingly. This is done by adjusting multiple sides.
- Ensure that you do not perfectly fit the form with the foot outline exactly and leave some margin so that the foot can move around on the shoe.
- Your result should look somewhat similar to the one in the photograph above.
Customizing the Depth Variation in the Shoe
Since the bottom of our feet are uneven, we will vary the depth of the shoe sole to accomodate for the depth variation and make wearing the shoe more comfortable.
- Similar to step 9,right click on a face, or a point and click "edit face".
- Move the faces up and down to adjust for the shape of your feet.
- I tried to mark on the foot outline where I should increase the height of the sole as seen colored in on the outline.
- The heel is pushed down.
- The part touching the toe will also be pushed down.
- Now, press the checkmark on the top toolbar to "FINISH FORM". It will turn the form into a Solid.
Making the Feet Strap of the Slipper
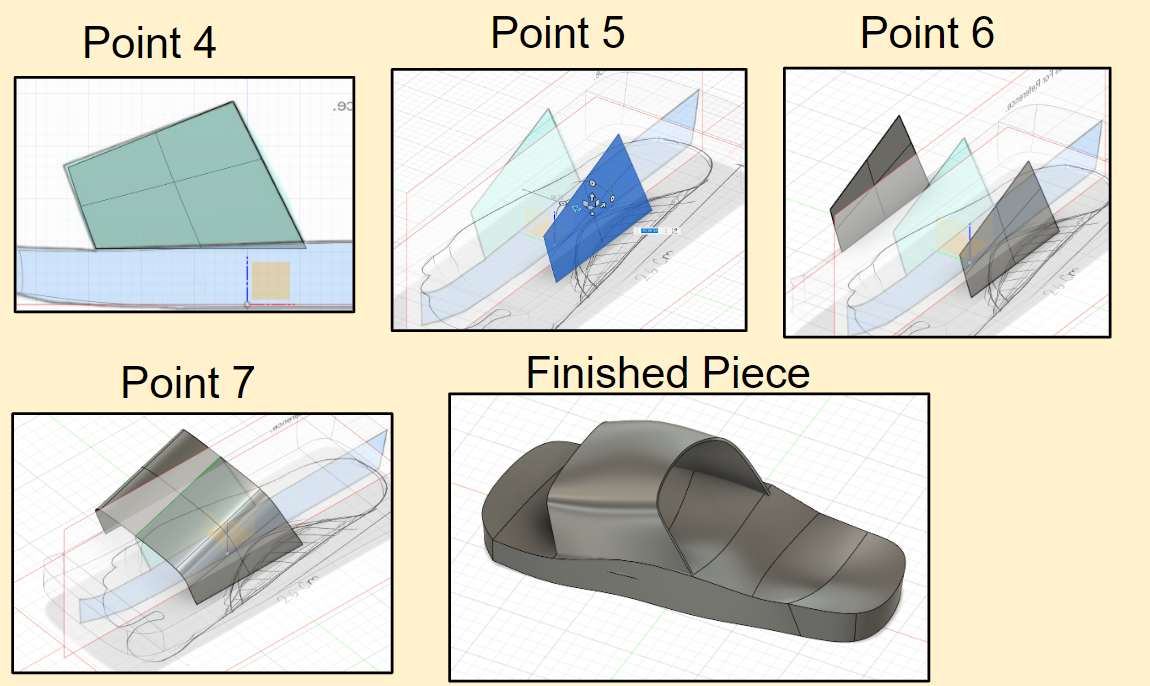
We are currently missing the shoe strap that keeps the foot attatched to the shoe sole.
I will not be going in too much depth in this step as these have similar procedures as before.
- Like before, change the view to see the whole shoe/slipper canvas.
- Click the purple cube on the taskbar to "Create Form".
- Click on the face tool on the taskbar similar to before.
- When prompted, choose the plane that is parralel to the shoe canvas.
- Make a face body that is similar to the one shown in the photograph above.
- Press OK to complete the face.
- Select edit body on the sidebar and move the body/faces away from the canvas the same distance in Step 6 - 5mm.
- Mirror and duplicate the shoe strap body/face to the other side of the canvas.
- Click OK to confirm.
- Bridge the top of both faces together with "Keep Creases" ticked off.
- Click OK to confirm.
- Clear the symmetry (similar to Step 9) and right click on the parts of the faces/body to "edit form" and adjust to fit within the shoe sole.
- Once done editing, thicken the shoe strap by doing to Symmetry dropdown -> Thicken.
- When prompted, thicken by 2mm.
- Click OK to confirm.
- Once finished, click the checkmark to "Finish Form".
Using the same method, you can add addition heel straps to make it feel less like a slipper and more of a formal shoe.
Adding Grip
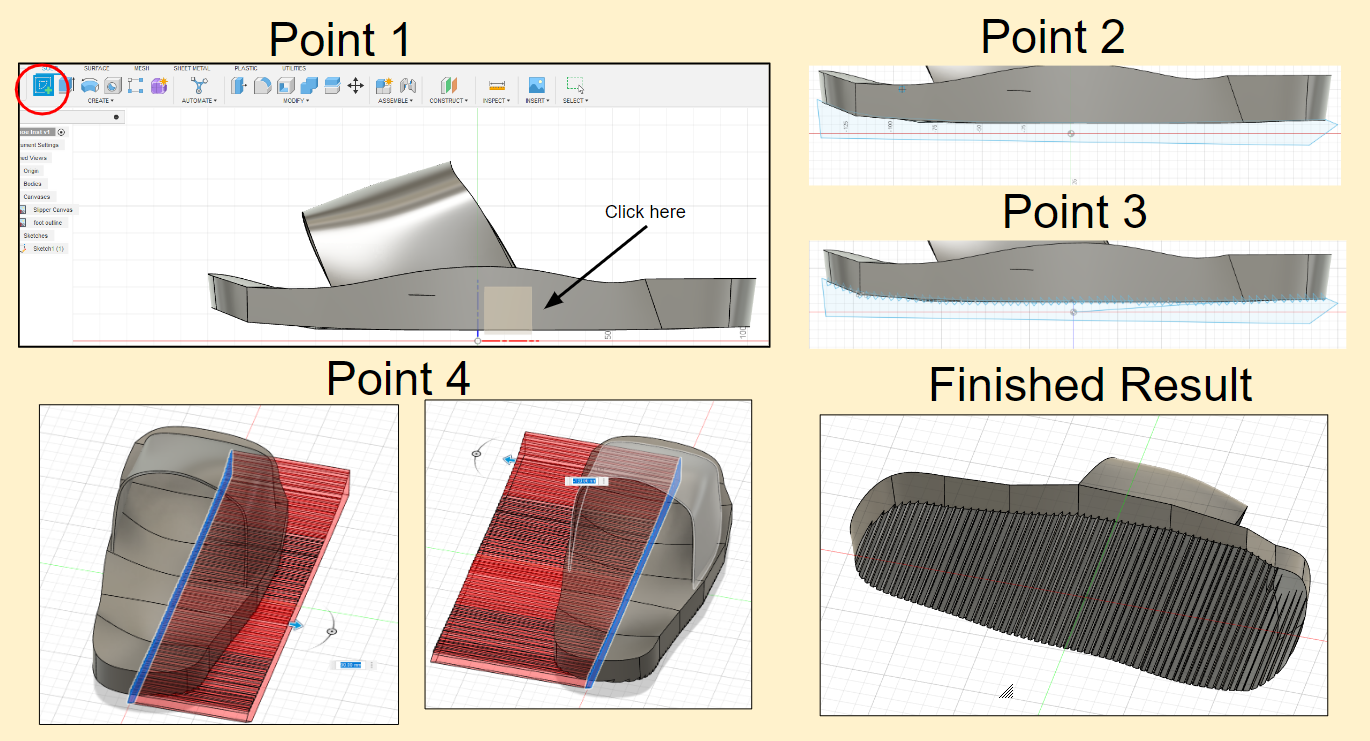
We now need to add gripping so that when we walk with the shoes, it does not slip on the surface we are walking on. In this case we are adding very simple grooves, however you can be creative with this.
- Make a drawing on the same plane as the side of the shoe.
- Zoom in and use the drawing tool(line tool) to trace out something similar to what is shown in the photograph. It will then later be used to cut grooves into the show sole so make sure that the lines are overlapping some part of the shoe. This is done to reduce inconsistency.
- Create tiny triangles and shown in the photo and duplicate it until it fills the whole sole.
- Highlight the drawing and extrude it to both sides of the shoe to cut in the gripping grooves.
- The finished result is shown in the photograph above.
- Export the file as an STL and drag it into your slicer.
Printing

When putting the stl into the slicer, it may not fit at first, but try to rotate and move the shoe to make it fit the bed. I personally had to turn the shoe sideways and relied on the supports to keep it up. If your printing bed is small, you can turn the shoe vertical and print that way.
- The shoe will be printed with 95A TPU. Be sure to load it in to the printer. TPU is used because of its flexibility and most rubber-like properties that are most similar to shoes.
- If you have a dehydrator, please use it to dehydrate the TPU spool before printing. I recommend at least 5 hours of dehydration at 50 celcius before printing. TPU is very hydroscopic (meaning it absorbs moisture) and will cause incosistencies and errors while printing if the TPU is wet.
- I reccomend printing at a higher layer height in order to save time. It is a shoe that does not need much detail. I personally used 0.28mm layer height.
- I recommend printing at less than 50mm/s
- Turn on the supports at a threshold angle of 40 degrees. Type: Normal
- Use low infill to reduce weight. I used 15% and it is still quite stiff. Also experiment with different infill patterns to adjust the feeling of wearing.
- Assuming that both your feet are the same size and shape, you can mirror the stl in the slicer to make the shoe for the other foot that you did not design for.
I added the stl that I made in case you do not want to make it step by step and want to try the printing right away.
Downloads
Removing Supports
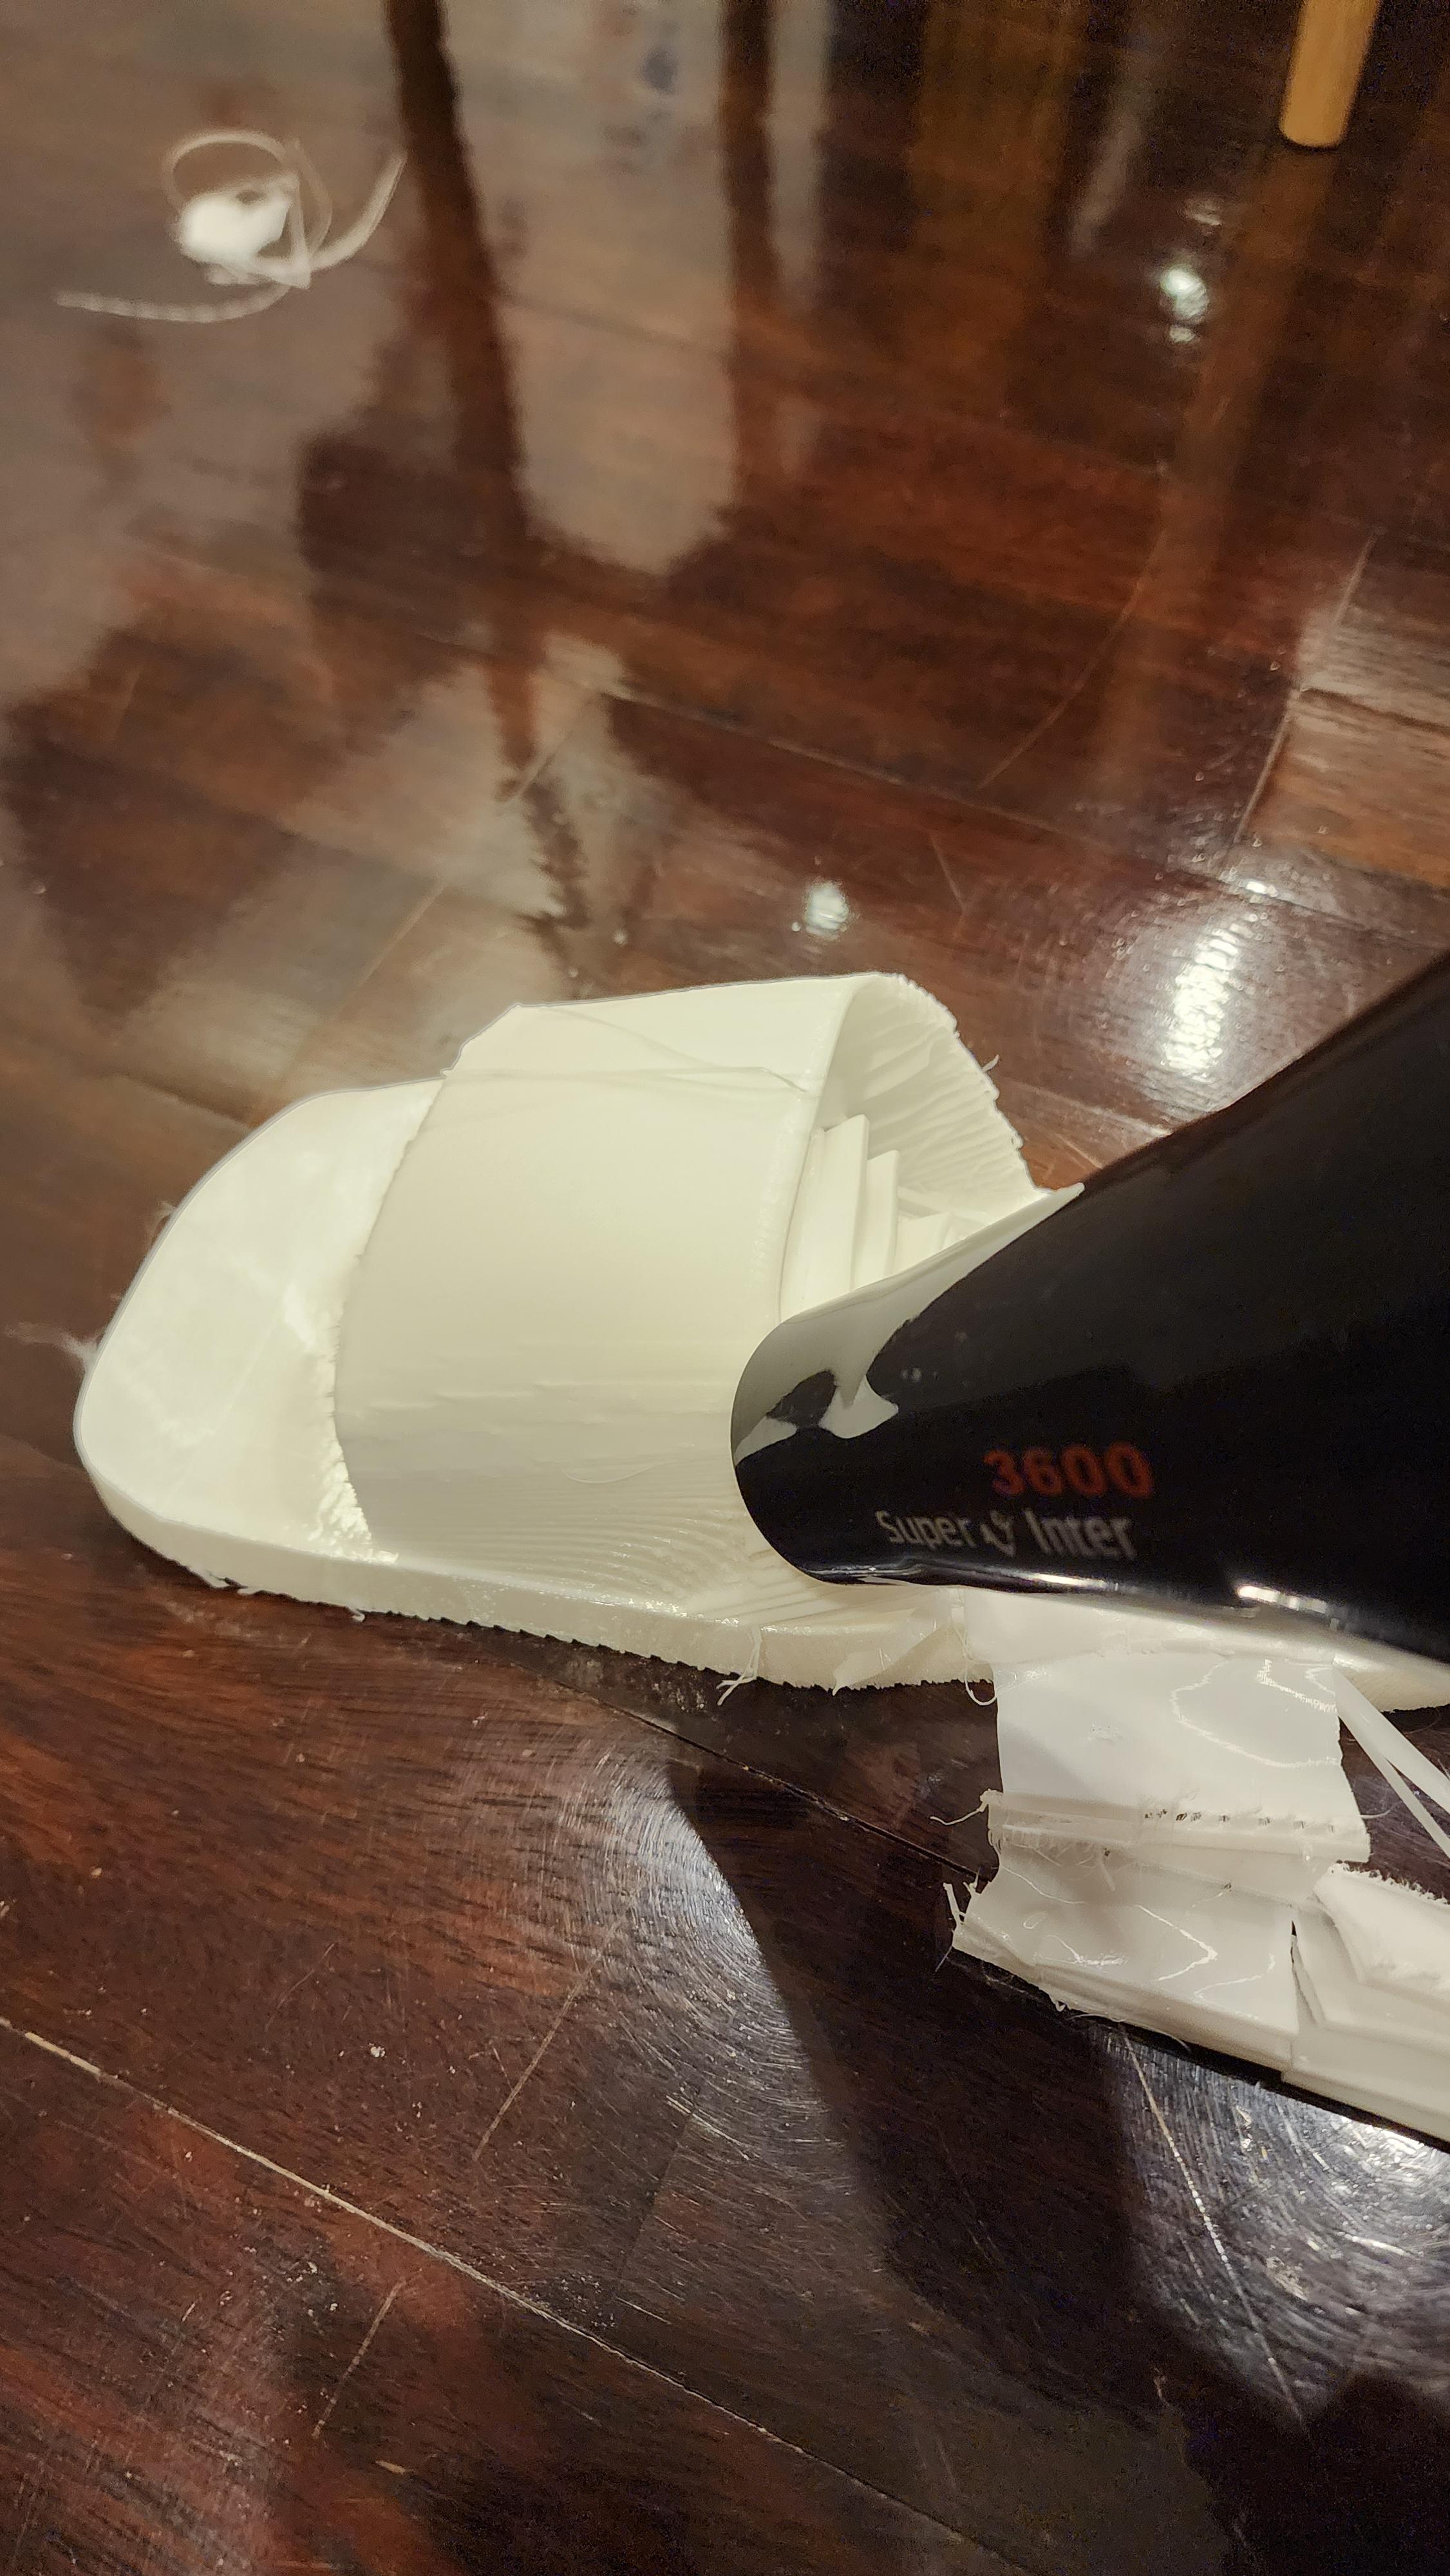
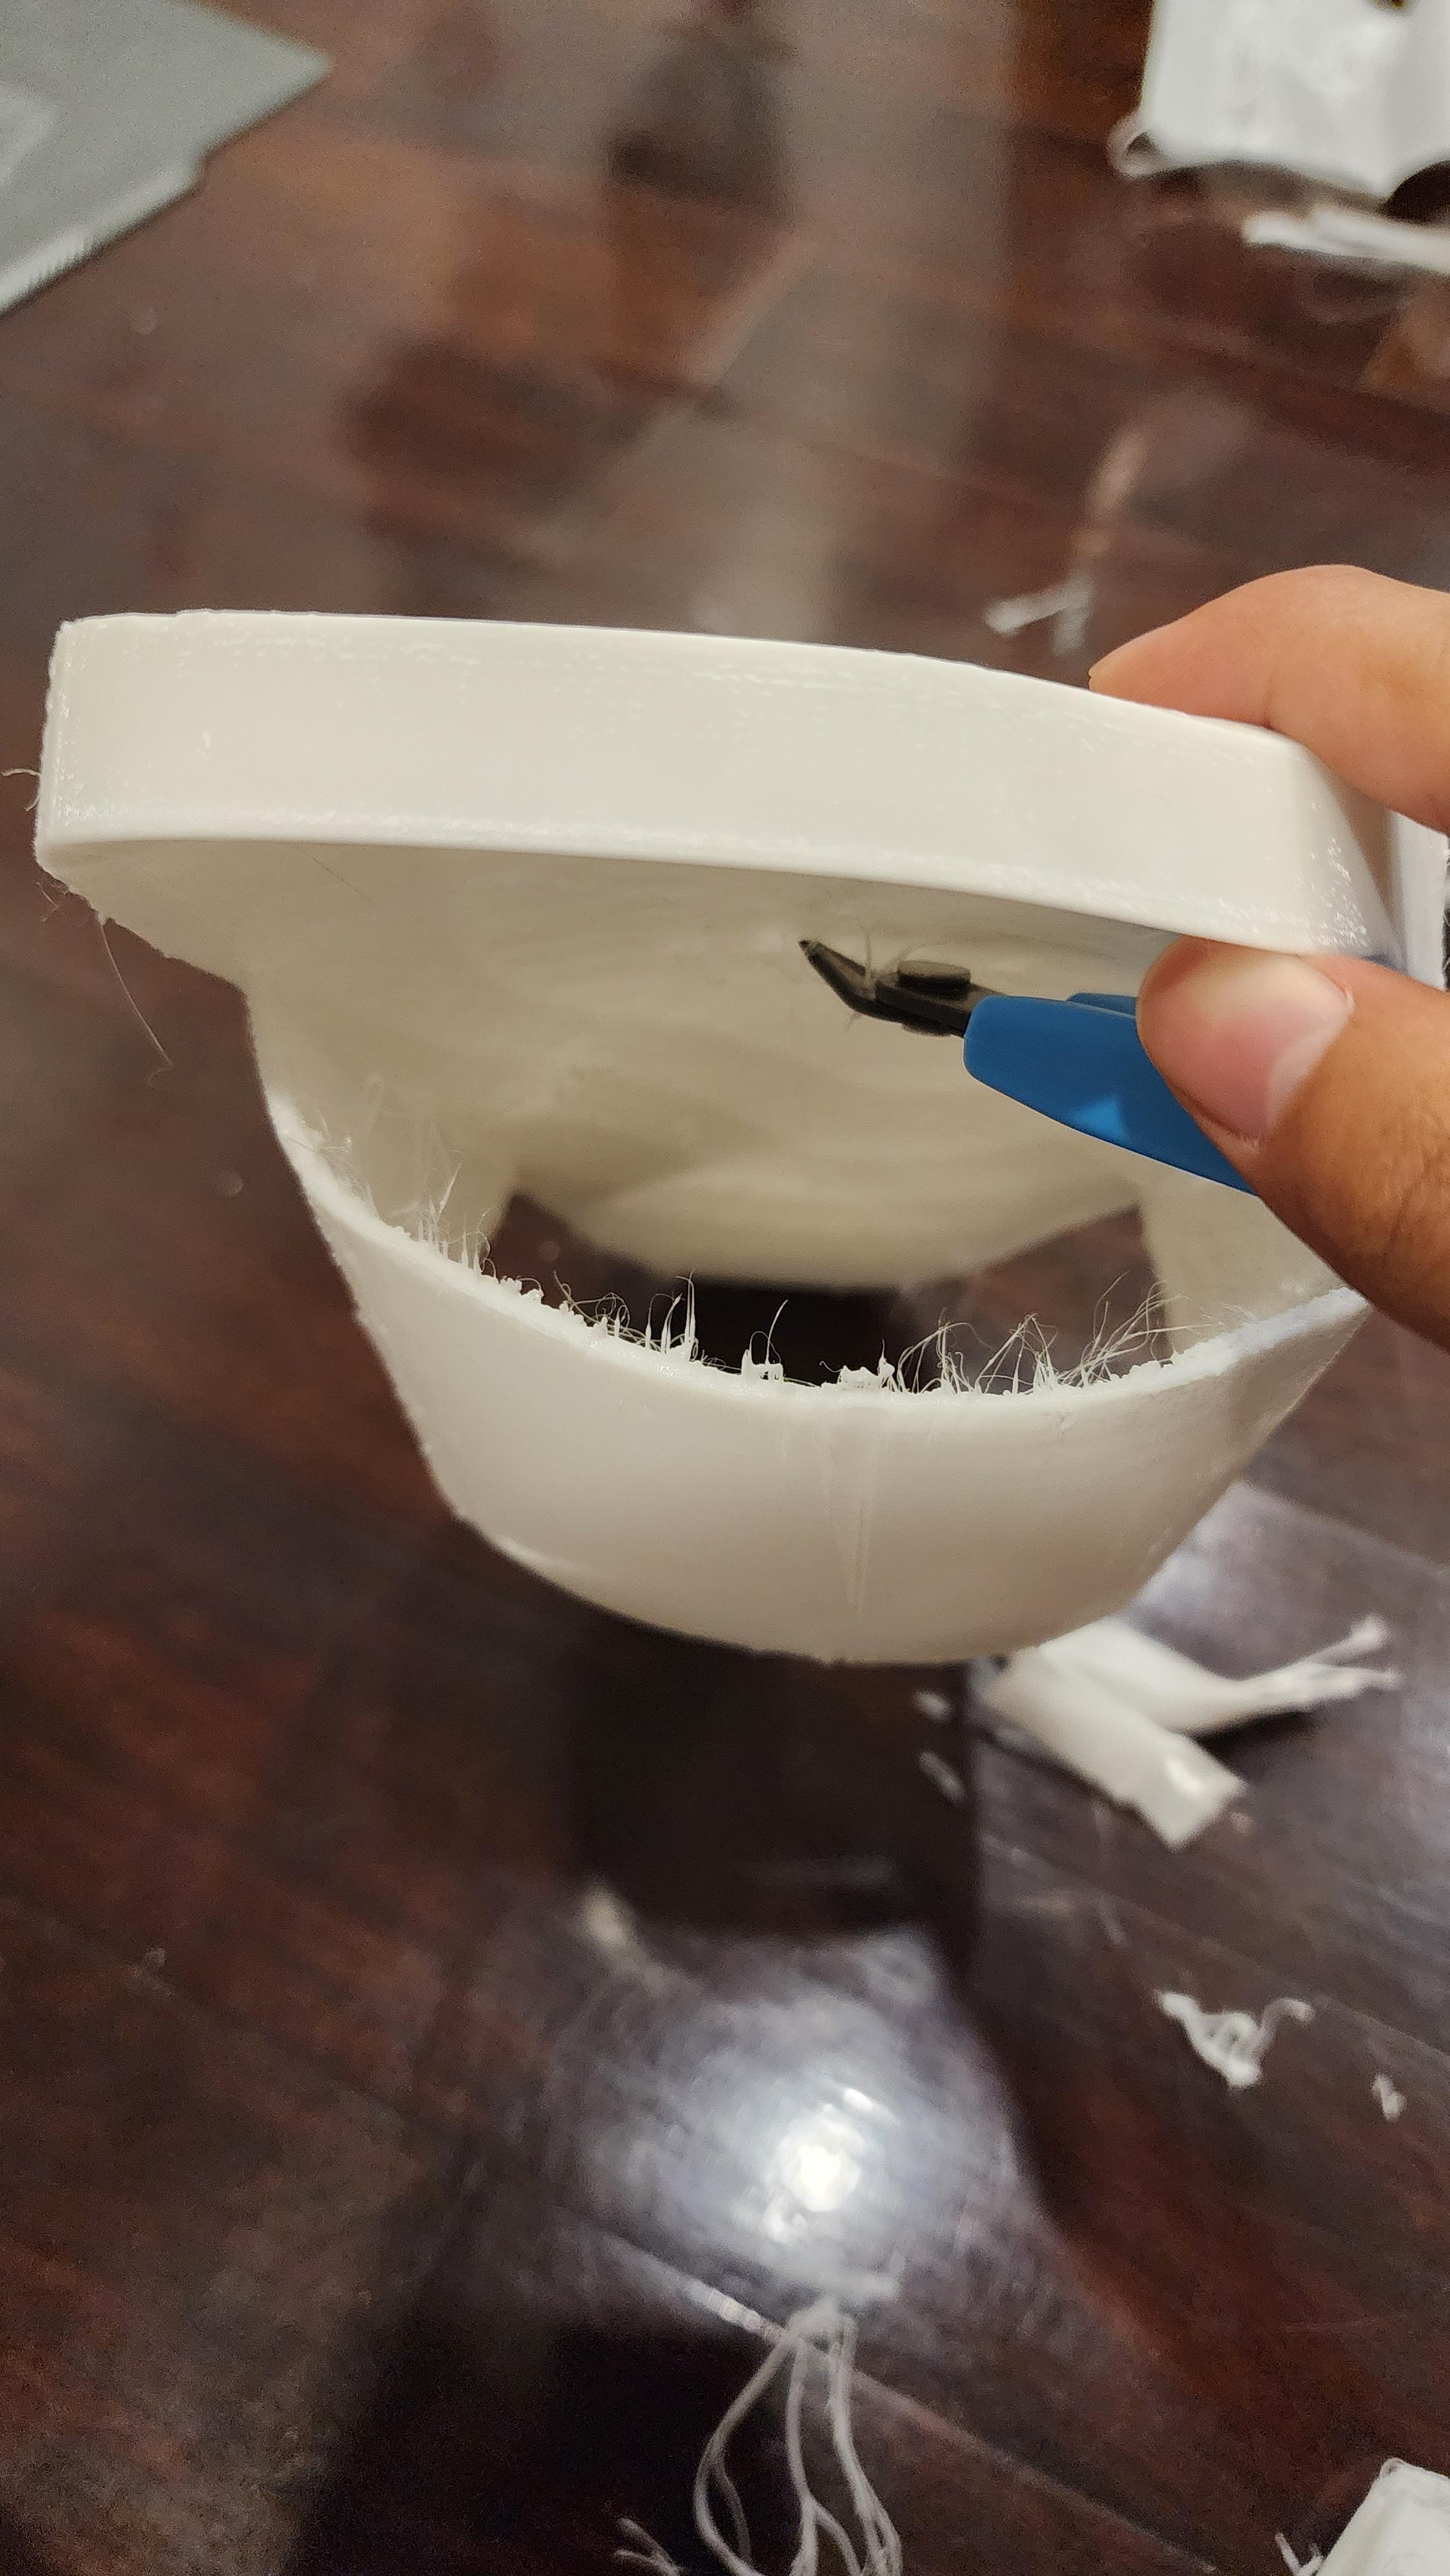
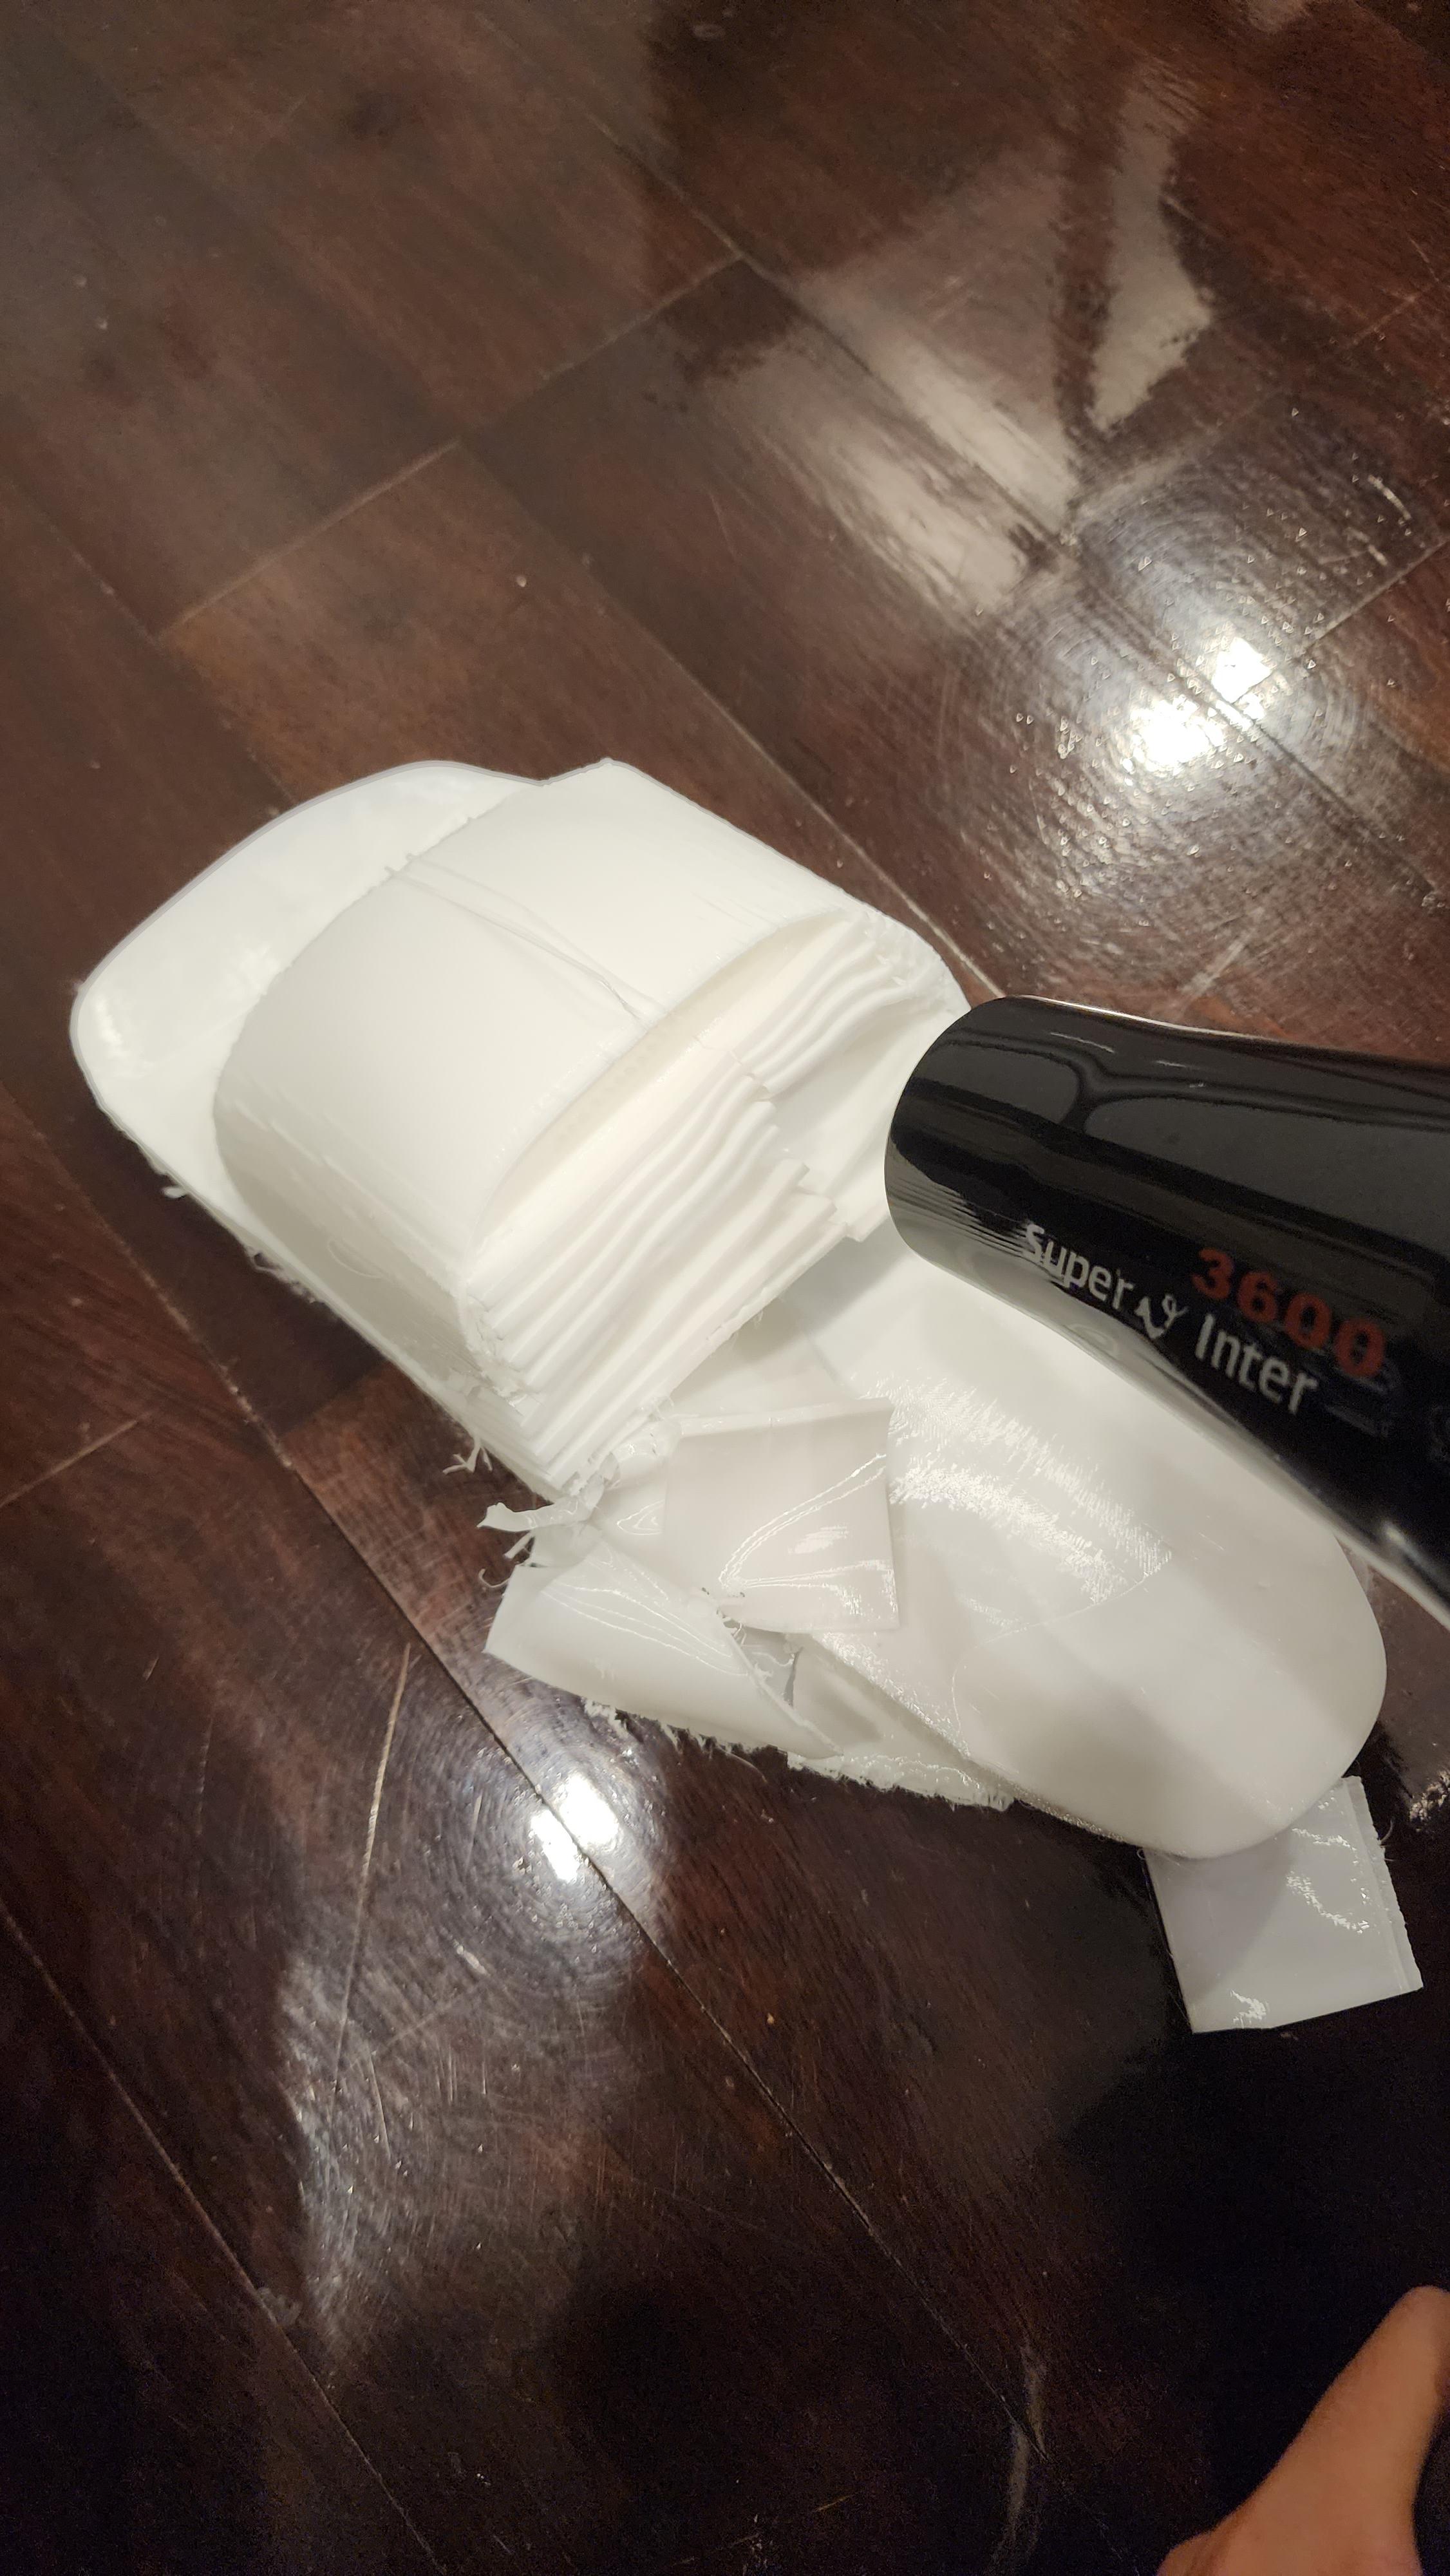
Removing TPU supports are quite difficult. I recommend using a heat gun or a hair dryer to heat up the tpu as shown, making it easier to remove. Make sure not to come into direct contact with the TPU when it is hot. Use tools such as a flush cutter or pliers to pull out the TPU. Be sure not to hurt yourself as TPU can also be quite sharp.
If you are using a heat gun or hairdryer, make sure that you are constantly heating the TPU and have proper gloves and insulation to protect your hands.
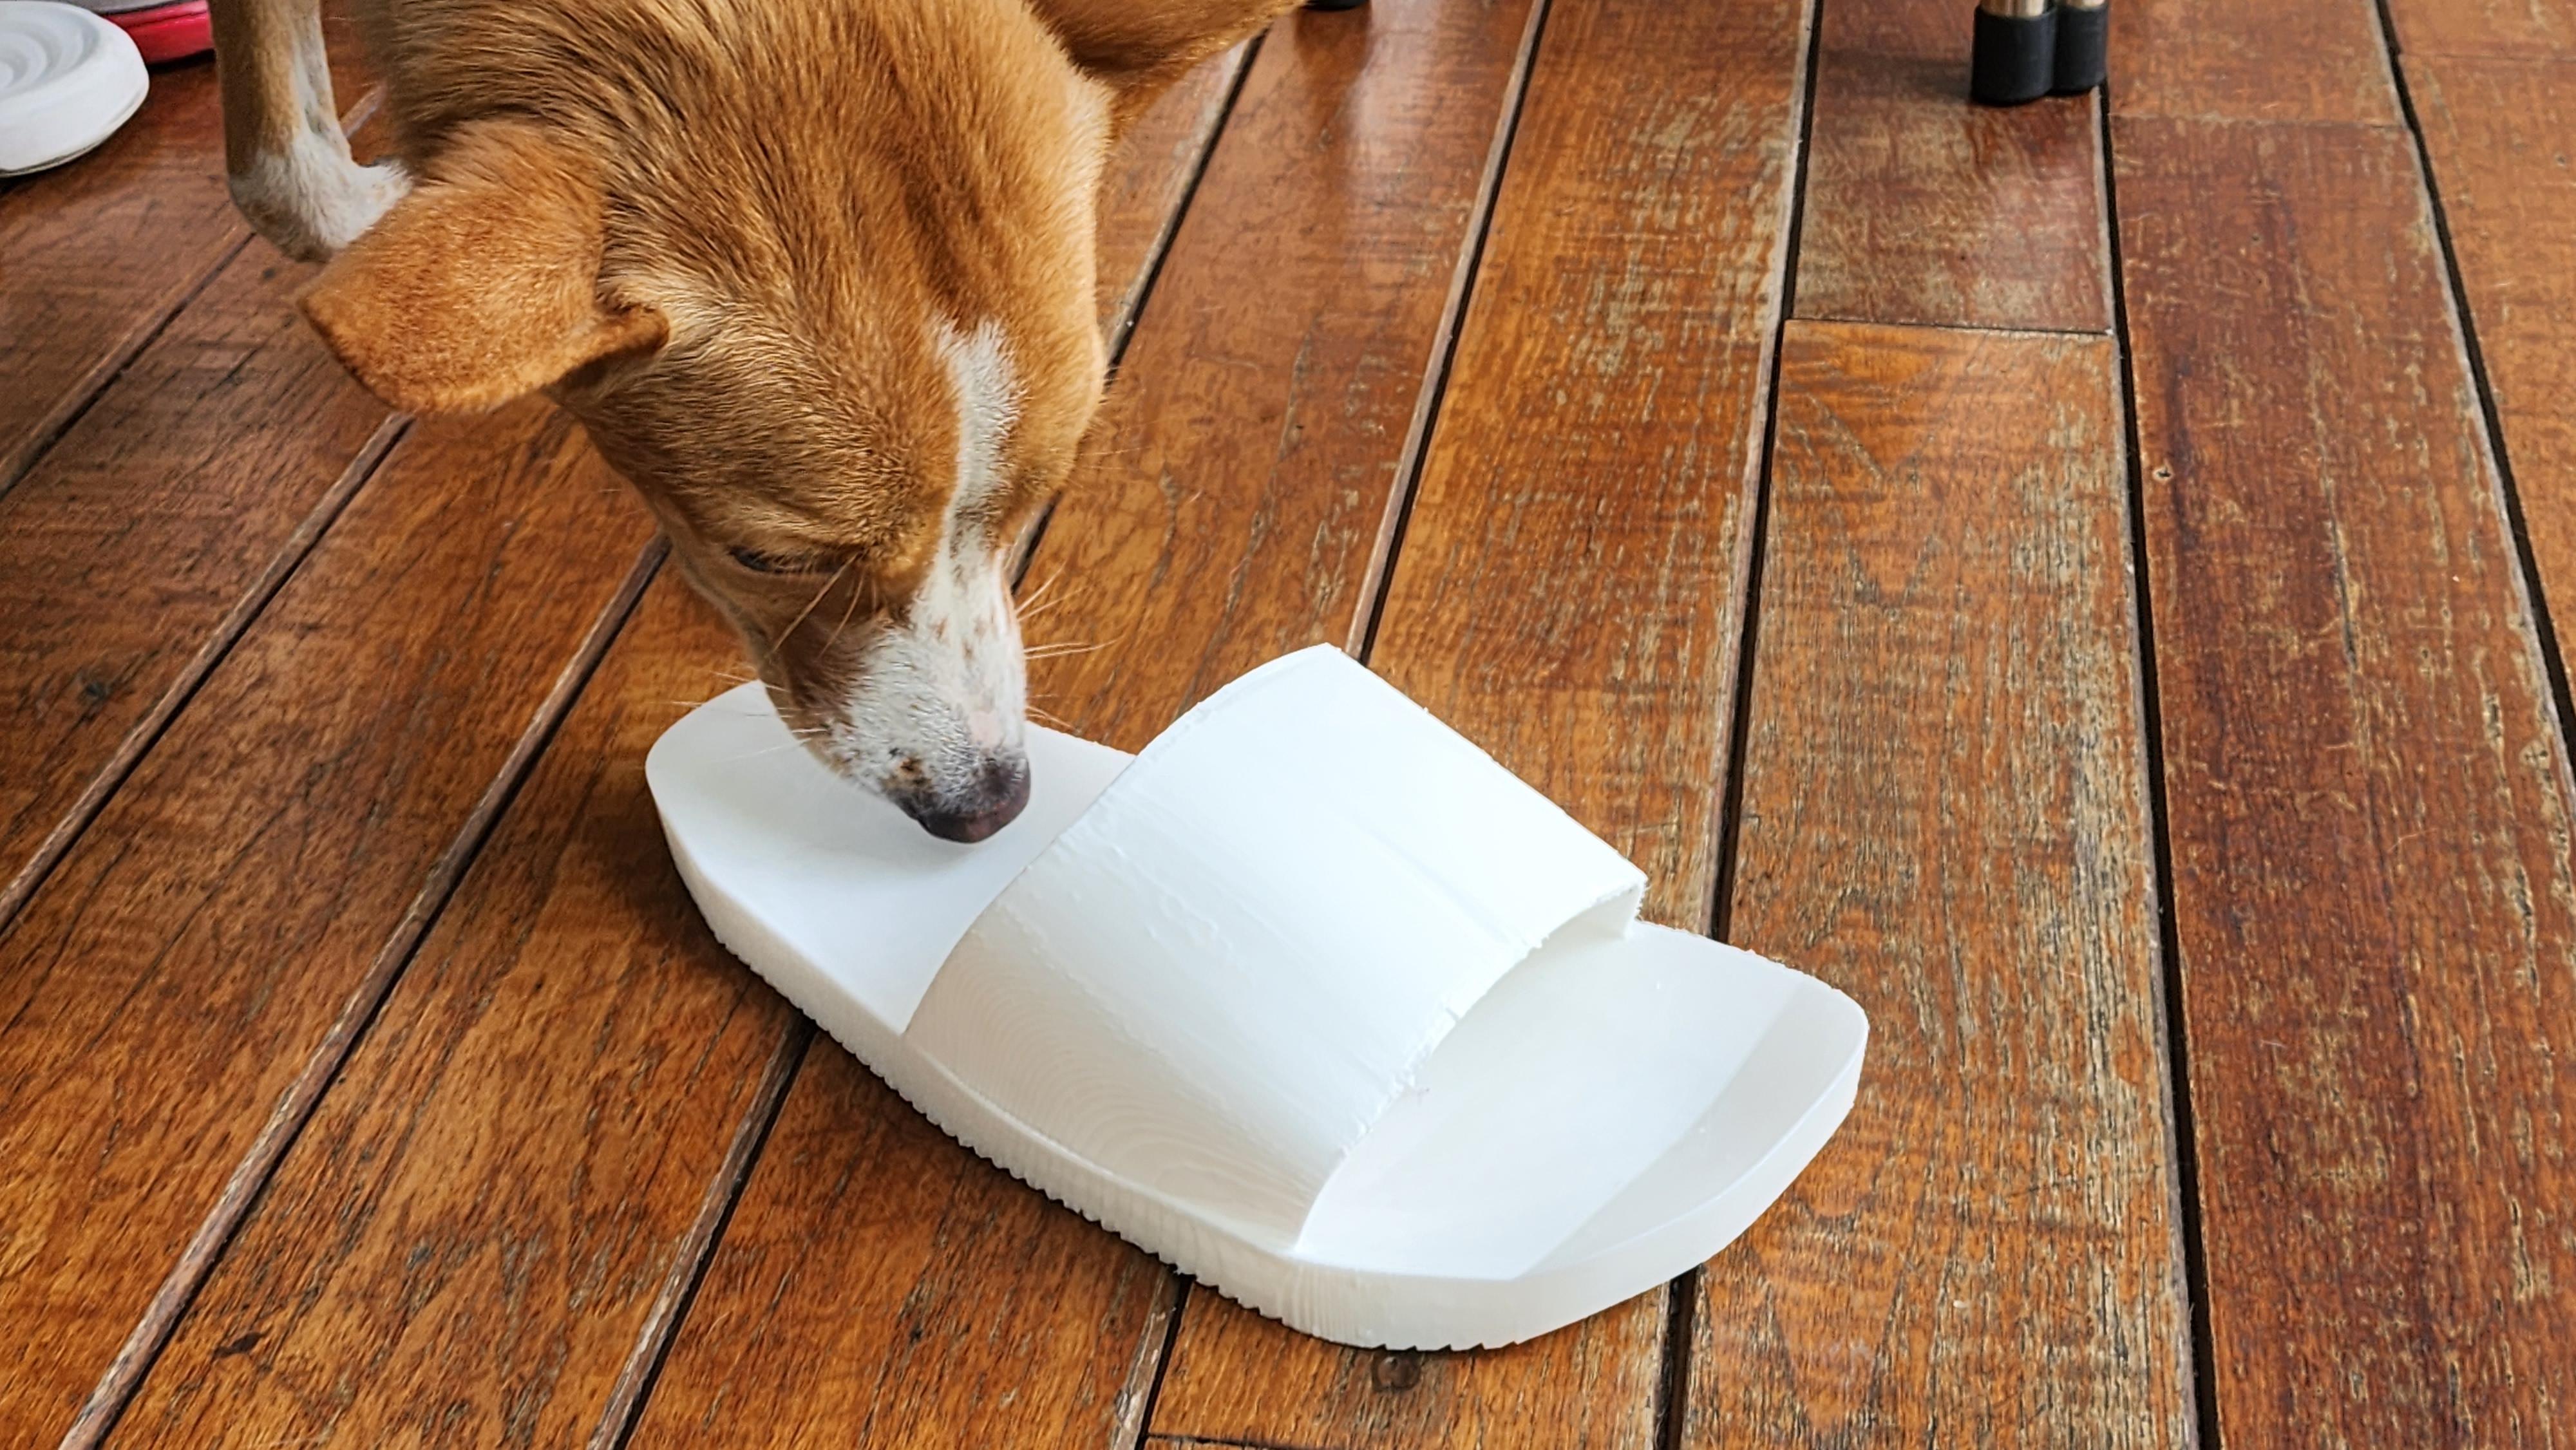
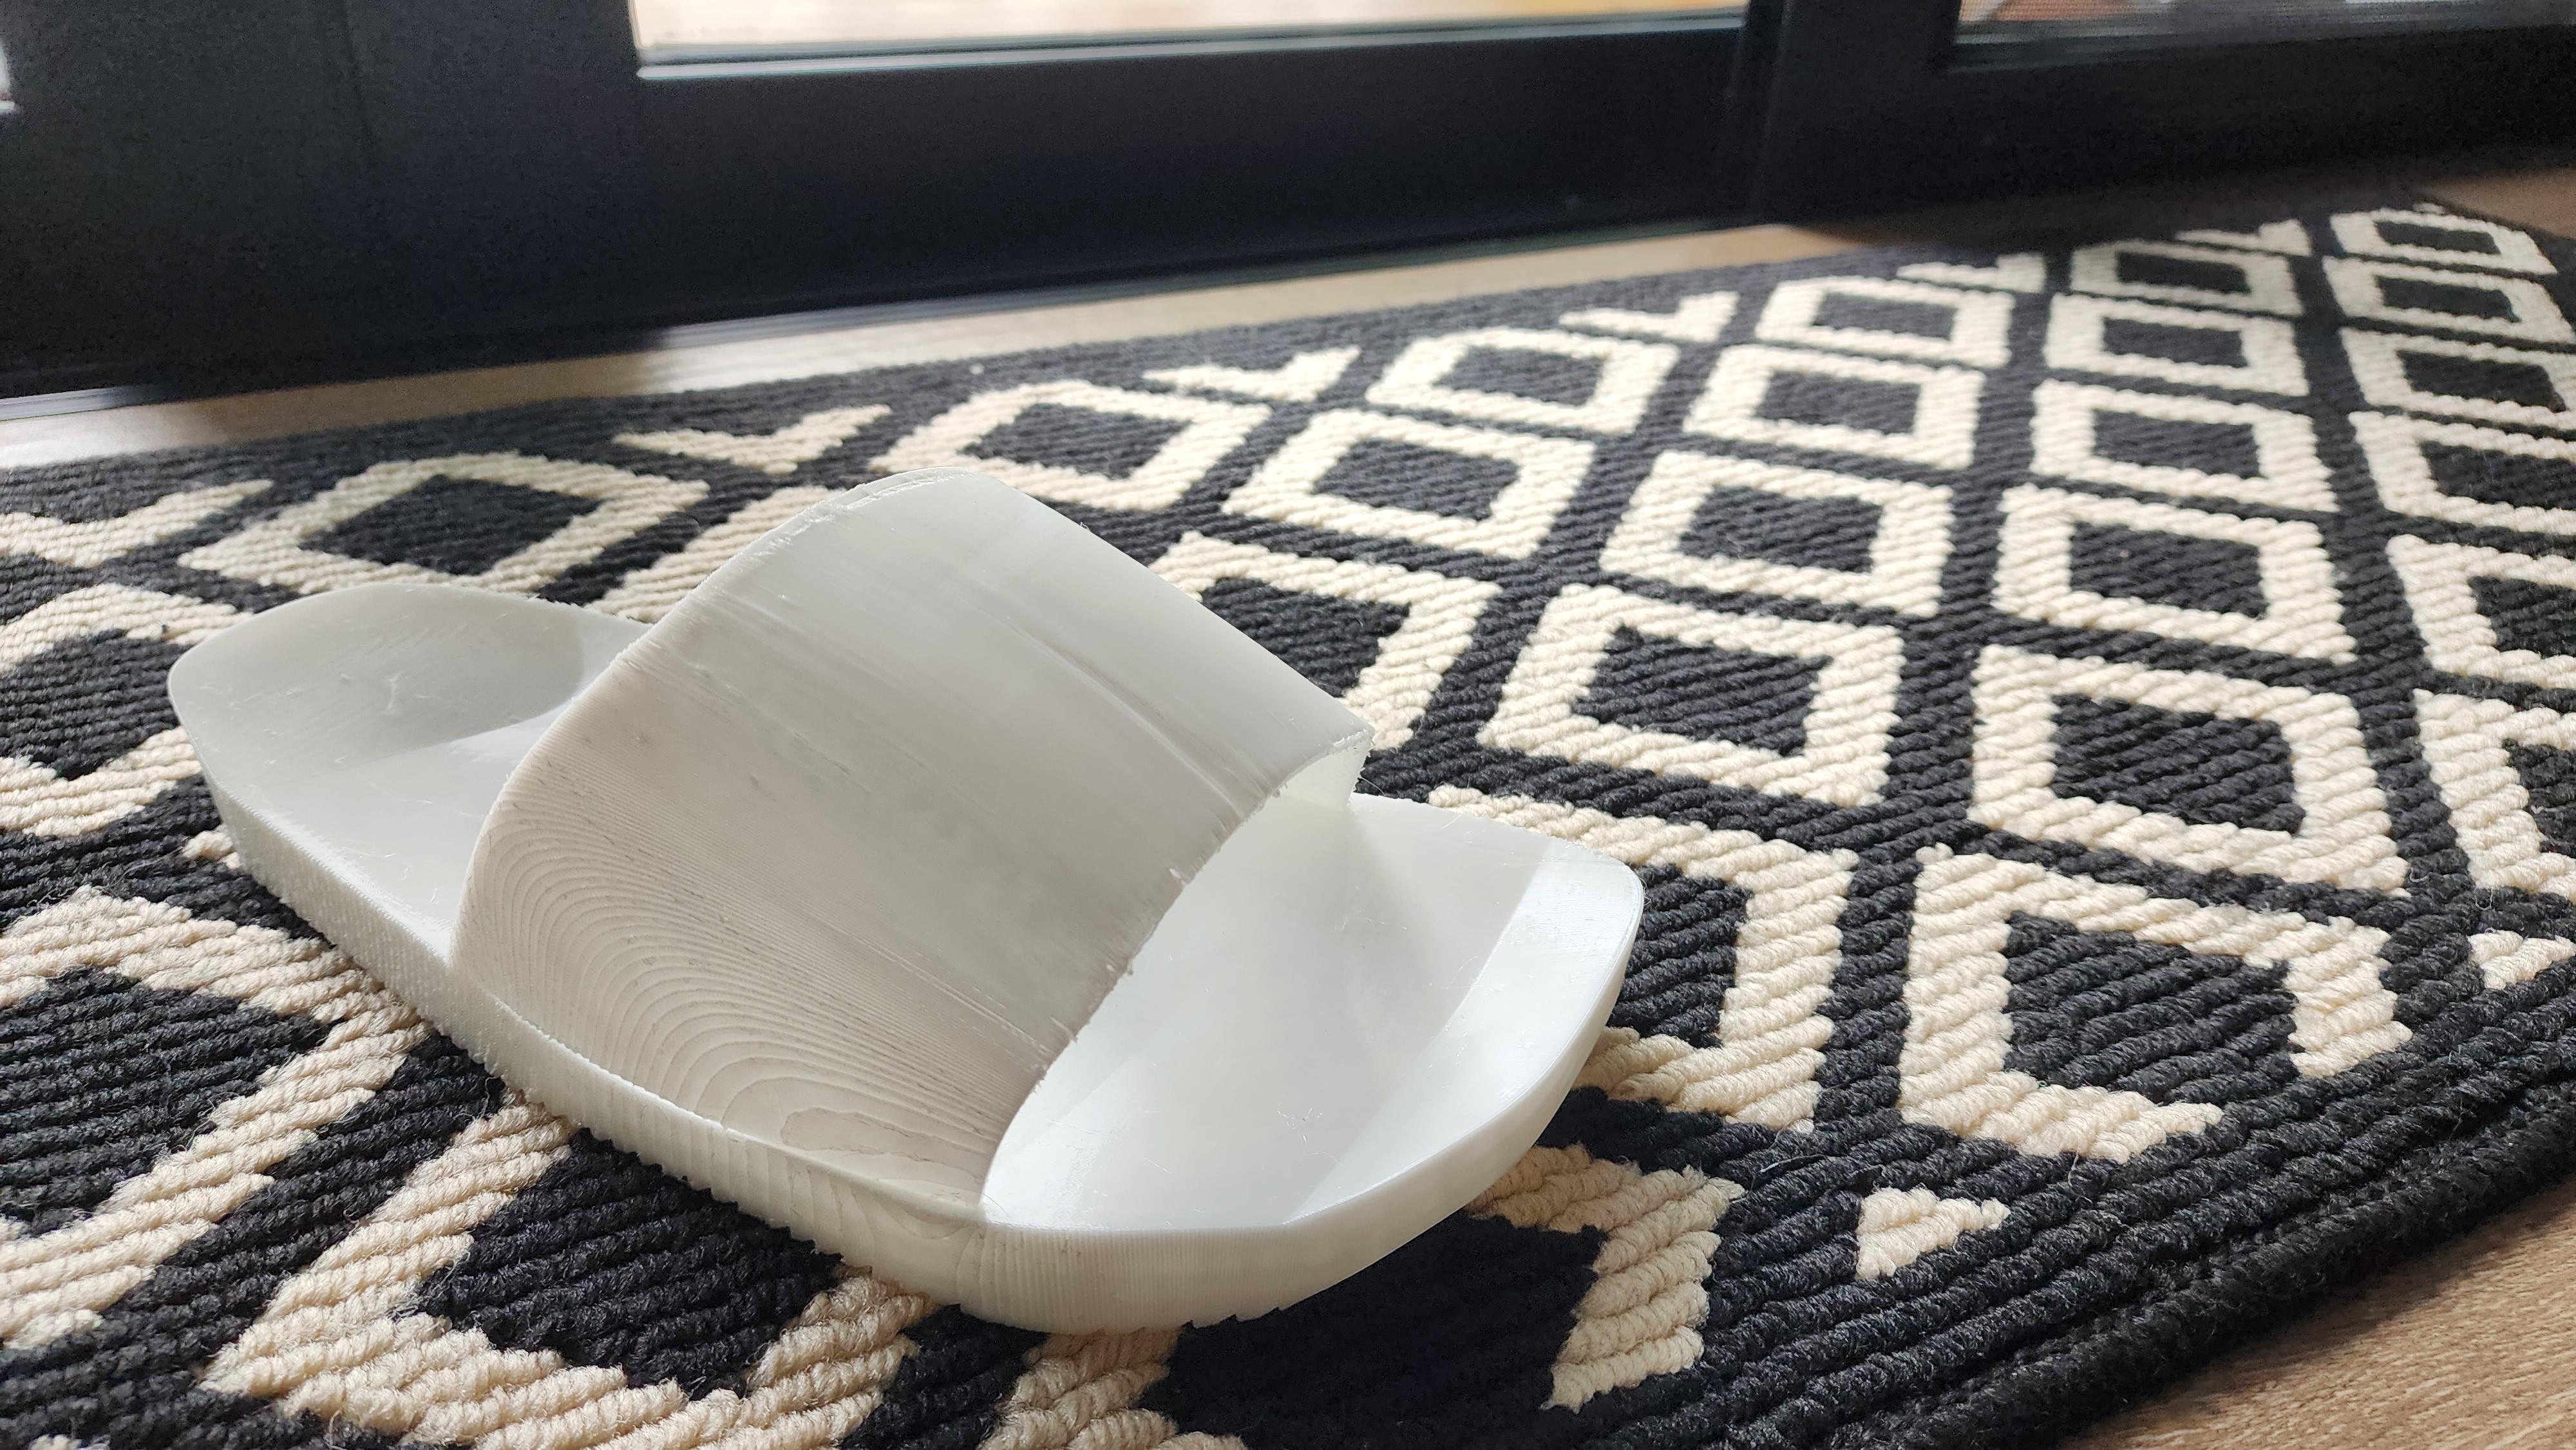
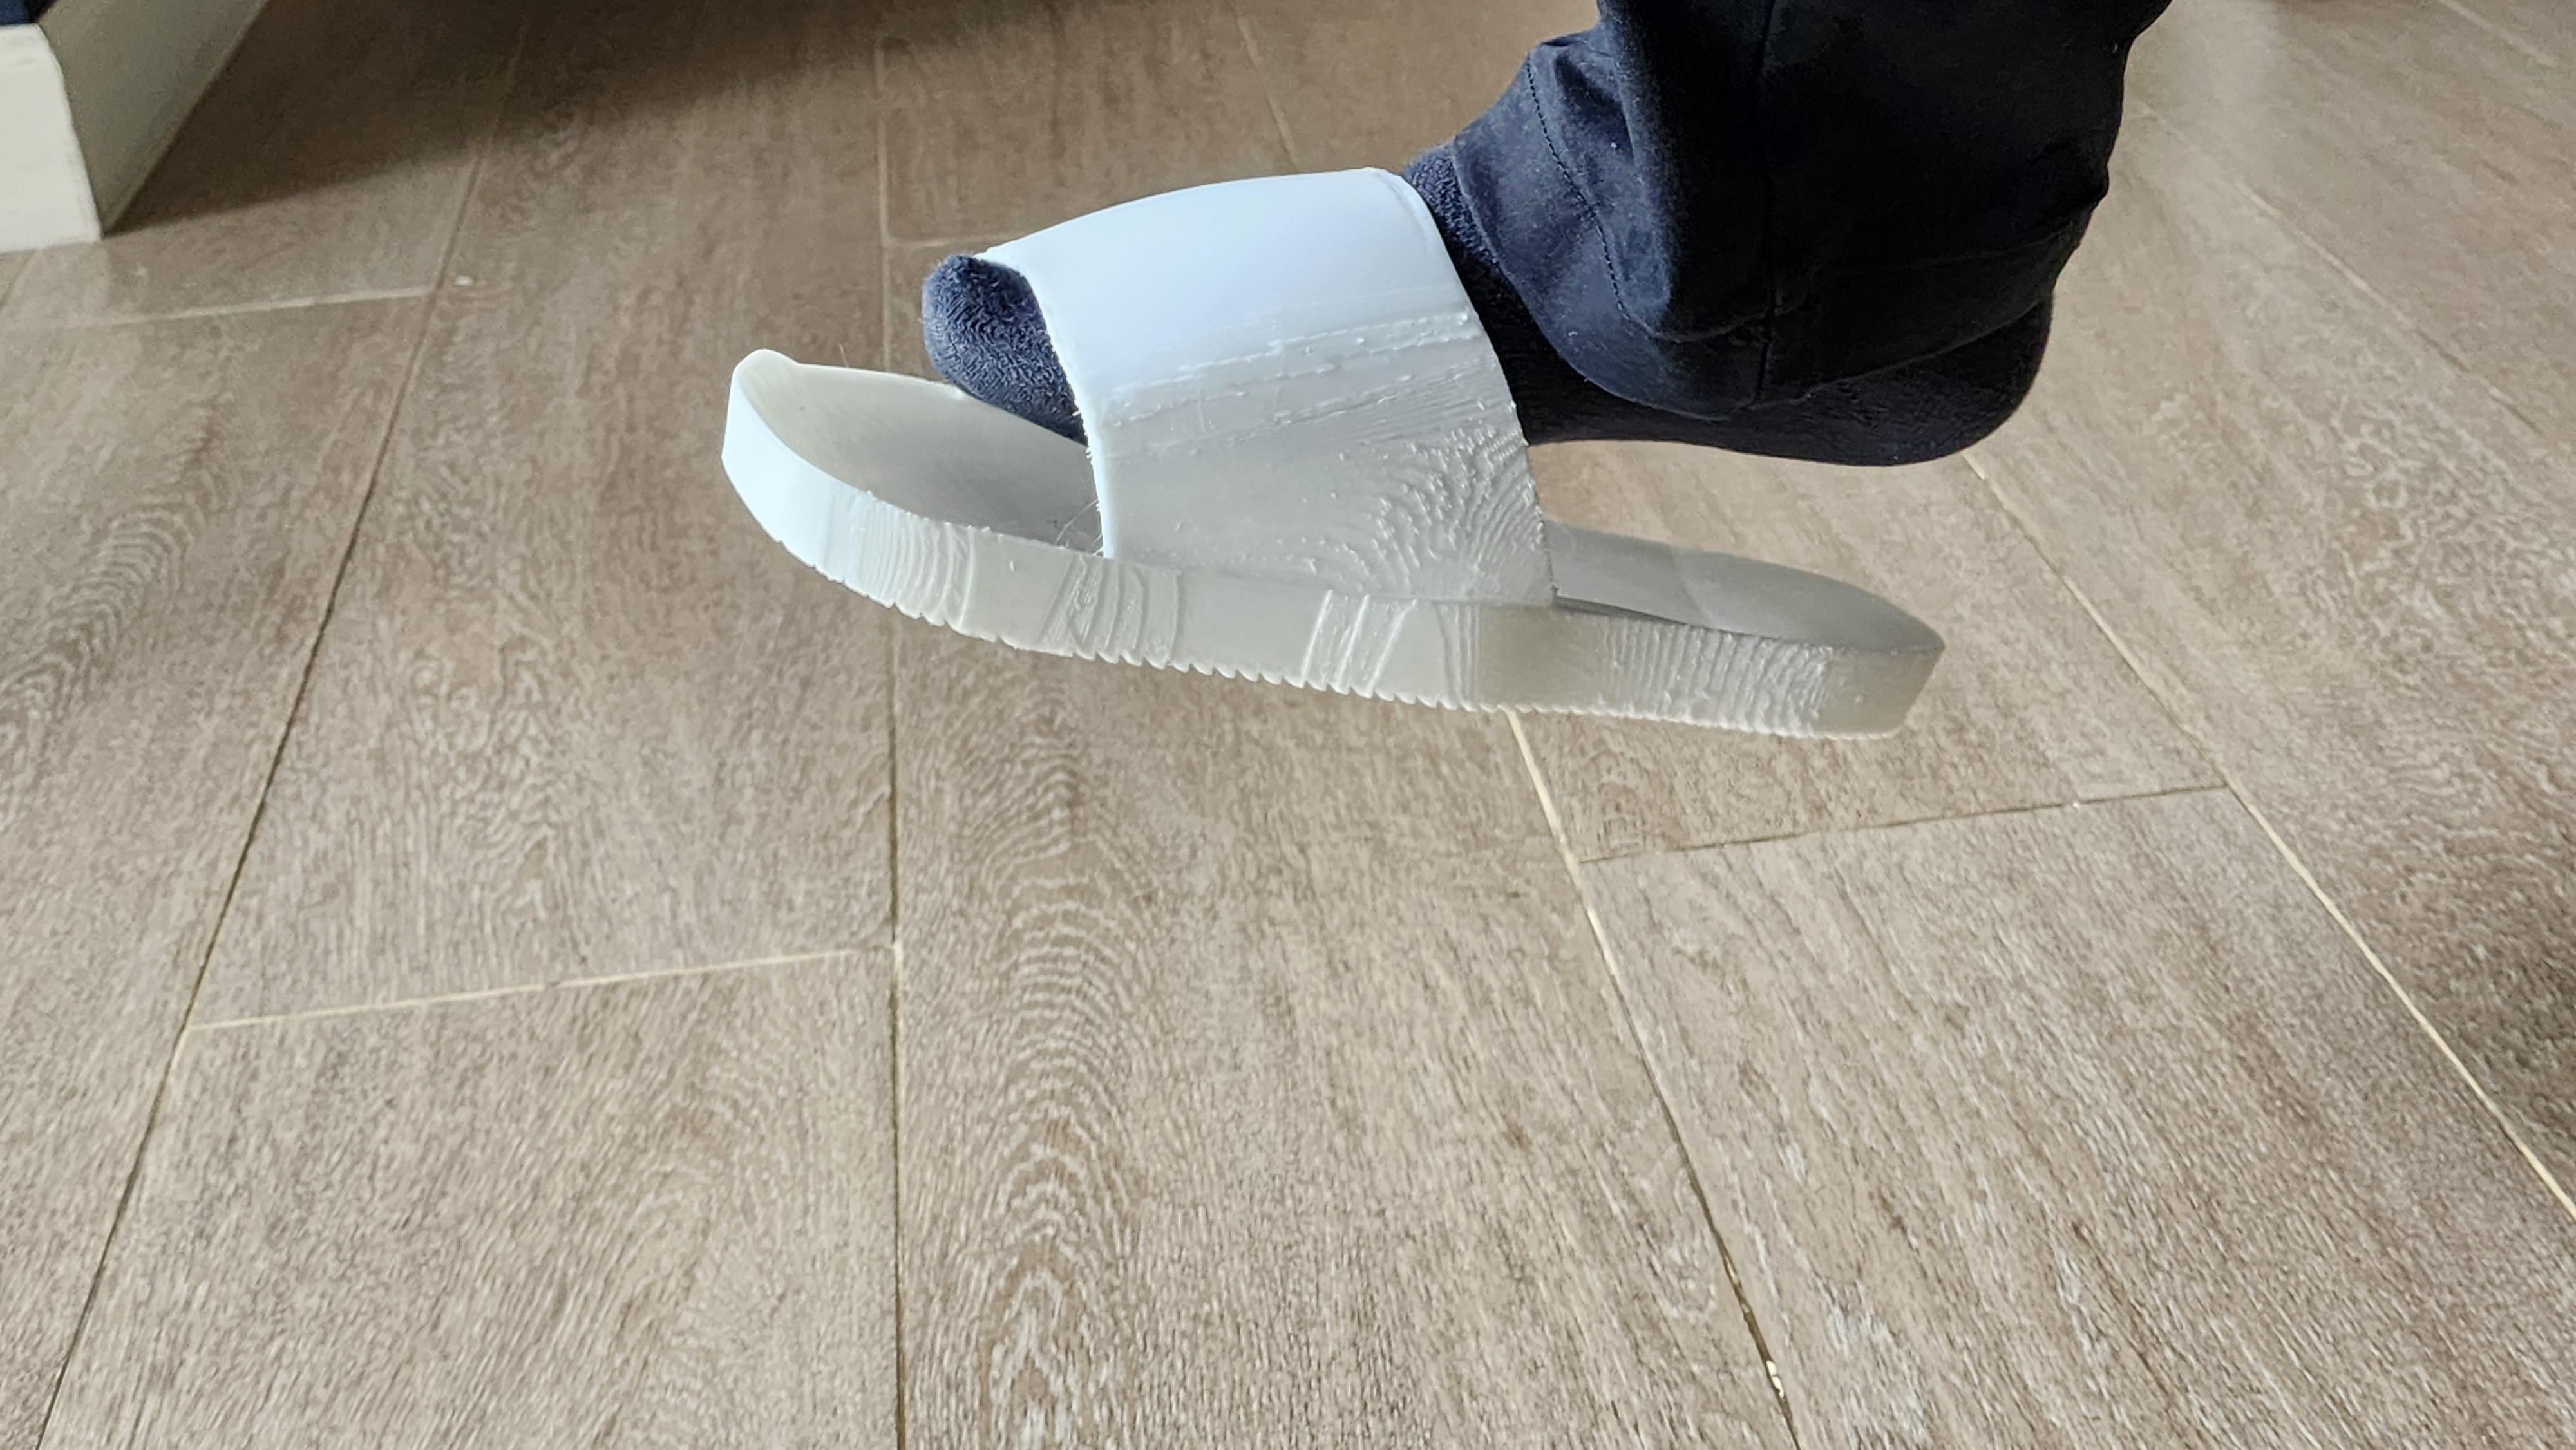
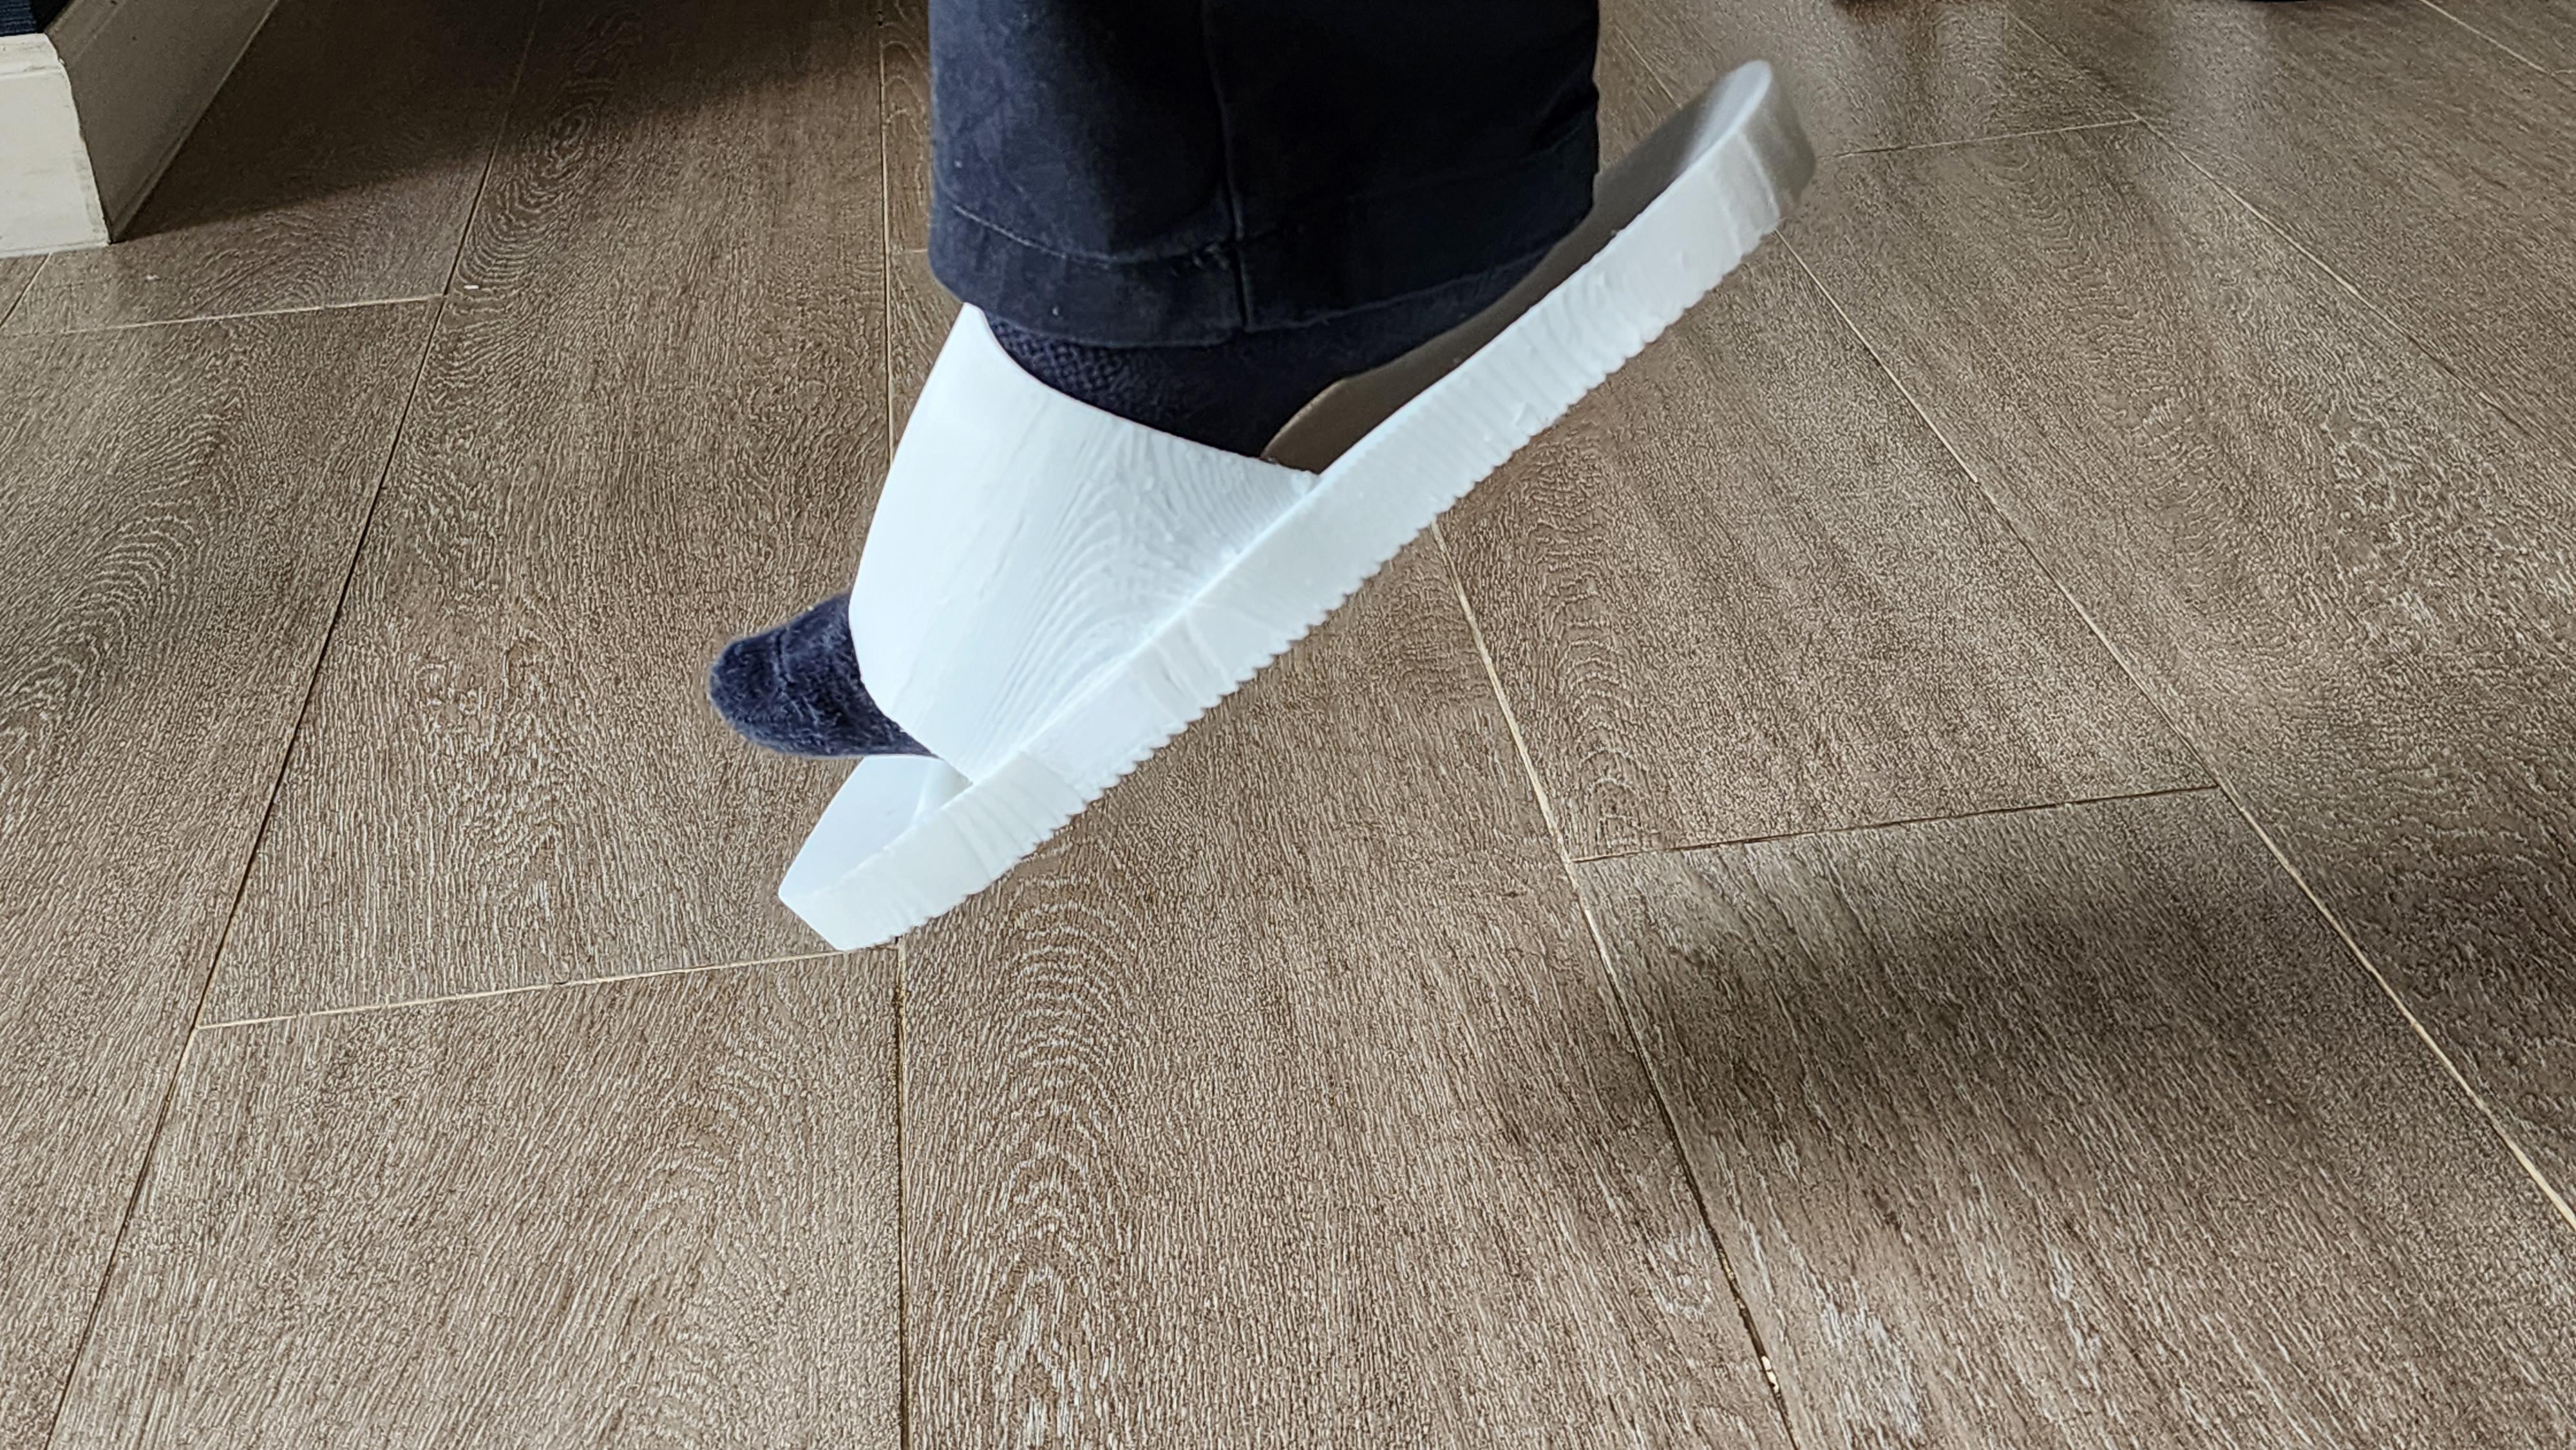
Photos
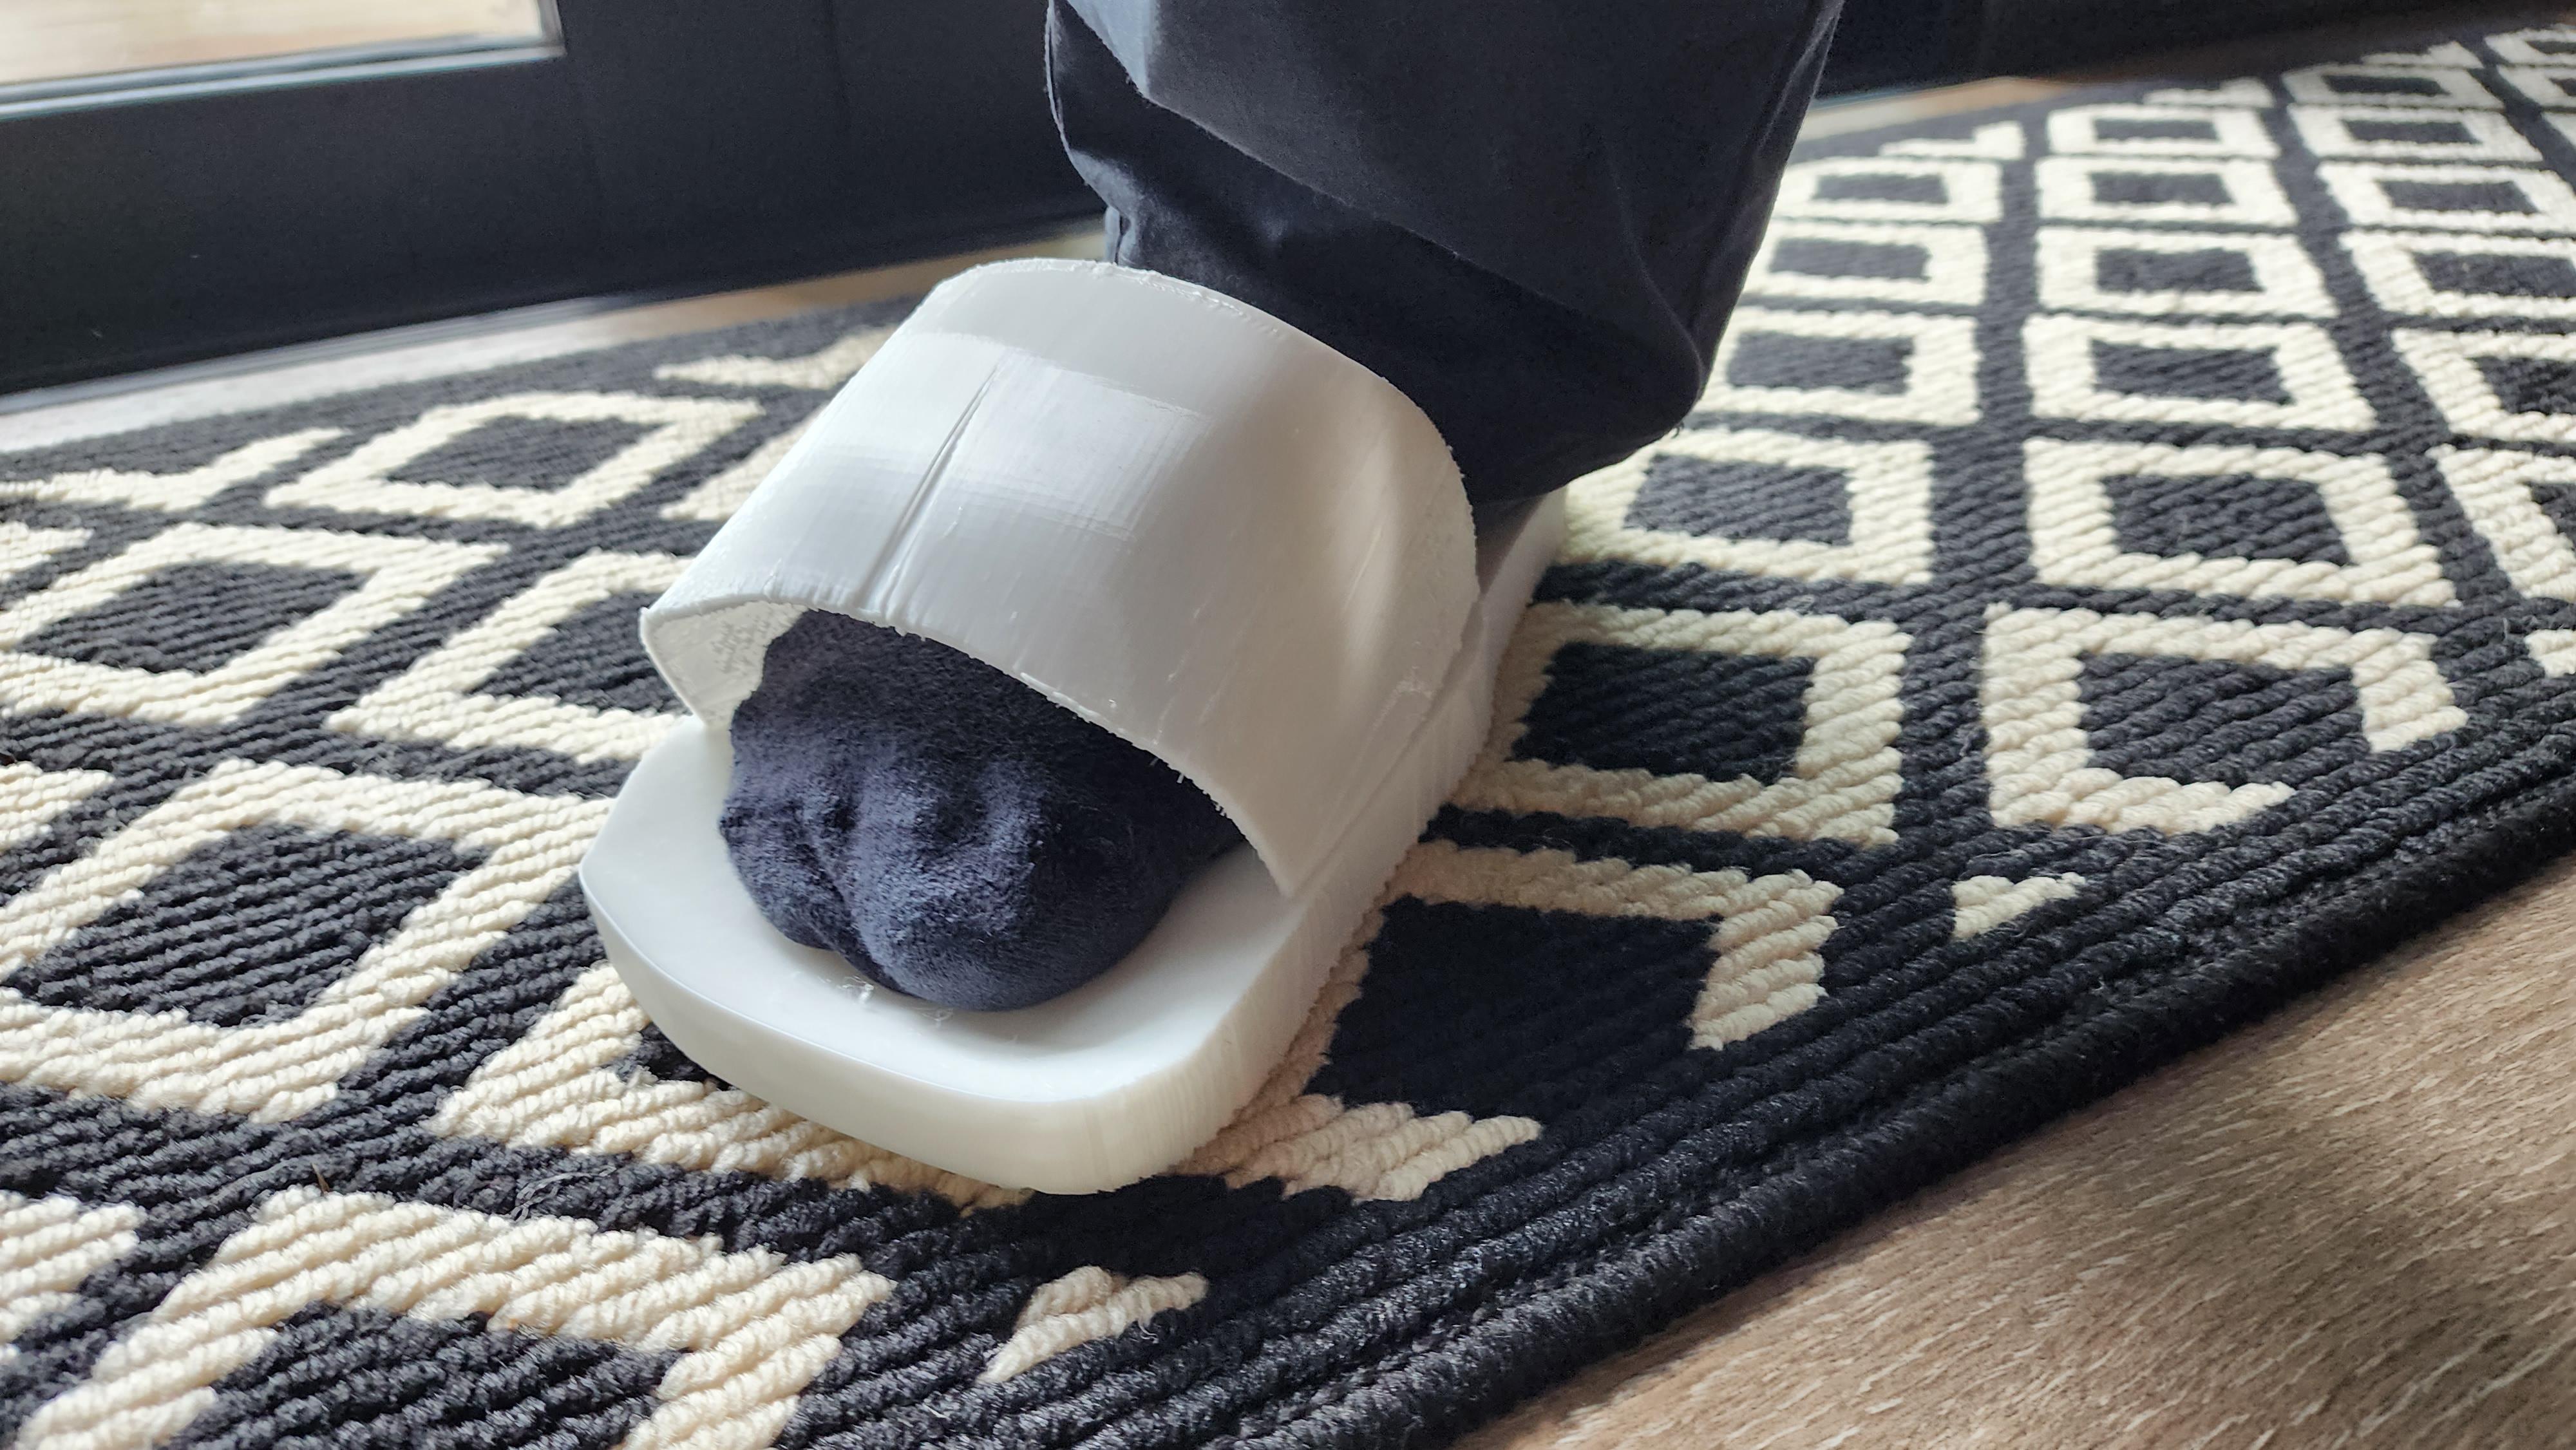

Evaluation
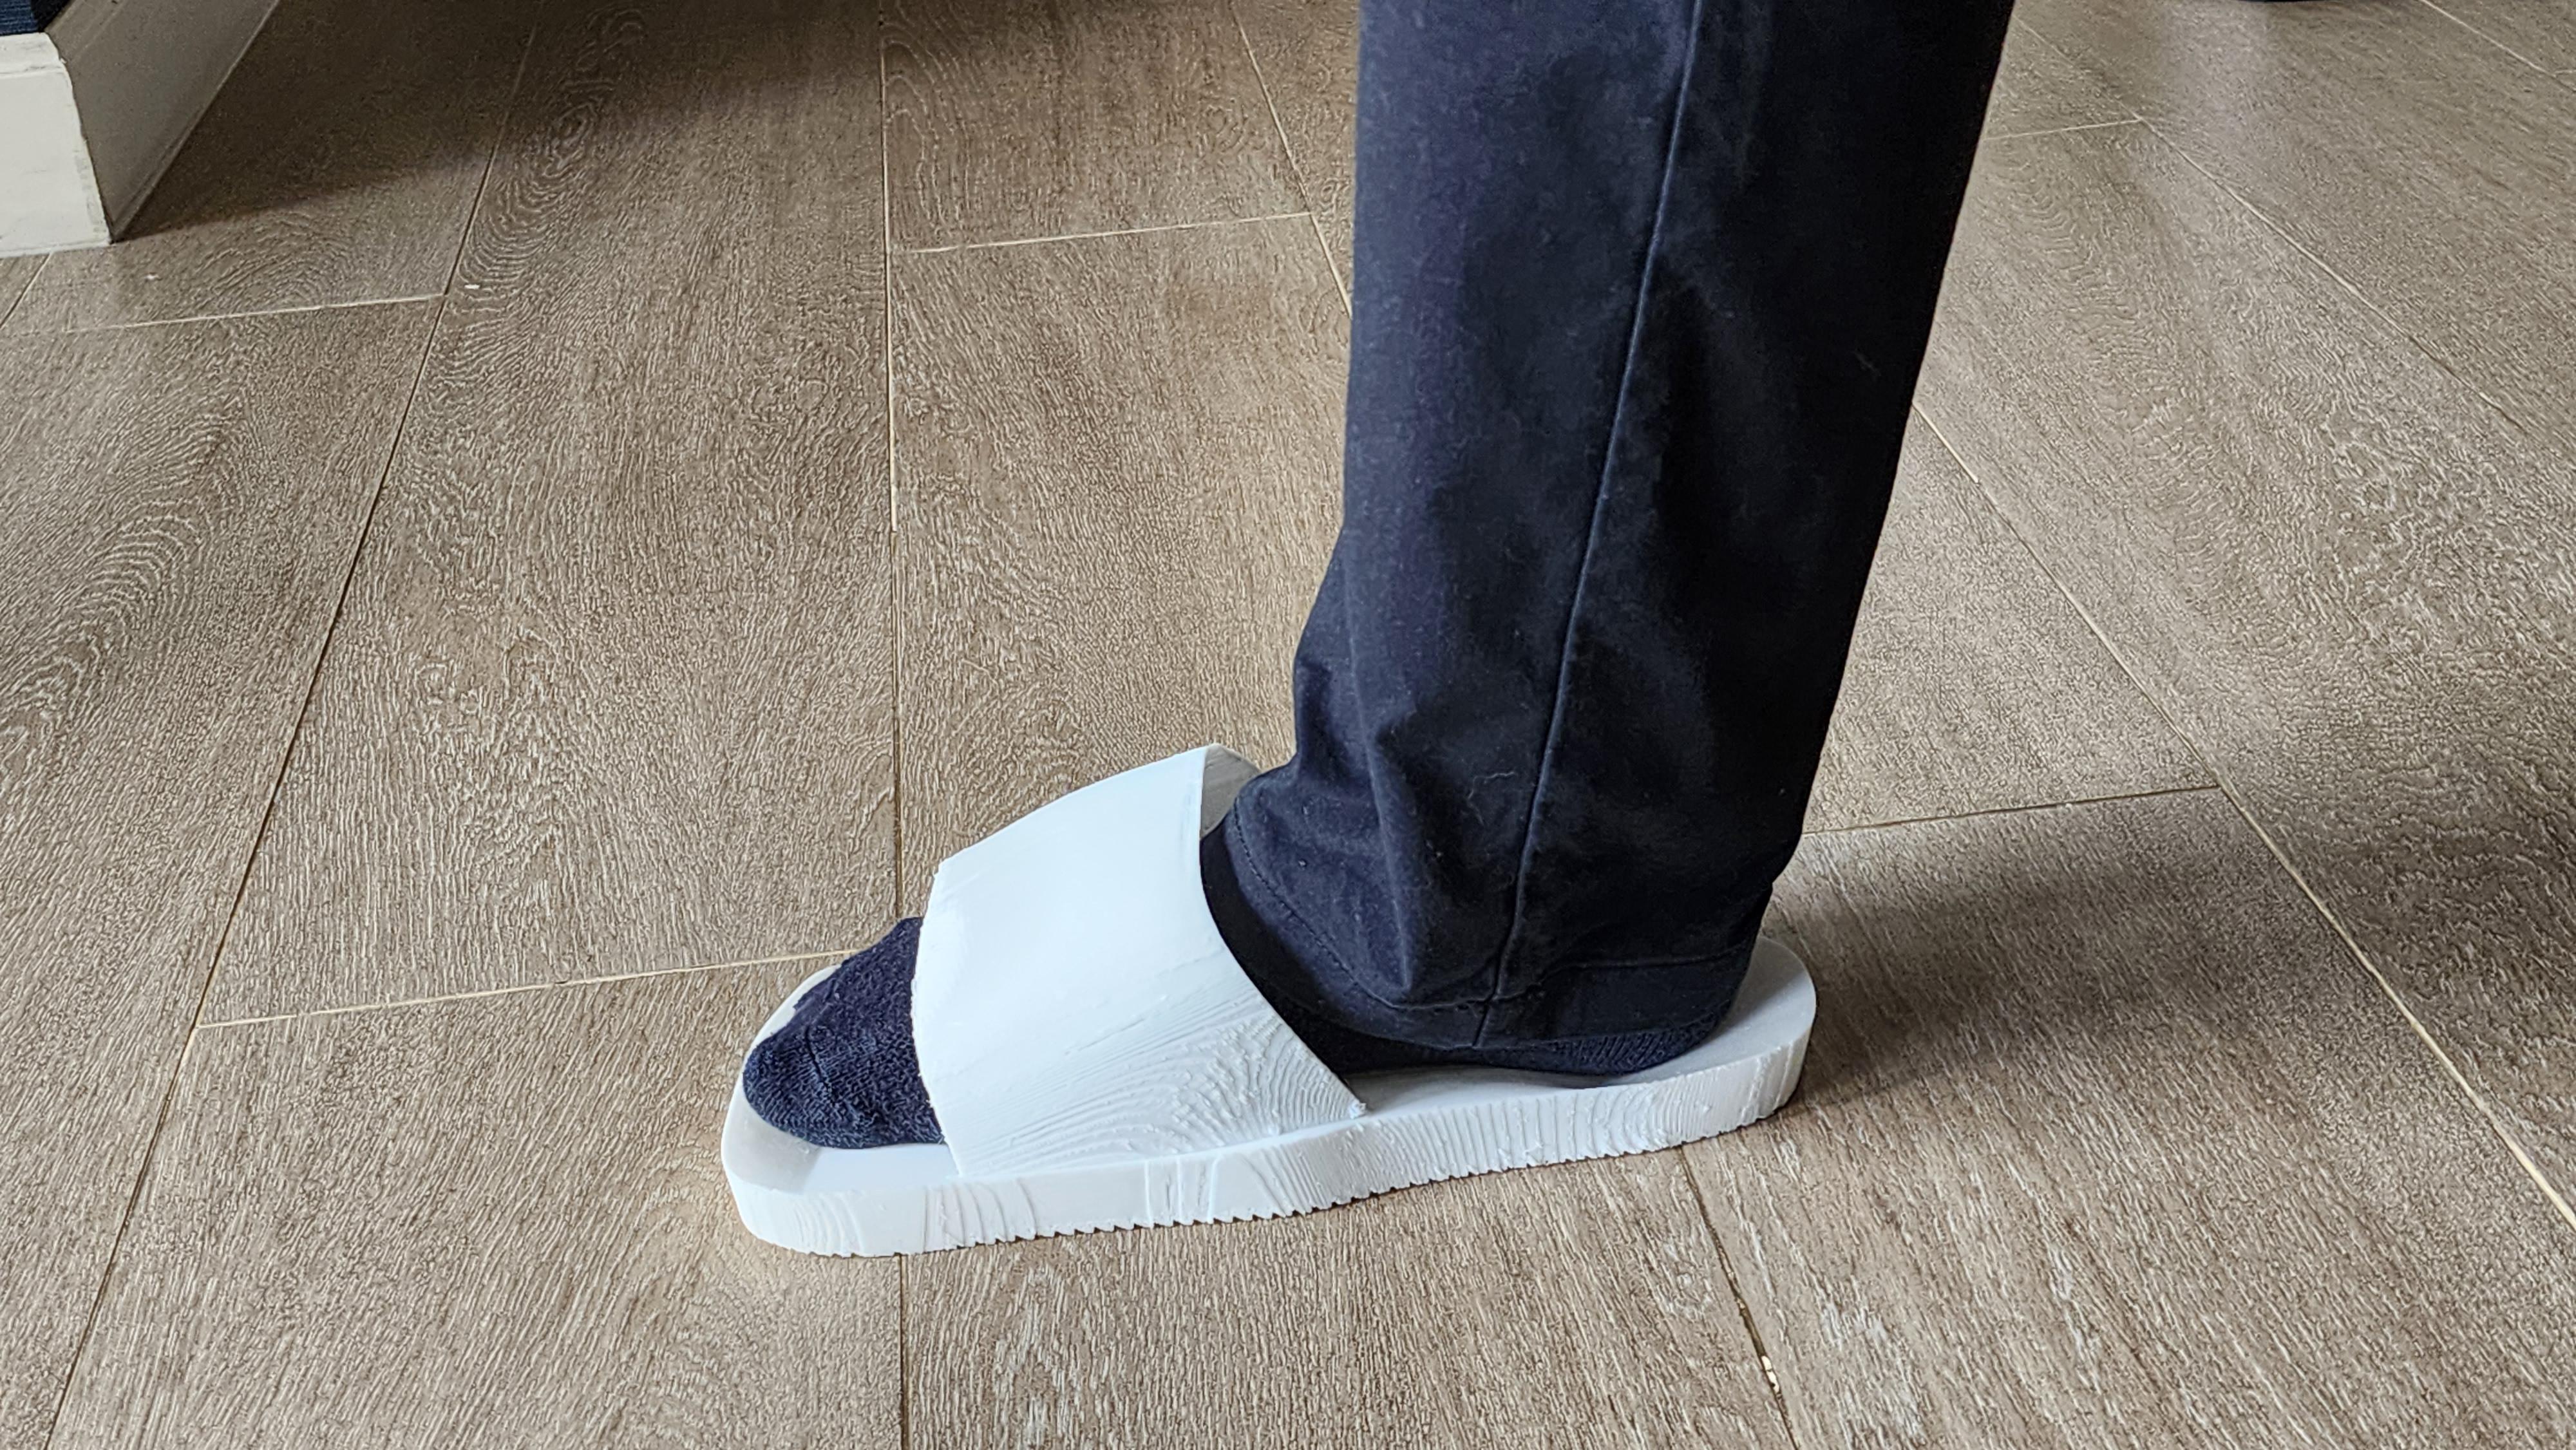
It fits my foot, but it is it quite loose. It is possible that I overestimated the measuring and the margins.
The strap is too large and too high. The foot is barely secure to the shoe. I made the strap the same as the canvas however in future iterations, I could reduce the strap size.
The floor grips/grooves that were added were not working inside the house. This is maybe because there are no grooves in the floor that the shoe could attatch on. In the future, I could change the material, maybe to 85A TPU or add a rubber padding on the bottom of the shoe to increase the grip.
Overall, designing the shoe has been a good exercise in working with forms and I reccomend you try to design one yourself, even if you don't print it.
Thank you very much!
Pun
If you have any questions, please contact me at weetuswotis@gmail.com