How to Let Others Remotely Control a Servo on Surrogate.tv
by SurrogateTV in Circuits > Raspberry Pi
286 Views, 1 Favorites, 0 Comments
How to Let Others Remotely Control a Servo on Surrogate.tv

In this guide we learn how to let others remotely control and view a servo motor through a game on Surrogate.tv
Supplies
- Raspberry Pi single board computer, for example model 3B+, 3A, or 4BA
- 16GB+ micro SD card
- An SD card reader, either built in to your computer or as an adapter
- An official Raspberry Pi Camera or some USB camera (UVC compliant)
- SG90 Micro-servo motor (or other normal servo motor)
- Jumper wires, for connecting the servo to the Raspberry Pi
Before You Start

If you prefer a video guide, the contents of this guide can be found in the video above.
Before you start, you should have our Raspberry Pi image installed on your Raspberry Pi, as shown in our setup guide, and a new game created. You can also read about the installation process from our documentation website.
Also make sure to watch our earlier guide on how to setup a remote SSH connection to your Raspberry Pi inside VSCode, or watch the video about it
You can find the final code used in this guide from our Github repository.
Update the SurroRTG SDK
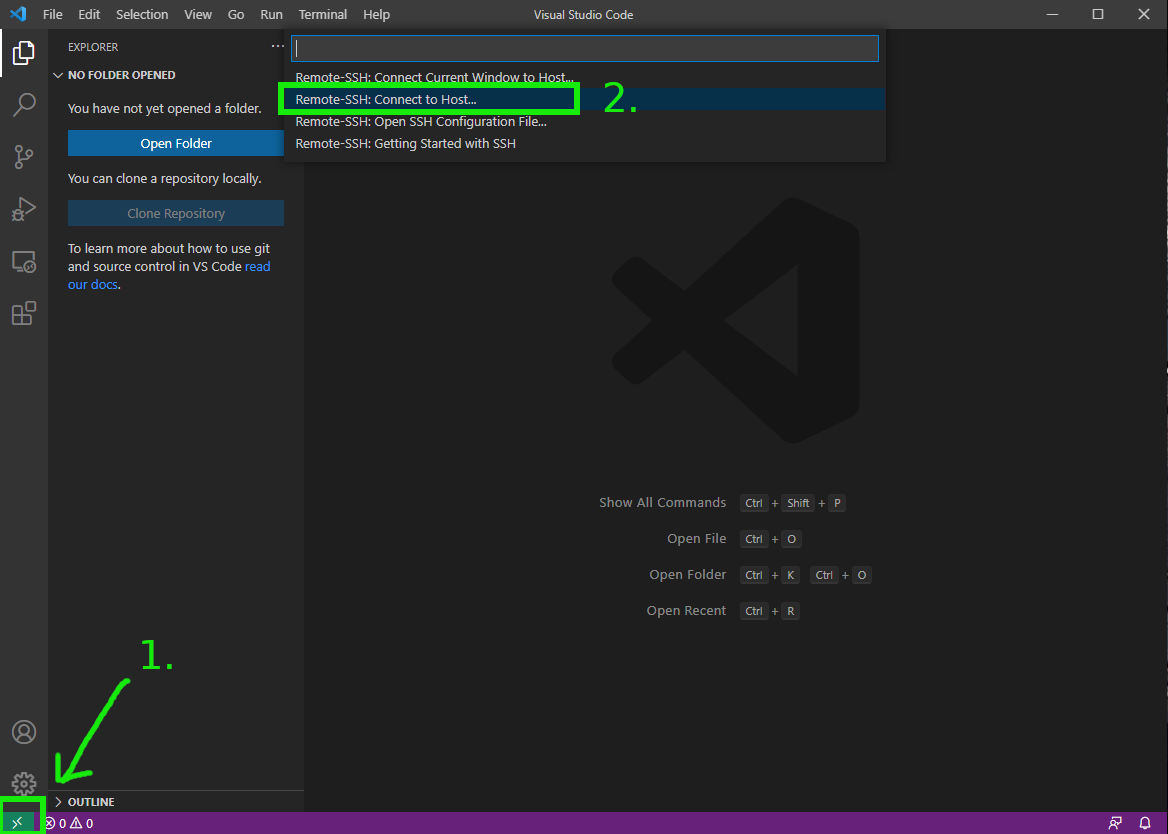


Connect to your Raspberry Pi by clicking the green "Open a Remote Window" button and then click "Remote-SSH: Connect to Host..." as shown in the image above.
You should see your Pi's IP address like in the image above. Click it to connect to the Pi. If you don't see your Pi's IP address there, follow the instructions in our earlier guide on the remote SSH setup.
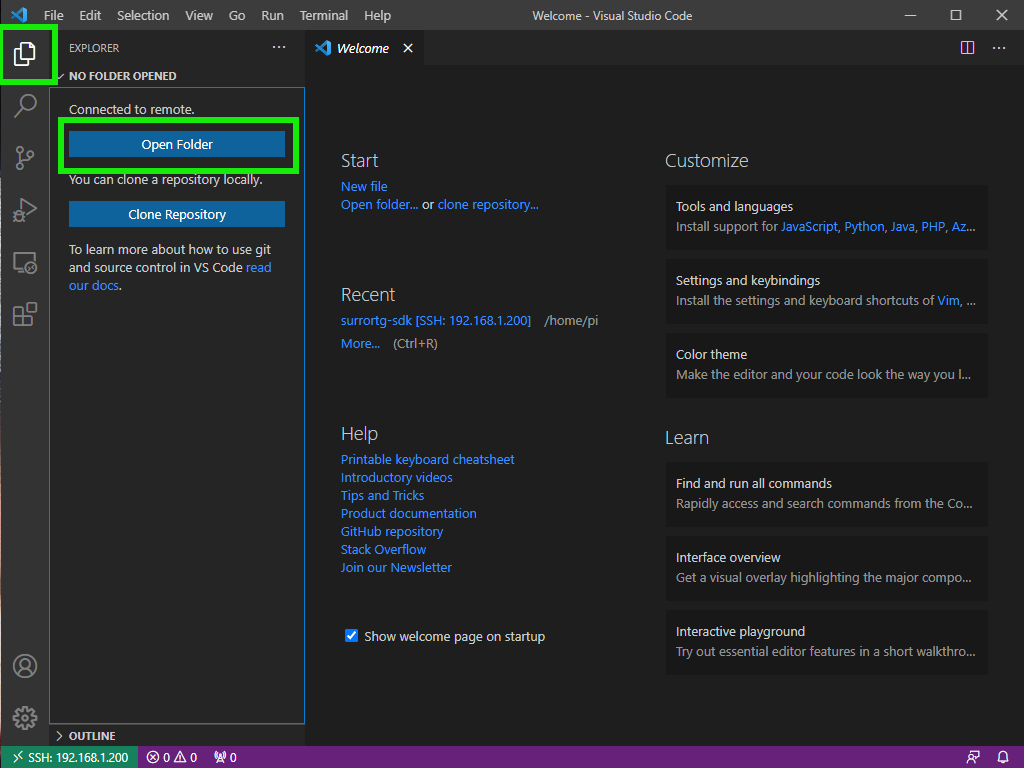
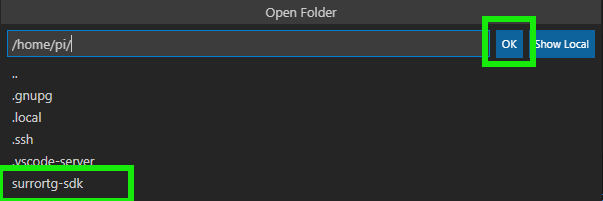
To get the latest SDK updates, first open the Explorer panel on the left side of VSCode and click on "Open folder" as shown in the image above. Select the folder named surrortg-sdk, click on "Ok" and enter your Pi's password.
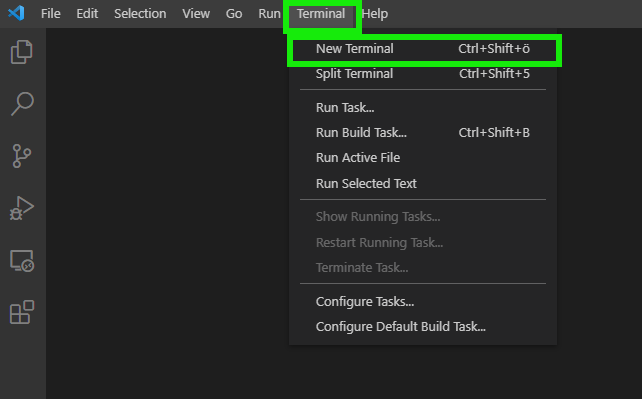
Then open a new terminal by selecting "Terminal" and "New terminal" from the VSCode menus. Use the git pull command in the terminal to update the SDK.
Connect the Servo
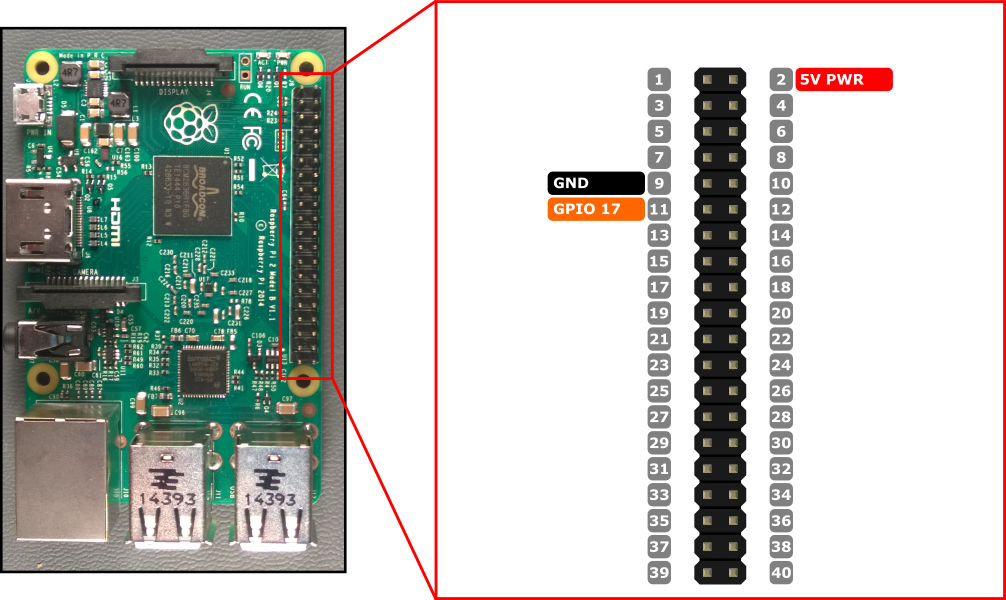

Most of the popular small hobby servos should work fine with our today's code, but if you are going to use some larger one or add much load to it, you’d probably want to add an external power supply also.
Let’s start by connecting the servo to the Raspberry Pi. To supply power, connect the red wire to a 5 volt pin and the brown one to a ground pin. You can use the pins shown in the picture above. Then connect the orange position control wire to the GPIO pin number 17 as shown in the image.
After this you can make sure that everything works by executing the servo.py file inside the devices folder, by running `python3 surrortg/devices/servo.py`
Now you should see some logs, and the servo should move back and forth. If not, double check your wiring.
Create a Game File
Now let’s create a game around this setup: inside the games folder, create another folder called servogame, and create a game.py file inside it.
Now copy the code below to the file you just created and save the file with Ctrl+S.
import logging

from surrortg import Game
from surrortg.inputs import Joystick


class ServoJoystick(Joystick):
    async def handle_coordinates(self, x, y, seat=0):
        logging.info(f"x: {x}")


class ServoGame(Game):
    async def on_init(self):
        self.io.register_inputs({"joystick_main": ServoJoystick()})


ServoGame().run()
We can use this code to see that the game itself works. In the code we first create a custom Joystick class that just logs the x coordinate whenever it gets player input, by overriding the handle_coordinates with some logging. Then to use this class in our game, we create a Game class and register the custom Joystick when the Game initializes.
To change the file which is executed when the game is running in the background, open the controller-rpi.service file from the scripts folder, and change the value of Environment=GAME_MODULE= to games.servogame.game
Press Ctrl+S to save this file. As a result the modified line of the file should look like the one shown below.
Environment=GAME_MODULE=games.servogame.game
Then in your VSCode's terminal run the command `sudo scripts/setup-systemd.sh` to set the new game file we just created to be executed by the controller.
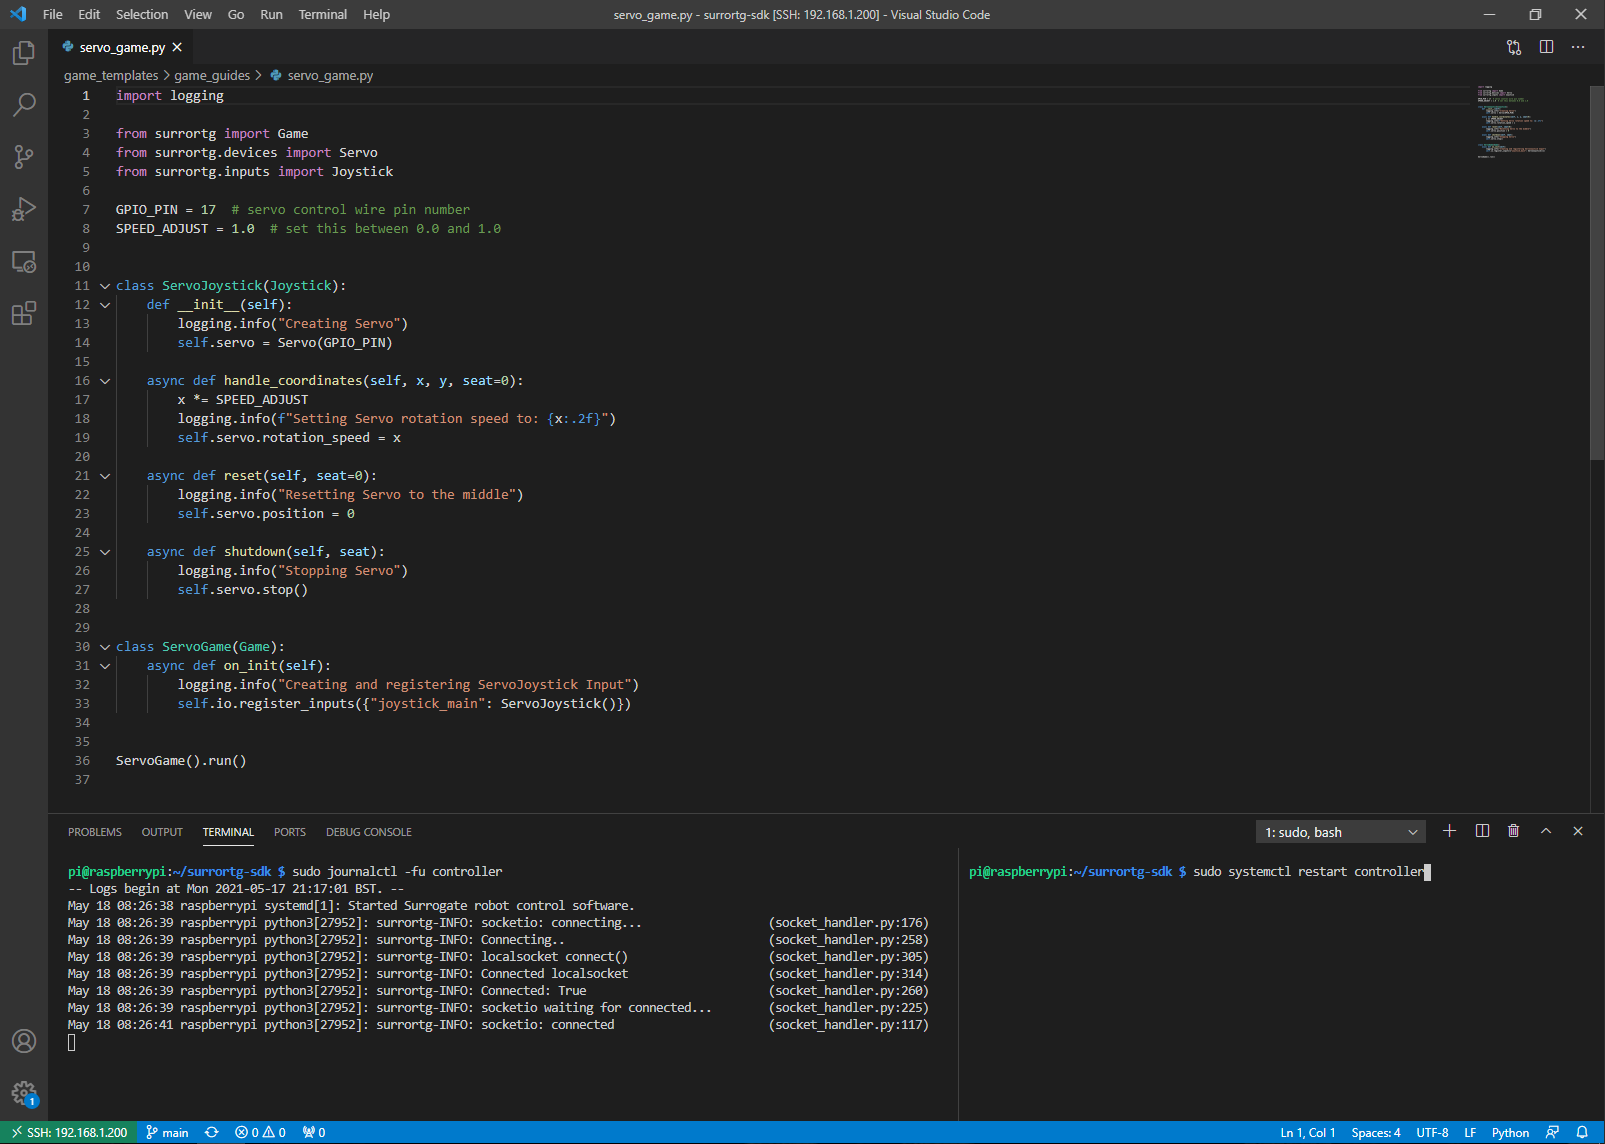
When doing development, it might be a good idea to split the terminal window so that you can see the logs and run commands at the same time. This can be done by selecting "Terminal" and then "Split terminal" from the menus in VSCode. To open the logs, use the command `sudo journalctl -fu controller`, and to restart the game after code changes, use the `sudo systemctl restart controller` command. You can see an example image above with the two terminals side by side.
Now go to your game's dashboard on Surrogate.tv and start the camera preview by pressing the "Preview" button next to the controller's name. If you now press the WASD keys, you should see the inputs coming in.
Whenever you make changes and want to see the effects in your game code,
- First save the file with Ctrl+S
- Then use the `sudo systemctl restart controller` command to put those changes into use
Add a Servo to the Game Code
Now let’s make the Joystick class to move the servo with the input. We first go through the changes one by one to see how it's done, and then show the resulting new game code.
First, we import the Servo class:
from surrortg.devices import Servo
Then, we create a servo object to the joystick class and set the servo's pin to 17, which is connected to the servo’s orange wire:
GPIO_PIN = 17 # servo control wire pin number


class ServoJoystick(Joystick):
    def __init__(self):
        self.servo = Servo(GPIO_PIN)
Finally, we add a command to set the servo’s rotation speed to match the input.
async def handle_coordinates(self, x, y, seat=0):
    logging.info(f"x: {x}")
    self.servo.rotation_speed = x
The resulting game code is shown below. You can now replace the game code you created earlier with this one, save the file with Ctrl+S, and restart the controller to put the new code to use. By going to the camera preview in your games dashboard, you can now test that the servo moves as expected as you press the A and D keys or Left / Right arrows.
import logging

from surrortg import Game
from surrortg.devices import Servo
from surrortg.inputs import Joystick

GPIO_PIN = 17 # servo control wire pin number


class ServoJoystick(Joystick):
    def __init__(self):
        self.servo = Servo(GPIO_PIN)

    async def handle_coordinates(self, x, y, seat=0):
        logging.info(f"x: {x}")
        self.servo.rotation_speed = x


class ServoGame(Game):
    async def on_init(self):
        self.io.register_inputs({"joystick_main": ServoJoystick()})


ServoGame().run()
Improve the Servo Game Code
Now we know that the servo code works, so let's improve the game code a bit!
First, we make the servo to always reset to the middle position whenever a player disconnects and input reset is automatically called. We can do this by adding a reset method to the ServoJoystick class:
async def reset(self, seat=0):
    self.servo.position = 0
Then, we add a servo stop command to the ServoJoystick's shutdown method, which is called when the game code is stopped or it is restarted with the `sudo systemctl restart controller` command:
async def shutdown(self, seat):
    self.servo.stop()
To finish the game code, let's add an optional speed adjustment value and some helpful logs to follow the game from the terminal window. You can see the resulting game code below. You can now once again replace the game code you created earlier with this one, save the file with Ctrl+S, and restart the controller to put the new code to use.
import logging

from surrortg import Game
from surrortg.devices import Servo
from surrortg.inputs import Joystick

GPIO_PIN = 17 # servo control wire pin number
SPEED_ADJUST = 1.0 # set this between 0.0 and 1.0


class ServoJoystick(Joystick):
    def __init__(self):
        logging.info("Creating Servo")
        self.servo = Servo(GPIO_PIN)

    async def handle_coordinates(self, x, y, seat=0):
        x *= SPEED_ADJUST
        logging.info(f"Setting Servo rotation speed to: {x:.2f}")
        self.servo.rotation_speed = x

    async def reset(self, seat=0):
        logging.info("Resetting Servo to the middle")
        self.servo.position = 0

    async def shutdown(self, seat):
        logging.info("Stopping Servo")
        self.servo.stop()


class ServoGame(Game):
    async def on_init(self):
        logging.info("Creating and registering ServoJoystick Input")
        self.io.register_inputs({"joystick_main": ServoJoystick()})


ServoGame().run()
Finished!
Now the basic game is ready, and it can be expanded to do whatever you’d want.
More servo commands can be found from the documentation page. You can find more complex game examples that use servos inside the games folder of the SDK.