How-to: Laser Engraving Photo
by cartonus in Workshop > Laser Cutting
457391 Views, 552 Favorites, 0 Comments
How-to: Laser Engraving Photo

I want to tell you how we engrave photos on a laser machine. After various tests, trial and error, born algorithm that allows you to get good quality engraving.
Excellent Quality Photo

Use photo only excellent quality.
Open in Adobe Photoshop.
Crop Photo

Crop photo as you need. Crop Tool (C)
Remove Background

Carefully remove background.
Use Polygonal Lasso Tool (L) Feather 0px, Anti-alias.
Make a white background, merge layers (Ctrl+E)
Convert Photo to Grayscale

Image > Mode > Grayscale
Edit Photo

Large dark areas of photos light.
The intensity of black color on face should be 10-15%.
The eyes should be almost white. Black 3-6%.
Light hair strands create more light. Dodge Tool (O) Range: Highlights.
Dark hair strands darken. Burn Tool (O) Range: Shadows.
Image Size
Resolution: 200 pixels/cm (508 pixels/inch)
Sharpen

Filter > Sharpen > Unsharp Mask
Amount: 200 % Radius: 1 pixels Threshold: 0 levels.
Make sharper eye, eyelashes, eyebrows, lips, hair using Sharpen Tool.
Convert Image to Bitmap
Image > Mode > Bitmap
Output: 200 pixels/cm (508 pixels/inch)
Method: Halftone Screen Frequency: 200 lines/cm (508 lines/inch)
Angle: 15 degrees
Shape: Round
Save As Format: BMP File
Format: Windows
Depth: 1 Bit
Eye
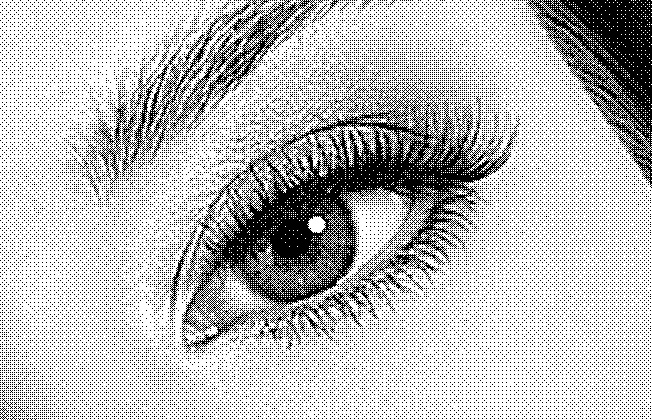
Cut a piece of image for tests.
Eye - the best choice
Laser Program
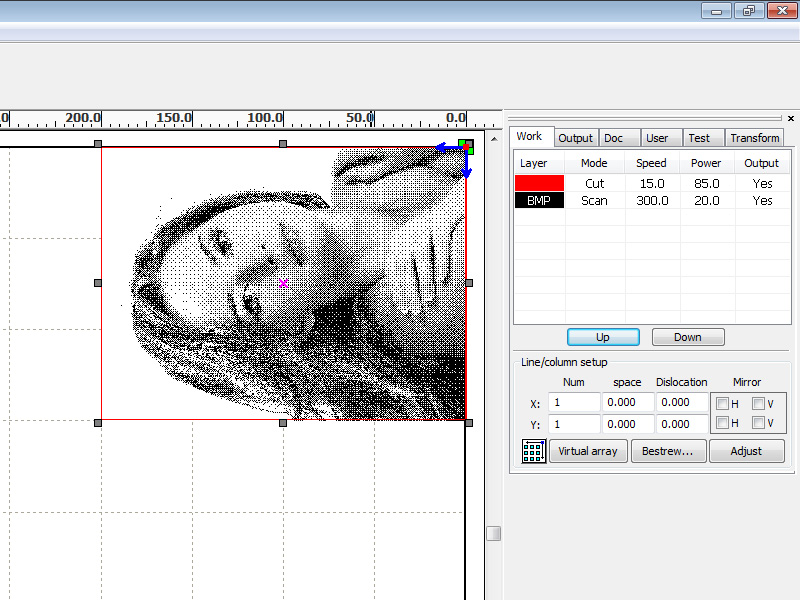
Import BMP image to RDWorks (or other your laser program).
Wood fibers should be parallel to the long axis (X).
Image as well.
Rotate image 90 degrees if necessary.
Set parameters for engrave
Parameters for 40 watt power laser (Program: RDCAM)
Speed(mm/s): 300 Max
Power(%): 20
Interval(mm): 0.05
Material: solid birch, plywood birch
Speed and power must be chosen by experimentation.
Video
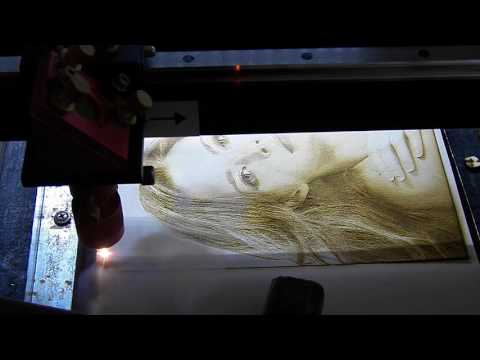
We use plywood birch in main.
It is accessible and cheap material.
Sand the plywood and cover it with varnish.
After engraving, wipe product with damp sponge to remove the soot and dust.
Result

Good luck!
More designs for laser cutting and engraving:
http://cartonus.com/