How to Ensure Your Coffee Machine Never Runs Dry
by madmcu in Circuits > Arduino
470 Views, 8 Favorites, 0 Comments
How to Ensure Your Coffee Machine Never Runs Dry

The goal of this tutorial is to detect when is coffee machine is going to be out of water before it happens. Indeed, using the pump of the machine without water may damage it.
We will do it in a total non intrusive way, we only put an Arduino board with an accelerometer on the coffee machine.
We will use NanoEdge AI Studio (a free tool) to automatically create an AI model able to classify if the doorbell is ringing or if it is just background noise.
Do not worry, you don't need knowledge in AI to follow this tutorial :)
Supplies
Hardware:
- Arduino Uno R4 WIFI
- STMicroelectronics X-NUCLEO-IKS01A3 with LSM6DSO accelerometer
- A micro-USB cable to connect the Arduino board to your desktop machine
You also need a coffee machine!
Software:
- Arduino IDE: To develop the code
- NanoEdge AI Studio: To create an AI library (click on the link to get the software)
SETUP

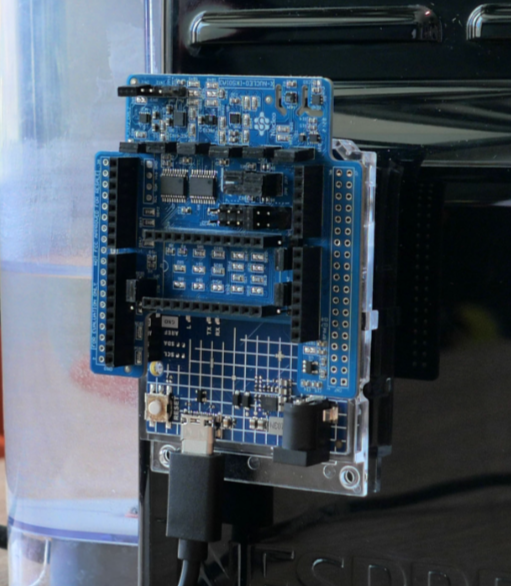

First plug the STMicroelectronics shield on the Arduino board and then use blu tack (or any other adesive) to put the board on the coffee machine.
In Arduino IDE:
Make sure you selected the right COM port: Tools > Port and select the right one.
Select the right board:
- Tools > Boards > Arduino Renesas UNO R4 boards > Arduino UNO R4 WIFI
- If you don't find it, click on Tools > Boards > Boards Manager..., look for the UNO R4 and install the package
Collect Accelerometer Data

We use the STMicroelectronics X-NUCLEO-ISK01A3 for its LSM6DSO. If you have any other accelerometer, you can use it.
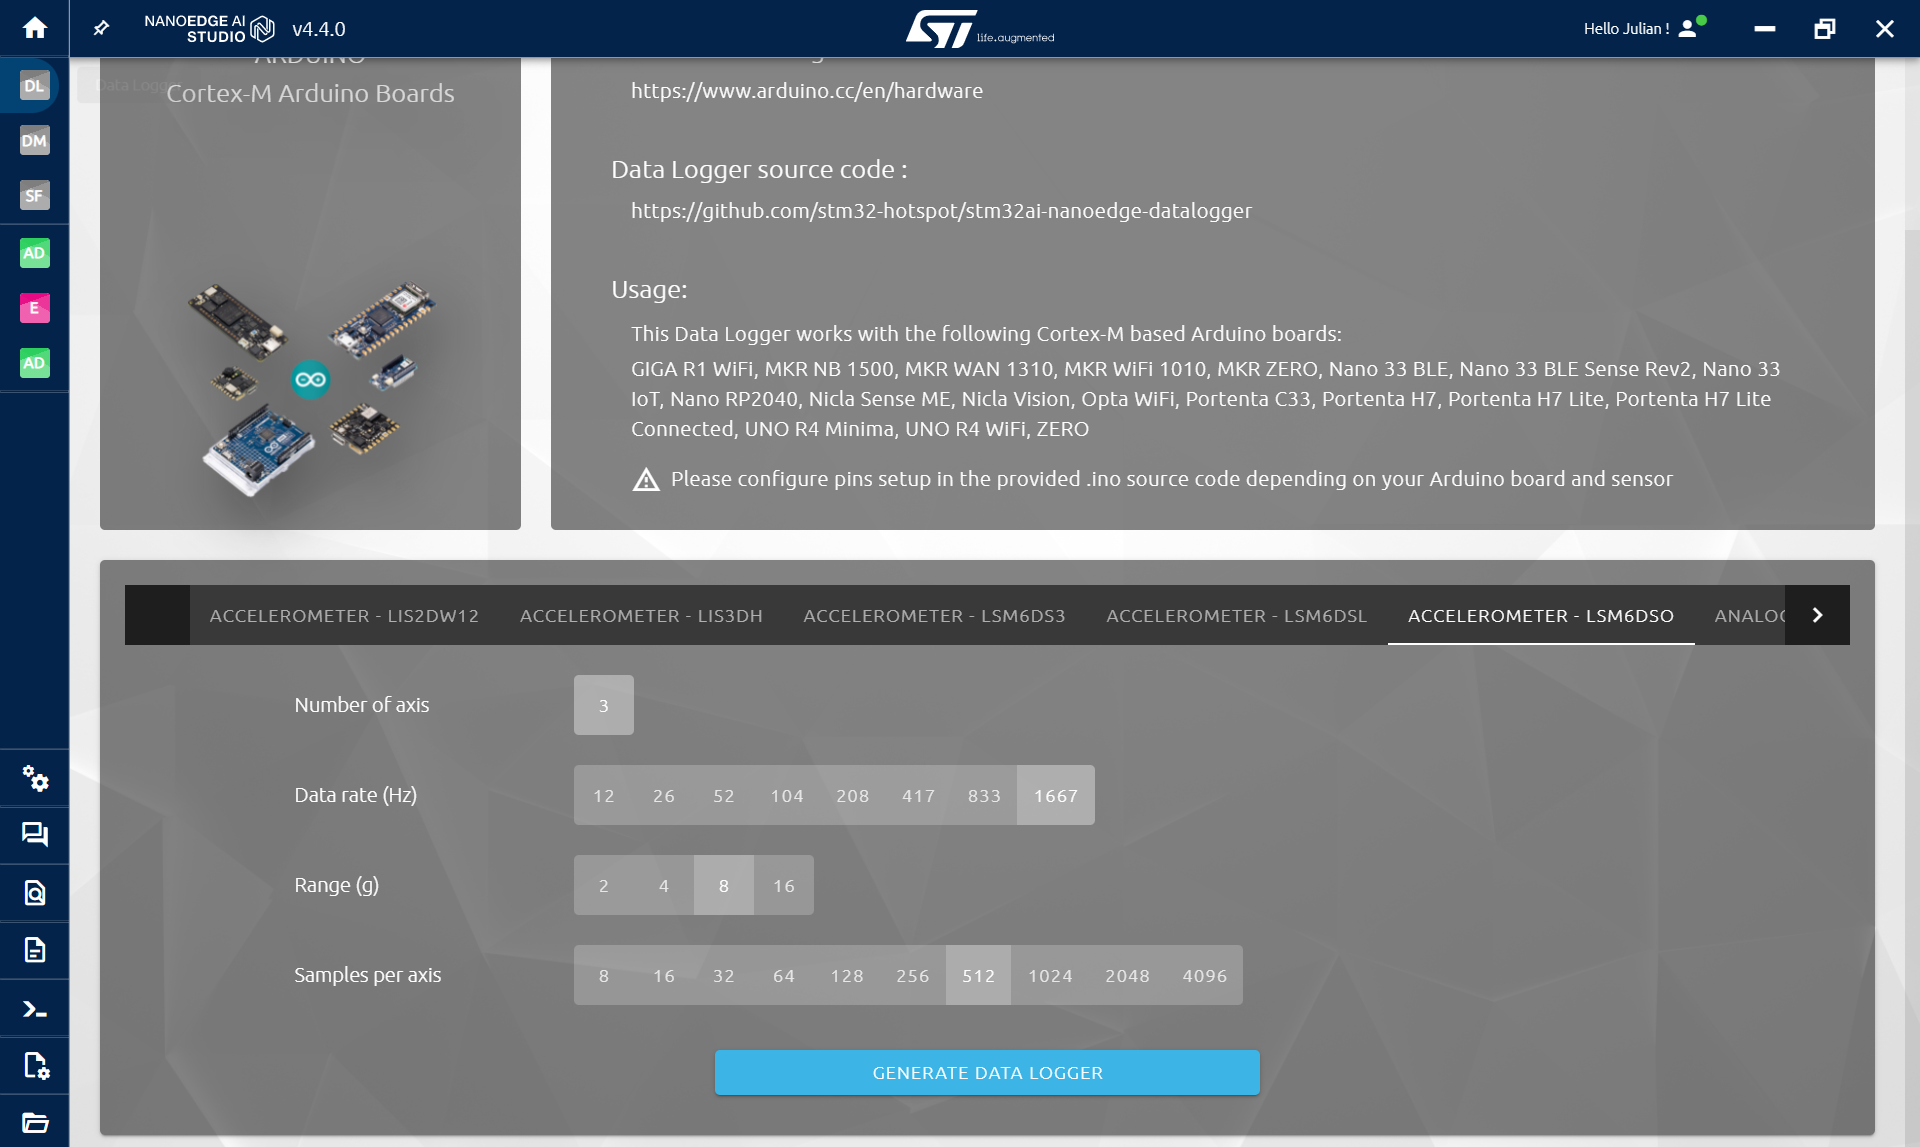
To get the datalogging code, we use NanoEdge AI Studio Datalogger generator for Arduino.
- Open NanoEdge AI Studio
- Go to Data logger Generator
- Select Arduino
- Select LSM6DSO
- Select the datarate, range and buffer size
- Click Generate Data Logger
In this project is selected the maximum datarate (1667Hz), a range of 8 and a buffer size of 512.
NanoEdge outputs a .zip containing a .ino file that you can directly use in Arduino IDE:
- Extract and open the .ino file
- Import the needed libraries (Wire and STM32duino LSM6DSO) and flash the code
Here is the code if you want it directly:
/* =============
Copyright (c) 2024, STMicroelectronics


All rights reserved.


Redistribution and use in source and binary forms, with or without modification, are permitted provided that
the following conditions are met:


* Redistributions of source code must retain the above copyright notice, this list of conditions and the
  following disclaimer.


* Redistributions in binary form must reproduce the above copyright notice, this list of conditions and the
  following disclaimer in the documentation and/or other materials provided with the distribution.


* Neither the name of the copyright holders nor the names of its contributors may be used to endorse or promote
  products derived from this software without specific prior written permission.


*THIS SOFTWARE IS PROVIDED BY THE COPYRIGHT HOLDERS AND CONTRIBUTORS "AS IS" AND ANY EXPRESS OR IMPLIED WARRANTIES,
INCLUDING, BUT NOT LIMITED TO, THE IMPLIED WARRANTIES OF MERCHANTABILITY AND FITNESS FOR A PARTICULAR PURPOSE ARE
DISCLAIMED. IN NO EVENT SHALL THE COPYRIGHT HOLDER / OWNER OR CONTRIBUTORS BE LIABLE FOR ANY DIRECT, INDIRECT, INCIDENTAL,
SPECIAL, EXEMPLARY, OR CONSEQUENTIAL DAMAGES (INCLUDING, BUT NOT LIMITED TO, PROCUREMENT OF SUBSTITUTE GOODS OR
SERVICES; LOSS OF USE, DATA, OR PROFITS; OR BUSINESS INTERRUPTION) HOWEVER CAUSED AND ON ANY THEORY OF LIABILITY,
WHETHER IN CONTRACT, STRICT LIABILITY, OR TORT (INCLUDING NEGLIGENCE OR OTHERWISE) ARISING IN ANY WAY OUT OF THE
USE OF THIS SOFTWARE, EVEN IF ADVISED OF THE POSSIBILITY OF SUCH DAMAGE.*
*/


/* If you want to use NEAI functions please, include NEAI library
 * in your Arduino libraries then, uncomment NEAI parts in the following code
 */


/* Libraries part */
#include "Wire.h"
#include <LSM6DSOSensor.h>
// #include <NanoEdgeAI.h>


/* Macros definitions */
#define SERIAL_BAUD_RATE  115200


/* Define the data type you want to collect */
#define ACCELEROMETER // Could be either ACCELEROMETER or GYROSCOPE


/* Sensor data rates.
 * You can choose from the following values for both accel & gyro:
 * 12.5f, 26.0f, 52.0f, 104.0f, 208.0f, 417.0f, 833.0f & 1667.0f.
  */
#define SENSOR_DATA_RATE	1667.0f


/* Sensor ranges.
 * You can choose from:
 * 2, 4, 8 & 16 for accelerometer.
 * 125, 250, 500, 1000 & 2000 for gyroscope.
 */
#define SENSOR_RANGE	8


/* NanoEdgeAI defines part
 * NEAI_MODE = 1: NanoEdgeAI functions = AI Mode.
 * NEAI_MODE = 0: Datalogging mode.
 */
#define NEAI_MODE 0
#define SENSOR_SAMPLES	512
#define AXIS  3


/* Sensor object declaration using I2C */
LSM6DSOSensor AccGyr(&Wire);


/* Global variables definitions */
static uint8_t drdy = 0;
static uint16_t neai_ptr = 0;
static int32_t sensor_values[3];
static float neai_buffer[SENSOR_SAMPLES * AXIS] = {0.0};


/* NEAI library variables */
// static uint8_t neai_code = 0, similarity = 0;
// static uint16_t neai_cnt = 0;


/* Initialization function: In this function,
 *  code runs only once at boot / reset.
 */
void setup() {
  /* Init serial at baud rate 115200 */
  Serial.begin(SERIAL_BAUD_RATE);


  /* I2C workaround: Sometimes, on some boards,
   * I2C get stuck after software reboot, reset so,
   * to avoid this, we toggle I2C clock pin at boot.
   */
  pinMode(SCL, OUTPUT);
  for (uint8_t i = 0; i < 20; i++) {
    digitalWrite(SCL, !digitalRead(SCL));
    delay(1);
  }
  delay(100);


  Wire.begin();
  AccGyr.begin();
#ifdef ACCELEROMETER
    AccGyr.Enable_X();
    AccGyr.Disable_G();
    AccGyr.Set_X_ODR(SENSOR_DATA_RATE);
    AccGyr.Set_X_FS(SENSOR_RANGE);
#else
    AccGyr.Enable_G();
    AccGyr.Disable_X();
    AccGyr.Set_G_ODR(SENSOR_DATA_RATE);
    AccGyr.Set_G_FS(SENSOR_RANGE);
#endif


  /* Initialize NanoEdgeAI AI */
  // neai_code = neai_anomalydetection_init();
  // if(neai_code != NEAI_OK) {
  //   Serial.print("Not supported board.\n");
  // }
}


/* Main function: Code run indefinitely */
void loop() {
  /* Get data in the neai buffer */
  while(neai_ptr < SENSOR_SAMPLES) {
    /* Check if new data if available */
#ifdef ACCELEROMETER
      AccGyr.Get_X_DRDY_Status(&drdy);
#else
      AccGyr.Get_G_DRDY_Status(&drdy);
#endif
    if(drdy) {
      /* If new data is available we read it ! */
#ifdef ACCELEROMETER
        AccGyr.Get_X_Axes(sensor_values);
#else
        AccGyr.Get_G_Axes(sensor_values);
#endif
      /* Fill neai buffer with new accel data */
      neai_buffer[AXIS * neai_ptr] = (float) sensor_values[0];
      neai_buffer[(AXIS * neai_ptr) + 1] = (float) sensor_values[1];
      neai_buffer[(AXIS * neai_ptr) + 2] = (float) sensor_values[2];
      /* Increment neai pointer */
      neai_ptr++;
    }
  }
  /* Reset pointer */
  neai_ptr = 0;
  /* Depending on NEAI_MODE value, run NanoEdge AI functions
   * or print accelerometer data to the serial (datalogging)
   */
  // if(NEAI_MODE) {
  //   if(neai_cnt < MINIMUM_ITERATION_CALLS_FOR_EFFICIENT_LEARNING) {
  //     neai_anomalydetection_learn(neai_buffer);
  //     Serial.print((String)"Learn: " + neai_cnt + "/" + MINIMUM_ITERATION_CALLS_FOR_EFFICIENT_LEARNING + ".\n");
  //     neai_cnt++;
  //   }
  //   else {
  //     neai_anomalydetection_detect(neai_buffer, &similarity);
  //     Serial.print((String)"Detect: " + similarity + "/100.\n");
  //   }
  // }
  // else {
    /* Print the whole buffer to the serial */
    for(uint16_t i = 0; i < AXIS * SENSOR_SAMPLES; i++) {
      Serial.print((String)neai_buffer[i] + " ");
    }
    Serial.print("\n");
  // }


  /* Clean neai buffer */
  memset(neai_buffer, 0.0, AXIS * SENSOR_SAMPLES * sizeof(float));
}
By default the code contains a commented part for NanoEdge AI libraries, but we will use it later, after creating a model.
Downloads
NanoEdge AI Studio


NanoEdge AI Studio is a free software developed by STMicroelectronics to help embedded users to easily create AI model. And it is pretty easy to use:
- Select a kind of project
- Import data
- Get the best model given your data
- Test it
- Compile and use it with few functions
Here we will do a Anomaly detection project (AD), we want to detect a normal situation where there is water to make a coffee and an abnormal situation, when there is no more water.
We could also have done a N class classification model, but more on that on the end.
In Project Settings:
- Give a name to the project
- Select the Arduino R4 Wifi as target
- Select the sensor: Accelerometer 3 axis
- Optionally add limit to FLASH and RAM (for the model search)
In Regular signals:
Here we log normal signals, in our case, when the coffee machine has enough water to do a coffee.
You can either import data that you already have (.txt or .csv files) or log directly in NanoEdge.
- What you want to log is the machine doing a coffee.
- Avoid empty signals (when the machine is doing nothing).
- Collect around 50 to 100 buffers.
In Abnormal signals:
Do the same, but when there not enough/no water at all to do a coffee.
Benchmark:
Now that we have 2 kinds of data, we can ask NanoEdge AI Studio to take these data and create an AI Library containing a model and its parameters but also preprocessing applied to our data like FFTs for example.
Click on new benchmark and select both kinds of data and click start.
During the benchmark, hundred of thousands of combination are tested to find the ones that works best on the provided data.
The score is a metrics that take in accound the overall accuracy of the model and its RAM and FLASH footprint.
Once you have an accuracy of 90% or more, you can stop the benchmark. It can take hours to try to find the most optimal library, but here if we have one that works, it is enough.
Validation:
In validation, the goal is to test if the model found during the benchmark works on new data. What can happens with AI model is overfitting, meaning that the model learned the data by heart, not how to distinguish them. What happens then is that he don't work well on unseen data.
Select the 5 best model, click on New Experiment and add new files of data:
- Learn files: NanoEdge Anomaly detection model can be retrained directly on the microcontroller, it gives generally better results this way. Here you can import the regular file used in the regular step (you can download it there).
- Regular files: you want to import a new file containing new regular signals. (you can go back to the regular step, log new data and download the file if you want)
- Abnormal files: same but with new abnormal signals.
After a little bit of time, you will get new accuracies for all 5 selected model, you should have an accuracy close to the one obtained during the benchmark. If not, do a new benchmark with more data.
Compilation:
Here we have two choices:
- Use the model trained during the benchmark
- Use the model but retrain it directly on the microcontroller.
If you don't want to retrain the model, check the box "Include knowledge from benchmark" before compiling.
if you instead want to retrain the model directly on the microcontroller, take a look at the neai_anomalydetection_learn() function in the documentation, nothing complicated:
https://wiki.st.com/stm32mcu/wiki/AI:NanoEdge_AI_Library_for_anomaly_detection_(AD)
Why retrain a model ?
For example, if you had multiple coffee machine, you could log data on one and create a model and then deploy the same model to every machine, it should work if they are the same machine.
With retraining, you could deploy the same model on each machine, but you could retrain each model separately to have "specialized" model on each machine and thus better accuracy.
Add NanoEdge to Arduino Code
Now that we have the anomaly detection library, we need to add it to our Arduino code:
- Open the .zip obtained, there is an Arduino folder containing another zip
- Import the library in Arduino IDE: Sketch > Include library > Add .ZIP library... and select the .zip in the Arduino folder
IF YOU ALREADY USE A NANOEDGE AI LIBRARY IN ARDUINO IDE:
go to document/arduino/library and delete the nanoedge one. Then follow the instruction above to import the new library.
IMPORTANT:
If you get an error because of RAM, it may be because of the library in NanoEdge. Go back to the VALIDATION STEP in NanoEdge and select a smaller library (click on the crown on the right), then compile it and replace it in Arduino IDE.
Option A: Retrain the model
In the code that we used for the datalogging, just change NEAI_MODE to 1 and uncomment the following code:
...
#include <NanoEdgeAI.h>
...
#define NEAI_MODE 1 //0 is data logging code, 1 is detection code
...
void setup(){
  ...
  neai_code = neai_anomalydetection_init(); //initialisation
  if(neai_code != NEAI_OK) {
    Serial.print("Not supported board.\n");
  }
}

void loop(){
   ...
   if(NEAI_MODE) {
     if(neai_cnt < MINIMUM_ITERATION_CALLS_FOR_EFFICIENT_LEARNING) {
       neai_anomalydetection_learn(neai_buffer);
       Serial.print((String)"Learn: " + neai_cnt + "/" + MINIMUM_ITERATION_CALLS_FOR_EFFICIENT_LEARNING + ".\n");
       neai_cnt++;
     }
     else {
       neai_anomalydetection_detect(neai_buffer, &similarity);
       Serial.print((String)"Detect: " + similarity + "/100.\n");
     }
  }
}
Option B: Use the knowledge from the benchmark
If you decided above to use the knowledge from the benchmark here is what to do:
- In the init() part of the code add: neai_anomalydetection_knowledge(knowledge);
- in the loop() after the if(NEAI_MODE) remove the if statement (and the else { and })
#include <NanoEdgeAI.h>
#include "knowledge.h"  // DON T FORGET TO LOAD THE KNOWLEDGE

void setup(){
...
  neai_code = neai_anomalydetection_init();
  if (neai_code != NEAI_OK) {
    Serial.print("Not supported board.\n");
  } else {
    neai_anomalydetection_knowledge(knowledge); //this part is to load the knowledge
  }
}


void loop(){
...
   if(NEAI_MODE) {

      // no more learning part, but detect is the same

       neai_anomalydetection_detect(neai_buffer, &similarity);
       Serial.print((String)"Detect: " + similarity + "/100.\n");
  }
...
}
The neai_anomalydetection_detect() is the part of the code that use the model for detection.
if the similarity is 100 it means that we have a signal 100% similar to the nominal data (enough water) if it is 0, we have 0% chance of being nominal data.
In the default code we simply print the similarity score, you can do a if statement that write ok if the similarity is above 90 or "you need to add water" in the other case, it is up to you:
if (similarity > 90){
 Serial.print("OK");
} else {
 Serial.print("Not enough water, please add water");
}
Thank you for reading :)