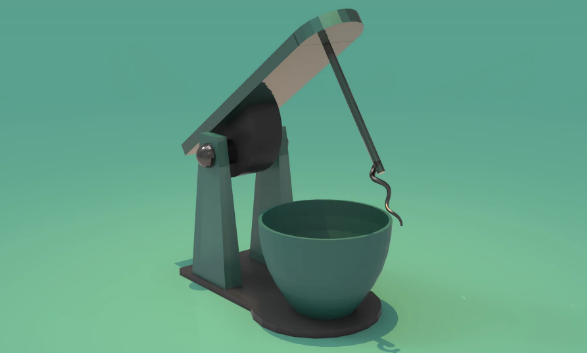
How to Design a Stand Mixer Using SelfCAD
by Julie80 in Design > Digital Graphics
95 Views, 1 Favorites, 0 Comments
How to Design a Stand Mixer Using SelfCAD

Learn How to Design a Stand Mixer Using SelfCAD with the help of this article
How to Design a Stand Mixer Using SelfCAD
Designing a stand mixer in 3D is a rewarding challenge that combines functionality with aesthetic appeal, and SelfCAD is the ideal tool to bring this household appliance to life. As a versatile, browser-based 3D modeling software, SelfCAD offers an array of features that allow users to craft detailed and realistic models, whether you’re a beginner or a seasoned designer. In this article, we will explore the step-by-step process of designing a stand mixer using SelfCAD, from the initial concept to the final render. Through this guide, you will learn how to leverage SelfCAD's tools to create a stand mixer that is both visually striking and accurately modeled, capturing the essential details and proportions of this kitchen staple. Whether you’re aiming for a sleek modern design or a classic look, this tutorial will equip you with the skills needed to design a stand mixer with precision and creativity.
To access the interactive tutorial to this article, https://www.selfcad.com/tutorials/70r2n2v5h6b1t1k3d4o576562101u735t6v6
Once you’ve launched the editor;
From the drawings category on the toolbar choose 3D Sketch
Set snap to grid vertices to true, Click on highlighted point to draw edge
Click on highlighted point to draw edge
Click on highlighted point to draw edge
Click on highlighted point to draw edge
Press Esc to stop drawing stroke
From the tool panel choose Arc 2; Click on highlighted point to draw arc
Click on highlighted point to draw arc
Click on highlighted point to draw arc
From the tools category on the toolbar choose fill polygons
Click to finalize fill polygons
From the modify category on the toolbar choose add thickness; Set thickness to 15
Click to finalize add thickness
From the 3D shapes category on the toolbar choose shape generator; Set top radius to 15, bottom radius to 30, number of edges to 4, extrusion height to 300, position x to 75, position y to 15, position z to -100
Click to finalize shape generator
Click scale on the toolbar; Set z to 120
Click ‘x’ to close transformation panel
From the utilities category on the toolbar choose mirror; Set direction to left, create copy to true, offset to 53
Click to finalize mirror
From the 3D shapes category on the toolbar choose capsule; Set height to 220, position y to 250, position z to -100, rotation z to 90
Click to finalize capsule
From the 3D shapes category on the toolbar choose cylinder; Set top radius to 100, bottom radius to 100, height to 70, arc to 180, position y to 220, position z to -110, rotation x to 145, rotation z to 90
Click to finalize cylinder
From the 3D shapes category on the toolbar cube; Set width to 130, height to 25, depth to 450, position y to 250, position z to -40, rotation x to 145
Click to finalize cube
From the 3D shapes category on the toolbar choose cylinder; Set top radius to 65, bottom radius to 65, height to 25, position y to 475, position z to 150, rotation x to 145
Click to finalize cylinder
Click on mesh 13 to select
Click stitch & scoop on the toolbar; From the tool panel choose union
Click to finalize union
From the 3D shapes category on the toolbar choose cylinder; Set top radius to 7, bottom radius to 7, height to 250, position y to 300, position z to 220, rotation x to 145
Click to finalize cylinder
From the 3D shapes category on the toolbar choose spiral generator; Set top radius to 5, bottom radius to 10, height to 120, revolutions to 100, top thickness to 2, position x to -8, position y to 225, position z to 310, rotation x to 145
Click to finalize spiral generator
From the 3D shapes category on the toolbar choose shape generator; Set fill top to false, top radius to 120, bottom radius to 50, number of edges to 32, extrusion height to 180, bevel offset to 2, bevel level to 5, position y to 10, position z to 150
Click to finalize shape generator
From the modify category on the toolbar choose add thickness; Set use mirrored thickness to true
Click to finalize add thickness
As you continue honing your design skills, remember that SelfCAD offers a wealth of resources to support your learning journey. To deepen your understanding and explore more advanced features, consider checking out the interactive tutorials (https://www.selfcad.com/tutorials) available on the SelfCAD website. The tutorials page provides a treasure trove of guides, tips, and tricks that cater to designers of all levels.
More structured learning experience can also be accessed at the SelfCAD Academy (https://www.selfcad.com/academy/curriculum/), https://www.youtube.com/@3dmodeling101, and 3D Modeling 101 series (https://www.youtube.com/playlist?list=PL74nFNT8yS9DcE1UlUUdiR1wFGv9DDfTB). This comprehensive resource offers in-depth courses taught by industry experts, allowing you to master the intricacies of SelfCAD at your own pace.