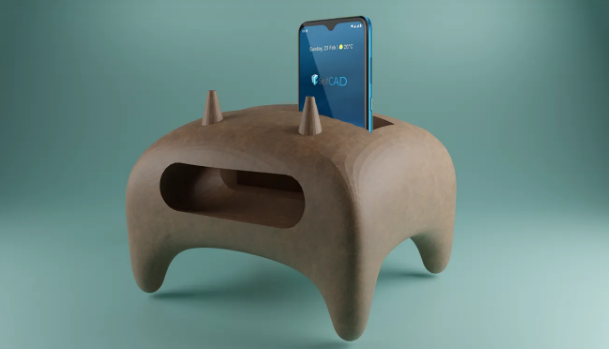
How to Design a Phone Speaker With Holder Using SelfCAD
by Julie80 in Design > Digital Graphics
109 Views, 0 Favorites, 0 Comments
How to Design a Phone Speaker With Holder Using SelfCAD

Learn How to Design a Phone Speaker with Holder Using SelfCAD with the help of this article
How to Design a Phone Speaker with Holder Using SelfCAD
Designing a phone speaker with an integrated holder is an innovative way to enhance both the audio experience and the practicality of phone usage. SelfCAD, a versatile and accessible 3D modeling software, provides the perfect platform to bring such a design to life. With its comprehensive set of tools, SelfCAD enables users to create custom, user-friendly designs that blend form and function seamlessly. This essay will guide you through the process of designing a phone speaker with a holder using SelfCAD, from the initial concept to the final product. Whether you’re aiming to improve sound quality or create a sleek, ergonomic holder, SelfCAD equips you with everything you need to craft a design that meets both aesthetic and functional requirements.
To access the interactive tutorial to this article, check out https://www.selfcad.com/tutorials/1t4n5264681o2771c5x2k3h6c593f652s5a6
Once you’ve launched the editor;
From the 3D Shapes category on the toolbar choose cube; Set width to 140, height to 69, depth to 125
Tick the checkmark to finalize cube
From the modify category on the toolbar choose edit details; Drag highlighted edge to highlighted line to add edge
Type in 20 value into the length measurement to adjust position of the new added detail and press enter to confirm, Drag highlighted edge above to highlighted line to add edge
Type in 20 value into the length measurement to adjust position of the new added detail and press enter to confirm
Set loop finding to true
Drag highlighted edge to highlighted line to add edge; Type in 20 value into the length measurement to adjust position of the new added detail and press enter to confirm
Drag highlighted edge to highlighted line to add edge; Type in 20 value into the length measurement to adjust position of the new added detail and press enter to confirm
Click to finalize edit details
Click to activate face selection; Click on highlighted region to select it
From the modify category on the toolbar choose extrusion; Set extrusion amount to 35
Tick the checkmark to finalize extrusion
Click on highlighted region to deselect it
From the 3D Shapes category on the toolbar choose capsule; Set top radius to 15, bottom radius to 15, height to 90, position y to 50, position z to 60, rotation z to 90
Click to finalize capsule
From the 3D Shapes category on the toolbar choose cube; Set height to 76, depth to 28, position y to 50
Tick the checkmark to finalize cube
Click highlighted part on selection cube to turn off region selection
Click wireframe button to set rendering mode
Click on mesh 8 to select it
Click scale on the toolbar; Set z to 73 using highlighted gizmo
Click ‘x’ to close transformation panel
Click solid button to set rendering mode
Click on mesh 4 to select it.click on mesh 8 to deselect
From the modify category on the toolbar choose round object; Set smoothness to 4
Click to finalize round object
Click on mesh 8, 12 to select
Click stitch & scoop on the toolbar; From the tool panel choose difference, Choose mesh 8, 12 to subtract
Click to finalize difference
From the 3D Shapes category on the toolbar choose cylinder; Set top radius to 2, bottom radius to 6, height to 18, position x to 29, position y to 92, position z to 35
Click to finalize cylinder
Click copy button to copy selected objects
Click move on the toolbar; Set x to -28 using highlighted gizmo
Click ‘x’ to close transformation panel
From the 3D Shapes category on the toolbar choose capsule; Set top radius to 8, bottom radius to 6, height to 25, position x to 3, position y to 46, position z to -66, rotation y to 90, rotation z to 90
Click to finalize capsule
Click on difference 1 mesh 16(1), mesh 16 to select
Click stitch & scoop on the toolbar; From the tool panel choose union
Click to finalize union
As you continue honing your design skills, remember that SelfCAD offers a wealth of resources to support your learning journey. To deepen your understanding and explore more advanced features, consider checking out the interactive tutorials (https://www.selfcad.com/tutorials) available on the SelfCAD website. The tutorials page provides a treasure trove of guides, tips, and tricks that cater to designers of all levels.
More structured learning experience can also be accessed at the SelfCAD Academy (https://www.selfcad.com/academy/curriculum/), https://www.youtube.com/@3dmodeling101, and 3D Modeling 101 series (https://www.youtube.com/playlist?list=PL74nFNT8yS9DcE1UlUUdiR1wFGv9DDfTB). This comprehensive resource offers in-depth courses taught by industry experts, allowing you to master the intricacies of SelfCAD at your own pace.