How to Design a Fire Hydrant (Low Poly) Using 3D CAD Software
by Julie80 in Design > Digital Graphics
212 Views, 0 Favorites, 0 Comments
How to Design a Fire Hydrant (Low Poly) Using 3D CAD Software

Learn How to Design a Fire Hydrant (Low Poly) Using 3D CAD Software with the help of this article
How to Design a Fire Hydrant (Low Poly) Using 3D CAD Software
Designing a fire hydrant is a complex yet fascinating task that merges engineering principles with creative problem-solving. With the advent of 3D modeling software like SelfCAD, this process has become more accessible and efficient, allowing designers to visualize, simulate, and refine their concepts digitally. SelfCAD stands out for its intuitive interface and powerful features, making it an excellent tool for both novice and experienced designers.
This article delves into the step-by-step process of designing a fire hydrant using SelfCAD. From conceptualization to the final model, each stage showcases how modern technology simplifies intricate designs. The fire hydrant, a critical component of urban infrastructure, serves not only as a functional device but also as an example of how design must balance practicality, durability, and aesthetic appeal. By understanding this design process, readers will gain valuable insights into the capabilities of SelfCAD and the broader applications of 3D modeling in solving real-world challenges
To access the interactive tutorial to this article, check out https://www.selfcad.com/tutorials/16a534q585i5f401b9644z6n4f3555s4z6n1
From the generators category on the toolbar choose shape generator; Set top radius to 20, bottom radius to 20, number of edges to 8, height to 5,
Click + button to add new segment; Set top radius to 30, bottom radius to 30
Click + button to add new segment; Set top radius to 25, bottom radius to 25, height to 30
Set top radius to 22, bottom radius to 22, height to 60, Click + button to add new segment;
Set height to 8; Click + button to add new segment;
Click + button to add new segment; Set top radius to 7, bottom radius to 25, height to 35, bevel offset to 0.8, bevel level to 3, bevel weight to 1
Click + button to add new segment; Set top radius to 3, bottom radius to 3, height to 5
Tick the checkmark to finalize shape generator
Click color picker button to change color of object; Click red
Click ok
From the generators category on the toolbar choose shape generator; Set top radius to 13, bottom radius to 13, height to 10
Click + button to add new segment; Set top radius to 3, bottom radius to 3, number of edges to 4, height to 5, position y to 50, position z to 30, rotation x to 90, rotation y to 22.5
Tick the checkmark to finalize shape generator
Click color picker button to change color of object; Click silver
Click ok
From the generators category on the toolbar choose shape generator; Set top radius to 3, bottom radius to 3, number of edges to 4, position x to -28, position y to 77, rotation x to 22.5, rotation z to 90
Tick the checkmark to finalize shape generator
Click color picker button to change color of object; Click silver
Click ok
From the utilities category on the toolbar choose mirror; Set create copy to true, direction to right, offset to 13
Click to finalize mirror
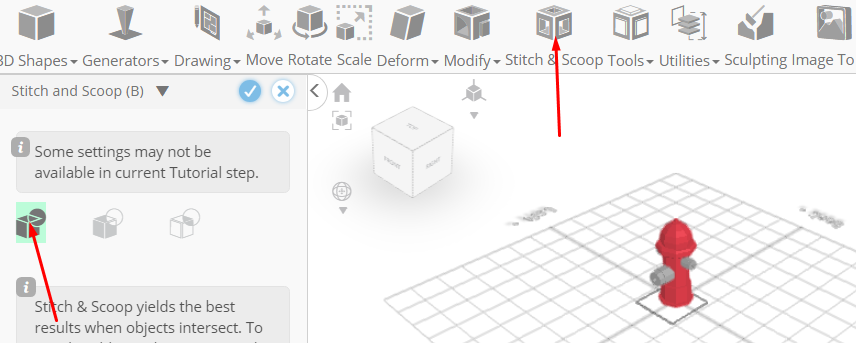
Click stitch & scoop on the toolbar; From the tool panel choose union.
Click to finalize union
As you continue honing your design skills, remember that SelfCAD offers a wealth of resources to support your learning journey. To deepen your understanding and explore more advanced features, consider checking out the interactive tutorials (https://www.selfcad.com/tutorials) available on the SelfCAD website. The tutorials page provides a treasure trove of guides, tips, and tricks that cater to designers of all levels.
More structured learning experience can also be accessed at the SelfCAD Academy (https://www.selfcad.com/academy/curriculum/), https://www.youtube.com/@3dmodeling101, and 3D Modeling 101 series (https://www.youtube.com/playlist?list=PL74nFNT8yS9DcE1UlUUdiR1wFGv9DDfTB). This comprehensive resource offers in-depth courses taught by industry experts, allowing you to master the intricacies of SelfCAD at your own pace.