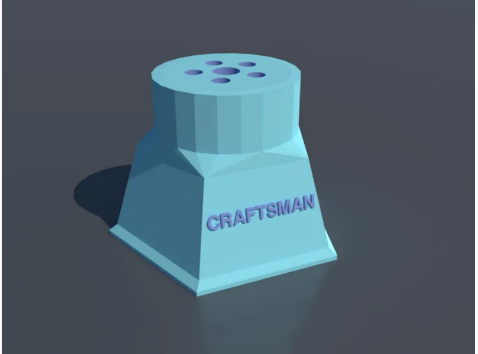
How to Design a Craftsman Screwdriver Case Using SelfCAD
by Julie80 in Design > 3D Design
79 Views, 1 Favorites, 0 Comments
How to Design a Craftsman Screwdriver Case Using SelfCAD

Learn How to Design a Craftsman Screwdriver Case using SelfCAD with the help of this article
How to Design a Craftsman Screwdriver Case using SelfCAD
3D modeling software like SelfCAD allows designers and hobbyists alike to create custom tool cases that are both functional and tailored to their specific needs. This article will walk you through the process of designing a sturdy and practical Craftsman screwdriver case using SelfCAD. Whether you're looking to protect your tools during transport or simply want to organize your workspace, this guide will equip you with the knowledge and skills to create a personalized and professional-grade tool case.
To access the interactive tutorial to this article, check out https://www.selfcad.com/tutorials/5hf1244d31103j86482v185e4094r52276p5
Once you’ve launched the editor;
From the generators category on the toolbar choose shape generator; Set top radius to 28, bottom radius to 28, height to 1
Click + button to add new segment; Set top radius to 26, height to 1.5
Click + button to add new segment; Set top radius to 20, height to 20
Click + button to add new segment
Set top radius to 14, bottom radius to 16, number of edges to 22, height to 12.5, offset to 3.5, bevel offset to 0.1, bevel weight to 4.8
Tick the checkmark to finalize shape generator
Click solid + wireframe button to set rendering mode
From the drawing category on the toolbar choose 3D Sketch; From the tool panel choose circle
Click on highlighted point to draw circle
Click on highlighted point to draw circle
Click ‘x’ to close 3D Sketch
From the 3D Shapes category on the toolbar choose cylinder; Set top radius to 3, bottom radius to 2, height to 32, position x to -30
Tick the checkmark to finalize cylinder
From the utilities category on the toolbar choose snap; Click on highlighted point to change position of the selected object, Set y to -32
Click ‘x’ to close snap panel
From the tools category on the toolbar choose copy offsets; Set operation to scale, Set x to -2, y to -12, z to -2, Click copy button to create copies
Click ‘x’ to close copy offsets panel
Click on mesh 4 to deselect it
From the utilities category on the toolbar choose snap; Click on highlighted point to change position of the selected object
Click ‘x’ to close snap panel
Click on profile 1 to select it
From the utilities category on the toolbar choose follow path; Set spacing enabled to true, spacing to 9
Tick the checkmark to finalize follow path
From the edit menu on the top toolbar choose group
Click move on the toolbar; Set y to 18.5
Click ‘x’ to close transformation panel
From the generators category on the toolbar choose text generator; Set text to CRAFTSMAN , font to helvetica, height to 3, depth to 1, position y to 12, position z to 21, Rotation x to -14,
Tick the checkmark to finalize text generator
Click on group 1, mesh 4 to select it
Click color picker button to change color of selected objects; Click blue
Click OK
Click on shape 1 to select it
Click stitch & scoop on the toolbar; From the tool panel choose difference, Choose mesh 4, group 1 to subtract
Tick the checkmark to finalize difference
Click solid button to set rendering mode
As you continue honing your design skills, remember that SelfCAD offers a wealth of resources to support your learning journey. To deepen your understanding and explore more advanced features, consider checking out the interactive tutorials (https://www.selfcad.com/tutorials) available on the SelfCAD website. The tutorials page provides a treasure trove of guides, tips, and tricks that cater to designers of all levels.
More structured learning experience can also be accessed at the SelfCAD Academy (https://www.selfcad.com/academy/curriculum/), https://www.youtube.com/@3dmodeling101, and 3D Modeling 101 series (https://www.youtube.com/playlist?list=PL74nFNT8yS9DcE1UlUUdiR1wFGv9DDfTB). This comprehensive resource offers in-depth courses taught by industry experts, allowing you to master the intricacies of SelfCAD at your own pace.