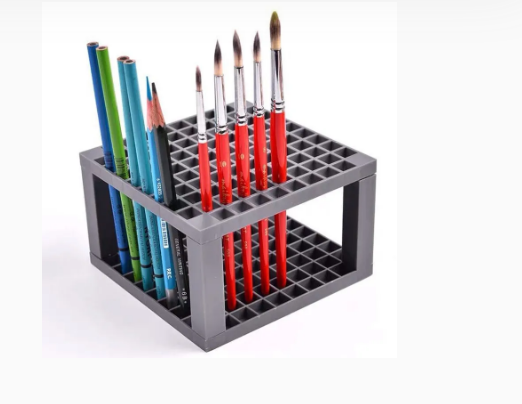
How to Design a Brush/Pencil Holder Using 3D CAD Software
by Julie80 in Craft > Digital Graphics
345 Views, 7 Favorites, 0 Comments
How to Design a Brush/Pencil Holder Using 3D CAD Software

Learn How to Design a Brush/Pencil Holder Using 3D CAD Software with the help of this article
How to Design a Brush/Pencil Holder Using 3D CAD Software
Designing everyday items using 3D modeling software has become a popular trend, especially as 3D printing becomes more accessible and versatile. Among these items, a custom-designed brush or pencil holder stands out as both a practical and creative project. SelfCAD, an intuitive online 3D design software, provides all the tools needed to bring such ideas to life, making it a great choice for beginners and hobbyists. This article explores the process of designing a unique brush or pencil holder using SelfCAD, covering each step in detail—from shaping and hollowing to adding personalized touches. By the end, readers will not only understand the basic techniques but also gain insight into the creative potential of SelfCAD, ultimately learning how to turn a simple design into a functional and personalized desk accessory.
To access the interactive tutorial to this article, check out https://www.selfcad.com/tutorials/4y334c364j684z2x52573j496l3y71u74b5b
Once you’ve launched the editor;
From the 3D Shapes category on the toolbar choose cube; Set width to 122, height to 10, depth to 122
Click to finalize cube
From the tools category on the toolbar choose copy offsets; Set y to 60, Click copy button to create copies
Click ‘x’ to close copy offsets panel
From the edit menu on the top toolbar choose group
From the 3D Shapes category on the toolbar choose cube; Set width to 10, depth to 10
Click to finalize cube
From the tools category on the toolbar choose copy offsets; Set x to 12, Set amount of copies to 9, Click copy button to create copies
Click ‘x’ to close copy offsets panel
From the tools category on the toolbar choose copy offsets; Set z to 12, Set amount of copies to 9, Click copy button to create copies
Click ‘x’ to close copy offsets panel
Click move on the toolbar; Set x to 0, y to 2, z to 0
Click ‘x’ to close transformation panel
Click on all the meshes to select them; Click copy button to copy selected objects, From the edit menu on the top toolbar choose group
Click inverse selection button to inverse selection
Click on group 3 to select it. Click on mesh 4 to deselect
Click stitch & scoop on the toolbar; from the tool panel choose difference, Choose group 3 to subtract, and set keepsubtractedobject to true
Click to finalize difference
Click on mesh 4 to select it. Click on difference 1 to deselect
Click stitch & scoop on the toolbar; from the tool panel choose difference, Choose group 3 to subtract
Click to finalize difference
Click on group 2 to select it. Click on difference 2 to select it
Click scale on the toolbar; Set y to 65 using highlighted gizmo
Click ‘x’ to close transformation panel
From the deform category on the toolbar choose taper; Set individual transformation to true; x to -6, z to -6
Click ‘x’ to close transformation panel
Click on difference 2 to select it
Click stitch & scoop on the toolbar; from the tool panel choose union
Click to finalize union
As you continue honing your design skills, remember that SelfCAD offers a wealth of resources to support your learning journey. To deepen your understanding and explore more advanced features, consider checking out the interactive tutorials (https://www.selfcad.com/tutorials) available on the SelfCAD website. The tutorials page provides a treasure trove of guides, tips, and tricks that cater to designers of all levels.
More structured learning experience can also be accessed at the SelfCAD Academy (https://www.selfcad.com/academy/curriculum/), https://www.youtube.com/@3dmodeling101, and 3D Modeling 101 series (https://www.youtube.com/playlist?list=PL74nFNT8yS9DcE1UlUUdiR1wFGv9DDfTB). This comprehensive resource offers in-depth courses taught by industry experts, allowing you to master the intricacies of SelfCAD at your own pace