How to Create a Retro-Gaming Machine Using RetroPie and a Raspberry Pi
by AdamWilborn in Circuits > Raspberry Pi
11644 Views, 129 Favorites, 0 Comments
How to Create a Retro-Gaming Machine Using RetroPie and a Raspberry Pi
Hey guys, and welcome to my tutorial on how to create your very own retro-gaming machine. This tutorial will teach you how to install RetroPie on a Raspberry Pi. Since quite a few models of the Raspberry Pi exist, I want to state I will focus on the Raspberry Pi 3 Model B. For the project, I will use a computer equipped with Windows 10. Before we get started, I want to first provide definitions for a few technical terms you will see throughout the Instructable.
Raspberry Pi: A low-cost, basic computer originally intended to help spur interest in computing among school-aged children.
RetroPie: Software that builds upon various projects to enable you to play your favorite arcade, home-console, and classic PC games with very little set-up.
Emulator: Software that enables a computer system to behave like another. In our case, enabling a Raspberry Pi to behave like several different video game consoles.
ROMs: Digital versions of game cartridges.
After reading over and understanding these terms, let's get started by learning what materials you will need to begin building your retro-gaming machine.
Materials Needed
To begin building our retro-gaming machine, we must first purchase some hardware. One of the simplest ways to purchase most of these components is through a kit such as the Canakit. The Canakit includes:
- Raspberry Pi 3
- Raspberry Pi Case
- MircroSD Card
- MicroSD Card Reader
- HDMI cable
- 5V 2.5A Micro USB Power Supply
Now that you have these materials, you only need to obtain a few additional components not included in the Canakit:
- Access to a computer
- Television or Computer Monitor (No specific type. Just make sure it has an HDMI port)
- One of the following controllers with USB capability:
Once you have obtained all the hardware components needed for the project, we can continue to the installation phase.
Download the RetroPie SD Image
.png)
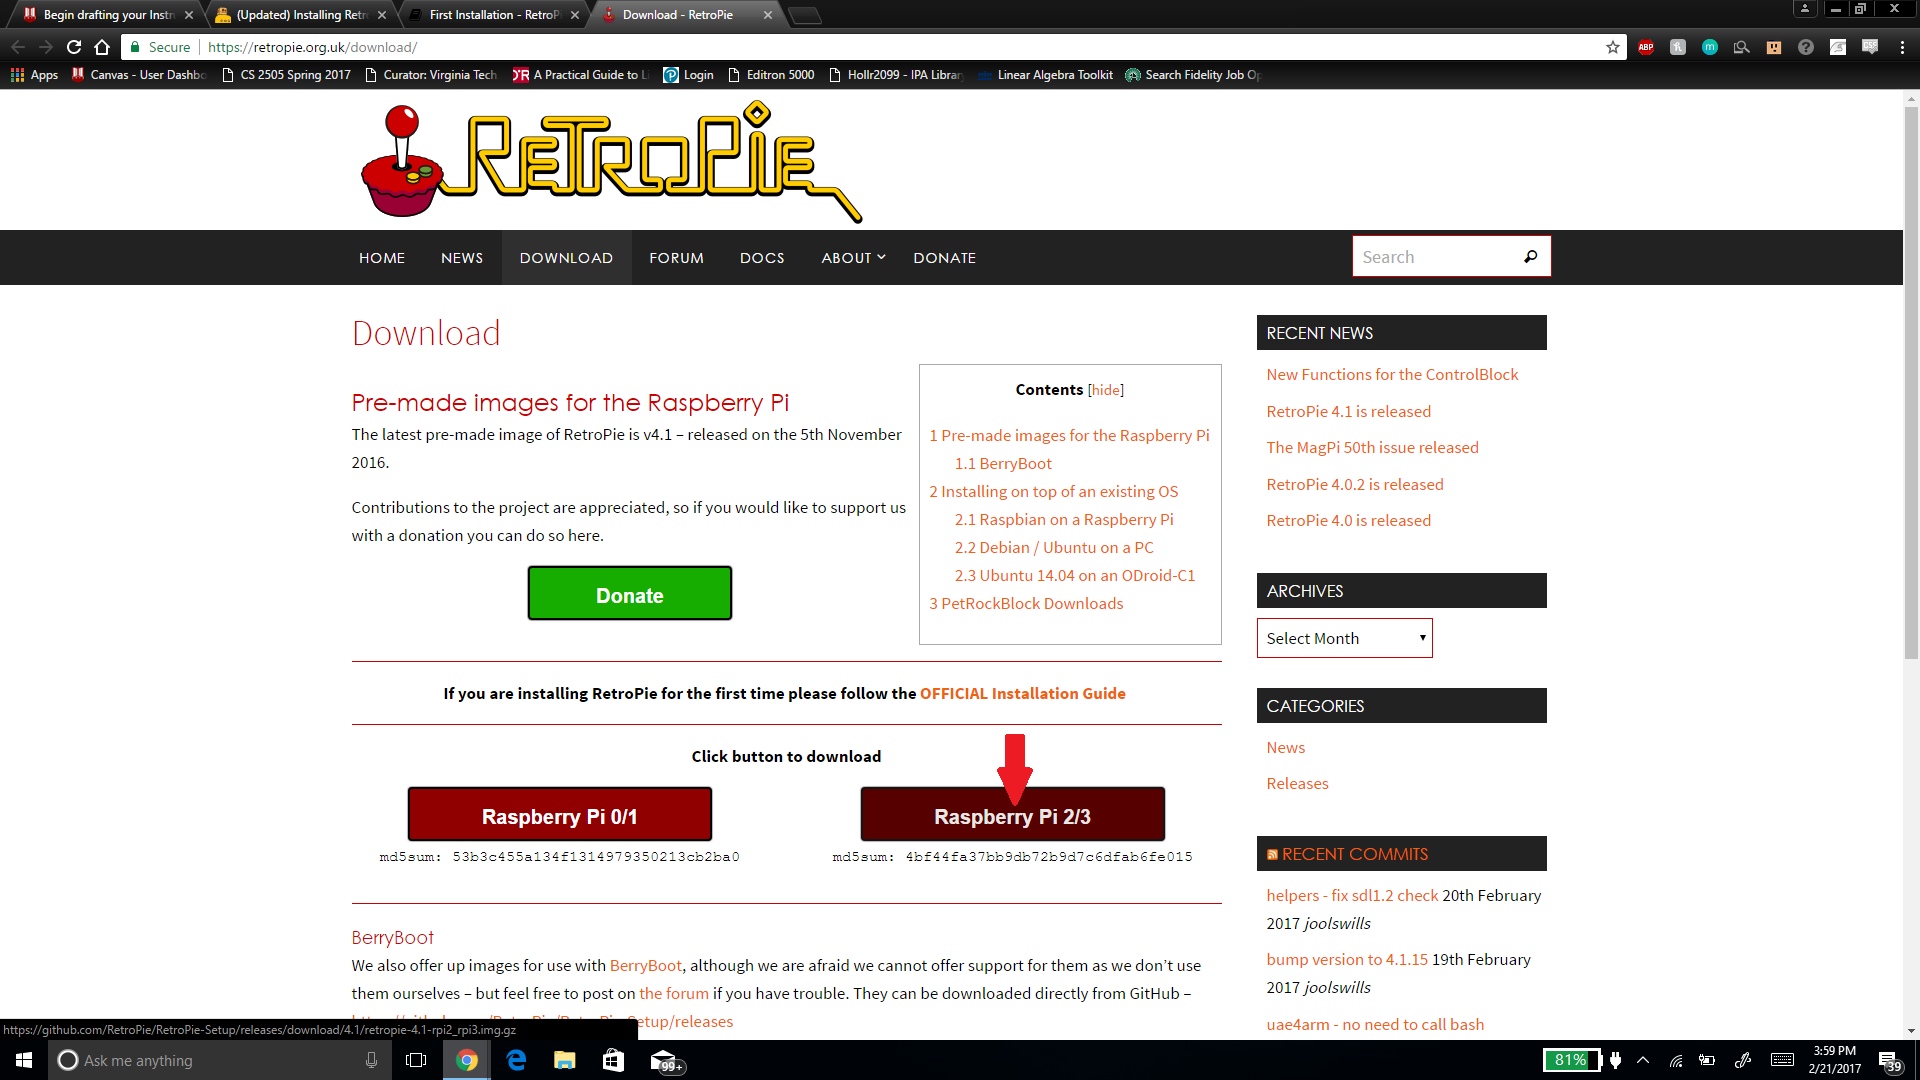
The next step in the project involves downloading the RetroPie SD image. To do this, follow these steps:
- Go to https://retropie.org.uk/download/.
- If you look at the picture I have provided, you can see a red arrow pointing to a box with the text "Raspberry Pi 2/3." Click the box to begin downloading the SD image.
Once the SD image has finished downloading, you may proceed to the next step.
Installing 7-Zip
.png)
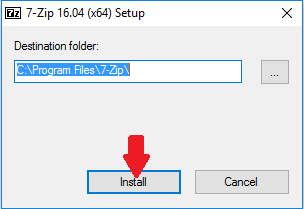
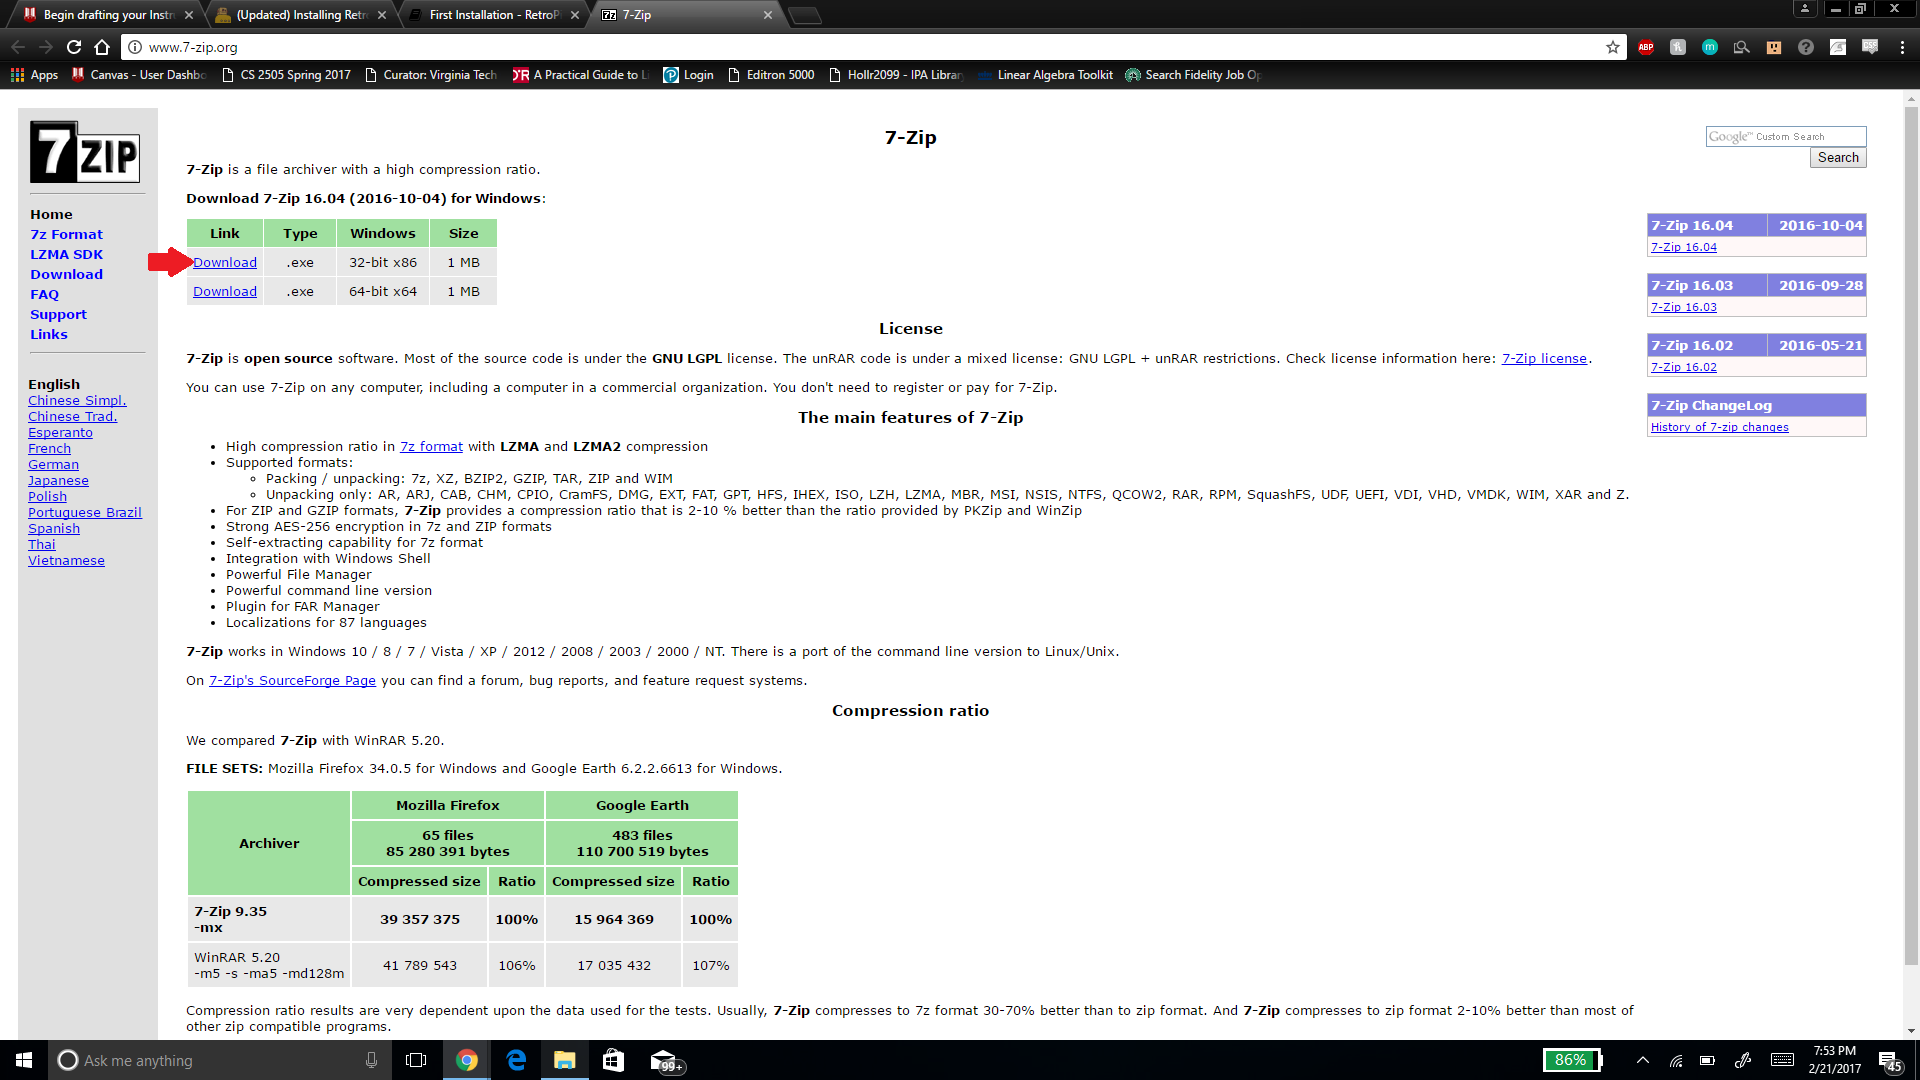
Now since you have downloaded the SD card image, we next need extract it. We first need to download 7-Zip in order to extract the image. To download 7-Zip, follow these simple steps:
- Go to http://www.7-zip.org/. Click on the download link as shown in the first picture by the red arrow.
- Once the download completes, click the downloaded application to finish the installation (If prompted with a warning asking "Do you want to allow this app from an unknown publisher to make changes to your device?" click yes).
- Now you should see the 7-Zip Setup box on your screen. Click the install button the red arrow touches in the second picture. This will finish installing the program.
- Once the program finishes installing, close out of the Setup box.
You have now successfully installed 7-Zip. You can now begin extracting the RetroPie SD image.
Extract the RetroPie SD Image
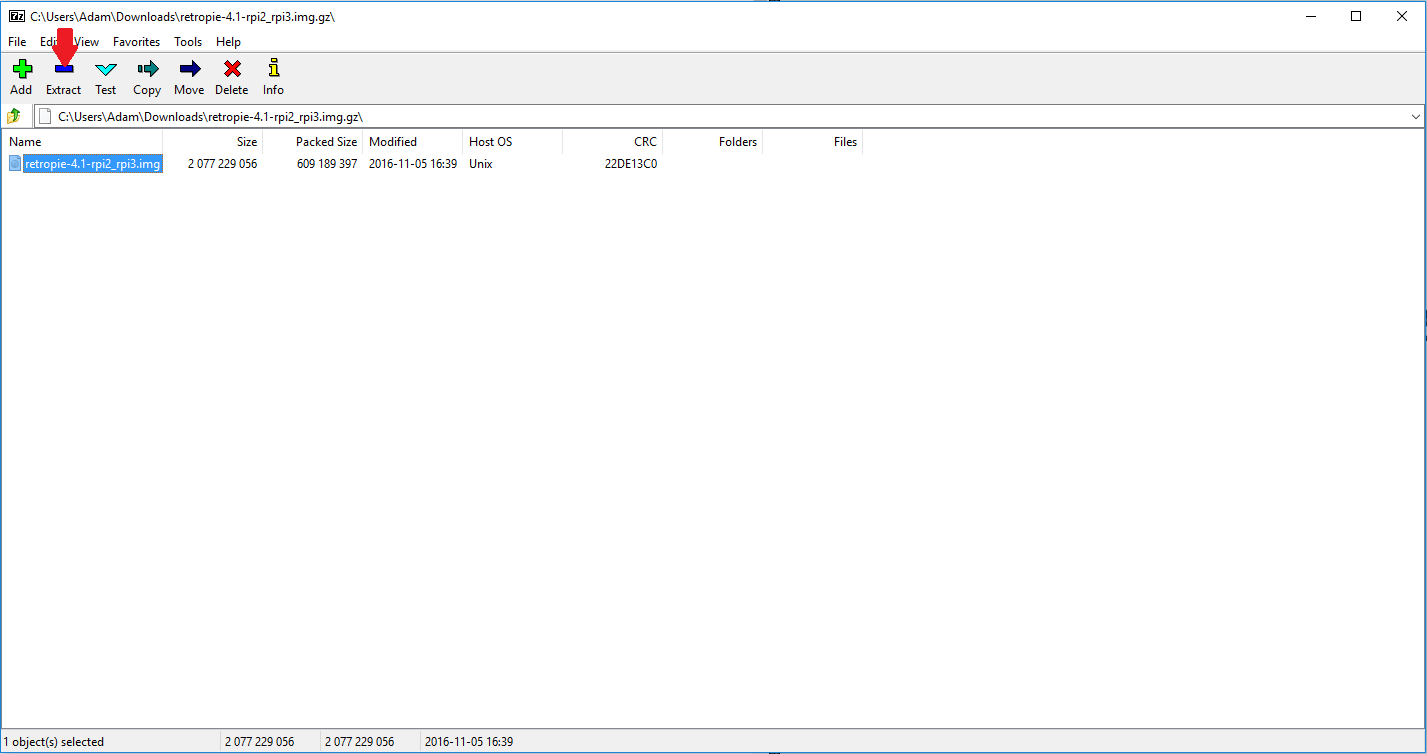
Once you have successfully installed 7-Zip, you need to extract the RetroPie SD Image. To extra the image, follow these steps:
- Open the 7-Zip program you just installed by clicking the start menu on the bottom left corner of your computer, type in "7-Zip," and click on "7-Zip File Manager."
- Find the RetroPie file you downloaded earlier in 7-Zip and double click it.
- You should now see a window similar to the picture. Click on the file you see in the window and then click the extract button the red arrow is pointing to.
- 7-Zip should bring up another window with the location of where you will extract the SD image to. Remember this location and then click the "OK" button to begin extracting the SD image.
Once 7-Zip has finished the extraction, you can close out of 7-Zip and continue to the next step.
Installing Win32 Disk Imager
.png)
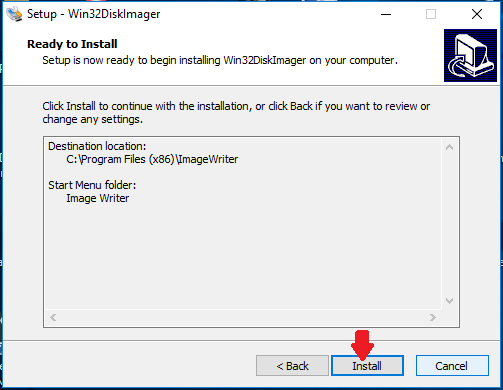
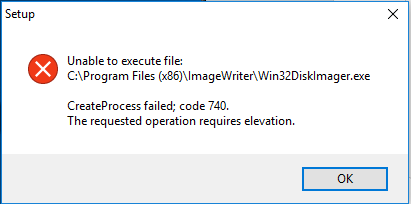
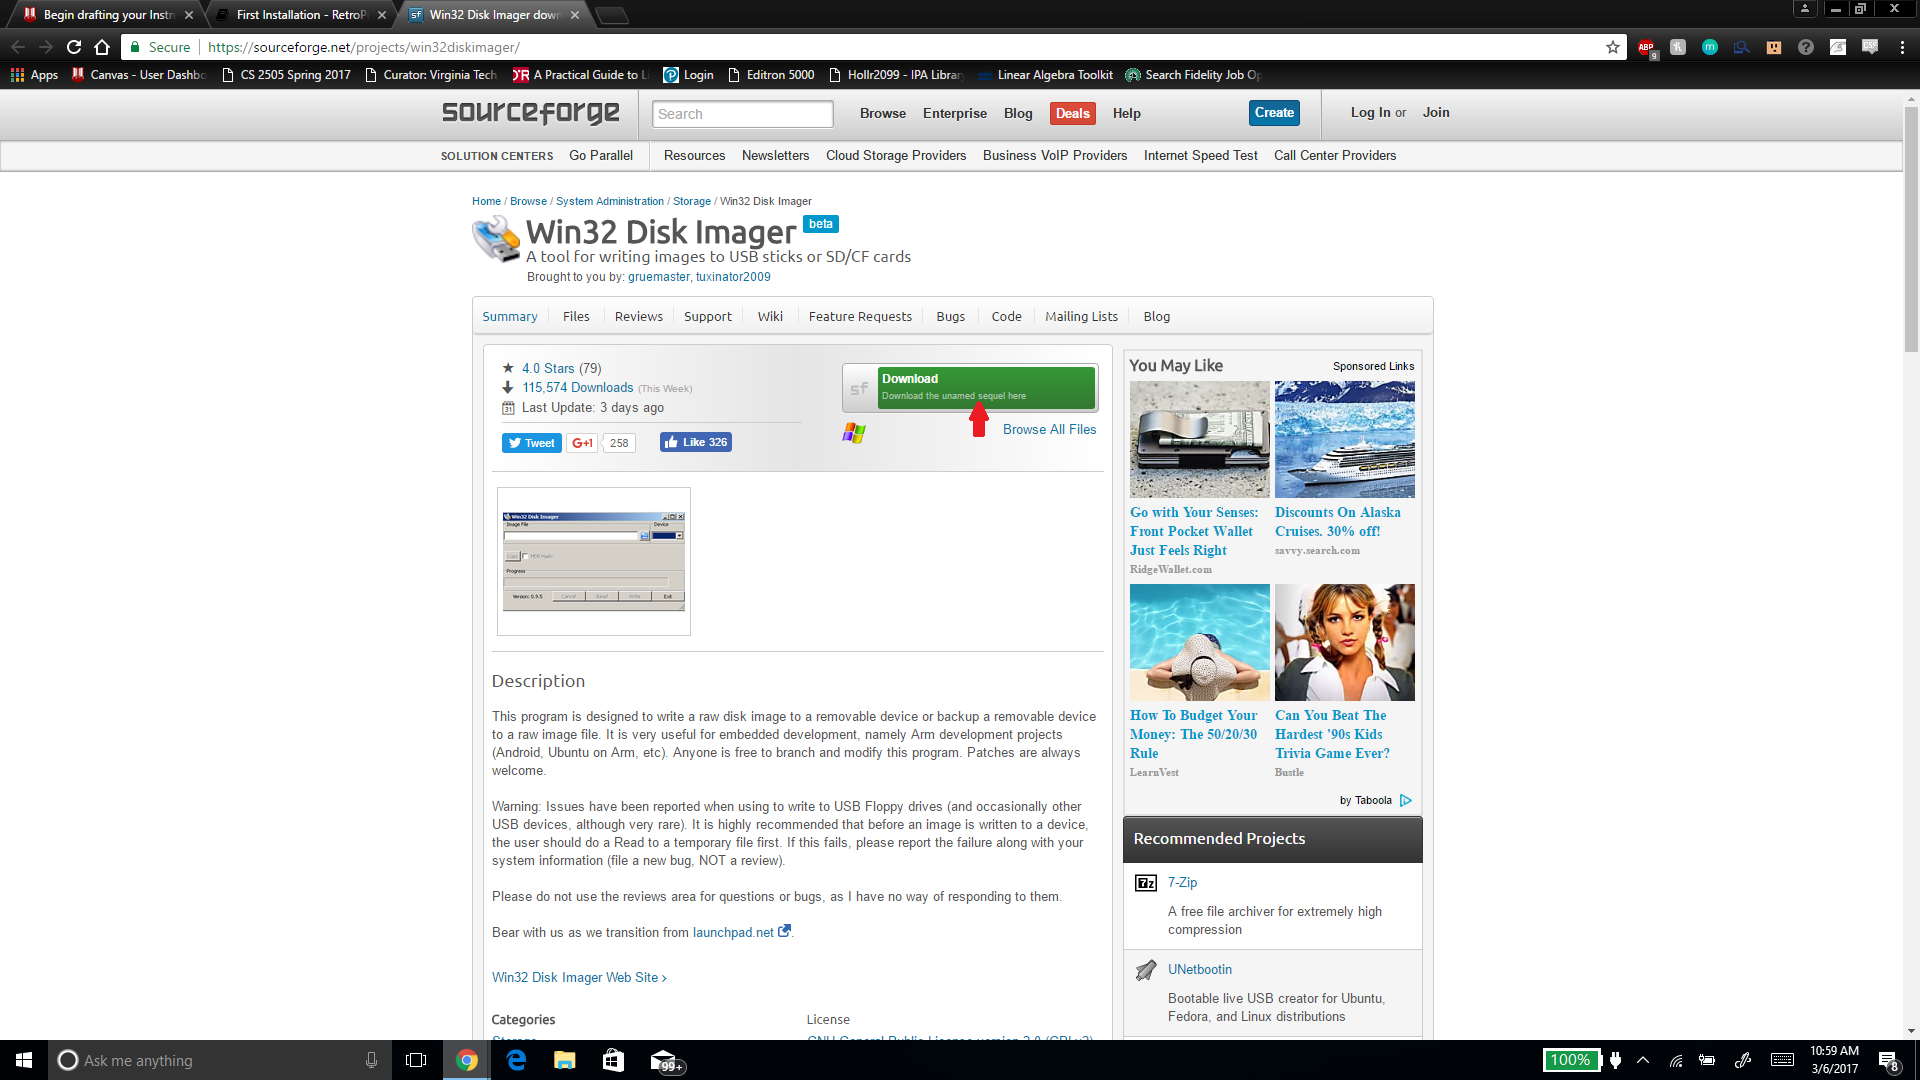
After you have successfully extracted the SD card image, you must write the image to the MicroSD card. Before writing the image, you first need to download a program called Win32DiskImager. To download the program, follow these steps.
- Go to https://sourceforge.net/projects/win32diskimager/?source=typ_redirect.
- Click on the green download button as shown in the first picture by the red arrow.
- Click the downloaded application to bring up the Win32DiskImager Setup Wizard.
- Click the Next button to continue setting up the program.
- Click the button that says "I accept the agreement" and then click the Next button.
- Click the Next button three more times to navigate to the end of the Setup Wizard
- You now should see a screen like the one in the second picture. Click the Install button by the red arrow. This will install Win32DiskImager.
- Once the program has finished installing, click the Finish button to exit the Setup.
NOTE: After clicking the Finish button, the program Win32DiskImager should open automatically. In some cases, the program will not open automatically and produce an error as seen in the third picture. If this happens, don't worry. Just exit out of the error. Now click the start menu on the bottom left of your computer, type in "Win32DiskImager," and click on "Win32DiskImager." Now the program should open.
Installing the RetroPie SD Image
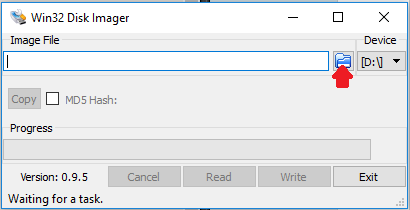
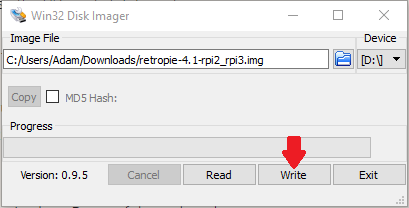
After you have finished installing Win32DiskImager, you can now write the RetroPie SD image to the MicroSD card. Win32DiskImager should still be open from the last step. To begin writing the image, follow these steps:
- Insert the MicroSD card into your MicroSD USB reader.
- Insert the MicroSD USB reader into a USB port on your computer.
- Click the folder icon on the Win32DiskImager program by the red arrow as seen in the first picture.
- Find the location of the RetroPie SD image I told you to remember in "Step 3: Extract the RetroPie SD Image," and then double click the image.
- Click the Write button by the red arrow as seen in the second picture, and then wait for the write to complete.
- Once the writing is complete, a box will pop up saying "Write Successful." Click the OK button to close the box.
- Click the Exit button to close Win32DiskImager.
- Remove the MicroSD USB reader from your computer.
- Remove the MicroSD card from the MicroSD USB reader.
You have now successfully installed the RetroPie SD image on your SD card.
Connecting the Raspberry Pi to a TV
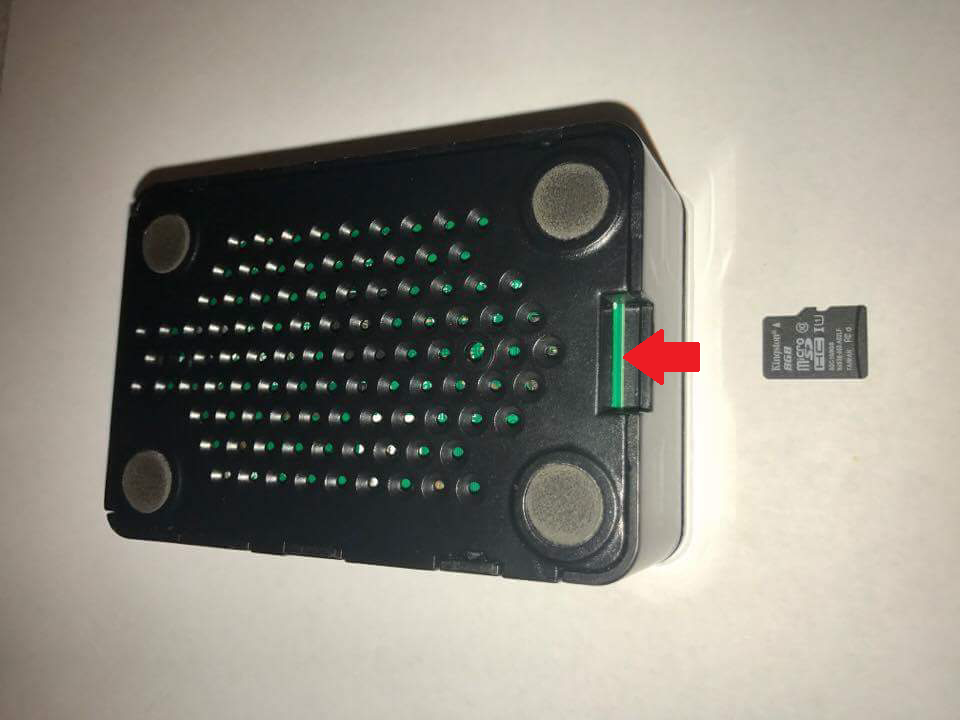
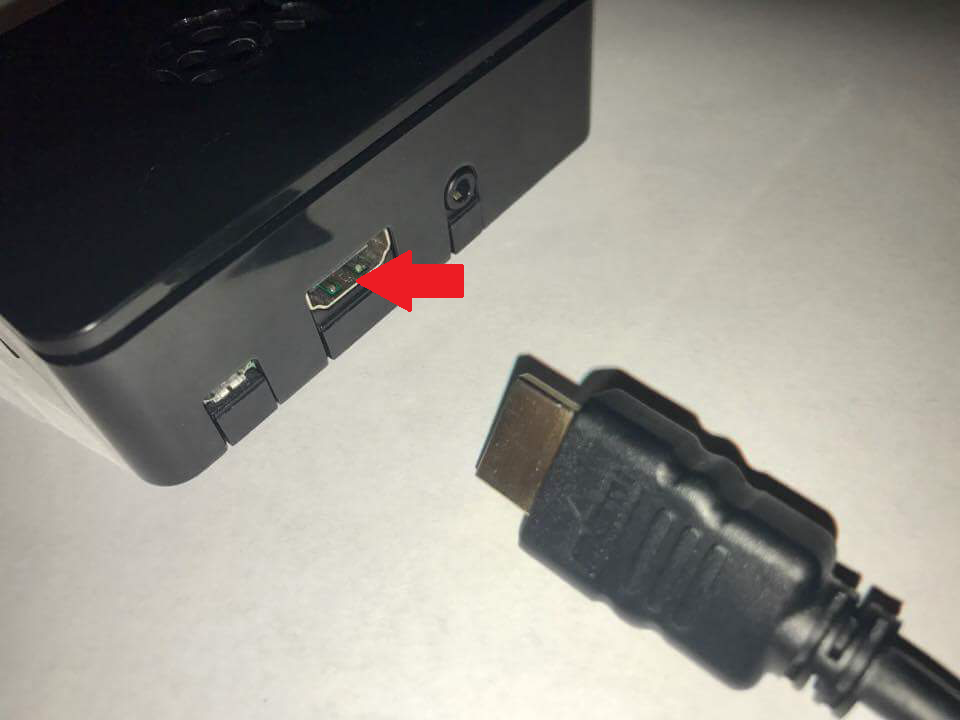
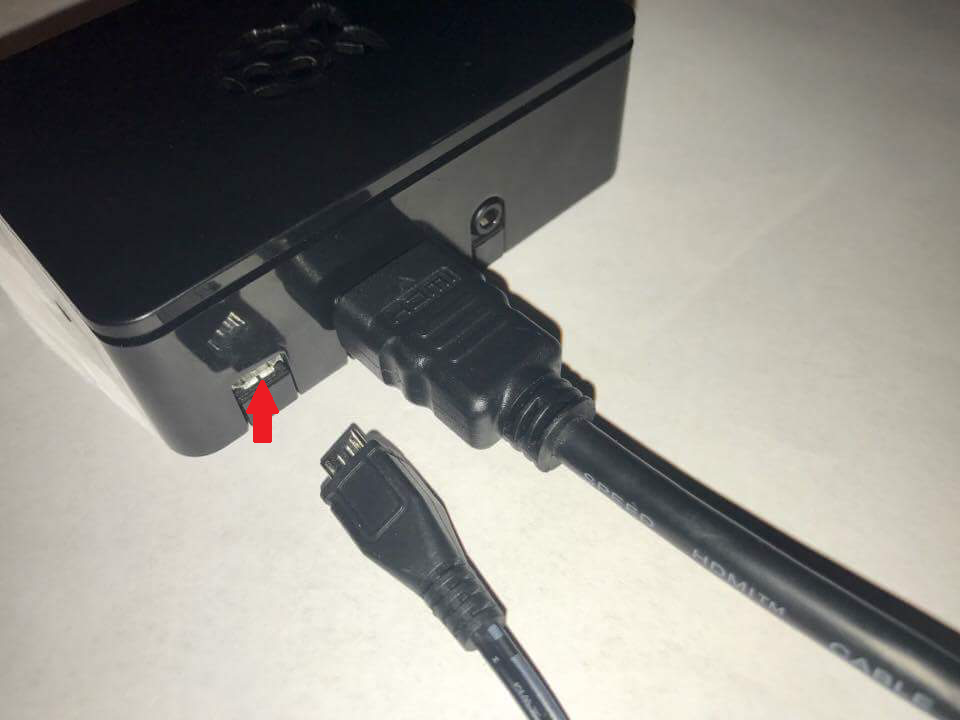
After you have successfully installed the RetroPie SD image on your MicroSD card, you need to connect your Raspberry Pi to your television. Before we connect the Raspberry Pi to the TV though, I would recommend putting the Raspberry Pi in the case included with the Canakit. Now, follow these steps:
- Insert the MicroSD card into the bottom of the Raspberry Pi as shown in the first picture by the red arrow.
- Now plug the HDMI cable into the side of the Raspberry Pi as shown in the second picture by the red arrow.
- Plug the other end of the HDMI cable into a HDMI port on your TV.
- Plug the Raspberry Pi power adapter into an electrical outlet, and then plug the other end of the power adapter into the Raspberry Pi as shown in the third picture by the red arrow.
During your first-time powering on the Raspberry Pi, the Raspberry Pi will begin the initial set up of RetroPie. Let the process continue. You can now move on to the next step.
Configure a Controller
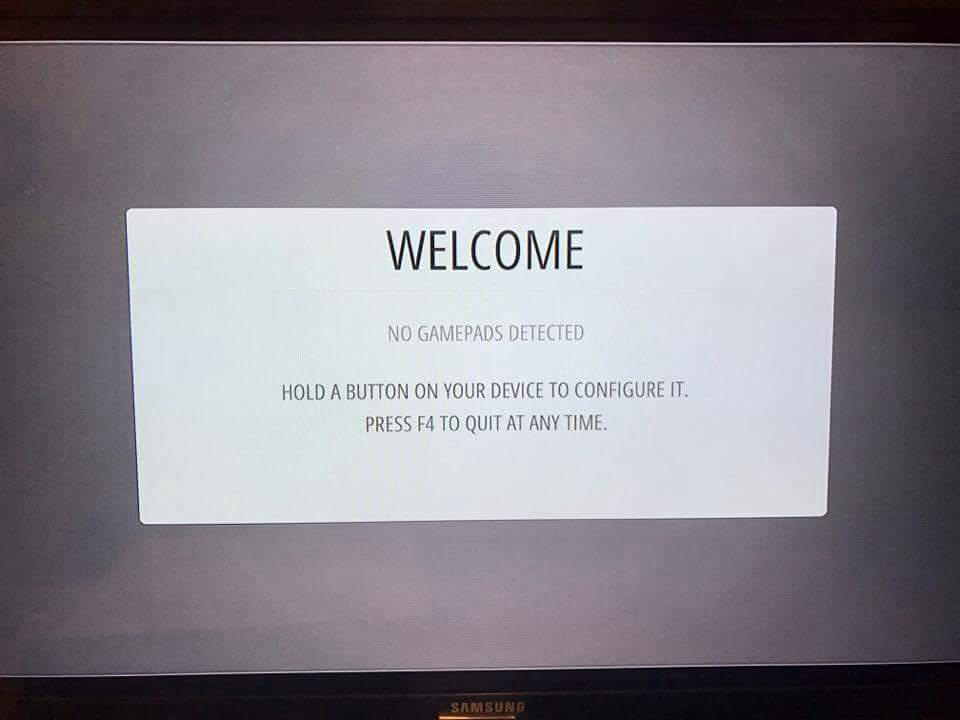
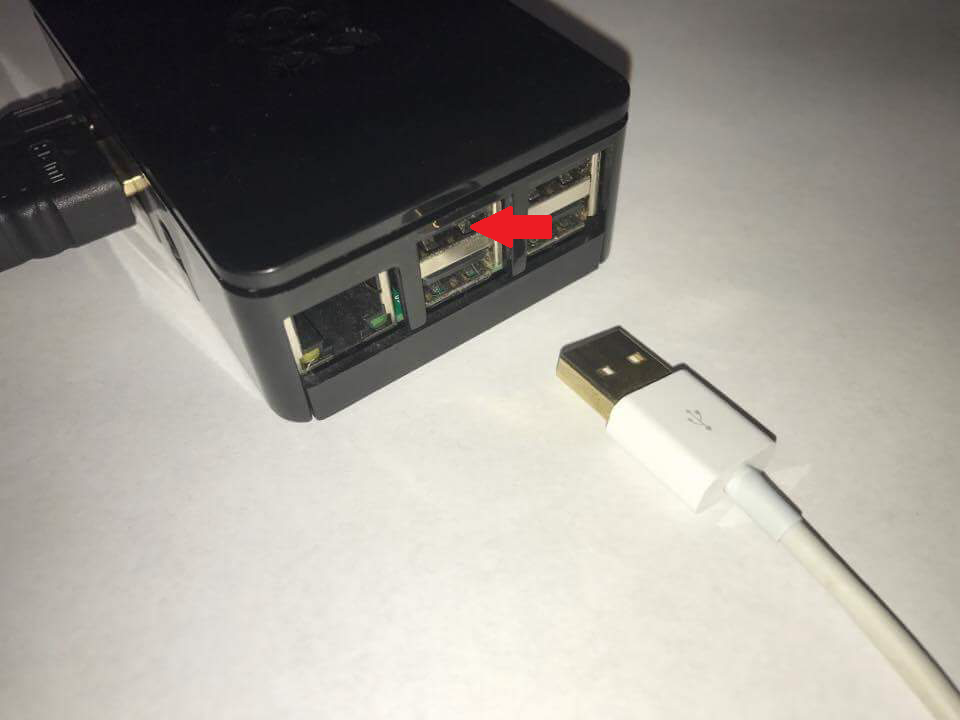
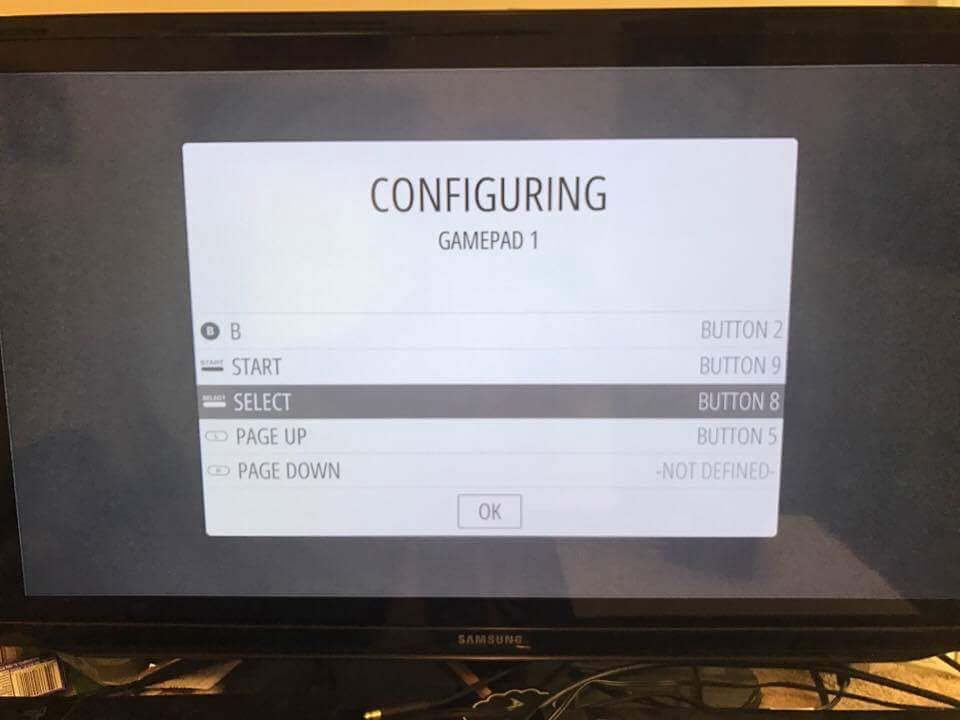
After your Raspberry Pi has finished the initial set up of RetroPie, you will need to configure a controller. First off, make sure your screen resembles my screen as seen in the first picture. Next, following these steps:
- Plug your USB game controller into one of the USB ports on the Raspberry Pi as shown by the red arrow in the second picture.
- Once RetroPie recognizes the controller and says "1 GAMEPAD DETECTED," hold down any button on the controller until the configuration screen pops up.
- Now, you need to map each button on your controller to the buttons used in RetroPie. To map the buttons, simply go down the list in the configuration menu and hit each button on your controller that corresponds to each of the buttons used in Retroie (See the note at the bottom).
- Once you're on the OK button at the bottom of the menu, simply press the button you have configured as the "A" button.
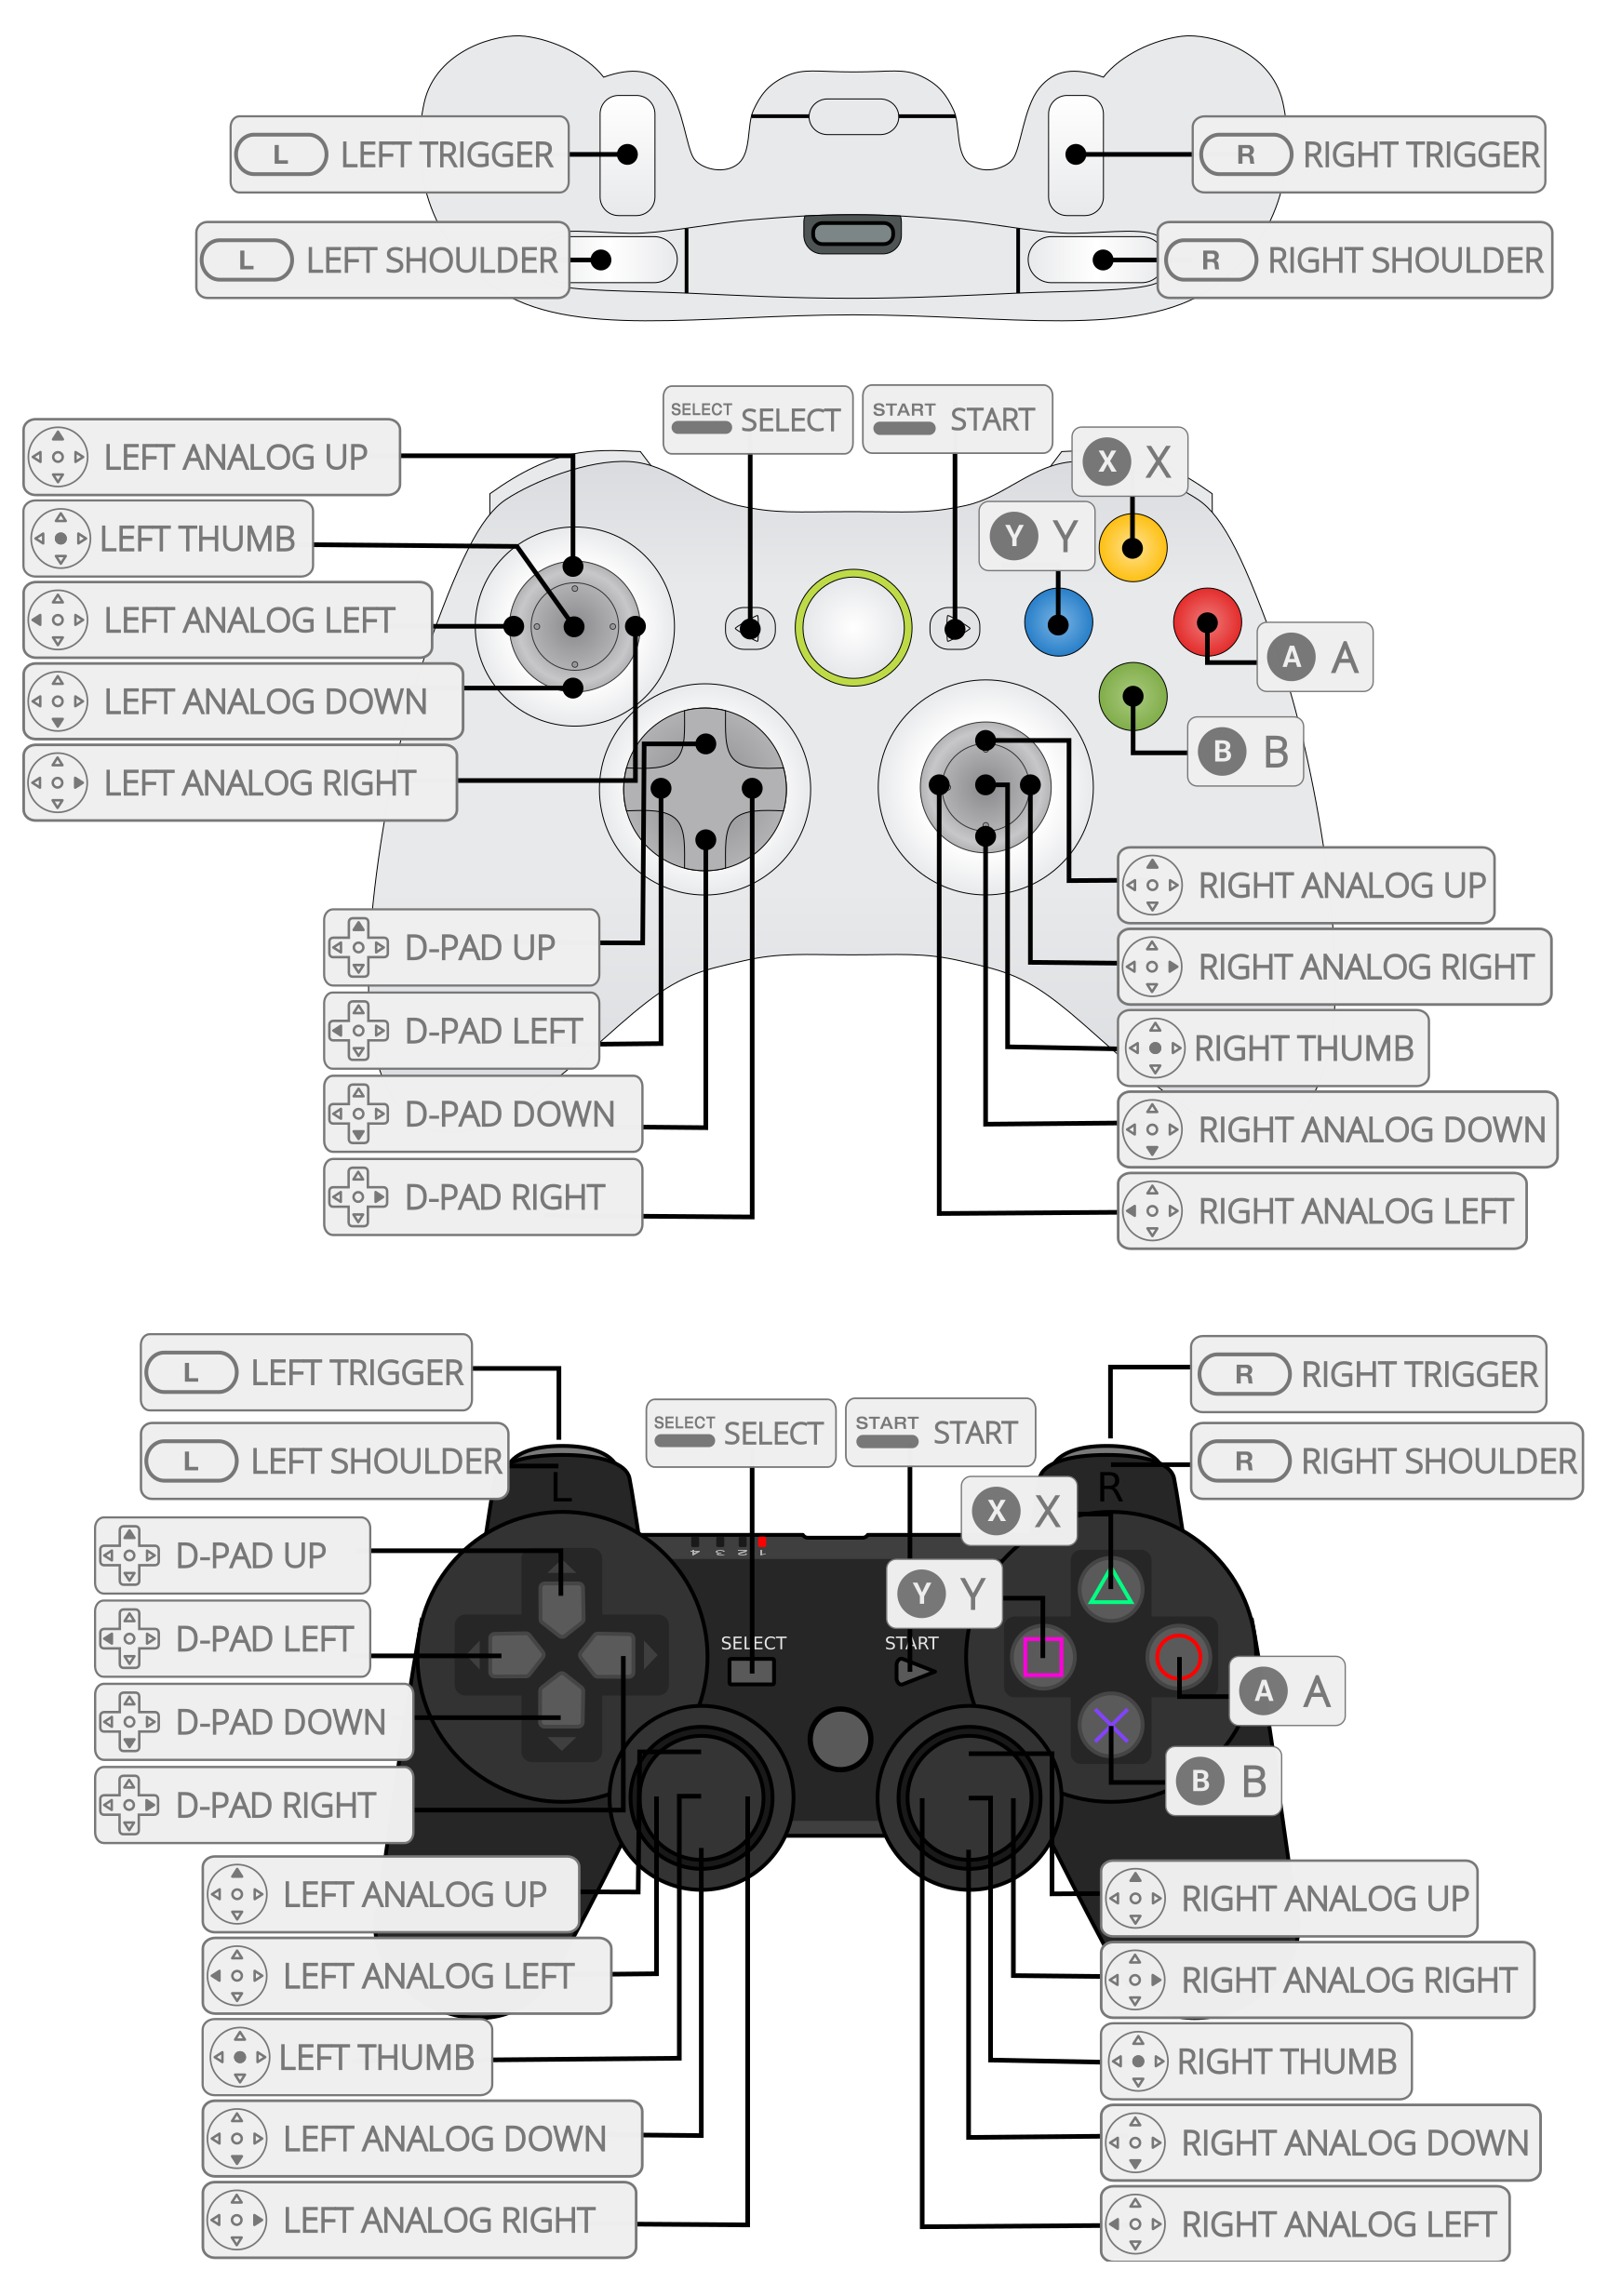
NOTE: I will use the PlayStation 3 controller. Looking at the third picture, the first line in the configuration menu asks me for the "B" button. How do I know what the "B" button corresponds to on my controller? To figure this out, simply look at the diagrams I have provided of all three controllers as seen in the fourth picture. They show the buttons on the controllers and what each button maps in RetroPie. Since I'm using the PlayStation 3 controller, the "B" button will be the "X" button on my controller. So, for the line with the "B" button, I would simply hit the "X" button on my controller. Repeat until all buttons are mapped.
Transferring ROMs
.png)
.png)
WARNING: Due to the nature/complexity of Copyright/Intellectual Property Rights Law, which differs significantly from Country to Country, information will not be provided about where to find ROMs. This guide is written for educational purposes only.
Once you have successfully configured a controller, you need to transfer ROMs to the Raspberry Pi. In our case, we will transfer ROMs through a flash drive from a computer to the device. To transfer the ROMs, follow these steps:
- Plug your flash drive into a USB port on your computer.
- Click the start menu on the bottom left of your computer, type in "This PC," and click on "This PC."
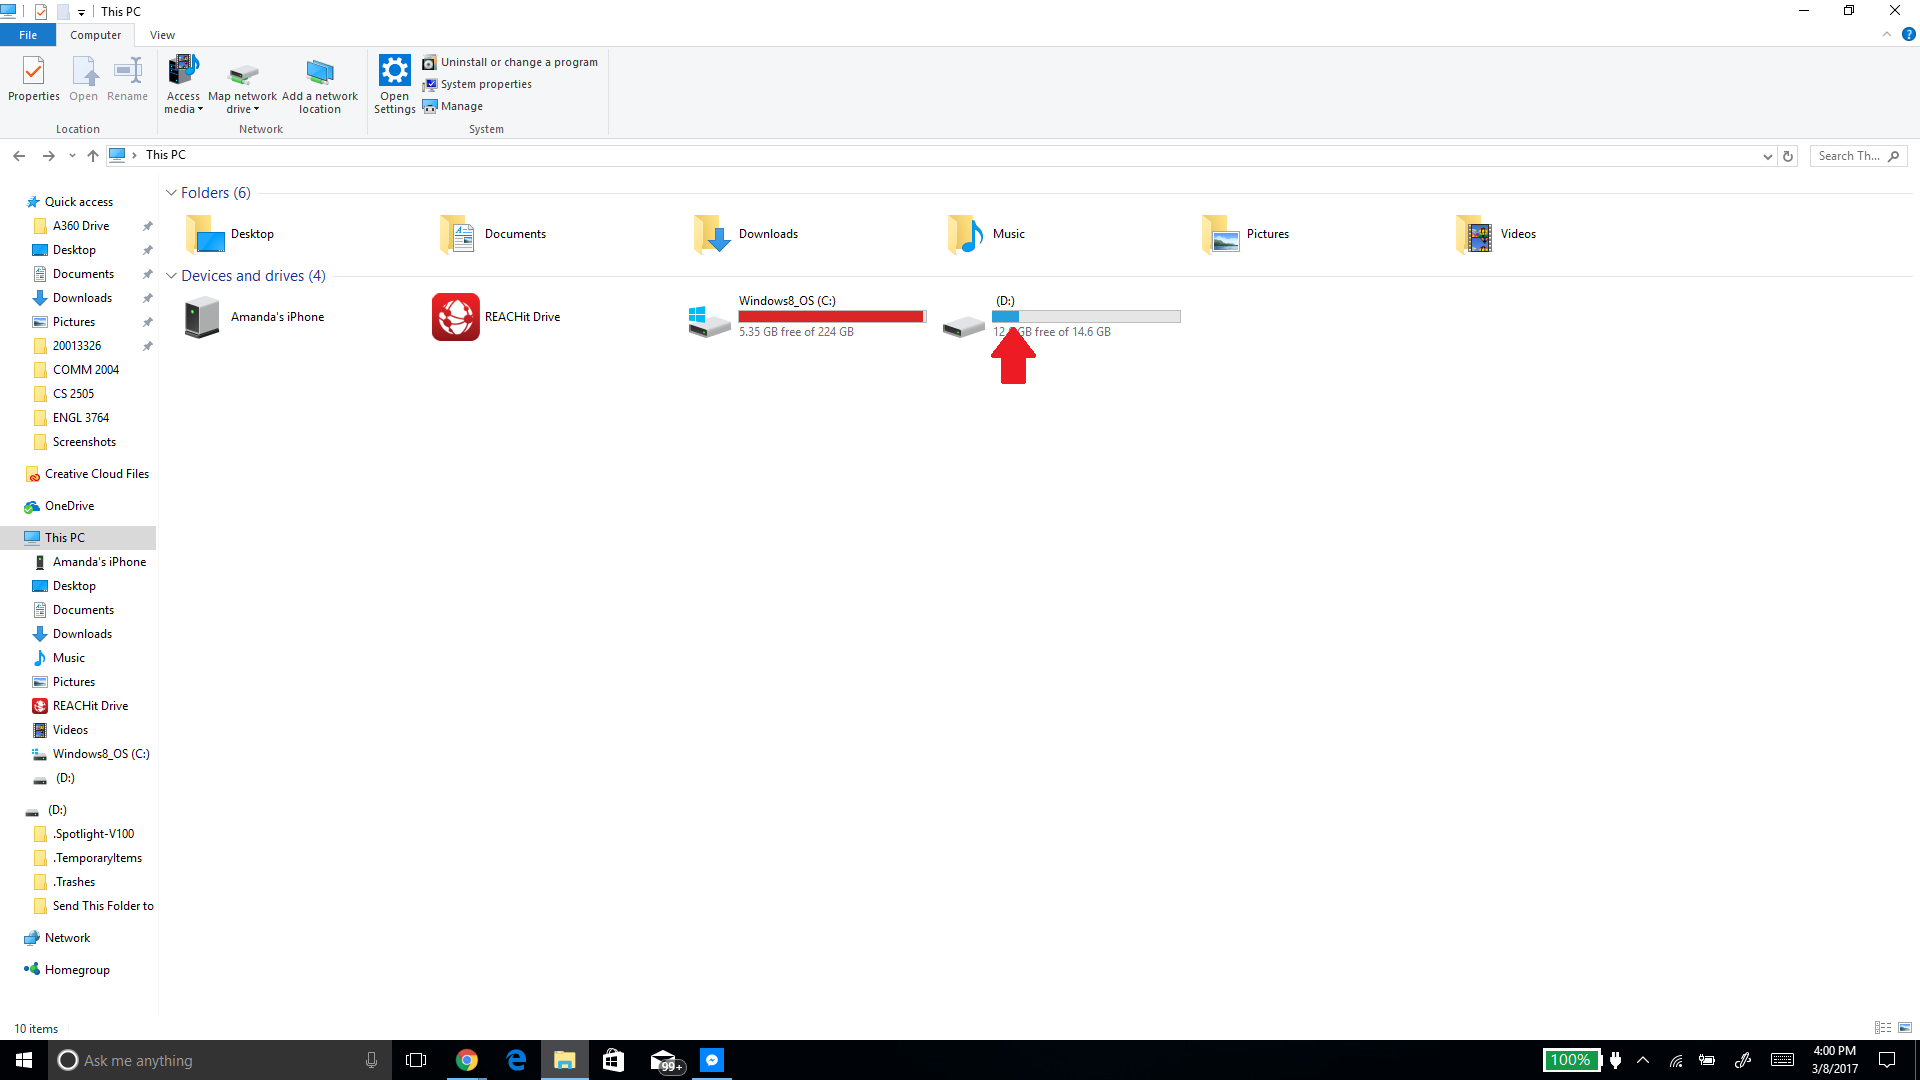
- Double click on the of the flash drive you plugged in the computer. For instance, I'm going to double click on the drive labeled "(D:)" by the red arrow in the first picture.
- Now right click in the white area below all the files, hover over "New," and click on "Folder." You now have a created a new folder called "New folder."
- Right click on the folder called "New folder," click "Rename," and type "retropie" without the quotations.
- Unplug the flash drive from your computer, and then go plug the flash drive in a USB port on the Raspberry Pi.
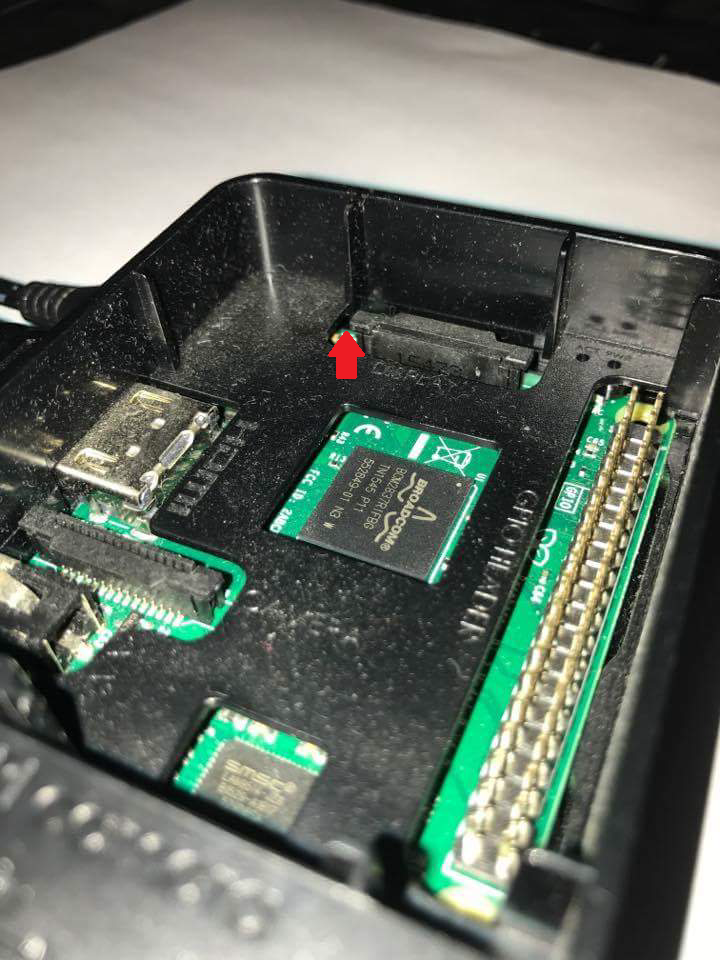
- Wait for the green light located by the red arrow in the second picture to stop blinking.
- Unplug the flash drive from the Raspberry Pi, and then plug the flash drive back into a USB port on the computer.
- Now find the ROMs located on your computer, select them all, right click on one of the selected, and then click "Copy."
- Navigate back to your flash drive, and double click on the "retropie" folder you created. You should now see a "roms" folder.
- Double click the "roms" folder. You should now see folders named various gaming consoles.
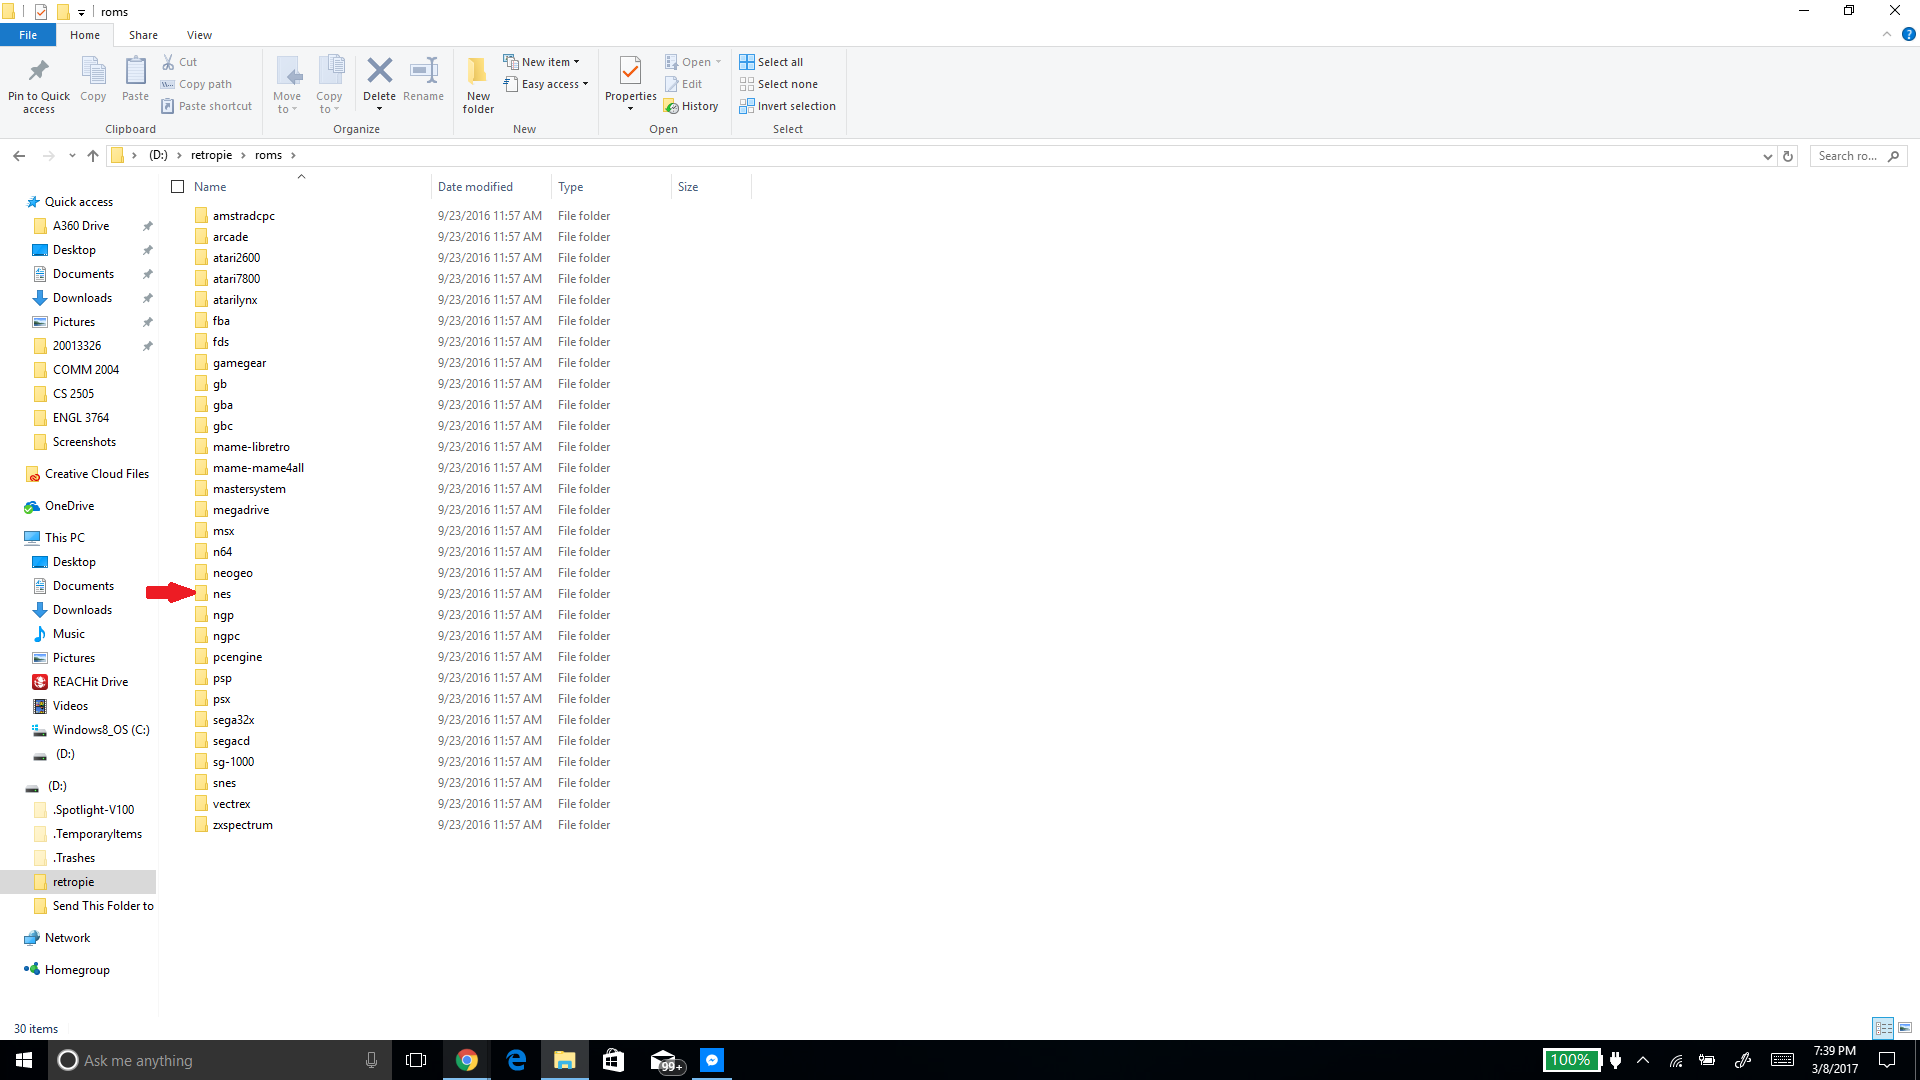
- Double click on your ROMs' respective folder (For example, I am transferring a NES ROM, so I will double click on the folder named "nes" as seen by the red arrow in the third picture).
- Right click in the white area, and click "Paste."
- Repeat numbers 6 and 7.
- Press whatever button you configured as the "Start" button on your controller.
- Go down and hover over the "Quit" option. Press whatever button you configured as "A."
- Hovering over "RESTART EMULATIONSTATION," press the "A" button again.
- Hovering over "YES," press the "A" button one last time.
Once EmulationStation has finished restarting, you will have successfully transferred ROMs to your Raspberry Pi. To add more ROMs to the Raspberry Pi, simply repeat numbers 9 through 18.
Enjoy Your Retro-Gaming Machine
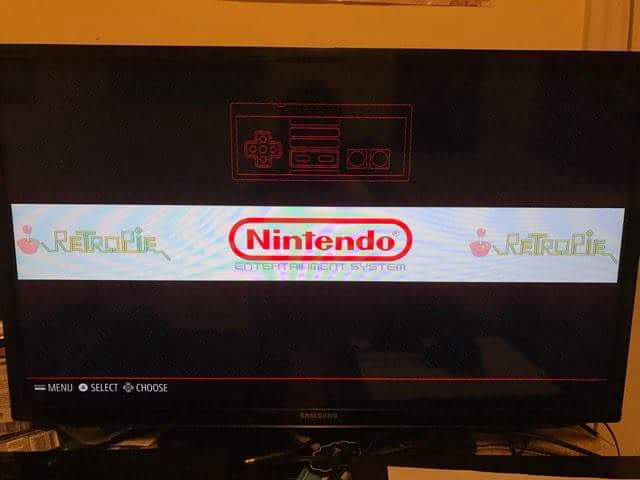
Congratulations! You now have your very own Retro-Gaming Machine. To play one of your ROMs, simply press whatever button you configured as "A" on whatever gaming console your ROM corresponds to. For instance, I want to play a NES ROM. I will hover over the NES console as seen in the picture and press the "A" button. I will then find whatever ROM I added that I want to play, hover over it, and press the "A" button again. The ROM will then load, and you will be able to enjoy the game.
I want to give proper attribution to the RetroPie Project as a source for my Instructable.