How to Create Your Tabletop From a Tree Limb
by Progressive Automations in Workshop > Furniture
1549 Views, 19 Favorites, 0 Comments
How to Create Your Tabletop From a Tree Limb
.jpg)
A personalized standing desk offers significant health benefits and can truly help your workspace stand out by making it to the style and character that matches your personality. April Wilkerson’s custom tabletop project promotes creativity and hands-on DIY skills from personalizing a standing desk. We will go over the details and products used in creating April’s stylish tabletop from a fallen tree limb.
Shaping the Fallen Tree Limb

The first step in this build is to collect the fallen tree limb which will be used for the tabletop. Next, make a jig that can assist with keeping your chainsaw straight and properly aligned so that your cuts have the same sized depth. The Stihl MSA 220 Chain Saw is used by April in this example. Once all your cuts are completed, your pieces will share a similar shape to that of “cookies”.

Use a mold that is 2 inches larger than the intended tabletop dimensions to keep your cookies in place. For this project, April uses a homemade mold constructed out of OSB (oriented strand board) and Tyvek tape. You will now fill in the mold with the cookies and decide their orientation.

Try arranging them so that any cookies that may have missing barks will not appear with this issue once the tabletop has been cut and shaped into the final form later. Cut a flat side on each cookie using a table saw so they can later align on the edge of the mold. Numbering each piece will help keep them organized.

Place the round cookies on the bottom of the mold and then lay the cookies with a flat side on top. Find the center of the mold and then let the top edge of the round cookies touch the center line. Then, trace the flat-sided cookies on top using a pencil.

Once the pencil tracing is completed for all the flat-sided cookies, you can now use a bandsaw to cut them into shape by following the traced marks.

Once your tree limbs are cut and positioned to your liking, you need to keep the cookies at the bottom of the mold in place. This can be done by using a hot glue gun to stick them into position.

Adding the Chosen Epoxy Mixture

We start by filling in the red areas of the mold using epoxy. The epoxy mixture used here is the "total boats high-performance two-part epoxy". In this example, April decided to tint the epoxy black since the desk frame she has is black, and may add drawers later. Before pouring, April used a level and shimmed up the epoxy where it was needed since most epoxy (including this one) should be poured in 0.25-inch depth. Ensure there is enough mixture to do the first layer. The heat from the chemical reaction can cause the epoxy to not cure well or could lead to cracking if too much was poured at one time.

The epoxy mixture rises and heats, however, it eventually spikes and then starts dropping back down. Once it hits that spike and goes on the decline, that's when the next layer can be added. April's custom tabletop will be approximately 1.25 inches thick. As she is going with solid black, the center will not be visible. Because of this, using filler to take up some space in the center helps reduce the amount of epoxy that was required.
Filling in the Tabletop’s Gaps
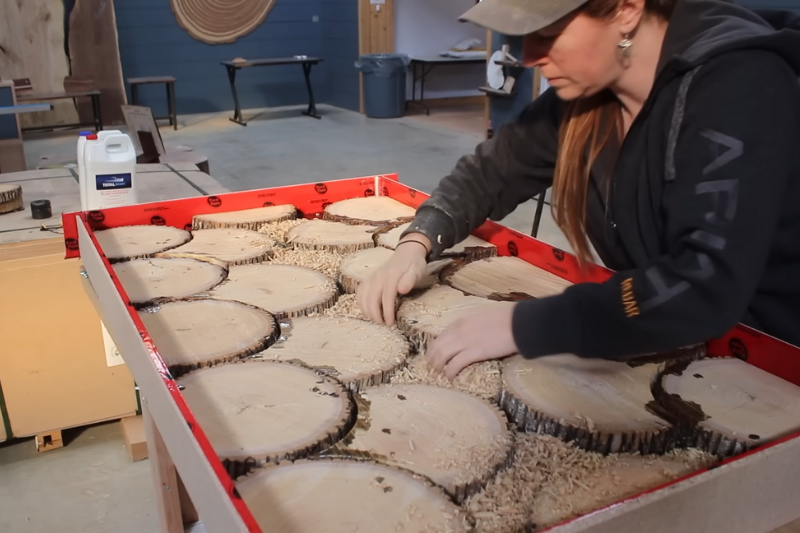
April uses sawdust as the filler and left about 3/8-inch room between the sawdust and the top of the cookies so that flattening the top will not result in visible sawdust specks. A vacuum was used to get the edges free from sawdust. Doing this is to ensure the sawdust will not appear on the edges when the tabletop is completed.

We now need to keep the sawdust together to prevent them from spreading out unintentionally. Spray adhesive was used to bond the sawdust as seen below.

Pour another three layers of epoxy on top while following the required settling time in between each layer as done previously. It is here that the epoxy finally reached the top of the lowest point on the cookies.

Let the epoxy fully harden and cure. This should be completed after letting it rest for about 70 hours. Unscrewed the homemade mold to unveil the tabletop. You may also need to use a pry tool to assist with removing the tabletop from the bottom surface.

Since green wood was used, moisture was released from the pieces after they were cut into shape. As epoxy was unintentionally left out, the top end grain was left unsealed. This resulted in moisture starting to escape from the top side.
Making the Finishing Touches

After filling up all the tabletop gaps, we are now required to make the finishing touches. The custom tabletop was brought to a CNC machine to flatten the bottom side and top sides. A router and jig can also be used if no access to CNC was available, however, the CNC reduces the amount of time required to complete the task. The CNC used by April was a vacuum bed, which means suction throughout the entire bed that pulls the material down. All the moving air being pulled through the unsealed cookies accelerated the drying and unintentionally resulted in the cookies starting to shrink and break away from the bark.

Due to this, the tabletop had to be very carefully flipped over to stay in one piece. We recommend having two individuals when flipping the heavy tabletop. The CNC machine will now be used to flatten the top side and get all the cookies to be the same thickness by reaching the lowest point of the cookies. Skim every cookie to remove all saw marks from the cutting.

After the bulk of flattening has been handled by the CNC, sanding will be the next step. April uses a 4-inch belt sander to take the custom tabletop down to 220 grit and to remove all cut marks from the flattening process.
![]()
The original plan was to seal the top using a coat of clear epoxy and let it drip over the sides while being thinly coated, however, the bark was separating so much that it resulted in gaps between the cookies. Due to this, April decided to place the tabletop back into the mold and pour the clearcoat there. This ended up working well. April realized she had forgotten to seal the cookies before pouring the topcoat. By not doing a thin seal coat first, it allows the wood to constantly release air bubbles so as the epoxy is curing (even when using a heat gun) they're still going to be rising and the sun can get trapped. April decided to make this area the back of her computer desk and place monitors here to conceal its appearance. Once the clearcoat has finished curing, your tabletop is now complete!
![]()
Installing the Solo Ryzer Frame

Now that the tabletop is completed, we can proceed with the installation of the desk frame. Assemble the desk frame by following the procedures in our user manual. For more reference, we also have a video of the full assembly tutorial linked below:
https://www.youtube.com/watch?v=wuOpLGBerkk
After completing the installation of your desk frame, flip it upside down to prepare for the next step. Next, place the frame on top of the custom tabletop's bottom side.

Install the frame and its accessories securely to the tabletop using a drill and the required screws. After mounting the custom tabletop to the desk frame, flip the setup right side up to complete your project. We can now see the customized standing desk in action along with the build process linked below:
https://www.youtube.com/embed/W3L5vWYVqMA

Conclusion
By following a few steps and using the right supplies, April now has her very own custom tabletop from a tree limb! Her personalized tabletop combined with our desk frame is now used as a stylish standing desk to conveniently change working heights at any given time. For more cool projects by April, feel free to visit her Youtube channel!
Thank you to April for sharing your project - We are delighted to see you enjoying the new adjustable desk setup!
If you have any custom projects, applications, or technical questions about our products, feel free to reach out to us anytime. We are experts in what we do and will be happy to assist you with your future custom projects!
sales@progressiveautomations.com | 1-800-676-6123