How to Convert Digitized Film Negatives Into Quality Positives in Less Than 5 Seconds
by pbriggs8 in Circuits > Cameras
50253 Views, 29 Favorites, 0 Comments
How to Convert Digitized Film Negatives Into Quality Positives in Less Than 5 Seconds


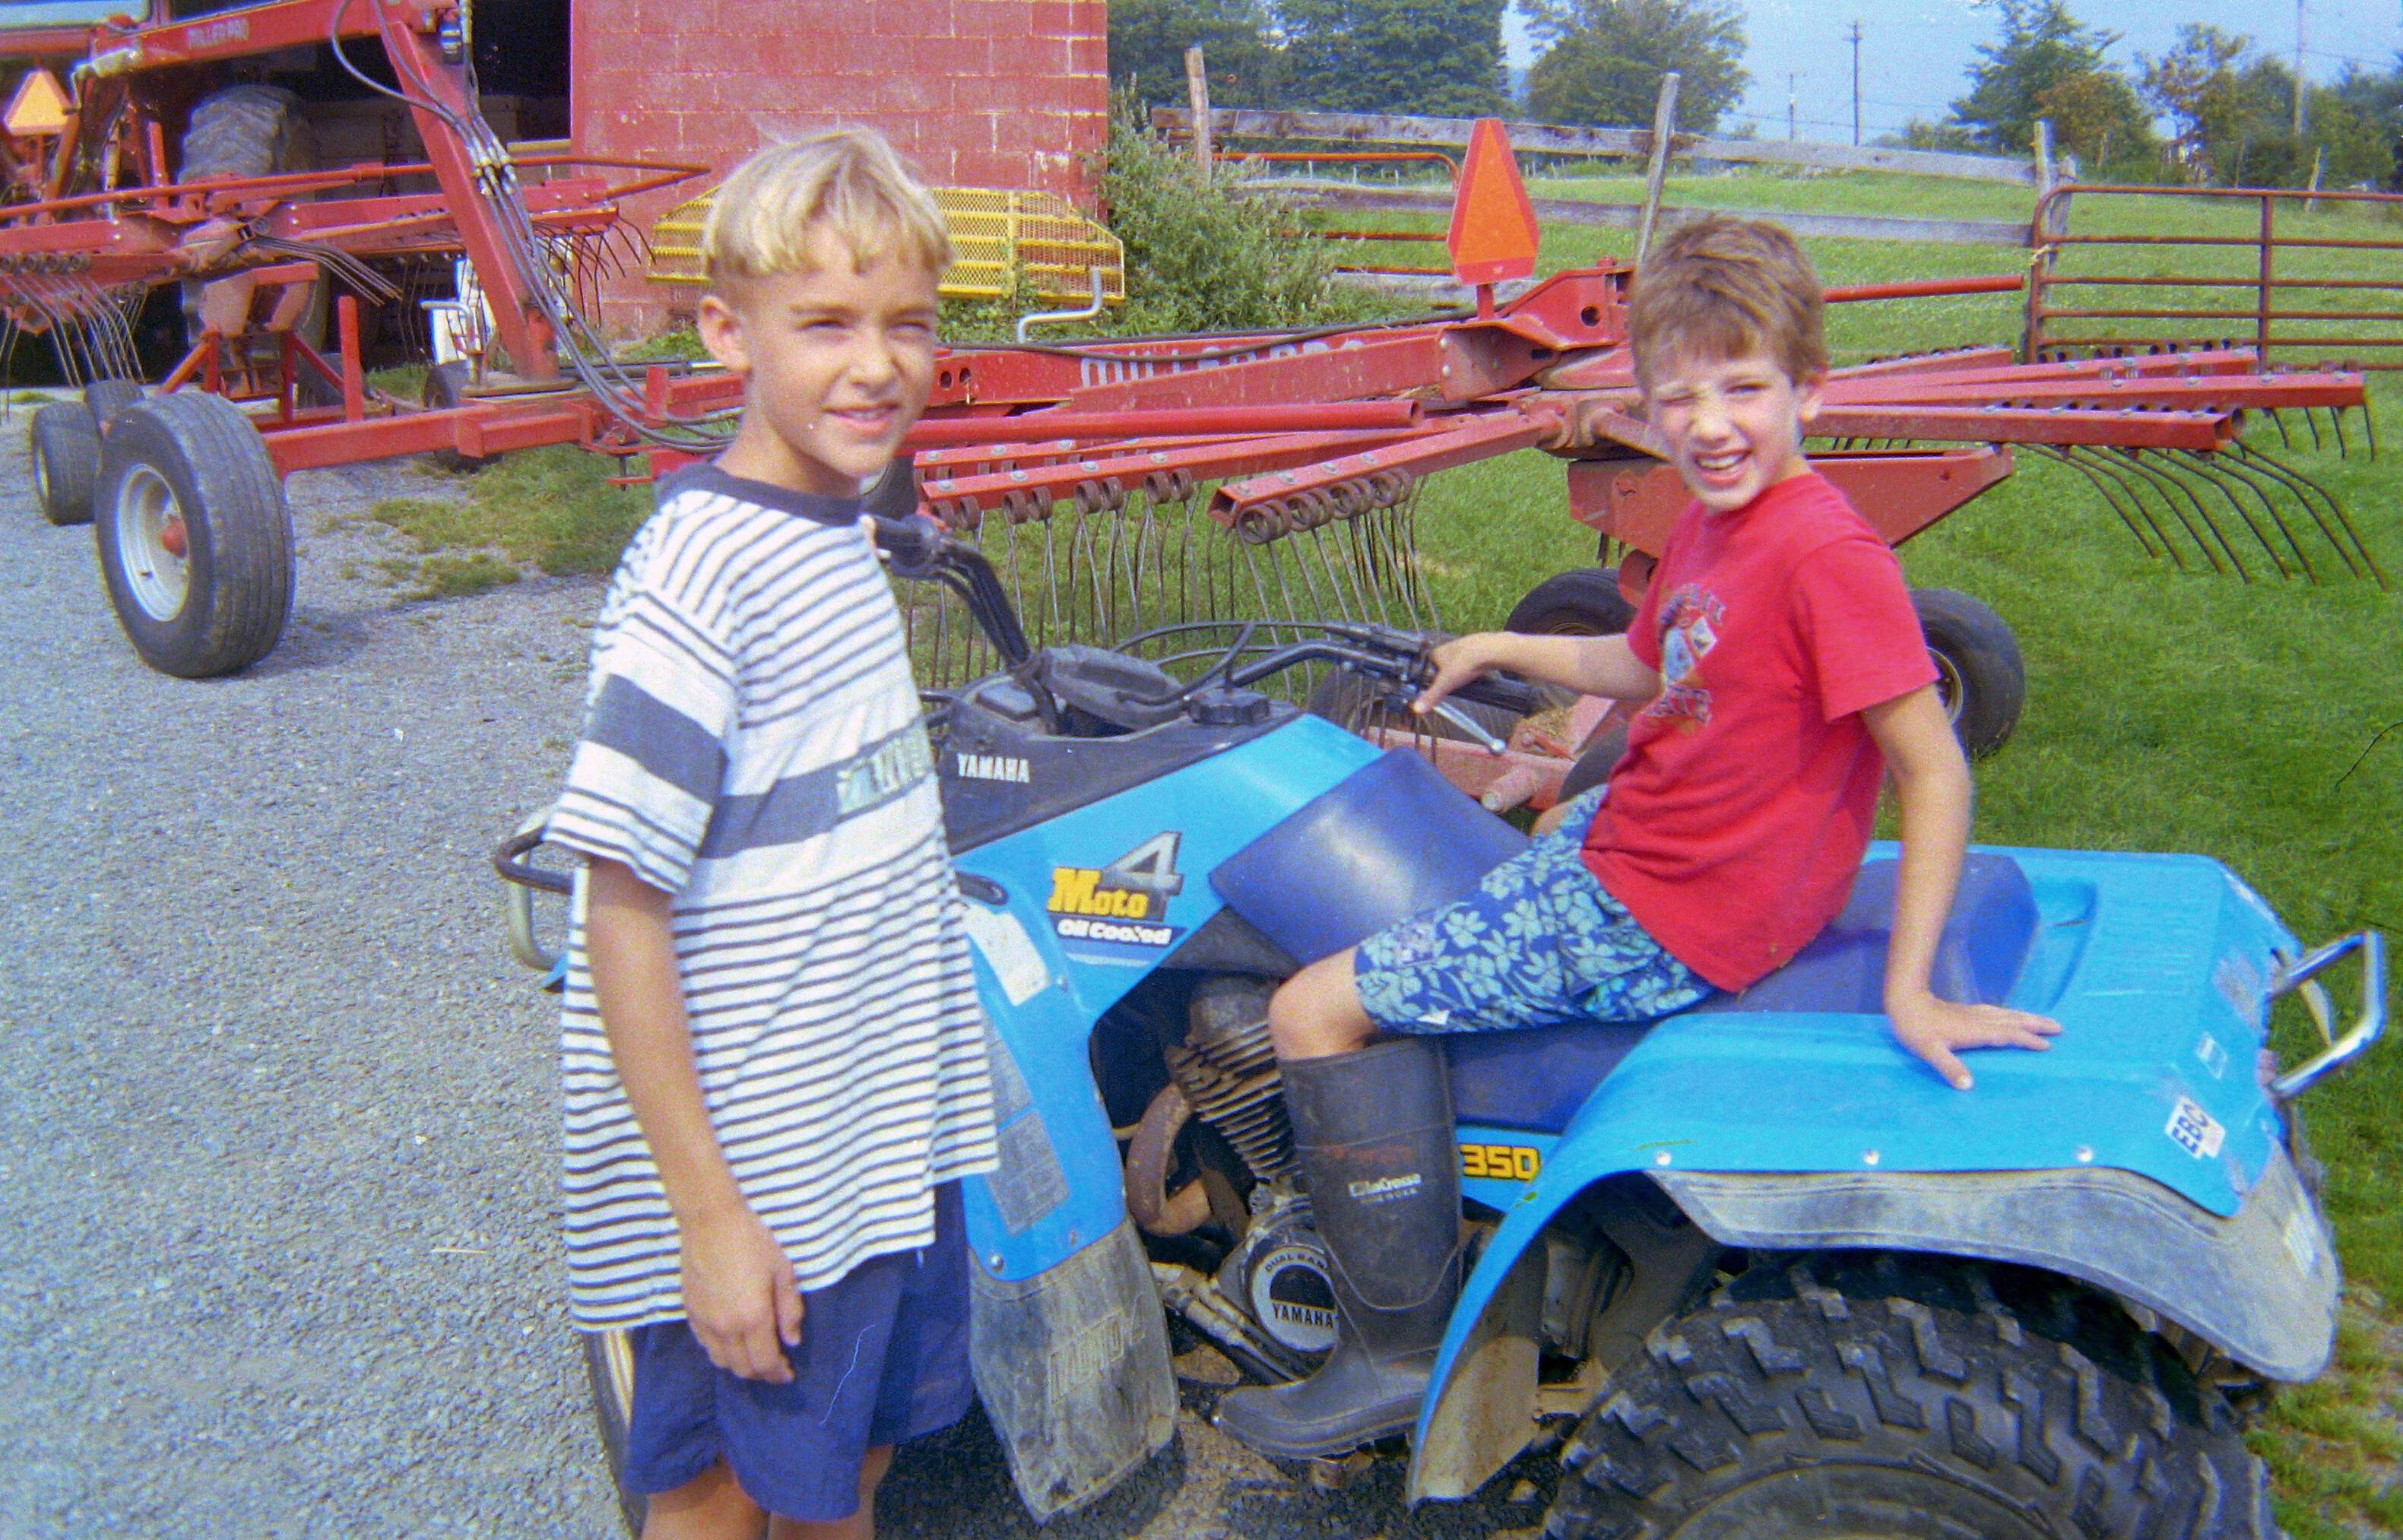
This Instructable shows how you may quickly convert camera or smartphone jpeg images of film negatives into quality positives. And, yes - it can be done in less than 5 seconds per negative once the conversion software is properly set up!
This Instructable assumes that you have already taken a digital picture of your negative using a smartphone or digital camera.
There are many ways to convert digital negatives to positives. The simplest way is to use the Invert command available in most photo editors; however this does not correct for the orange mask base color on color film negatives. After using the Invert command, there are various ways to manipulate the Red, Green, and Blue colors to obtain proper balance positive colors, but this can be a time-consuming process that requires some expertise to master. It is far easier and quicker to use VueScan to convert your digital negatives, and get near-perfect results in just a few seconds.
I have found that using a 3rd party software product called VueScan ($40) greatly simplifies the conversion process, although you may want to want to use a photo editing program after the conversion to touchup white balance and contrast. VueScan will convert both color and black-and-white digitized film negatives into quality positives.
The following steps show you how to use the VueScan software to convert your digitized film negatives into quality positives.
Disclaimer: I do not work for VueScan, nor am I affiliated with them in any way. I am simply sharing what I have found to be a simple and fast process to convert negatives.
Note: The three images above are: 1) Initial digitized film negative taken with a Canon Powershot SX110 IS, 2) the initial output from VueScan, and 3) the VueScan image, adjusted for white balance and contrast (touchup is not covered in this Instructable).
Obtain Digital Images of Your Film Negatives
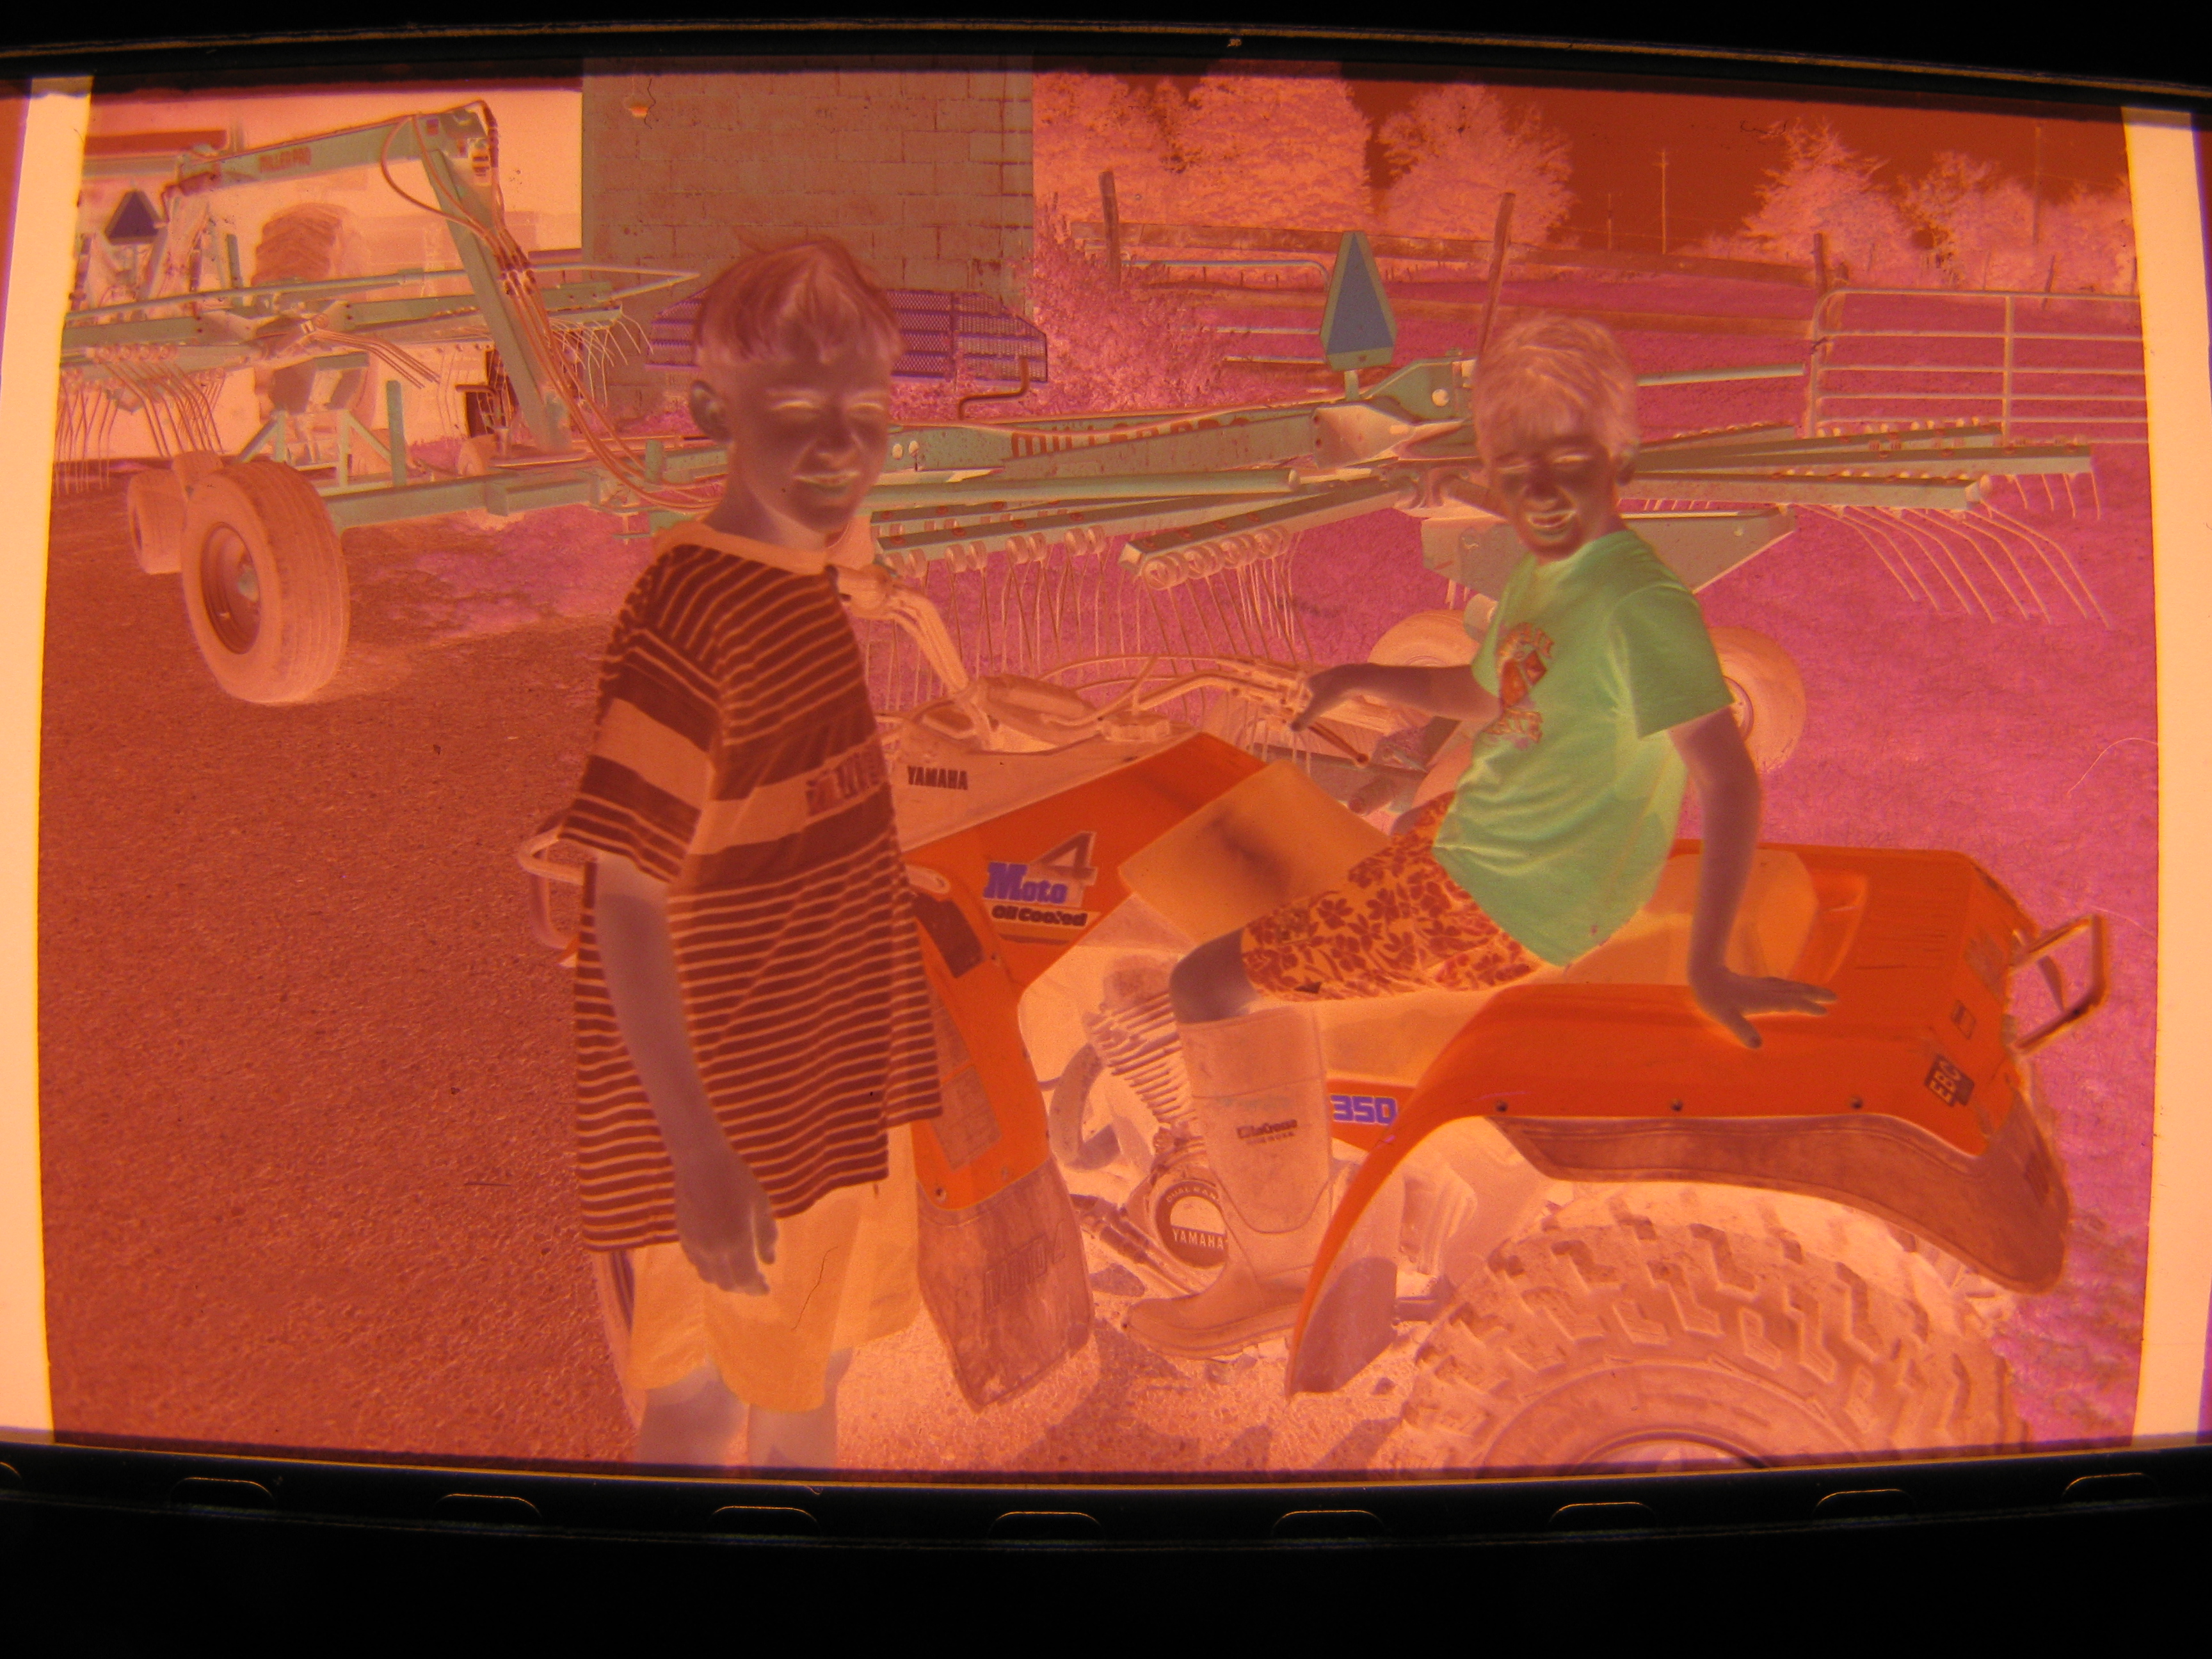
This Instructable assumes that you have a way to obtain jpeg images of your film negatives. For faster processing, it is best to have the negative positioned in approximately the same location in each image to allow for batch cropping and processing; otherwise, each image will need to be cropped individually.
Once you have your digitized negatives, put all of the ones that you want to convert into the same directory/folder on your computer (this will allow you to use VueScan's batch conversion feature).
There are several ways to make digital images of your film negatives. I have found that the easiest way is to build a jig to hold a digital camera in front of a lightbox, and then use another jig to quickly position the negatives in front of the camera. I have documented this in a separate Instructable, located here:
https://www.instructables.com/id/How-to-Convert-Fil...
Open VueScan - Adjust Presets
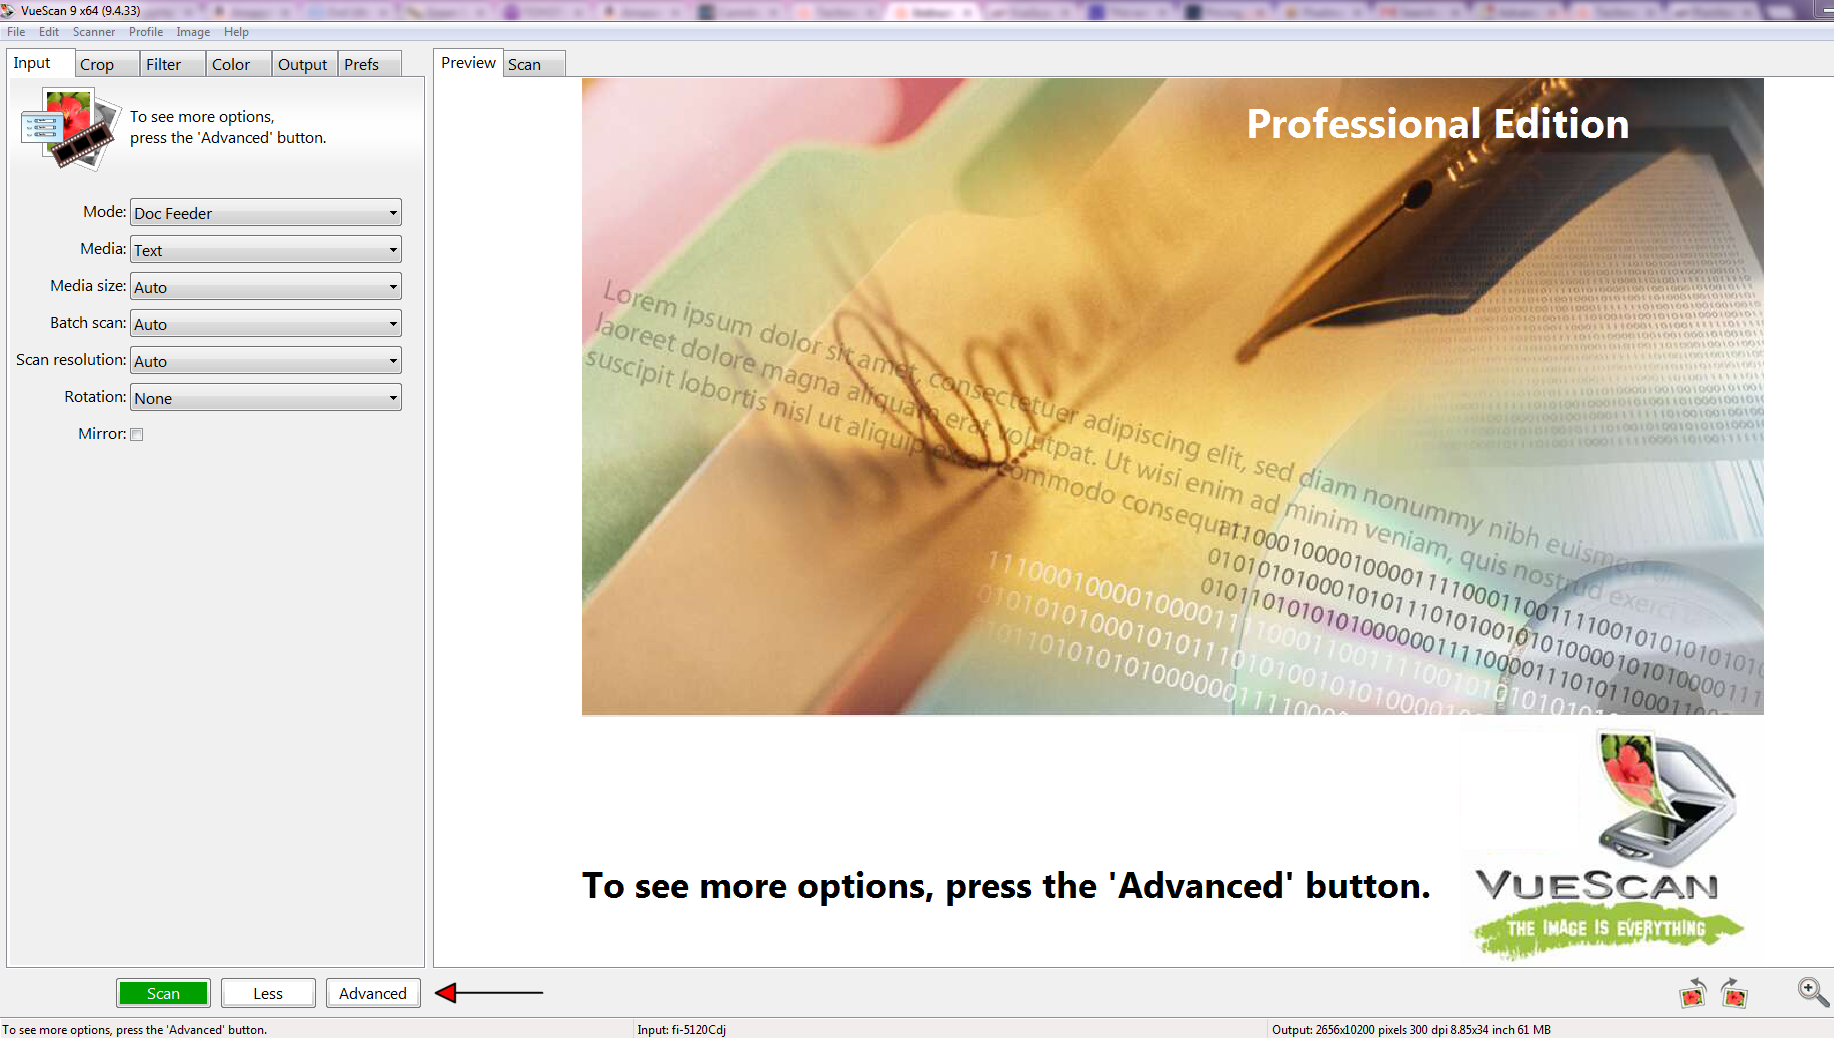
o Download VueScan from http://www.hamrick.com/
You can use the trial version if you want to test this capability (although it will leave a watermark). You don't need to have a scanner. The standard edition costs $40 and will work fine for digital camera jpeg negative conversion purposes.
o Open VueScan and set the following (the presets only need to be set once, and then can be saved and used again for future images):
- On the Input tab, select Advanced (this will enable you to edit extra options on all tabs)
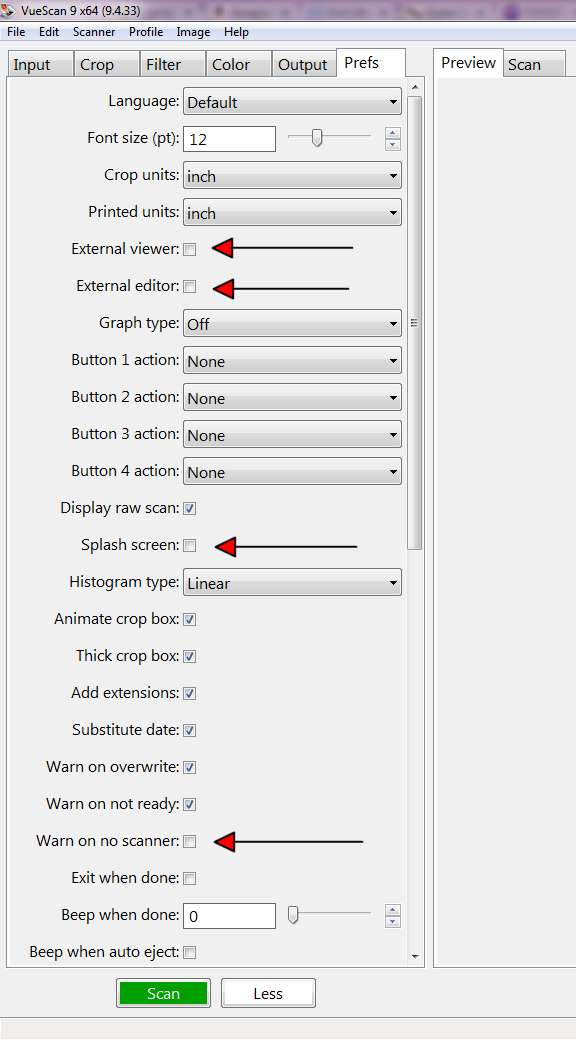
- On the Prefs tab, deselect External Viewer, External Editor, Splash Screen, and Warn on No Scanner (shown deselected)
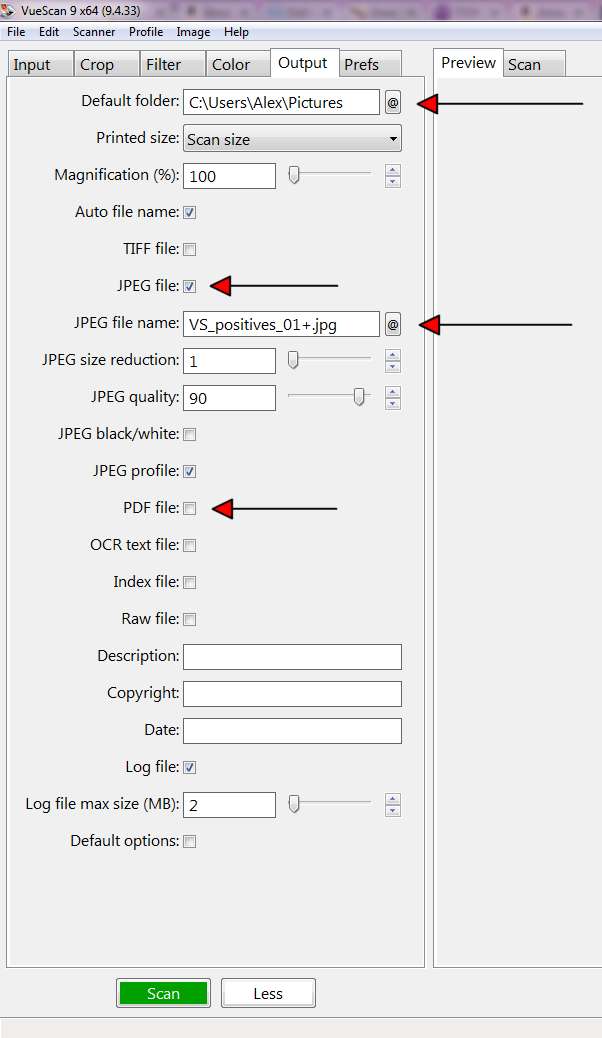
- On the Output tab, deselect PDF file, select JPEG file, for the Default folder, select the @ symbol and navigate to the folder where you want the converted images stored, and for the JPEG file name, select a naming convention for your output files (see the VueScan help file for more details)
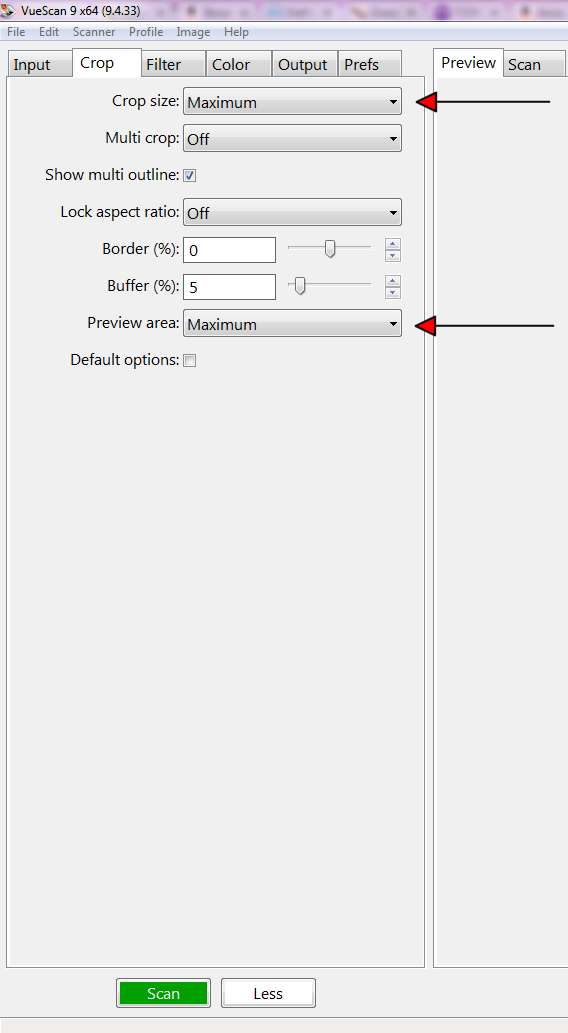
- On the Crop tab, for both the Crop size and Preview area selections, choose Maximum
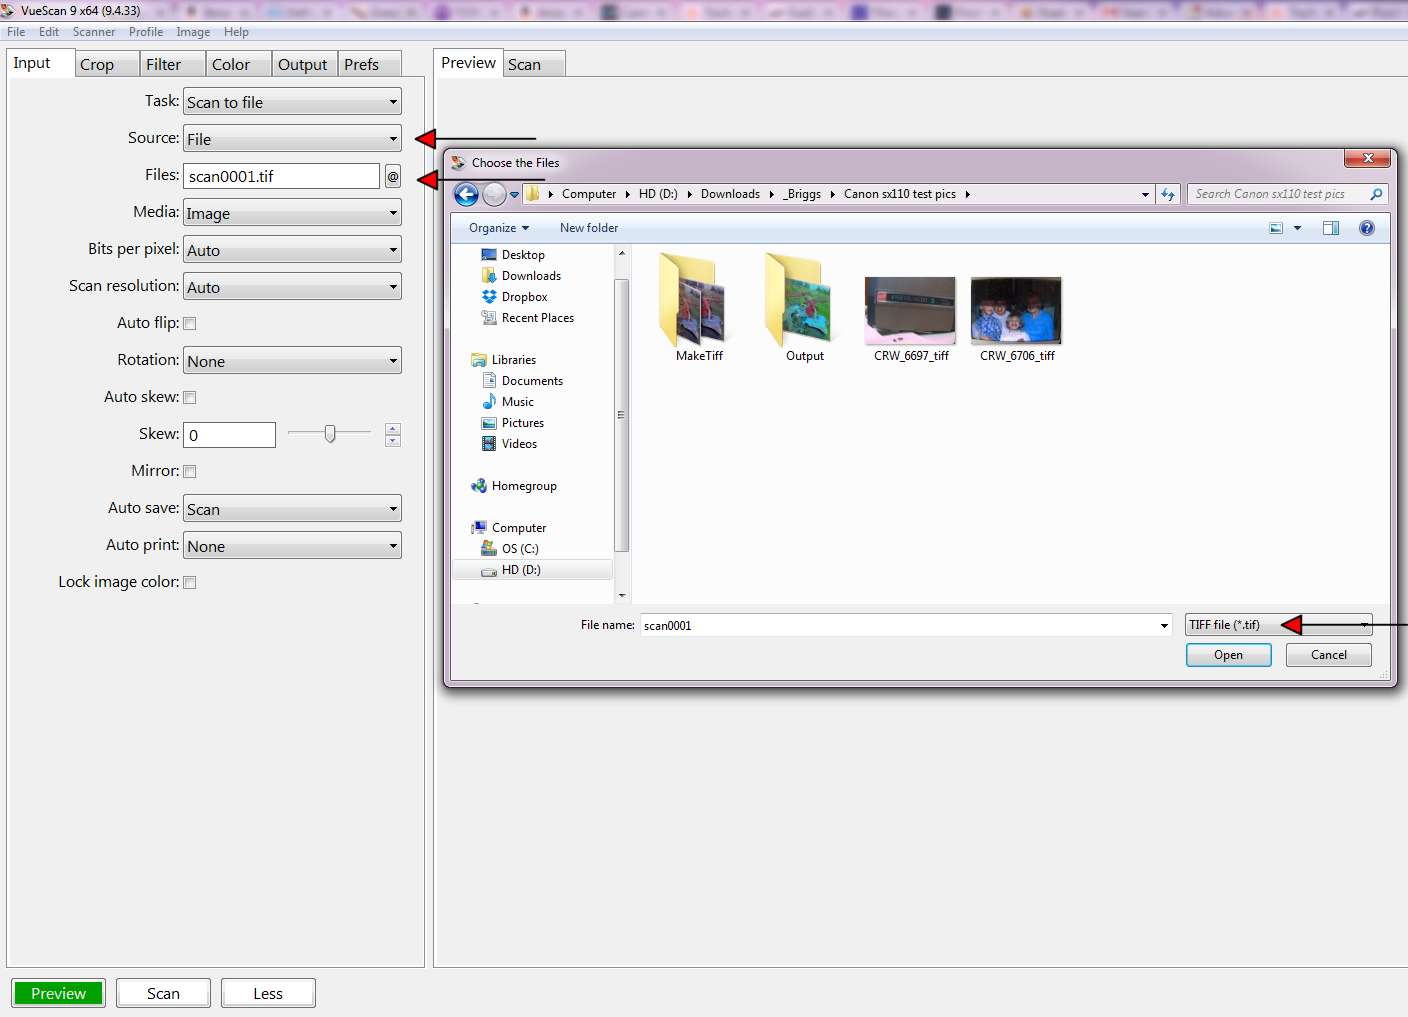
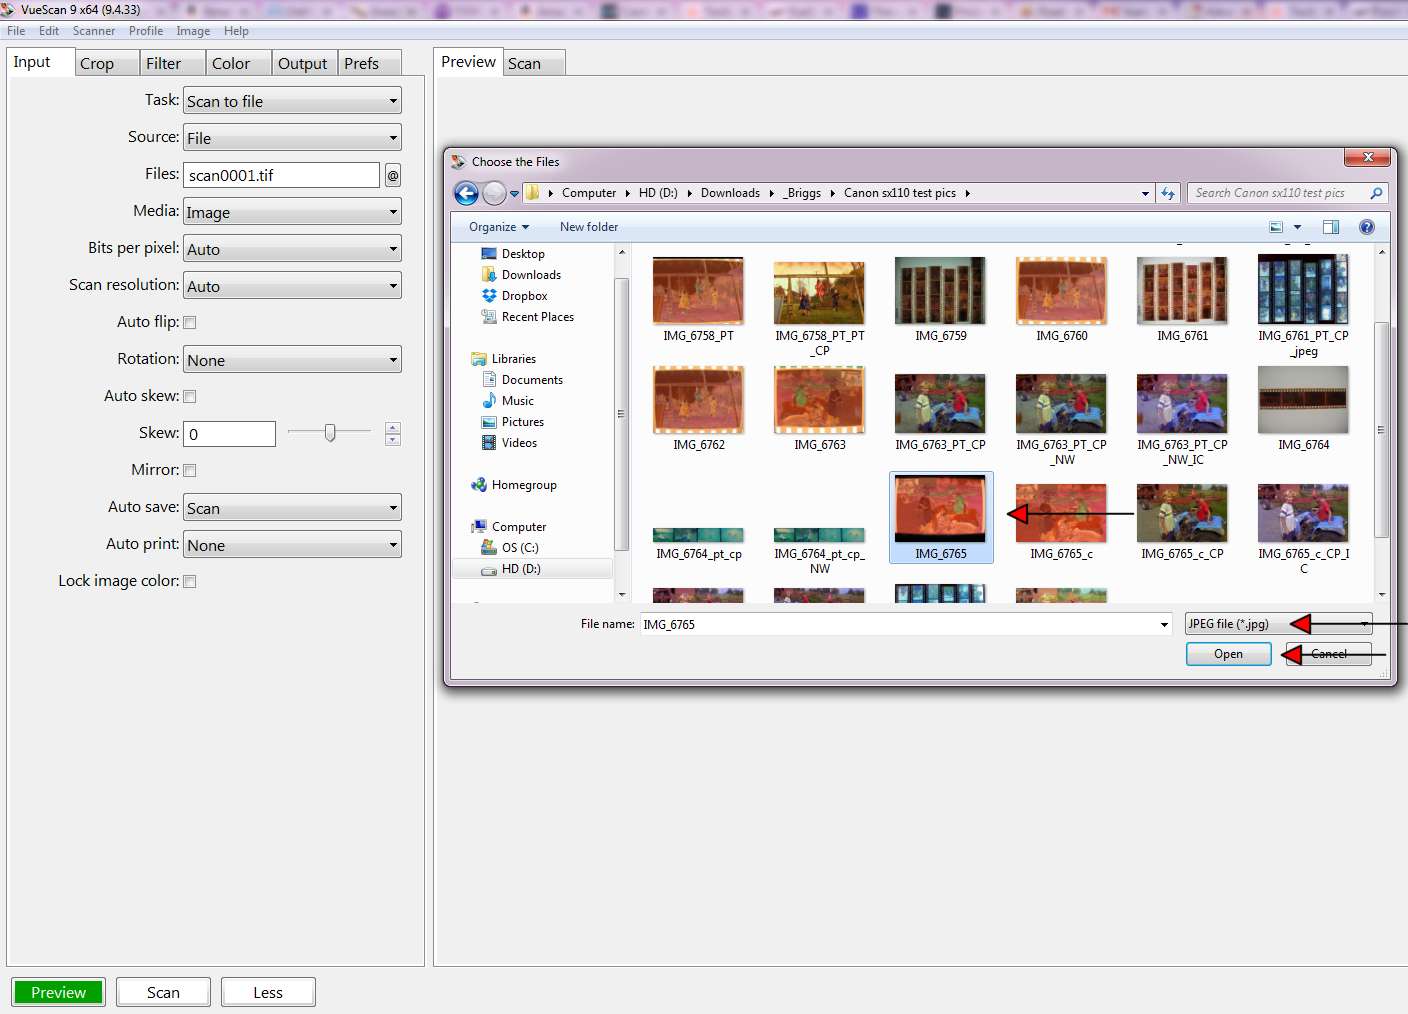
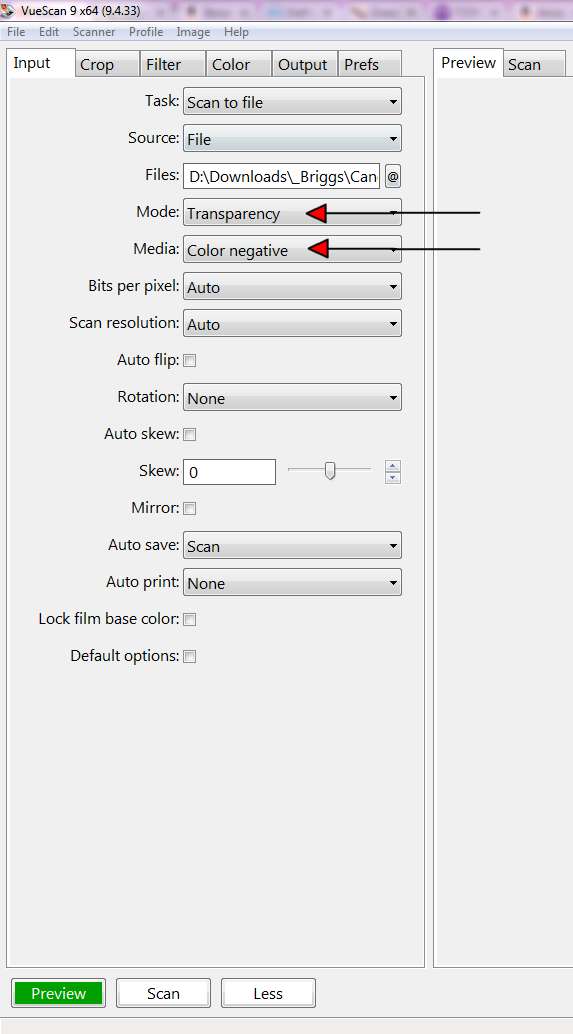
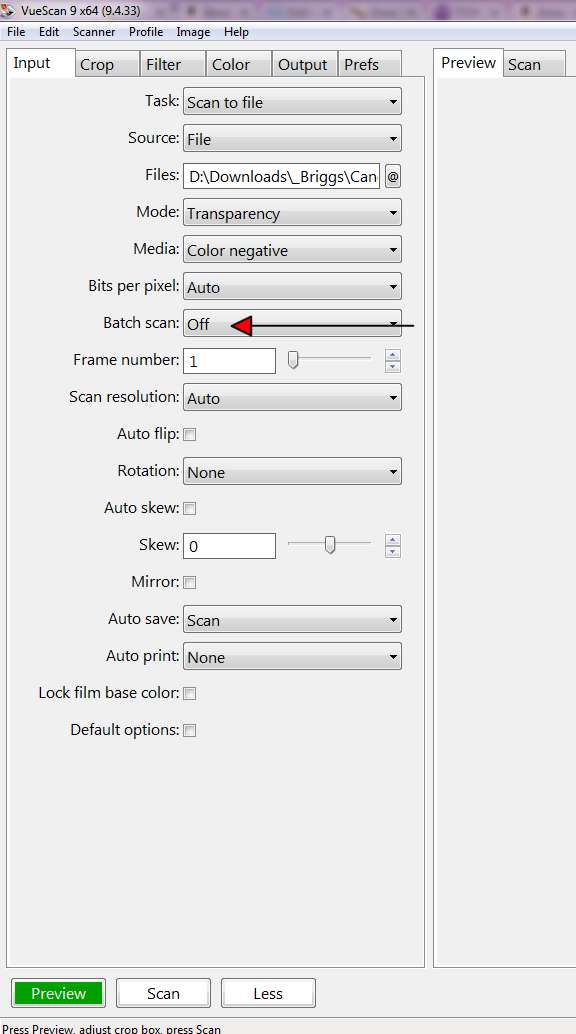
- On the Input tab, make sure that the Source selection is set to File (vs an attached scanner). On the Files selection, select the @ symbol and navigate to the folder where you have your digital negative files located (step 1), change the file type from TIFF (default) to jpeg, select one of your images, and select Open. This will enable extra selections on the Input tab. Ensure the Mode is set to Transparency. Change the Media to Color Negative. If the Batch Scan selection is showing (it may not be showing), make sure it is selected to Off.
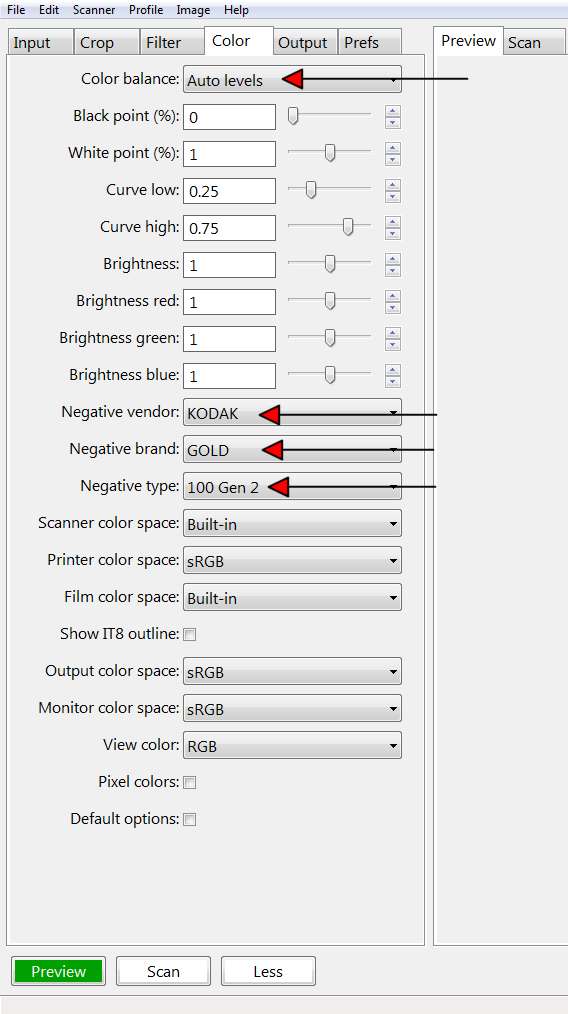
- On the Color tab, change the Color balance to Auto levels, and for the Negative Vendor, Negative Brand, and Negative type, select the values for your film (if you don't know these, just use the default settings).
Congratulations, you are now ready to preview your image!
Before you preview your image, be sure to save your presets by going to File, Save Options, and saving your presets as a unique *.ini file.
Preview Your Digital Negative & Adjust Cropping & Save
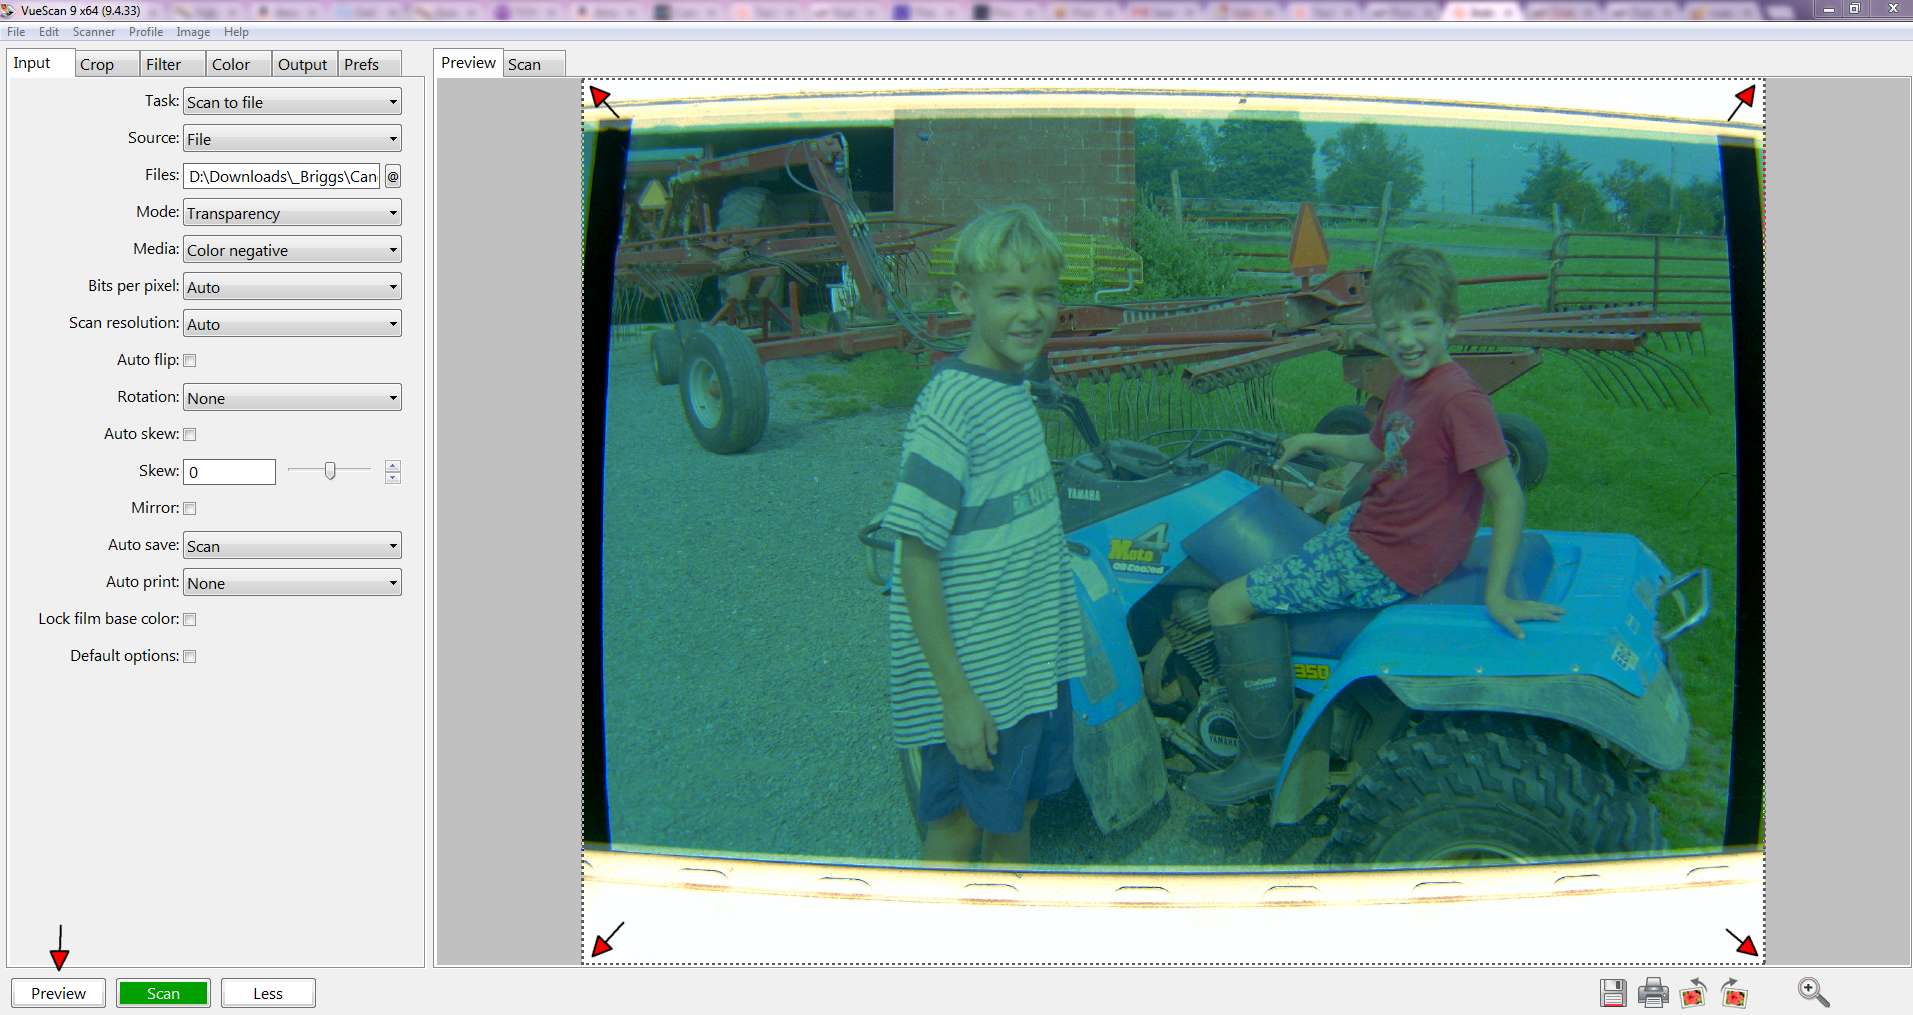
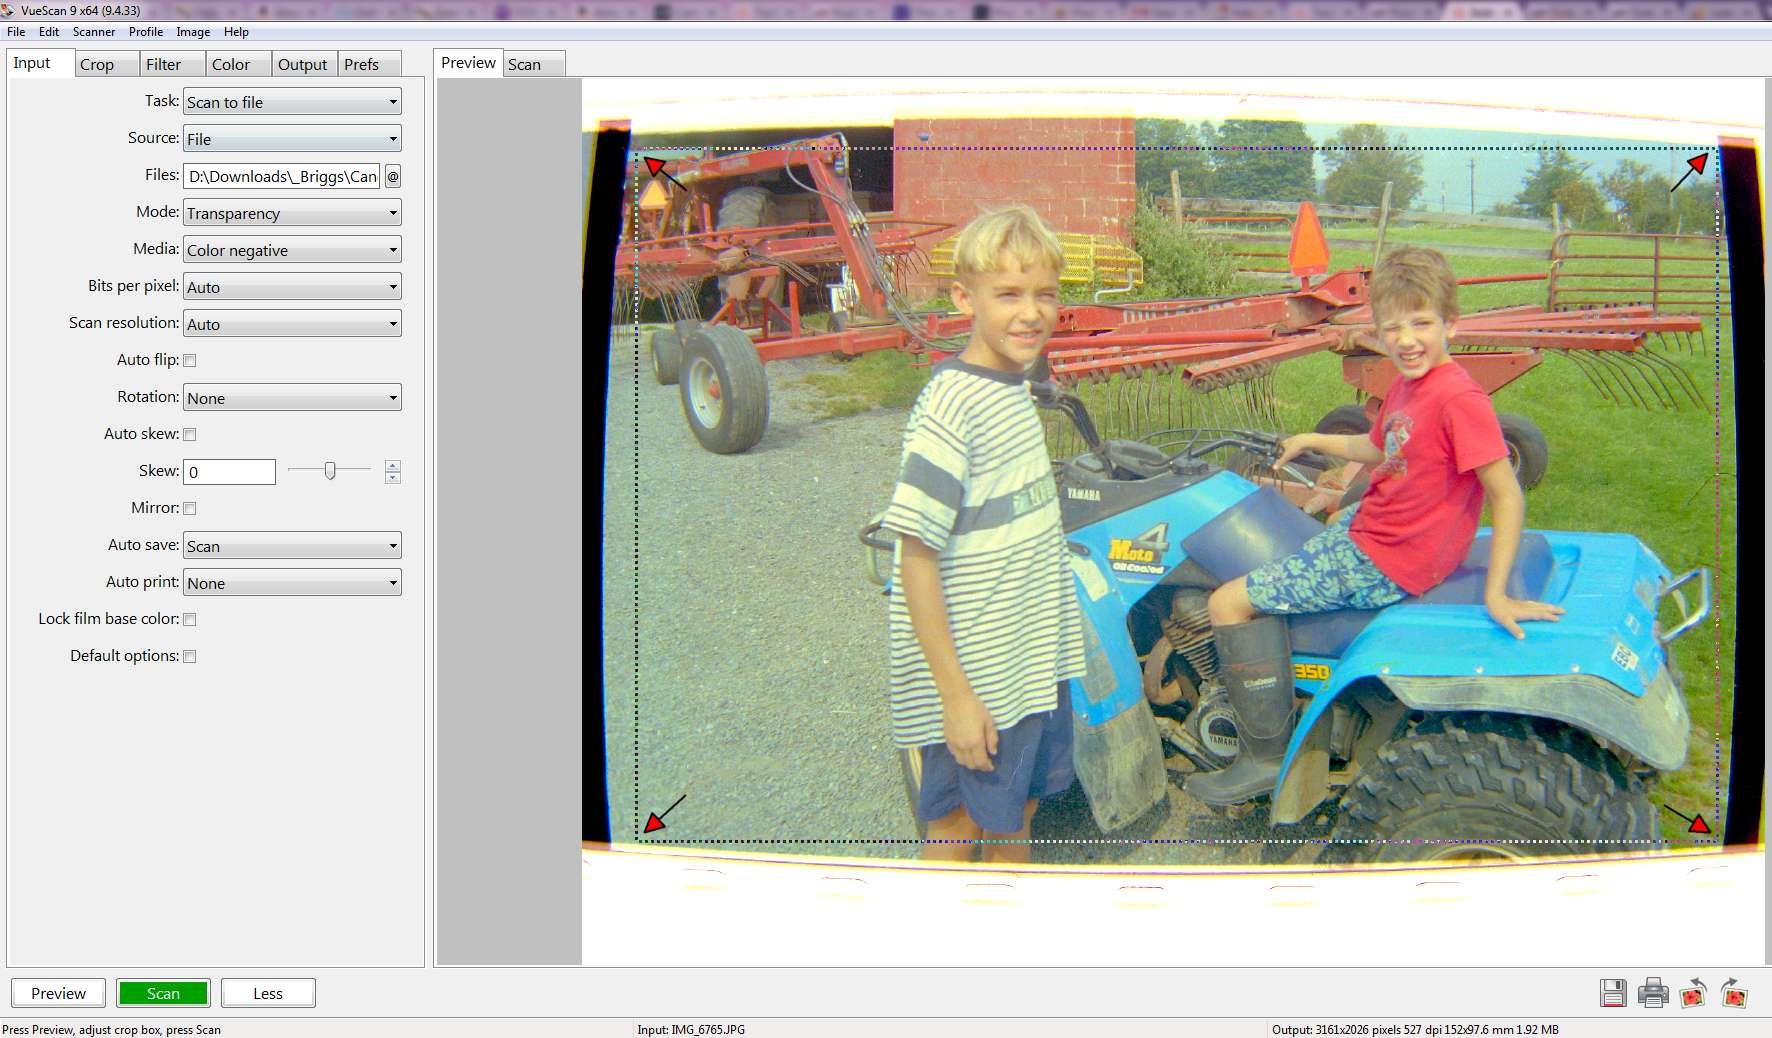
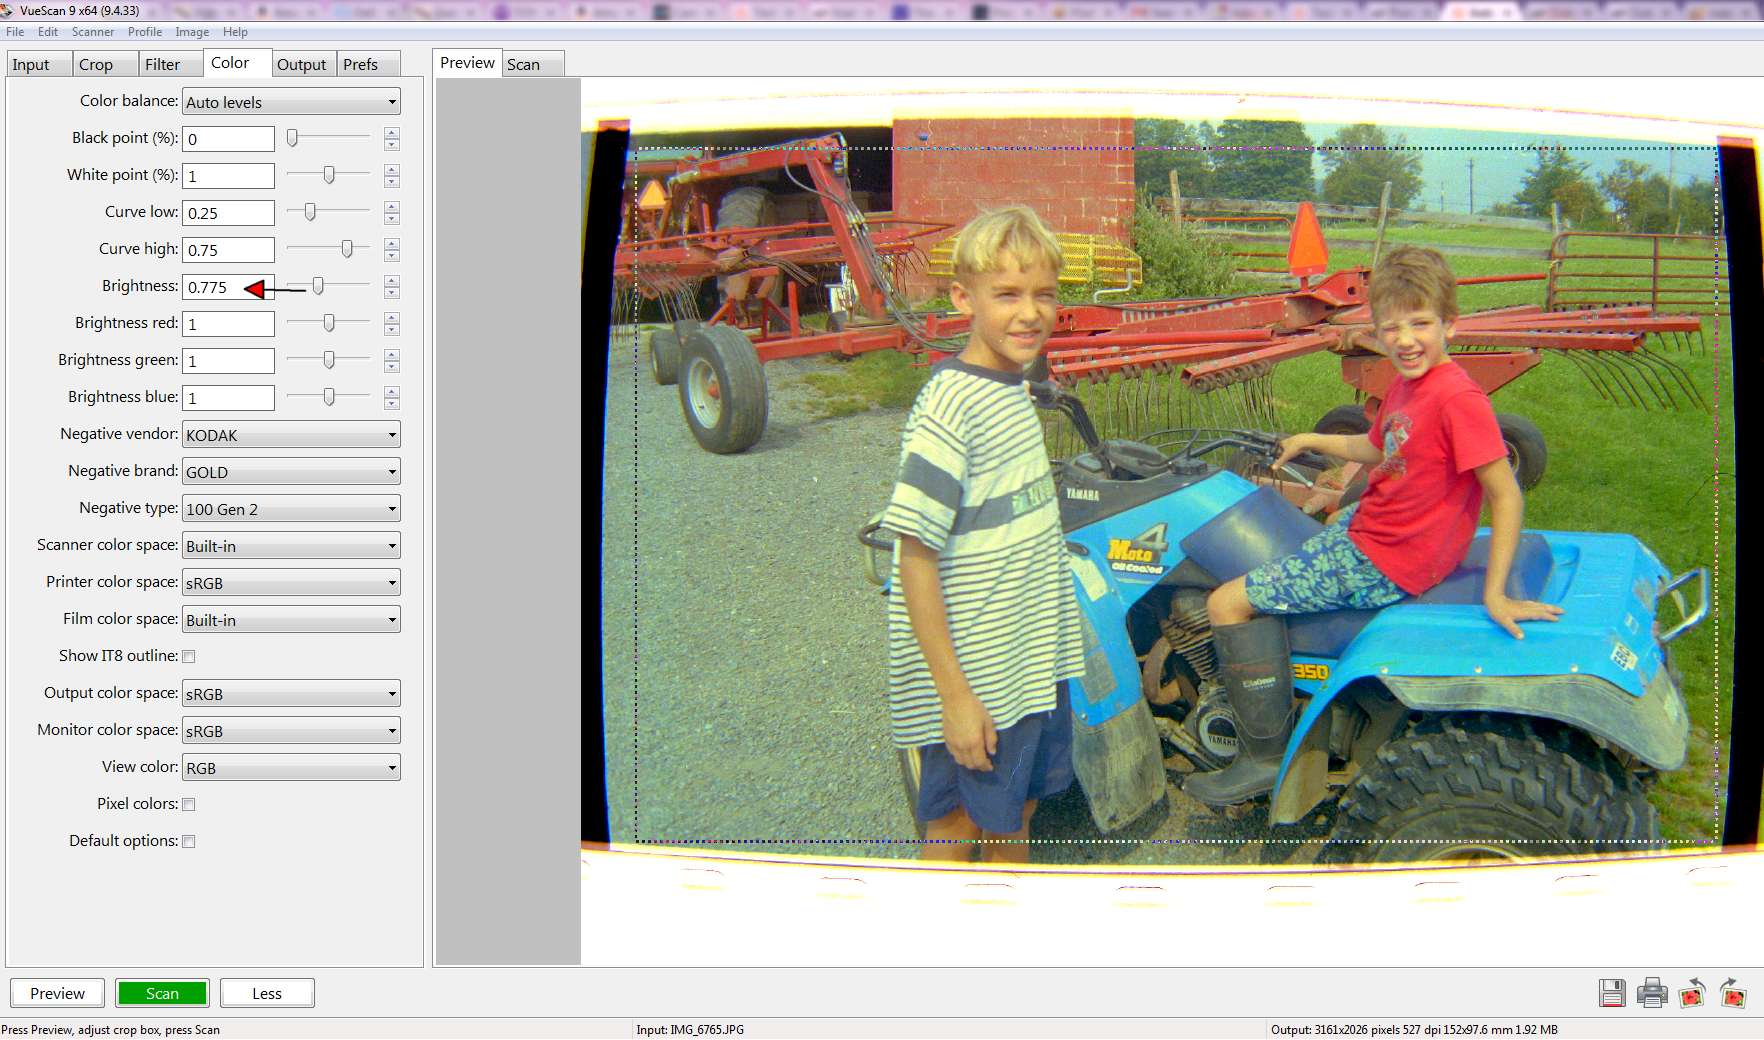
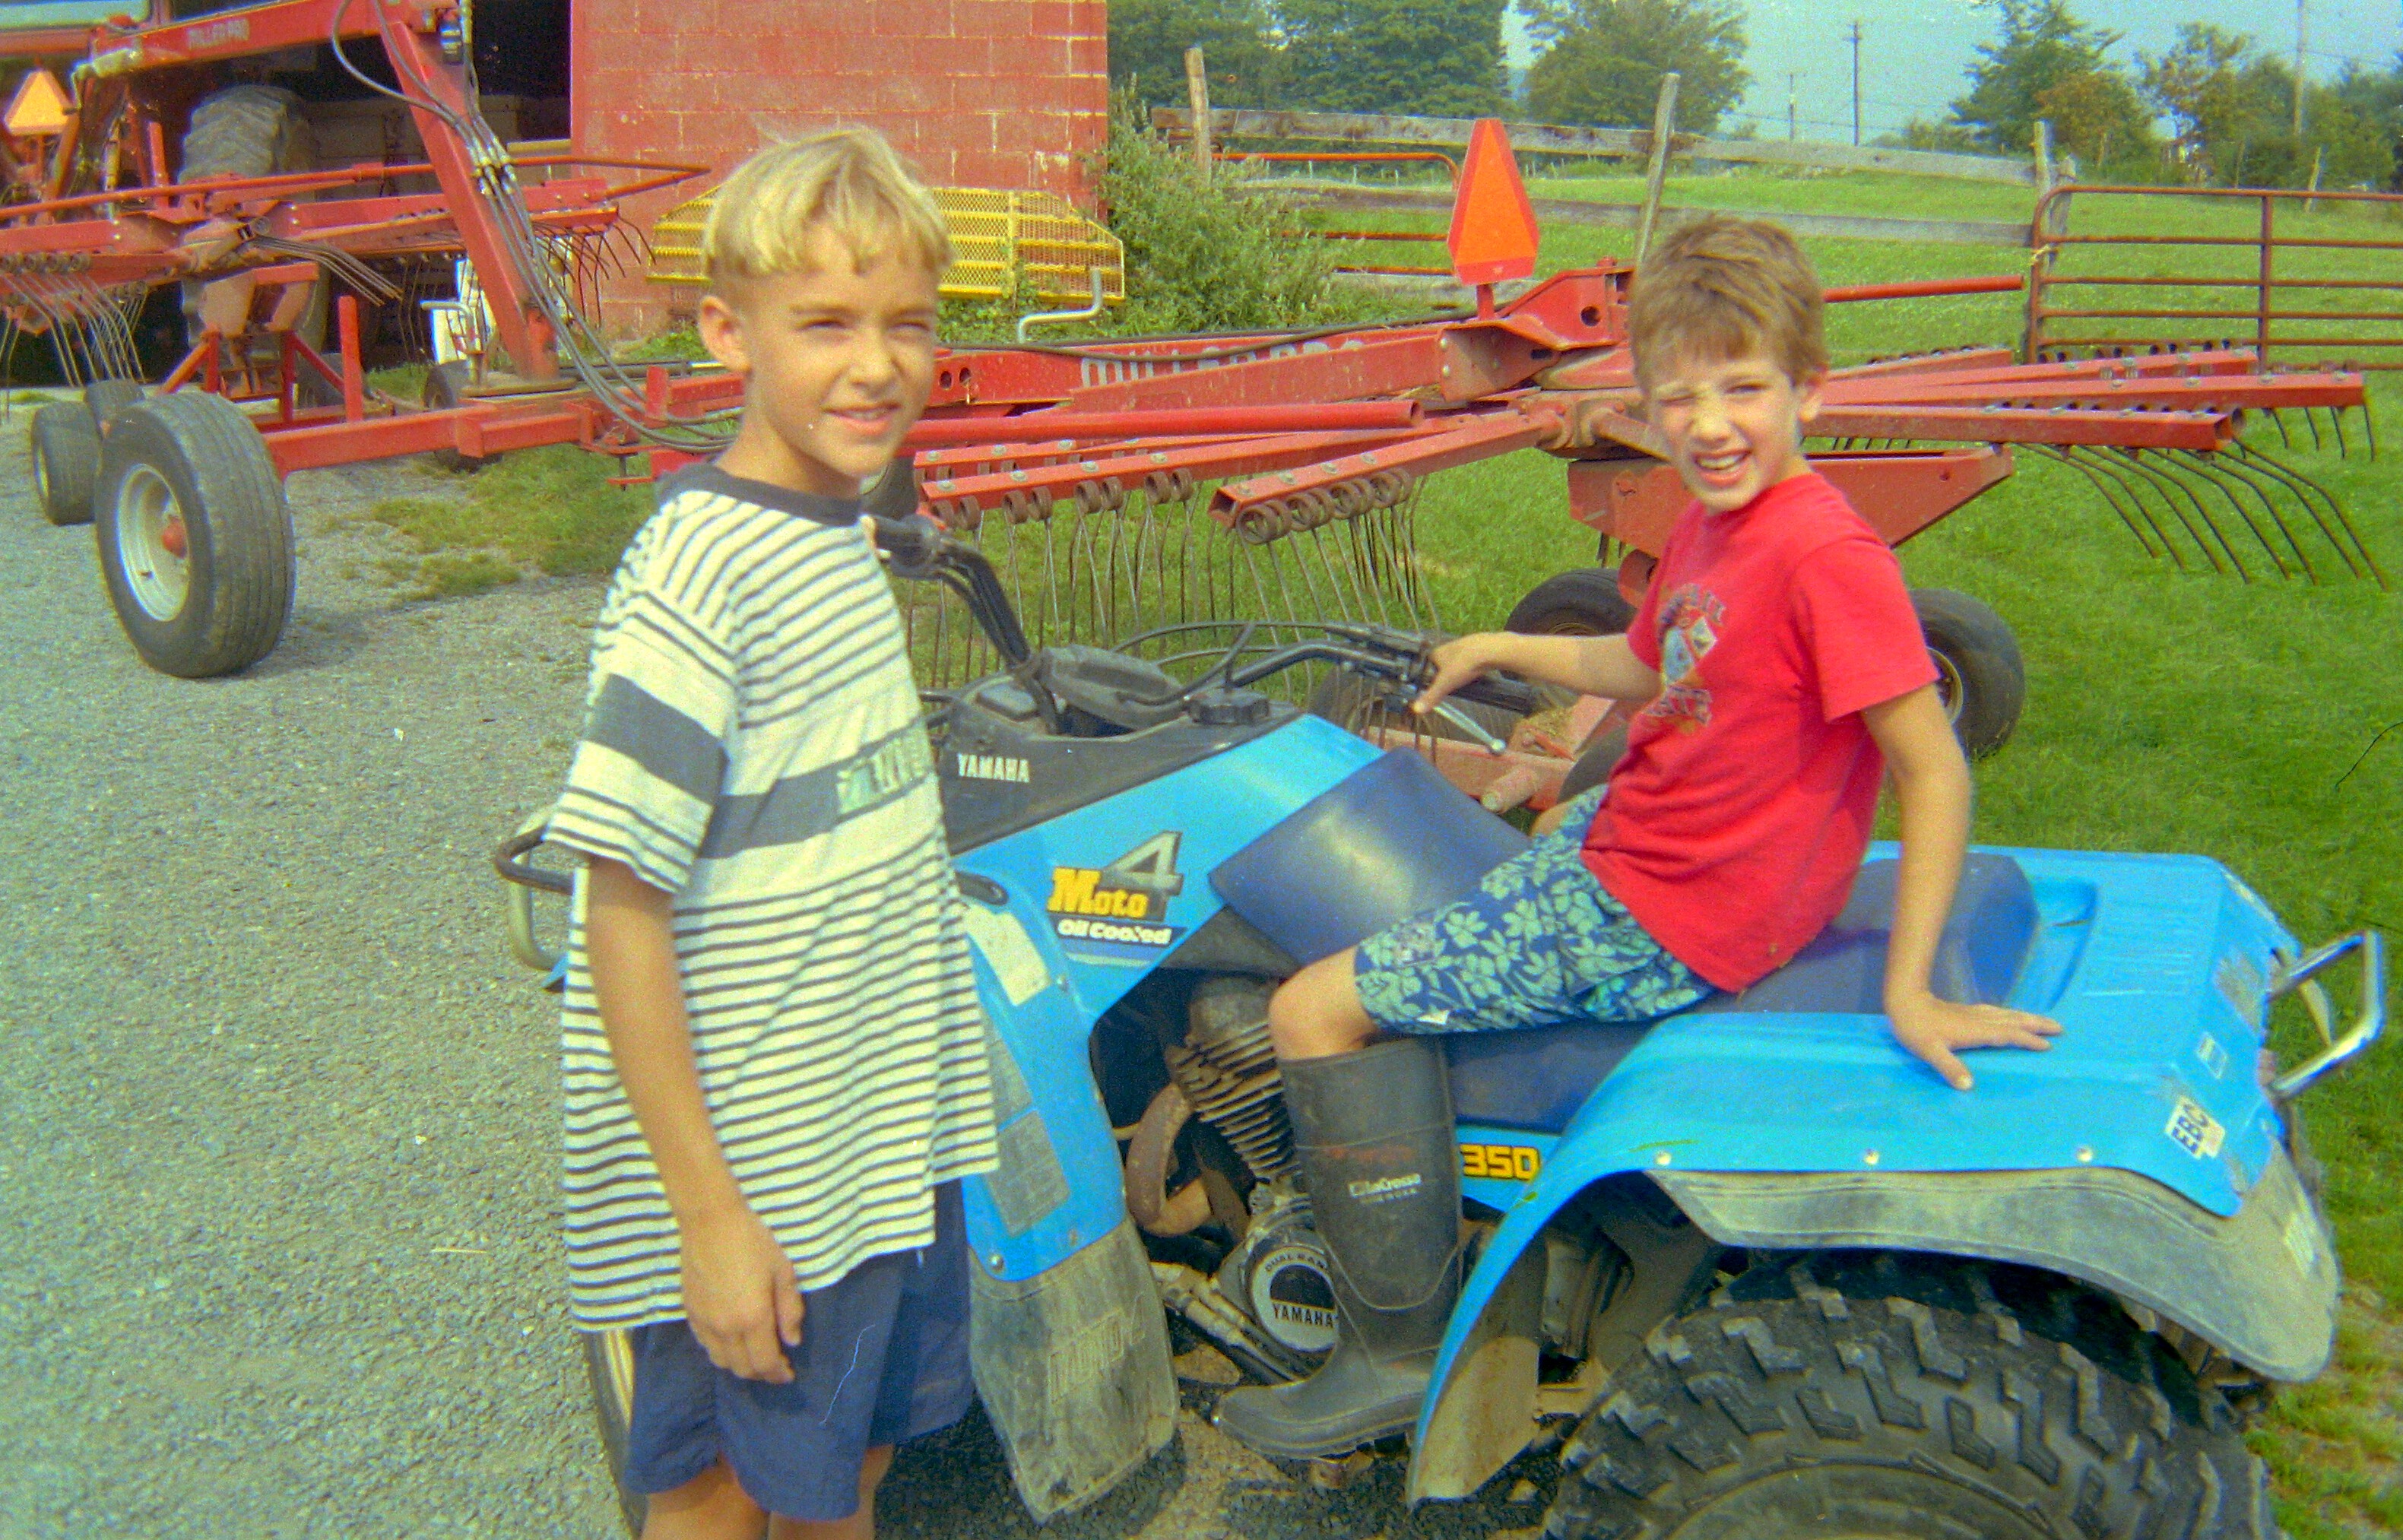
Now comes the fun part!
After you have set all of your presets, make sure that you have "opened" an image via the Files selection on the Input tab.
Select Preview.
Don't worry that the negative may look off-color. VueScan does its negative conversion magic best when the when the negative is completely enclosed in the crop box.
Adjust the crop box so the negative is completely contained within it.
At this point, you should be viewing a quality positive. You may be able to enhance the image quality even more by making a few additional adjustments. To increase image contrast, you may want to decrease the Brightness setting on the Color tab. You may also want to try different film types. You may also want to try changing some of the settings on the filter tab (Restore colors, Restore fading, Grain reduction, sharpen). Don't be afraid to experiment with the settings.
Once you have found the settings that work best for your current image (adjusted crop box, etc.), you may want to save these as updated load options under Files -> Save options.
Select Save to save the converted image in the previously selected output location.
To see a short video of how this process works, see the link below for a video that I made, beginning at approximately the 2 minute point in the video.
Batch Scan Digital Negatives As Appropriate
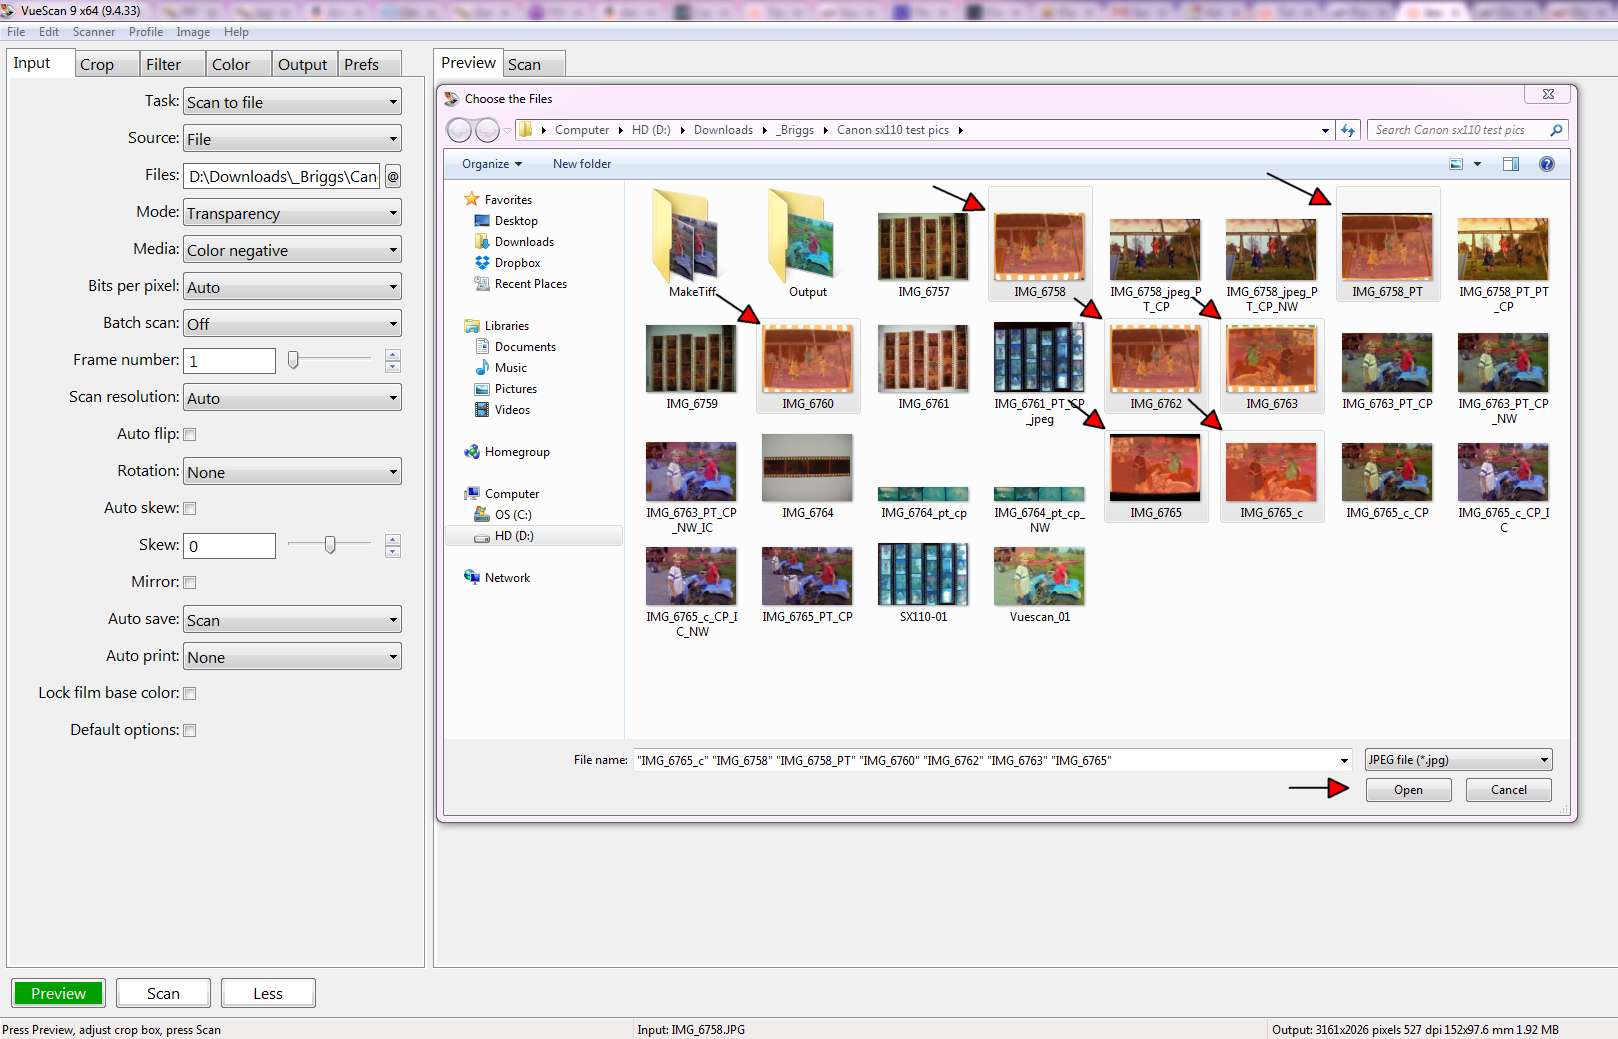
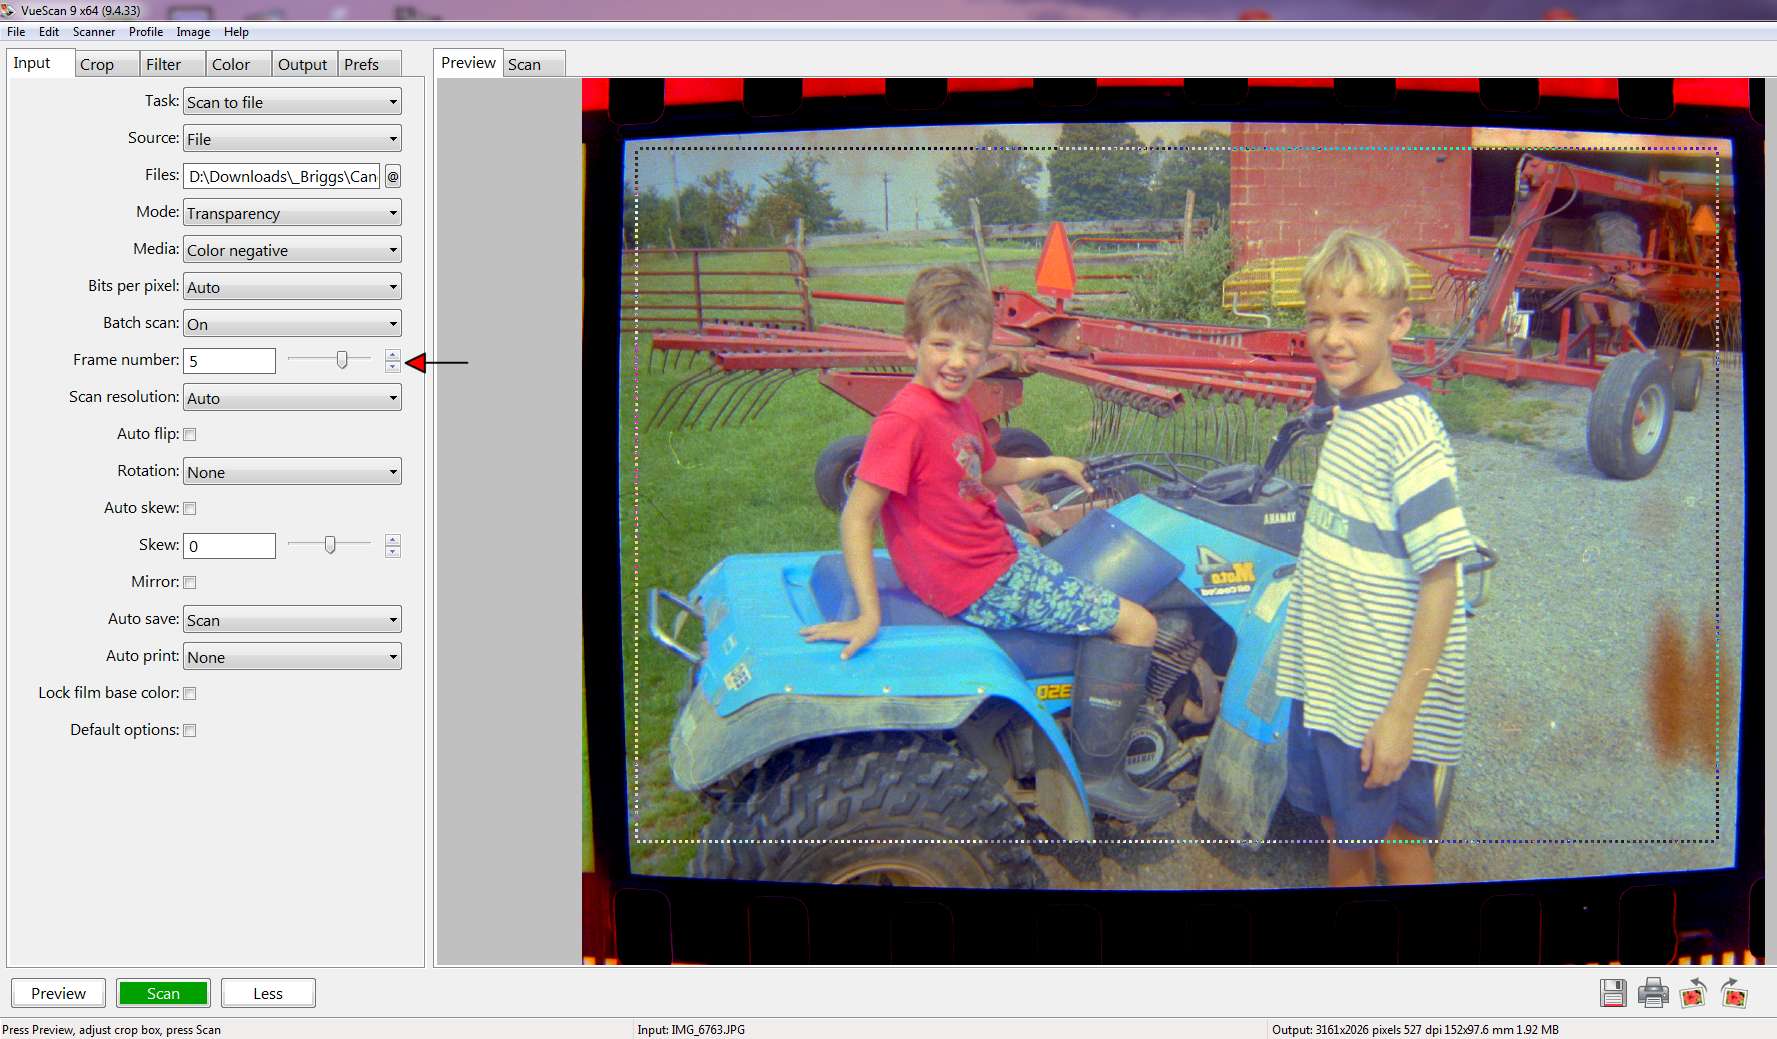
VueScan allows you to batch scan your digital negatives to really speed things up.
If your digital negatives are positioned in approximately the same location in each image, you can use the existing crop and color settings for all of your images.
Go to the Input tab, and select the @ symbol under Files, then hold the Control key down and select multiple images that you want to convert. Select Open.
Since the Batch scan selection had been turned off previously, you will now need to turn it on.
On the Input Tab, go to Batch scan and select On.
Select Preview.
VueScan will now process & preview all of the selected images using the existing crop and color settings.
You can review each of the images for adequacy by selecting individual frame numbers. If you need to adjust the cropping for individual frames, you may do so and VueScan will remember it.
Select Scan to save ALL of the converted images to the designated location.
You may now proceed to do minor touchup adjustments (white balance, contrast, etc.) in your favorite photo editing program.