How to Control an RGB LED Strip - Arduino Tutorial
by codebender_cc in Circuits > Arduino
59183 Views, 183 Favorites, 0 Comments
How to Control an RGB LED Strip - Arduino Tutorial
![CameraZOOM-20160604000752947[1].jpg](/proxy/?url=https://content.instructables.com/FJV/DLN1/IP02TXEL/FJVDLN1IP02TXEL.jpg&filename=CameraZOOM-20160604000752947[1].jpg)
In this tutorial we will use one strip with 8 RGB LEDs with the Arduino uno board. We will use the Adafruit's NeoPixel library to change the color of each led.
Let's get started!
What You Will Need

For this project you will need:
- Arduino uno
- RGB LED strip
- 3 breadboard cables
The Circuit

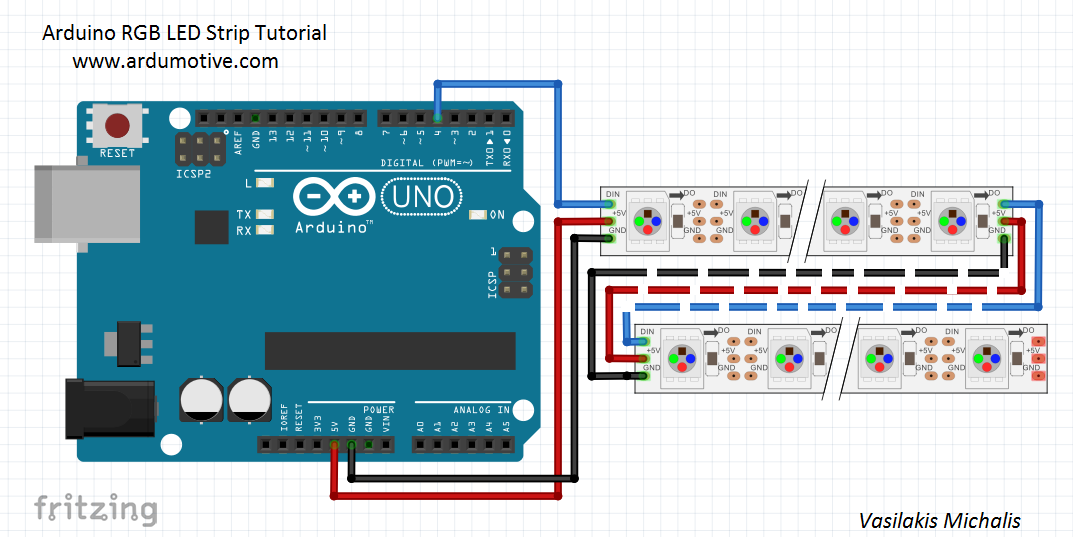
The connections are pretty easy, see the above image with the breadboard circuit schematic.
The Code
Here's the code, embedded using Codebender!
Try downloading the Codebender plugin and clicking on the "Run on Arduino" button to program your Arduino board with this sketch. And that's it, you've programmed your Arduino with this sketch!
Press the "Edit" button and:
- change the color of LEDs at lines 16 to 18
- change the brightness of LEDs at line 23 "pixels.setBrightness(value 0-100);"
- change the delay time at line 32
Well Done!
![CameraZOOM-20160604001007553[1].jpg](/proxy/?url=https://content.instructables.com/FMJ/0YMM/IP02TYAQ/FMJ0YMMIP02TYAQ.jpg&filename=CameraZOOM-20160604001007553[1].jpg)
You have successfully completed one more "How to" tutorial and you learned how to use an RGB LED strip with Arduino!
I hope you liked this, let me know in the comments.
There will be more of them, so make sure to click Follow button!