How to Clone Windows From a Hard Disk to an M.2 SSD (and Keep It Bootable)
by accessrandom in Circuits > Computers
560 Views, 5 Favorites, 0 Comments
How to Clone Windows From a Hard Disk to an M.2 SSD (and Keep It Bootable)
If you find this instructable useful, please consider subscribing to my Youtube channel for upcoming DIY tutorials concerning technology. Thank you!
Make Sure You Know What You Want to Do
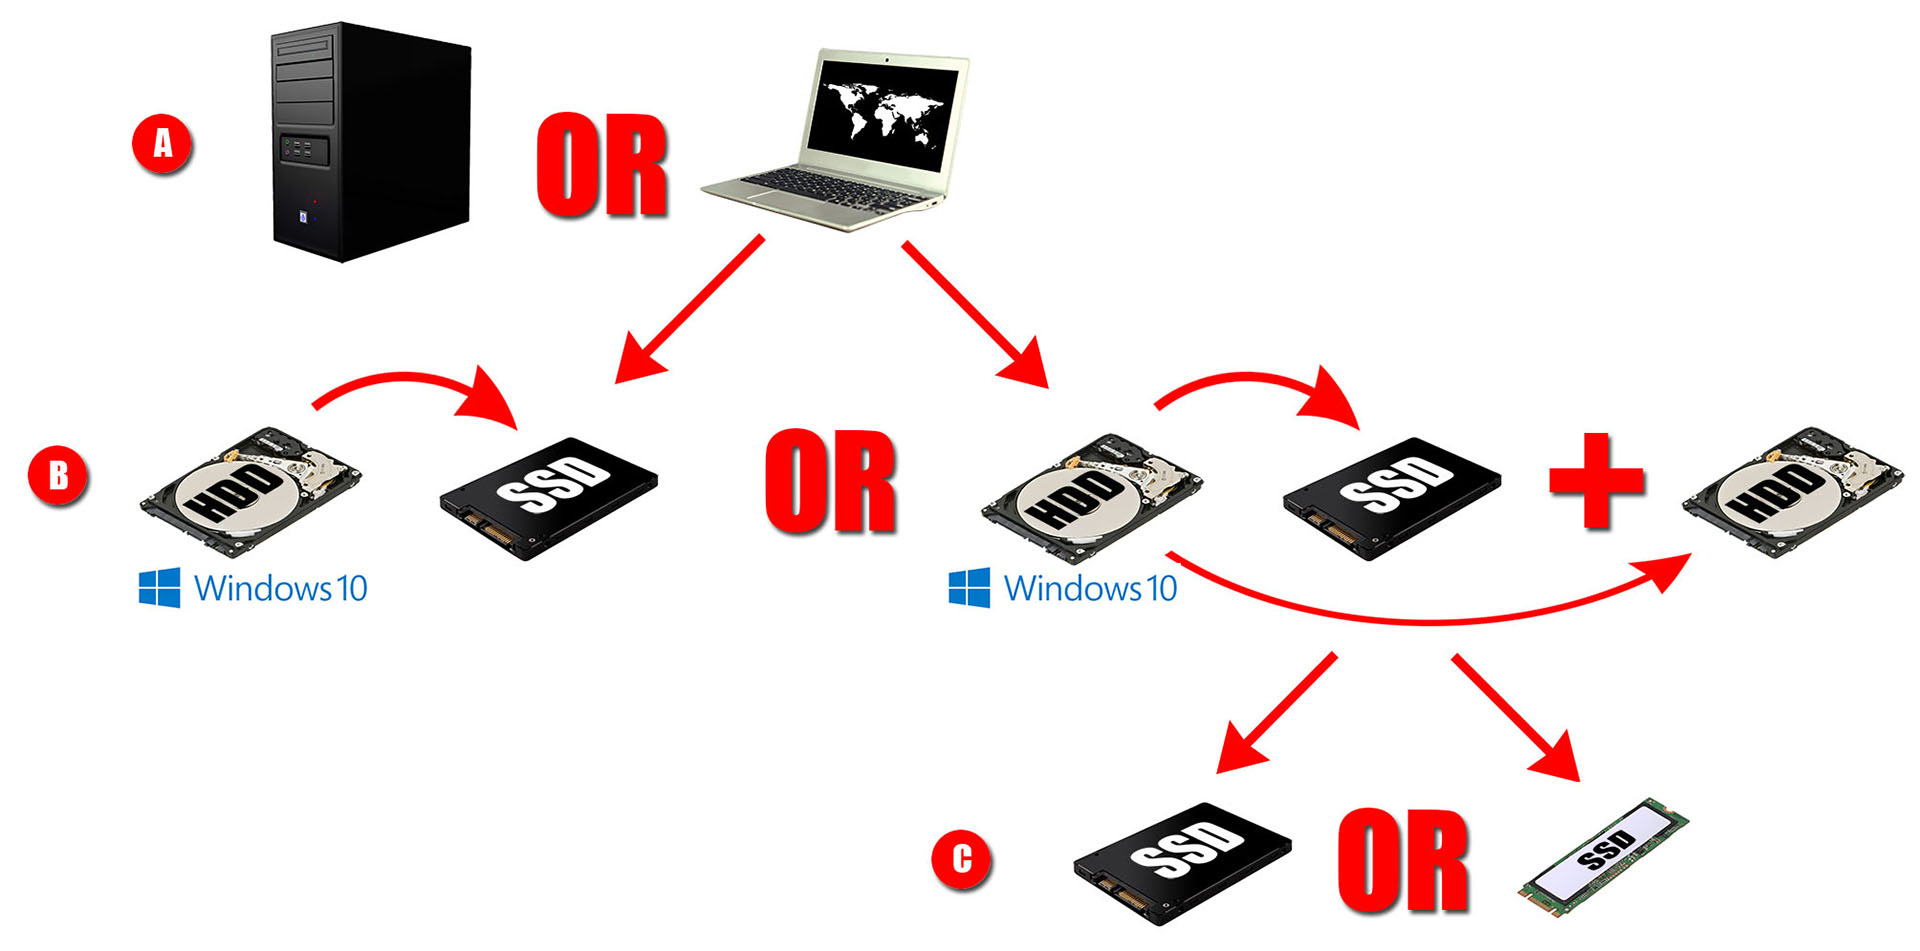
"Cloning a hard drive" sounds straightforward but when that hard drive contains Windows, it can seem quite a daunting task. Before starting the cloning process, we need to consider several use cases. Please refer to the image above.
(A) First, is your computer a desktop OR a laptop? Cloning the hard drive that contains the Windows partition is a common operation in either. Though a desktop often has easier access to the storage devices inside it (making it easier to physically add and/or disconnect them), the process is similar for both desktops and laptops. In this instructable, we will consider cloning the hard drive of a laptop.
(B) Secondly, are you planning to REPLACE your existing 2.5" hard drive with a 2.5" SSD, OR are you planning to ADD an SSD to the laptop, clone the hard drive to it, and then continue using the hard drive as secondary storage?
If the former, you would need to attach the SSD to your laptop (commonly in an external USB enclosure), clone the hard drive to the SSD, then physically swap the internal 2.5" HDD with the 2.5" SSD.
If the latter, you'll need to simply add an SSD. This is the use case that we'll cover in this instructable.
(C) The final decision is whether to use a 2.5" SSD or some form of M.2 SSD. If you're adding a 2.5" SSD, you will typically need a hard drive caddy that replaces your optical drive (if your laptop supports it). Otherwise, you will need to access your laptop internals and add an M.2 SSD. We'll use an M.2 SSD in this instructable.
In summary, we are considering the use case of (A) a laptop, (B) adding an SSD to the laptop, cloning the contents of the hard disk to the SSD, including the bootable Windows partition, and (C) using an M.2 SSD.
Please keep in mind that I'm using screenshots of the Dell Inspiron 5570 specifically for this instructable, so my original hard drive is a 5400 rpm 1 TB disk, and the SSD that I've added is a 360GB M.2 SSD.
The Plan
)
We're going to clone all partitions of a hard drive to an M.2 SSD module, including the bootable Windows partition. I'll use a free program called Macrium Reflect to perform the clone. My intent is to use the SSD module as my boot drive, and to use the slow 5400 rpm hard drive that originally came with the laptop as a secondary drive.
Understand that we're going to clone the entire disk as Dell gave it to us, so that includes all the programs, drivers, and all the shovelware that Dell has installed. Now if you want to remove certain programs before performing the clone, that's up to you.
If you wish to view the optional video guide, I have included it here.
Assumptions

- I assume you are installing a brand new SSD in your laptop (which has not been initialized).
- To clone a hard drive to an SSD drive, the used space of the source hard drive must be smaller than the total space of the destination. After all, the existing data must fit inside the capacity of the new SSD. If the used space of the source hard drive is larger than the SSD, you will need to uninstall some programs and/or offload some data to an external drive.
- I will assume that the size of the new SSD is smaller than the hard drive (e.g. you install a 360 GB SSD in a laptop that has a 1TB HDD).
- I assume that you know how to enter the BIOS and change the boot sequence of drives.
- For screenshot purposes, I assume you have Windows 10 (though other recent versions of Windows should work fine).
- The steps below assume that you have already installed the SSD in the laptop, and you have booted and logged into Windows on the HDD.
Download Macrium Reflect Free
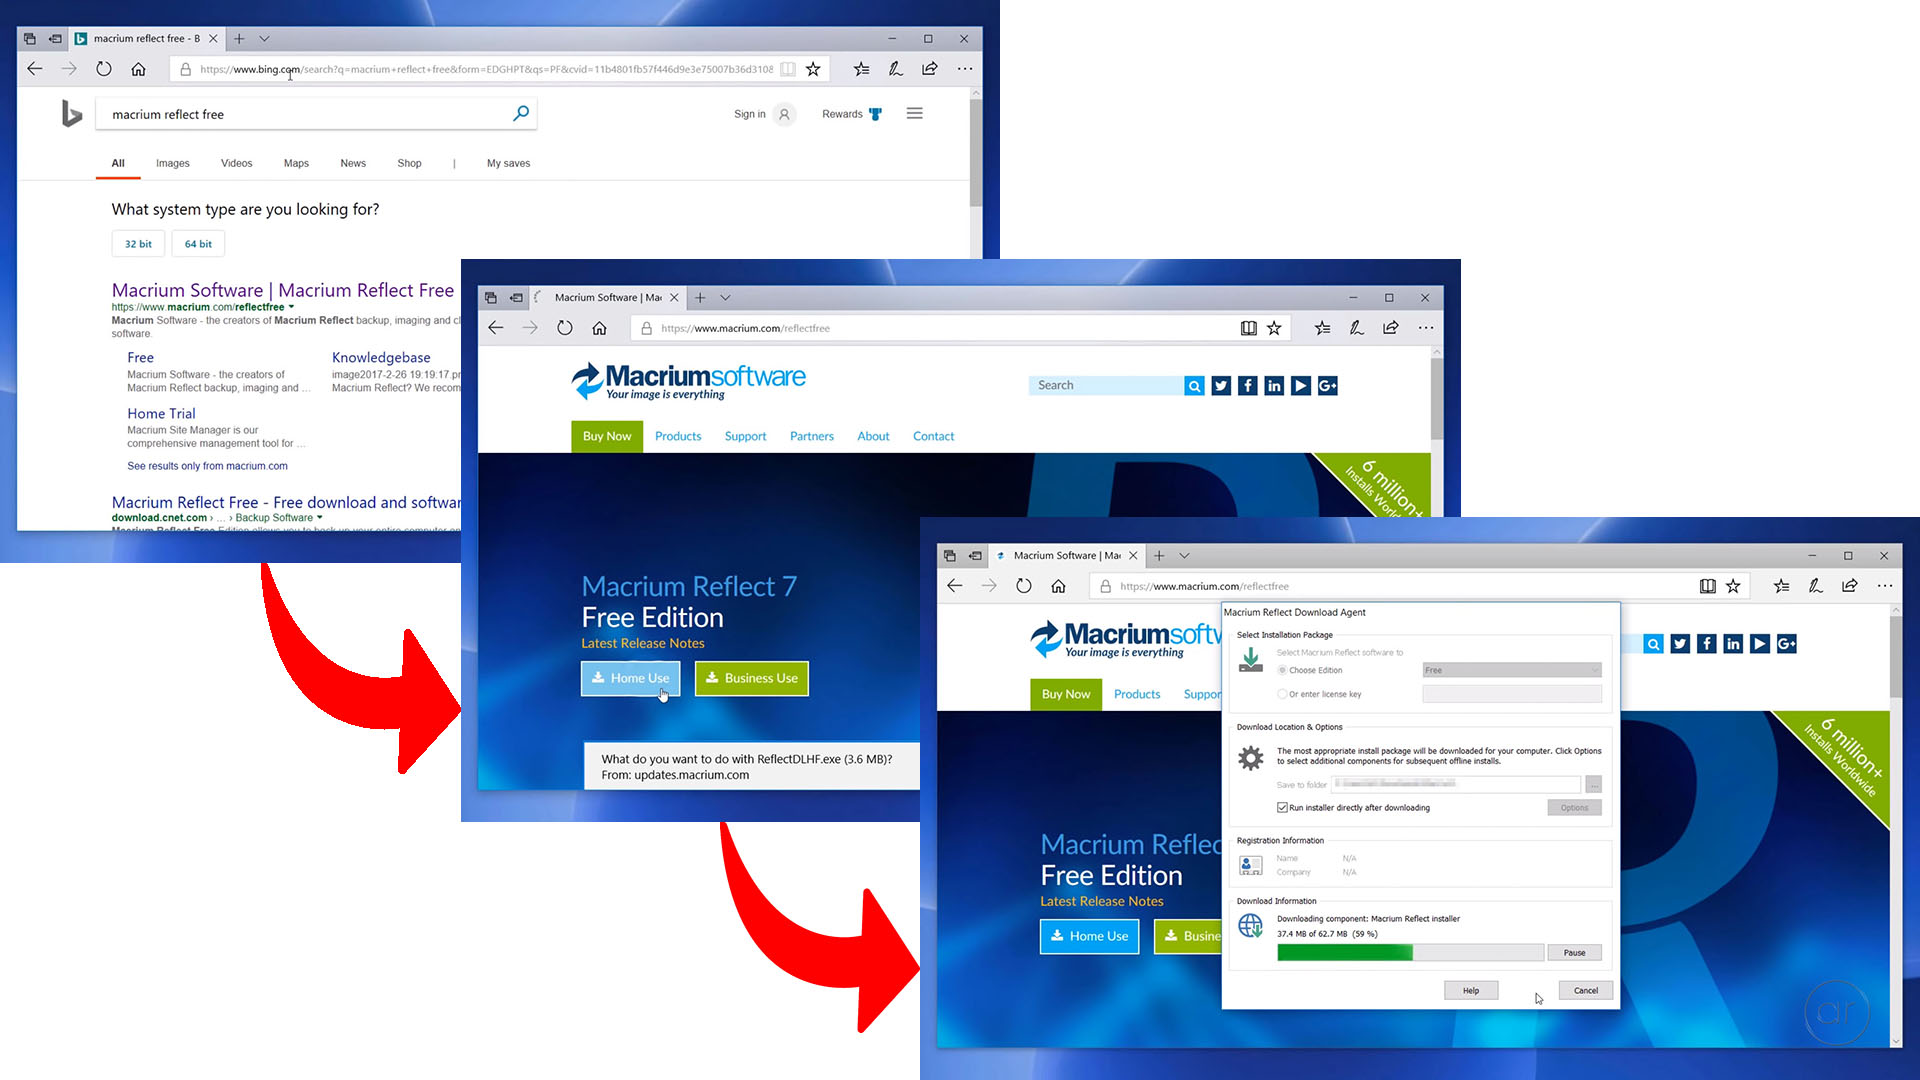
Let's start by searching for "Macrium Reflect Free" in the web browser, which should return Macrium's website for their free version. Download the version for "Home Use" and click Save. This a relatively small file, which is just a download manager stub that retrieves a larger installer later on.
Click the Run button - and using the defaults, hit the Download button, after which the installation process starts.
Run the Install Wizard
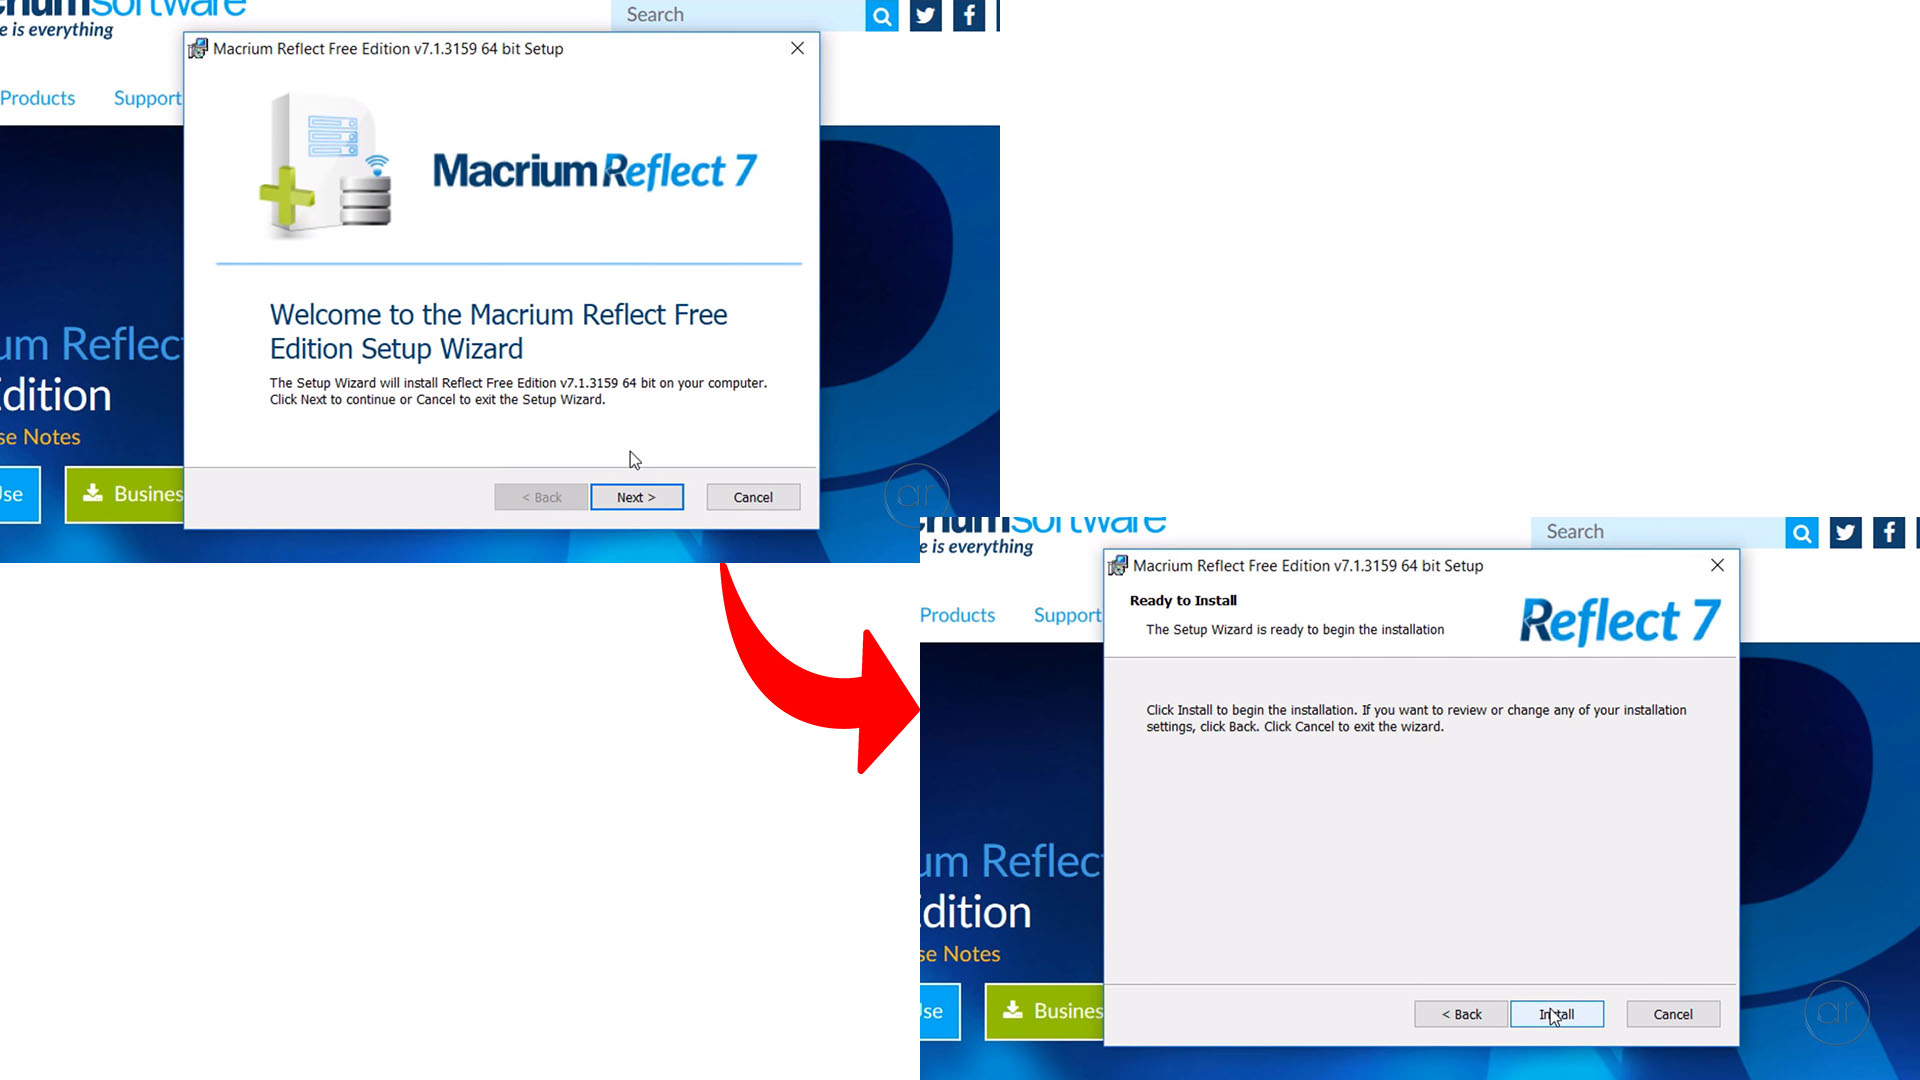
Clicking Next installs the first component, which is the pre-installation environment - or the PE components for Windows. After that, it launches the setup wizard for Macrium Reflect. After stepping through the wizard, click Install.
Launching Macrium Reflect Free
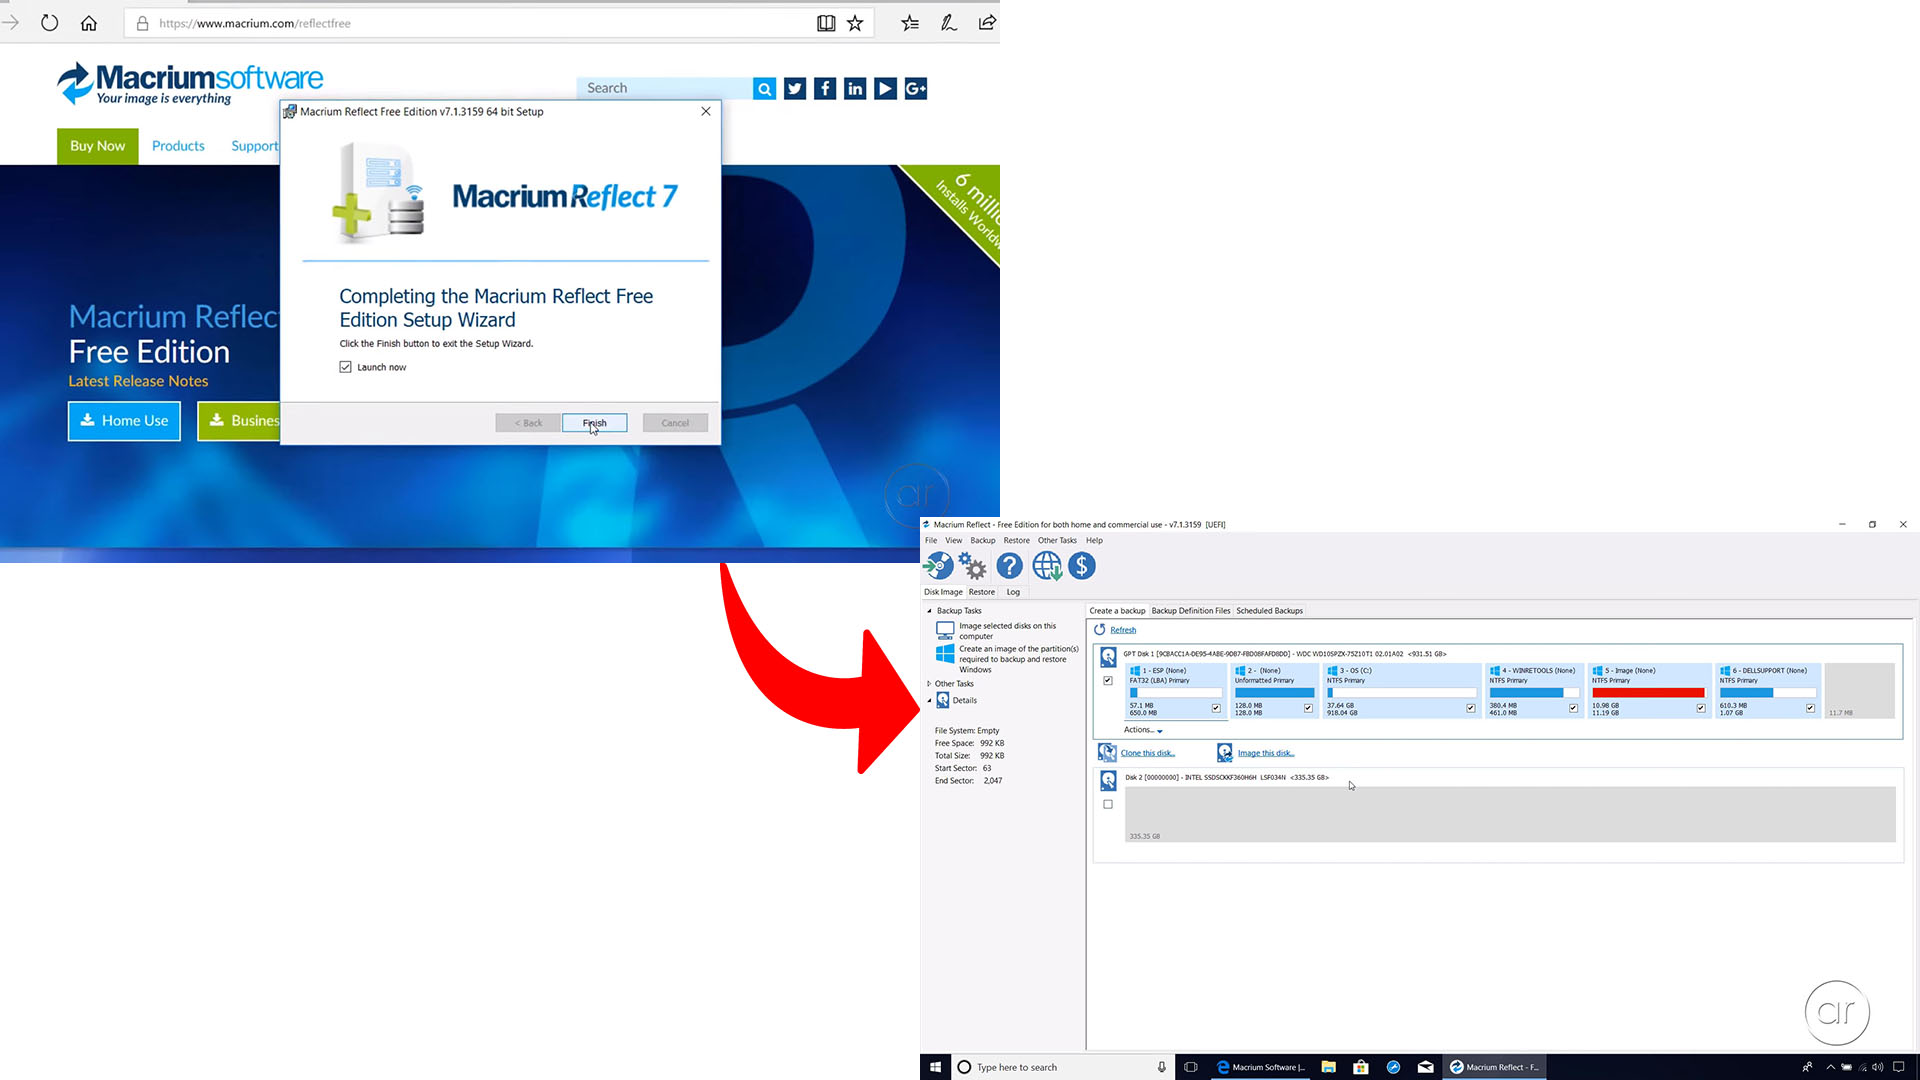
After the installation is complete, click the Finish button, which launches Macrium Reflect.
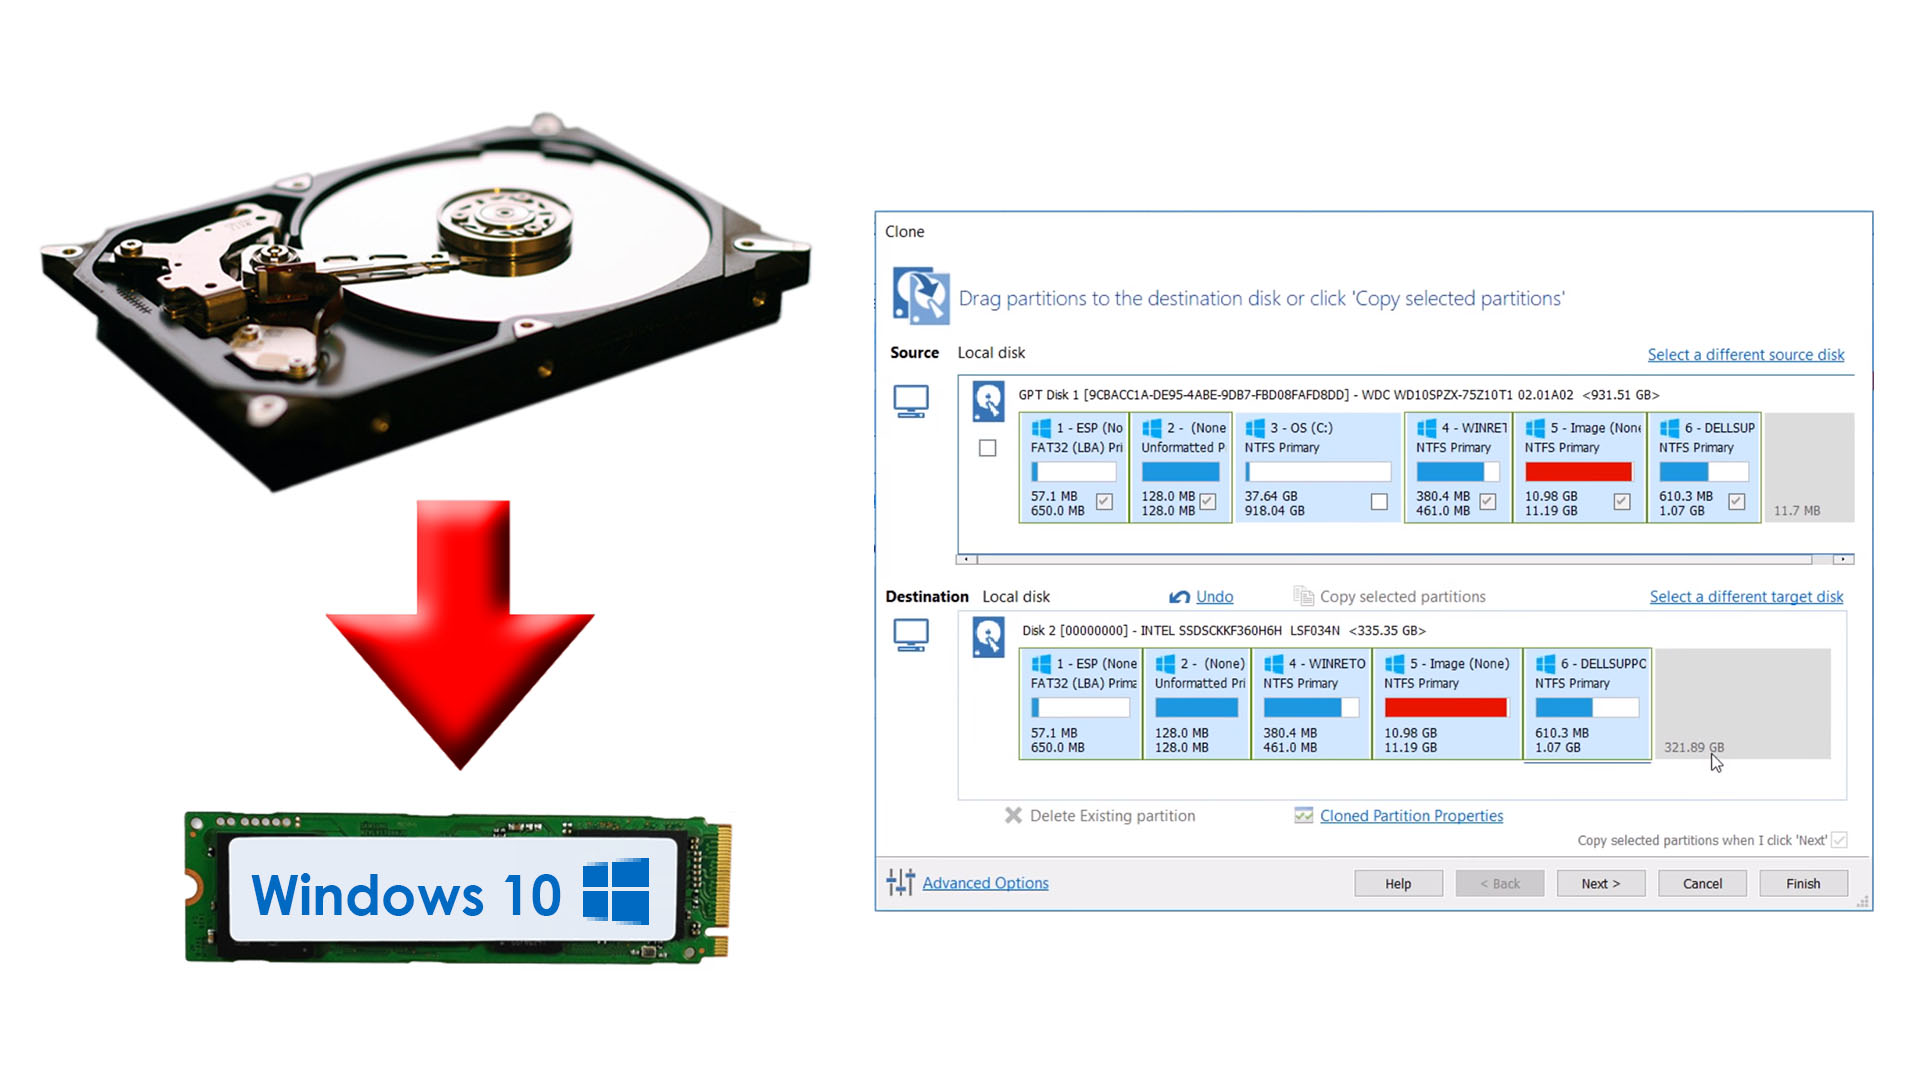
What we see here is Disk 1, which is the slow 5400 rpm 1 TB drive. The plan is to clone all six partitions over to the new drive, labeled Disk 2, which is our SSD.
Create a Rescue Disk
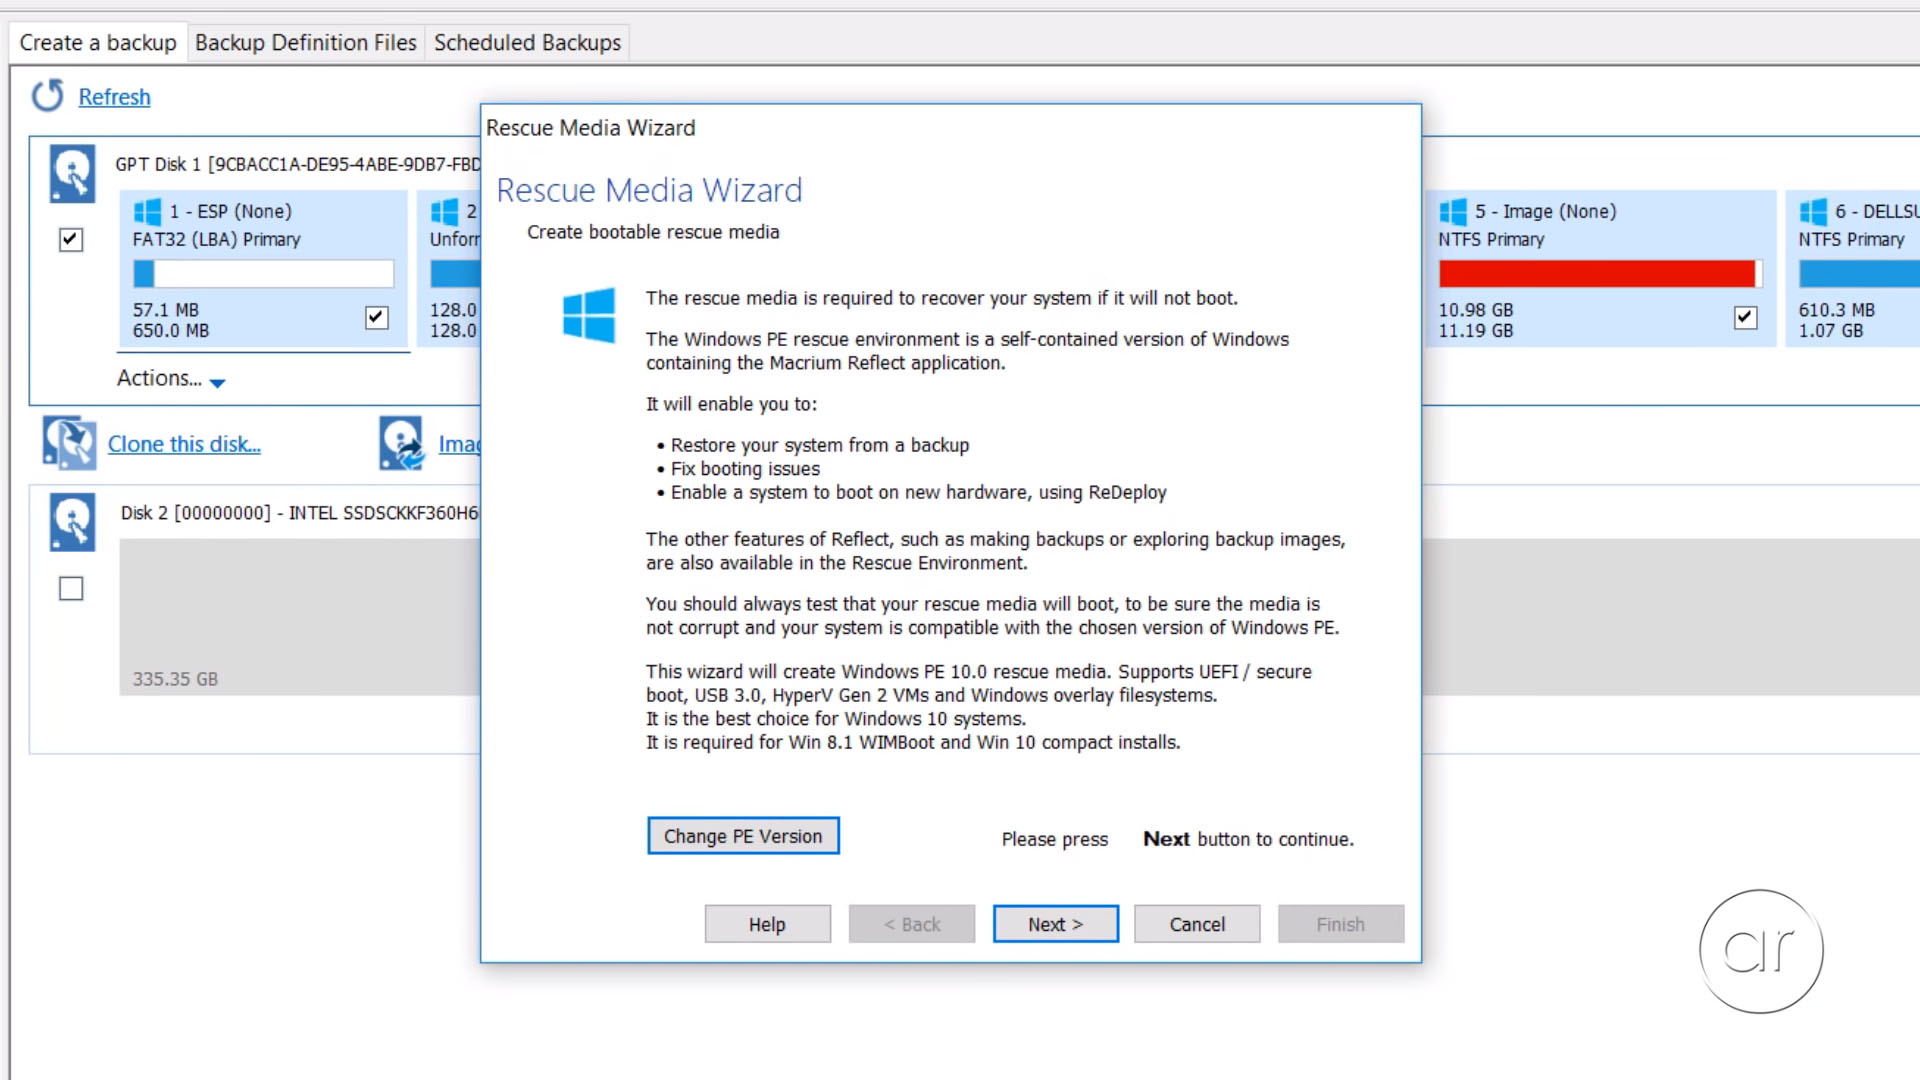
Before we perform the clone, I highly recommend that you create a rescue disk by going to Other Tasks -> Create Rescue Media from the menu - just in case something fails. I'm going go through the steps of creating it because I don't want you to be stuck without a Windows boot disk. This actually saved me once as I was deleting partitions that I shouldn't have been touching.
Complete the Wizard for the Rescue Disk
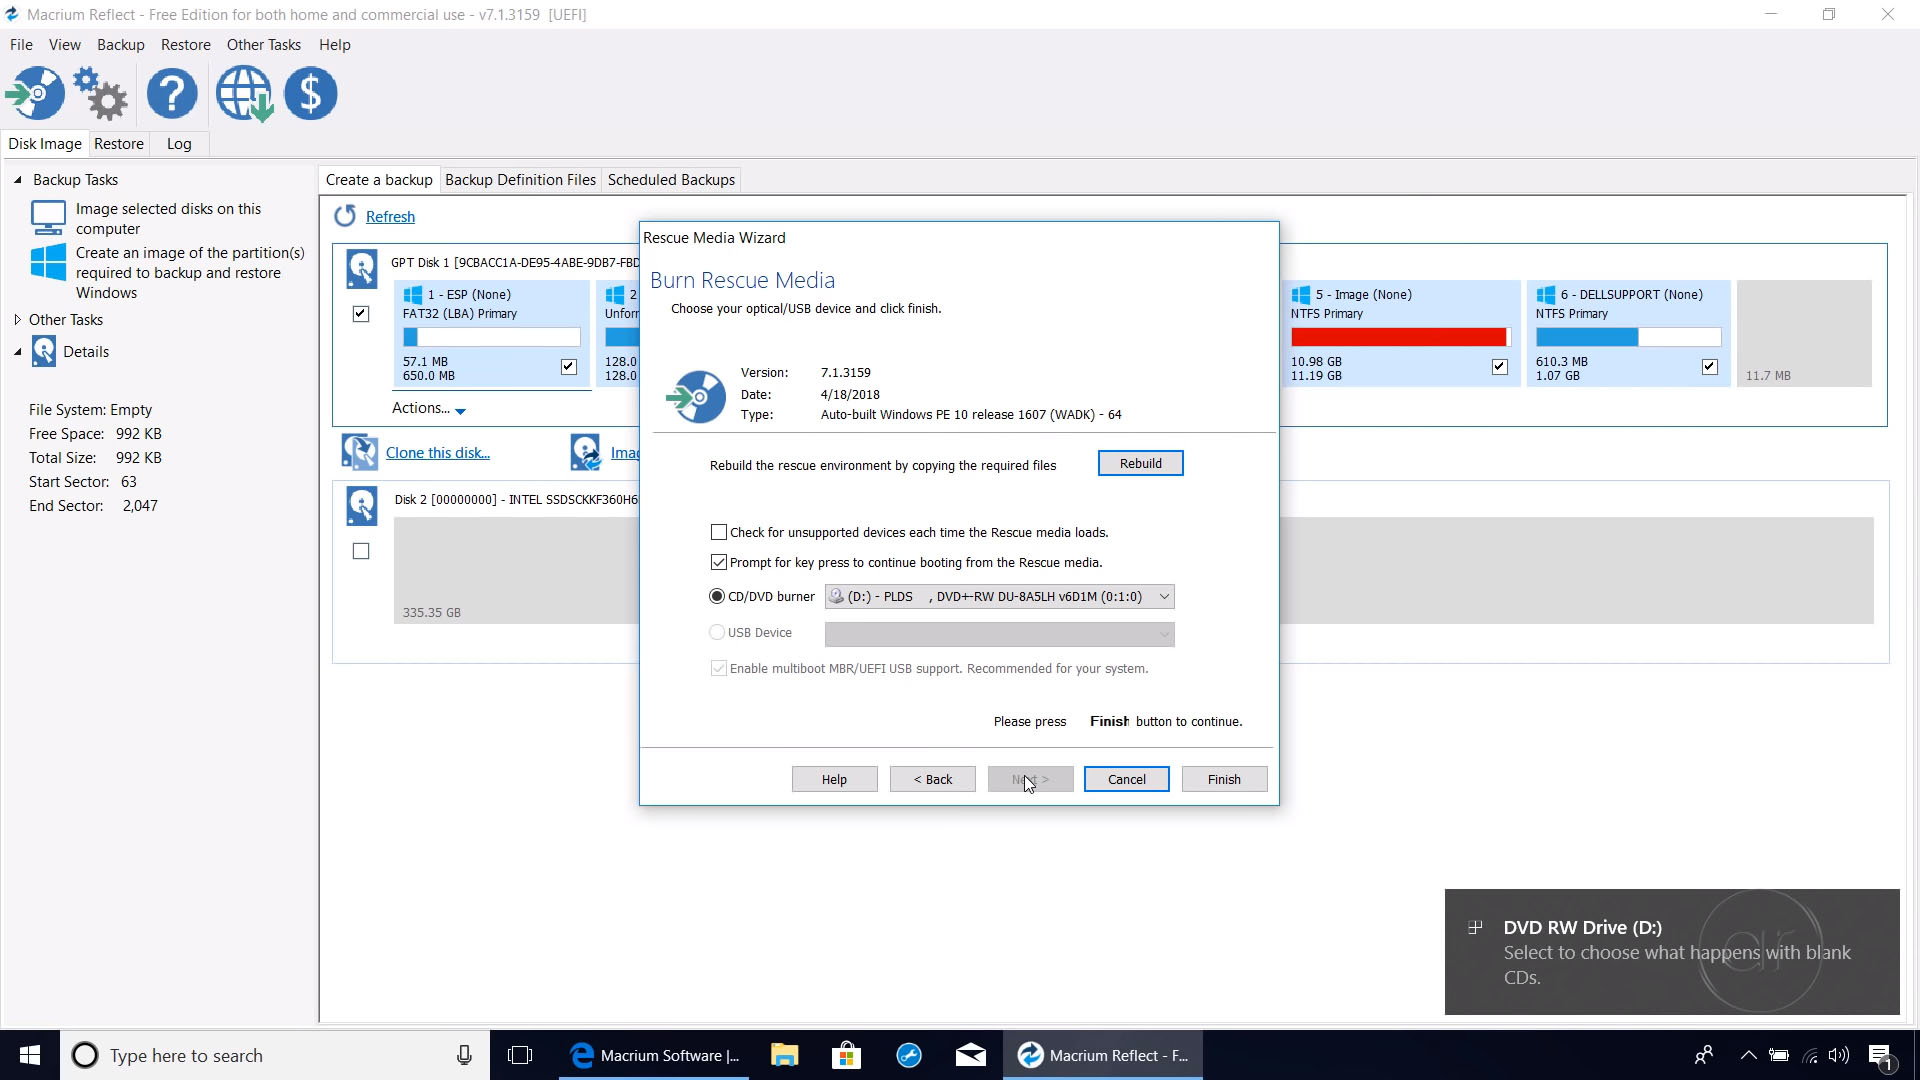
Accept the defaults for the wizard until you reach the step for writing the media. You'll need to provide either a USB drive, or a blank CD or DVD - after which you click Finish. Once the media has been written, eject it and keep it in a safe place
Clone the Disk
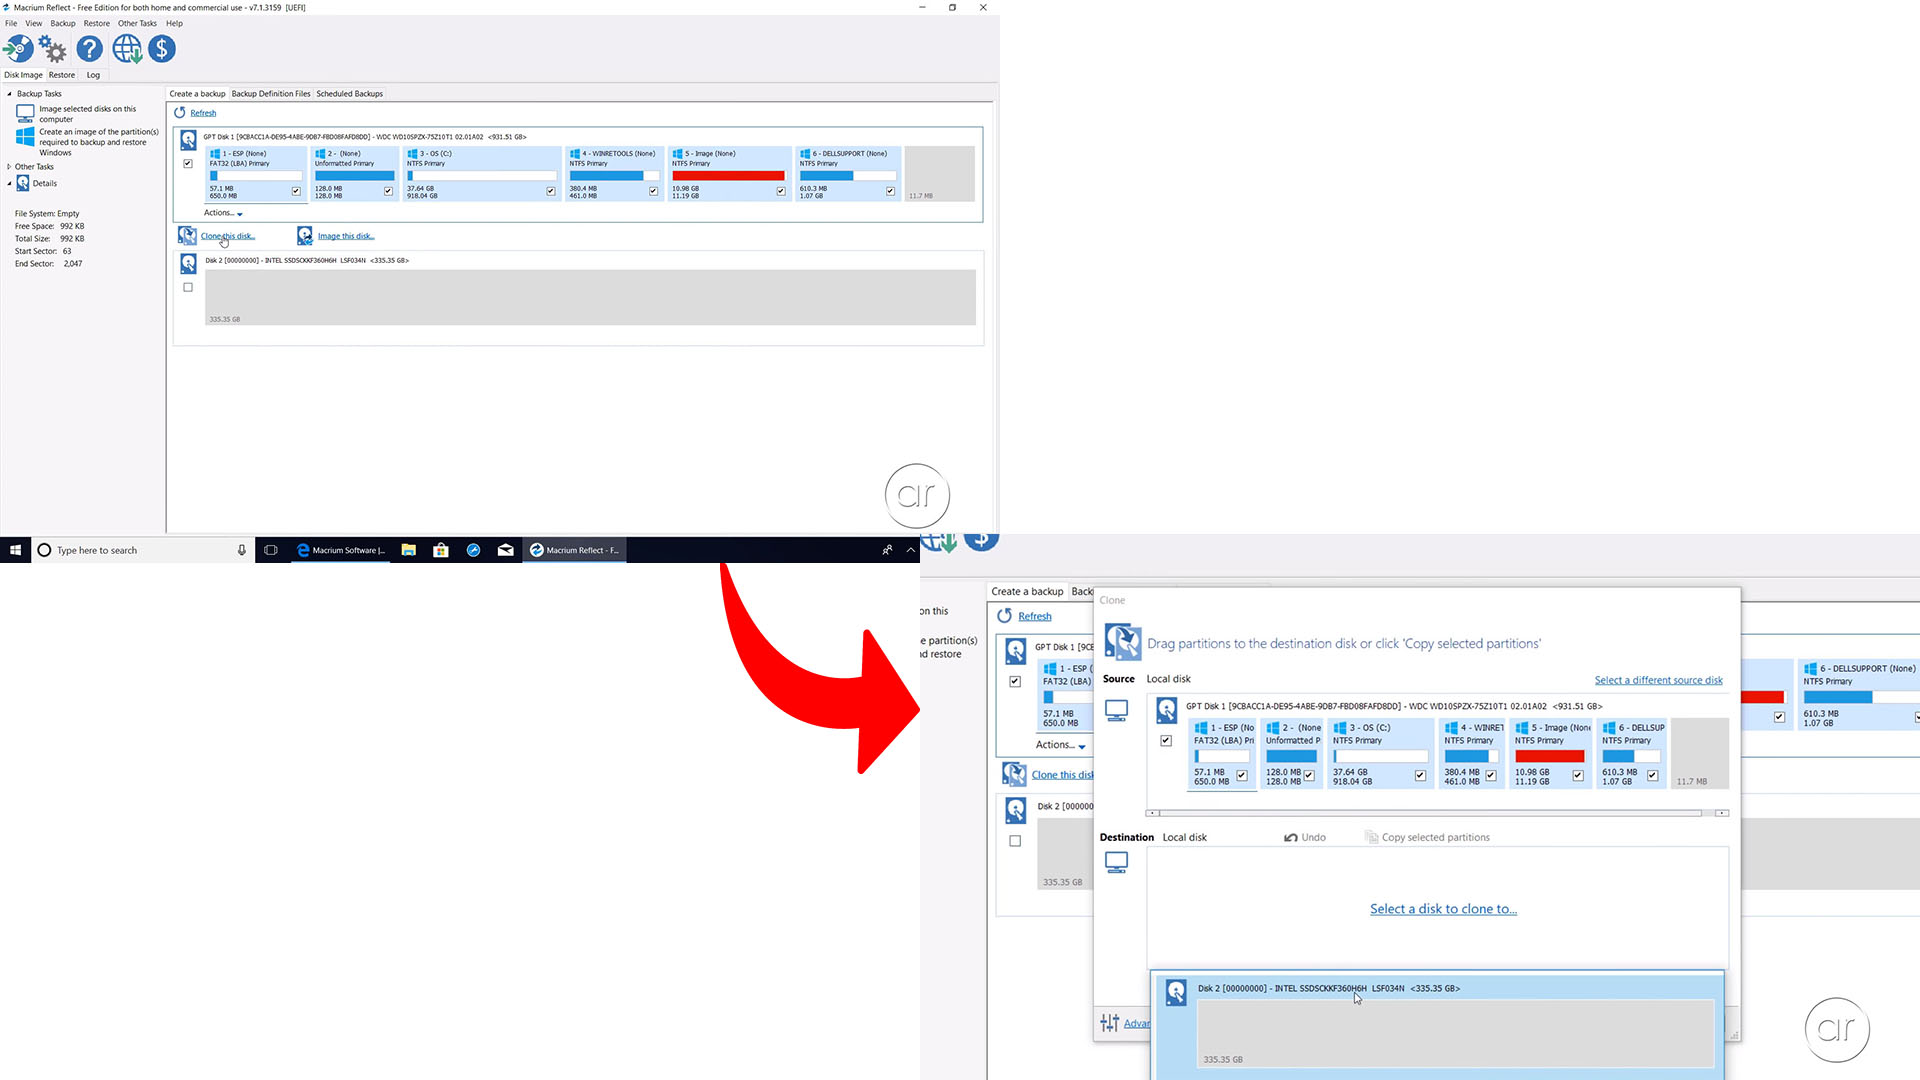
The next step is to clone from the 1TB hard drive to the SSD. Click "Clone this Disk" and then Select a disk to clone to - which of course is the SSD.
The problem is that the source drive is 1TB, while the SSD is only 360GB, so we won't be able to do a bit-by-bit clone to the SSD. You'll notice that we have six partitions, the largest being the third one, where Windows resides. All the others are in the MB or low GB range, so by comparison, they're negligible in size. It's kind of misleading because the boxes representing the partitions aren't to scale.
Drag the Smaller Partitions First
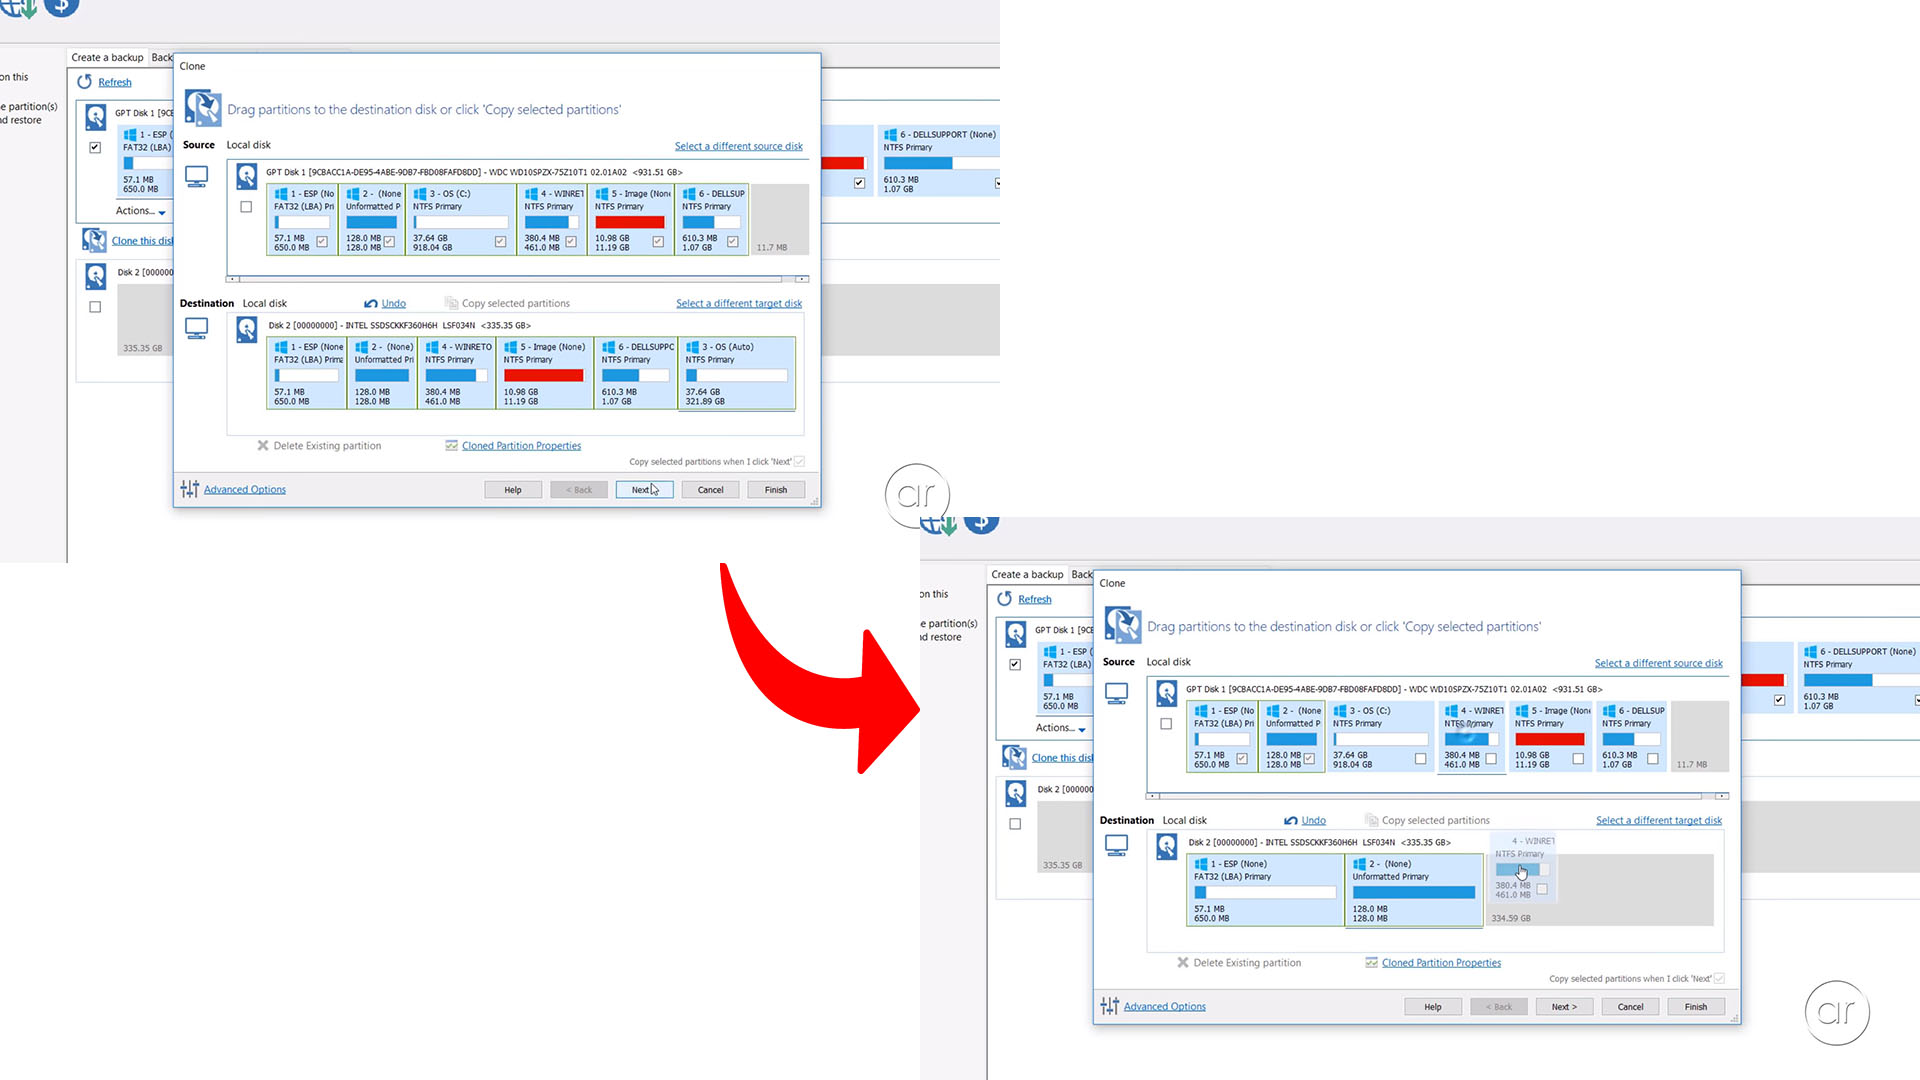
We'll start by dragging and dropping the smaller partitions into the Destination box. By doing so, we're leaving the remaining space for the final partition. When I drag that down, it'll automatically resize it to fit - in my case, from 918 GB down to 321 - using up all space in the SSD. We can now click Next.
Scheduling Not Necessary
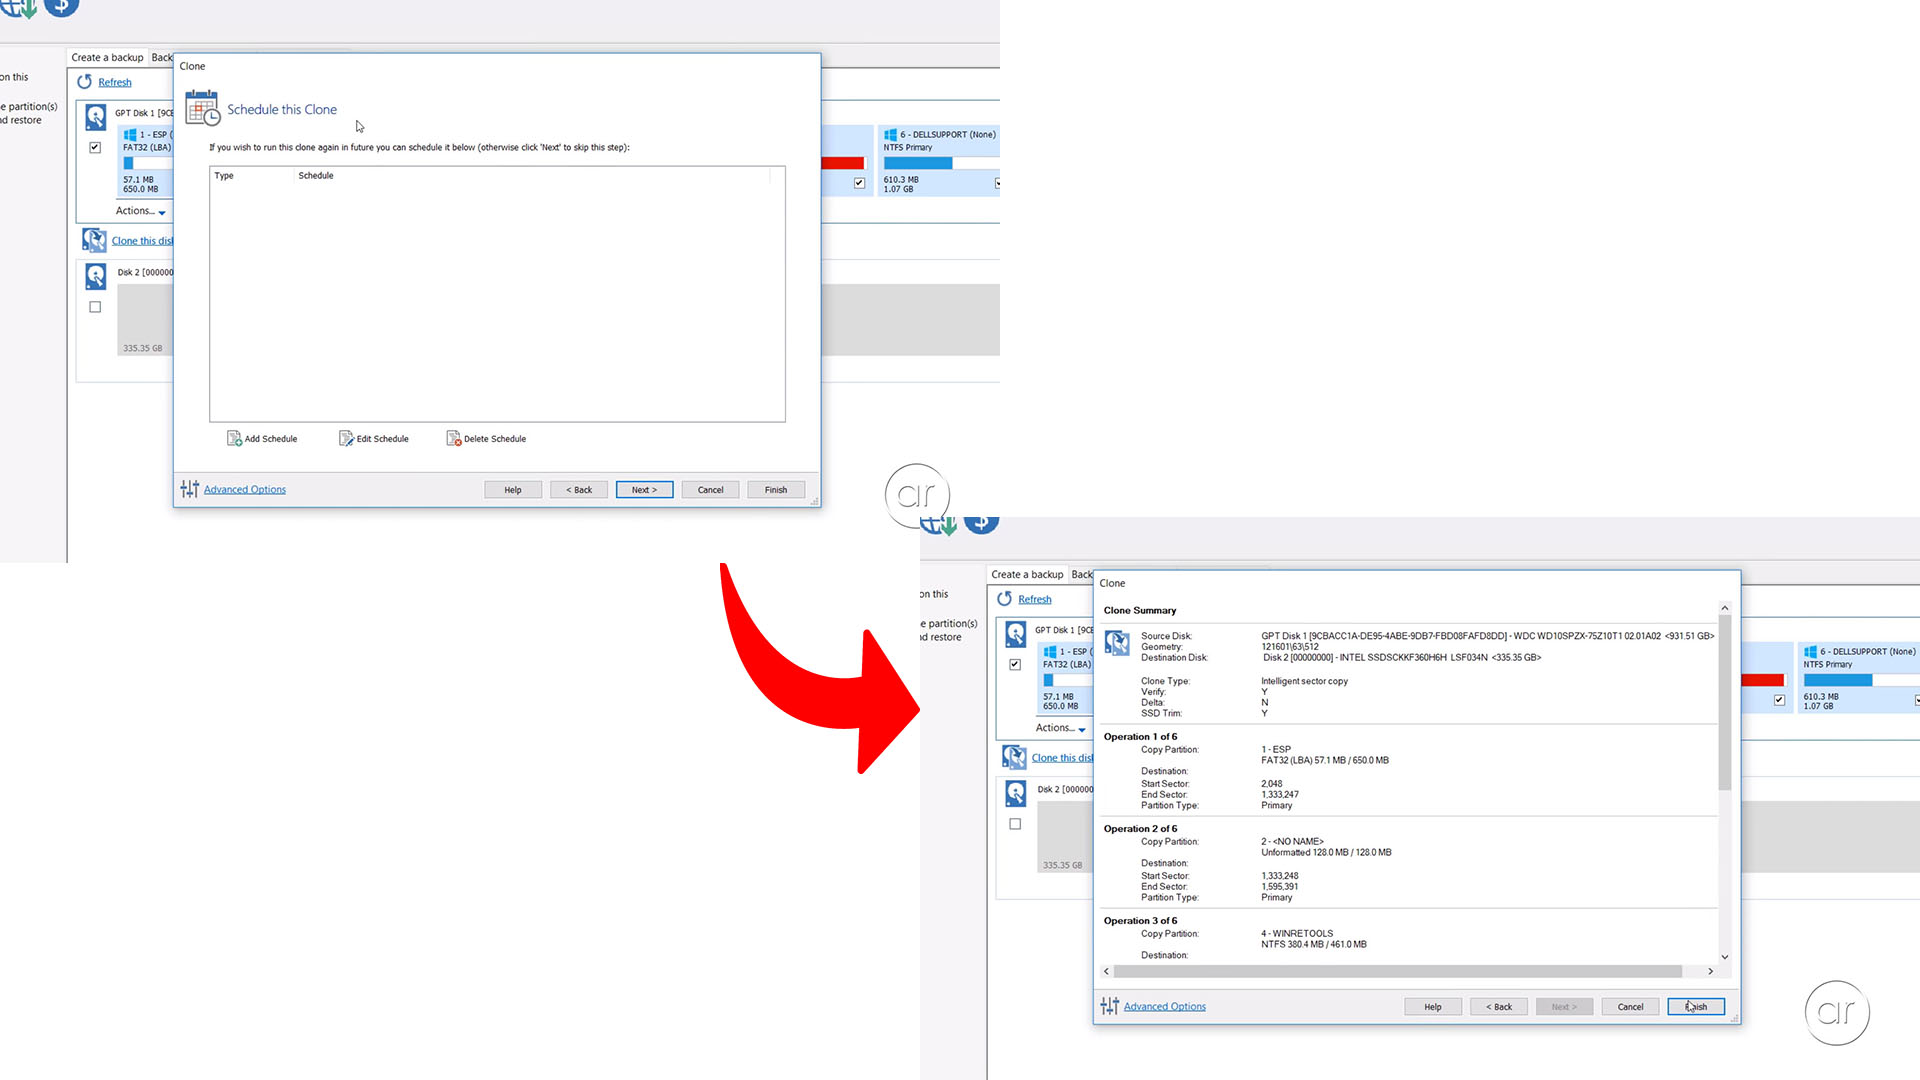
You use this screen if you want to schedule the clone on a regular basis. But for us, this'll be a one-time operation so we can skip it. After reviewing the summary, let's click Finish.
Start the Clone
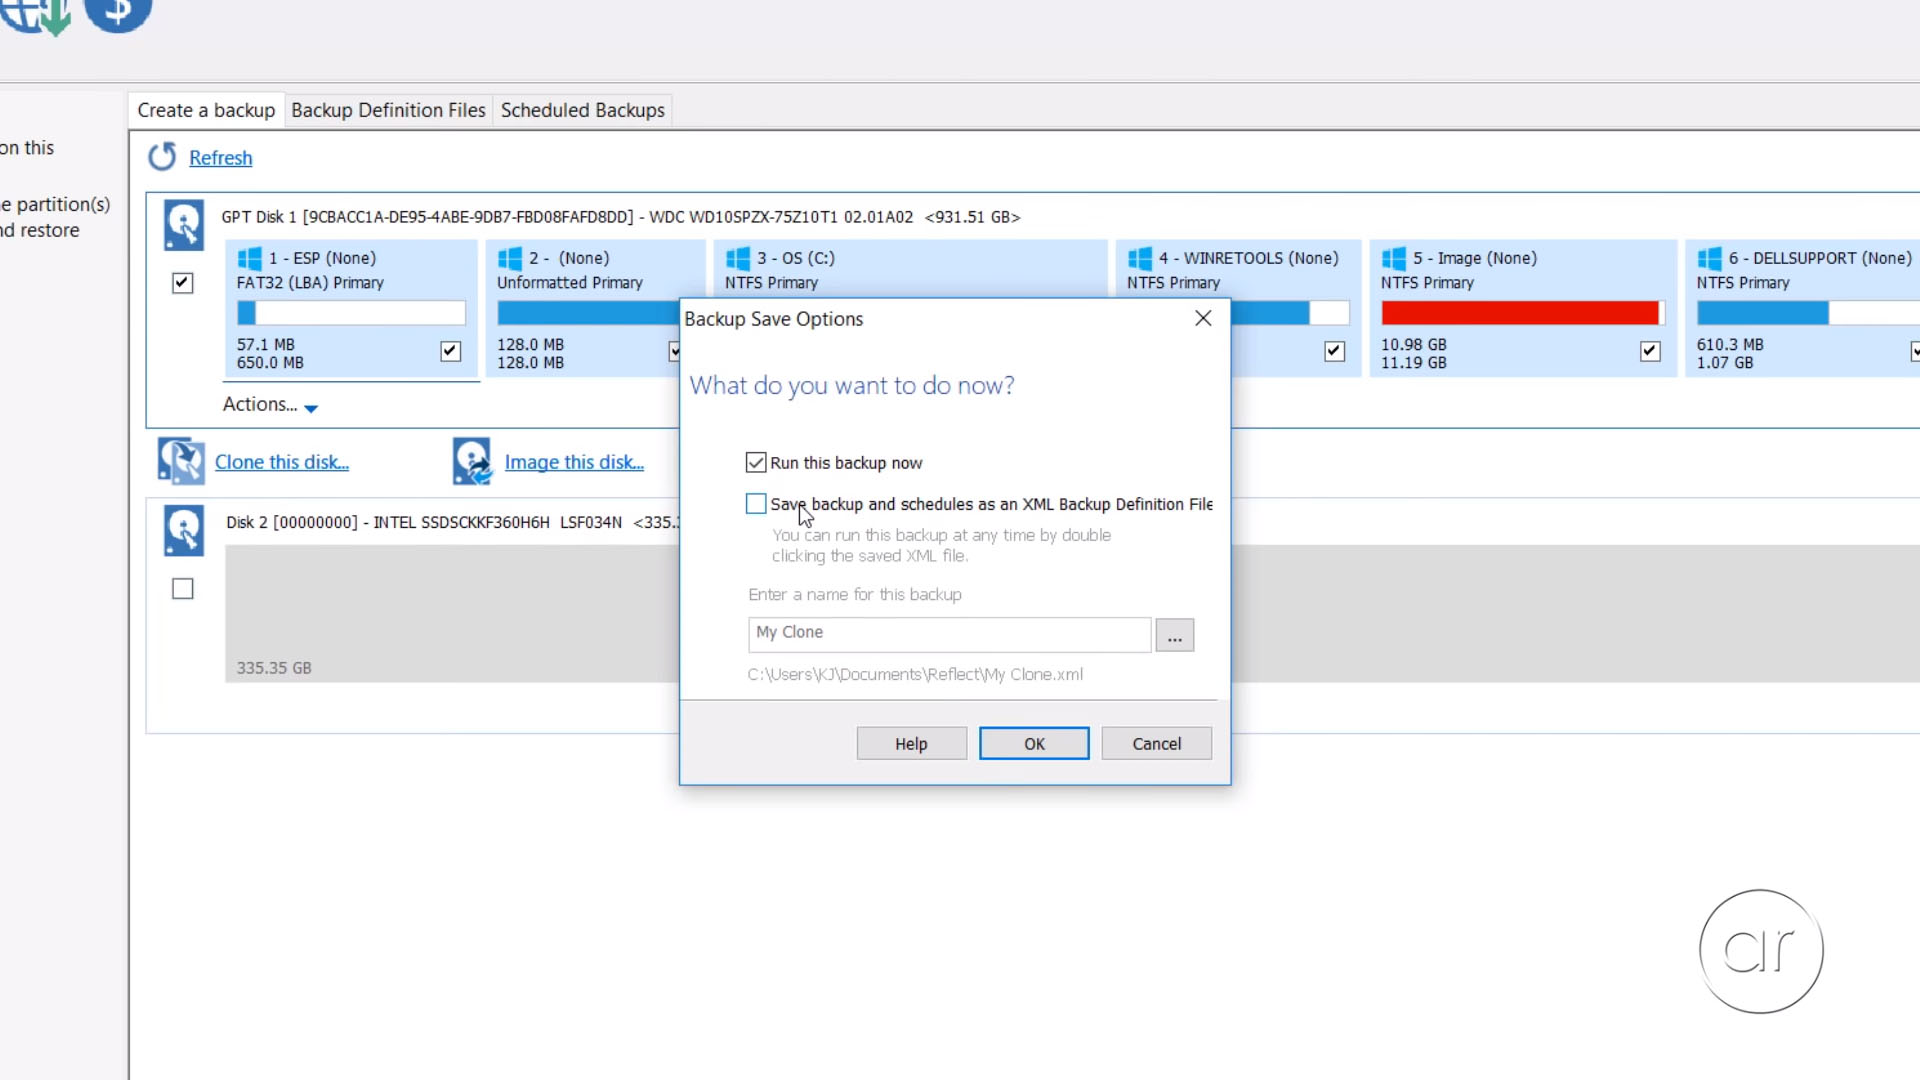
We do want to run the backup now, but there's no need to save the backup as an XML, since again, we're only doing this once. Let's click OK. This starts the cloning process.
Verify the Clone
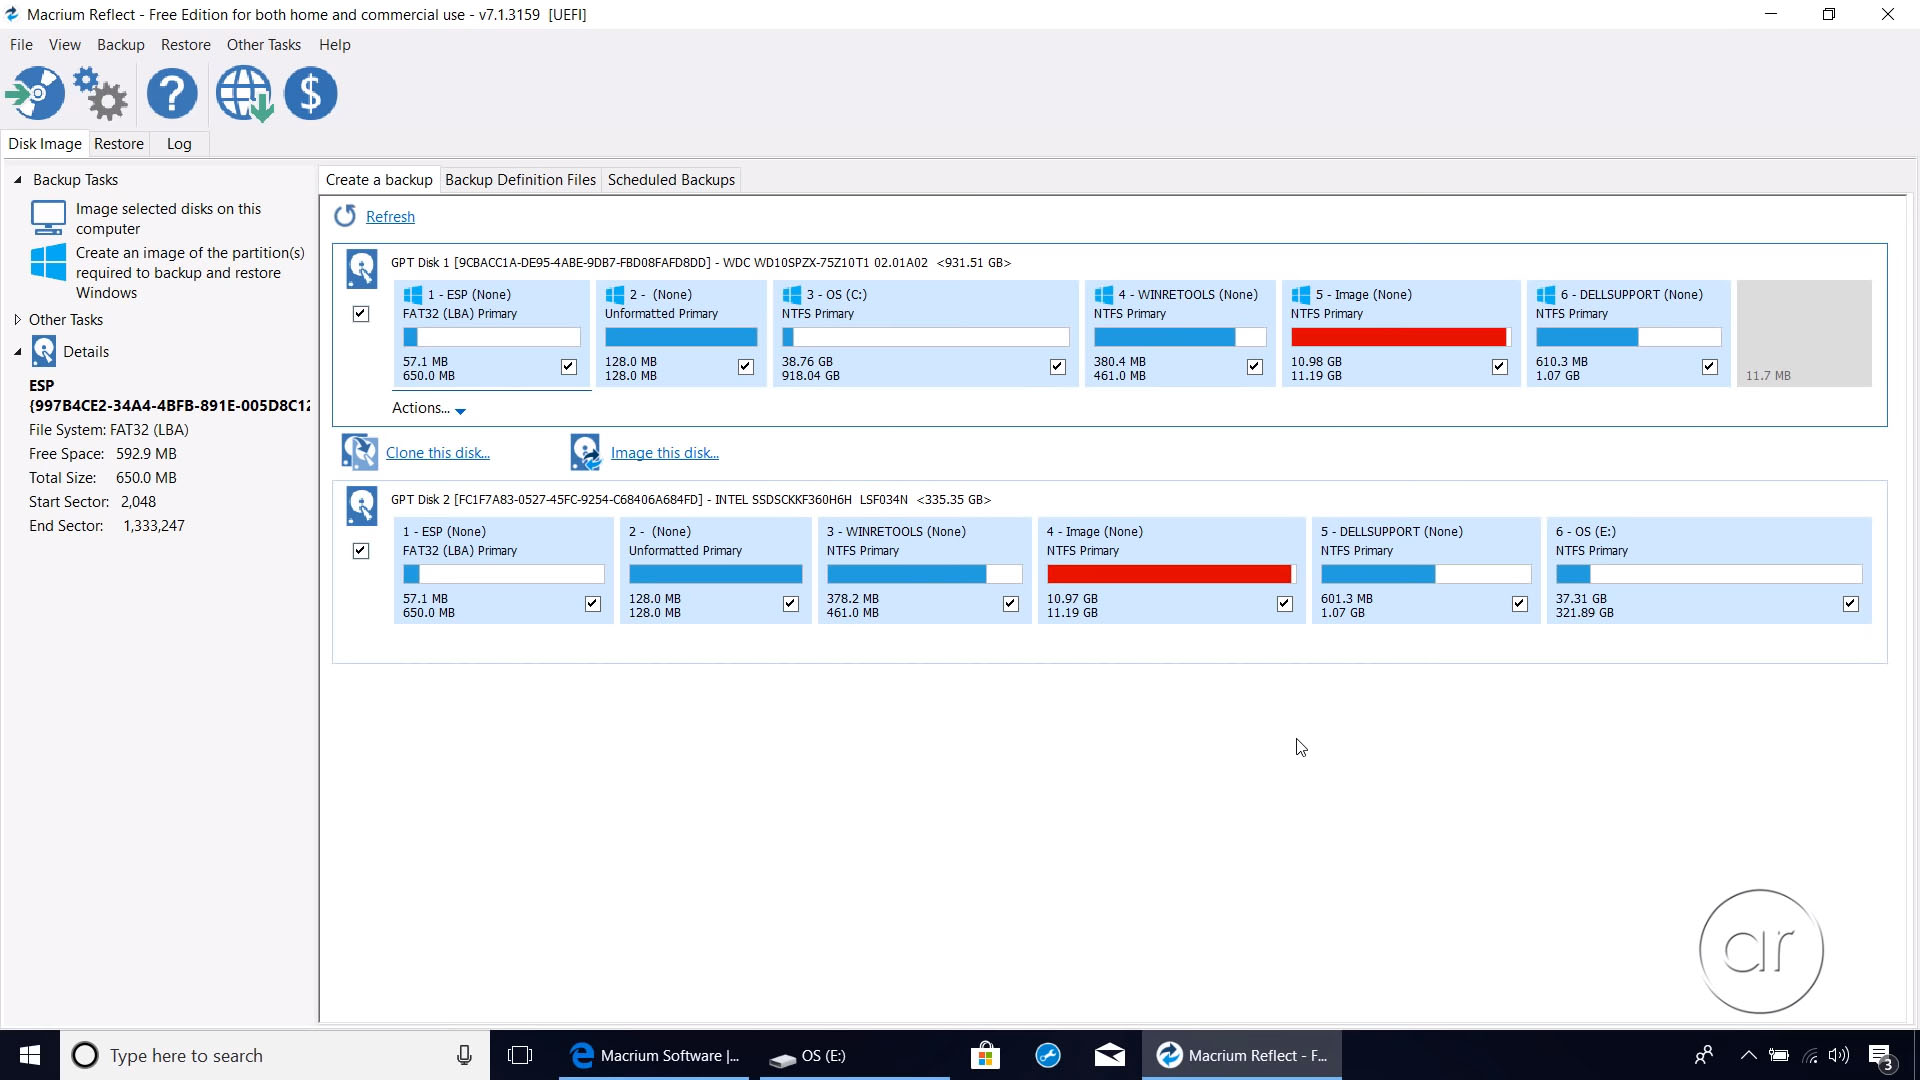
If the clone is a success, close the dialog boxes to verify that we have all six partitions copied over to the SSD.
Restart the Laptop and Enter the BIOS
Now, all we need to do is swap these two drives, so let's go ahead and restart the machine.
When the Dell icon shows up, you'll need to press the F2 key to enter the BIOS. For other laptops, you will need to refer to your manufacturer to see what key to press for the BIOS screen.
Change the Boot Sequence
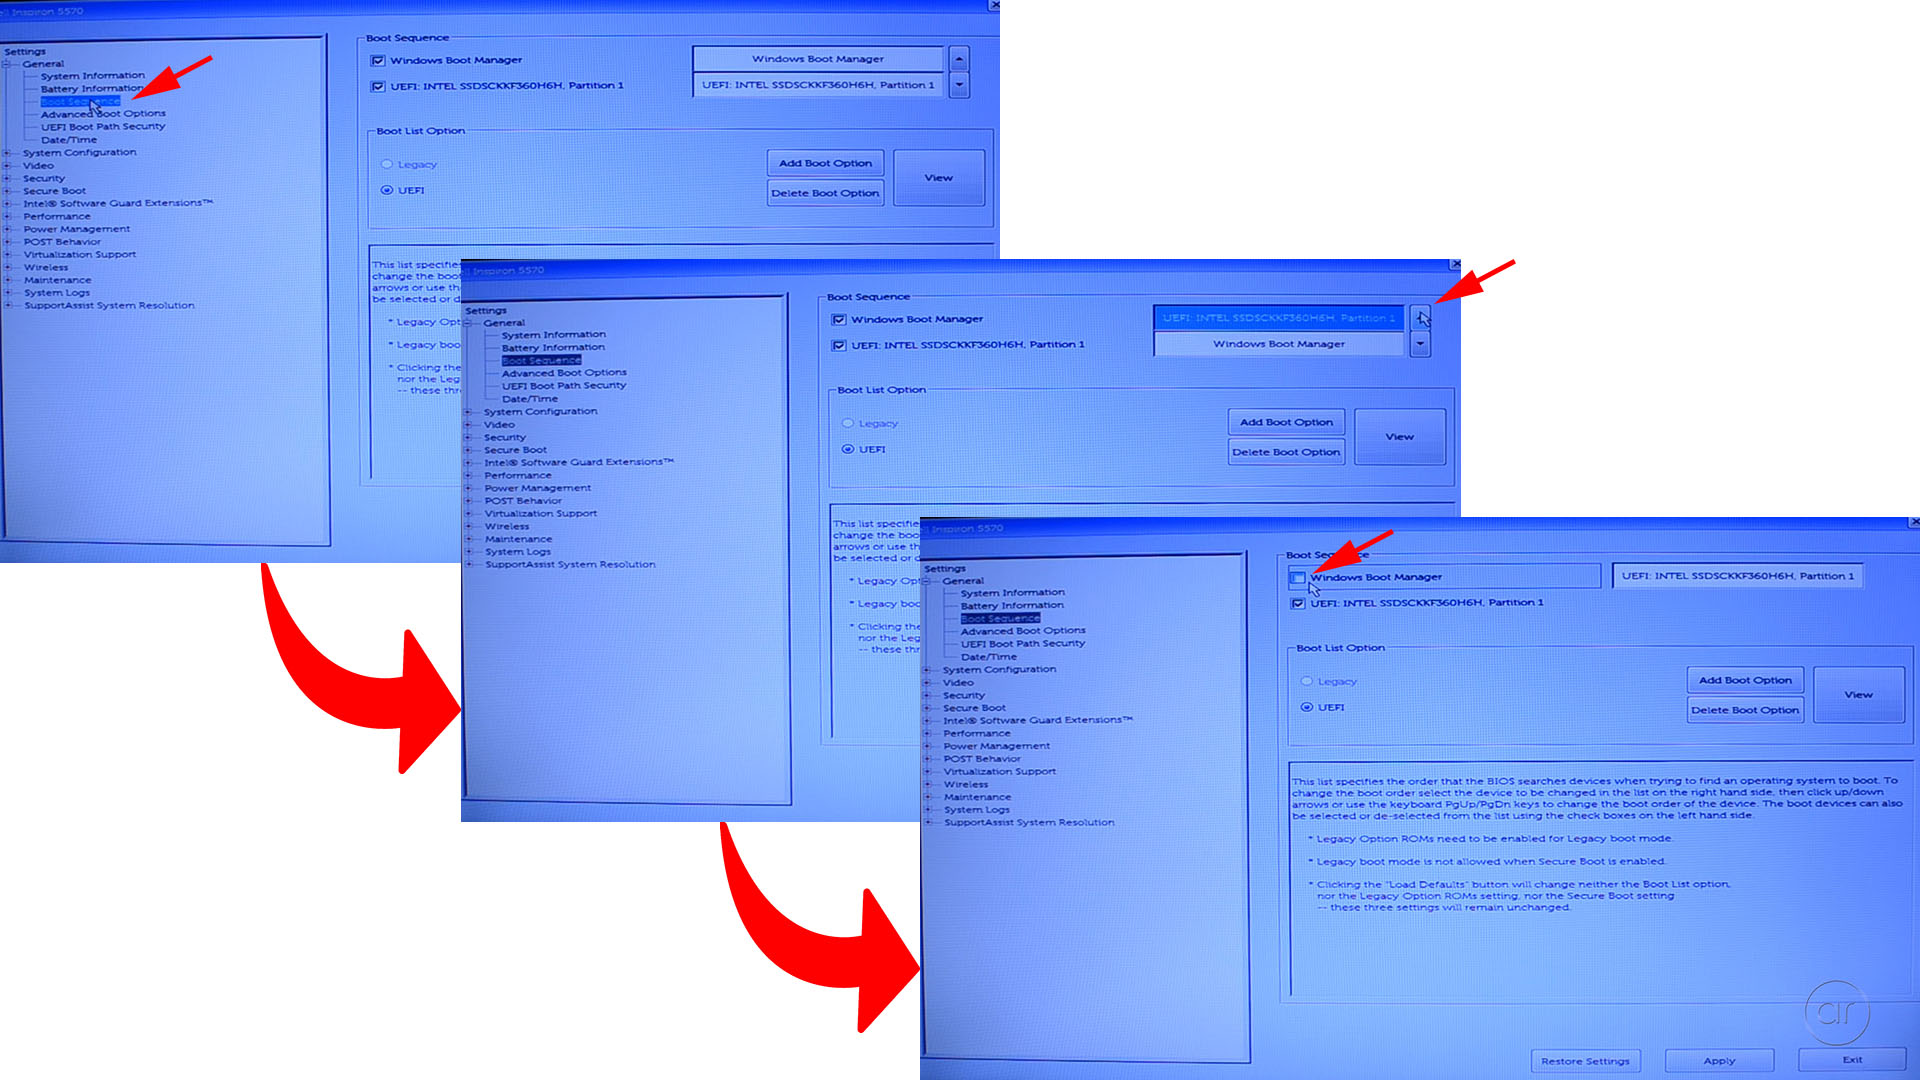
The section for Boot Sequence will again vary depending on the manufacturer of your laptop, but for the Dell, all you need to do is click on Boot Sequence, which shows that the SSD is the second device in the boot order. What you'll want to do is click on the SSD selection, and use the up arrow to move it into first place. In fact, to make sure that the SSD is the ONLY device that we can boot from, go ahead and deselect the Windows Boot Manager.
Note: In the video, I also disable the hard drive, but this is an optional step. I only do this to prove that the SSD is the ONLY drive I can boot from.
Save Changes and Reboot
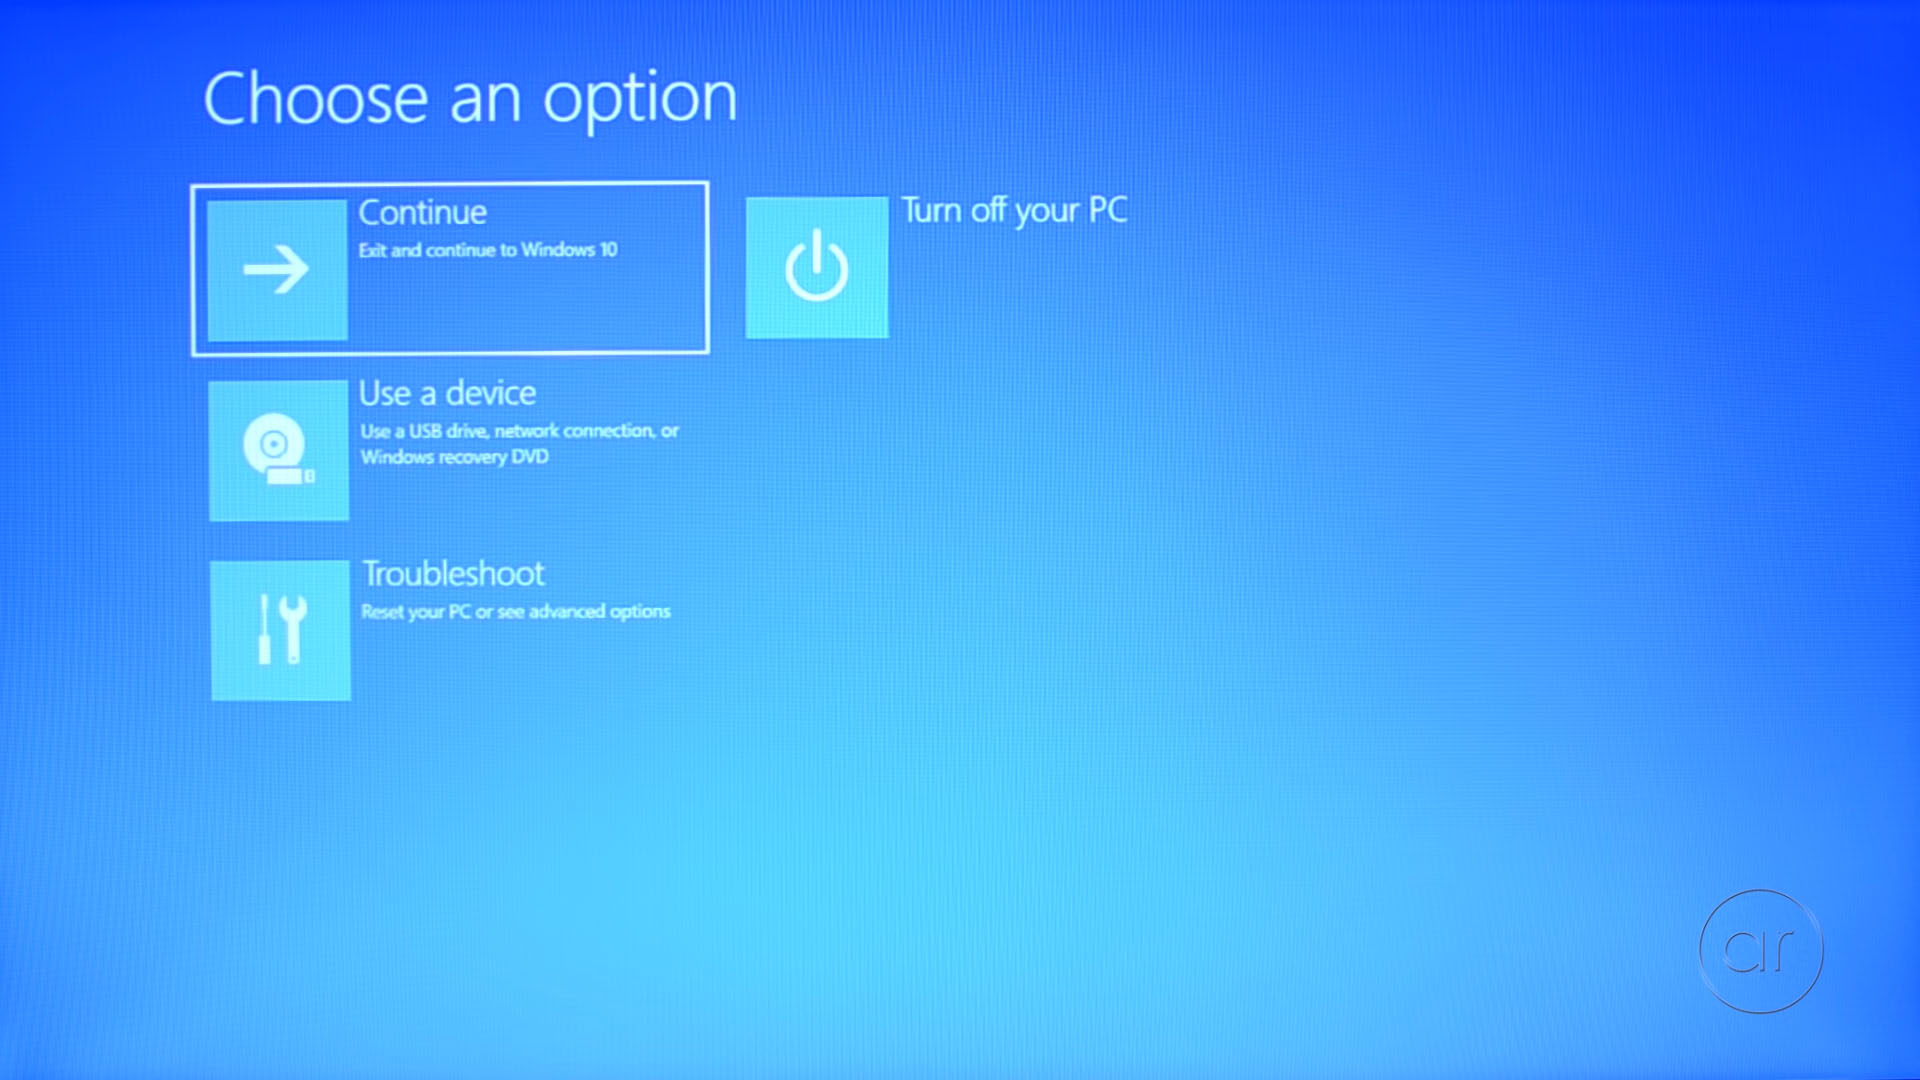
Apply the changes, Save as Custom User Settings, click OK, and then Exit - which will reboot the machine. When it first starts, you may see this screen. This is the only time you should see it - you won't see it again upon subsequent reboots. What you'll want to do is click Continue in order to boot into the SSD.
Boot Into Windows
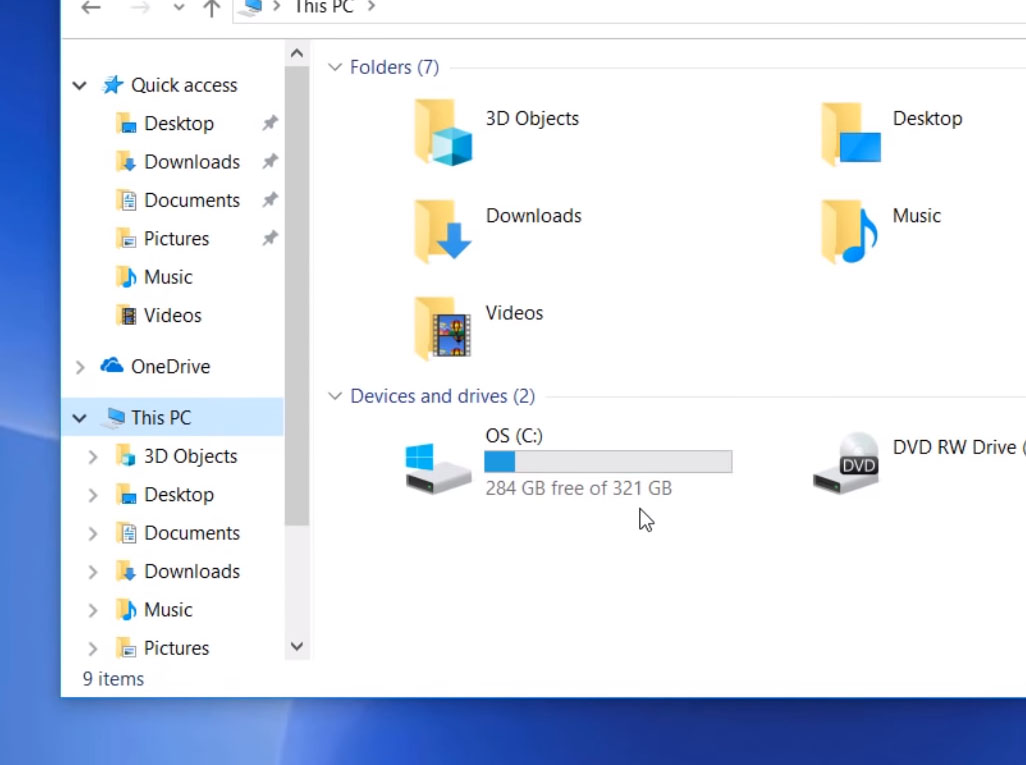
If you start Windows Explorer, you will see the C drive as 360 GB - and it is indeed booting from the SSD. The older drive should appear as the D drive, which can then be used as a secondary storage drive.
Final Words
Before you start deleting partitions or files from the slower drive, make sure to successfully boot from the SSD often, and over some period of time. Either that, or make sure you create an image of the original disk before erasing it. And always keep the rescue CD handy just in case you need it in the future.
In general, it's always best to install Windows from scratch - you lose all the bloatware from your laptop manufacturer, though you may need to keep a record of your product key depending on the laptop, and you might need to search for drivers after you install. However, there are times when a clone is helpful - in addition to the aforementioned product key/drivers, you also preserve the OEM/recovery partitions that the laptop manufacturer has set up for you, and some of the pre-installed software may be useful.