How to Build an Equatorial Mount for Long Exposure Astrophotography
by ridiculously.awesome in Workshop > Science
110985 Views, 211 Favorites, 0 Comments
How to Build an Equatorial Mount for Long Exposure Astrophotography
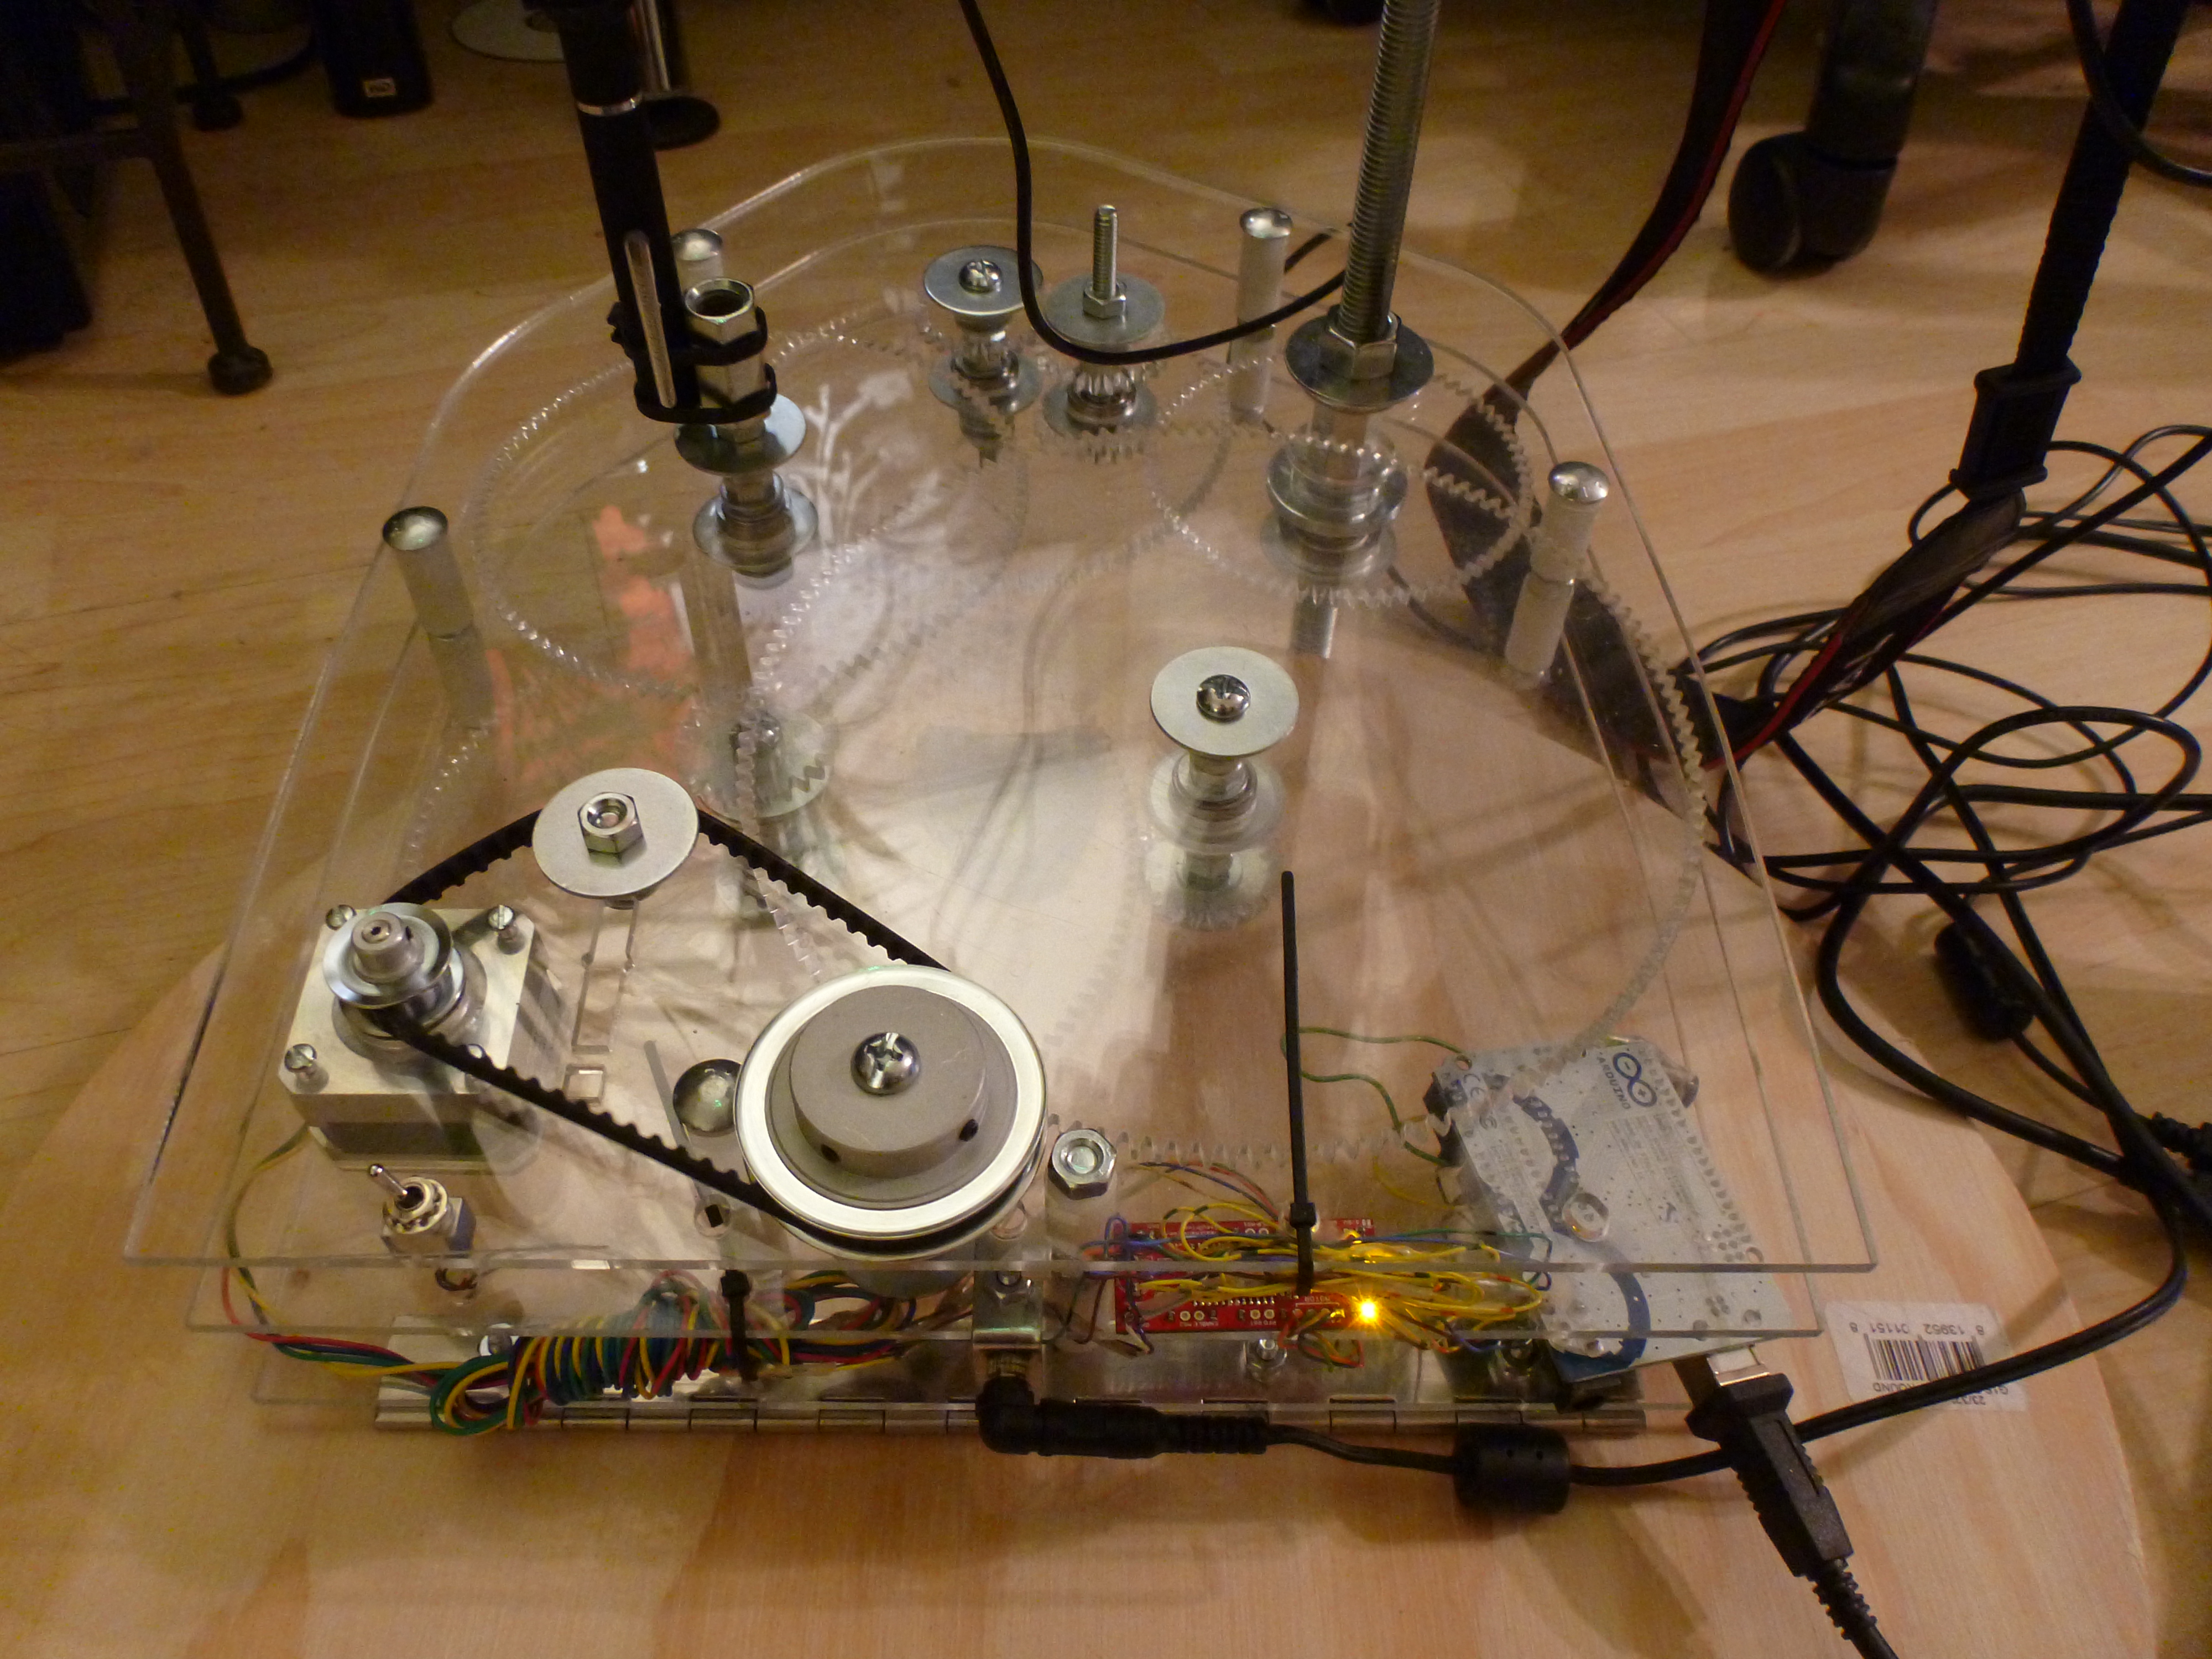
Last Fall (2011) I took full advantage of the fantastic sabatical policy where I am employed. My wife and I spent a good portion of this time driving around the beautiful American Southwest and the many awesome parks on and around the Colorado Plateau. While driving hundreds of miles in desolate landscapes the clarity of the night sky inspired me to dream up a camera mount that would rotate to accommodate the polar rotation of the planet. Any long photographic exposures of the stars with a static tripod will result in star trails--which is cool--but precludes an astrophotographer from capturing faint details in the night sky. I calculated the gear ratios in my head (over many hours of isolation) while my wife slept in the passenger seat next to me and started to dream up the other mechanical requirements to build this tool. After returning from my sabbatical and after the new year rolled over I began spending time at the San Jose TechShop where I discovered all the awesome tools that can bring musings like mine out of your head and into the real world. With the access they provide to so many otherwise difficult-to-access tools I decided to make it at TechShop (www.techShop.ws.) The laser cutter and acrylic sheet were the media and method I chose to make this dream real. I also used Autodesk Inventor, which I learned to use at TechShop, to create the mechanical system and the drawings that would drive the laser to cut the acrylic with mesmerizing precision and accuracy. This instructable describes the process and steps I defined to create this equatorial mount.
Getting Inspired

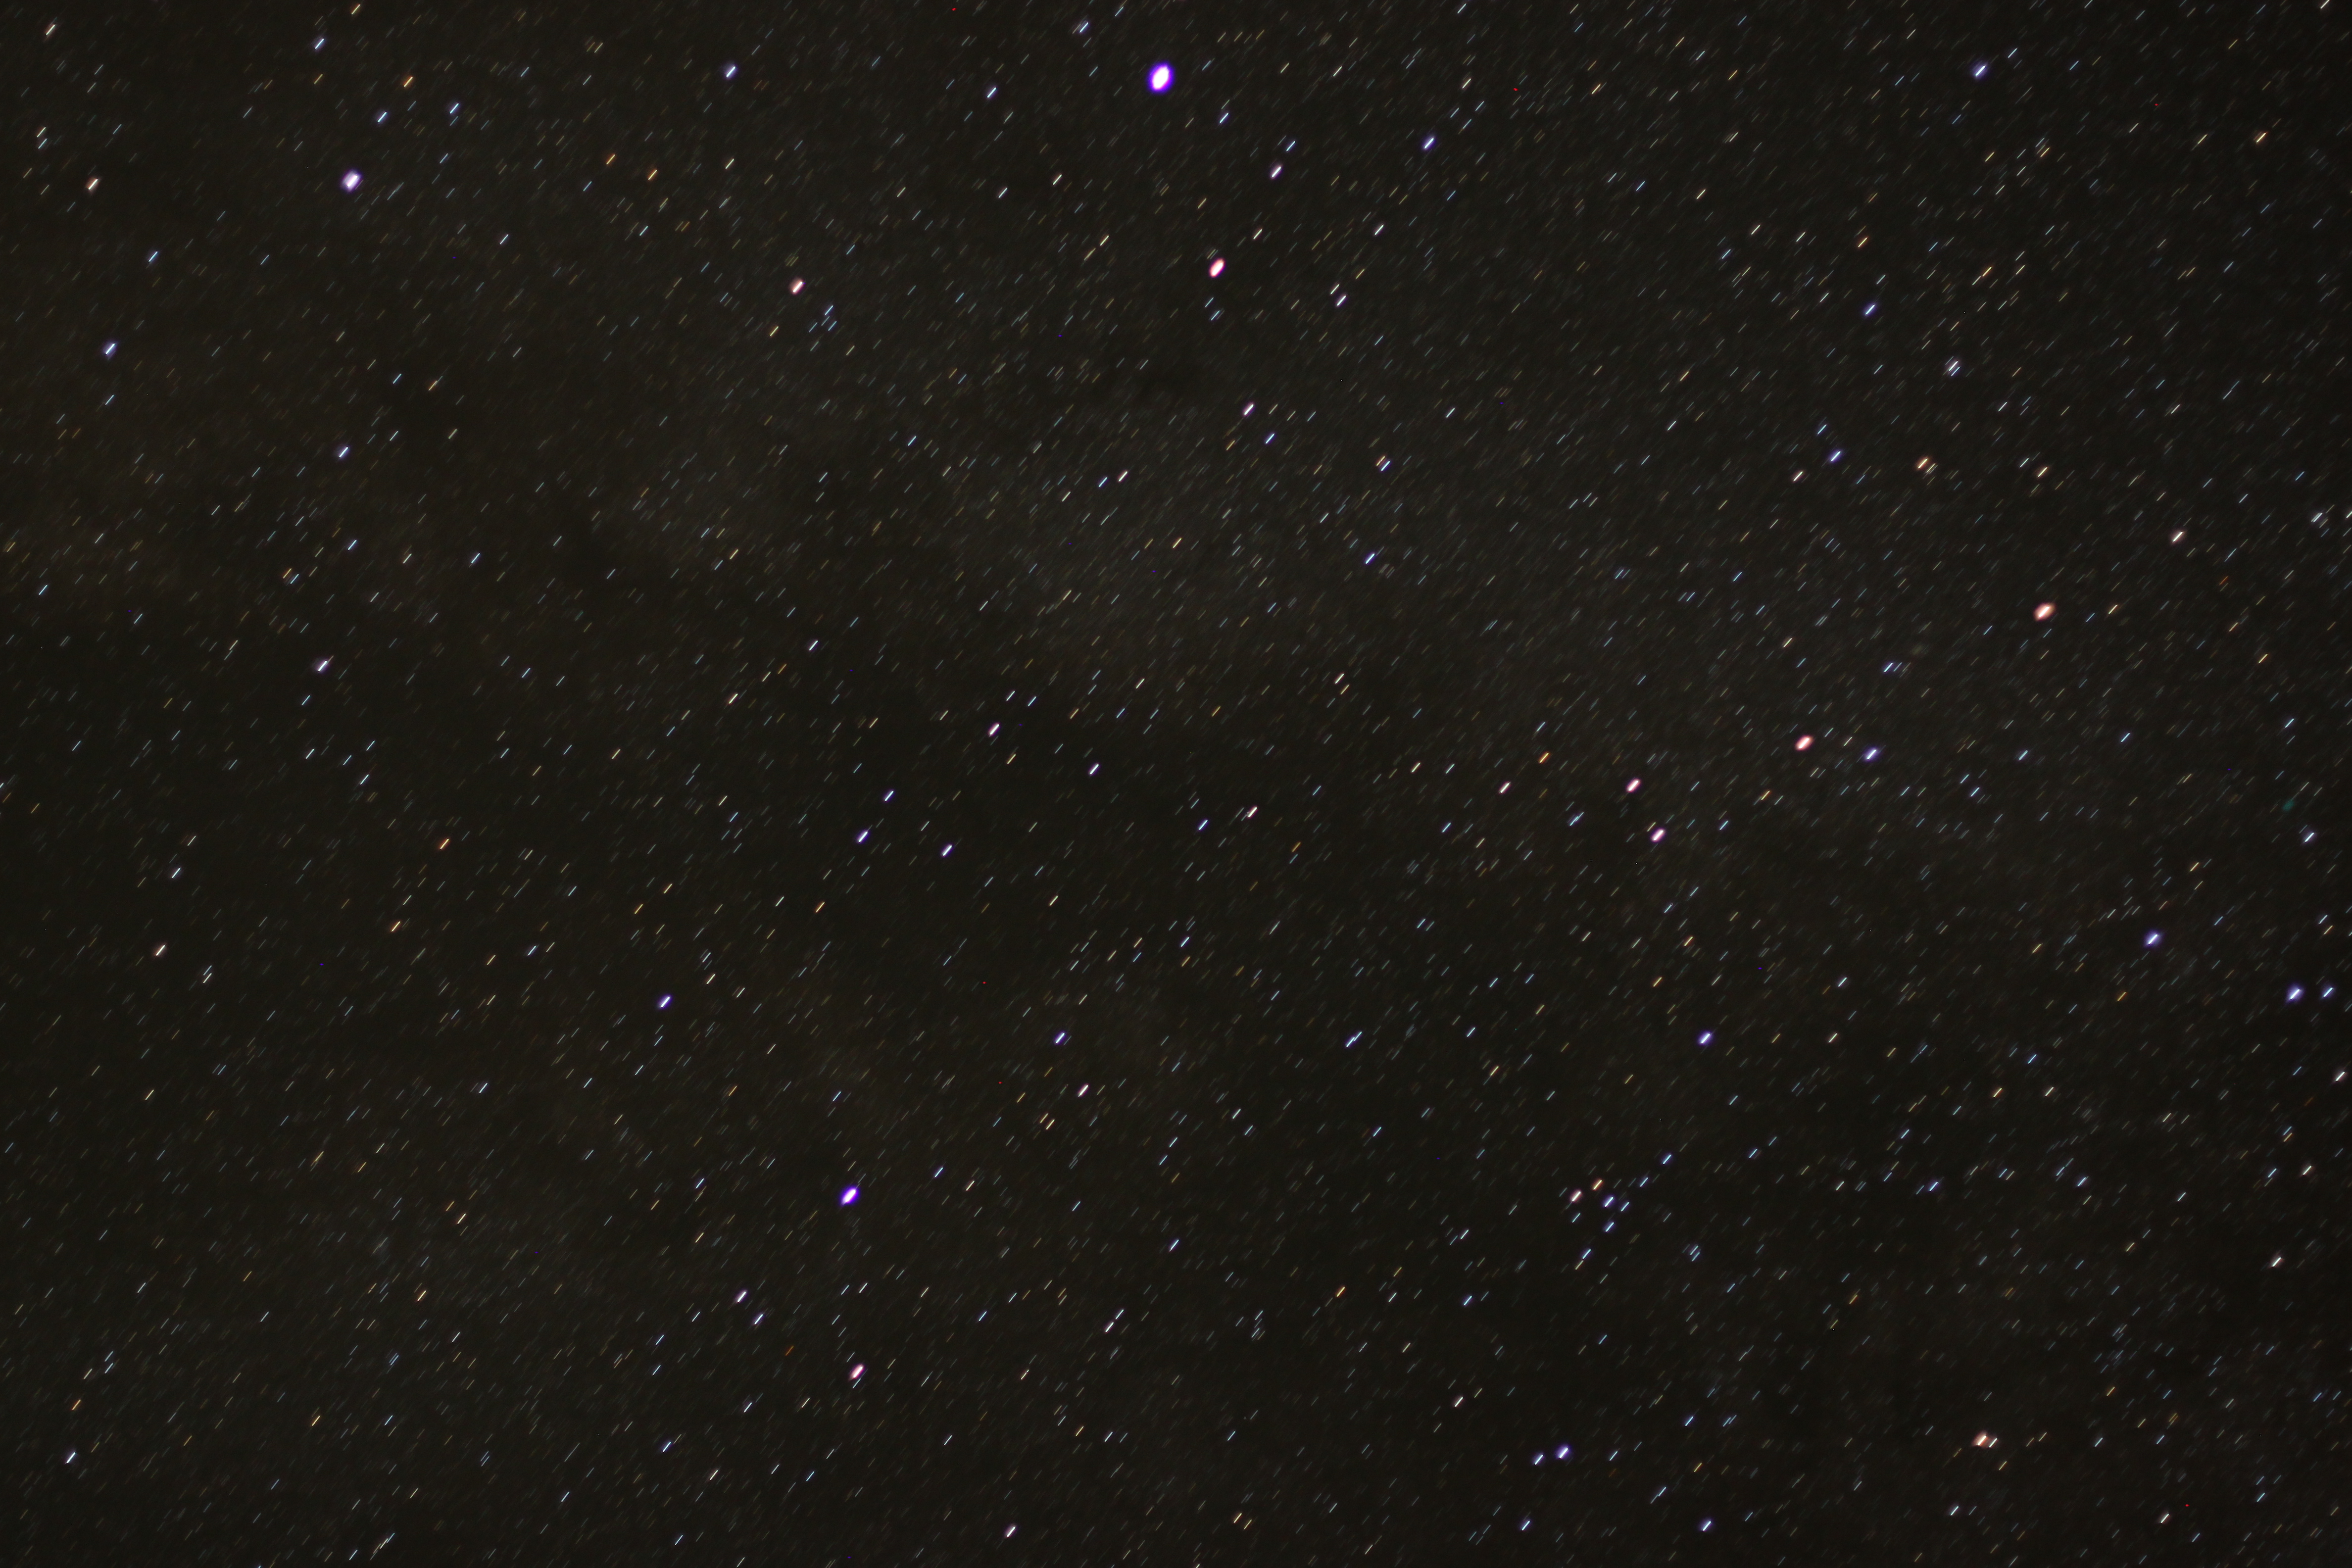
Take some time off of work and go somewhere. Spend many, many hours driving in remote and unfamiliar places. Go and explore the world. Without the distractions of work it is amazing how your mind can wander and dream up ideas. I included one of my favorite pictures from our trip of Monument Valley using a long exposure shot with a car's tail lights creating trails. The second photo is an example of how the rotation of the earth creates trails when taking even short (30 second) "long exposure" pictures of the stars. This was taken at F1.8 at 50mm on a Canon T1i. You don't have to look too closely to see the star trails. You can also catch a faint glimpse of the Milky Way across the image.
Tools and Materials
You will need the following tools and materials to complete this project. All of these tools are available at TechShop, which is where I chose to do a lot of the work.
Tools:
Arduino SDK
Autodesk Inventor (or equivalent CAD tool)
Microsoft Excel (or equivalent spreadsheet software)
Epilog 60W Laser Cutter
Digital Caliper
Hack Saw
Screw Driver
Adjustable Wrench
Materials:
3/16" or 1/4" Acrylic Sheet (any color, but I used clear)
1/4" Inner Diameter Ball Bearings (12)
1/4" x 3" Machine Screws
1/2" Inner Diameter Ball Bearings (2)
1/2" Threaded Steel Rod
1/4" x 3 1/2" Carriage Bolts (6)
1/4" x 1" Nylon Spacers (12)
1/4" Inner Diameter, Washers (~20)
1/4" Inner Diameter, 1 1/4" Outer Diameter Washers (~15)
1/4" Nuts (~30)
Stainless Steel Piano Hinge
Square with adjustable angle arm
Levels
Pan and Tilt Tripod Head
Controls and Electronics:
12V Stepper Motor
Stepper Motor Controller
Arduino UNO Board
12V DC Power Supply
5mW Class IIIA Green Laser (optional)
Downloads
Designing the Gears
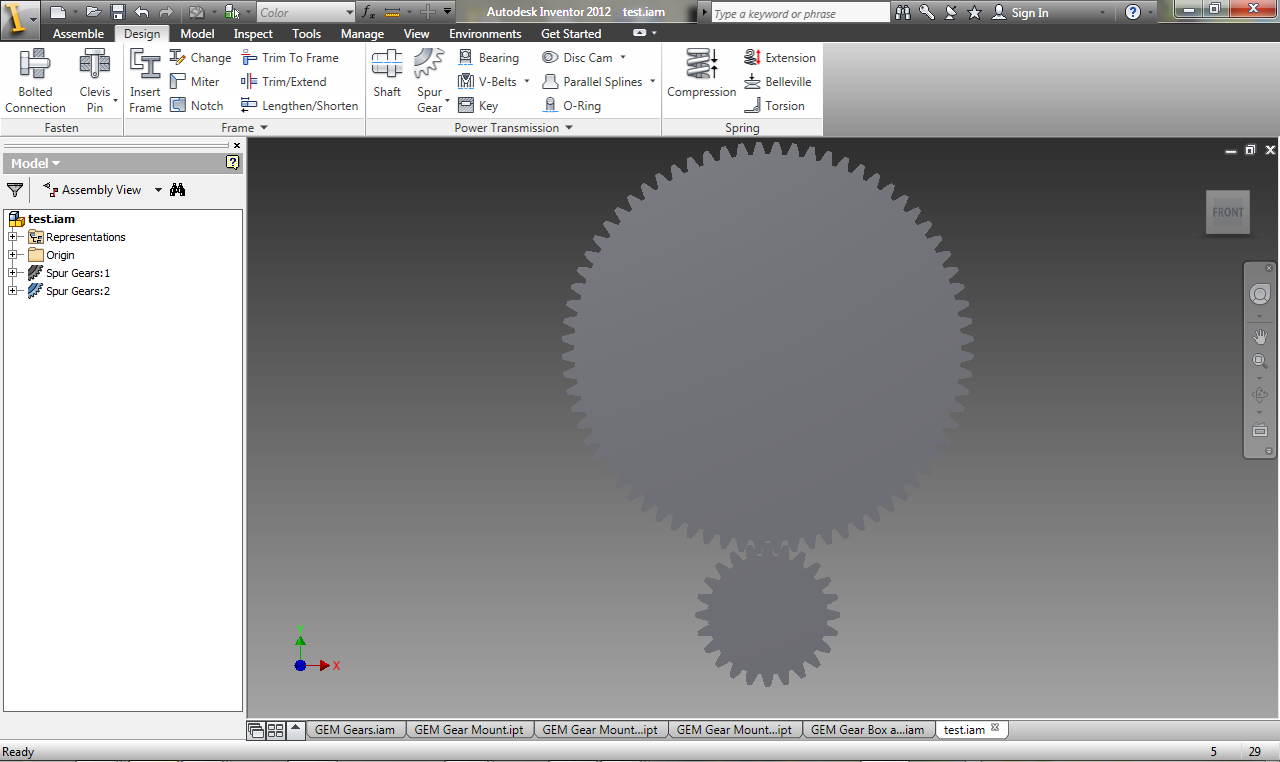
In order to design the gears you must calculate the gear ratios that you will need to convert your motor to 1RPD (one rotation per day). Your camera will be mounted to a spindle that rotates at this speed. This is where I spent a good amount of my time driving and thinking through the design. My final decision was to use a 1RPM motor which requires a conversion of 1:1440 (1 RPM * 60m/h * 24h/d => 1440.) This number works out nicely because you can use its whole number factors to create a set of linked gears. The factors I used are [3, 4, 4, 5, 6] so the gears would have the gear ratios of 3:1, 4:1, 4:1, 5:1 and 6:1. There are other factors you could use as well, any rational numbers that are factors of 1440 will work. If you choose a different speed motor you must follow a similar exercise to determine an appropriate set of gears.
Now that the gear parameters have been determined we need to use AudoDesk Inventor (2012) or an equivalent CAD solution to design them. Inventor was great for this project as it has a built in spur gear generator that takes in your paramaters and calculates and renders the final gear design. This tool will not, however, assemble all of the gears into a gear box--that we'll save for the next step.
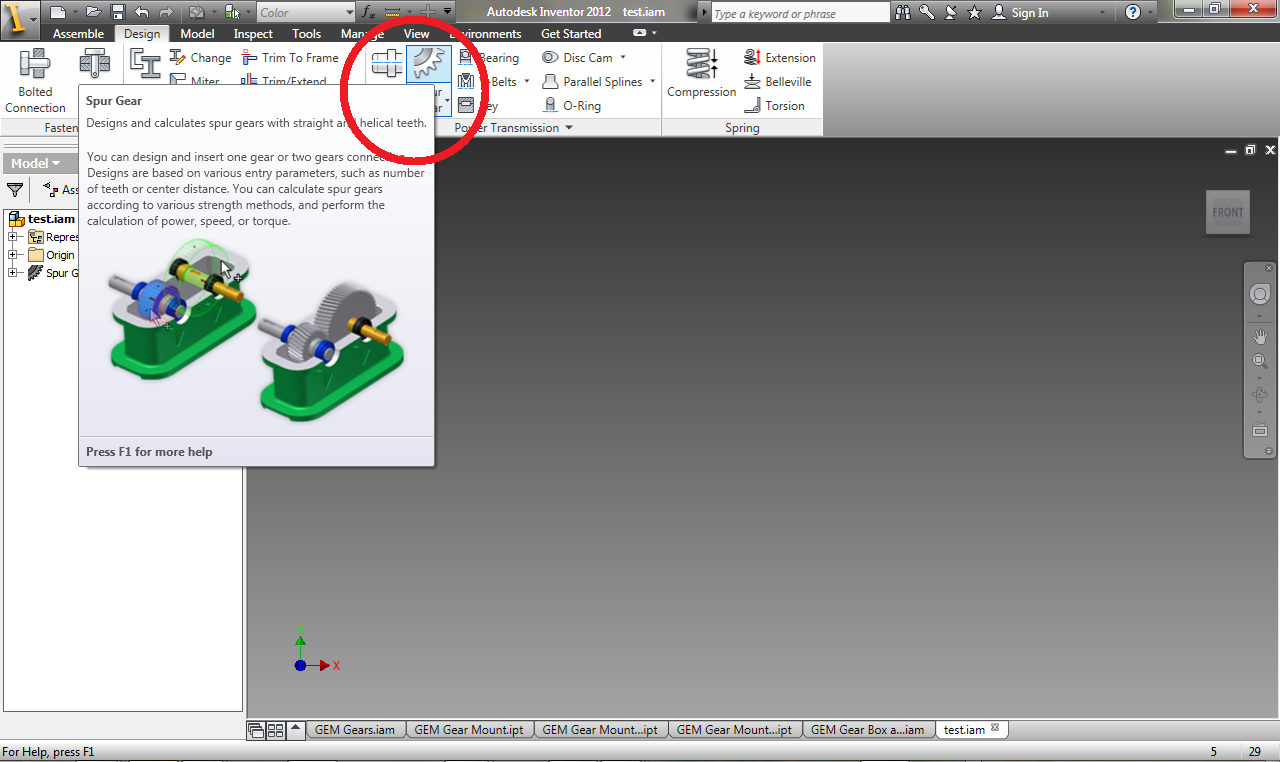
You can create the gears by opening a new assembly in Inventor. Under the Design tab on the menu you will see a group of mechanical components grouped as "Power Transmission". One of the items is for designing spur gears. Clicking on this item will bring up the "Spur Gears Component Generator" dialogue box. (See first illustration.)
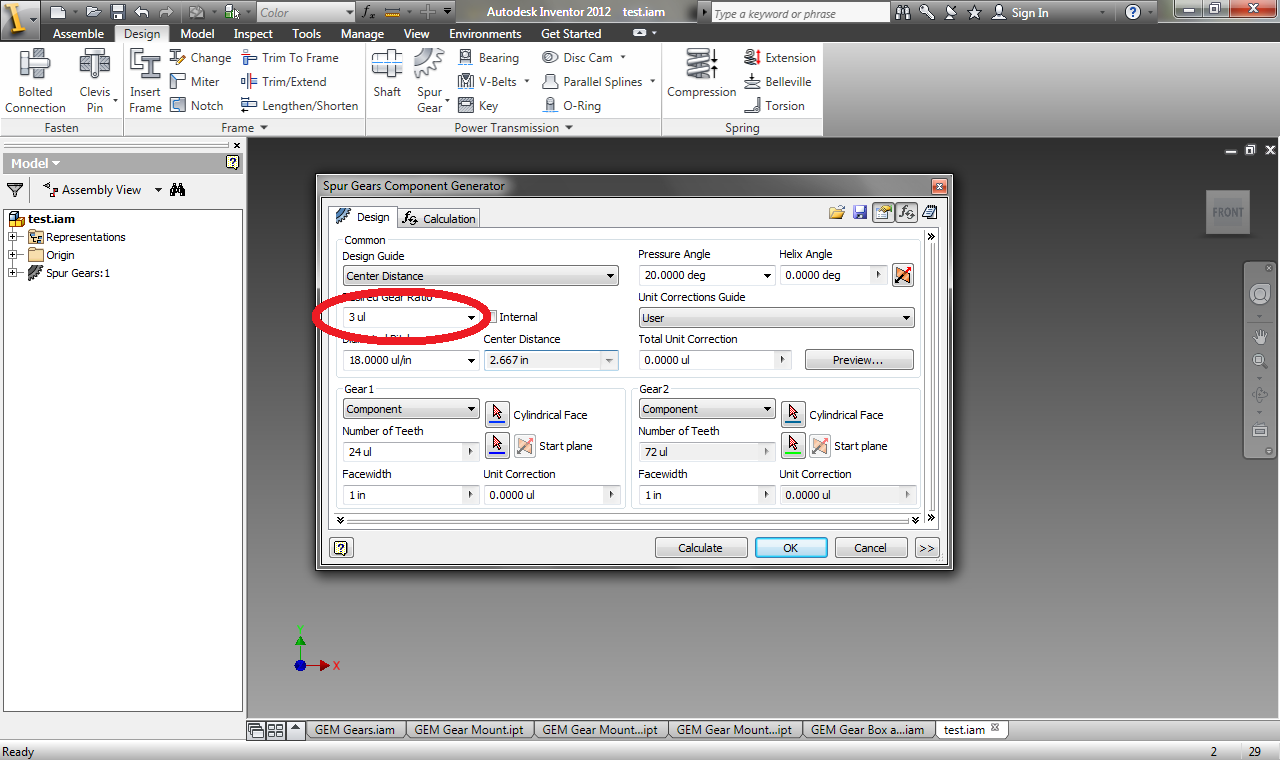
Since we are stepping down the rotation through the gears and only using the profile of the parts to guide the laser cutter we don't need to worry too much about the fine details in this box. I kept all of the parameters at their default and only changed the value in the "Desired Gear Ratio" text box. For the first set of gears you should set this value to 3 and click on "Calculate". (See second illustration. ) This will generate values for the "Gear 1" and "Gear 2" group in the bottom half of the dialogue box. Make sure that both gear 1 and gear 2 are configured to "Component" and when you click on "OK" you will be prompted to save the file. After saving the gears they will magically appear in the work area. (See third illustration.) You may then place the component anywhere you like. Repeat this process for all of the spur gears you have chosen (in this case 3:1, 4:1, 4:1, 5:1, 6:1) and place them in the work space.
The final step is to edit the gear extrusions to equal the thickness of your acrylic material. In my case this was 3/16".
Linking the Gears
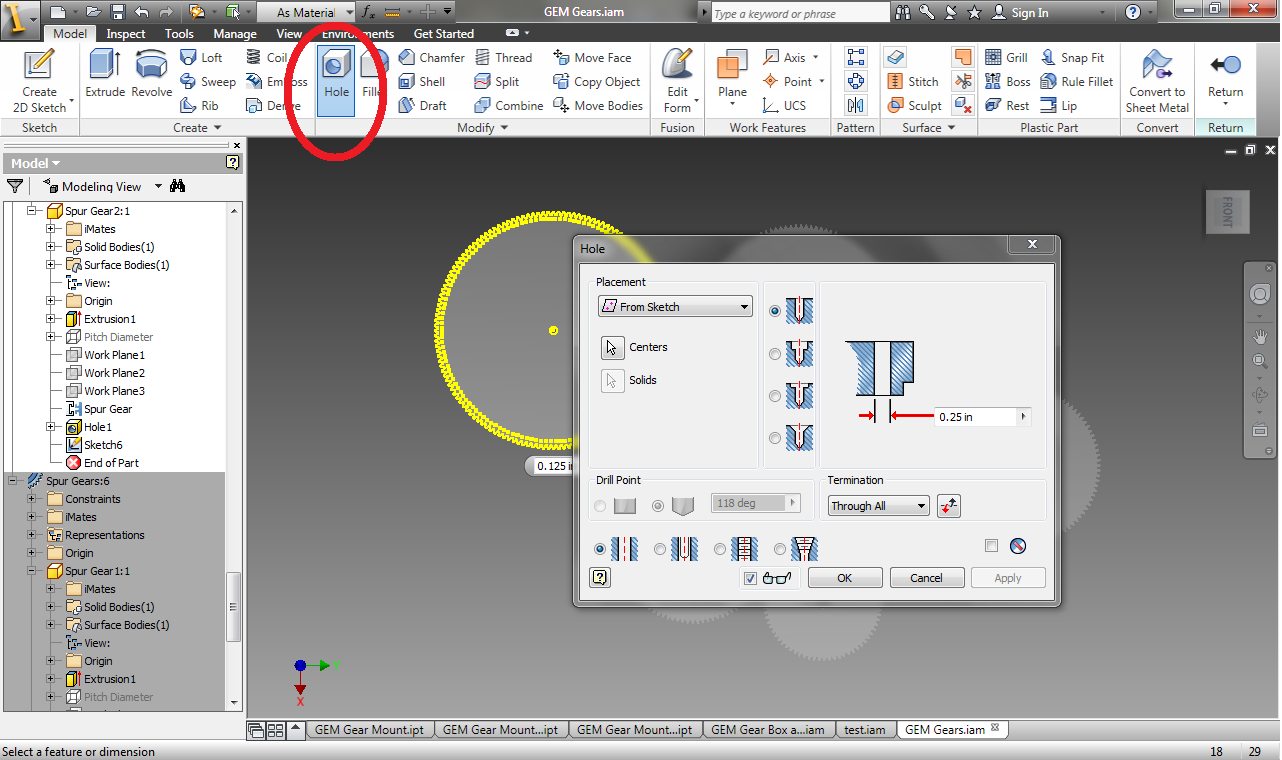
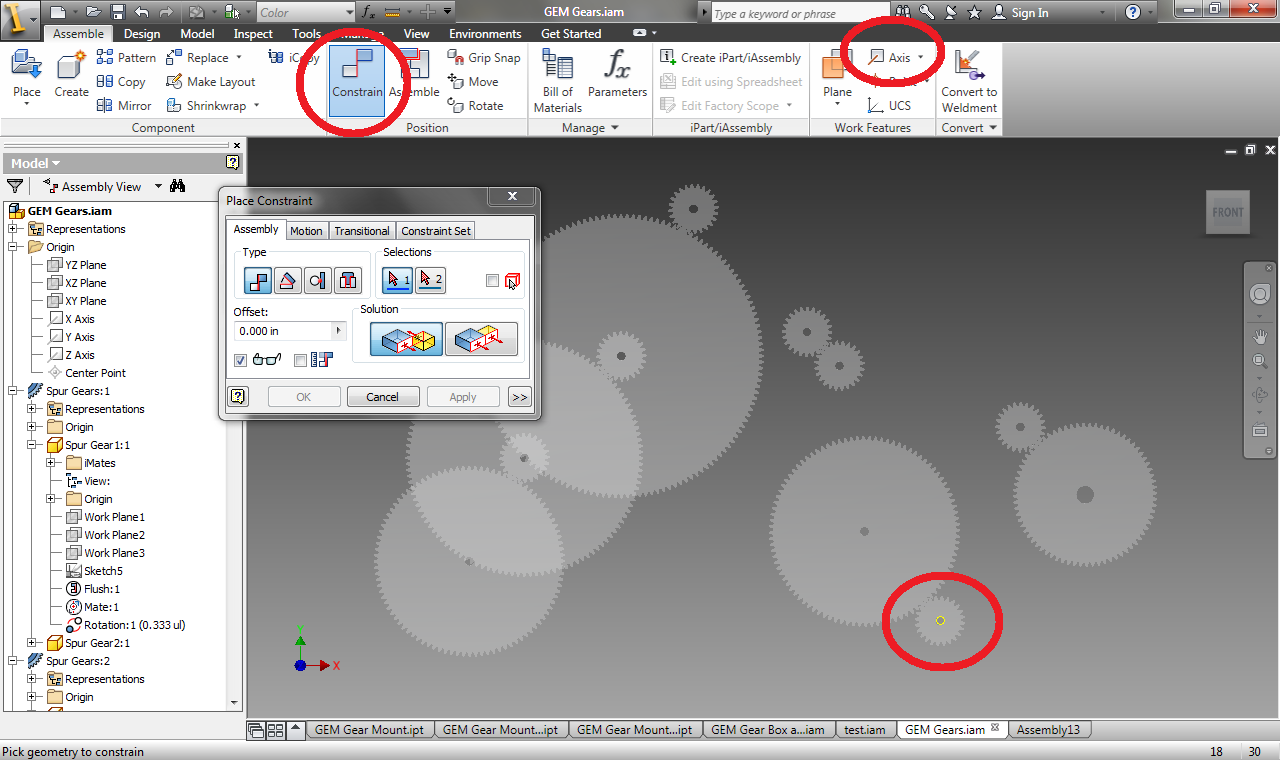
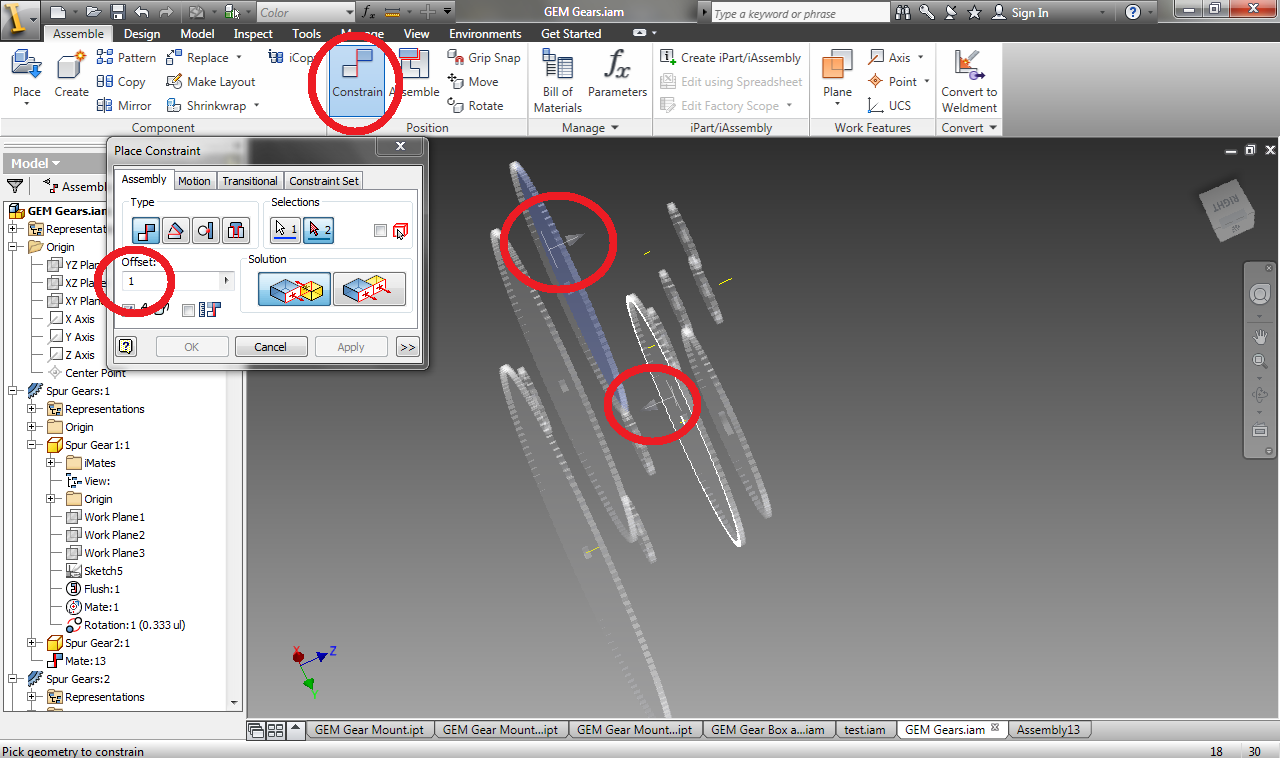
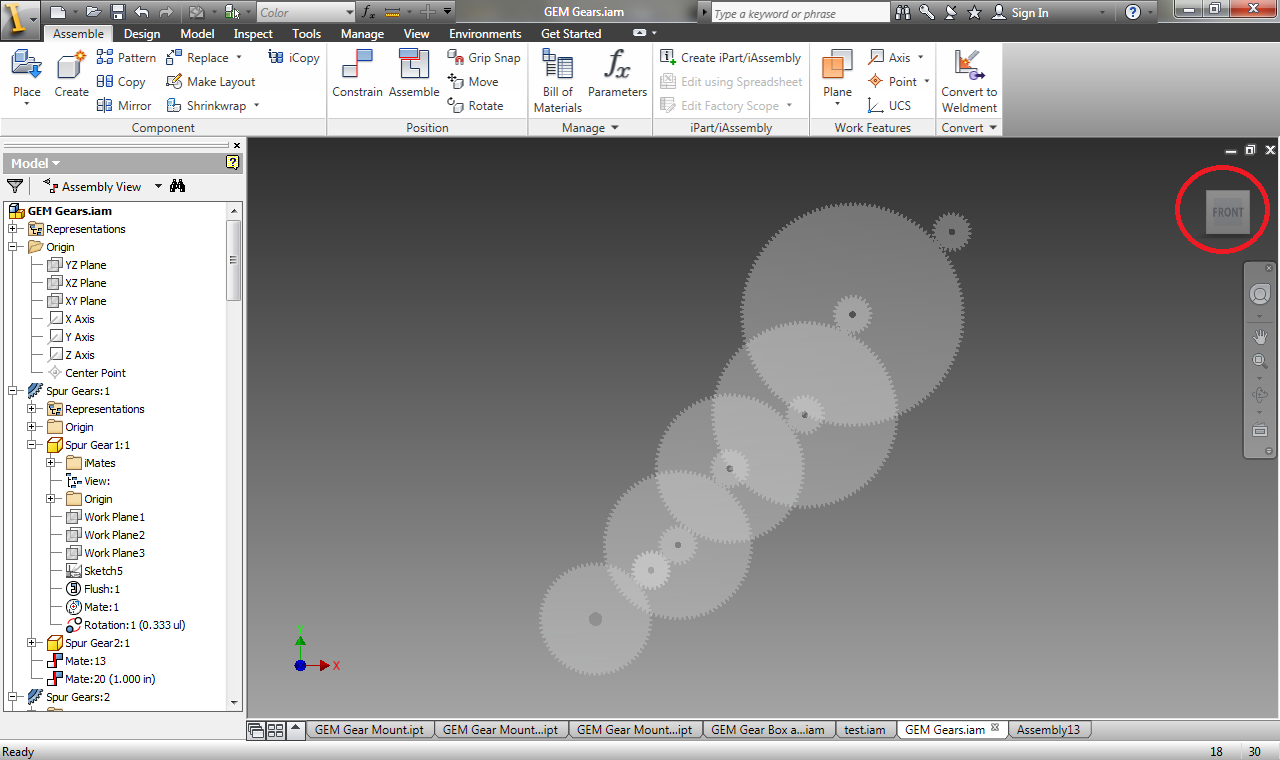
This process requires a few steps. The first is to place holes of equal size at the center of each gear. This is followed by constraining the rotational axis of each gear to the rotational axis of any other gear that will be on the same shaft. Finally you should constrain the faces of the linked gear sets with an offset.
To place a hole in the center of each gear open one of the gear components and create a new sketch on the face of the gear. Select the "Point" from the "Draw" group and place a point on the center of the gear. Finish the sketch and select the "Hole" tool from within the "Modify" group. Select the point you created and define the diameter of the circle to be equal to the diameter of the steel rod you will be using (in my case 1/4".) The type of hole should be a drilled simple hole. Repeat this process for all of the remaining gears in your design. (See first illustration)
You cogs are now finished. You can now begin linking all of the gear sets together by creating and constraining their rotational axis. First select the "Axis" tool within the "Work Features" group. Select the hole you created to make the axis. Repeat this for the other gear you wish to link to this one. Once you have created a matching set of axis you can click on the "Constrain" item in the "Position" group. Constrain the two axis you created by clicking on both of them and apply the constraint. Continue doing this for the remaining holes. The gear sets may be linked in any order. I chose to start with the largest gear and incrementally linked the next smallest gear until all were linked. You must constrain the rotational axis of a large gear to the rotational axis of the small gear of the set you are linking with it. (See second illustration.)
Once the axis of all of the gears are linked you must constrain the face of each linked pair with an offset. This will arrange them so they are offset from each other and free to rotate. (See third illustration.)
You now have a set of spur gears that are all linked properly and we can begin constructing a gear box to contain them. (See fourth illustration.)
Designing the Gear Box
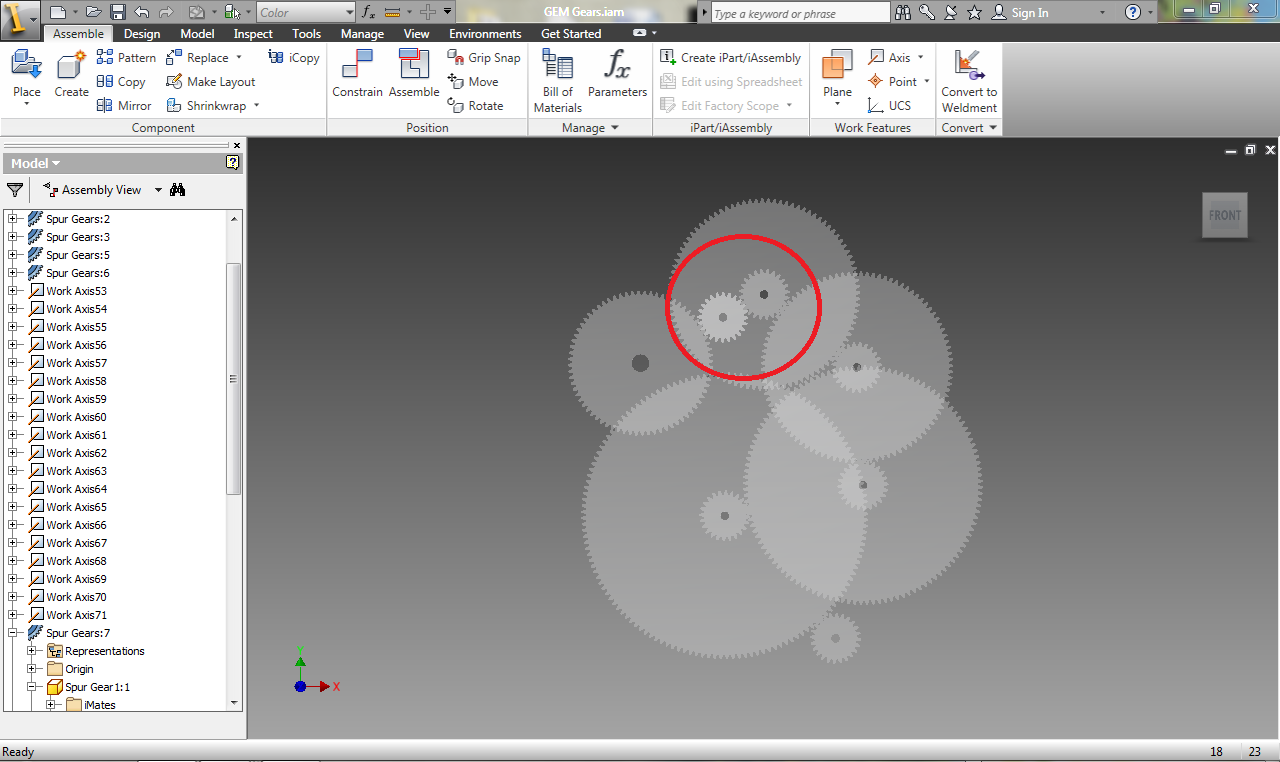
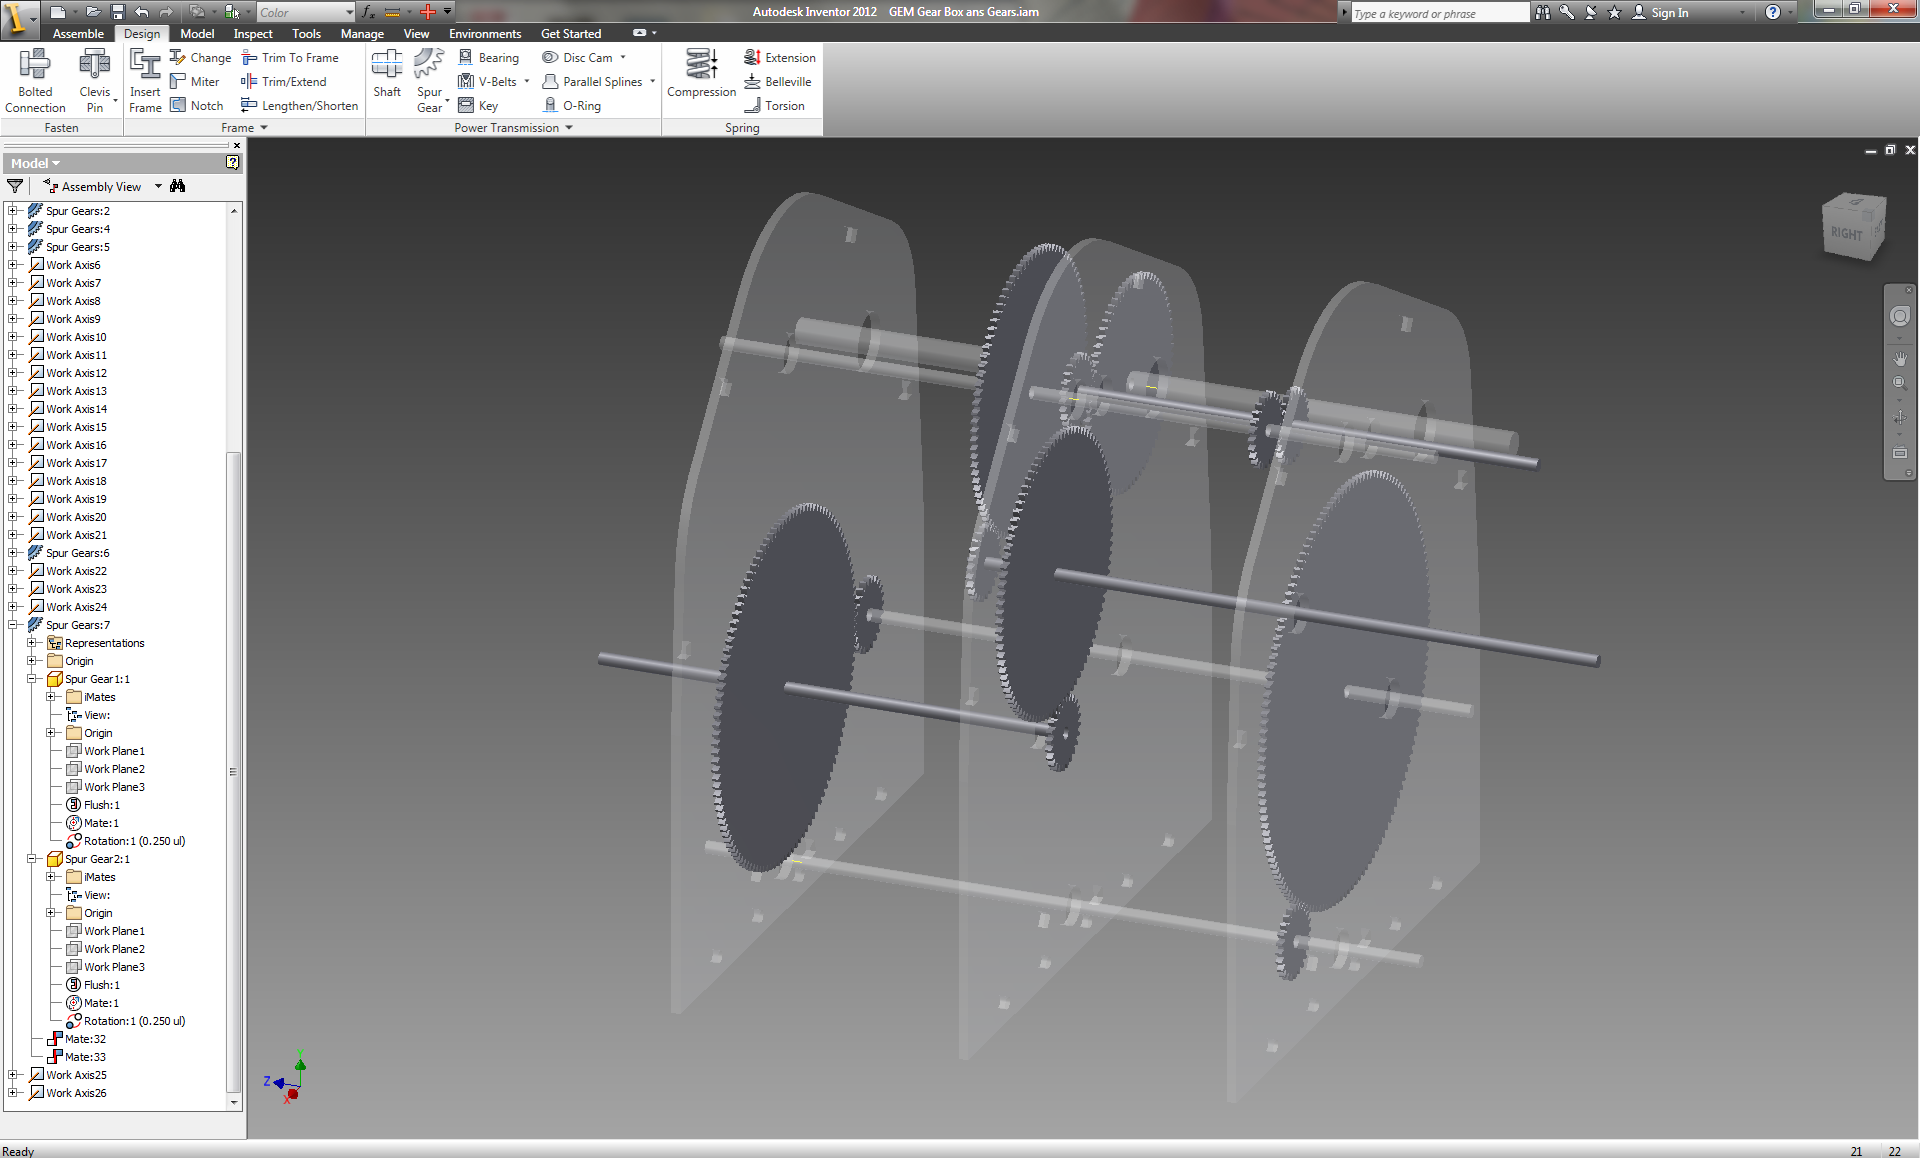
In this step you will need to create three separate panels that will house the ball bearings on which each shaft will rotate. Before beginning you will need to arrange the gears into their final configuration. When you arrange the gears you must be sure to prevent them from obstructing any other shaft as much as possible. I had to add a second set of gears with a 1:1 ratio in order to allow the aluminum shaft to pass through the entire gear box. (See first illustration.)
Once your gears are in their final position create a new work plane offset from the surface of one of the gears. This will be the surface upon which you will create the shape of the gear box housing. You may simply draw a rectangle around all of the gears or for a more efficient and elegant design you can create a contour around the gears. This is the process that I used.
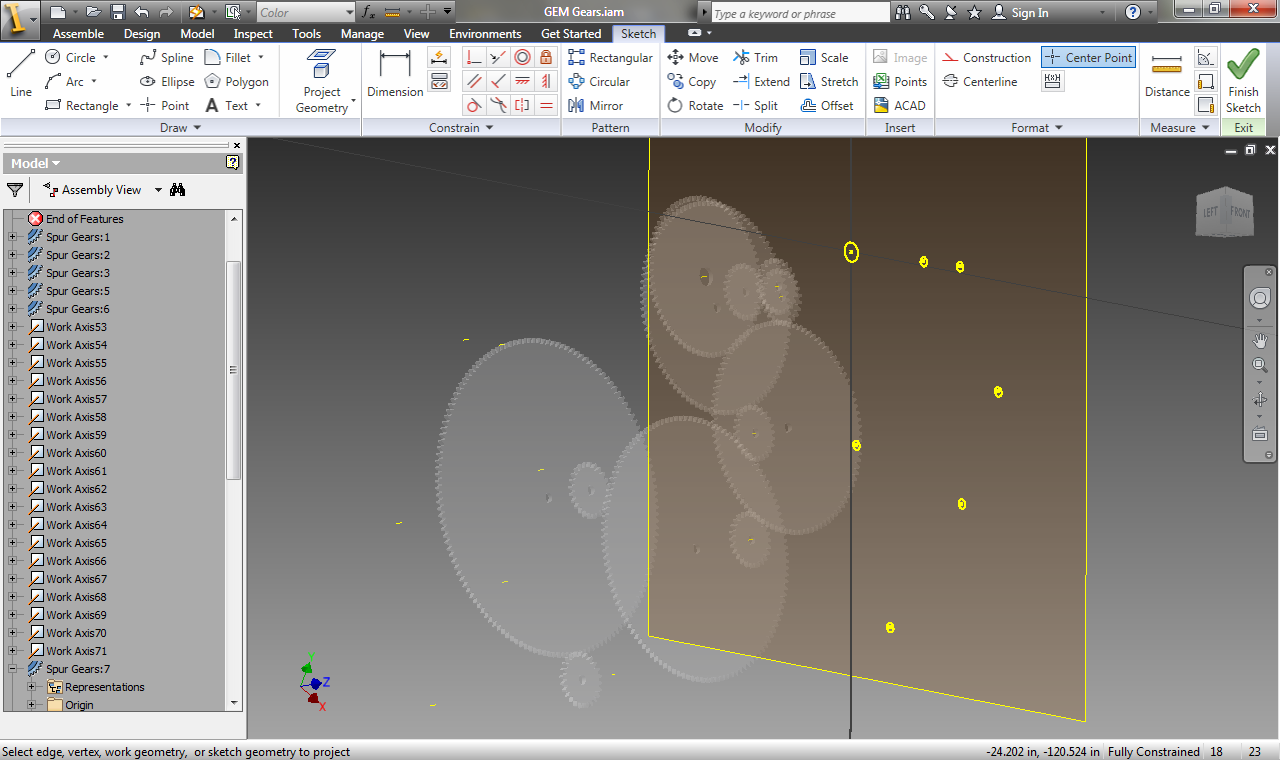
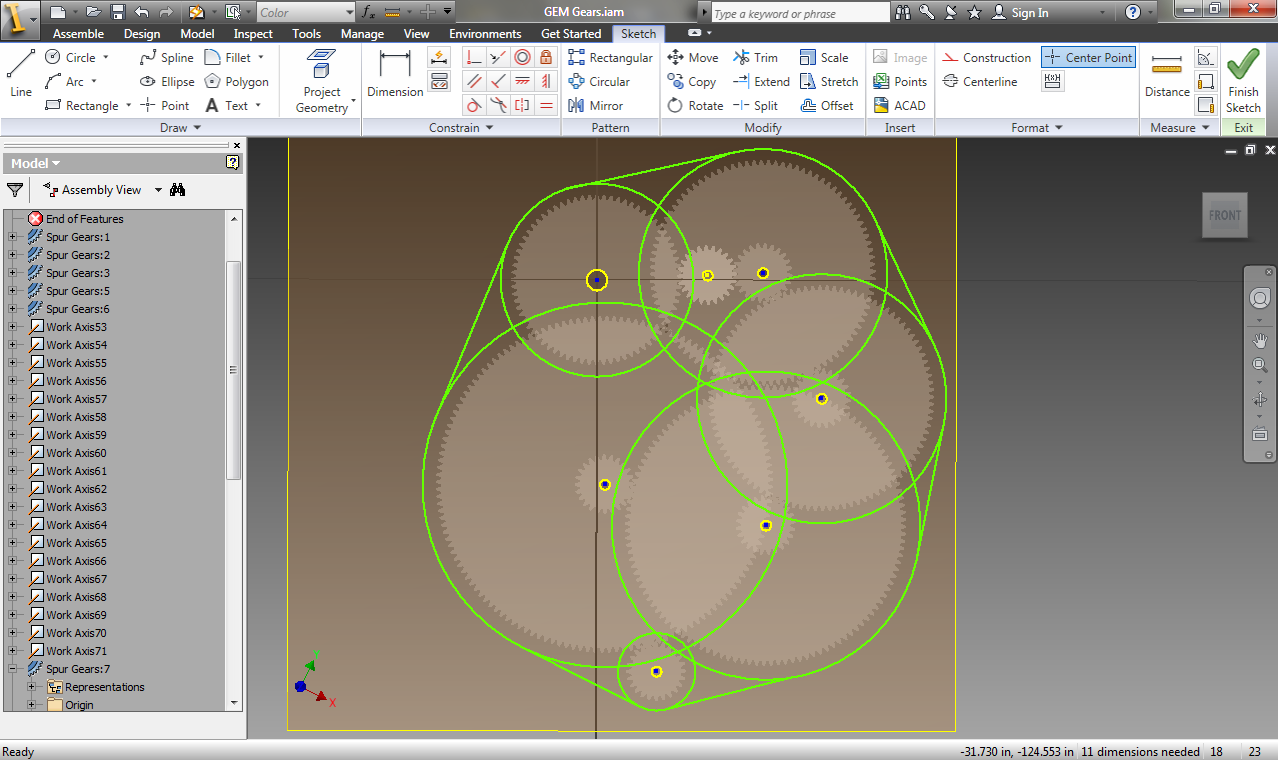
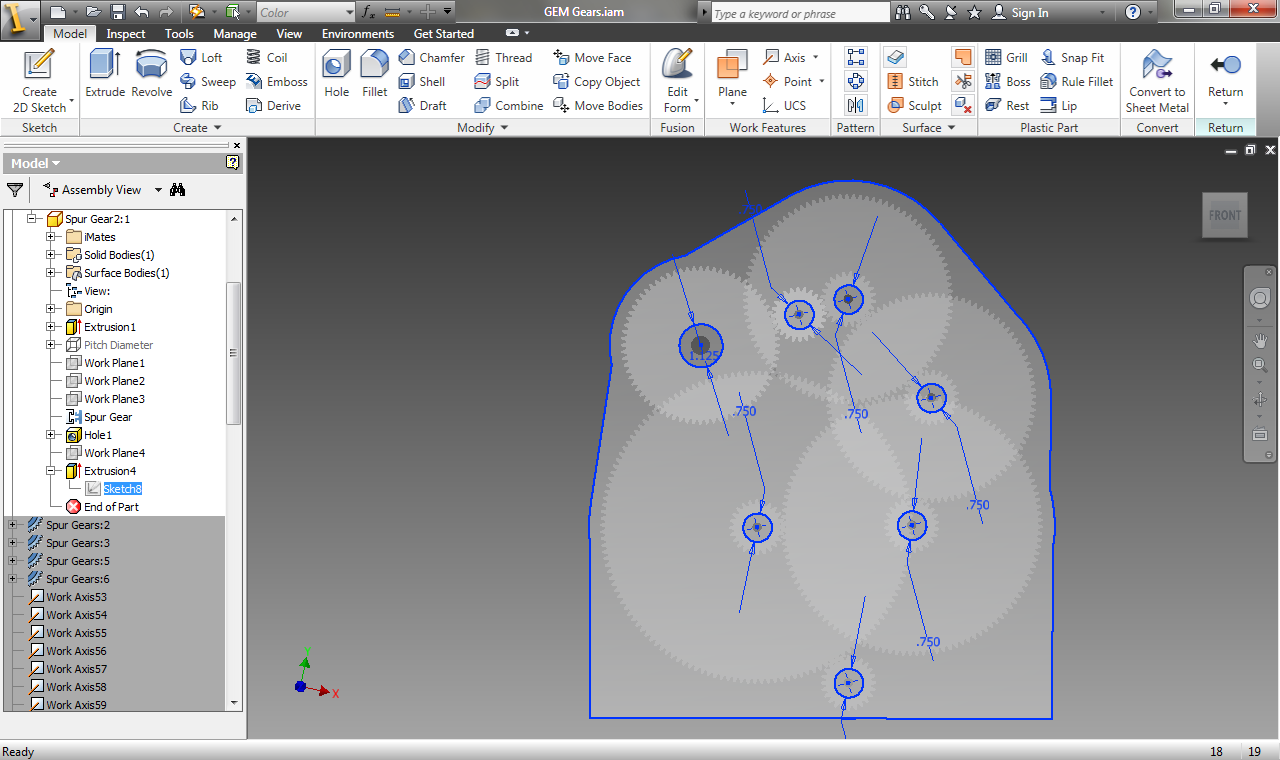
Create a new sketch on the surface you created and select "Project Geometry". Click on each of the holes of the gears to project this shape onto your work surface. (See second illustration.)
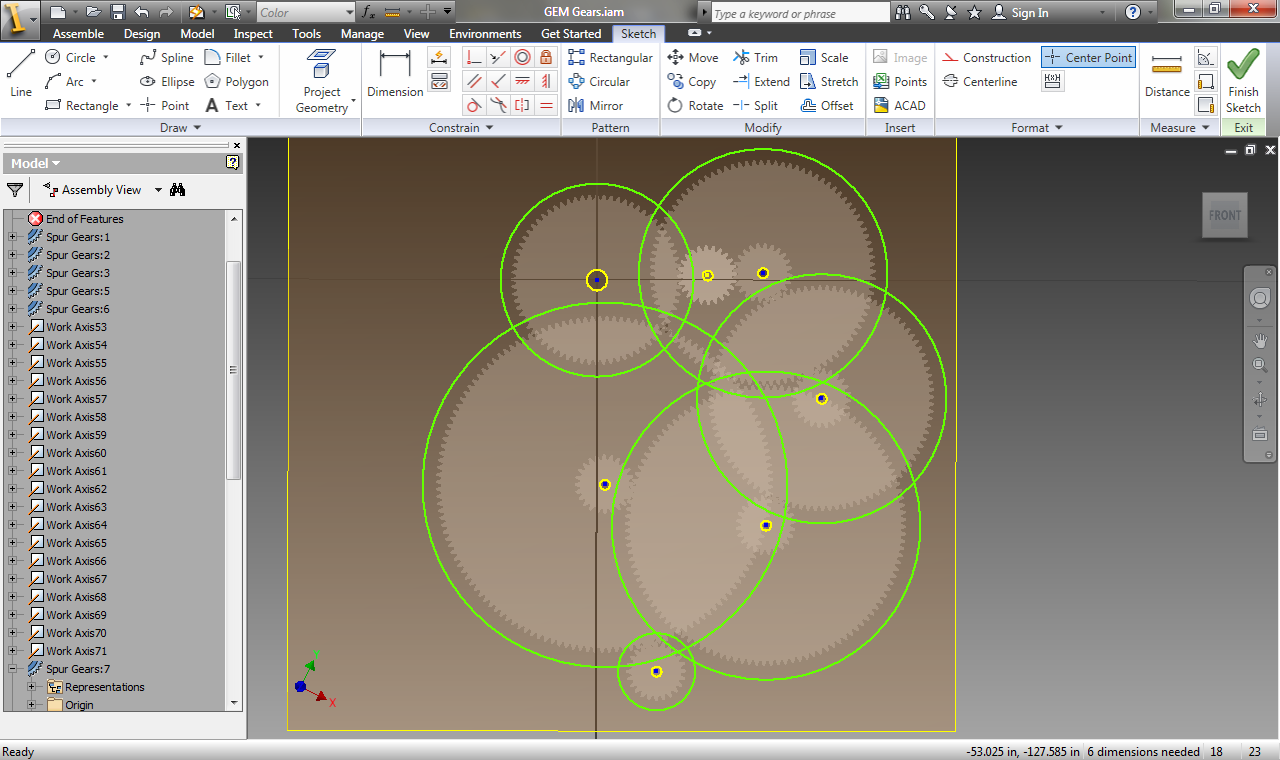
Once you have projected the holes in the gears onto your work plane you can create circles centered upon the middle of each circle. (See third illustration.)
Now join the circles with tangential lines. (See fourth illustration.)
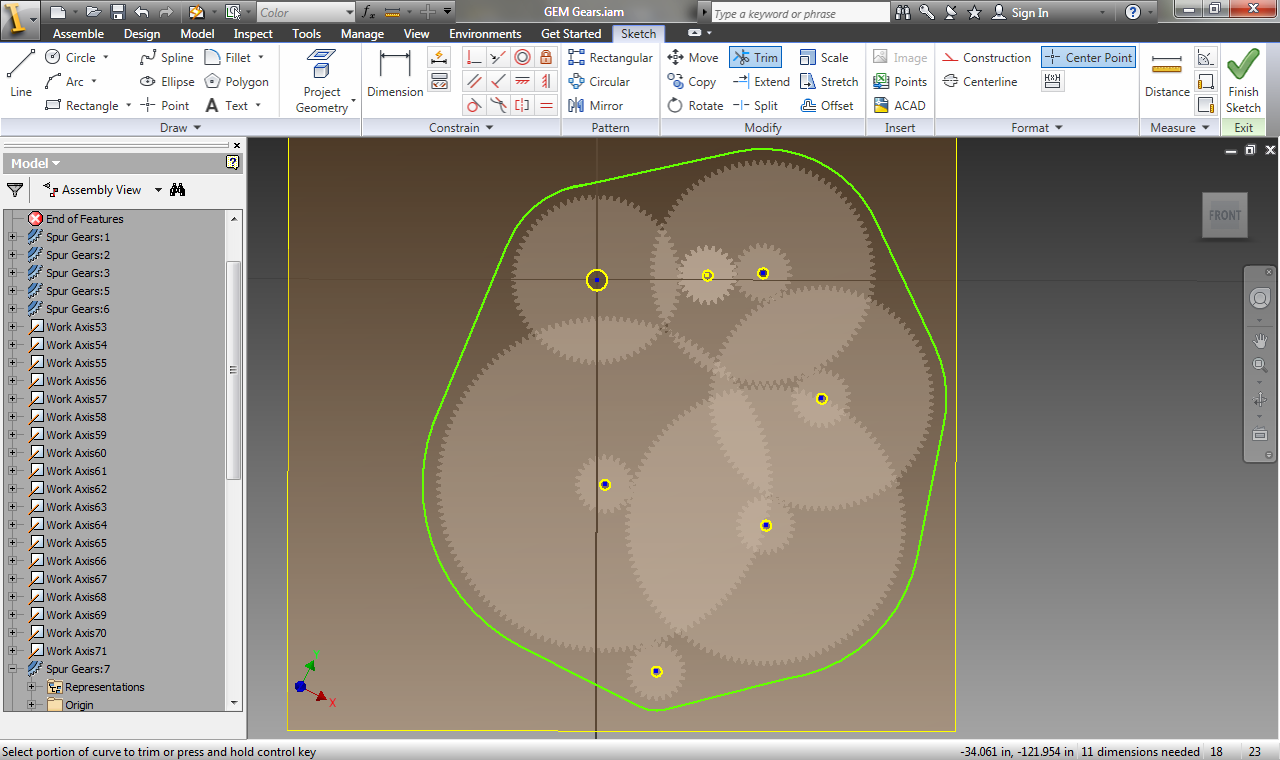
Now use the "Trim" tool within the "Modify" group and select all line segments that exist inside of the contour of the shape you have created. (See fifth illustration.)
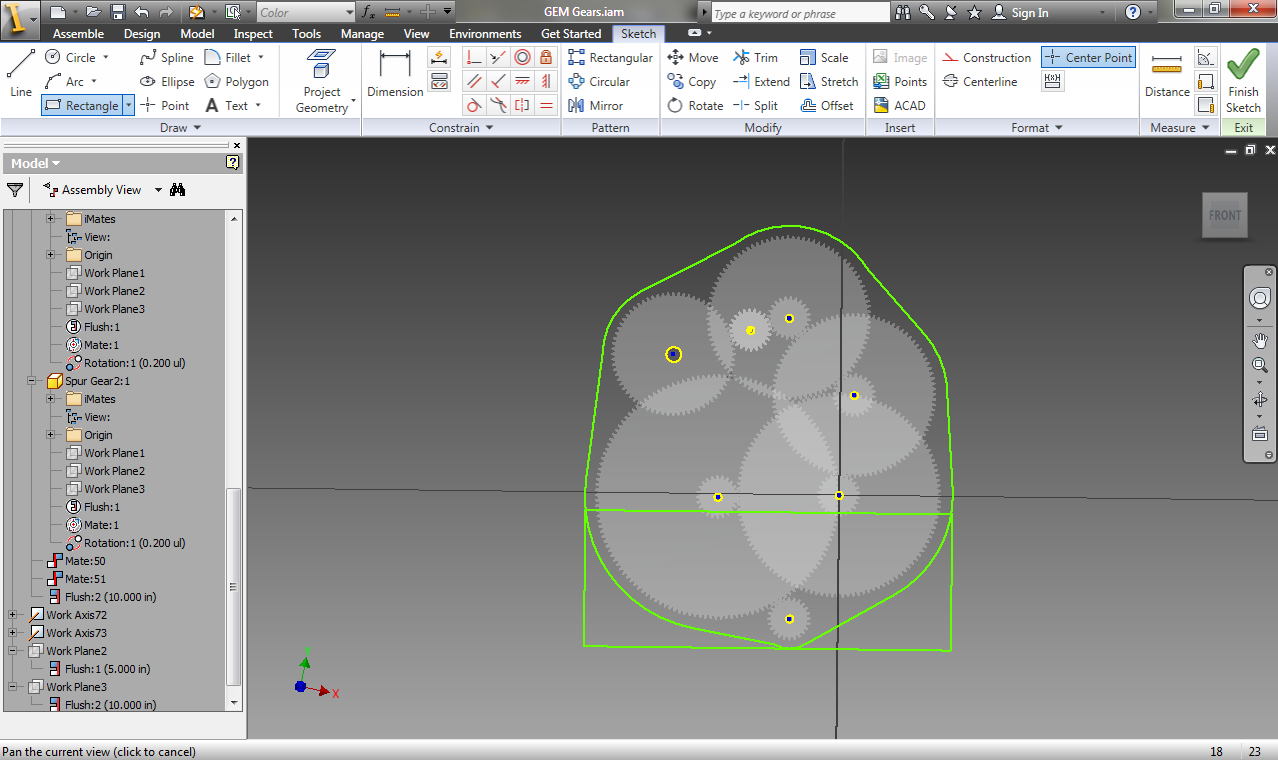
The last step in building the contour of the panel is to create a straight segment at the bottom that we will attach the piano hinge to in order to rotate the plane of rotation to align with the planetary polar rotation. To do this rotate your drawing until the shape is aligned to your preference. After doing this create a rectangle that aligns with the furthest points along the perimeter of the panel. (See sixth illustration.)
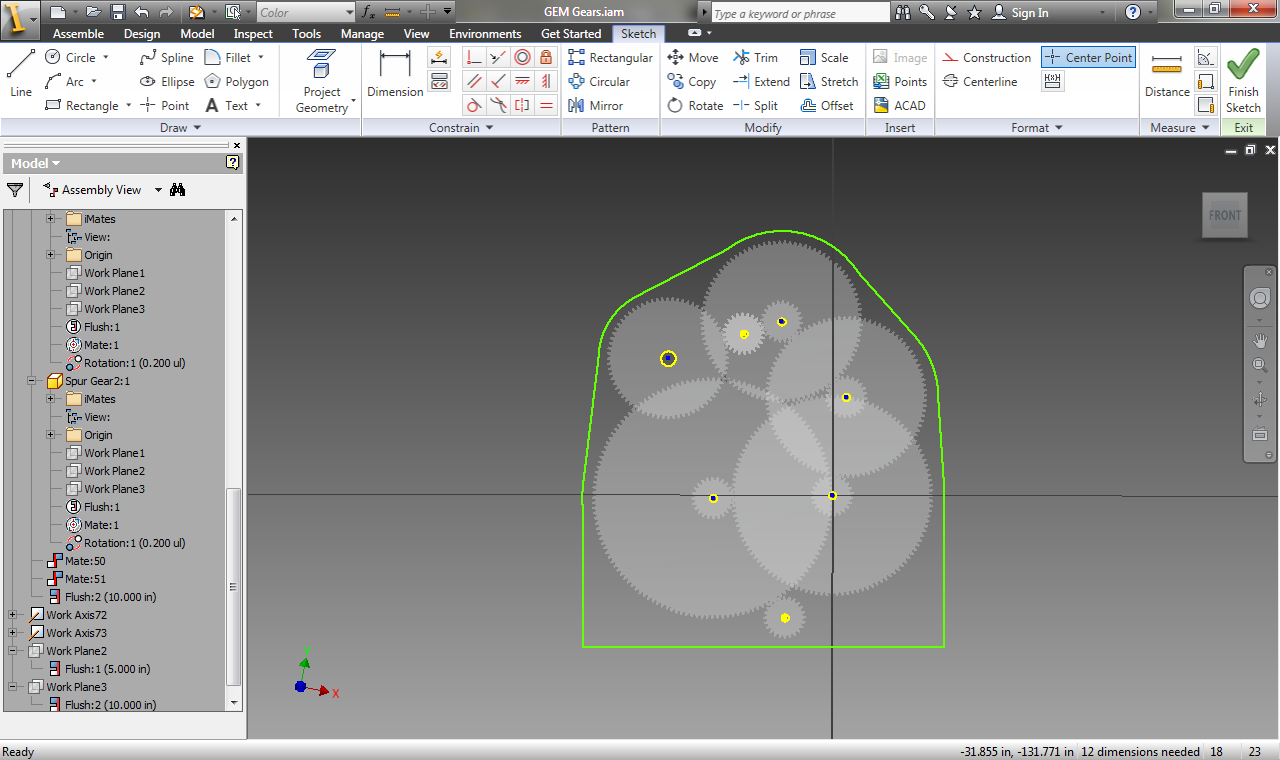
The last step in creating the contour of the panel is to trim the remaining interior lines. (See seventh illustration.)
Once the contour is defined you need to modify the projected hole patterns to match the outer diameter of the ball bearings you are using. In my case I used ball bearings with outer diameters of 1.125" and .75". (See eighth illustration.)
You should now extrude this shape to create the first panel for your gear box. Extrude this to the width of the acrylic sheet you are using, in my case 3/16".
Once you have created the first panel you must duplicate this design for the front and back panels. In the final illustration on this part you can see how the panels align with the gears as well as the axles that connect the gears.
Designing the Power Transmission
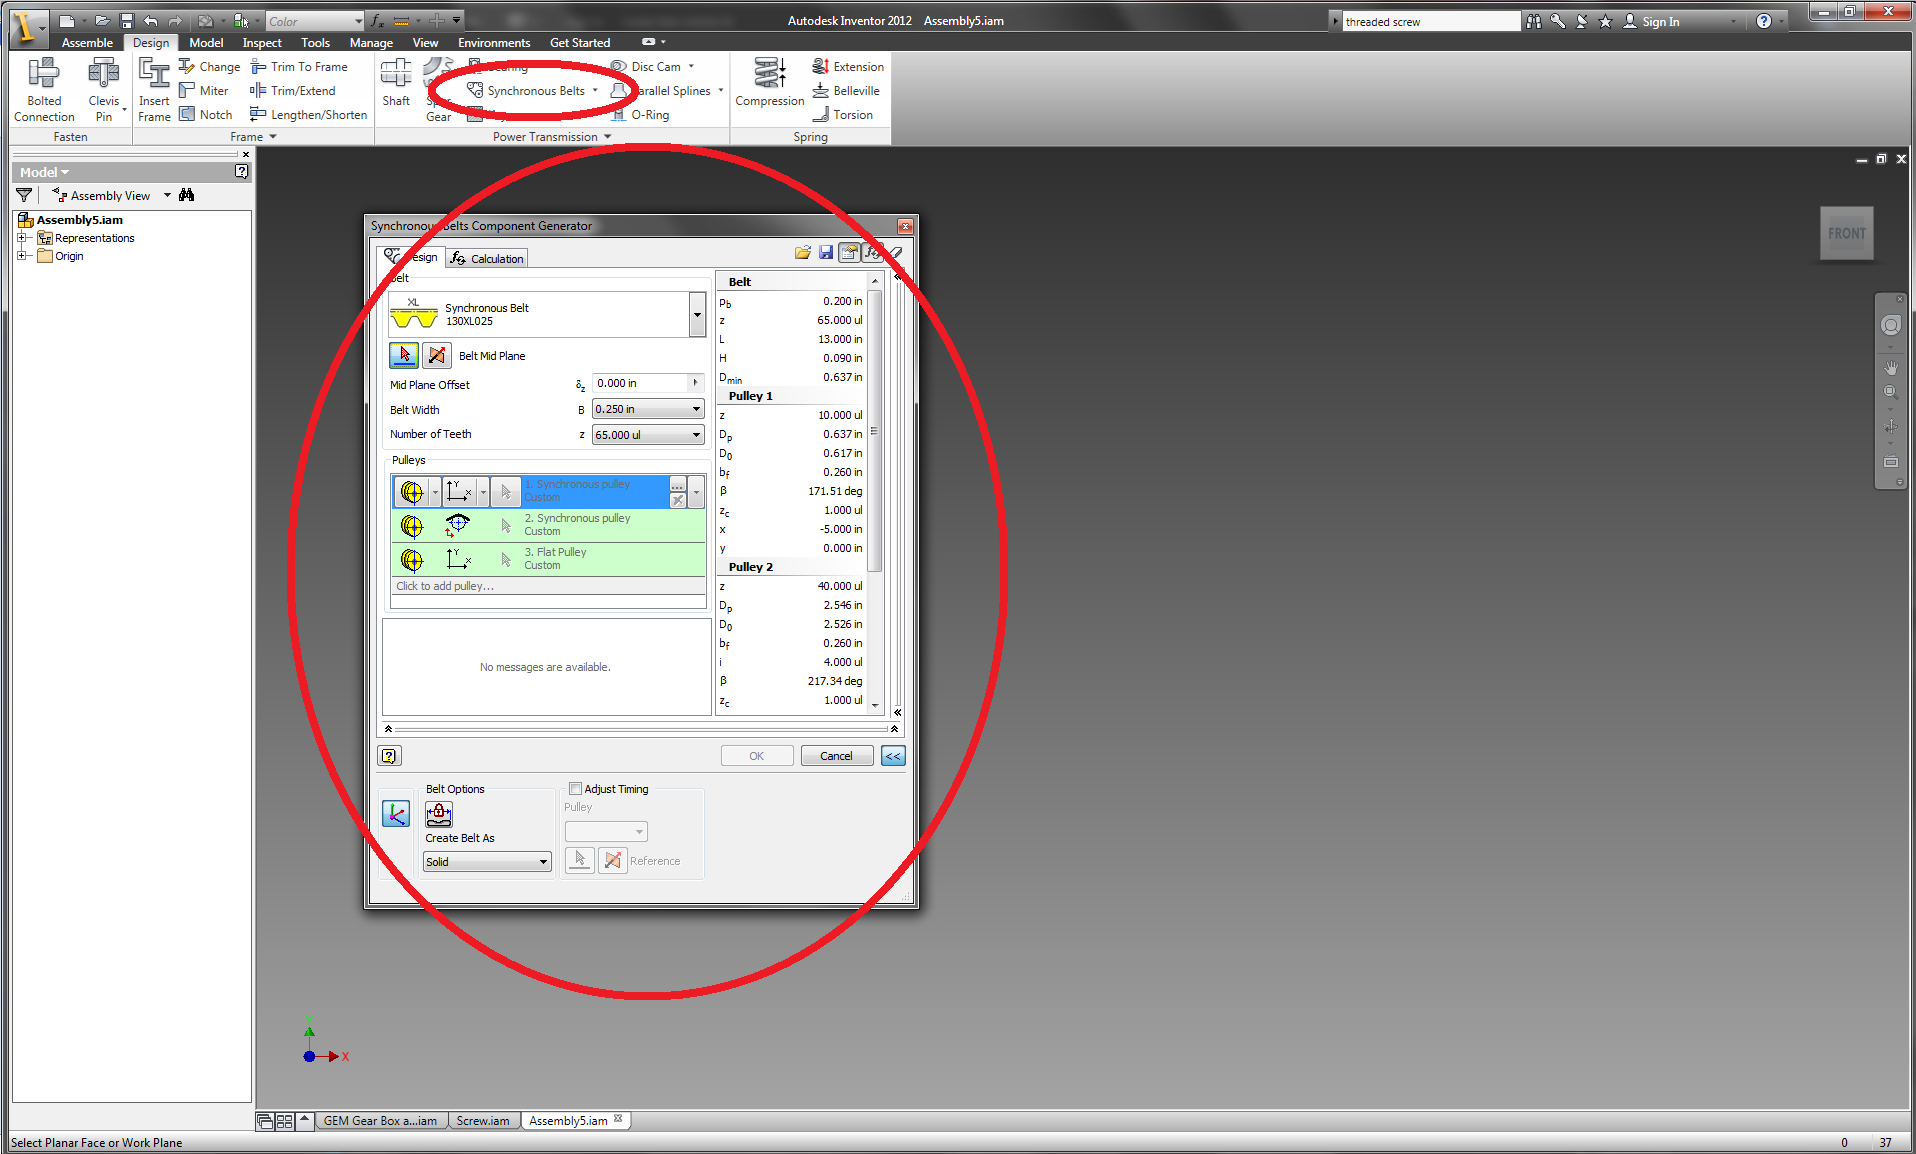
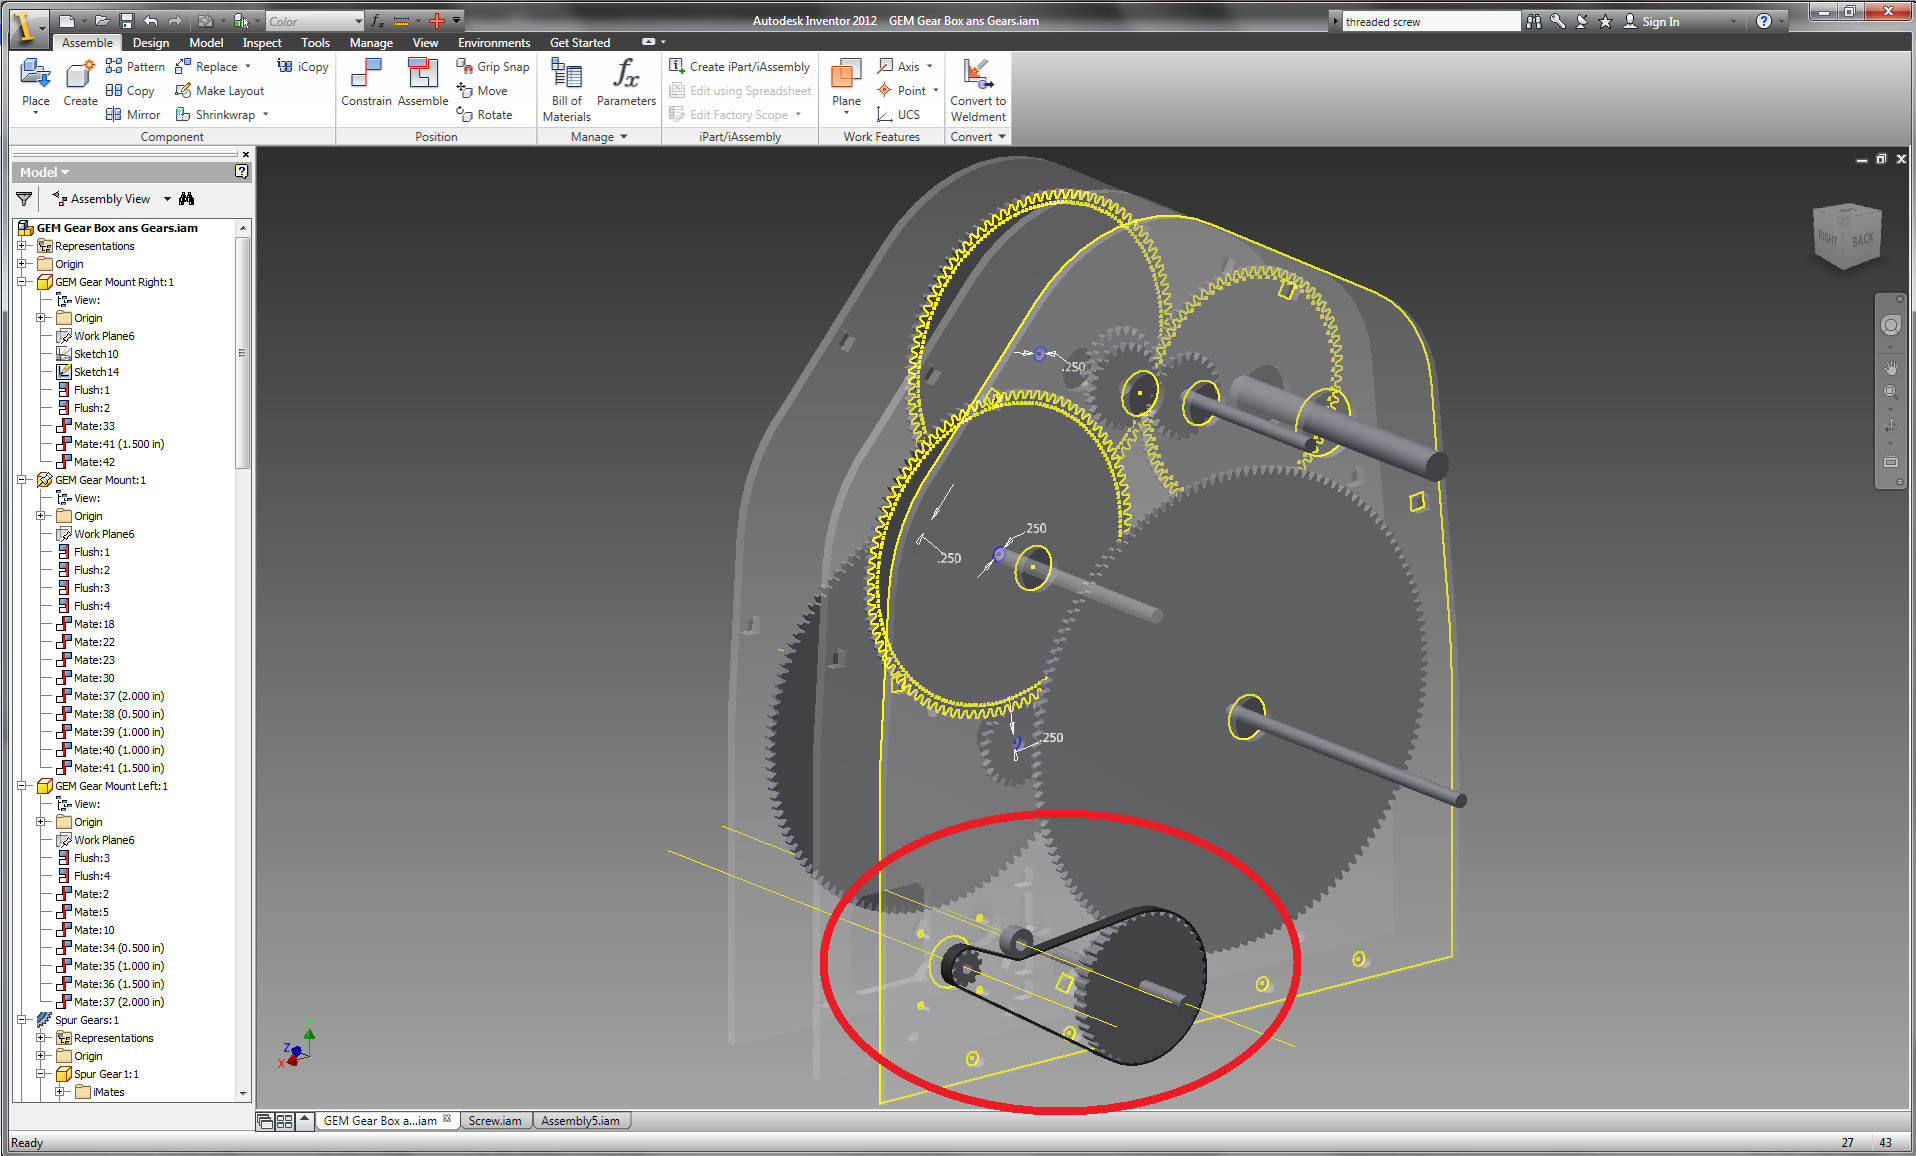
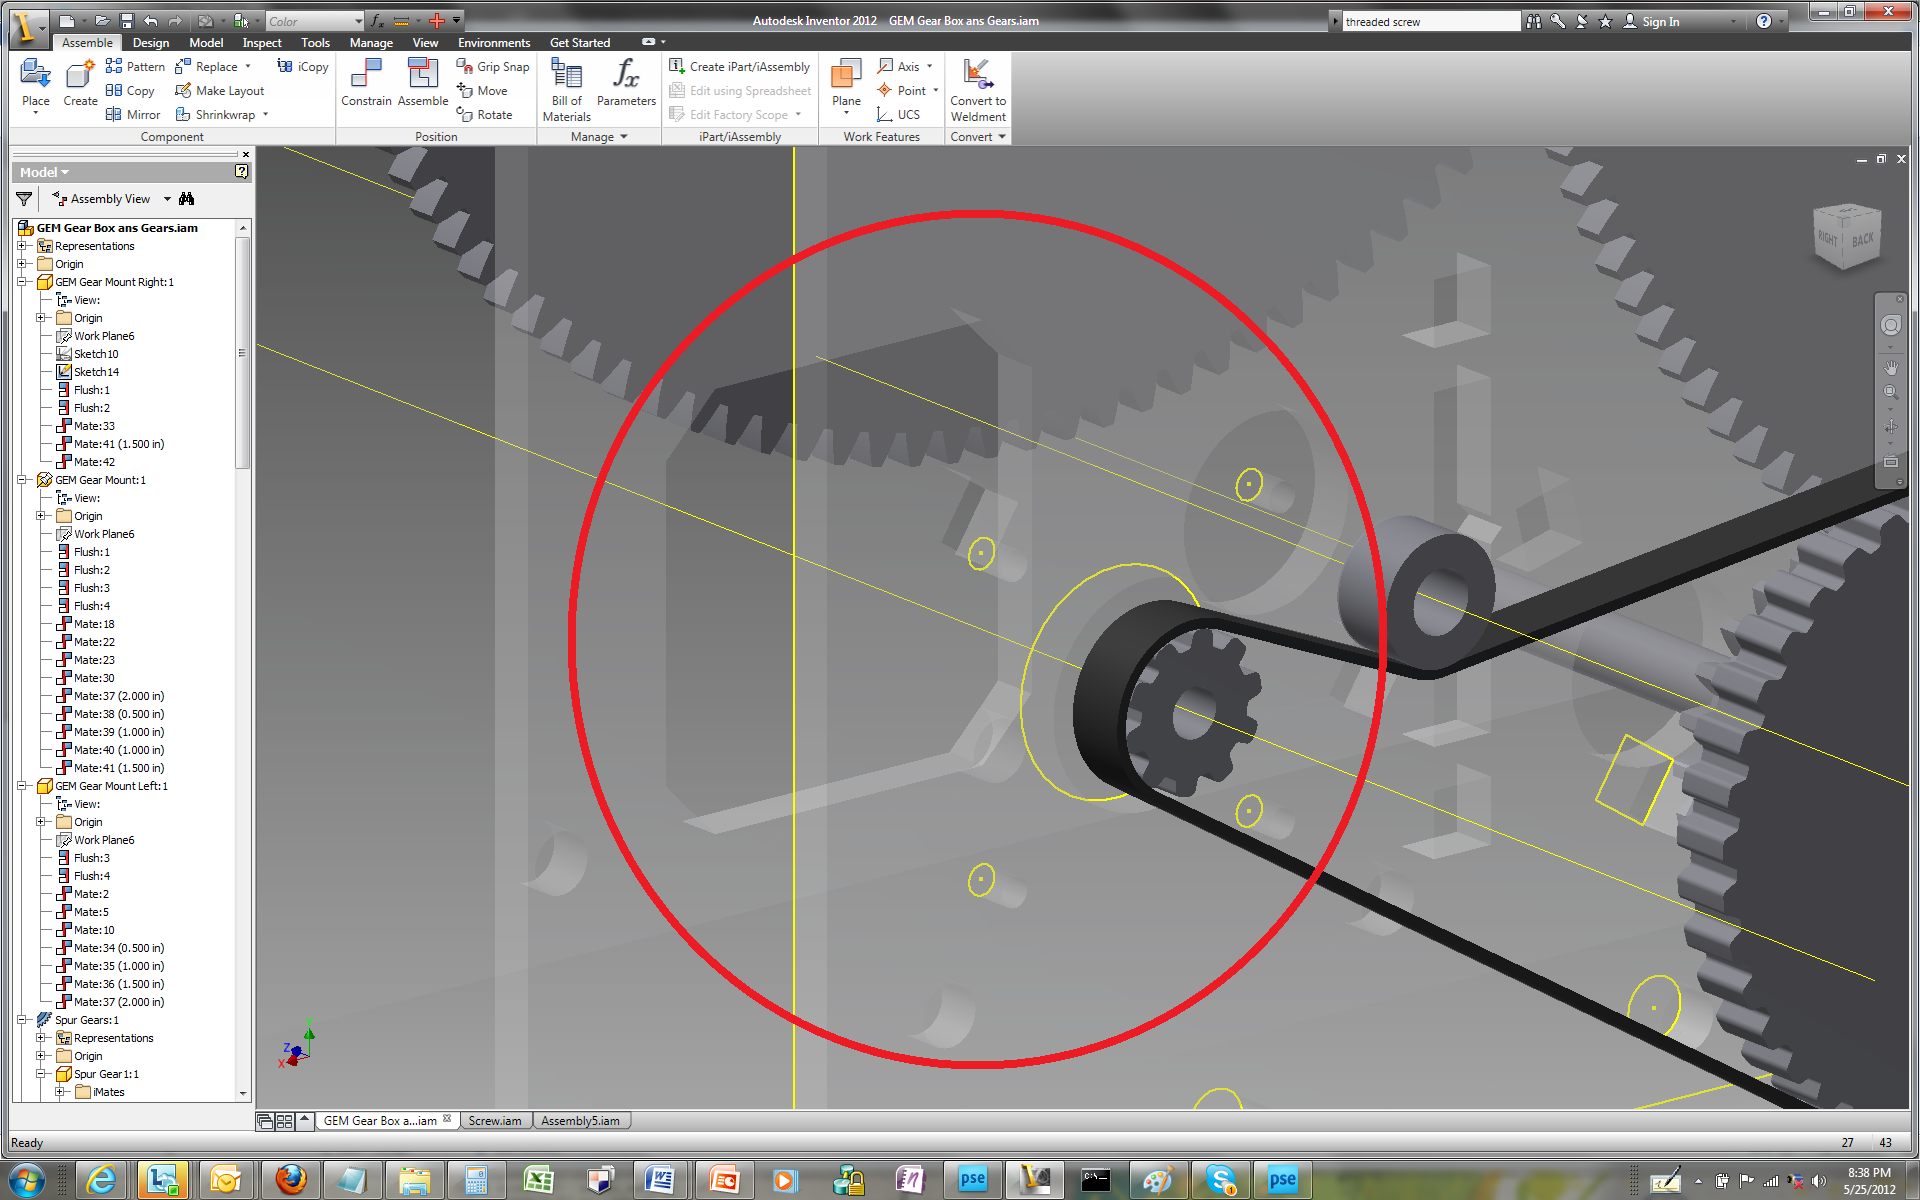
This last step of the physical design involves creating a timing pulley and a harness for the stepper motor. Autodesk Inventor provides a very nice wizard for this purpose, just like the gears.
Under the "Design" tab and within the "Power Transmission" group select the "Synchronous Belts" item. (See first illustration.)
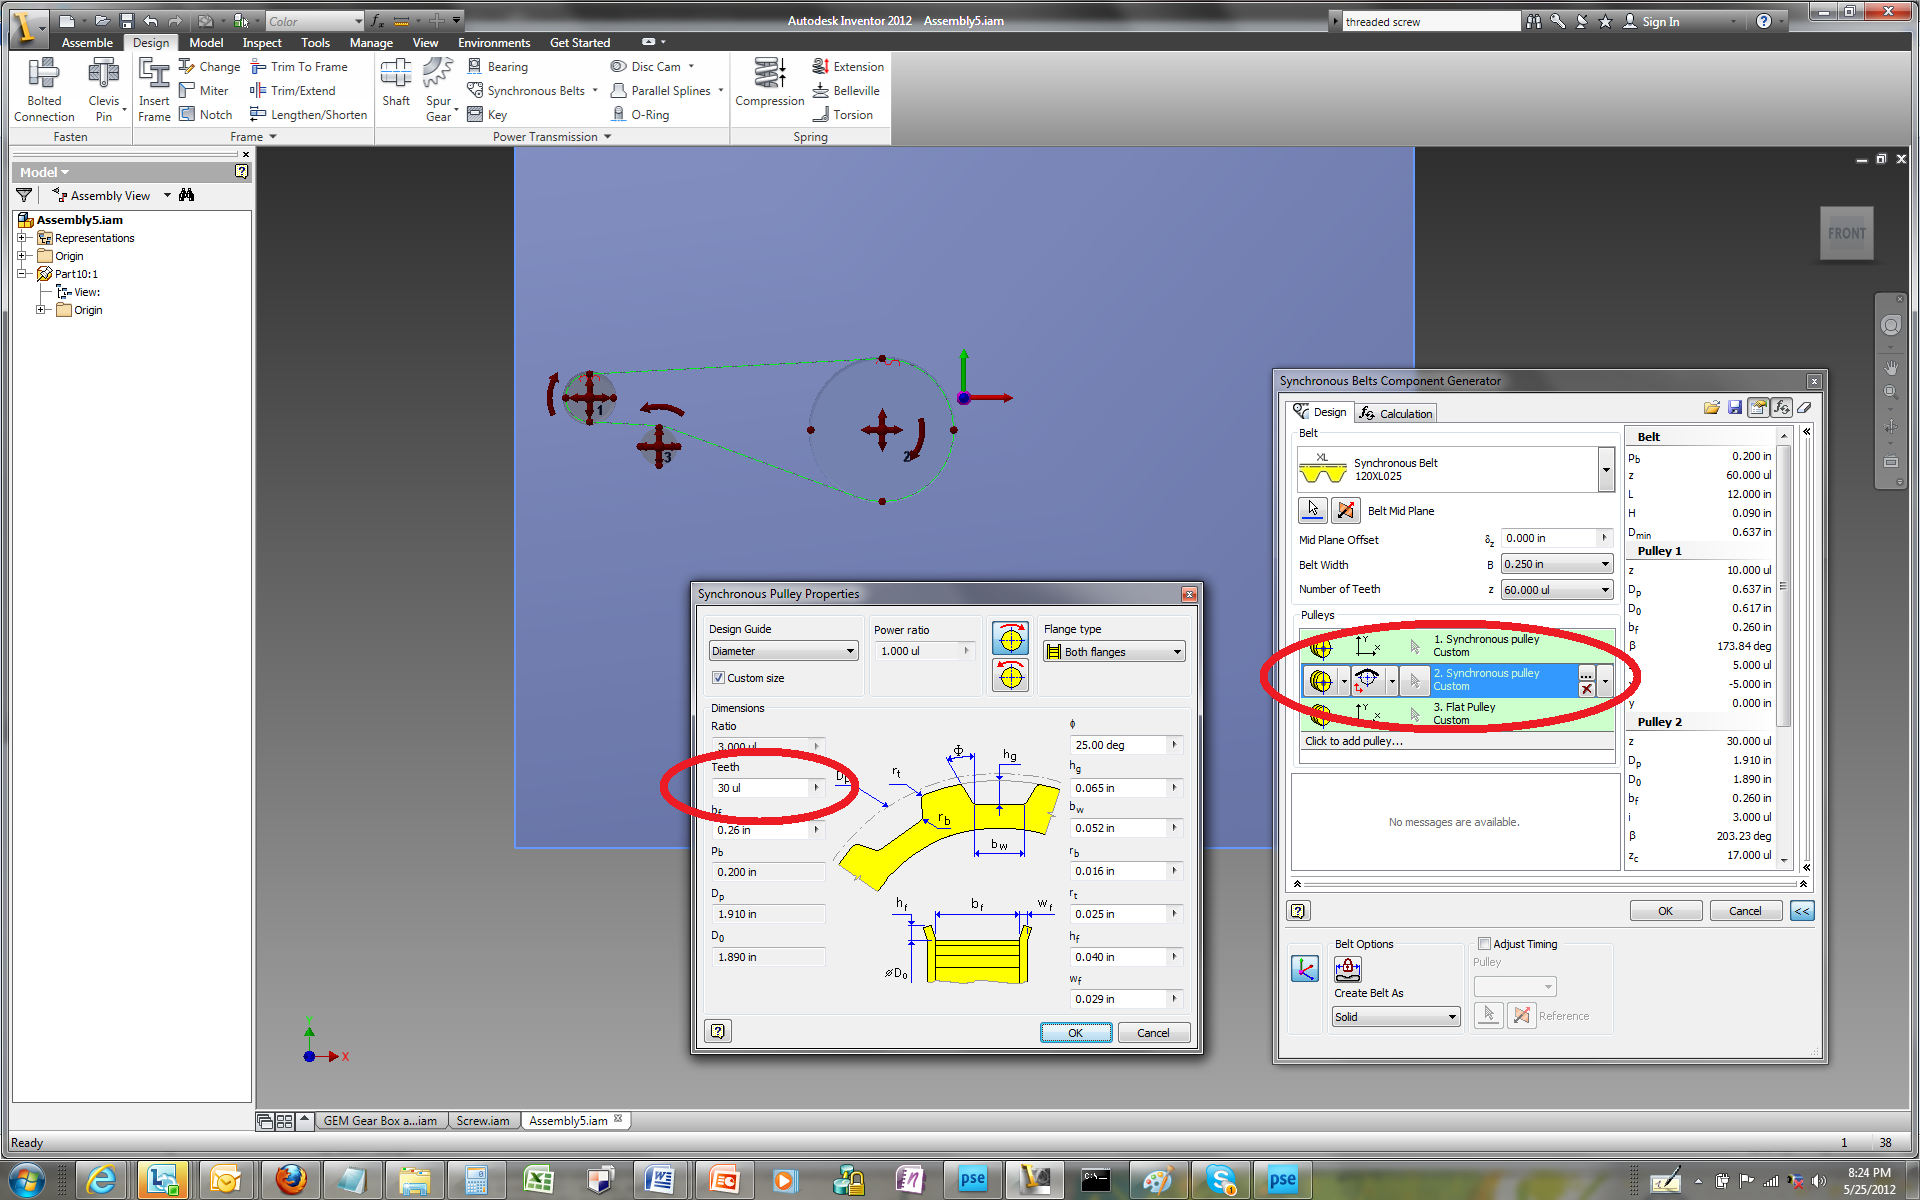
You will need to build the timing pulley on top of a solid object. I used a 1:3 ratio for transmitting the power from the stepper motor to the gear box. You will need to modify the number of teeth for each gear according the values you have chosen. (See second illustration.)
Now that you have designed the power transmission you must place it on the gear box. Link the center point of the larger timing pulley to the axle of the last gear in the gear box. Rotate the power transmission until it is in a good position on the outside of the gear box. (See third illustration.)
The final step in this process is to create the mounting features for the stepper motor so that it aligns with the power train. Use the center of the smaller primary timing pulley to place the center of the stepper motor onto the front panel. Then use this point to create the features needed to mount the motor. (See the fourth illustration.)
Fun With Lasers: Cutting Out the Components
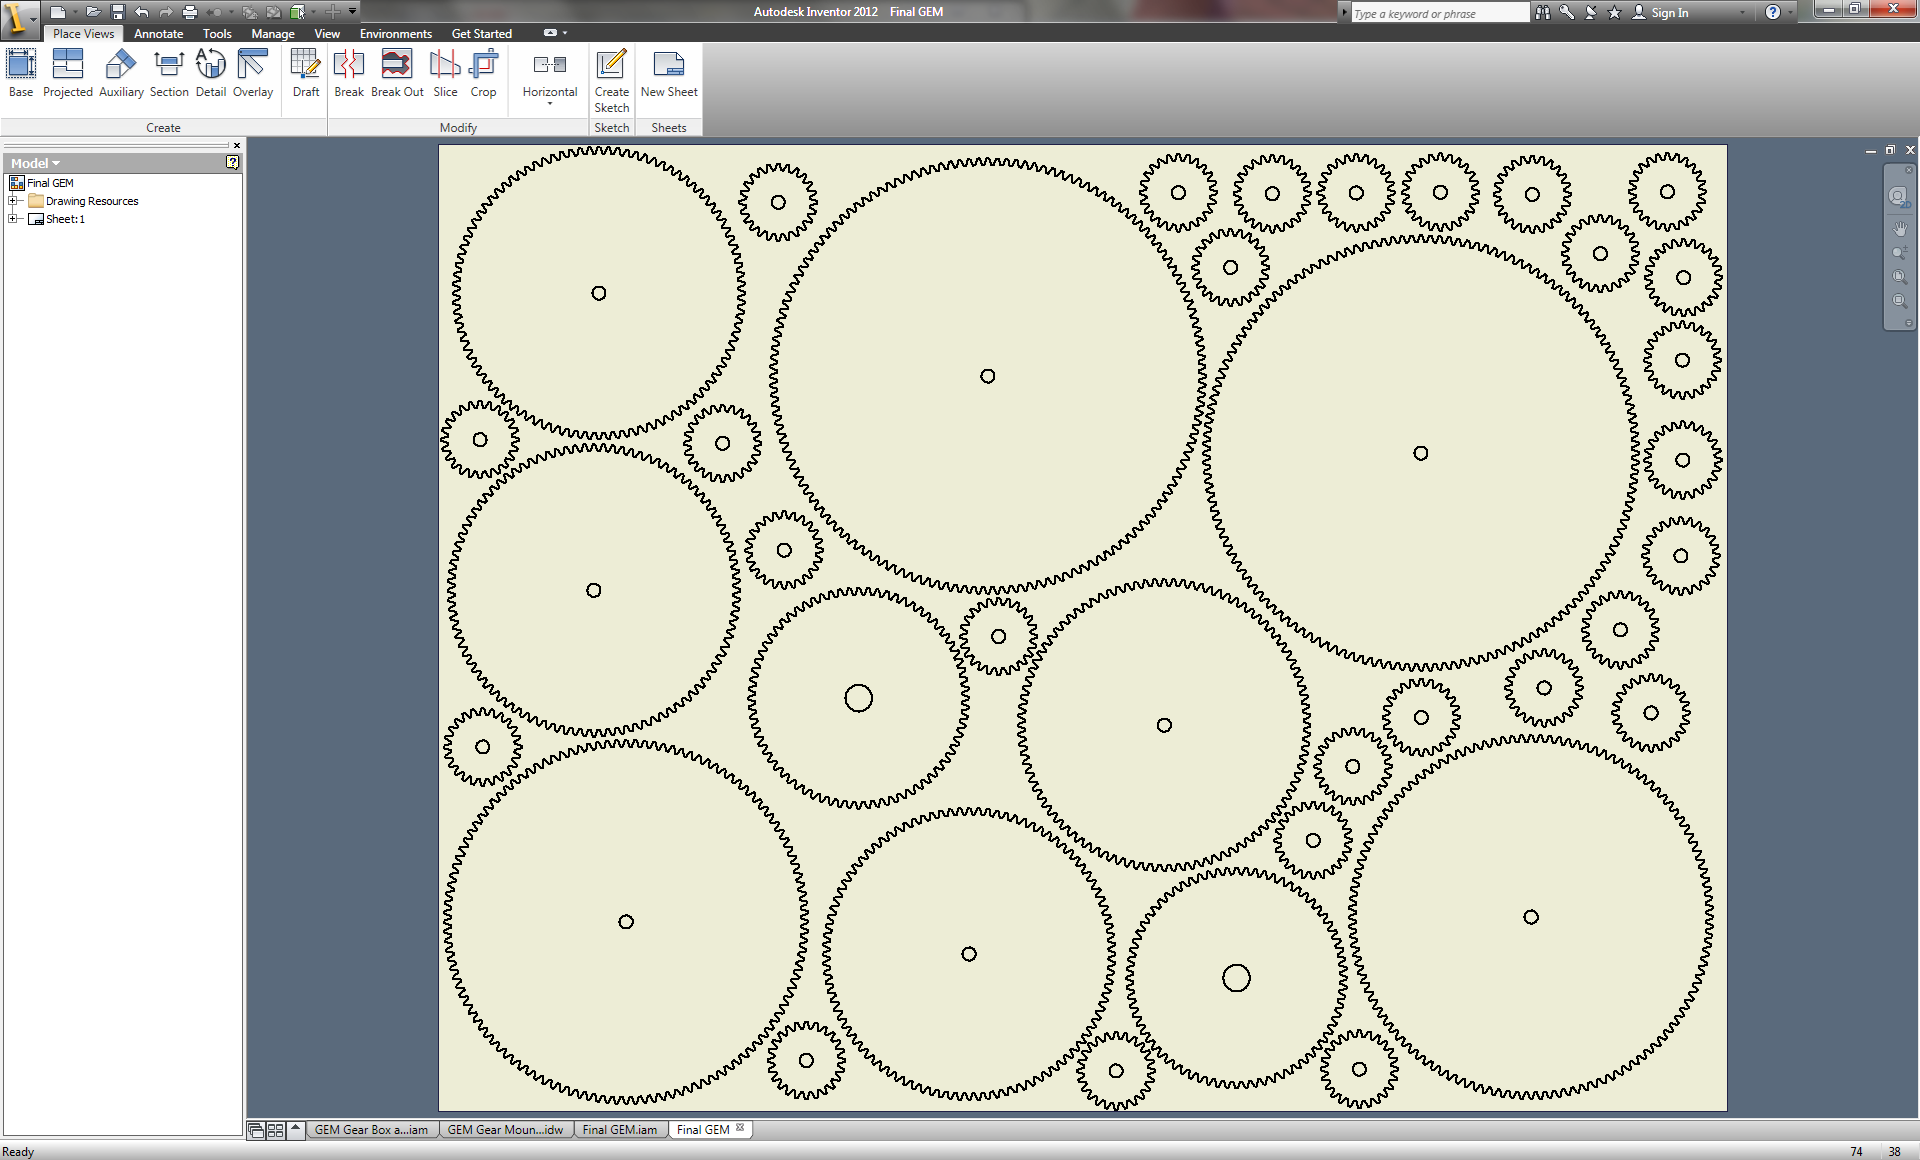
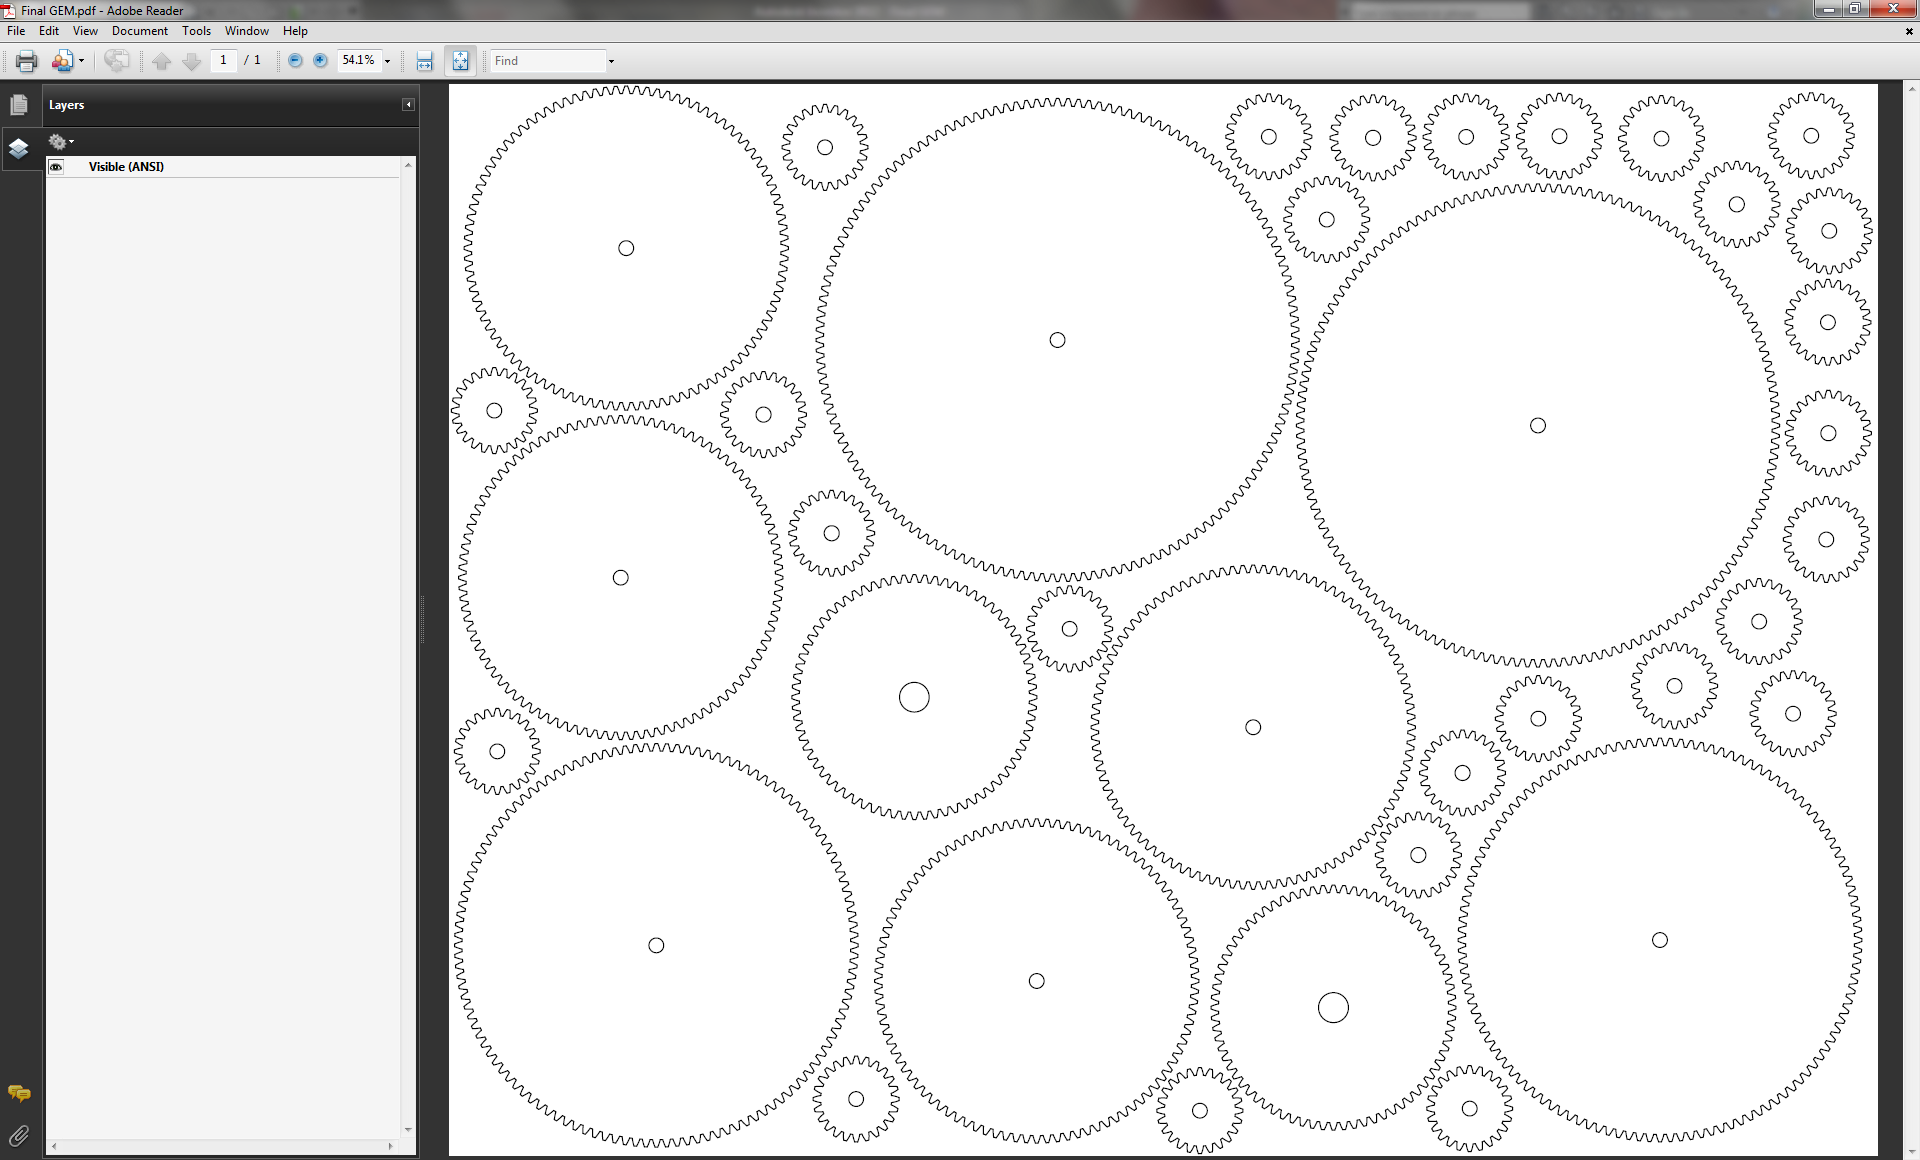
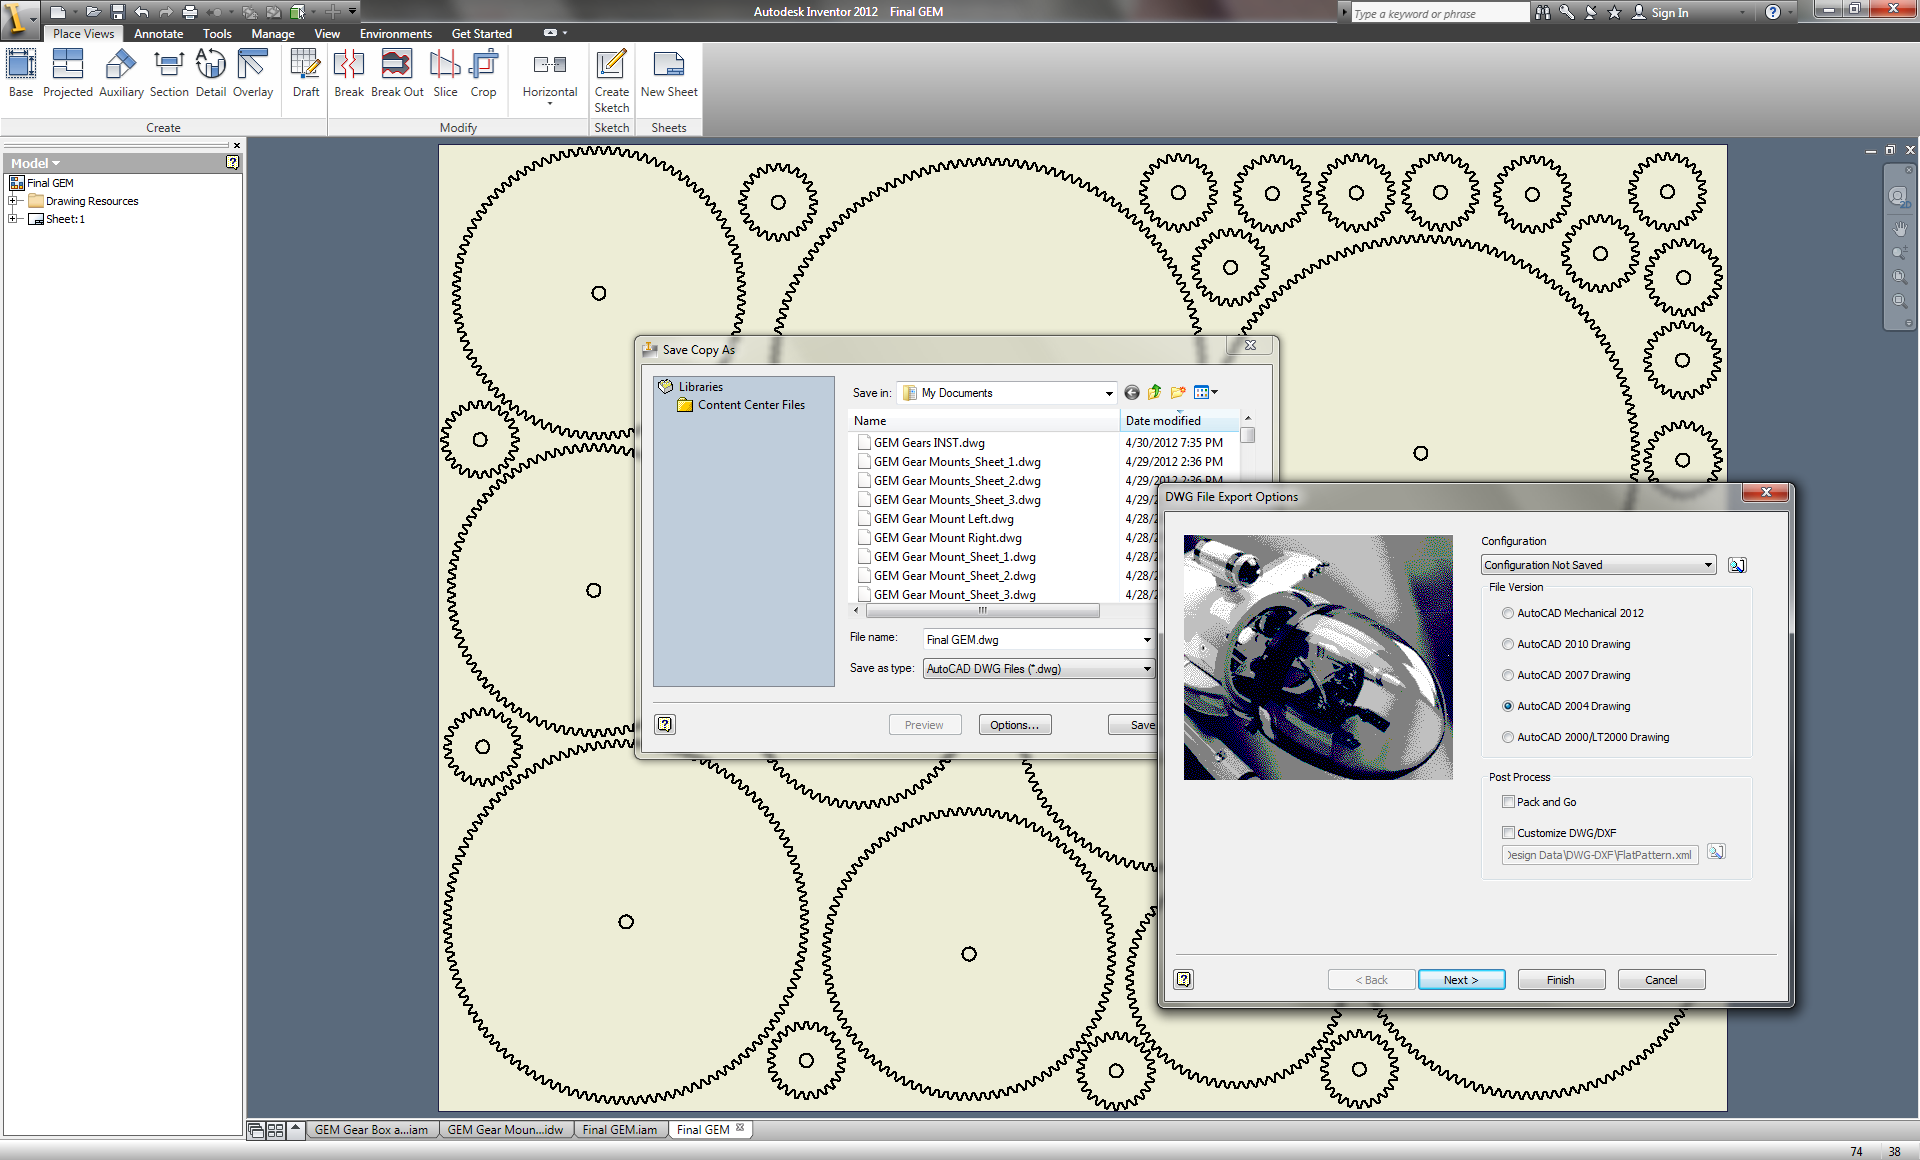
Once you have completed the design of the gears and the gear box you must convert the files into vector drawings that can be cut out using a CNC laser. First create a new drawing and delete the perimeter and author drawings. Change the size of the drawing to be equal to the size of your acrylic sheet. Paste your gears into one file. (See first illustration.)
Create additional drawings using the same method and import the panels you created for the gear box.
You should export these files into a format that is compatible with whatever vector drawing software you plan to use to cut the file. I chose to use Adobe Illustrator for this step and therefore exported the files as AutoCAD DWG files. For some reason the latest version of Adobe Illustrator only works properly with files saved as AutoCAD 2004 Drawings so make sure you select this option when exporting the file. (See second illustration.)
Next open the file in illustrator. (See third illustration.) After the file is loaded you must first select the entire drawing and change the width of all of the vectors to .001pt or smaller. The Epilog laser driver requires a very fine line to be interpreted as a cutting vector. If you skip this step the laser cutter will treat the vectors as rasterized images and only etch the images onto the surface of the acrylic. Finally before you print the images to the laser you must configure the laser to the specified parameters provided by the manufacturer for the material you are using. Once you have done this send the drawing over to the laser cutter and begin the cut!
Assembling the Gear Box and Power Train
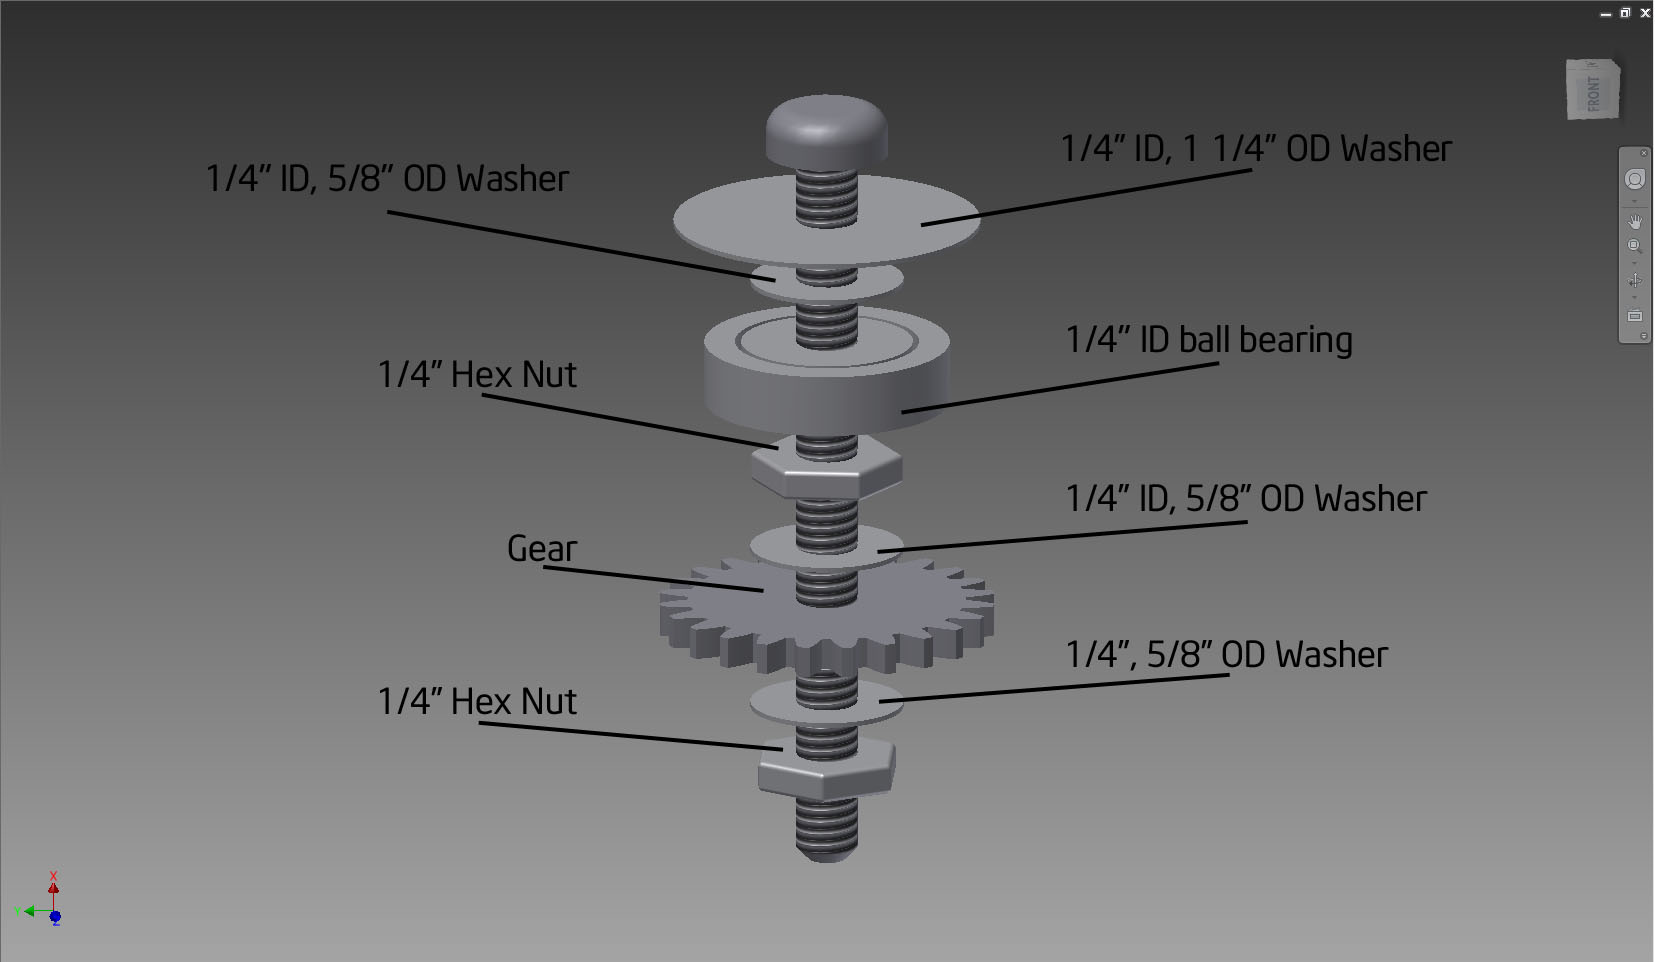
Excited with the naive belief that I was nearly finished, I plunged myself into this step. In my mind I was going to be taking long exposure photos that night! Ah, but reality soon knocked me back down to Earth. It turned out to be a multi-hour project with lots of back-tracking to complete the first assembly. Assembling the gear box is like assembling a 3D puzzle. With off-the-shelf nuts and washers the spacing will be inconsistent and therefore a direct guide on this part of the project is impractical. Instead I have provided a list below outlining the methods that I found useful in successfully solving this puzzle.
The parts that I used to assemble the gear box include the following items. All of these are listed in the tools and materials section of this tutorial as well as required quantities.
- 1/4" -20 thread machine screws (2 1/2")
- 1/4" -20 carriage bolts (2 1/2") to assemble the three panels
- 1/4" -20 hex nuts
- 1/4" x 1" Nylon Spacers to evenly space the three panels
- 1/4" ID (inner diameter), 5/8" OD (outer diameter) washers
- 1/4" ID, 1 1/4" OD washers
- 1/4" ID ball bearings
- 1/2" -13 steel threaded rod (providing the rotational platform for camera)
- 1/2" -13 hex nuts
- 1/2" ID, 1 1/2" OD washers
- 1/2" -13 to 1/4" -20 reducing coupler (to attach the camera mount to the steel rod)
- 1/2" ID ball bearings
Be systematic in the assembly process
We engineers have a terrible habit of jumping directly into the pool before checking the water. Have a plan mapped out for how you will proceed from a collection of parts to the final assembled machine. I began by first assembling the gears and axles to the same panel that the power transmission system is mounted on. From there I built up each additional layer of the gear box paying special attention to the 3D CAD drawing as I went.
Be prepared to retrace your steps
As you go through the process of assembling the parts you will find that the spacing of the gears will need to be adjusted. This will require a bit of disassembly of the components to make the adjustments. Don't get caught up in the desire to tighten down every nut as you go. This will only make it more difficult to go back and make these adjustments later.
Have all of your parts and tools organized and available
You will need to focus a great deal on the process as you go in order to keep track of your progress. As mentioned above, it will be necessary to retrace your steps to make minor modifications as you go. Of course once you retrace your steps you'll need to continue your progress. Without a clear mental image of the assembly process you have followed it will be very difficult to progress towards completion. By having all of the parts and tools organized you will not be distracted by looking for things as you go and will consistently advance towards completing the assembly.
Plan for space and time
You will need plenty of space to work on the assembly as well as a number of uninterrupted hours. Block off at least a few hours of time to work on the assembly. You may still need to stop and resume the project, but the more you separate the assembly process into discontinuous stages the slower and less efficient the process will be.
Programming the Motor Controller
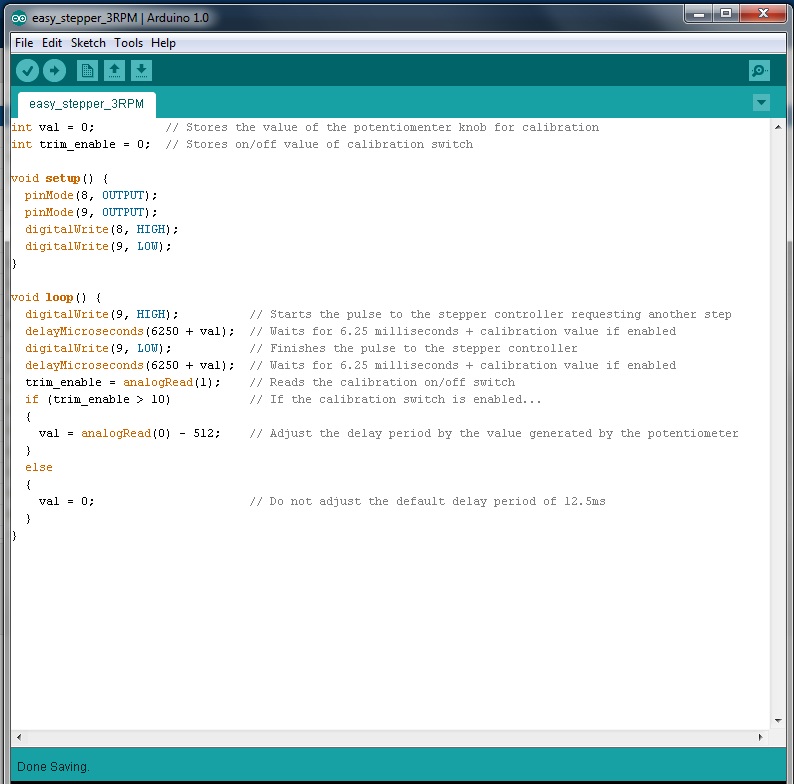
Once the physical construction is completed you will need to program and wire up the Arduino Uno board and the stepper motor controller to the stepper motor. Since I decided to use a 3:1 ratio for the power train I had to program the stepper motor to rotate at 3RPM to achieve one rotation per day on the camera spindle.
I also chose to implement a calibration knob to make fine tune adjustments to the rotation speed, in case this was necessary. The source code for the Arduino is very simple:
===================================================================
int val = 0; // Stores the value of the potentiomenter knob for calibration
int trim_enable = 0; // Stores on/off value of calibration switch
void setup() {
pinMode(8, OUTPUT);
pinMode(9, OUTPUT);
digitalWrite(8, HIGH);
digitalWrite(9, LOW);
}
void loop() {
digitalWrite(9, HIGH); // Starts the pulse to the stepper controller requesting another step
delayMicroseconds(6250 + val); // Waits for 6.25 milliseconds + calibration value if enabled
digitalWrite(9, LOW); // Finishes the pulse to the stepper controller
delayMicroseconds(6250 + val); // Waits for 6.25 milliseconds + calibration value if enabled
trim_enable = analogRead(1); // Reads the calibration on/off switch
if (trim_enable > 10) // If the calibration switch is enabled...
{
val = analogRead(0) - 512; // Adjust the delay period by the value generated by the potentiometer
}
else
{
val = 0; // Do not adjust the default delay period of 12.5ms
}
}
===================================================================
Wiring Up the Electronics
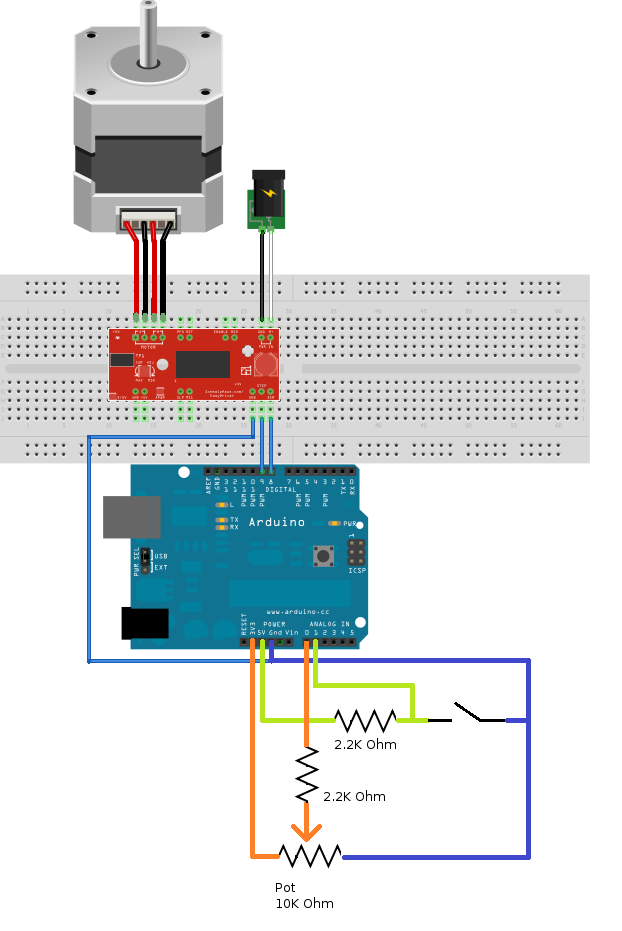
In addition to the Arduino board I used an inexpensive stepper motor controller called the Easy Driver. Information for this device can be found at http://www.schmalzhaus.com/EasyDriver/index.html. The source code from the previous step was derived from the source code provided at this site.
The illustration below is a modification from the examples page at http://www.schmalzhaus.com/EasyDriver/Examples/EasyDriverExamples.html
I've added the potentiometer and switch which are used to calibrate the speed of the stepper motor. This design reads the voltage off of the wiper of the potentiometer as an analog input and takes the digital value (0 - 1023) as the calibration offset. The switch used in this circuit determines whether or not the stepper motor speed will be offset by this value.
Final Product
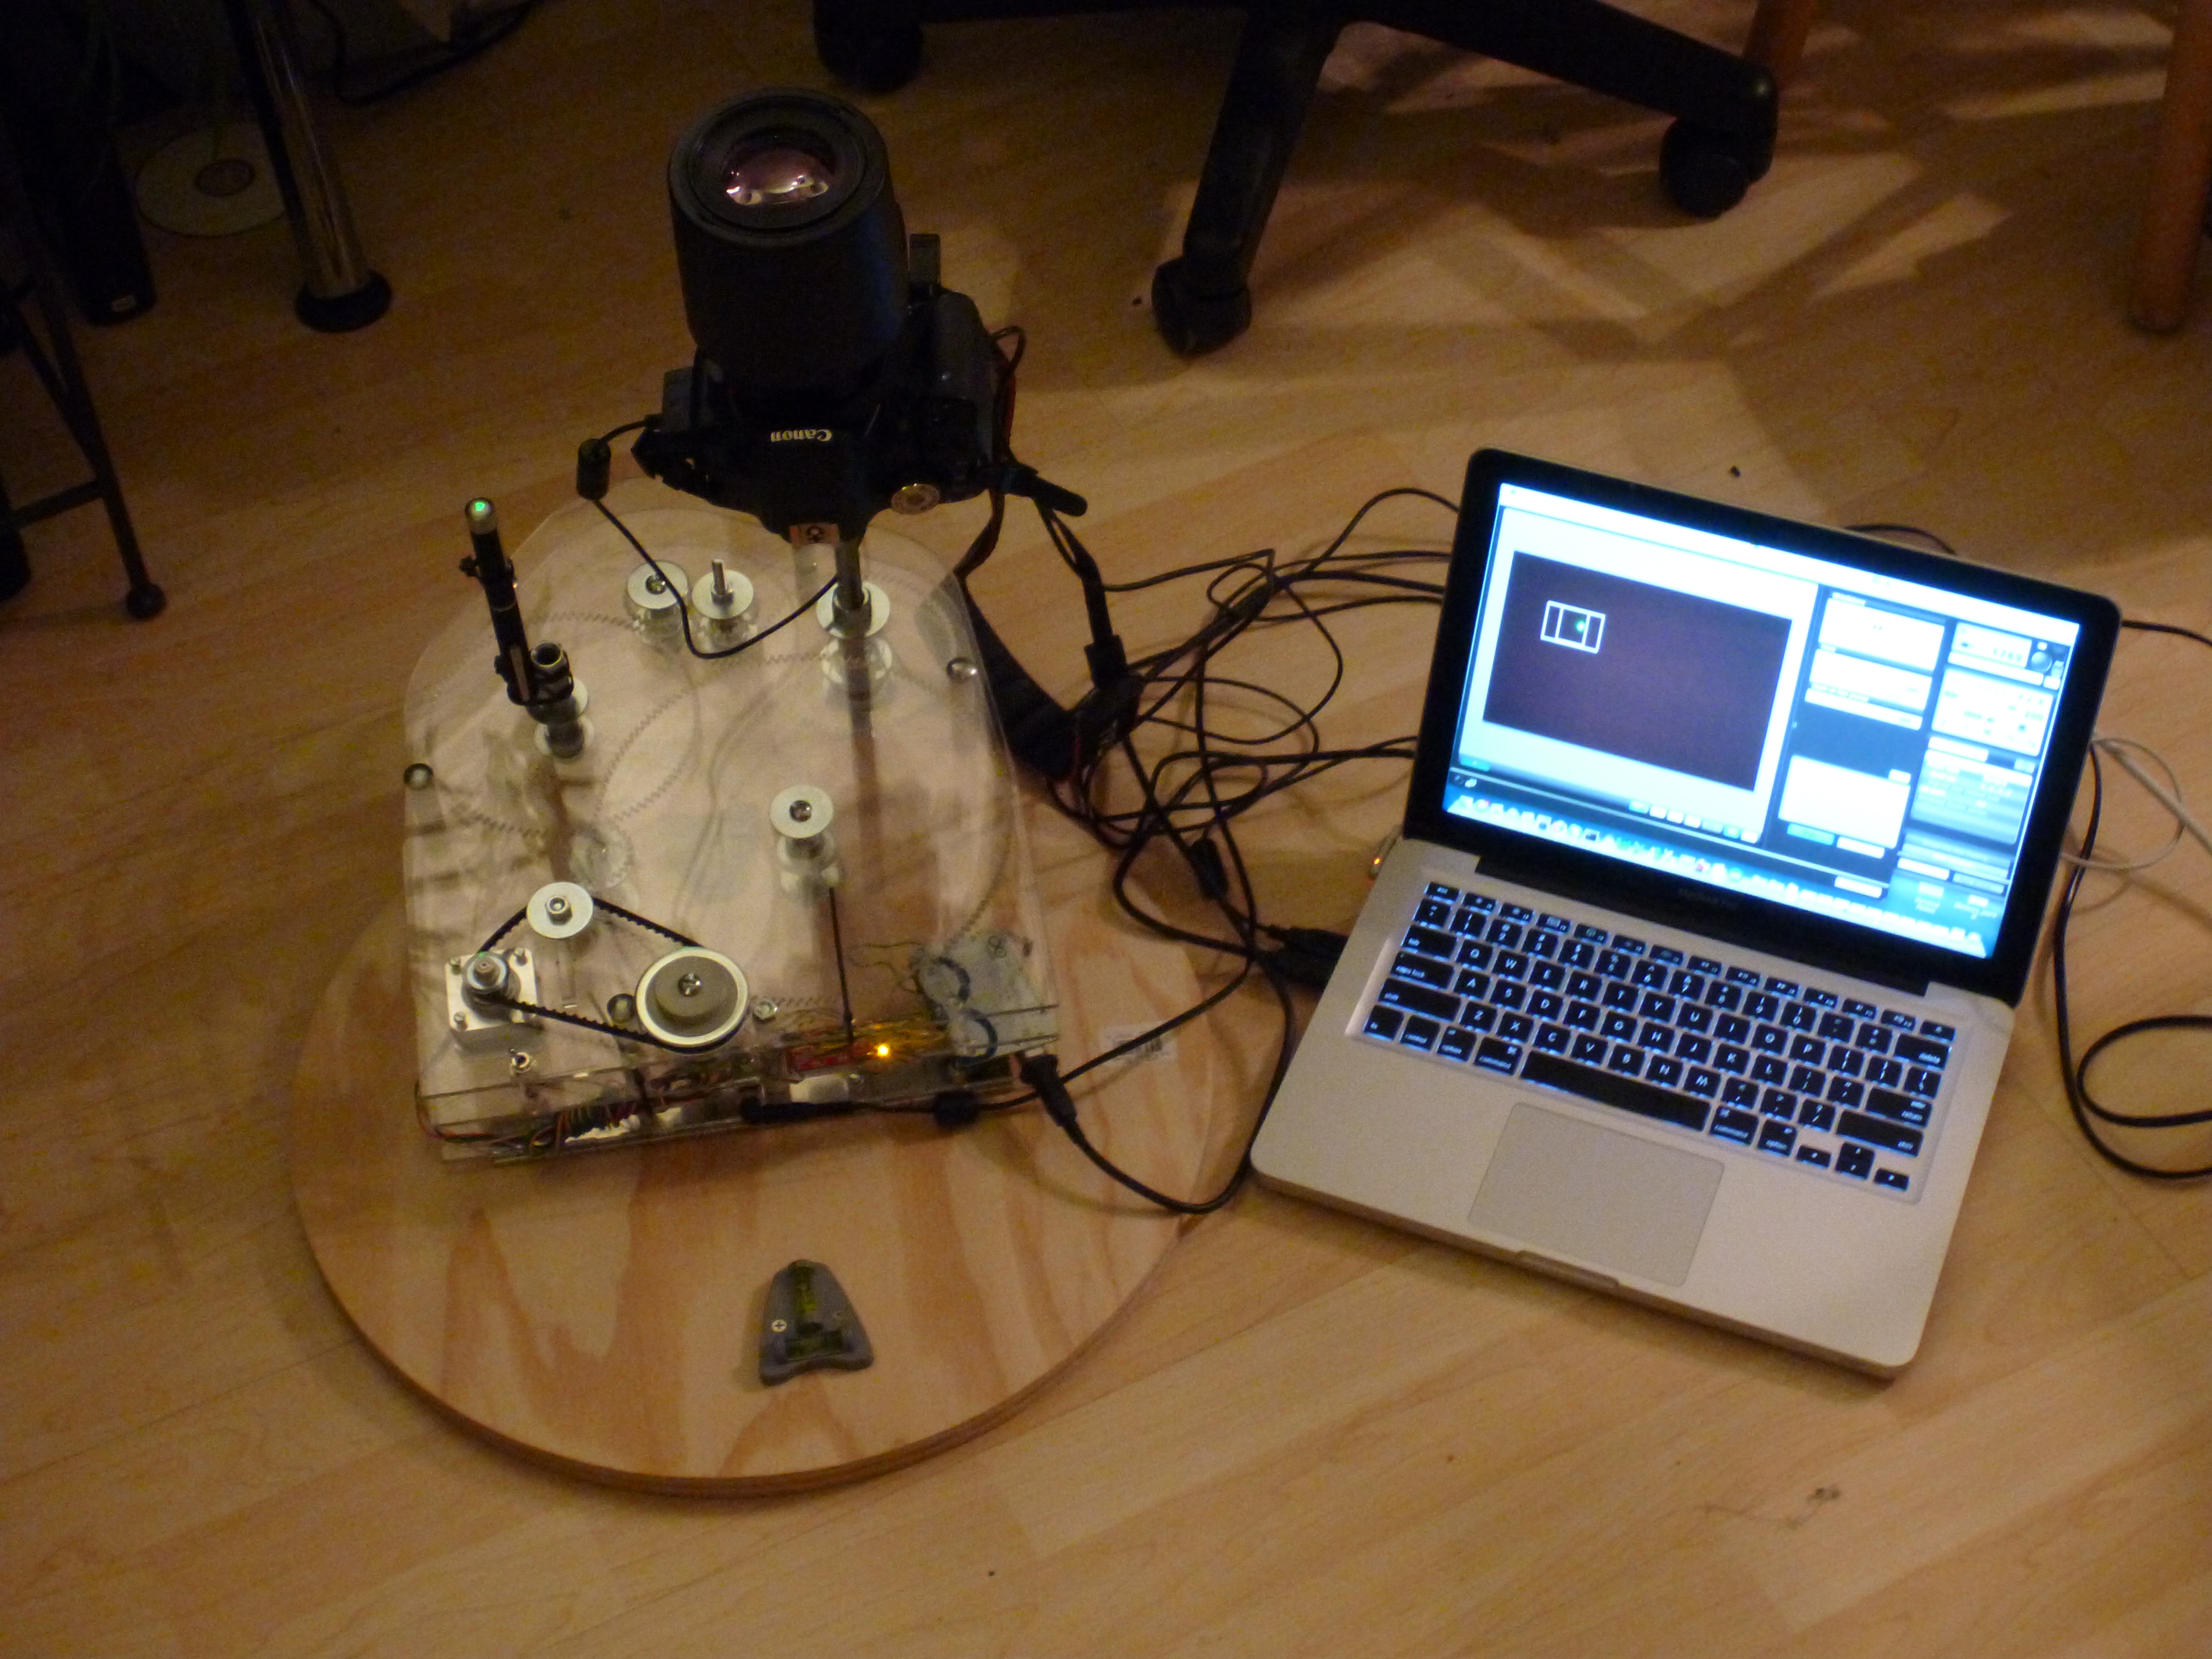

After finishing the electronics you will need to finish the build by mounting the unit to a stable platform. I used a 20" diameter plywood circle and the piano hinge listed in the Tools and Materials section. It is important to use a large stable platform to minimize motion and vibration. If your platform is unstable your mount will be more likely to move during a long exposure and this could show in your photos.
You will also want to attach at least one level to the base. This will allow you to create a more precise alignment to the rotational plane of the planet. If you are using a green laser (as shown in the pictures) you will not need the levels. The laser allows you to point the mount towards the polar star without the need for measuring angles.
To attach the Pan and Tilt tripod head you need to first cut off about 1/2" of one of the 1/4" machine screws. Now take the stud you just made and screw it into the 1/2"-13 to 1/4"-20 reducing coupling nut also listed in the materials section. This should then be screwed on to the 1/2" threaded rod and the tripod head finally attached to this adapter.
The final (optional) step is to attach a green laser to a 1/4" coupling nut using zip ties and screw this on to one of the exposed machine screws to act as an optical guide.
The illustrations below show the final product based on the materials I used for this project.
The Results: Long Exposure Astrophotography
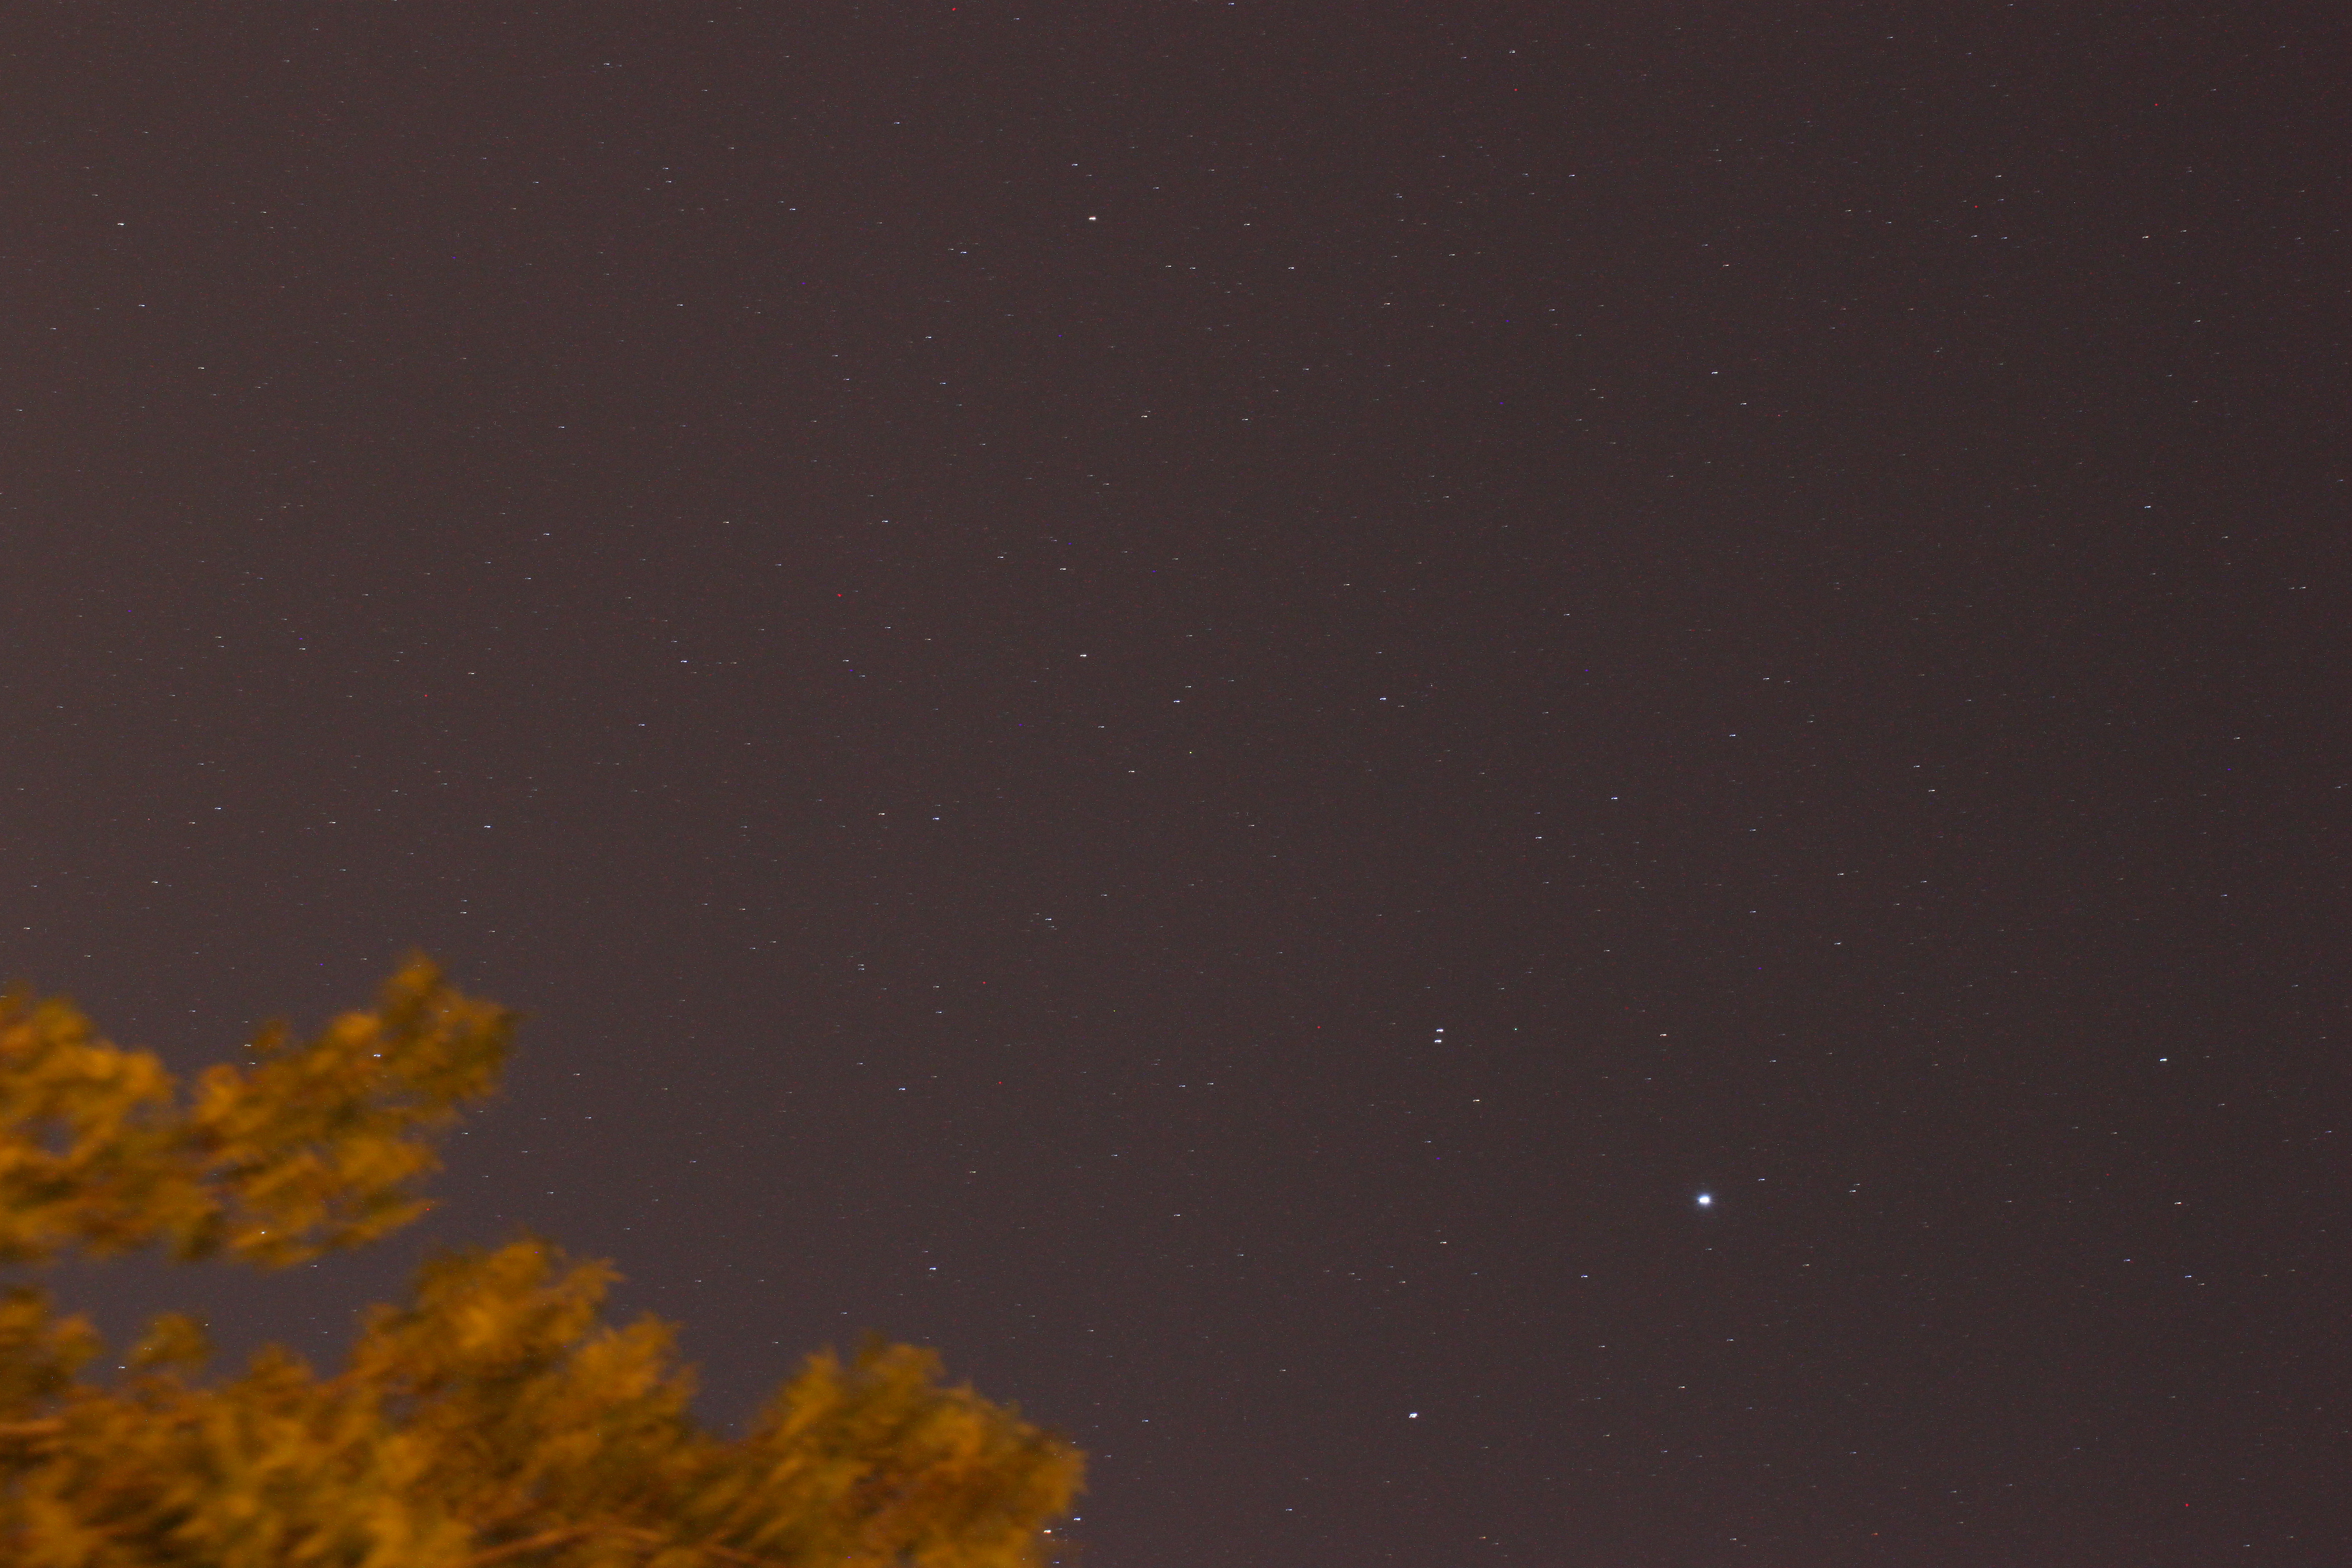
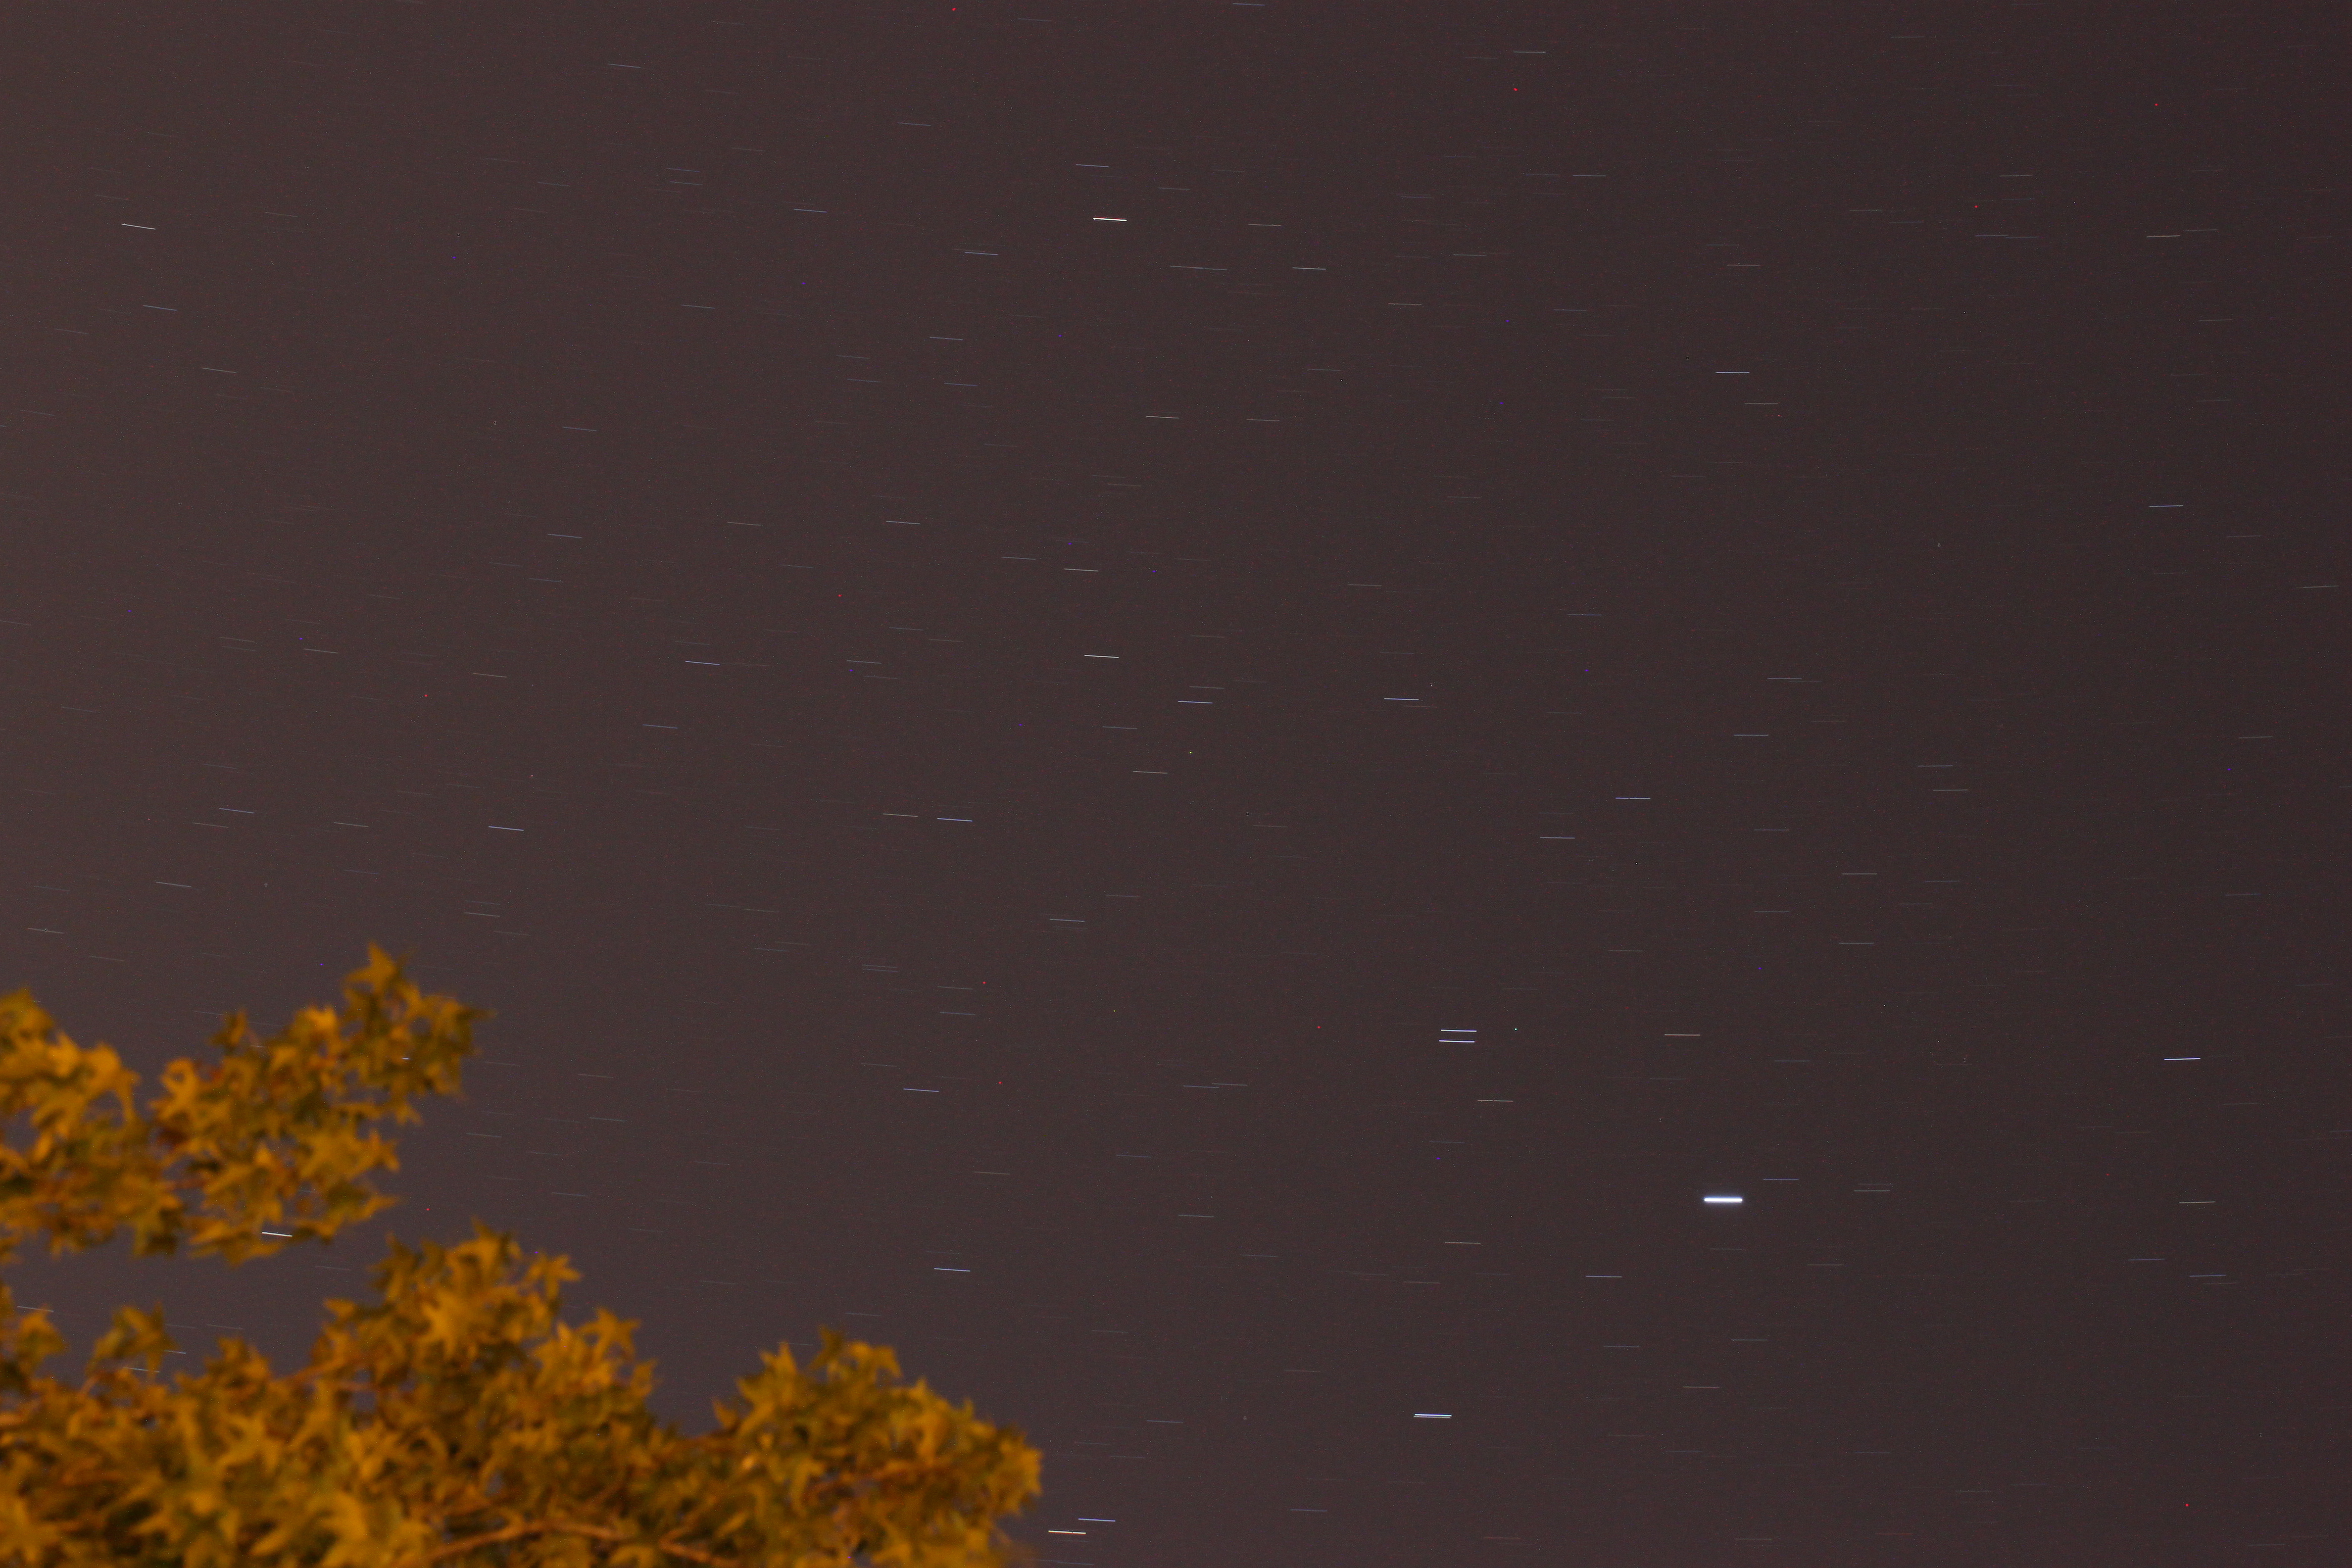
I just finished my first test of the equipment and I am extremely happy with the initial results. I performed a very rough alignment of the system to Polaris using the green laser. I then used the remote live view software with my Canon to line up and shoot two test images. The first illustration shows a 60 second capture of the Western sky from my patio with the equatorial mount engaged. The second shot was configured with identical settings but with the equatorial mount turned off. Both pictures were taken with a 100MM L Macro at 400 ISO. The difference between the two shots is very pronounced!
I am very excited to take some more pictures with my 400mm lens + 1.4x + 2.0x extenders! It is an amazing feeling to see this project working after all of the time I've placed into it and am excited to move forward from here.
I am very excited to take some more pictures with my 400mm lens + 1.4x + 2.0x extenders! It is an amazing feeling to see this project working after all of the time I've placed into it and am excited to move forward from here.
What's Next...?
I've learned a lot during this process and have a few thoughts one what to do next...
Auto alignment using GPS module for the Arduino
Stepper motor controls of angle and azimuth for camera mount
Celestial object finder
Moon tracker
Improved materials
Smaller design
Many more....
Stay tuned for the new and improved version two.
http://www.123dapp.com/stl-3D-Model/Equatorial-Mount-for-Astrophotography/667245