How to Build a 3D Printed Wire Bender
by designedtomake in Workshop > 3D Printing
3193 Views, 39 Favorites, 0 Comments
How to Build a 3D Printed Wire Bender

In this project, I'll show you how to build a 3D printed wire bender. This tool is specifically designed to coil wire to different diameters, creating perfectly uniform circles. I originally built this to handle very springy, high-tensile piano wire for a 3D printed cross-roller bearing that you can check out here if you're curious, but as you'd see it's also effective for other materials. This guide will walk you through the design, the parts, and the assembly process.
Supplies
Materials & Tools
- 3D printer and filament (I used polycarbonate for some high-stress parts)
- A base (3D printed)
- A bearing block (3D printed)
- A carbon fiber axle (or a suitable metal rod)
- Bearings to keep the axle centered
- Two sleds (3D printed) with threaded inserts (one right-handed, one left-handed)
- A threaded rod with a right-handed and a left-handed thread section
- A central housing with bearings to hold the threaded rod
- Guide rails (I used 10mm x 10mm MakerBeam, but a linear bearing shaft could also work)
- Grommets and various nuts/bolts
- Basic assembly tools
The Design & Mechanics


The core of this wire bender's design is the use of a threaded rod with both a right-handed and a left-handed thread. The two sleds are each attached to one of these threaded sections. When I turn the rod, the right-handed thread pulls one sled in one direction while the left-handed thread simultaneously pulls the other sled in the opposite direction. This ensures that the two sleds move towards or away from the central pulley at the exact same rate. This simple but effective mechanism helps to ensure a perfect, consistent circle every time.
Printing the Parts


I've designed all the parts to be 3D printable. You'll need to print the base, bearing block, sleds, central housing, and other small components. I recommend printing the sled bearings in a strong material like polycarbonate, as they will experience high forces perpendicular to the printed layers. I learned this the hard way after a previous version built with PLA didn't last very long.
Assembling the Base and Guides


Start by assembling the main structure.
- Attach the bearing block to the base.
- Insert the carbon fibre axle and its accompanying bearings into the bearing block.
- Mount the 10mm x 10mm MakerBeam guide rails to the base. I chose MakerBeam for its rigidity and to see how well the T-slots would work to constrain motion, but you could use a standard linear bearing shaft as an alternative.
Assembling the Core Mechanism


Now you'll assemble the key moving parts.
- Secure the threaded inserts into the two sleds. Make sure to use the correct insert for the right-handed and left-handed threads on your rod.
- Slide the sleds onto the guide rails.
- Install the central housing, which holds the bearings for the threaded rod and the grommets.
- Carefully insert the threaded rod through the central housing and into the sleds.
- Turn the rod to ensure that the sleds move smoothly and simultaneously towards and away from the center.
Testing the Wire Bender


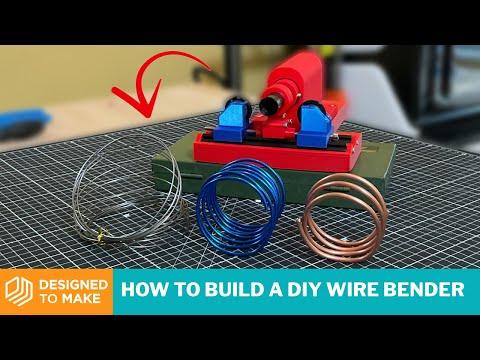
With the bender assembled, I put it to the test with a few different materials:
- 1.2mm Piano Wire: This is a very springy, high-tensile wire. The bender did an excellent job of creating a consistent, uniform coil.
- 3mm Anodized Aluminum Wire: This is a much more ductile craft wire. The bender was able to bend it relatively well.
- 3mm Copper Tubing: I also tested it on this material. The bender successfully formed it into a uniform coil.
While the bender works well on all the materials, it's most valuable for the very springy piano wire, where hand-bending is nearly impossible to get a consistent coil. For the more ductile aluminium and copper, you could probably use a correctly sized rod to bend the wire by hand. However, if you need to fine-tune the exact diameter or create a large coil (like the size of a tin can), a scaled-up version of this design would work perfectly.
Final Thoughts

I'm very happy with what I've achieved with this project. I've designed and built a specialized wire-bending tool that works well and solves a specific problem. I hope this project inspires you to tackle your own unique engineering challenges with 3D printing.