How to 3D Scan, Sculpt, and 3D Print Custom Earrings
by PatrickBrennanDesign in Craft > Jewelry
930 Views, 2 Favorites, 0 Comments
How to 3D Scan, Sculpt, and 3D Print Custom Earrings
3D printing is a fascinating technology that is becoming increasingly accessible to the public, particularly for designers and artists. Incredibly powerful 3D scanners now exist for free on mobile app stores, and allow users to quickly create fully textured and UV-mapped models of complex natural objects with relative ease. With this, I hope to explore spiraling patterns and organic, botanical forms to create functional jewelry.
This project is created as a course assignment at the California State University, Long Beach; taught by Behnaz Farahi: DESN 551: Materials, Tools, and Techniques of Prototype.
Supplies
Overview
- An iPhone or iPad with a LiDAR Lens
- Scaniverse
- Meshmixer
- Rhino 7
- Object(s) that you would like to scan
- A white backdrop
- Good lighting
- Earring backings
- Jewelry and metal glue
Software
An iPhone with a LiDAR Lens (iPhone 12 or newer)
In order to bring your physical object into the digital space, you can use an iPhone or iPad equipped with a LiDAR lens. These are standard on iPhone 12 and newer.
Scaniverse (free mobile app)
Scaniverse is an incredibly powerful mobile 3D scanner and it is available for free on the iOS app store! It is capable of producing very high-quality 3D scans right from your iPhone or iPad, and generates universal files that can be exported to the 3D-modifying software that we will be using later in this tutorial.
Meshmixer (free software)
Meshmixer is free software available from Autodesk. It is a relatively simple 3D editing software. This is where we will be doing a majority of the initial cleanup for our model.
Rhinoceros (paid software) or Blender (free software)
Rhinoceros is a very powerful CAD software capable of designing incredible things in 3D. It is not free, however it is available to students at a deep discount -- and very worth the investment.
For a free alternative, use Blender. Blender is a very versatile software capable of handling a myriad of 3D projects, including what we will be making in this tutorial.
Other materials
Objects that you'd like to scan
3D scanners are capable of capturing color patterns and textures that would be incredibly difficult to replicate otherwise. To take full advantage of its capabilities, I recommend something from nature. I chose a succulent from my garden.
A word of caution...
Some challenges that I personally have encountered are with thin or almost-flat objects, like leaves, as well as glossy objects. This is due to the nature of 3D scanning not receiving enough, or misinterpreting, the information collected by Scaniverse's recordings.
A white background
White backgrounds create a clear contrast between the subject of the scan and its surroundings. There are a multitude of inexpensive ways to achieve this, such as pieces of paper, 2 pieces of foam presentation board from a big box store, a bed sheet, or even a white wall and table.
Good lighting
The better the lighting, the better the object scan. A ring light, a setup near a window, or direct light outdoors is optimal for 3D scanning.
Earring backings
This hardware is necessary for the stud earrings we will be making in this example. These can be purchased in large quantities for a low cost through craft stores or Amazon. They come in multiple sizes, so the size will be dependent on your specific design. But for this example, I used a 6mm stud with a butterfly backing.
Jewelry and Metal Glue
I recommend Aileen's Jewelry and Metal Glue for its instant bond. Please familiarize yourself with the warning labels and use proper PPE when using the glue.
Set Up for Scanning
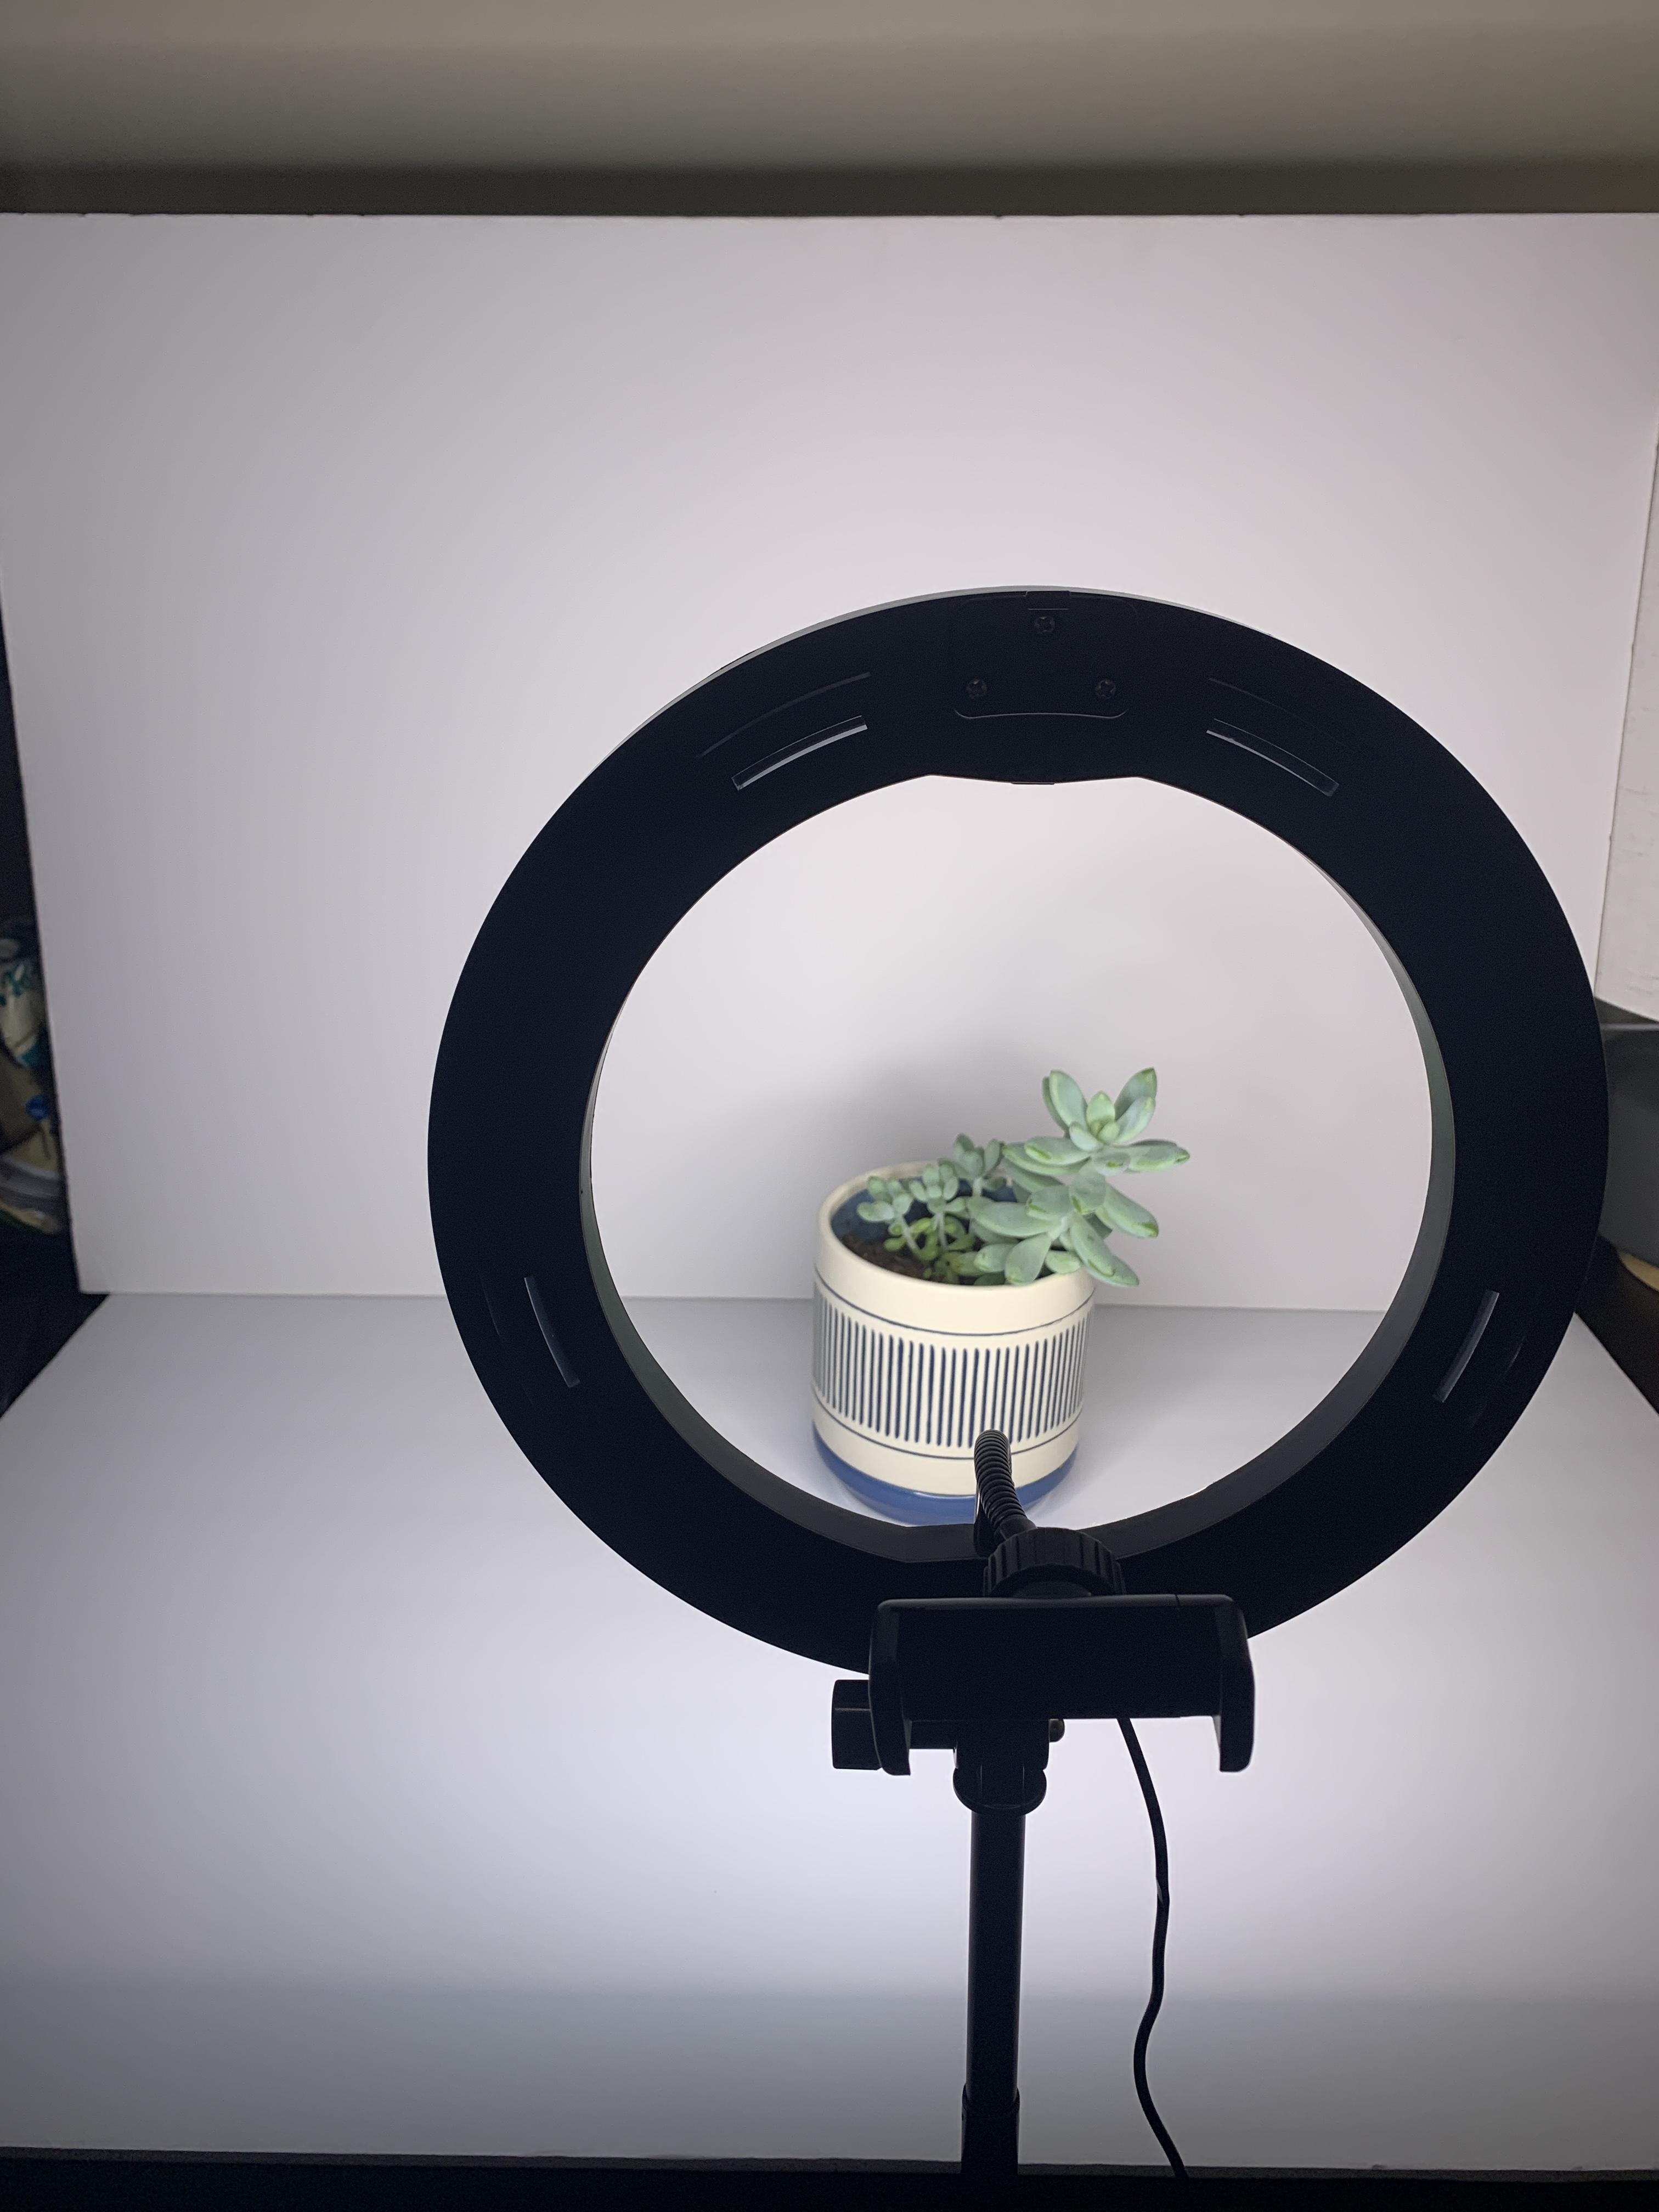
For this process, I used two pieces of white presentation board for my background. I then set up a ring light to have control over the lighting within the set. You want bright, balanced light and a clean background as you scan. You want your set to be in a place where you can comfortably move around the object and have control over your phone's camera.
Let's Scan!
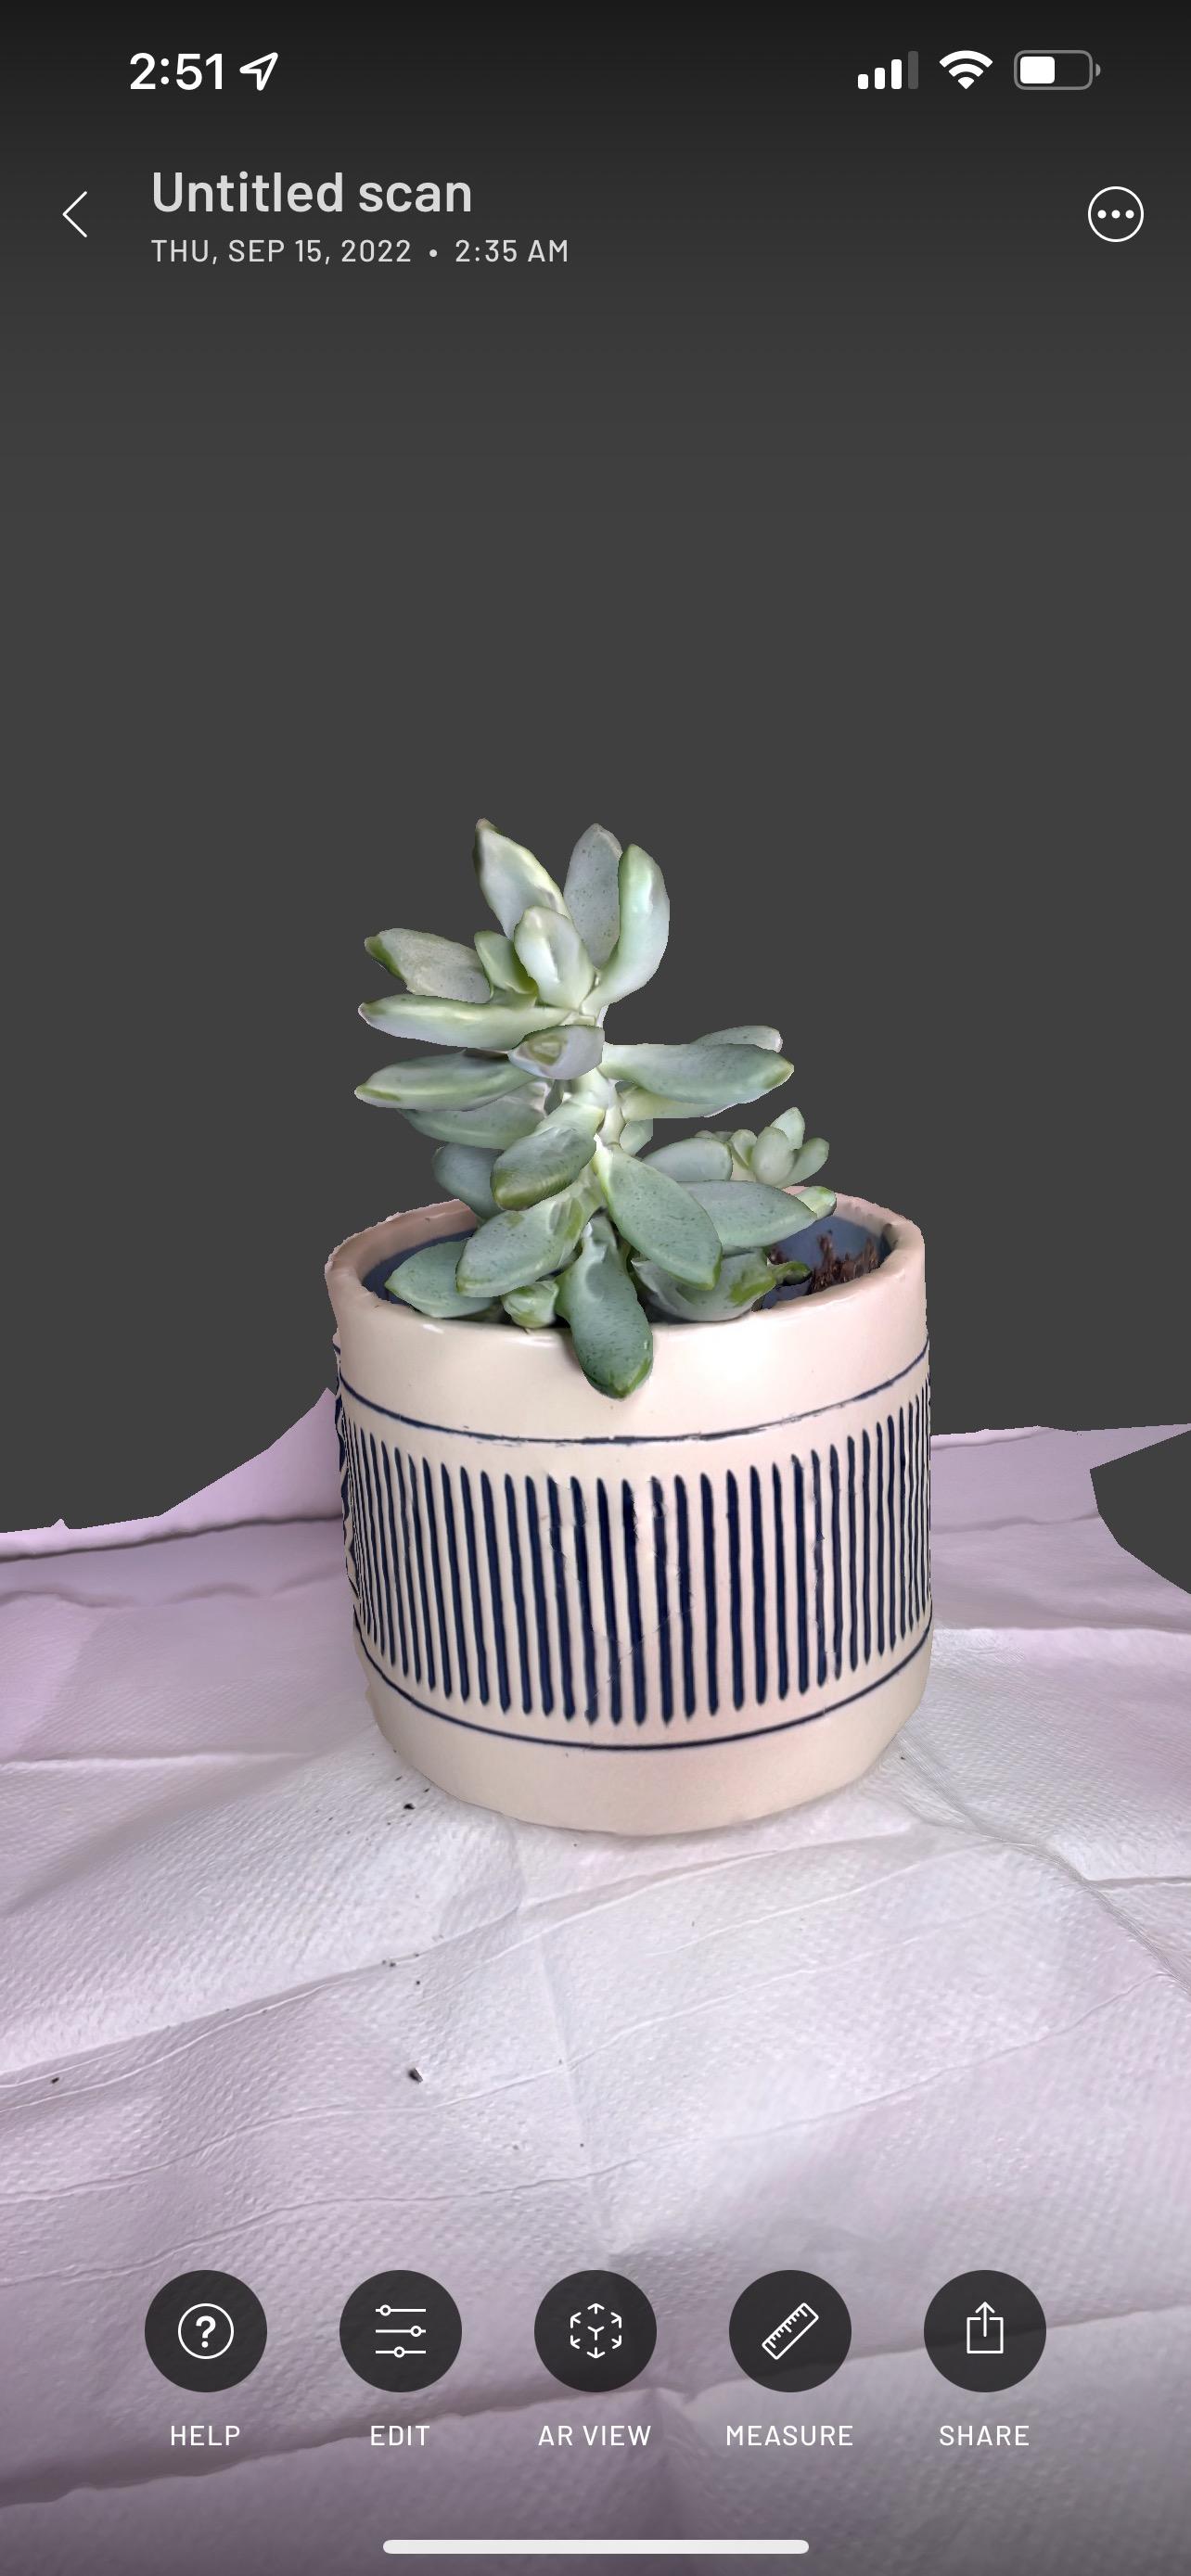
Now, open Scaniverse. For small objects like a succulent, set the mm distance to under 1mm. Don't be afraid to experiment with the settings and find a
As you are moving around the object, make sure that the object stays stationary. Scaniverse creates a video that it uses to process the scene and create a 3D rendering of the scanned environment. Make sure the object is on a stable surface as you scan it. Any movement or disruption of the object's position can alter or degrade the quality of the scan.
Once you are satisfied with the quality and detail of your scan, you can use Scaniverse to do some quick cleanup, including cropping out any unintentionally-scanned surfaces or background space.
Important tip!
Take your time with your scan. Make sure to get as many of the details as you possibly can. For reference, the full rotation around this succulent took about 15 minutes.
Export Scan for Modification
Once your scan is complete, export it as an OBJ file and send it to yourself via email, Dropbox, or Google Drive. This file type works best when importing to Meshmixer for initial cleanup.
Clean Up Your Scan in Meshmixer
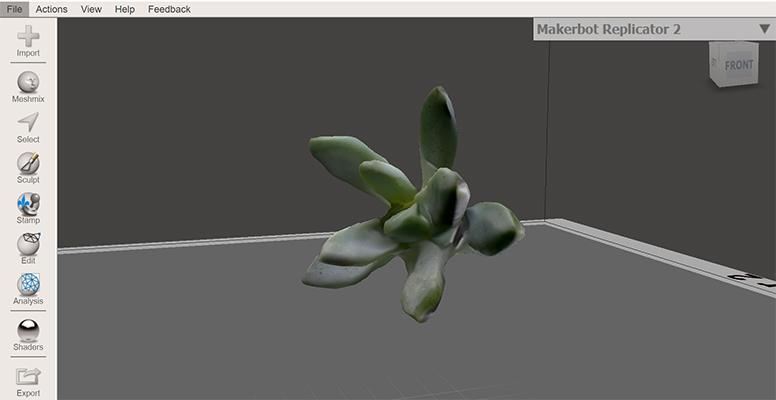
Autodesk Meshmixer is a powerful free software that can be used to quickly make models that are 3D print-ready. It can quickly assess through its analytics tools and repair any cracks or holes in the model. It can make modeled objects solid and watertight, which is necessary for a 3D scan (or any 3D model for that matter) to successfully print.
Once you've fixed any cracks, you can use its powerful sculpting tools to correct any errors (or make any artistic improvements that you'd like to make) to your model. Additionally, you can quickly scale your model to larger or smaller sizes depending on your intentions for the object after printing.
My scan upon initial import measured about 1mm, which was far too small to print, so I scaled it to ~25mm (approximately 1 inch).
IMPORTANT NOTE! Sometimes Scaniverse models are incredibly small. It is important to check the dimensions (in millimeters by default, but can be converted to inches) ahead of any printing. 3D printers have limitations on how small or large an object can be to successfully print. So make sure that
Export File to .obj
This file type packages the texture and UV maps of the scan into one file, along with any modifications to the scale of the object. For additive modifications to your 3D scanned model, we will be using Rhino 7 for more stability
Import Your .obj File Into Rhino 7
Rhino 7 is an incredibly powerful software used by architects and designers to create incredible renderings of objects and structures of all sizes.
We will be using it to make practical, structural changes to our scanned 3D model from Meshmixer. The reason for this is that sometimes Meshmixer has difficulty uniting models and primitive shapes used for structural purposes. With Rhino, no such problem exists.
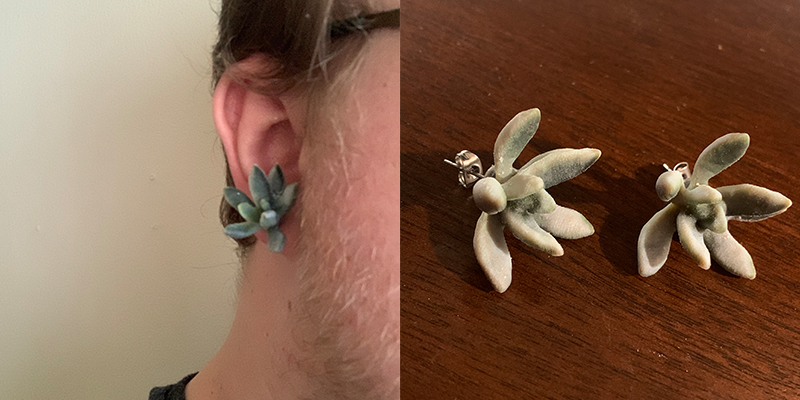
Consider the way you would like your jewelry to hang or appear on the body. With this succulent, I opted to have it face forward so that it would appear to be growing out of the earlobe. To do this, I used a primitive cylinder shape to create a flat surface to glue my earring stud to the final 3D print.
From there, I used the Boolean Union function to combine my primitive shape with my 3D scanned object. If done correctly, the two 3D objects will become one solid, watertight object that is ready for print.
Export From Rhino 7 As .3mf
This file type packages the texture and UV maps of the scan into one file, along with any modifications to the scale of the object. This is ideal for full-color 3D prints, to preserve that color and texture.
Send Your File Off to Print, and Wait.
This project was done in collaboration with the California State University Long Beach Innovation Space, part of the Academic Technology Department, and the CSULB Library. Here, I submitted my completed file for print on their PolyJet printer in full color at ~25mm. Once your file is submitted or sent off to your printer, simply wait until it is ready.
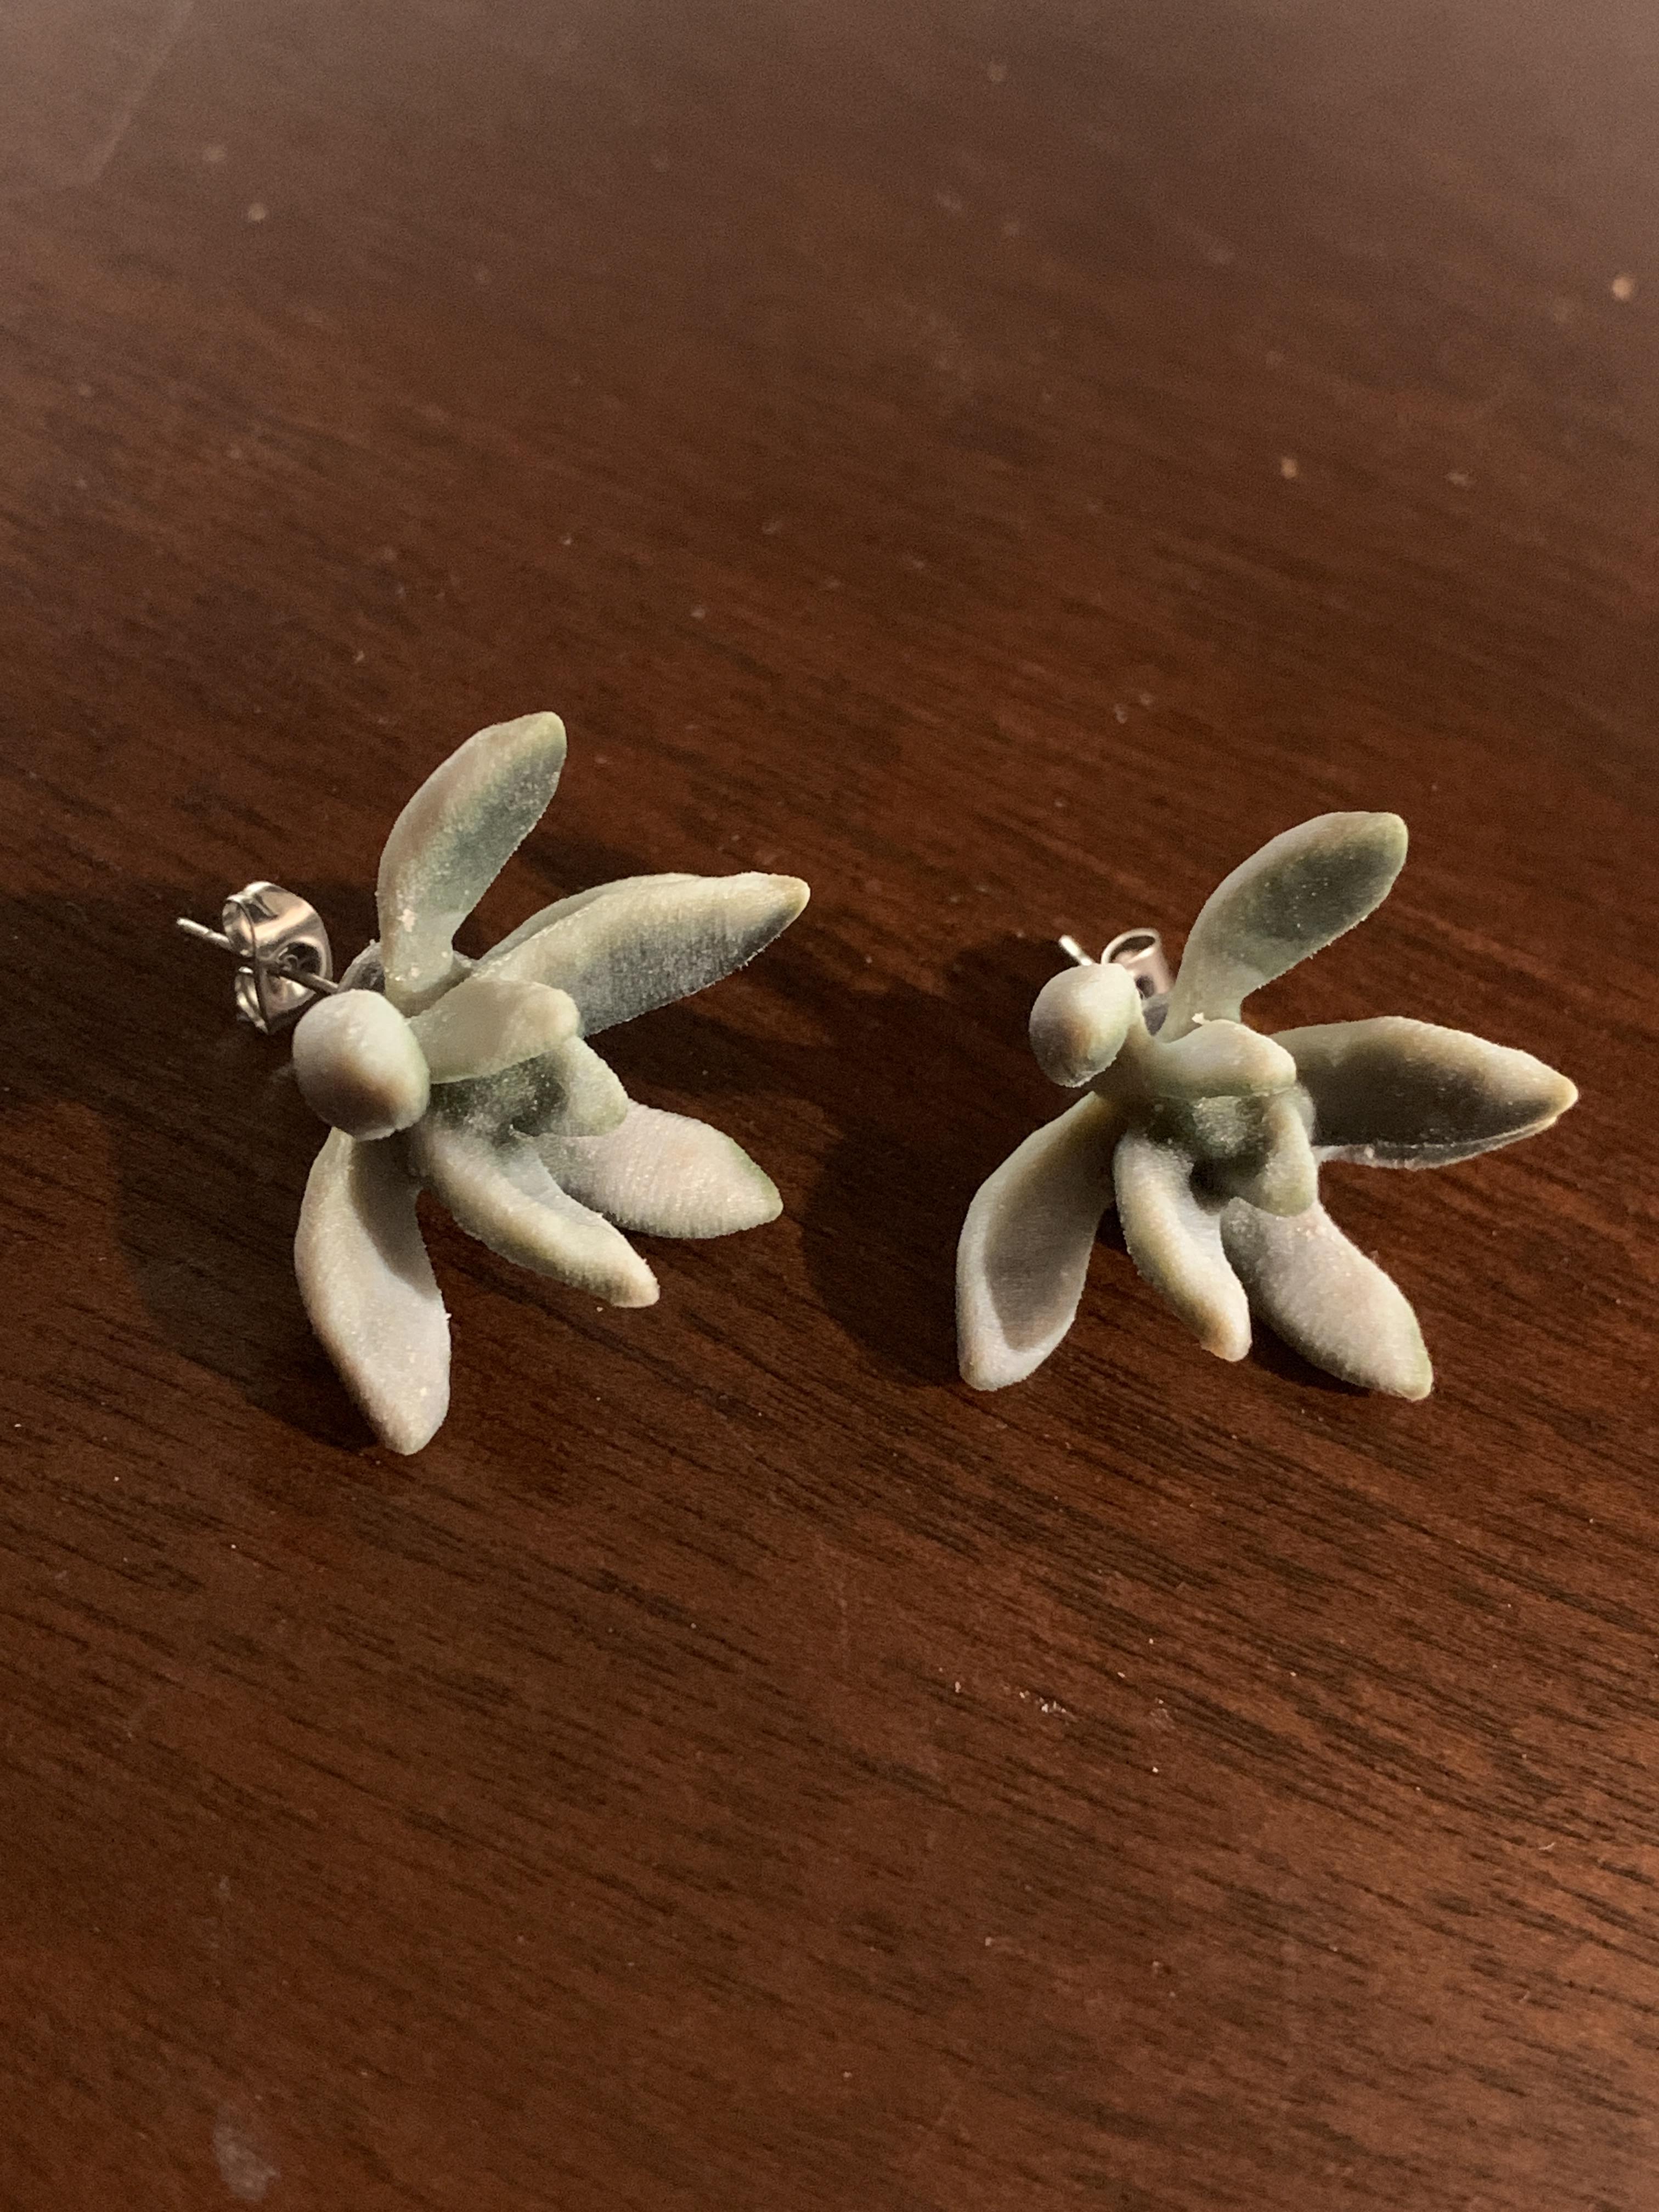
Receive and Clean Your New 3D Print!

At this size and with the colors of the model, this took about an hour to print and several more to clean. The PolyJet leaves a film on the plastic that needs to be brushed off with a toothbrush post-print. Once cleaned, your glorious new creation is ready for jewelry hardware.
Add Hardware
For these stud earrings, the process of applying the hardware was fairly simple. Simply add a drop or two of glue to the flat side of the stud, and apply the glue-covered side of the stud to the flat surface of the 3D print. Wipe off any excess with a paper tissue, and apply light, stable pressure to the print and stud for 30 seconds.
WARNING!
While the glue bonds the two surfaces immediately, it can take at least 30 minutes or longer to fully harden. Wait a considerable amount of time for the glue to fully dry and harden before wearing your new earrings to ensure that any excess glue does not bond to the skin. If such a bond occurs, seek medical attention.
Ta-Dah! You're Done!
You've now completed making your very own 3D-printed earrings! Congratulate yourself, and enjoy!