How to Animate a Walkcycle From the Front in Flash
by Nikkisaurus in Circuits > Art
19307 Views, 6 Favorites, 0 Comments
How to Animate a Walkcycle From the Front in Flash
Did you know that the more you walk, the heavier you get? This isn't for good of course, or treadmill manufacturers would go out of business and Body Break would be redundant, but it is true, even if for a small fraction of time. Laws of relativity say that mass is equal to energy, therefore, when you put out more energy, you become heavier, but the change is so small you can't even notice it until you're close to the speed of light; and I don't think think anyone can speed-walk that fast!
But you're not here to learn about science, oh no, I can hear you right now, sitting at your computer, contemplating clicking that back button as you mutter: science is gross. Yes, I hear you, and that is why I have prepared for you a step by step guide on how to animate walking sans science. No degree in physics required, just a love to animate and a want to learn. So if you're ready for some fun times (hopefully) and some learning (probably) then, let's jump right in, on y va!
But you're not here to learn about science, oh no, I can hear you right now, sitting at your computer, contemplating clicking that back button as you mutter: science is gross. Yes, I hear you, and that is why I have prepared for you a step by step guide on how to animate walking sans science. No degree in physics required, just a love to animate and a want to learn. So if you're ready for some fun times (hopefully) and some learning (probably) then, let's jump right in, on y va!
In the Words of Scar the Lion: BEEE PREEEPAAARED!!
To animate, I use Flash CS5, but the process should be relatively the same in all versions of Flash. There is nothing fancy involved in what I'm going to show you, anyone with mediocre drawing skills and access to these or similar programs can make beautiful walk cycles.
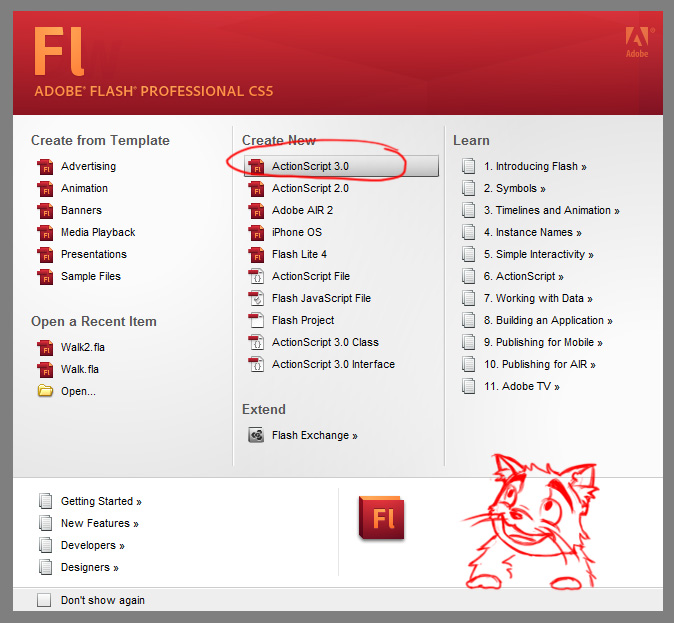
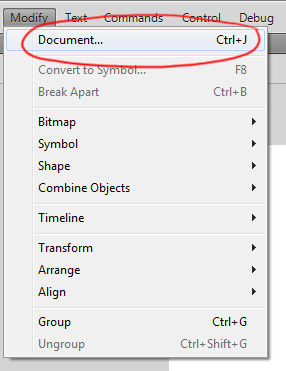
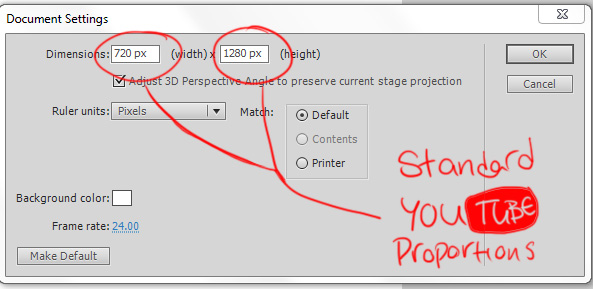
Alright, so all you have to do to start is open Flash. That should be easy. Once the program has loaded, look for the Create New column and click ActionScript 3.0. This will open a blank document, BUT DON'T GET TOO EXCITED YET! Before you can start animating, you should think about where you plan to use your animation. I plan to upload mine to Youtube, so I'm setting my proportions to 1280p by 720p. This will make my canvas the perfect size to upload in high quality to Youtube. To do this, all I did was drop down the Modify menu in the top bar,and then choose Document. This gave me a window where I can input my dimensions. Once I was sure those were the dimensions I wanted, I clicked OK...and that was it! Operation Step One: Success!
Alright, so all you have to do to start is open Flash. That should be easy. Once the program has loaded, look for the Create New column and click ActionScript 3.0. This will open a blank document, BUT DON'T GET TOO EXCITED YET! Before you can start animating, you should think about where you plan to use your animation. I plan to upload mine to Youtube, so I'm setting my proportions to 1280p by 720p. This will make my canvas the perfect size to upload in high quality to Youtube. To do this, all I did was drop down the Modify menu in the top bar,and then choose Document. This gave me a window where I can input my dimensions. Once I was sure those were the dimensions I wanted, I clicked OK...and that was it! Operation Step One: Success!
You're a Tool

It's true. You are. And the most important one too. There are lots of other tools to choose from in Flash, but YOU are the one that matters, because without you, the animation can never come to fruition. Alright, now that you feel really nice and fuzzy and warm, let me tell you about the other tools.
You can skip this section if you already know the Flash ropes.
Alright, for those of you who are new to Flash, this is the hill you have to climb before you can find the land of milk and honey. Understanding what's what.
The most important tools I think you should know are the Selection tool (the black arrow at the top of the toolbar), the Lasso tool (the circle-y thing that looks like a lasso, fifth from the top), the Brush tool (the one that looks like a brush, under the pencil), the Fill Bucket (the one that looks like a bucket pouring paint), the Eraser (the one that looks like ... an eraser...), and lastly, the Zoom tool (which looks like a magnifying glass). When you start drawing, you'll use the Brush tool and Eraser tool (unless you're perfect and never make mistakes, YOU DEVIL SPAWN). You can adjust smoothing on the Brush tool in the settings on the right side of your work space; the higher the smoothing, the more your lines will look 'stroke-y' and smooth, but if its low, then your lines will be a little 'pixel-y'. Its all up to preference. At the very bottom of the toolbar, above the stroke looking icon, is a black circle. If you click on that, you can change the size of your brush. A few icons above that, the black box under the bucket icon, can be used to choose the colour of your lines.
There's more than the eraser to use if you make a mistake too (this isn't your grandfather's animation program!!) The Lasso tool can be used to select certain aspects of your drawing by 'trapping' it in the circle you draw around it. One you have a piece selected (you'll know when the area turns grey), you can use the black arrow to move this around. Lastly, the Fill Bucket can be used to fill any space that is closed off with colour, in case you want more than just an outline.
Phhhew, that's a lot to take in if you're new at this, but it's fairly instinctive once you understand it a little.
Before I talk about the actual function of walking, let me run over how to use frames.
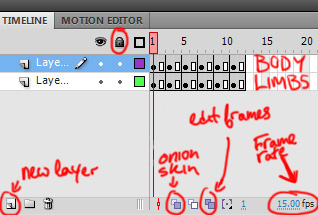
For this animation, I am putting the limbs on one layer, and the torso and head on the other. This means that while I edit the limbs to make them move, the body can remain unchanged, or vice versa.
The most important aspects of the animation Timeline you should know are the Lock Layers button (looks like a lock, you can use this to edit one layer and make sure that the other isn't affected at all), the New Layer button, (looks like a sheet of paper with the corner turned up, you can click this to make more layers, for more complicated animations), the Onion Skin button (looks like a blue square over lapping a white square, you can use this to see the layers underneath, if you want to know just how much something is moving frame by frame), the Edit Multiple Frames button (looks like two blue squares, you can use this to edit more than one frame at a time, like if you're scaling your entire animation), and lastly, the Frame Rate (the number with 'fps' after it. FPS stands for frames per second, this is how fast your animation is going through frames. I have my FPS set to 15 just for this animation, but the standard is 24.
WHOOOOA, if you made it through all that, kudos! That was the hardest step, the rest will be like eating cake for you, you clever little devil you.
Walk Logic
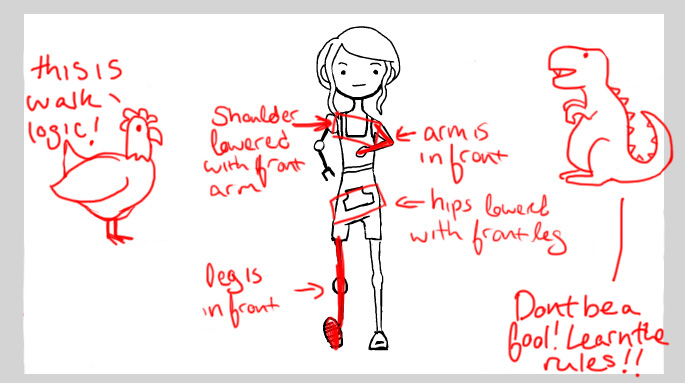
You (hopefully) walk everyday. Even to the fridge counts. But do you ever REALLY think about what you're doing? Does a dog think about licking it's butt? Does a bird think about flying? Does Arnold Schwarzenegger wonder where his career went? NO! So I implore you to do this. Walk around a little and think about it. Feel where your arms are when your feet touch the ground, feel how your shoulders move and your hips sway (yes, your hips sway, even if you're not Tyra Banks).
Alright now I've prepared a few crudely drawn examples of how people move when they walk.
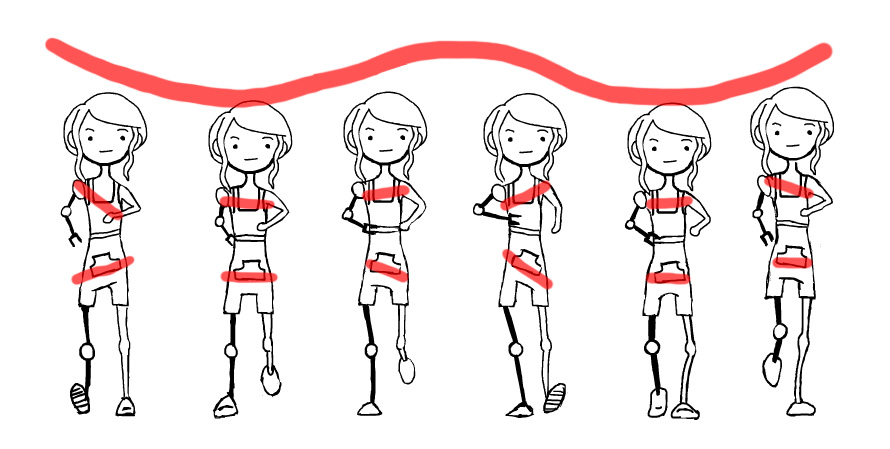
Firstly, as you will see in the first picture, when your left arm is fully forward, your right leg will be fully forward. The opposite goes for your right arm and left leg, and you can see from the boxes I've drawn over her shoulders and hips, that when the right arm is pulled back, the shoulder lifts, and when the right leg is extended forward, the hip drops.
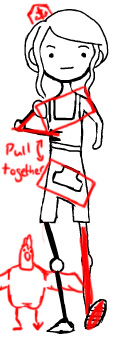
In the next image you can see the opposite of this happening, where the hip drops with the left leg and the shoulder raises on the left. It's almost as if these imaginary boxes pull together on the side or the front arm and opposite of the front leg.
If you look at the next image, this is an example of when the invisible boxes are parallel. This happens when the arms are in relatively the same position. The legs though, will never be in the same position, or she would loose momentum...and then this would have to be an Instructable on standing....(yawn).
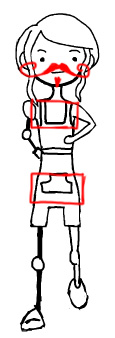
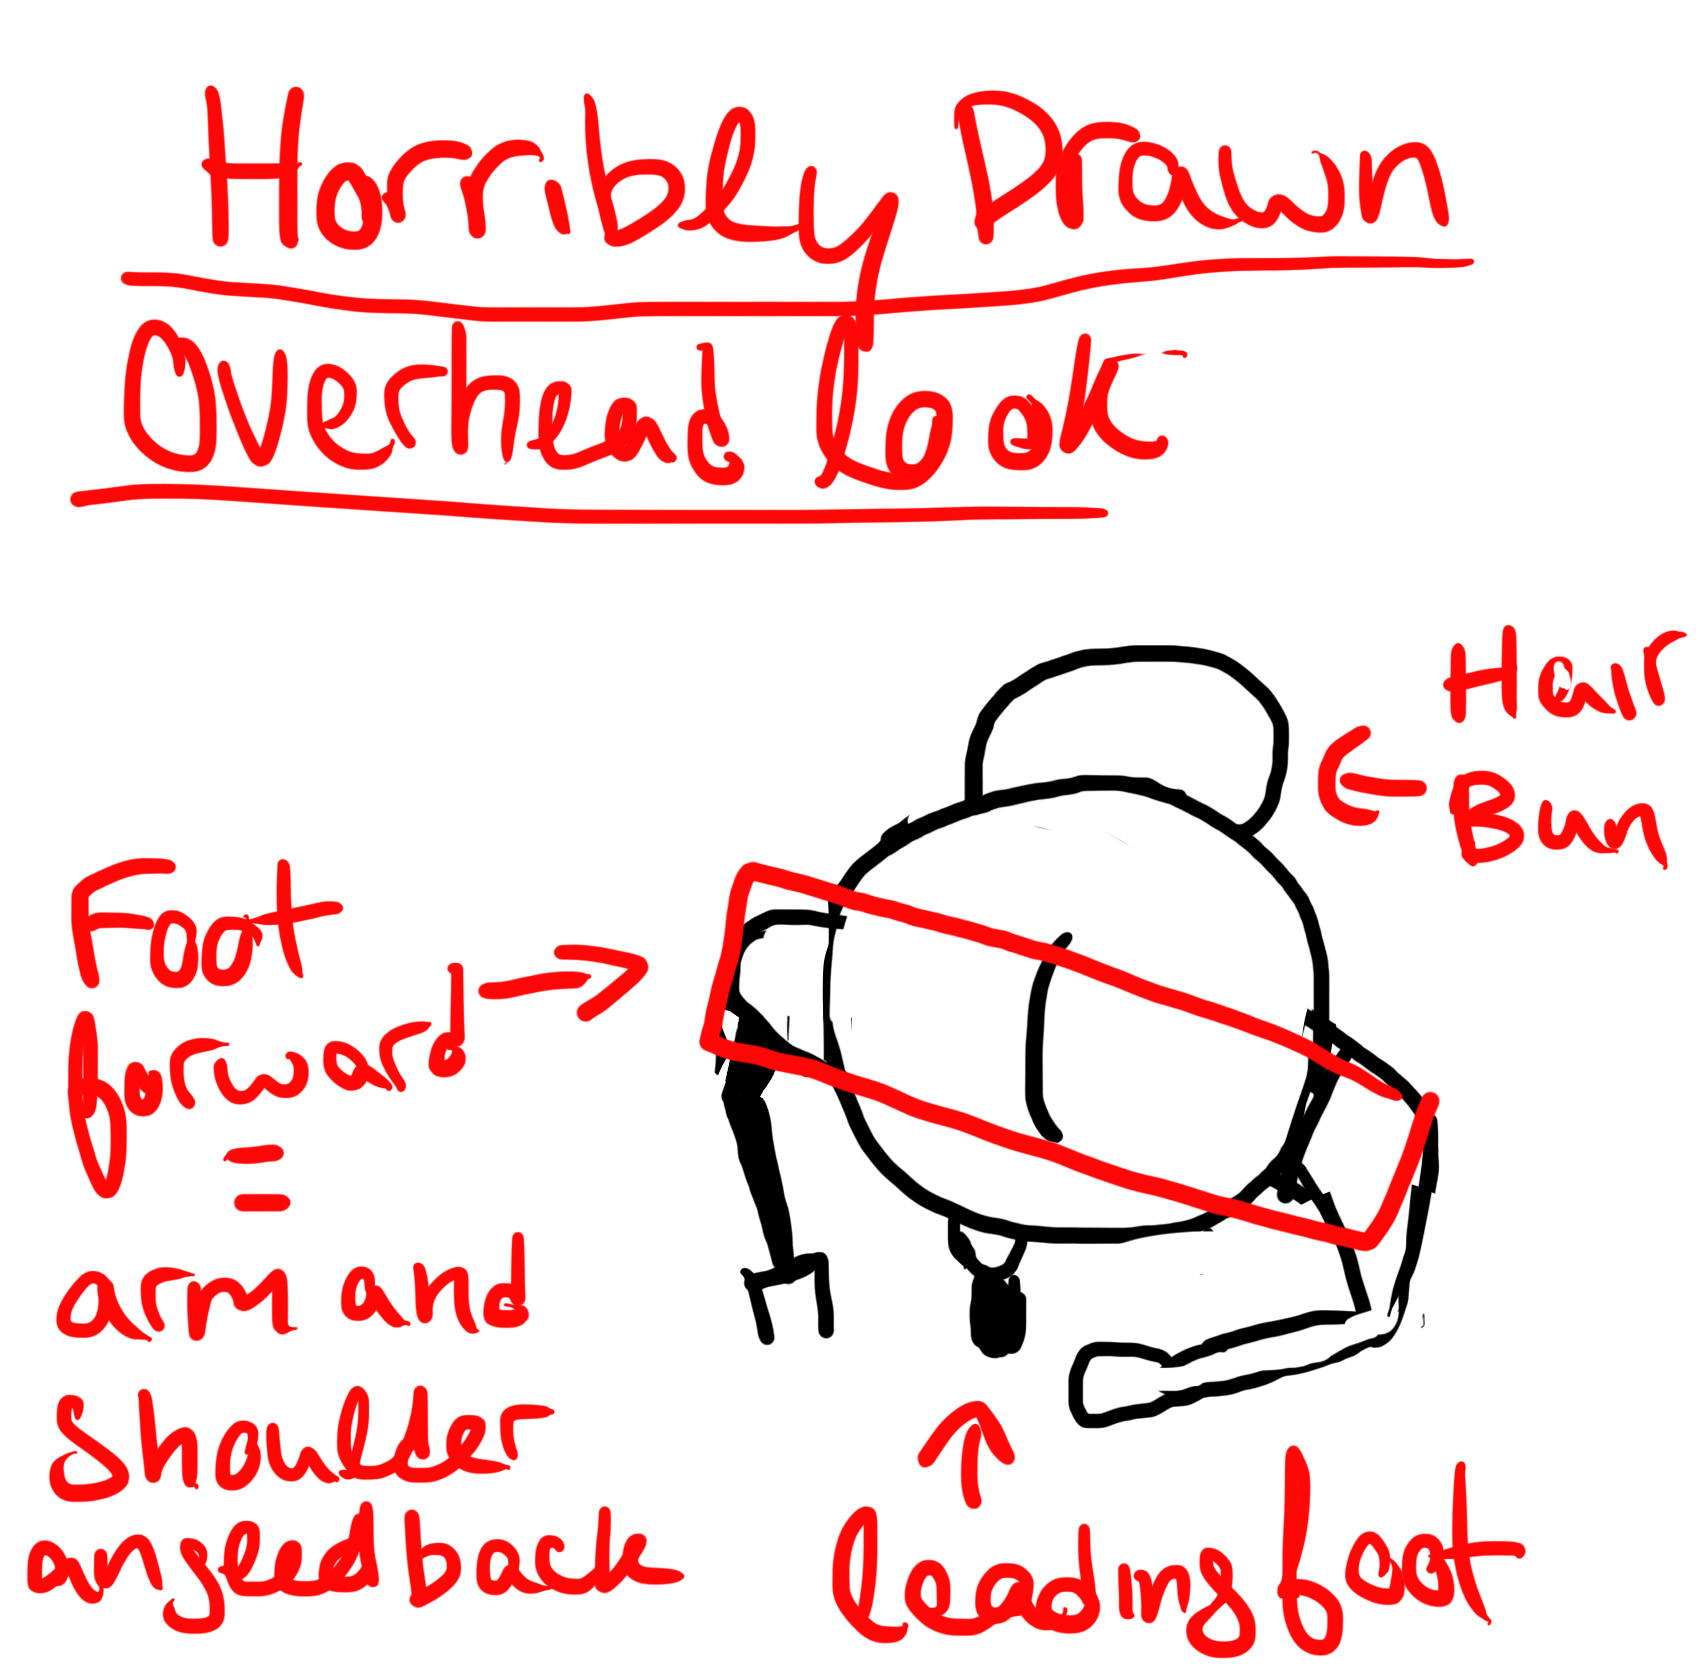
The boxes don't just move vertically though, they also move horizontally. As you can see from the crudely drawn over head shot of our model, when the left foot is forward, the left shoulder is back, and vice versa. If you could see the box for her hips, you would see that it is opposite of the shoulder box, just like in the front view.
The last illustration I've made is of all the key frames involved in my walk cycle. Once you understand how these invisible boxes work, it's good to also think about how much your character bobs up and down as they walk. A character with a joyful almost-skip will move up and down quite a lot, whereas a character who perhaps is shy and shuffling will hardly move at all; but they will still have to move. If you've ever seen a walk cycle where a characters legs pump and their arms swing, but their torso floats along without bobbing at all, you'll know how very awkward and unnatural it looks--unless your character is a ghost. In the last picture, I've added the slope that most walkers have as they bob up and down. It's the big line that looks a bit like a mustache. As you can see, her height is greatest when one of her legs is fully extended. Just as the right leg becomes entirely straight and the right foot is just meeting the ground (the first frame in the illustration), she is raised in height, but as her left foot flattens and her right foot lifts (second frame) she looses height. She gets this height back as her left leg becomes straight, and the cycle continues.
With these tips in mind, draw your first frame. You can hit F5 to extend the frame if you feel it's too short. Once you're happy with your first frame, you can add the next one by hitting F6. I used six key frames, but in a polished walk cycle, you would have many, many more.
On top of taking tips from this Instructable, I also implore you to look at lots of different walk cycles and tutorials. Some people have other things to say than I do (and perhaps smarter things), and it's always fun to watch walk cycles on Youtube, especially when they're stylized. Pull inspiration from everywhere, heck, even watch the way people walk while you wait for the bus...just don't stare at them too weirdly, and if they get upset, just justify everything with "Oh, I'm an artist,". They eat it up like cake.
IT'S ALIIIVEEEEEE!
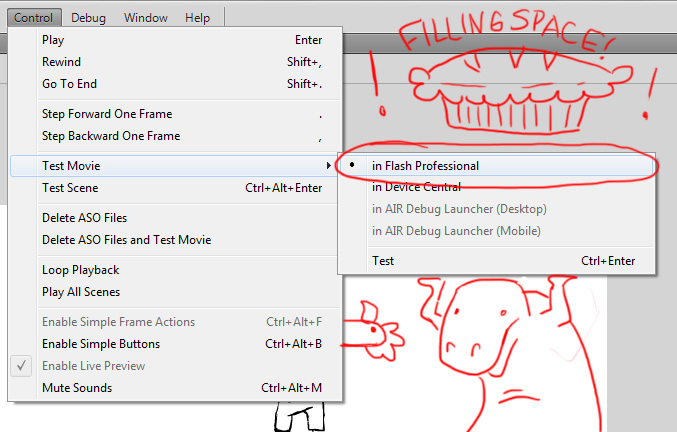
Alright, so now that you've taken a little time to draw out your frames, how about we see how they look? To preview them quickly you can hit the Enter key, but this will just run through the animation after the frame you have selected, and the stage is still visible. If you want to see what the end product might look like, it's better to use Test Movie.
To do this, just go to the control menu, drop it down and hover over Test Movie, and then select 'in Flash Professional'. This will open a window that will let you preview your animation without all the other things to distract you from its beauty. Actually, when I saw beauty, I mean, relatively pixelated muddled-ness, BUT DON'T WORRY, once you render it, it will be be just as beautiful as it was in the stage.
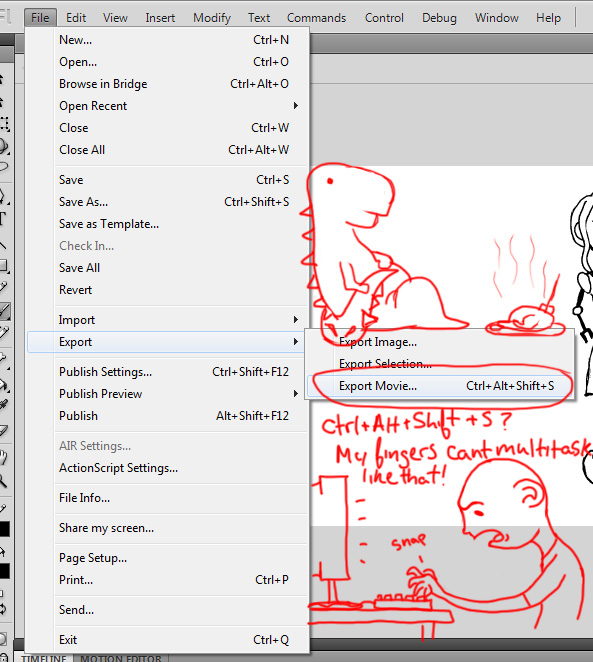
If you're sure you're happy with your walk cycle, then it might be time to export it. To do this just just drop down the File menu, hover over Export, and then select Export Movie. Or if you're an ambitious little firecracker, hit Ctrl+Alt+Shift+S. Then give it a name, I suggest something original like: My Walkcycle--or you could try something different, like: Classified Government Information I Stole; that way if you ever get in trouble with the law and your computer is confiscated, the cops who have to go through suspicious things on your hard drive will be treated to the beautiful genius that is your walk cycle.
Now just choose .AVI for Save as Type, and hit save, BADDA BOOM!
Premier Science
WOO! So you made it through the most time consuming part! It's all brainless instruction following form now on, so don't worry, you science haters, I got you!
Now you have a video, but it's only a few seconds long. To make it a real walk cycle that loops you need to open it in some kind of video editing software. I'm using Adobe Premiere Pro CS5, but the steps are probably pretty similar with any program.
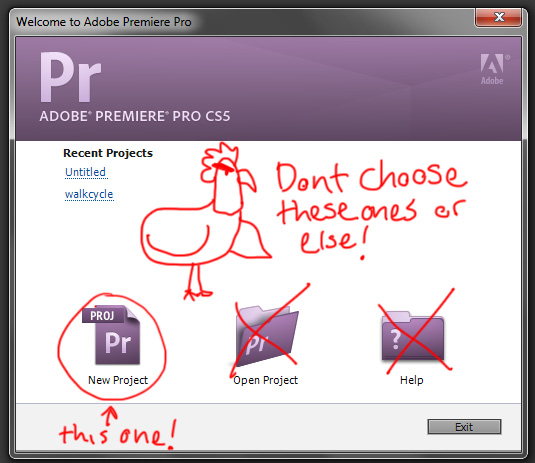
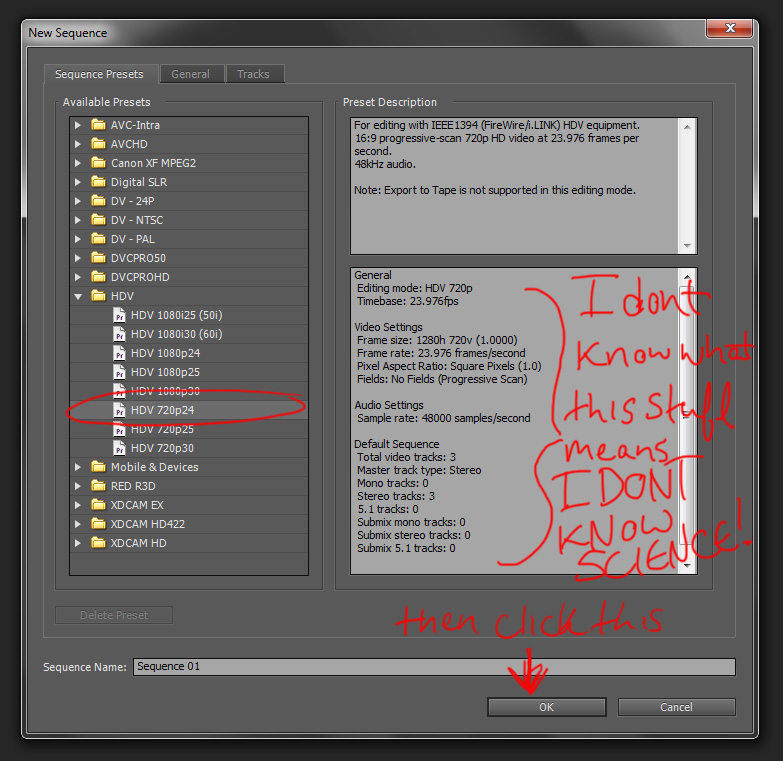
So the first thing you're going to do is open a new project that you can import your walk cycle into. To do this, all you have to do is start Premiere up and select New Project. This will give you a window called New Project; here you can input the name of your video, but don't change any of the settings. Just hit OK, and this will bring you to a new window. In this New Sequence window, under the Available Presets, drop down the HDV category, and select HDV 720p24, and then hit OK.
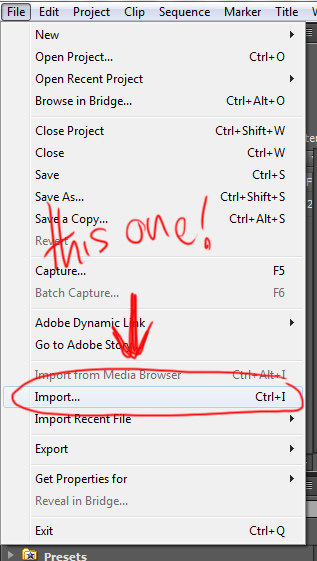
Now that you have a new project open and ready, drop down the File menu, choose import, and then find your walk cycle and open it.
Easy right? ONWARD!
(fruit) Loop
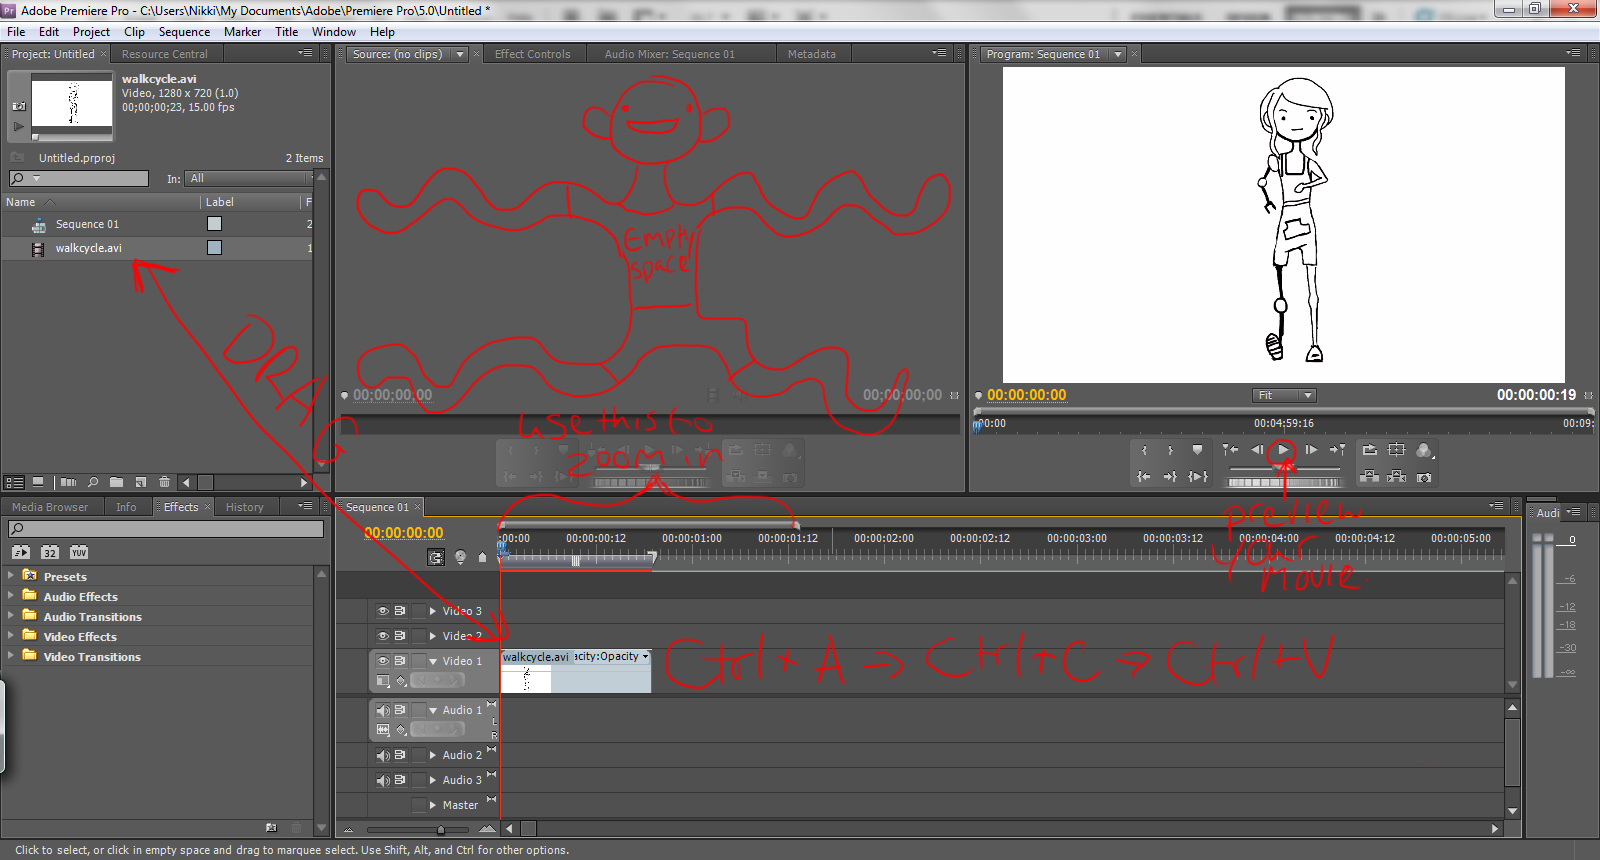

Now you should see your walk cycle in the top left corner of your workspace. If you click and drag it on to the row called Video 1, it will show up in the viewer on the right. Hit the play button and see what happens. Doesn't quite look like anything yet, right? BUT FRET NO, FOR I AM HERE TO SPARE YOU A BRAINACHE!
The clip should be a little blip on the timeline, pretty impossible to see well, so because this is such delicate work (like brain surgery, seriously) you're going to want to zoom in. To do this just use the section above the timeline that looks like a ruler, and drag the grey bar to the left. When you do this, you should see your clip getting larger.
WE'RE SO CLOSE, HANG IN THERE BABY! Alright, now we have to loop the clip by copy and pasting it a lot. The easy way to do this is to hit Ctrl+A (so you know you have your clip selected), then Ctrl+C (to copy your clip), and lastly Ctrl+V (to paste your clip). This is a good way to do it, I think, because each time you hit Ctrl+A, you select all the clips in the timeline, so each time you paste, you have double the clips you have before.
Keep doing this until your animation is the desired length. To get the full value of the walk cycle, try not to make it shorter than 20 seconds. I like to have a few minutes so I can enjoy without having to start the video over again often.
I DID IT MOM!!
I'M SO PROUD OF YOU! If you've managed to make it this far, take a moment to pat yourself on the back.
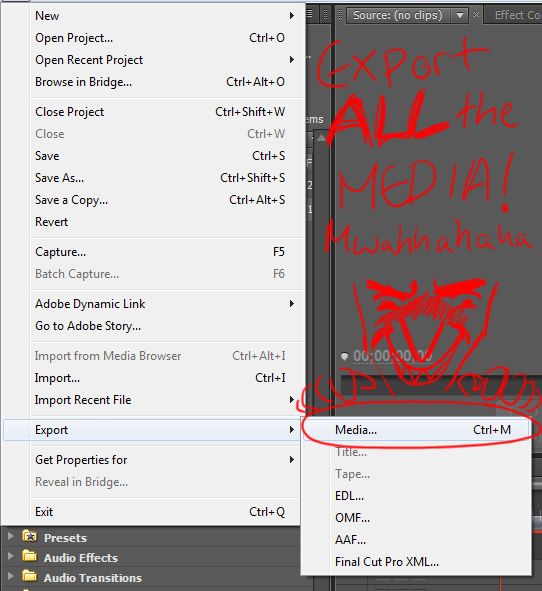
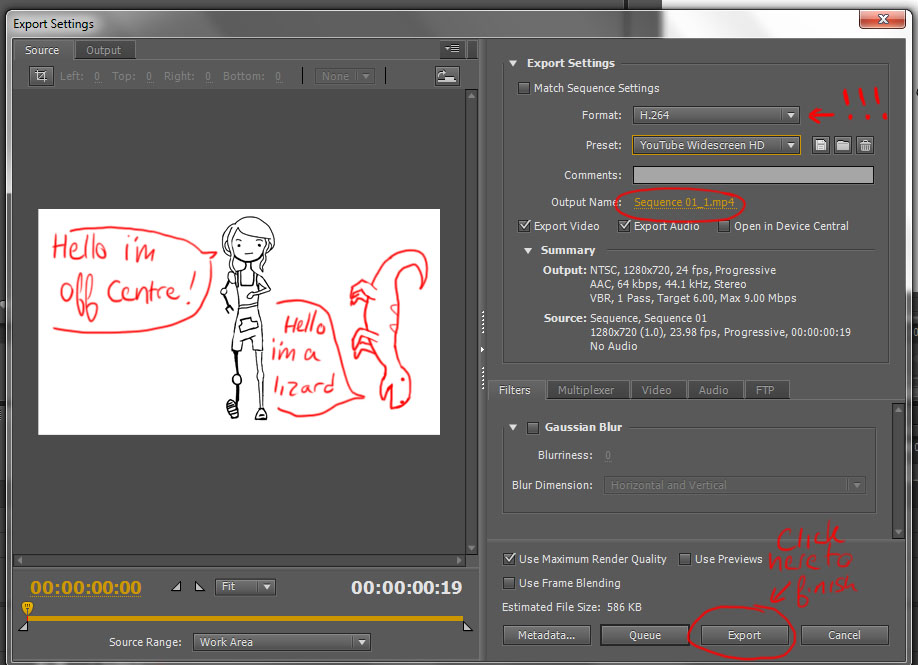
The only thing left to do now is Export it in a format that is Youtube friendly. This is really easy, all you have to do is drop the File menu down, hover over Export, and then select Media. This will open a new window where you can select how your video will export. Make sure the Format option is H.264 and the Preset is Youtube Widescreen HD. Also, you can name your animation using the Output Name option. When you're sure you have your settings right, hit Export to finish. Now a progress bar will appear, and when it has finished, you will have a beautiful, bona fide walkcycle. Voila!
The only thing left to do now is Export it in a format that is Youtube friendly. This is really easy, all you have to do is drop the File menu down, hover over Export, and then select Media. This will open a new window where you can select how your video will export. Make sure the Format option is H.264 and the Preset is Youtube Widescreen HD. Also, you can name your animation using the Output Name option. When you're sure you have your settings right, hit Export to finish. Now a progress bar will appear, and when it has finished, you will have a beautiful, bona fide walkcycle. Voila!