Hosting Https for AlexaPi Custom Skill
by misperry in Circuits > Raspberry Pi
1698 Views, 11 Favorites, 0 Comments
Hosting Https for AlexaPi Custom Skill

Would you like to activate a custom Alexa Skill without having to build a lambda function in AWS?
Here is the answer. You just need to host an https with a signed certificate. Sounds hard right? But actually it is very simple. This tutorial will walk you thought how to do this.
Things you will need:
1.) Router that has the ability to forward ports
2.) dynamic dns name
3.) Raspberry Pi with HomeAssistant installed on it
4.) A custom skill setup: Refer to https://www.instructables.com/id/Custom-AlexaPi-Skill/ for making of the skill
Create Dynamic DNS


You will first need to go to a dynamic DNS hosting website like: Dynu , DNSdynamic, No-IP, DuckDNS, or afraid.org
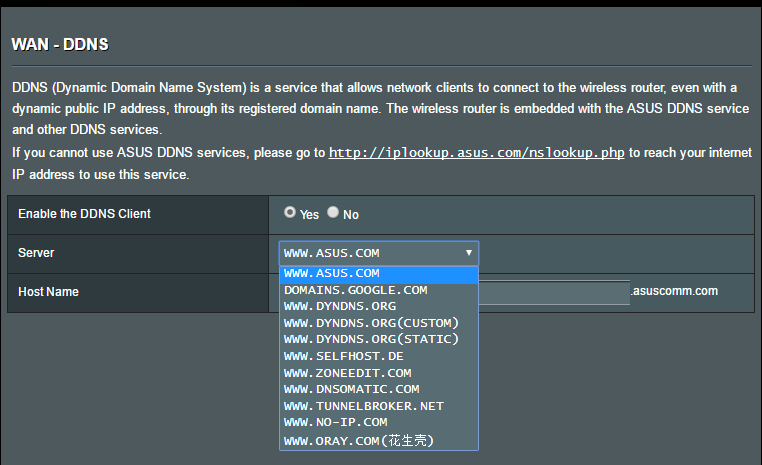
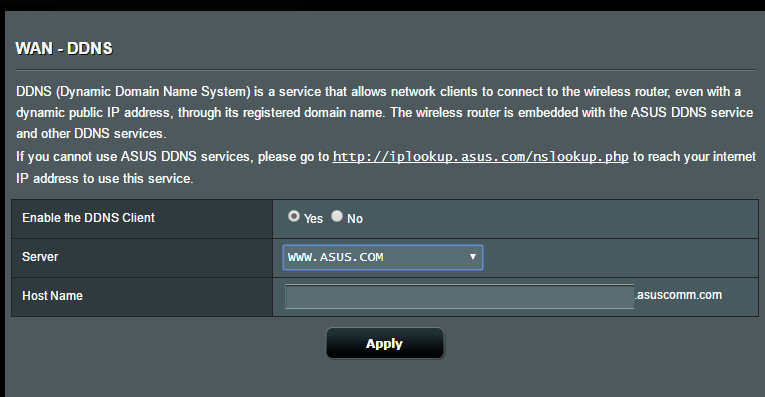
Once you have created an account and picked your name that you want to use you will need to set up your router to keep this site updated with your outward facing IP address.
For this example I have included a picture of my router configuration screen under the WAN settings and DDNS tab.
Forward Port Settings

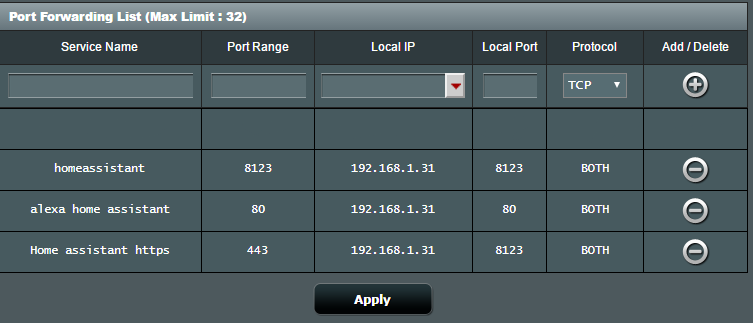
Now you will need to forward certain ports in your router to your raspberry pi that has the HomeAssistant on it so the skill can contact your HomeAssistant.
To do this you need to forward the ports that HomeAssistant uses. Now for the web browser port you have two choices. You can either forward port 80 (standard http port) or you can forward port 443.
Where I live port 80 is blocked on residential service. Thus, I had to forward port 443. so what you do is under port range you type in the port to forward (example 443) then under Local IP you type the IP address of your PI. Next you will type the port number 443 again under Local Port, this way the router knows that if anything coming form the "internet" that is on port 443 it will forward it to port 443 on your raspberry pi, and finally you will choose "both" (TCP and UDP) for the Protocol.
You will also have to forward in this same way port 8123 that is the default port that the web service uses in HomeAssistant.
I have included a picture of all this from my router as an example. In this picture I have included everything
Setting Up Certbot
Now you will need to install and build the certbot certificate service. We will be following the HomeAssistant documentation located here: https://home-assistant.io/blog/2015/12/13/setup-en...
You will type the following on your raspberry pi to download the automatic configure and install code:
Go to where ever you want to have cert bot directory. (in my case i placed it in my /home/pi/ directory)
$ mkdir certbot
$ cd certbot/
$ wget https://dl.eff.org/certbot-auto
$ chmod a+x certbot-auto
Now you will need to edit the following command based on what port you are forwarding from the previous step.
If you are using port 80:
$ ./certbot-auto certonly --standalone --preferred-challenges http --email your@email.address -d hass-example.duckdns.org
If you are using port 443:
$ ./certbot-auto certonly --standalone --preferred-challenges tls-sni --email your@email.address -d hass-example.duckdns.org
This should install and build the keys for the certificate.
Permissions
Now we will need to add the homeassistant user to the users group so that we can set permissions for this to use the keys.
First you will need to go to /etc/letsencrypt with the following command:
$ cd /etc/letsencrypt
Now change permissions as follows:
$ chown root:users *
$ cd live/
$ chown root:users *
$ cd exmaple.example.com //basically the folder that has your web DNS name
$ chown root:users *
$ cd archive
$ chown root:users *
$ cd exmaple.example.com //this is where your keys will be stored
$ chown root:users *
Now we need to add the Homeassistant user to the users group.
$ cd /etc/
$ sudo vim group
Now look for the field: users:x:100:pi
now add the homeassistant user so the line reads like this: users:x:100:pi,homeassistant
save this and quit.
HomeAssistant .ymal File Configuration
Now we need to configure the .yaml file to use the keys we just created.
$ cd /home/homeassistant/.homeassistant
$ sudo vim configuration.yaml
Now you will want to go to the section labeled http:
Once there you will need to make it look like this:
http:
# Uncomment htis to add a password (recommended!)
api_password: <make up a password here if you have not>
ssl_certificate: /etc/letsencrypt/live/example.example.com/fullchain.pem
ssl_key: /etc/letsencrypt/live/example.example.com/privkey.pem
#Uncomment this if you are using SSL or running in Docker etc
#base_url: example.duckdns.org:8123
Once you have added the two lines "ssl_certificate" and "ssl_key" (also make sure to add an api_password if you havent) you should be good to restart homeassistant.
Now to test to see if you have created this correctly use the following command:
$ sudo su -s /bin/bash homeassistant
$ sudo hass --script check_config
Now you can check to see if there are any errors with what you have configured in the .yaml file.
Once you get no errors you will need to restart homeassistant with the following commands:
$ exit
$ sudo systemctl stop home-assistant@pi
$ sudo systemctl start home-assistant@pi
you can check the start up with:
$ sudo journalctl -f -u home-assistant@pi
Configuring Skill to Use Our Https


Now we come to making the Alexa Custom Skill use your newly cert'ed https instead of using an AWS Lambda Function.
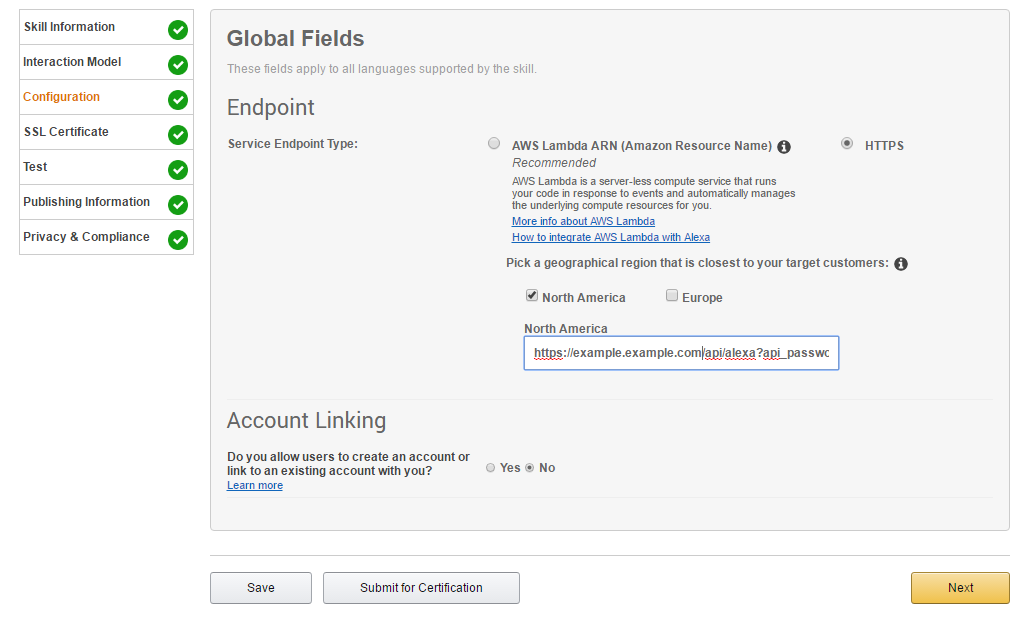
login to your developer account for amazon and choose your alexa skill. Once in you will need to navigate to your skill and choose the configuration option on the left.
Here you will select the HTTPS radial option. Then choose your region (I have chosen North America since that is where I am)
Finally you will type in your web address and it will be of the following formatt:
https://example.example.com/api/alexa?api_password... your api pass is>
Then you will choose next at the bottom right.
On the next screen you will choose the first radial option "My development edpoint has a certificate from a trusted certificate authority"
Then choose next and if all went well you should get the enabled toggle in the upper left of this display.
You should now be able to test and see if it is all working. Please feel free to comment and share this instructable. I have included a video from my youtube site for this and I encourage you to stop by my youtube channel if you have not for more videos like this and more great content.
ICStation Affilate Link
http://www.shareasale.com/r.cfm?b=498665&u=1013844&m=48335&urllink=&afftrack=
Support the channel tip with bitcoins Address: 1MvcZHRbDm9czS8s776iutBBPJ39K4PEHh
Follow me on youtube http://www.youtube.com/misperry
Follow me on Twitter http://www.twitter.com/misperryee
T-Shirts http://www.zazzle.com/misperry